
hitch mount tire carrier on a 2nd gen
 Jan 11, 2008 | 10:47 AM
#1
Thread Starter
Registered User
Joined: May 2007
Posts: 636
Likes: 0
From: used to be so. cal. now Indy
hitch mount tire carrier on a 2nd gen
hi, gang,
i want to make a hitch mount full size spare carrier(32/11.5/15 BFG AT), and i don't want to spend more than $40 + my time. i have a hitch already a welder, a cut-off whell, a drill, wrenches and bunch of nuts 'n bolts.
here are some cretirias
1.) it will be for off-road use only, removeable, it will be on my DD 4runner. i don't want to carry the extra weight everyday, gas ain't cheap.
2.) it can be fold down allowing the tailgate fully open.
3.) i can move the licese plate on to it when i use it, lighted, i don't like tickets.
4.) need to be strong, safety safety safety.
5.) i don't want to buy any tools just for this project.
6.) i want to finish it in 4 hours, not dragging along my entire weekend.
7.) tire to be mounted as low as possibe for better rear sighting and Center of Gravity. safety safety safety.
i have some ideas from my bike rack seems workable, but i'm woundering if 2" .120 wall and 1-3/4" .120 wall regular steel squre tubings are strong enough for this kinda duty.
thanks
p.s.
i got a quote from the local steel yard today, 4 feet of 2" and 3 feet 1.3/4" will cost $21 tax included.
Jan 13, 2008 | 10:23 PM
#2
Thread Starter
Registered User
Joined: May 2007
Posts: 636
Likes: 0
From: used to be so. cal. now Indy
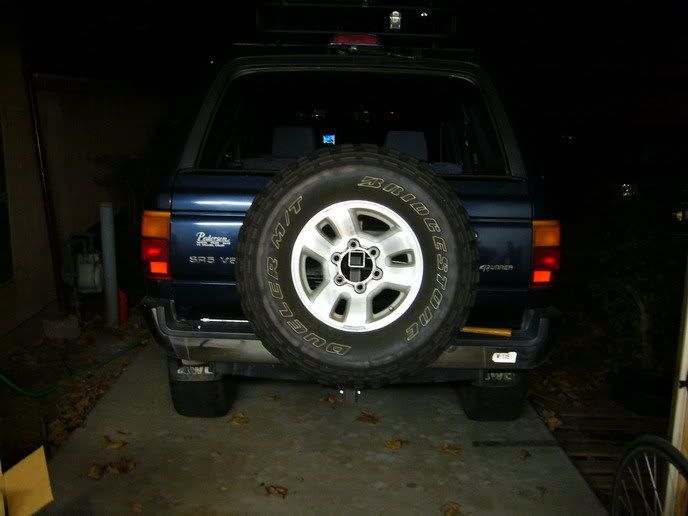
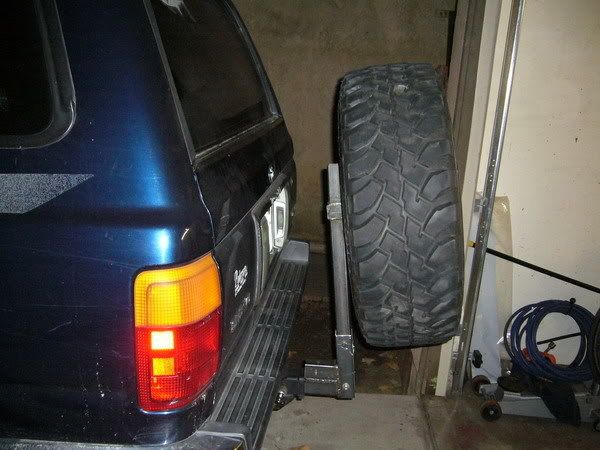
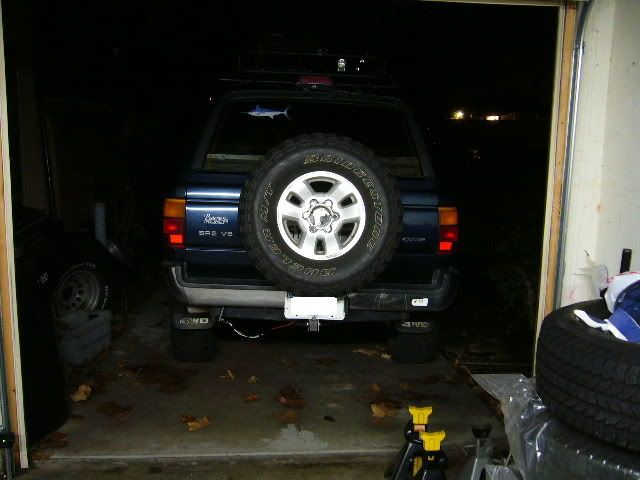
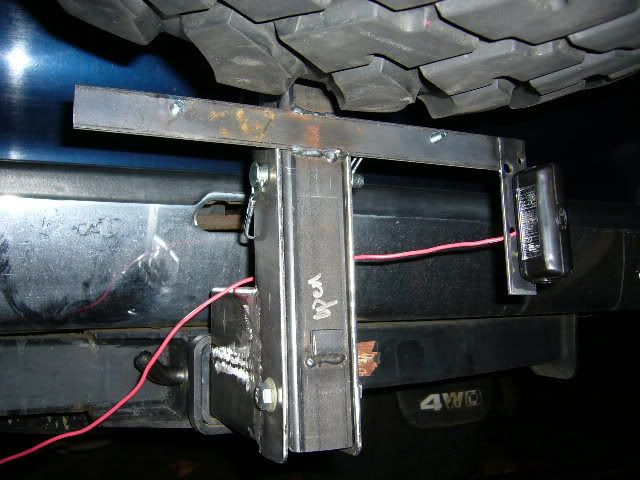
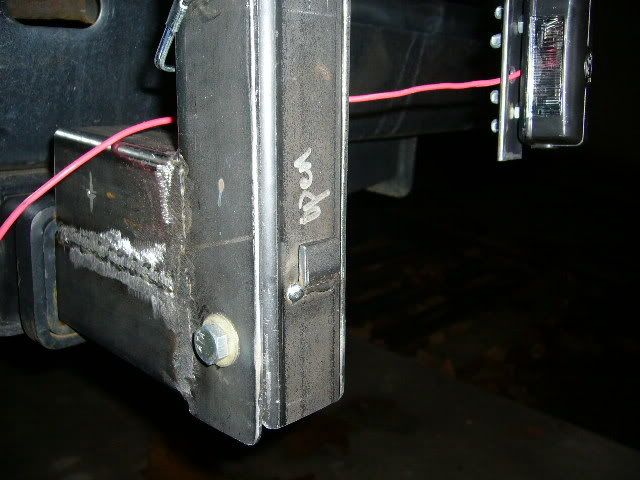
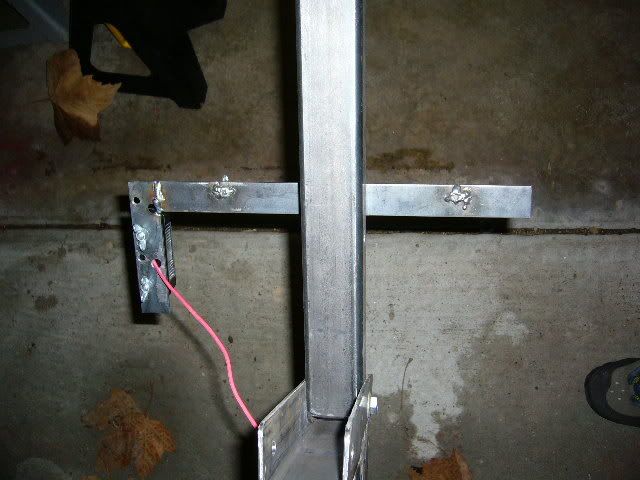
not finished but i'm getting there, most important thing is, i'm still under budget. $23 spent, so far. $20.77 for 4-foot of 2" .120 wall squre tubing, 3-foot of 1.75" .120 wall squre tubing. another $2.5 for a lock pin.
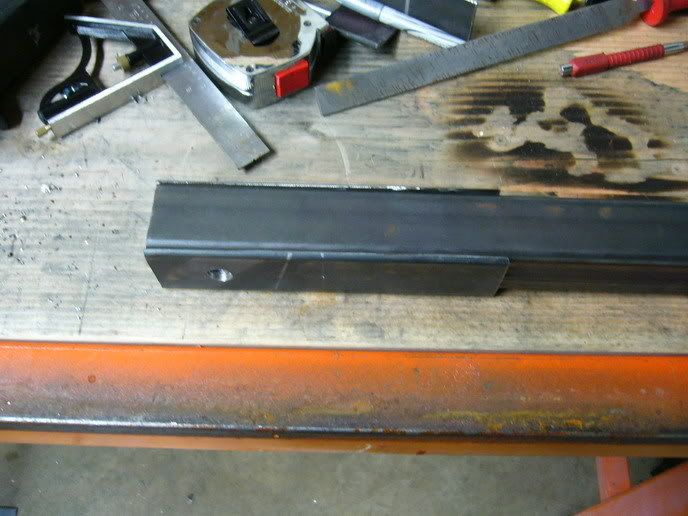
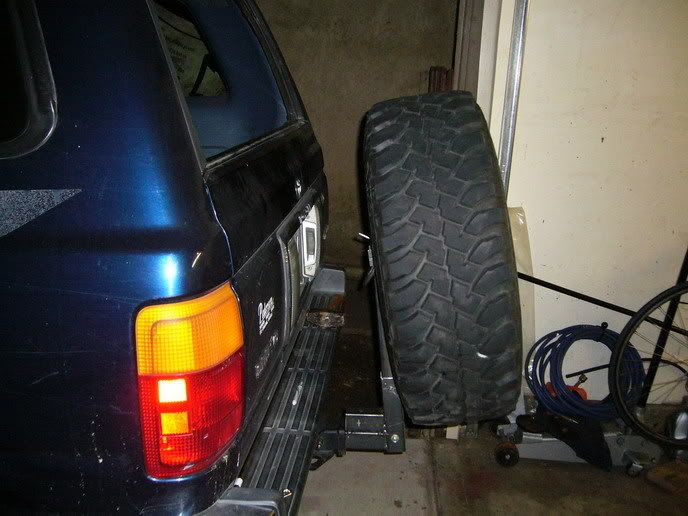
first, the 2" tubing goes into the receiver, with a 86 degree angle on the other end.
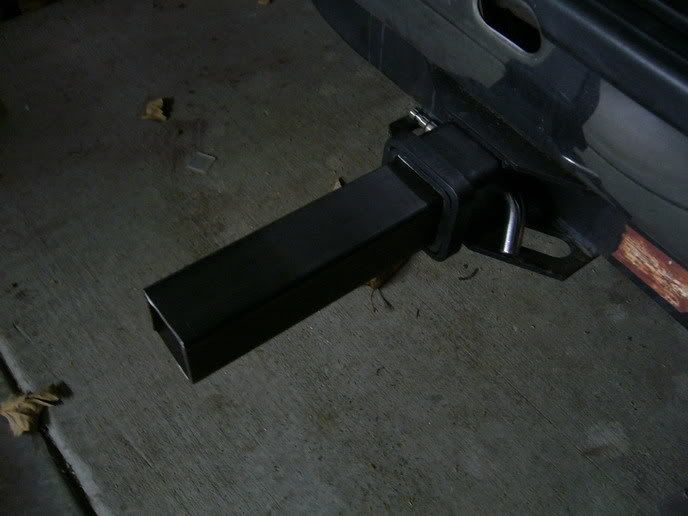
next piece is another 2" but vertical, straight cust, no angle. with one of the 4 sides of the wall cut out. this piece will hold the 1.75" tubing.
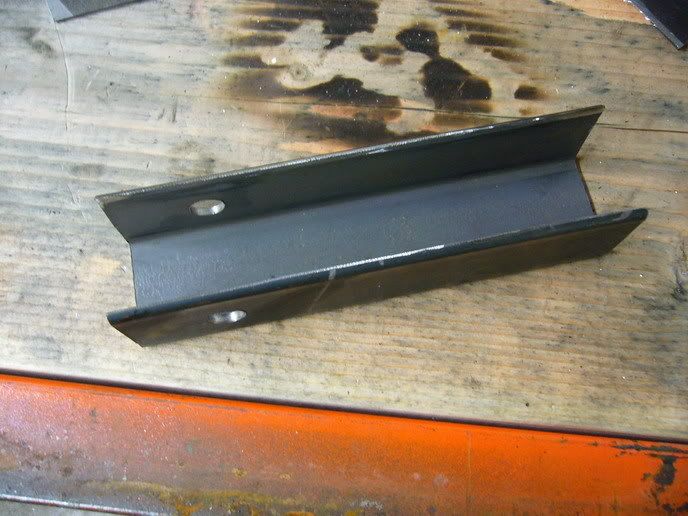
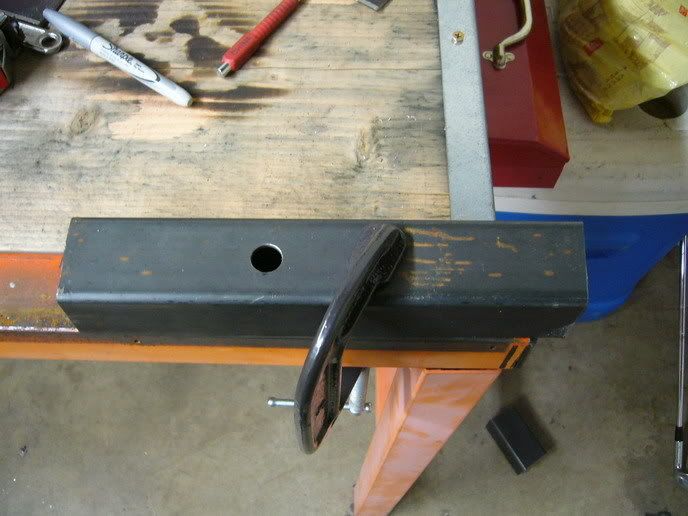
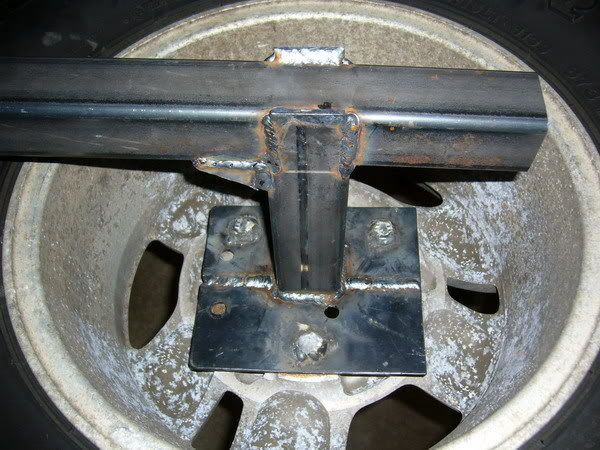
third piece will be a bracket to hold the spare tire backplate, this will be horzontal.
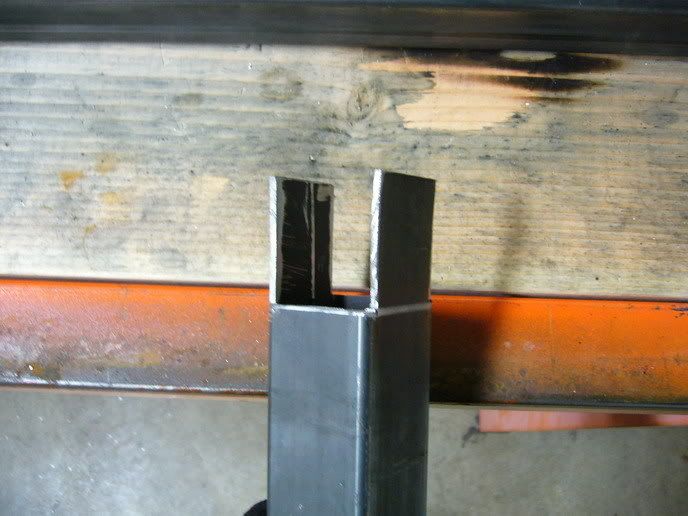
forth piece is the 1.75" veritical tubing,
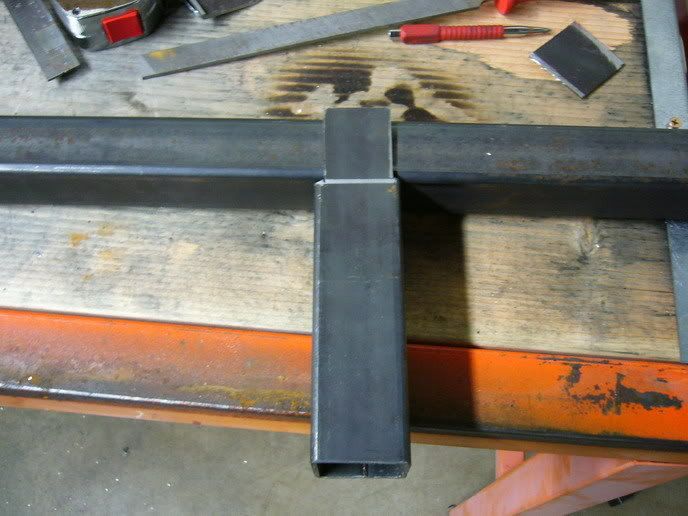
tacked up for preliminary fitting:
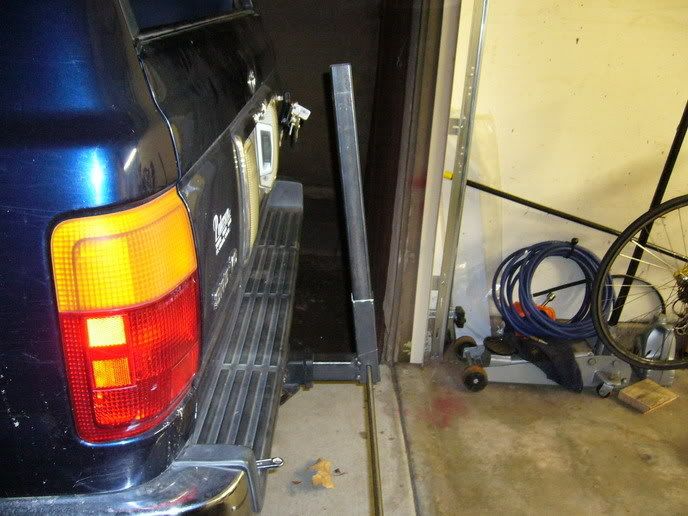
it took a while to get the tailgate clearance right
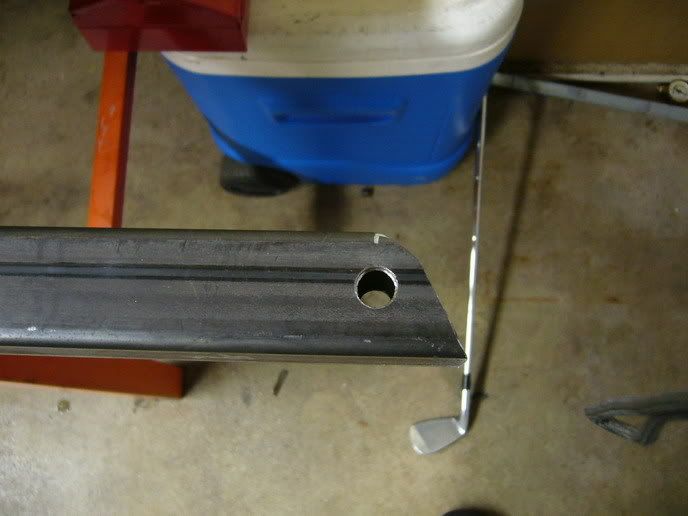
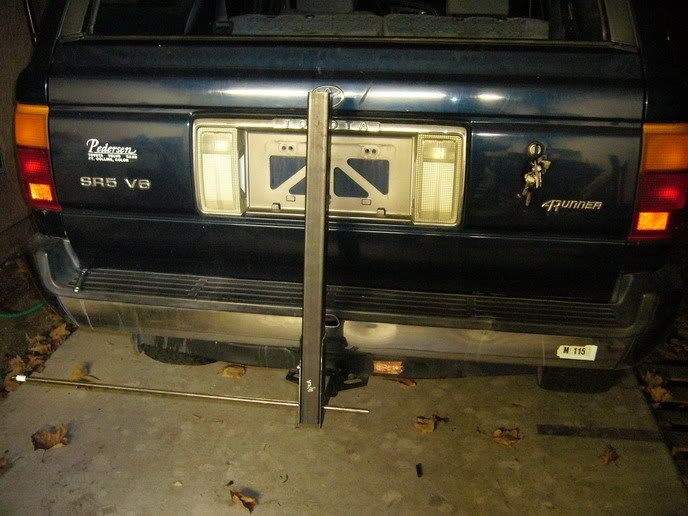
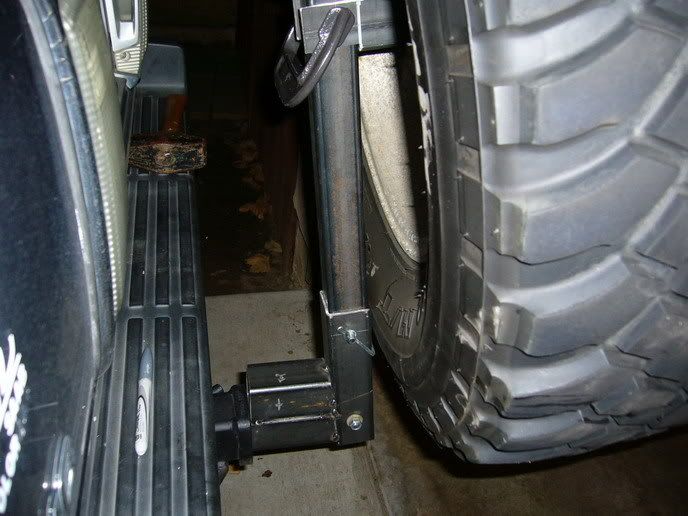
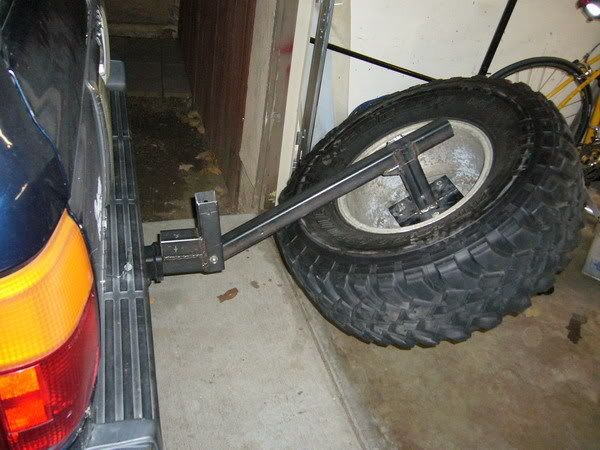
clamp on the tire bracket(piece# 3), drill and install the lock pin, try out the tire location
first, is top:
then, 6 inches lower
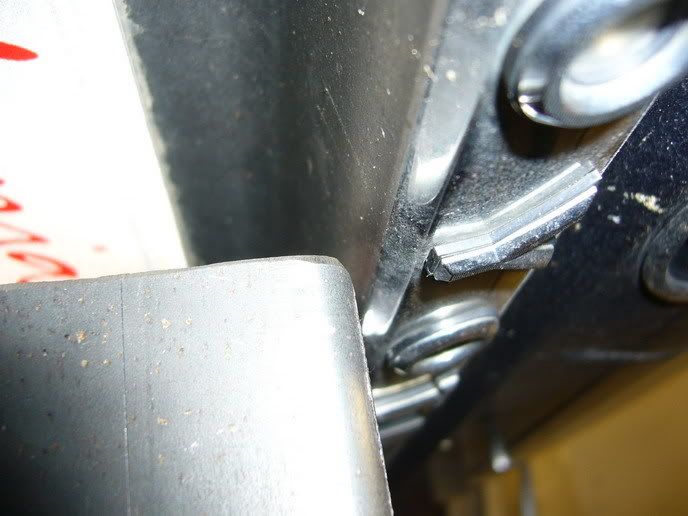
lock pin
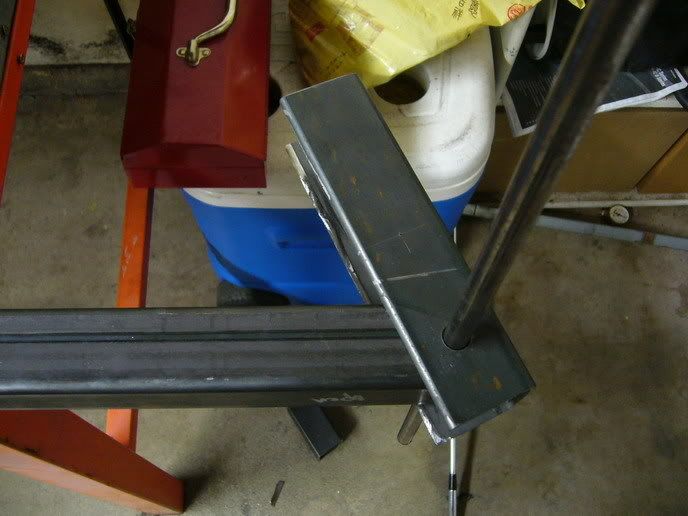
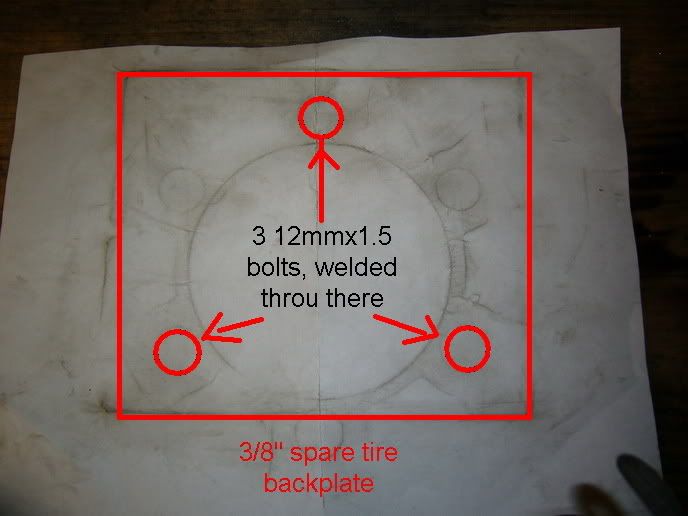
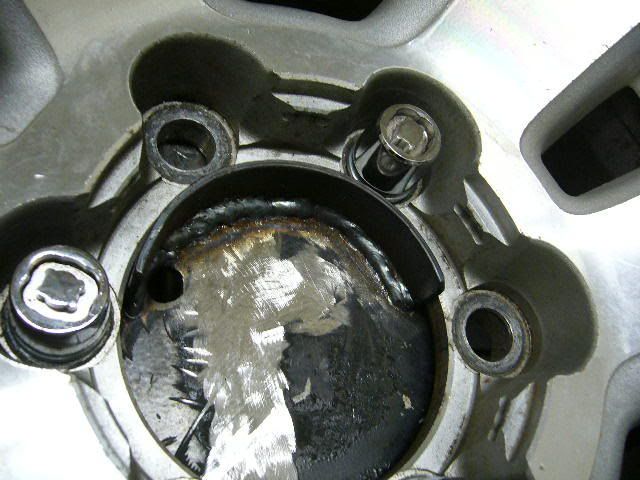
made a impression of the rim bolt pattern, i have a small piece of 3/8" plate, drilled 3 holes for the lug nuts, but i forgot to buy the lugnuts, otherwise, i could have finished all the fab works this afternoon.
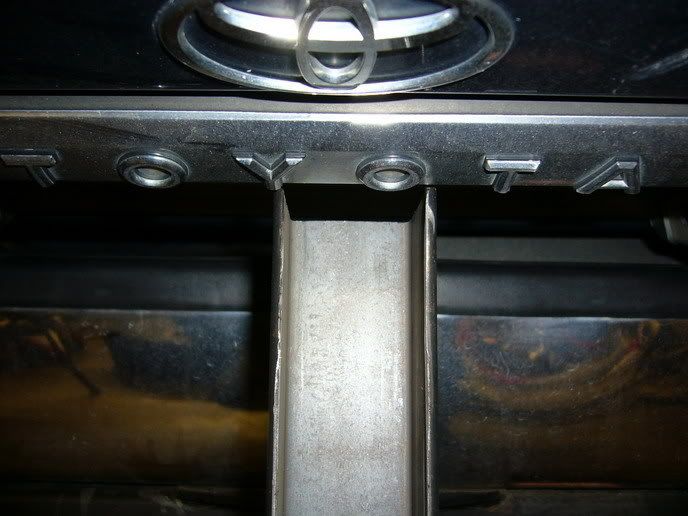
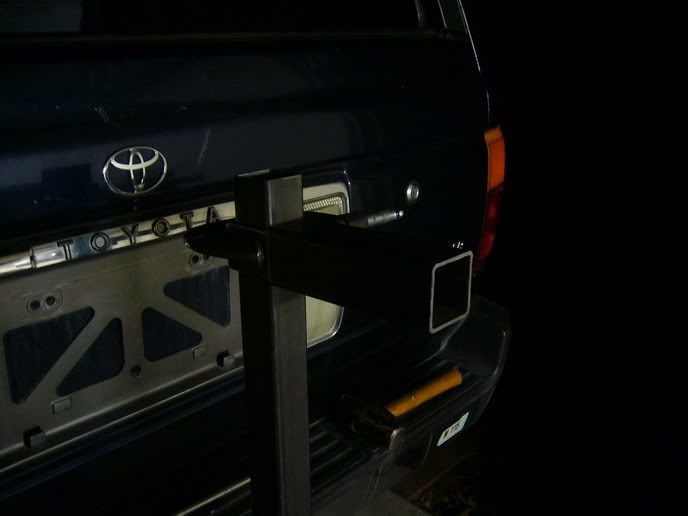
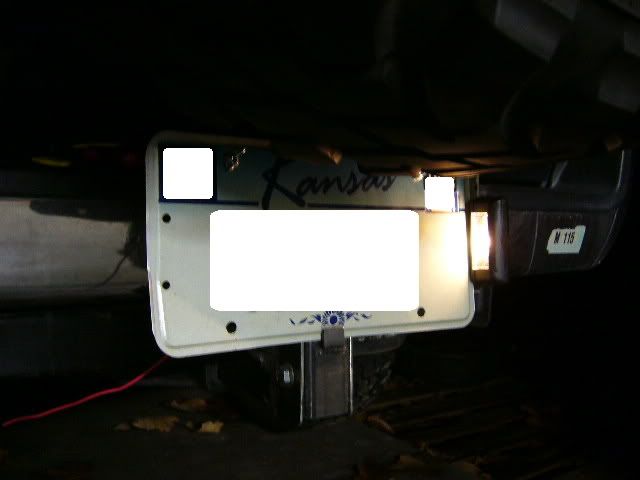
i need to weld a small strip of steel at the lower part of the vertical tubing, so the license plate can be bolted on when needed. a small LED light zip tied on to the tubing will provide lighting, since i'm only gonna use it off-road, lighting is only required driving at night.
here are some questions:
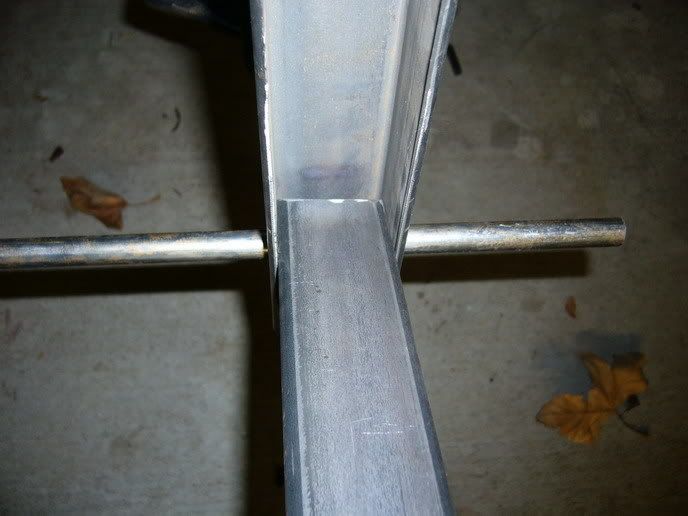
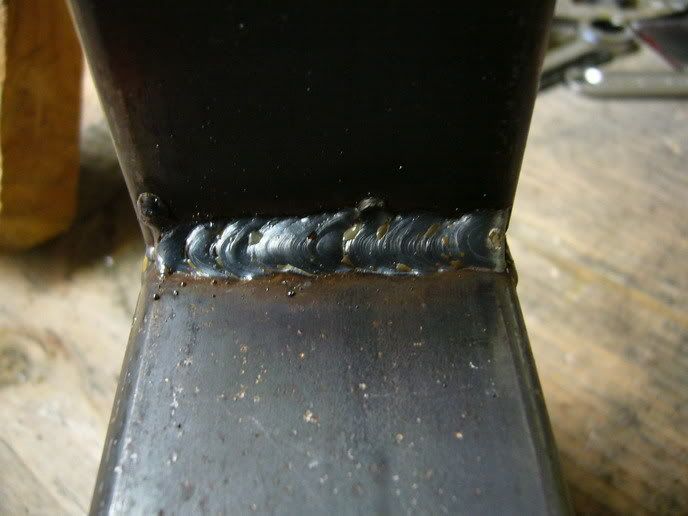
i'm a newby welder, just started couple weeks ago, but pratice alot in my garage, i'm using argon/co2 mix gas and what these brown spots are? feel like glass.

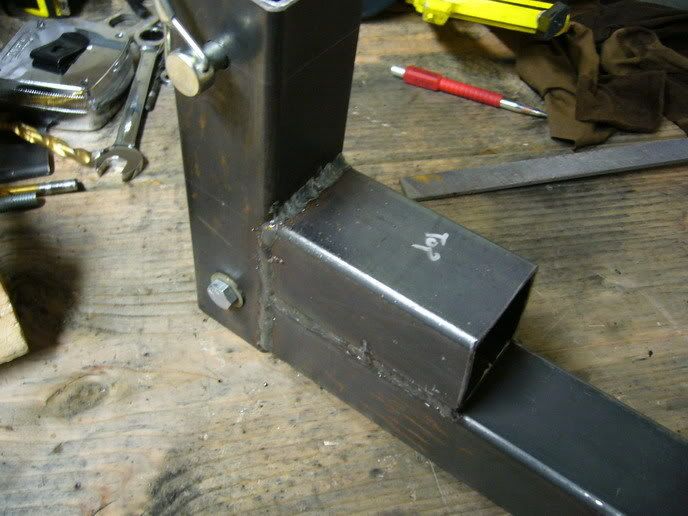
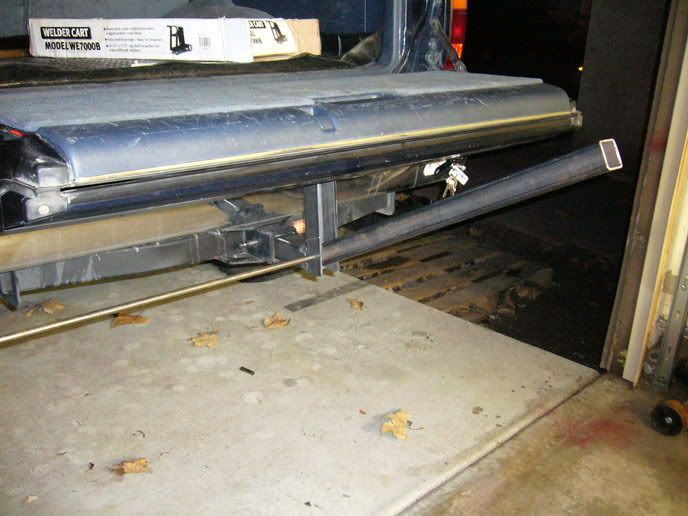
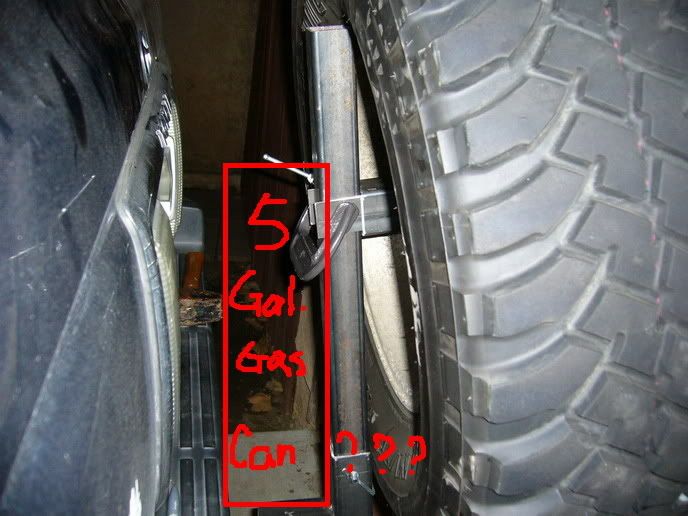
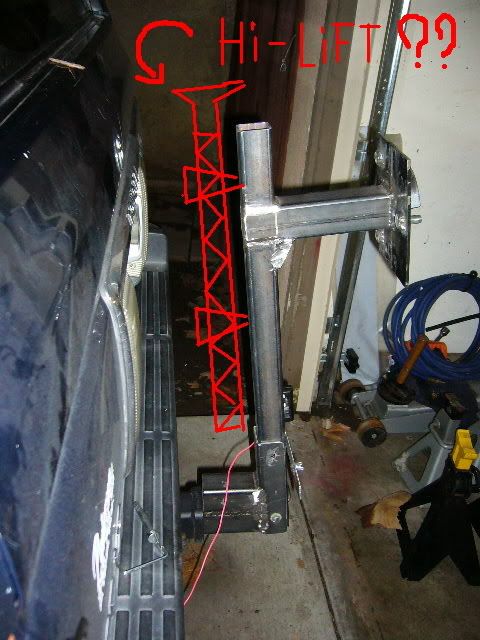
the hitch receiver tubing(piece# 1), has plenty of length inside the receiver, which i can drill another set of holes, making it stick out more, more space between the vertical tubing and tailgete, engough for a 5gallon jerry can. some fab work needed, but will it be a good idea adding more load on the it?
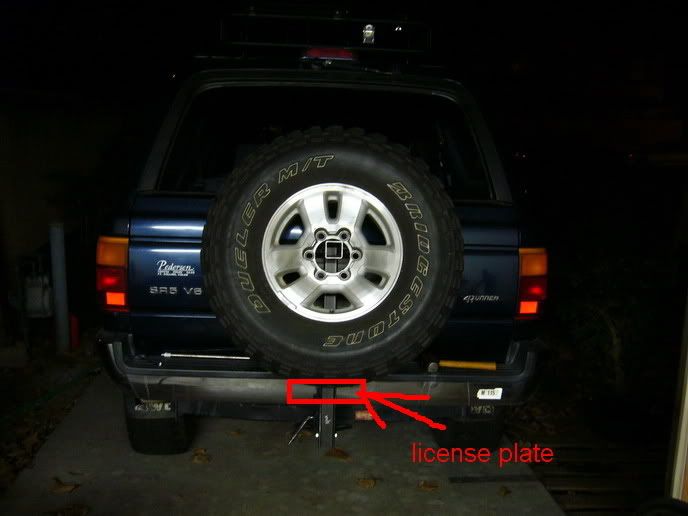
and, which hight, in your opion, is better? top or lower?
thanks.
i want an auto darken helmet!!!!
.
first, the 2" tubing goes into the receiver, with a 86 degree angle on the other end.
next piece is another 2" but vertical, straight cust, no angle. with one of the 4 sides of the wall cut out. this piece will hold the 1.75" tubing.
third piece will be a bracket to hold the spare tire backplate, this will be horzontal.
forth piece is the 1.75" veritical tubing,
tacked up for preliminary fitting:
it took a while to get the tailgate clearance right
clamp on the tire bracket(piece# 3), drill and install the lock pin, try out the tire location
first, is top:
then, 6 inches lower
lock pin
made a impression of the rim bolt pattern, i have a small piece of 3/8" plate, drilled 3 holes for the lug nuts, but i forgot to buy the lugnuts, otherwise, i could have finished all the fab works this afternoon.
i need to weld a small strip of steel at the lower part of the vertical tubing, so the license plate can be bolted on when needed. a small LED light zip tied on to the tubing will provide lighting, since i'm only gonna use it off-road, lighting is only required driving at night.
here are some questions:
i'm a newby welder, just started couple weeks ago, but pratice alot in my garage, i'm using argon/co2 mix gas and what these brown spots are? feel like glass.
the hitch receiver tubing(piece# 1), has plenty of length inside the receiver, which i can drill another set of holes, making it stick out more, more space between the vertical tubing and tailgete, engough for a 5gallon jerry can. some fab work needed, but will it be a good idea adding more load on the it?
and, which hight, in your opion, is better? top or lower?
thanks.
i want an auto darken helmet!!!!
.
Last edited by TC4RNR; Jan 13, 2008 at 10:33 PM.
Jan 14, 2008 | 12:06 PM
#4
Thread Starter
Registered User
Joined: May 2007
Posts: 636
Likes: 0
From: used to be so. cal. now Indy
I would consider it to be an "Universial", not just for the 2nd gen 4Runners, it would on with any vehcile with a 2" hitch receiver, even Taco's and Tundras, or soccer mom's minivans..LoL.
i did have a lockable hitch pin i bought from wally world long ago, i'd recommend you do get one too because you don't wanna someone just go and grab the whole thing while you away.
i did have a lockable hitch pin i bought from wally world long ago, i'd recommend you do get one too because you don't wanna someone just go and grab the whole thing while you away.
Jan 14, 2008 | 12:51 PM
#5
Contributing Member
Joined: Jun 2005
Posts: 3,415
Likes: 9
From: Phx, AZ
I like where you are going with the design.
Couple things...
I'd go higher if you are going to run with your rack off road. You'll be surprised how even the smallest dip will really hang you up in the rear.
I think you are going to find there is a lot of play (noise) once you get that tire on there. I know from bike racks I have used in the past that the best ones have some kind of mechanism to secure the rack in the hitch mount.
If you hand it out further for a gas can you'll be magnifying you departure angle problem. Again, depends on where you are planning to go... but something to keep in mind.
Also, thieves are crafty. Seems like presently they'd undo one bolt and be gone with your wheel/ tire. Wonder if you could weld the nut or secure some other way to prevent that from happening.
Just throwing out some ideas...
Jan 14, 2008 | 12:53 PM
#6
awesome write up . Looks like your overall objectives were met. I need to learn to weld too....when my brother in law helped me with the sliders, the auto darkening helmets were so much better than flipping a helmet up all the time.
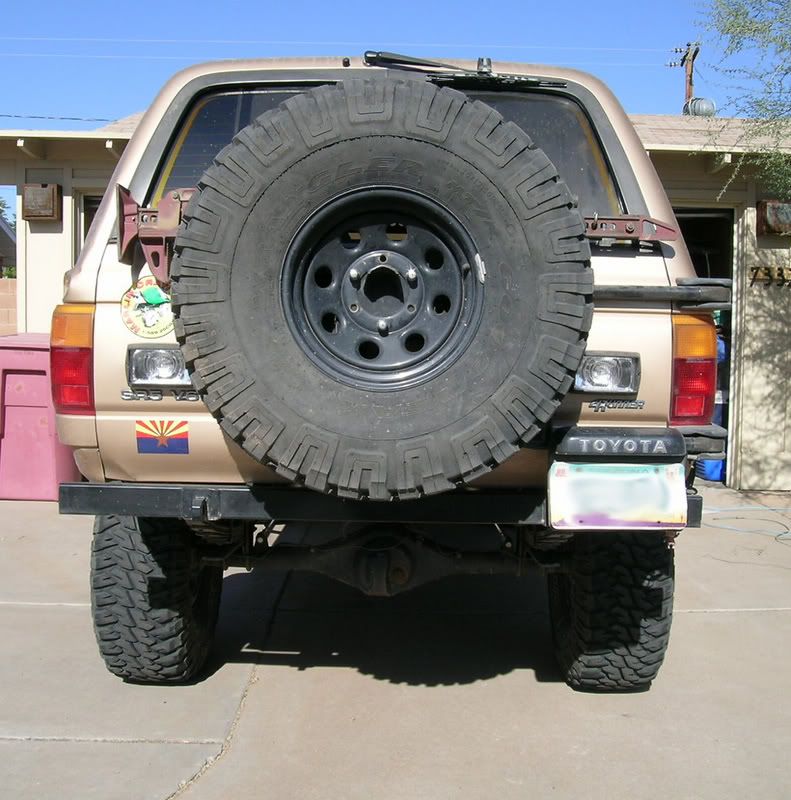
As far as the locking pin and keeper bolts/pins I suggest you carry an extra one with you. I have only had my CBI carrier on the back of my truck for a couple of weeks and already found that some lowlife had pulled the pin and lowered the tire when I was at Home Depot. The cable lock kept them from getting away with the tire if that was their goal. For your bolts are you using Grade 5 or Grade 8? Hard to tell from the picture, I know that the standard grade 2 cheapo stuff won't hold up long.
I think mine sticks out about the same as yours and have found that I am going to be notching the upright so it cants in so it is closer to the rear of the truck...maybe even lower it somewhat, your visibility is going to be a lot better than mine is currently..
. Looks like your overall objectives were met. I need to learn to weld too....when my brother in law helped me with the sliders, the auto darkening helmets were so much better than flipping a helmet up all the time. As far as the locking pin and keeper bolts/pins I suggest you carry an extra one with you. I have only had my CBI carrier on the back of my truck for a couple of weeks and already found that some lowlife had pulled the pin and lowered the tire when I was at Home Depot. The cable lock kept them from getting away with the tire if that was their goal. For your bolts are you using Grade 5 or Grade 8? Hard to tell from the picture, I know that the standard grade 2 cheapo stuff won't hold up long.
I think mine sticks out about the same as yours and have found that I am going to be notching the upright so it cants in so it is closer to the rear of the truck...maybe even lower it somewhat, your visibility is going to be a lot better than mine is currently..
Jan 14, 2008 | 02:51 PM
#7
Thread Starter
Registered User
Joined: May 2007
Posts: 636
Likes: 0
From: used to be so. cal. now Indy
[QUOTE=Elvota;50720892]Also, thieves are crafty. Seems like presently they'd undo one bolt and be gone with your wheel/ tire. Wonder if you could weld the nut or secure some other way to prevent that from happening.
QUOTE]
good point, and welding the nut should be simple and effective. i'll just do that when every thing is settled in place.
as for the noise, my bike rack makes tons of noise, we have to wait and see after i got the lugbolts.
as for the departing angle, i don't think i'd have much of choise because of the tailgate. if i have a 3 gen, i'd angle the hitch tubing upwards(instead of straight out of the receiver) for a better departing angle.
Trending Topics
Jan 14, 2008 | 03:26 PM
#8
Contributing Member
Joined: Jun 2005
Posts: 3,415
Likes: 9
From: Phx, AZ
I even raised my factory carrier up about 2" and I still drag the tire. I move it inside if I know I am going on some harder trails to avoid the problem all together.
But then again... that's with a 35" tire back there.
It really depends a lot on the type of terrain you will be driving on.

 Jan 26, 2008 | 07:59 PM
#11
Thread Starter
Registered User
Joined: May 2007
Posts: 636
Likes: 0
From: used to be so. cal. now Indy
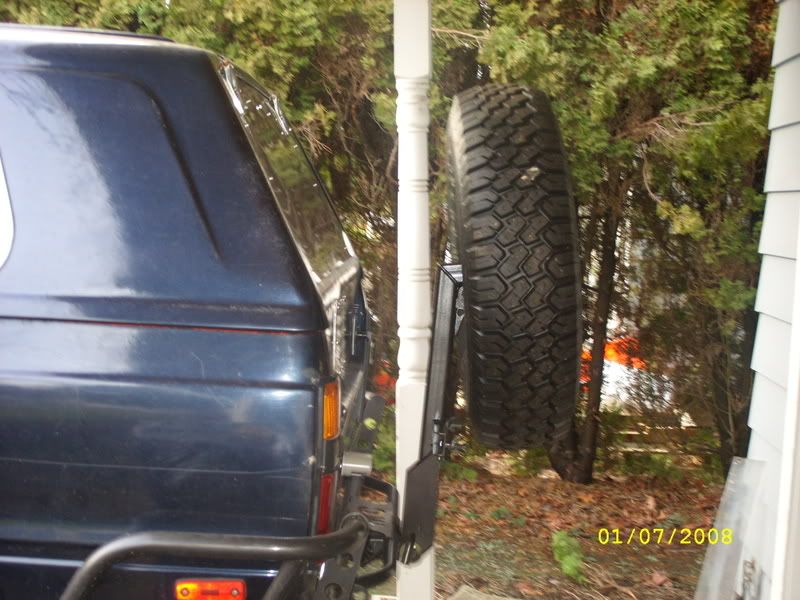
finally finished all the fab work, ready for paint. test drove it a little around the neighborhood, nosie seems minimal
few more little things:
a.) i added a "lip" on the backplate, so the weight is carried by the lip with putting up and taking off the spare tire, making the whole tire swap a one man job, more safely.
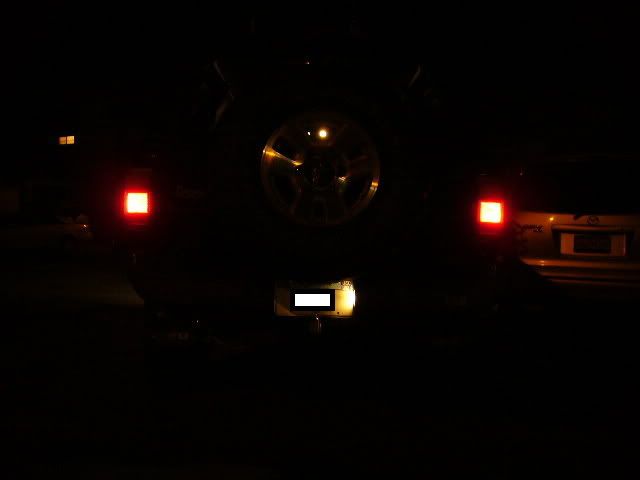
b.) finished the license plate lighting and mounting simply using a trailer tag light($7), a flat 4-plug trailer lighting pigtail($2) and 4 screws and 2 wingnuts and couple metal strips. plug it right into the trailer plug, so no modification
so, what do you guys think my next move? doable??
few more little things:
a.) i added a "lip" on the backplate, so the weight is carried by the lip with putting up and taking off the spare tire, making the whole tire swap a one man job, more safely.
b.) finished the license plate lighting and mounting simply using a trailer tag light($7), a flat 4-plug trailer lighting pigtail($2) and 4 screws and 2 wingnuts and couple metal strips. plug it right into the trailer plug, so no modification
so, what do you guys think my next move? doable??


Thread
Thread Starter
Forum
Replies
Last Post
RedRunner_87
95.5-2004 Tacomas & 96-2002 4Runners (Build-Up Section)
84
Jun 1, 2021 01:51 PM
coffey50
Offroad Tech
17
Jul 28, 2015 10:55 AM
skoti89
Offroad Tech
3
Jul 8, 2015 12:05 AM
Steezy96yota
86-95 Trucks & 4Runners (Build-Up Section)
1
Jul 6, 2015 10:00 AM


