
Bumper build. Finally!


 Sep 8, 2010 | 06:24 AM
#23
Thread Starter
Registered User
Joined: Sep 2006
Posts: 309
Likes: 0
From: Portland Oregon
I've already seen how weak the cross member is. Last time I went wheeling my stock skid ripped off and the bolt pulled right out of the cross member causing it to bend at the bolt hole a bit. How should I go about beefing up the cross member? Should I weld a quarter inch plate across the front and bottom of it?
Sep 9, 2010 | 02:04 PM
#24
Registered User
Joined: Sep 2008
Posts: 3,887
Likes: 16
From: Spokane, WA
I've already seen how weak the cross member is. Last time I went wheeling my stock skid ripped off and the bolt pulled right out of the cross member causing it to bend at the bolt hole a bit. How should I go about beefing up the cross member? Should I weld a quarter inch plate across the front and bottom of it?
And then beefing up the top triangles.
TG sells a kit, with pretty good reviews.
after i wrecked my pickup i replaced the front xmember with a 2.5x2.5x.25 wall steel square tube. its beef.
Sep 10, 2010 | 12:51 AM
#25
Registered User
Joined: Nov 2004
Posts: 868
Likes: 1
From: Ameliasburgh, On. Ca.
Sep 10, 2010 | 06:35 AM
#27
Thread Starter
Registered User
Joined: Sep 2006
Posts: 309
Likes: 0
From: Portland Oregon
Thanks for all the input guys. I'm moving this weekend so I wont get too much done with the bumper but I'll keep posting my progress.
Bandit, the cardboard mock up was all your idea. I loved your bumper build and your skid is amazing so far. I went through your bumper build at least 20 times to gain confidence to drop the money on mine, thanks for the inspiration.
Bandit, the cardboard mock up was all your idea. I loved your bumper build and your skid is amazing so far. I went through your bumper build at least 20 times to gain confidence to drop the money on mine, thanks for the inspiration.
Sep 10, 2010 | 10:57 AM
#29
Registered User
Joined: Feb 2007
Posts: 354
Likes: 10
From: Stevensville, MI
Bandit, the cardboard mock up was all your idea. I loved your bumper build and your skid is amazing so far. I went through your bumper build at least 20 times to gain confidence to drop the money on mine, thanks for the inspiration.
Sep 10, 2010 | 04:18 PM
#31
Thread Starter
Registered User
Joined: Sep 2006
Posts: 309
Likes: 0
From: Portland Oregon
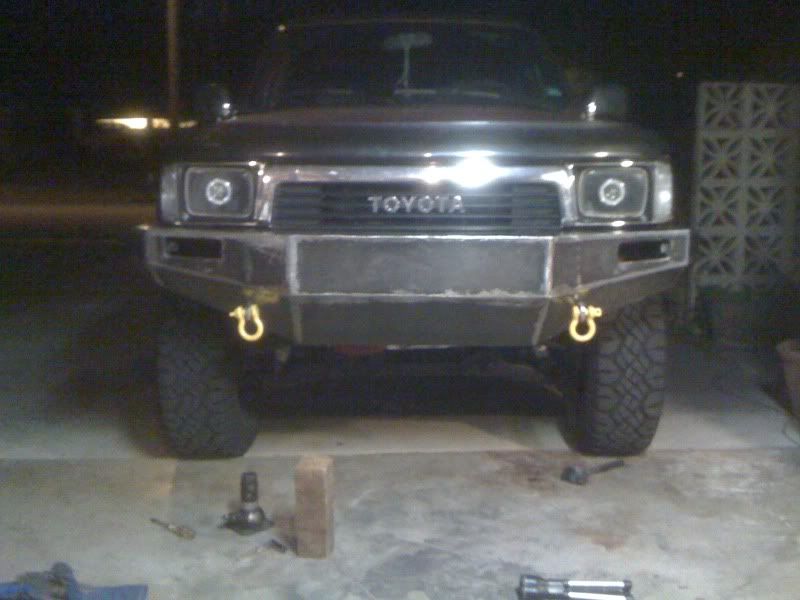
I am going to add reinforcing behind the plate. I am going to add some vertical plates and i'm thinking about adding some 1/4 plating behind it as well. it will be pretty strong when its all finished.


 Oct 23, 2010 | 05:13 PM
#33
Thread Starter
Registered User
Joined: Sep 2006
Posts: 309
Likes: 0
From: Portland Oregon
So I got some more work done on it. It's all done except for paint.
As for the paint, my original idea was to truck bed liner the entire thing, but my brother asked if he could do some airbrush work on it. So he is going to airbrush the front section and the two sections the turn signals mount in. He is going to lay down a coat of silver and do the art work in black and then finish with a coat of candy red that will match the color of my truck. The rest of the bumper will be truck bed liner. Not sure what color I am going to do the shackles (probably black), but they definitely wont be yellow.
I really just want this thing to be done so I can move on to building a skid plate and brain storming ideas for the rear bumper. If i could do it all over i would try to cut the metal into as few pieces as possible so there was less welding and grinding. Bending the metal would have been a lot less work. I've been looking into winches so i can plan for that as well, they are spendy so that might be put off for a while.
Last edited by SigEp4Runner; Oct 23, 2010 at 05:15 PM.
Nov 12, 2010 | 09:18 PM
#35
Thread Starter
Registered User
Joined: Sep 2006
Posts: 309
Likes: 0
From: Portland Oregon
My brother started painting my bumper last week, he has been pretty busy painting a couple other cars. Here is what we have so far. Keep in mind that i gave him free range to do what he wanted with it and it isnt costing me anything. I'm glad its free paint work because I plan on scratching it.
Primer. We used an etching primer so the paint would stick real well.

Base coat. The paint is an orangish color so that when he does the candy red over the top it will match the color of my 4runner.

First layer of stencils

more detail added

One side done

He has finished doing the skulls on both sides and he is going to do something different in the center section. He went and got the truck bed liner and the application gun for it so he can do that as soon as the airbrush and clear coat is done. I told him it needed to be done by Wednesday night this week (Ive been waiting long enough), hopefully he gets it done and I have a pic of the finished bumper by the end of the week.
Primer. We used an etching primer so the paint would stick real well.
Base coat. The paint is an orangish color so that when he does the candy red over the top it will match the color of my 4runner.
First layer of stencils
more detail added
One side done
He has finished doing the skulls on both sides and he is going to do something different in the center section. He went and got the truck bed liner and the application gun for it so he can do that as soon as the airbrush and clear coat is done. I told him it needed to be done by Wednesday night this week (Ive been waiting long enough), hopefully he gets it done and I have a pic of the finished bumper by the end of the week.
Nov 12, 2010 | 09:23 PM
#36
Thread Starter
Registered User
Joined: Sep 2006
Posts: 309
Likes: 0
From: Portland Oregon
Here's a couple pics of the truck he is doing some clear coat repair on. This thing is pretty sweet, it even has train horns hooked up, they are loud!!

The bumpers are insane on this truck

The bumpers are insane on this truck
Dec 14, 2010 | 06:09 PM
#38
Thread Starter
Registered User
Joined: Sep 2006
Posts: 309
Likes: 0
From: Portland Oregon
So here's an update:
Its been a very slow process having my brother paint the bumper, he has been busy. He finally got the rest of the airbrush work done and laid down the candy and clear coat. The clear was then touched up and the runs were sanded, cut and buffed. Here it is as it currently sits.
Before touch up

After touch up


Edges taped and almost ready for the truck bed liner.

Hopefully the truck bed liner will be done some night this week.
Its been a very slow process having my brother paint the bumper, he has been busy. He finally got the rest of the airbrush work done and laid down the candy and clear coat. The clear was then touched up and the runs were sanded, cut and buffed. Here it is as it currently sits.
Before touch up
After touch up
Edges taped and almost ready for the truck bed liner.
Hopefully the truck bed liner will be done some night this week.


