
86 4x4 Frame Repair
 Mar 13, 2011 | 02:25 PM
#1

Thread Starter
Registered User
Joined: Oct 2005
Posts: 578
Likes: 2
From: New Brunswick, Canada
86 4x4 Frame Repair
I've been a member of YotaTech for a number of years and I've added my 2 cents worth on alot of threads trying to help fellow YotaTech enthusiasts with their problems. Well, now it is time to share one of mine.
I've got an 86 4x4 standard cab long bed pickup that is starting to show it's age...especially up here in the great white north where on a quiet night when you are laying in bed you can hear your vehicle rusting away.
An exaggeration you say? Well maybe a little bit, but between the Atlantic Ocean, damp wet springs, snow in the winter and tons of salt on the roads, it's hard to keep a vehicle very long.
I did a 5M-Ge conversion a few years back and my truck was in pretty good shape in fact the guy that I bought it from had already replaced the frame, but the rust has taken it's toll. I picked up an 87 cab from another YotaTech member who lives about 4 hours from me. He got this cab out of a barn up in Quebec. It had been sitting there 20 years and with the exception of a couple of small dents, it's mint....NO RUST!!!
So I planned to rebuild my truck this summer, I've had the Jap Spec 1uz-Fe for a number of years, but before that I had to get it inspected. Now up here they don't smog vehicles, but you have to pass a Government inspection each year. It's a mechanical and structural inspection... well the poor old 86 got rejected!
It needs 2 new rotors (not a big deal), got to fix a rocker panel( spray foam and fiberglass the cab's going to be scrapped in a couple of months anyway), but the frame was rusted out just back of the rear cab crossmsmber on the drivers side. So now starts the saga of frame repair!
Last edited by Hadmatt54; Mar 14, 2011 at 03:44 AM.
Mar 13, 2011 | 11:47 PM
#2
Registered User
iTrader: (1)
Joined: Apr 2009
Posts: 13,381
Likes: 100
From: I live in New Tripoli Pa out in the woods
At this point if you have not all ready it is time to do the screw driver test.
Every time I do one of these trucks or 4Runners It seem it is always worse then first thought.
I also say each time the next one I am pulling the Bed off but never seems to happen because of one reason or another..
These are prone to rust in the area of the front spring hanger from all the moisture and other dirt that gets in there.
Would love to see pictures of that swap
Mar 14, 2011 | 03:35 AM
#3
Thread Starter
Registered User
Joined: Oct 2005
Posts: 578
Likes: 2
From: New Brunswick, Canada
As much as I love Toyotas and I think that their design engineers are smart people and come up with some great ideas, I have to wonder about their thought process when it comes to designing and building their frames. A box frame is strong, but then fill it full of holes so that all the road crud can get in there stay wet and rust away? The plastic plugs that they install in the bigger holes last about 2 minutes. The frames are great if you live in a hot dry climate, I've got an 86 factory Turbo 4Runner project that I am restoring and the frame is like the day it came off of the assembly line. It came from California, Florida and I bought it in New Hampshire, but it's never seen winter conditions or road salt! You would think that when 2/3 of North America, most of Europe and a fair chunk of Asia have winter to deal with they could come up with a better idea.
Here's a picture of the initial damage.
[IMG] [/IMG]
Here is the crud that you are talking about. I took about an 1 1/2" of sand, mud and rust out of the frame rail that stretched from the rear cab crossmember back to the round crossmember above the axle. I stuck my finger in the square hole inside of the body mount of the other side and it is the same. Notice the size of the patch
[IMG] [/IMG]
Here's a picture of the initial damage.
[IMG]
[/IMG]Here is the crud that you are talking about. I took about an 1 1/2" of sand, mud and rust out of the frame rail that stretched from the rear cab crossmember back to the round crossmember above the axle. I stuck my finger in the square hole inside of the body mount of the other side and it is the same. Notice the size of the patch
[IMG]
[/IMG]
Last edited by Hadmatt54; Mar 14, 2011 at 03:48 AM.
Mar 14, 2011 | 03:41 AM
#4
Thread Starter
Registered User
Joined: Oct 2005
Posts: 578
Likes: 2
From: New Brunswick, Canada
wyoming9:
Which swap pictures are you talking about? The 1uz-fe that I'm going to do or the 5M-ge that's in the truck now?
Which swap pictures are you talking about? The 1uz-fe that I'm going to do or the 5M-ge that's in the truck now?
Last edited by Hadmatt54; Mar 14, 2011 at 03:45 AM.
Mar 16, 2011 | 12:33 PM
#5
Thread Starter
Registered User
Joined: Oct 2005
Posts: 578
Likes: 2
From: New Brunswick, Canada
Well I got back at it, got all of the bad places in the frame rail cut out! It went initially from this:-
[IMG]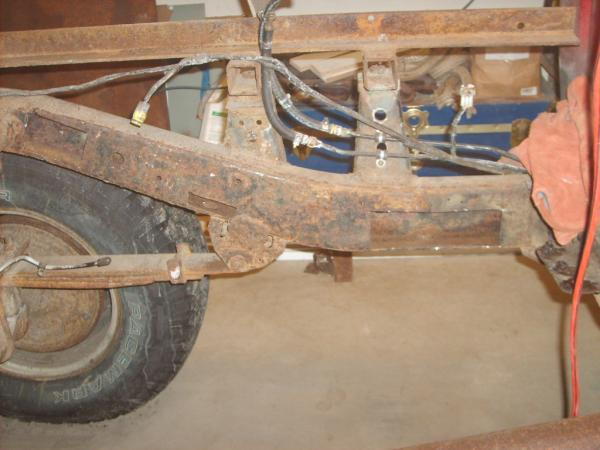 [/IMG]
to this!
[IMG] [/IMG]
One patch has now become three patches!
[IMG]
[/IMG]to this!
[IMG]
[/IMG]One patch has now become three patches!
Mar 16, 2011 | 01:42 PM
#6
Thread Starter
Registered User
Joined: Oct 2005
Posts: 578
Likes: 2
From: New Brunswick, Canada
Time to get to the welding. I really haven't done much Fab work since I SAS'd my truck and did the 5M-ge swap 5 years ago. I had bought this 120v. Mig:-
[IMG] [/IMG]
I basically taught myself to weld not professional by any means but I could lay down a pretty good bead and my welds didn't look too bad. My son had just finished his first year of machinist at the local tech school and he was a much better welder than me so when it came to build my truck I deferred the welding to him. This little machine has had a lot of wire put through it and it has performed well, but it's already had one liner installed and I think that it's ready for a second. The wire feed drags. It's a Liquid Air (Air Liquide) 130 and it's been a good machine, but my advice to anyone looking to buy a first mig is spend the extra money and buy a Miller or a Lincoln. At the time I think the comparable Miller was $300.00 more and this one basically looks like a Miller....,but it's not a Miller. The reason I say this is one of my co-corkers has a Miller 120 or 130, it's several years older than this machine and it has done a lot of fab work, body panels, etc. and he has never had a problem with his. I must say that I've never bought brand name wire and that could be why I've had to replace the liner. I've been told that Lincoln or Esab (to name a couple) mig wire has a smoother finish on the outside, where cheaper brands do not and they tend to tear up the liner. Live and Learn!!
A while ago one of the local welding supply stores had a great deal on a welder, auto darkning helmet, spool gun, etc and my son said "Dad we need more tools for the garage", so we came home with this:-
[IMG] [/IMG]
We have had this close to 1 1/2 years and I've never pulled the trigger on it once, I haven't fabbed anything, Time to start, getting used to this machine will be a learning curve, but one thing I know for sure is this machine will always get brand name wire!
[IMG]
[/IMG]I basically taught myself to weld not professional by any means but I could lay down a pretty good bead and my welds didn't look too bad. My son had just finished his first year of machinist at the local tech school and he was a much better welder than me so when it came to build my truck I deferred the welding to him. This little machine has had a lot of wire put through it and it has performed well, but it's already had one liner installed and I think that it's ready for a second. The wire feed drags. It's a Liquid Air (Air Liquide) 130 and it's been a good machine, but my advice to anyone looking to buy a first mig is spend the extra money and buy a Miller or a Lincoln. At the time I think the comparable Miller was $300.00 more and this one basically looks like a Miller....,but it's not a Miller. The reason I say this is one of my co-corkers has a Miller 120 or 130, it's several years older than this machine and it has done a lot of fab work, body panels, etc. and he has never had a problem with his. I must say that I've never bought brand name wire and that could be why I've had to replace the liner. I've been told that Lincoln or Esab (to name a couple) mig wire has a smoother finish on the outside, where cheaper brands do not and they tend to tear up the liner. Live and Learn!!
A while ago one of the local welding supply stores had a great deal on a welder, auto darkning helmet, spool gun, etc and my son said "Dad we need more tools for the garage", so we came home with this:-
[IMG]
[/IMG]We have had this close to 1 1/2 years and I've never pulled the trigger on it once, I haven't fabbed anything, Time to start, getting used to this machine will be a learning curve, but one thing I know for sure is this machine will always get brand name wire!
Last edited by Hadmatt54; Mar 16, 2011 at 01:46 PM.
Mar 17, 2011 | 03:27 AM
#7
Thread Starter
Registered User
Joined: Oct 2005
Posts: 578
Likes: 2
From: New Brunswick, Canada
This thread is like talking to myself, but I'm putting it up there so that those of you who run into this know what you are up against!
I've been working on it for the last couple of days. The welder works sweeeeet!, but the frame is pretty thin around the patches so even with the welder turned down, you have to be very careful. Some of the welds look pretty bad, but when you are burning through and have to patch those up, it's hard to make the welds look pretty.
[IMG]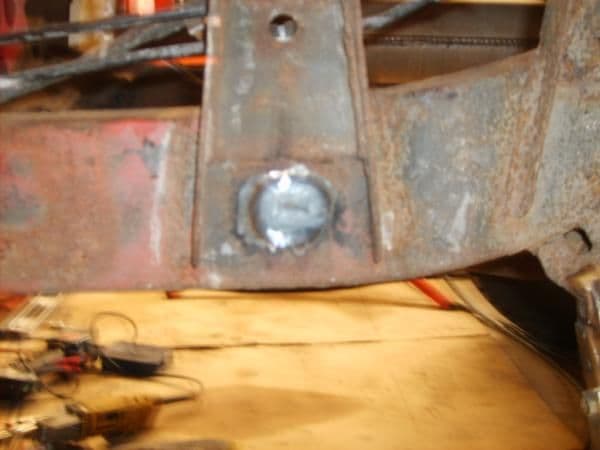 [/IMG]
The first job was filling in all of the holes Toyota puts in the frames.
[IMG]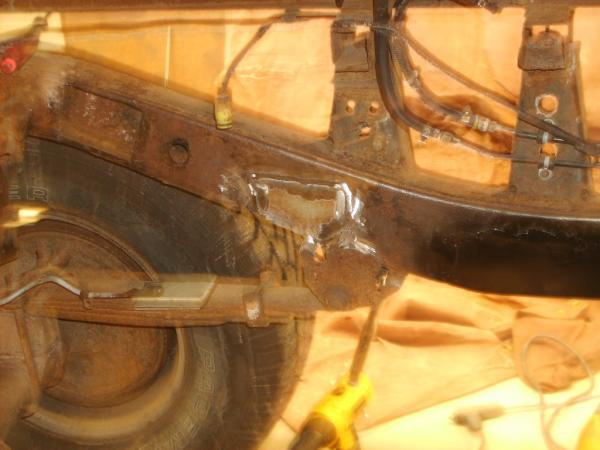 [/IMG]
This is the first patch welded in and painted and the second patch welded in.
The next picture is of the last patch that has to go in, notice how the round shock support crossmember is rusted out inside the frame? It's because Toyota does not seal the ends and all of the road & off road crud lays in there and rusts away!
The picture is a little fuzzy...not sure why, but you can see what I'm talking about
[IMG] [/IMG]
Third patch welded in:-
[IMG] [/IMG]
Frame painted and undercoated, now I just have to put my gas tank back in. I switched my tank to the drivers side when I did the 5M-Ge conversion and it will work perfectly for the 1uz-Fe
Finished!!
[IMG] [/IMG]
I've been working on it for the last couple of days. The welder works sweeeeet!, but the frame is pretty thin around the patches so even with the welder turned down, you have to be very careful. Some of the welds look pretty bad, but when you are burning through and have to patch those up, it's hard to make the welds look pretty.
[IMG]
[/IMG]The first job was filling in all of the holes Toyota puts in the frames.
[IMG]
[/IMG]This is the first patch welded in and painted and the second patch welded in.
The next picture is of the last patch that has to go in, notice how the round shock support crossmember is rusted out inside the frame? It's because Toyota does not seal the ends and all of the road & off road crud lays in there and rusts away!
The picture is a little fuzzy...not sure why, but you can see what I'm talking about
[IMG]
[/IMG]Third patch welded in:-
[IMG]
[/IMG]Frame painted and undercoated, now I just have to put my gas tank back in. I switched my tank to the drivers side when I did the 5M-Ge conversion and it will work perfectly for the 1uz-Fe
Finished!!
[IMG]
[/IMG]
Trending Topics
Mar 20, 2011 | 05:40 AM
#8
Registered User
Joined: May 2008
Posts: 156
Likes: 0
From: Fort Lewis, WA
My frame looks the same as that, hopefully however it is mostly just surface rust, when I get the body off I will be able to tell more, I am hoping I won't have to cut into it like that...but i'll do what i gotta
Mar 20, 2011 | 06:04 AM
#9
Registered User
Joined: Aug 2009
Posts: 13,574
Likes: 72
From: Wilkes-Barre, PA, USA
Nice to see someone actually fixing these kind of things instead of trashing the frame. I was in the same boat 2 years ago but, unfortunately don't know how to weld and had the frae repaird above the leaf hangers.
Now above the bumpstops is kinda getting bad. One of these days I am gonna have to find out if wyoming9 would be willing to patch it for me.
Now above the bumpstops is kinda getting bad. One of these days I am gonna have to find out if wyoming9 would be willing to patch it for me.
Mar 22, 2011 | 07:33 AM
#11

Registered User
Joined: Dec 2010
Posts: 43
Likes: 0
From: Nova Scotia, Canada
Looks like my summer project. Though all my rust and badness is on the passenger side.
Any time you paint a frame I would advice using POR15 (Paint Over Rust). You can get it at any marine parts store. You just have to clean the rust up as best you can and make sure that all the dirt is off of the frame. Then you just paint it on with a roller/ brush/ spray gun if you so desire. It bonds with the rust and protects the metal from further rusting.
Any time you paint a frame I would advice using POR15 (Paint Over Rust). You can get it at any marine parts store. You just have to clean the rust up as best you can and make sure that all the dirt is off of the frame. Then you just paint it on with a roller/ brush/ spray gun if you so desire. It bonds with the rust and protects the metal from further rusting.
 Mar 22, 2011 | 07:52 AM
#13
@ ravenlord
i have to do alot of rust repair on the body and frame of my rig as she sits right now and i was thinking of stripping the frame completely so i could get cleaner results than what POR 15 would give me. could i strip the whole thing and do a rust primer and then a bedliner? i really wanted to get rid of the rust, not just kinda paint over and 'convert it'.
i have to do alot of rust repair on the body and frame of my rig as she sits right now and i was thinking of stripping the frame completely so i could get cleaner results than what POR 15 would give me. could i strip the whole thing and do a rust primer and then a bedliner? i really wanted to get rid of the rust, not just kinda paint over and 'convert it'.
Mar 24, 2011 | 03:43 AM
#14
Thread Starter
Registered User
Joined: Oct 2005
Posts: 578
Likes: 2
From: New Brunswick, Canada
As I stated at the beginning of this thread the truck will get rebuilt this summer, so I'm going to sand blast the frame and then decide whether I will use POR 15 or some other product. If I get rid of the rust I may use the new Dupli-color bedliner on the frame. The guys on Trucks used this in their Super-Dually tow rig and it looks like a great product.
For now I just put rust paint on the frame as the first coat and then as a second coat I put on spray-on undercoating.
For now I just put rust paint on the frame as the first coat and then as a second coat I put on spray-on undercoating.

Thread
Thread Starter
Forum
Replies
Last Post
GreatLakesGuy
The Classifieds GraveYard
8
Sep 4, 2015 09:27 AM


