
2nd Gen Body Armor: front and rear bumper, rocksliders, and tire carrier
 Dec 2, 2010 | 08:56 PM
#1
Thread Starter
Registered User
Joined: Oct 2007
Posts: 69
Likes: 0
From: Loganville, GA
Whats up guys!
Here are some pics of the great tube work I got done on the '86. These are all my design and built by the gifted fabricators at Sixditch Enterprises. Let me know what yall think!!
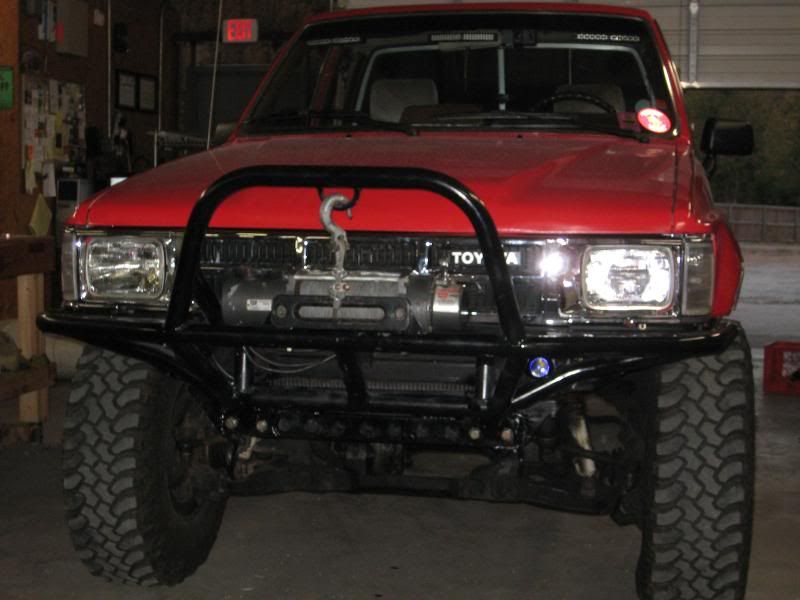
Front Winch Bumper:
-This was designed to be as low-profile as possible, keeping the winch up high and as close to the body as possible for the best approach angle.
-Bumper was built to be super heavy-duty, with 1 3/4" DOM tubing; new plates welded to the front cross member to add mounting points for a total of six 1/2" bolts.
-Down-tubes are kinked to provide for maximum approach angle (underbody was trimmed to allow for this effect).
-Extra support tubes added to stinger for reinforcement.
-Side impact bar stretches the full width of the bumper underneath the grille.
-Dimple-died 1/8" plates add strength and style to the corners of the bumper.
-Tabs allocated for bullet-style fog light turn signals and rock-lights, all mounted conservatively out of harms way
-Removable dimple-died skid plate adds style and protection for radiator / condenser


Rear Rockcrawler Bumper:
-Super low profile, body-hugging design. Also built to be super heavy duty, 1 3/4" DOM tubing; eight 1/2" bolt mount locations (no need to weld the mount rails to the frame like the other guys suggest)
-Mount system includes L-bracket design that wraps the frame rail on the side and bottom (again, no need to weld to the frame)
-Hugs the body with minimum hang-down (bottom tube 1/2" below body, with no gap between body and top of bottom tube; very clean)
-Extra corner impact protection
-Top bars below tailgate add rear impact protection
-Step bar with dimple-died step plate to add strength, impact protection and style, matching front bumper
-two 3/4" D-Ring shackle mounts
-tabs allocated for auxiliary reverse lights and rock lights, all tucked out of the way of impact


Rocksliders:
-Again, built to be super heavy duty, 1 3/4" DOM tubing; 4 legs of attachment
-Hugs the body as close as possible (I elected to trim the pinch seam at the points the legs extend out to the frame; this is obviously up to whoever is mounting them)
-Outer tubes extend 4" out at an upward angle to about 1/2" below an opened door
-These provide an additional upper tube behind each door to protect the cab and bed up to near the bodyline for added protection in tight situations
-Three support legs between inner and outer tubes for superior impact protection
-Rocksliders are removable from welded mount legs via sleeved mounts that are cross-drilled (along with the rockslider legs at the mount points) to be bolted into place once slid onto sleeves (not in pictures yet; coming soon)


Bed-Mount Angled Spare Tire Carrier:
-Heavy duty design, 1 3/4" DOM tubing
-Angled 30 degrees to allow for maximum bed space
-Easily removable and re-installable; Bottom plates are bolted to bottom side of the bed and held into place, with no need to mess with anything on the underside to remove carrier. Simply Impact-out the bolts at each leg and remove; to re-install, start each bolt into the pre-mounted bottom plates, and impact into place.
-Includes lock ring and lock plate for a padlock or other anti-theft device.
-Allocates up to virtually any size tire possible; mine is set up to allocate for up to a 36" tire in its location on the bed (this is the biggest tire I would want).


And just for the heck of it, here's a demo of the rock lights

Let me know what yall think!!
Here are some pics of the great tube work I got done on the '86. These are all my design and built by the gifted fabricators at Sixditch Enterprises. Let me know what yall think!!
Front Winch Bumper:
-This was designed to be as low-profile as possible, keeping the winch up high and as close to the body as possible for the best approach angle.
-Bumper was built to be super heavy-duty, with 1 3/4" DOM tubing; new plates welded to the front cross member to add mounting points for a total of six 1/2" bolts.
-Down-tubes are kinked to provide for maximum approach angle (underbody was trimmed to allow for this effect).
-Extra support tubes added to stinger for reinforcement.
-Side impact bar stretches the full width of the bumper underneath the grille.
-Dimple-died 1/8" plates add strength and style to the corners of the bumper.
-Tabs allocated for bullet-style fog light turn signals and rock-lights, all mounted conservatively out of harms way
-Removable dimple-died skid plate adds style and protection for radiator / condenser
Rear Rockcrawler Bumper:
-Super low profile, body-hugging design. Also built to be super heavy duty, 1 3/4" DOM tubing; eight 1/2" bolt mount locations (no need to weld the mount rails to the frame like the other guys suggest)
-Mount system includes L-bracket design that wraps the frame rail on the side and bottom (again, no need to weld to the frame)
-Hugs the body with minimum hang-down (bottom tube 1/2" below body, with no gap between body and top of bottom tube; very clean)
-Extra corner impact protection
-Top bars below tailgate add rear impact protection
-Step bar with dimple-died step plate to add strength, impact protection and style, matching front bumper
-two 3/4" D-Ring shackle mounts
-tabs allocated for auxiliary reverse lights and rock lights, all tucked out of the way of impact
Rocksliders:
-Again, built to be super heavy duty, 1 3/4" DOM tubing; 4 legs of attachment
-Hugs the body as close as possible (I elected to trim the pinch seam at the points the legs extend out to the frame; this is obviously up to whoever is mounting them)
-Outer tubes extend 4" out at an upward angle to about 1/2" below an opened door
-These provide an additional upper tube behind each door to protect the cab and bed up to near the bodyline for added protection in tight situations
-Three support legs between inner and outer tubes for superior impact protection
-Rocksliders are removable from welded mount legs via sleeved mounts that are cross-drilled (along with the rockslider legs at the mount points) to be bolted into place once slid onto sleeves (not in pictures yet; coming soon)
Bed-Mount Angled Spare Tire Carrier:
-Heavy duty design, 1 3/4" DOM tubing
-Angled 30 degrees to allow for maximum bed space
-Easily removable and re-installable; Bottom plates are bolted to bottom side of the bed and held into place, with no need to mess with anything on the underside to remove carrier. Simply Impact-out the bolts at each leg and remove; to re-install, start each bolt into the pre-mounted bottom plates, and impact into place.
-Includes lock ring and lock plate for a padlock or other anti-theft device.
-Allocates up to virtually any size tire possible; mine is set up to allocate for up to a 36" tire in its location on the bed (this is the biggest tire I would want).
And just for the heck of it, here's a demo of the rock lights
Let me know what yall think!!
Last edited by dixiemuddtoy; Dec 9, 2010 at 07:24 AM.
Dec 2, 2010 | 09:16 PM
#4

Registered User
Joined: Apr 2008
Posts: 471
Likes: 0
From: Tempe, AZ
Those are beautiful haha truck looks amazing as well.
I have a 1st Gen 4Runner and I'm looking into some armor for it. I'm going to be getting a 1-2" body lift for it however, so I want to wait till that's done to get bumpers made for it.
Great work though, really like the design.
I have a 1st Gen 4Runner and I'm looking into some armor for it. I'm going to be getting a 1-2" body lift for it however, so I want to wait till that's done to get bumpers made for it.
Great work though, really like the design.
Dec 2, 2010 | 09:30 PM
#6
Thread Starter
Registered User
Joined: Oct 2007
Posts: 69
Likes: 0
From: Loganville, GA
Preciate it man!!
These can easily be modified (not even sure it's needed) to fit 2nd Gen 4runners (Frames are the same to my knowledge, could be mistaken). I am already aware of the front crossmember differences b/t 1st and 2nd gen 4runners / 2nd and 3rd Gen pickups; this can be easily addressed.
Preciate it man, I'm pretty OCD so I tried to account for everything I wanted in the design of these. I know they're overkill, but that's the only way I know how to do it...hehehe

Those are beautiful haha truck looks amazing as well.
I have a 1st Gen 4Runner and I'm looking into some armor for it. I'm going to be getting a 1-2" body lift for it however, so I want to wait till that's done to get bumpers made for it.
Great work though, really like the design.
I have a 1st Gen 4Runner and I'm looking into some armor for it. I'm going to be getting a 1-2" body lift for it however, so I want to wait till that's done to get bumpers made for it.
Great work though, really like the design.
Dec 2, 2010 | 09:33 PM
#7
Thread Starter
Registered User
Joined: Oct 2007
Posts: 69
Likes: 0
From: Loganville, GA
Trending Topics
 Dec 3, 2010 | 07:08 AM
#11
Registered User
Joined: Jun 2008
Posts: 73
Likes: 0
From: North Carolina
Just out of curiosity, are the plates on the bottom the exact same size as the plates above? If so you may want to change them to increase (or decrease) their size. When bolted together tight, they create a shear point in the bed between the two plates( like scissors) that can cause the bottom of the bed to break through, especially with the weight of the tire and the bouncing around back there.
Just a note. The bumpers and tire mount all look great though.
cb
Just a note. The bumpers and tire mount all look great though.
cb

 , BUT THE ARE PRETTY TIGHT.
Dec 3, 2010 | 08:42 AM
, BUT THE ARE PRETTY TIGHT.
Dec 3, 2010 | 08:42 AM
#14
Thread Starter
Registered User
Joined: Oct 2007
Posts: 69
Likes: 0
From: Loganville, GA
Dec 3, 2010 | 08:50 AM
#15
Thread Starter
Registered User
Joined: Oct 2007
Posts: 69
Likes: 0
From: Loganville, GA
Dec 3, 2010 | 09:06 AM
#16
Thread Starter
Registered User
Joined: Oct 2007
Posts: 69
Likes: 0
From: Loganville, GA
Just out of curiosity, are the plates on the bottom the exact same size as the plates above? If so you may want to change them to increase (or decrease) their size. When bolted together tight, they create a shear point in the bed between the two plates( like scissors) that can cause the bottom of the bed to break through, especially with the weight of the tire and the bouncing around back there.
Just a note. The bumpers and tire mount all look great though.
cb
Just a note. The bumpers and tire mount all look great though.
cb
Wouldn't take much at all to make the bumpers work
Dec 5, 2010 | 07:22 PM
#17
Thread Starter
Registered User
Joined: Oct 2007
Posts: 69
Likes: 0
From: Loganville, GA


