
4biker's Profile (97 Ltd)
 Mar 5, 2008 | 11:02 PM
#1
Thread Starter
Registered User
Joined: Feb 2007
Posts: 441
Likes: 0
From: Pleasant Grove, Utah
4biker's Profile (97 Ltd)
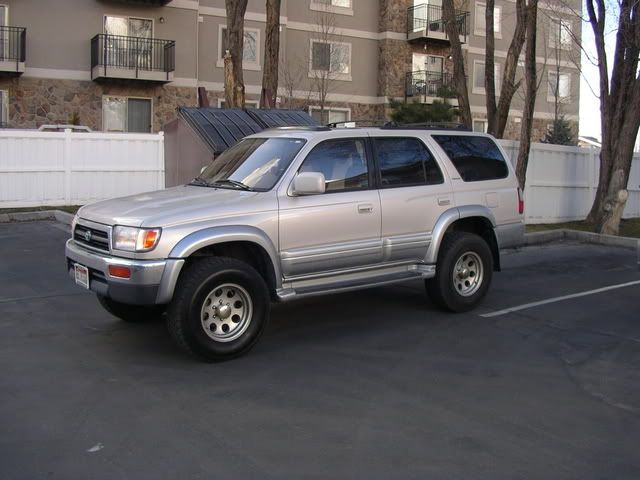
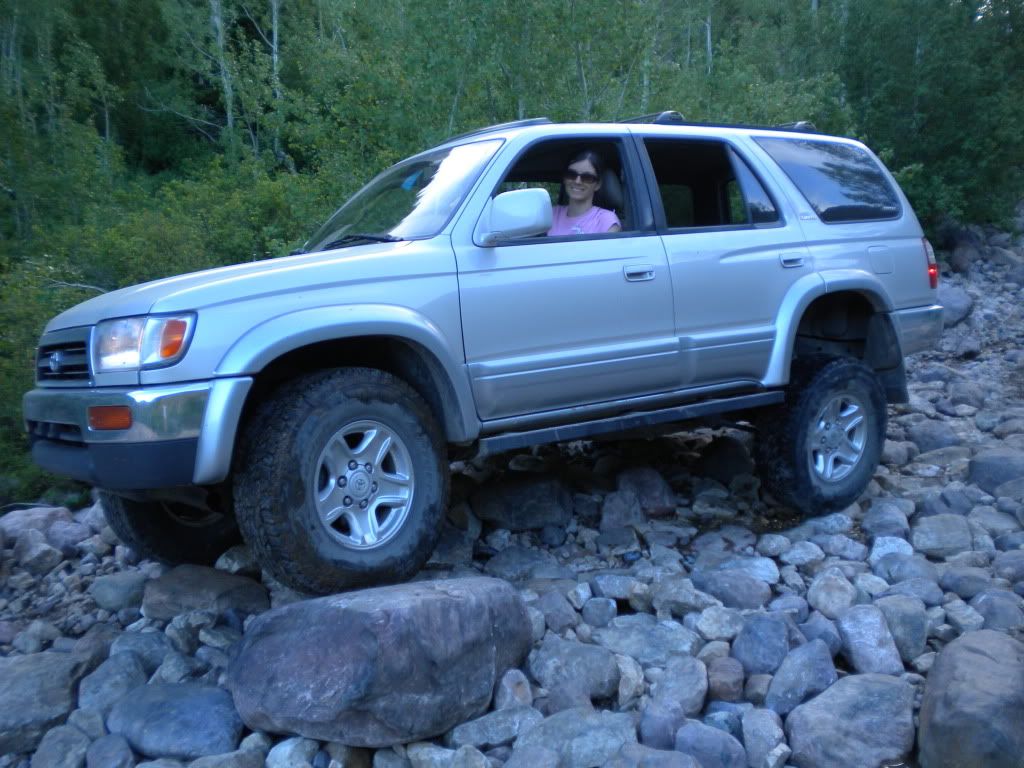
Okay, so I finally have something to contribute in this section. I started with a nice, stock '97 (a re-titled, Americanized, Canadian theft recovery) with an e-locker that had about 125000 miles. At this point I've had it a year, and it has been a great rig. I changed my first timing belt on this thing, and it has consistently been very reliable and easy to work on. It gets me around, specifically to mountain bike trailheads, in style and comfort.
When I picked it up from the dealer, he had just put brand new tires with an all-season tread on because he "thought the big offroad tires looked stupid," much to my chagrin.
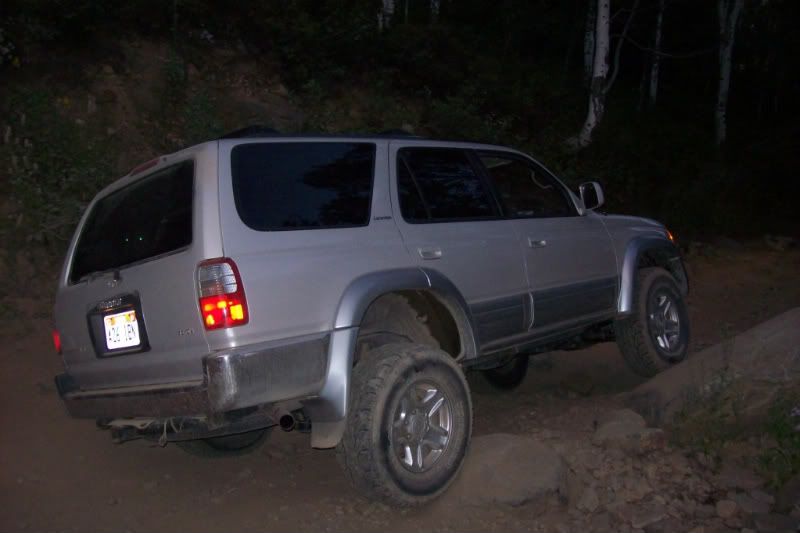
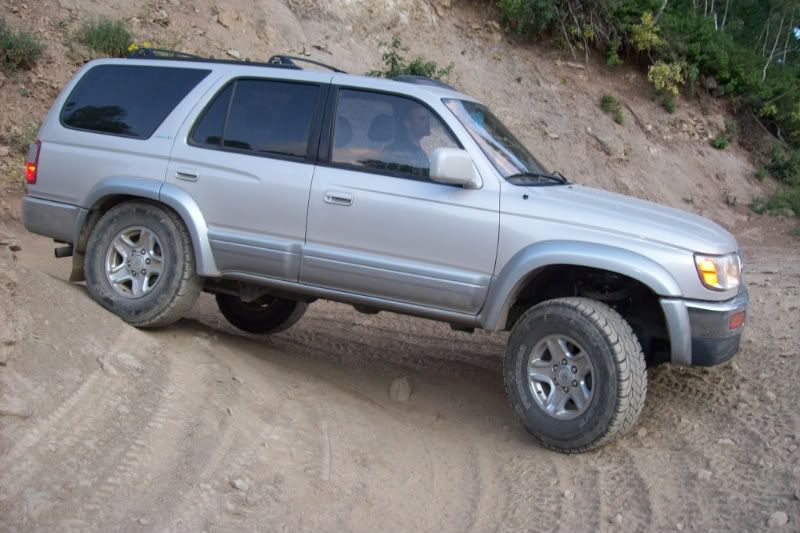
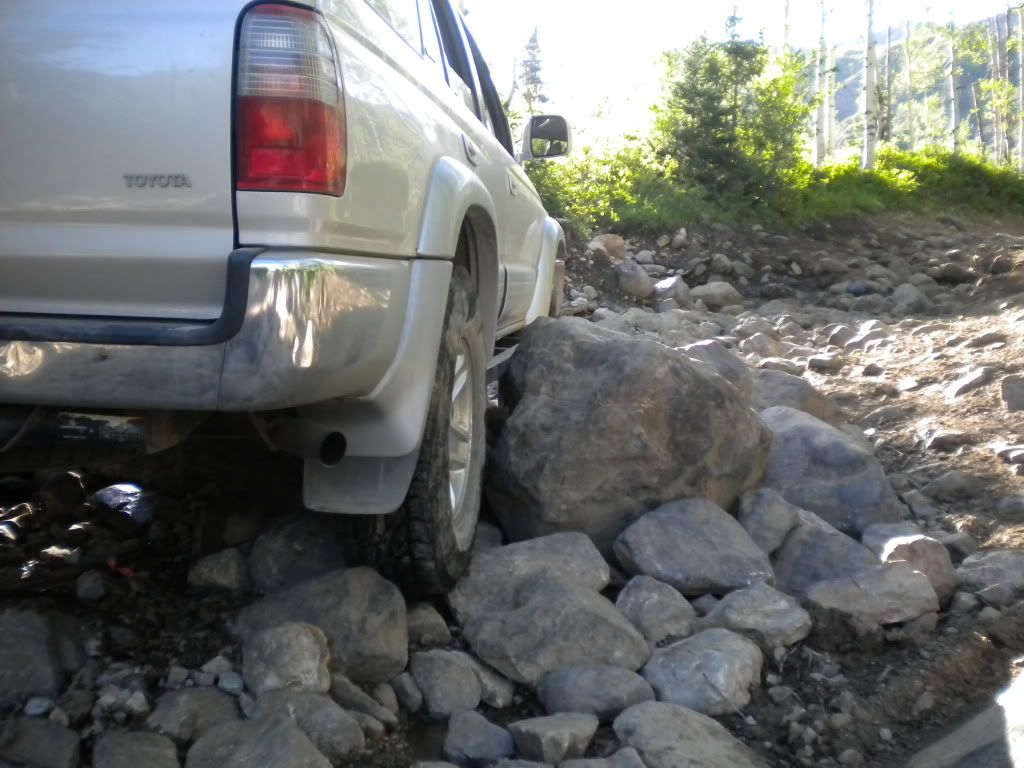
Here's a pic at the trailhead of one of my personal favorites, the Wasatch Crest.
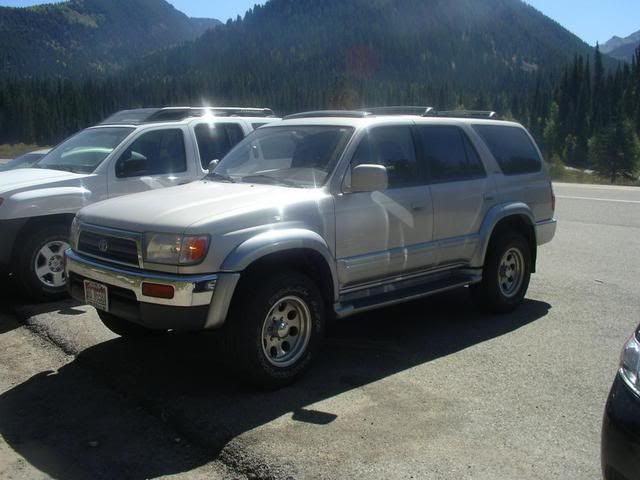
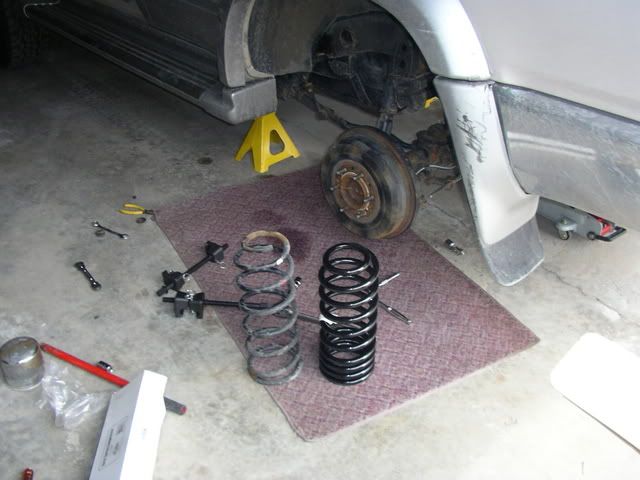
The only problem with this thing, is the springs in the rear were so susceptible to sagging - not at normal weight, but they sank like crazy with just a little bit of extra weight - always bottoming out, even with the '97 suspension recall performed.
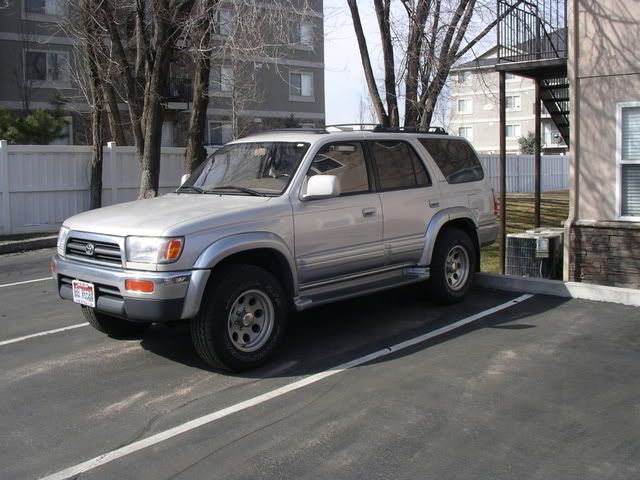
My answer, OME lift springs. I had a '99 Jeep that I put an OME suspension on and I absolutely loved it. I picked up a pair of OME 881's used for pretty cheap, and Doug at Toytec sold me a pair of OME 906's for the rear.
Here's the progression:
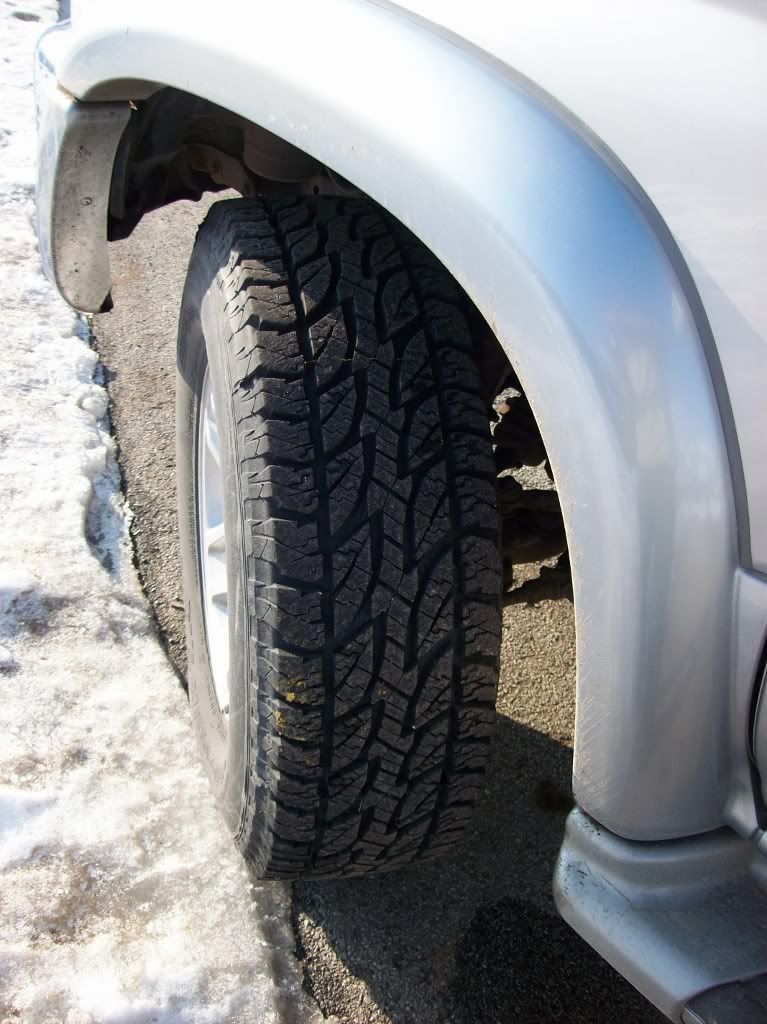
I picked up a set of slightly used Yokohama AT's 265/75/16 (they are sitting in the back of the 4-runner in the picture, that's why it's resting on the rear bumpstops).
Before any work:
I put the tires on
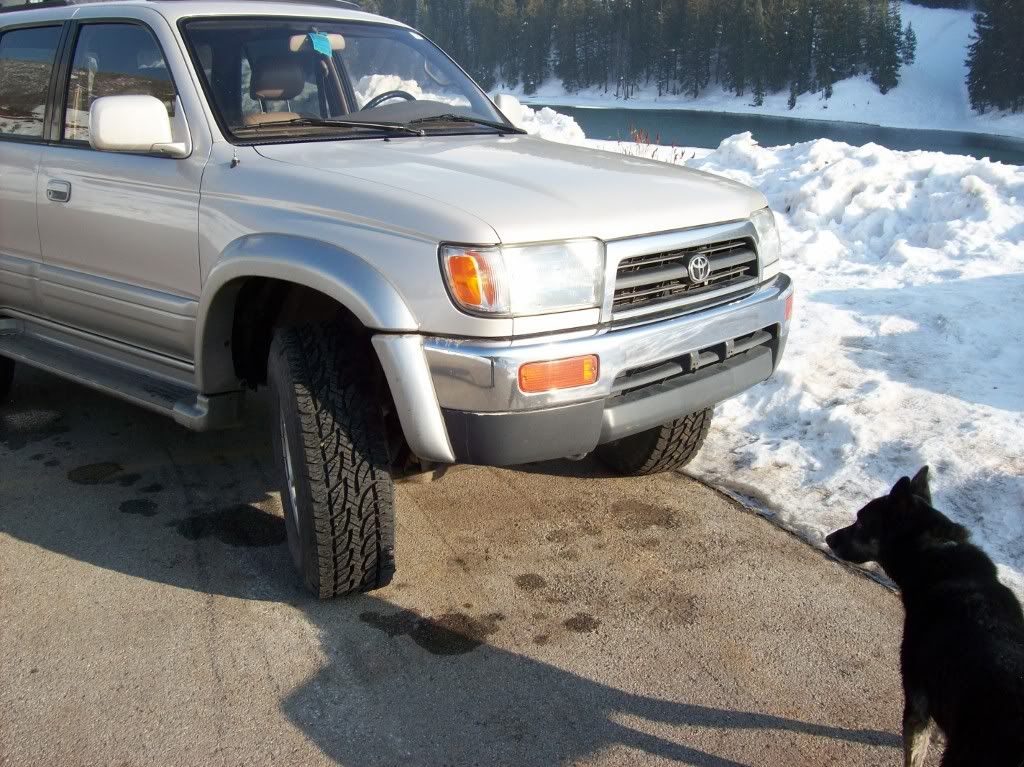
The front with new tires (yes, they rubbed on the lower front bumper trim)
The rear with new tires, unloaded rear end
Replaced the springs...
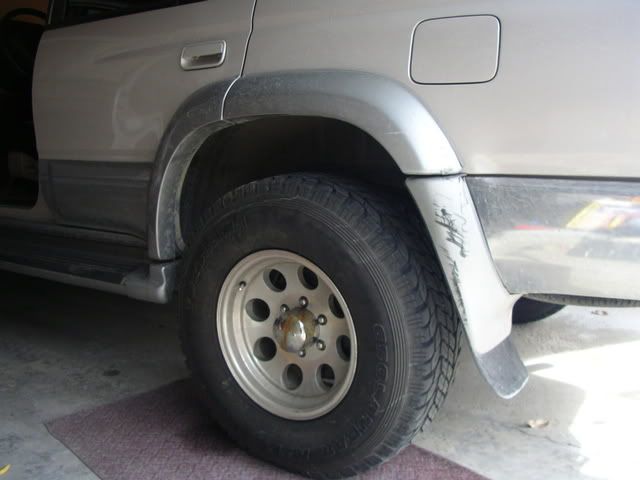
I was really surprised at how tall the originals were compared with the OME 906 springs, but the number of wraps on the coils is the important thing. You can see my wife's handiwork on the fender flare, as she didn't see the house while backing up
Replacing the front shocks was only difficult because the top nut would not come loose. I recommend finding a shop to do it, especially since they will have a fast/easy spring compressor, torch, and air tools.
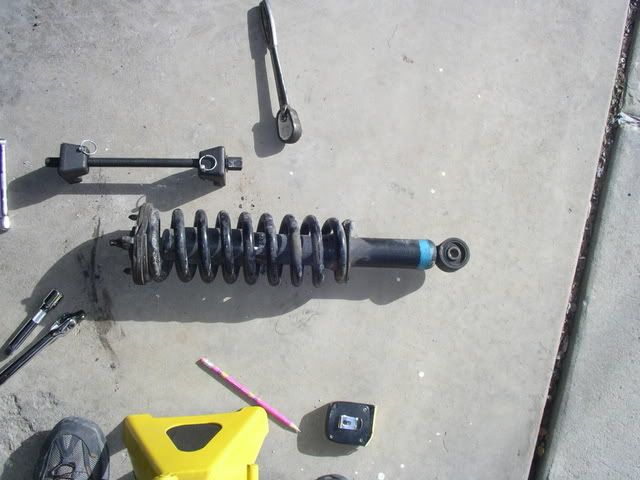
Rear with new coils
Front with new coils
Comparison shot
My understanding is that the coils will settle over the next several months, and that's okay with me. I just don't want the rear bumpstops to hold up the 4runner anymore.
I had measurements of before & after, but I think they were wrong, as it averaged just over an inch at each corner - it's definitely more than that.
Hopefully soon I'll wreck the running boards and get some sliders. I will try to get out soon and get some action shots.
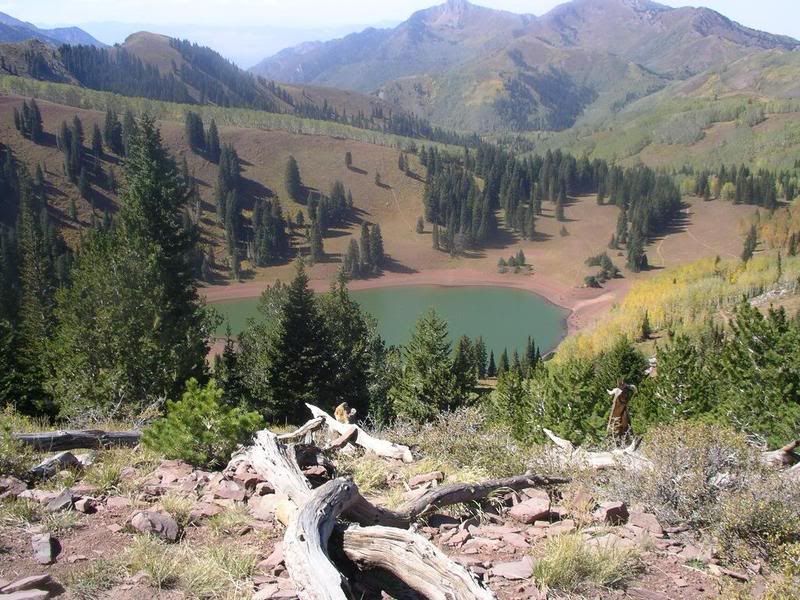
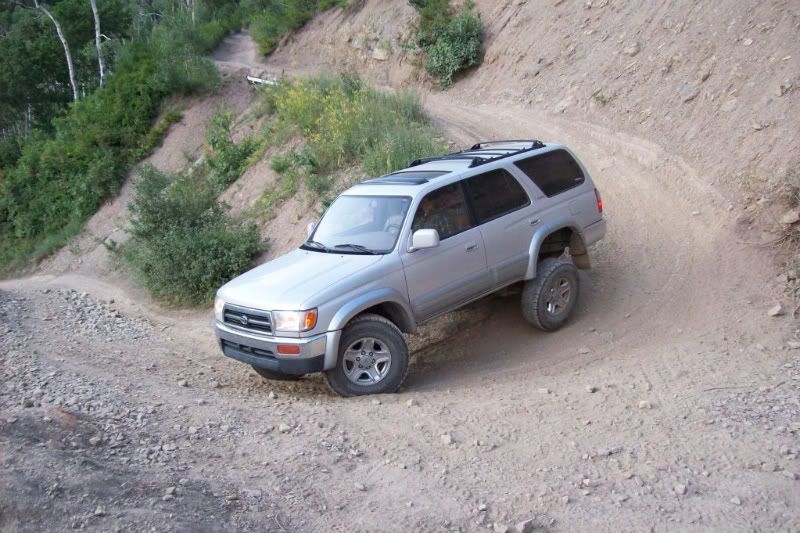
The top of the Wasatch Crest mtn bike trail:
Per the rules of this forum, please do not post in this thread, as any posts will be deleted. Thanks for looking!
When I picked it up from the dealer, he had just put brand new tires with an all-season tread on because he "thought the big offroad tires looked stupid," much to my chagrin.
Here's a pic at the trailhead of one of my personal favorites, the Wasatch Crest.
The only problem with this thing, is the springs in the rear were so susceptible to sagging - not at normal weight, but they sank like crazy with just a little bit of extra weight - always bottoming out, even with the '97 suspension recall performed.
My answer, OME lift springs. I had a '99 Jeep that I put an OME suspension on and I absolutely loved it. I picked up a pair of OME 881's used for pretty cheap, and Doug at Toytec sold me a pair of OME 906's for the rear.
Here's the progression:
I picked up a set of slightly used Yokohama AT's 265/75/16 (they are sitting in the back of the 4-runner in the picture, that's why it's resting on the rear bumpstops).
Before any work:
I put the tires on
The front with new tires (yes, they rubbed on the lower front bumper trim)
The rear with new tires, unloaded rear end
Replaced the springs...
I was really surprised at how tall the originals were compared with the OME 906 springs, but the number of wraps on the coils is the important thing. You can see my wife's handiwork on the fender flare, as she didn't see the house while backing up
Replacing the front shocks was only difficult because the top nut would not come loose. I recommend finding a shop to do it, especially since they will have a fast/easy spring compressor, torch, and air tools.
Rear with new coils
Front with new coils
Comparison shot
My understanding is that the coils will settle over the next several months, and that's okay with me. I just don't want the rear bumpstops to hold up the 4runner anymore.
I had measurements of before & after, but I think they were wrong, as it averaged just over an inch at each corner - it's definitely more than that.
Hopefully soon I'll wreck the running boards and get some sliders. I will try to get out soon and get some action shots.
The top of the Wasatch Crest mtn bike trail:
Per the rules of this forum, please do not post in this thread, as any posts will be deleted. Thanks for looking!
Last edited by 4biker; Jun 7, 2011 at 01:31 PM.
Apr 8, 2008 | 11:27 AM
#2
Thread Starter
Registered User
Joined: Feb 2007
Posts: 441
Likes: 0
From: Pleasant Grove, Utah
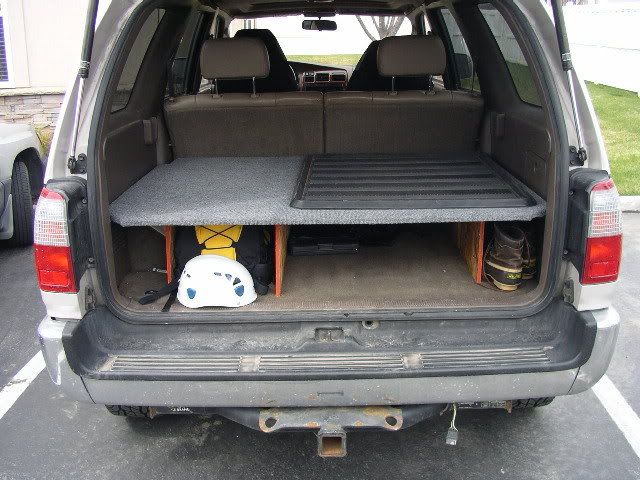
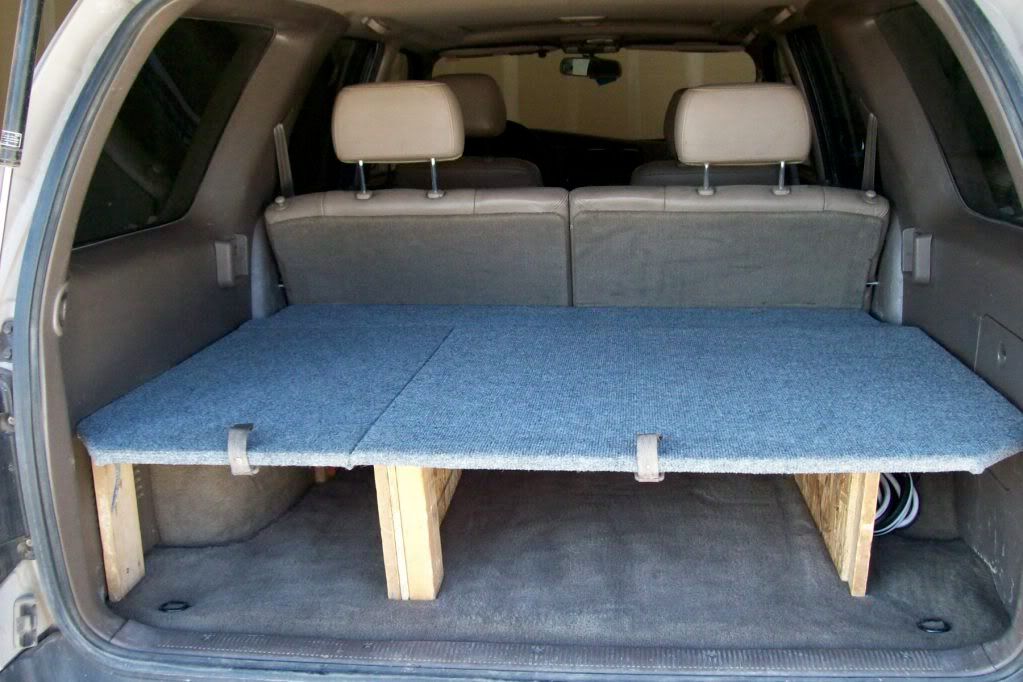
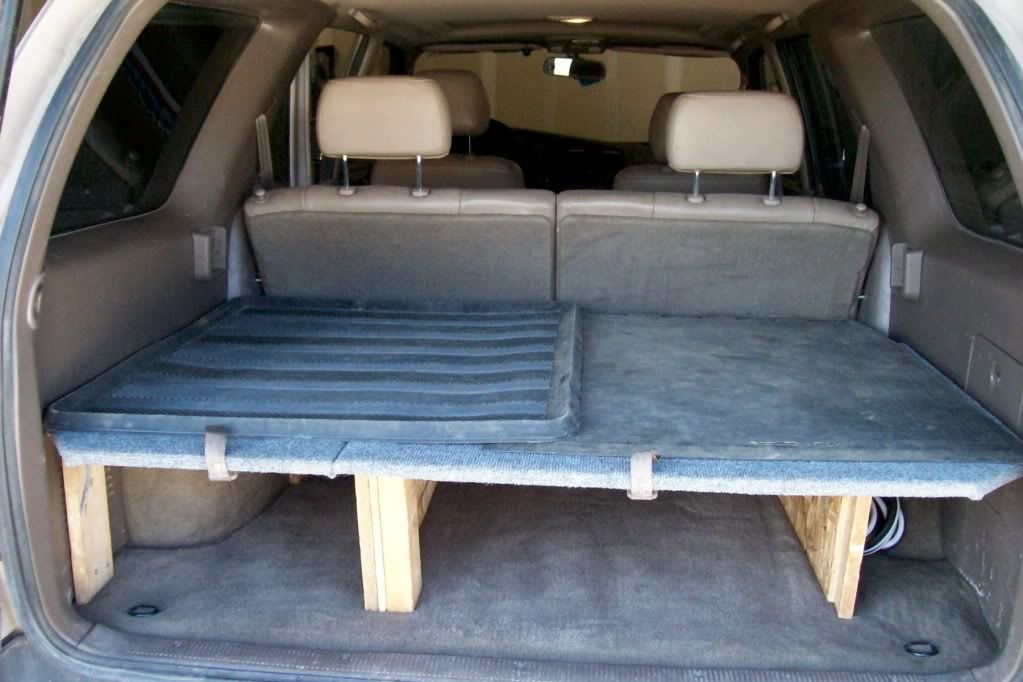
So we decided to drive the 5 hours to St. George in southern Utah. My wife's parents live on the way, so we volunteered to drive them down as well. With the dog, that's at least 4 bags and Jack in the cargo area. I decided to build a cargo platform, based on the sleeping platforms that others had made. I bought a 5/16 sheet at Home Depot and had them make the big straight cuts (since I don't have a table saw). When I got it home I cut the platform corners to size and cut the supports to length. I decided to simplify things by going exactly 10" from the floor. Going 10" gives enough clearance so you don't have to cut out space for the driver's wheel well with the gas filler bump. I decided to put the center support off-center so I can put larger items in if need be, and still have plenty left over. It's plenty strong either way, so I'm happy with it the way it is. To mount the support legs, I screwed 3 strips of 2x1" board to the underside of the platform, then put the platform into the 4Runner. I then screwed the top of each support piece into the side of the 2x1 down the length of the support. The middle support piece looks like it's leaning, but it's straight up & down.
Overall, it's a little tall for Jack, but he still fits fine. We have to leash him in so he doesn't jump into the rear seats or become a projectile in a front-end collision, but it's tall enough for him to stand. Plus, I can fit at least 5 carry-on size bags under the two spaces under the platform. I think the drawers would be nice to have, but I can fit a ton of stuff under this thing and no one knows it's even there. For small stuff I'll just use rubbermaid bins. There is no room for lateral motion, so the screws won't tear out, and It easily supports my weight. I covered the platform with a piece of indoor-outdoor carpet that hides Jack's black & white fur.
The whole project cost about $23 and took about 1 1/2 hours at home. Jack's bed fits perfectly on the side of the heavy cargo mat.
On our trip to St. George, I had 3 passengers (plus me), our medium-sized dog, and about 200lbs of cargo on the way down. I pulled my parents' tent trailer from my sister's house as well with a 150lb tongue weight, so I got to feel the new springs with a load, and see how they held up after hundreds of miles. This shot I took today, showing they certainly aren't sagging. I would happily go with the 881/906 combo again (I don't think I ever bottomed out). I have noticed with the slightly bigger tires, there is a noticeable loss of available passing power on the freeway - I don't know if I'll go to a 33" tire without either regearing or supercharging.
Apr 8, 2008 | 12:06 PM
#3
Thread Starter
Registered User
Joined: Feb 2007
Posts: 441
Likes: 0
From: Pleasant Grove, Utah
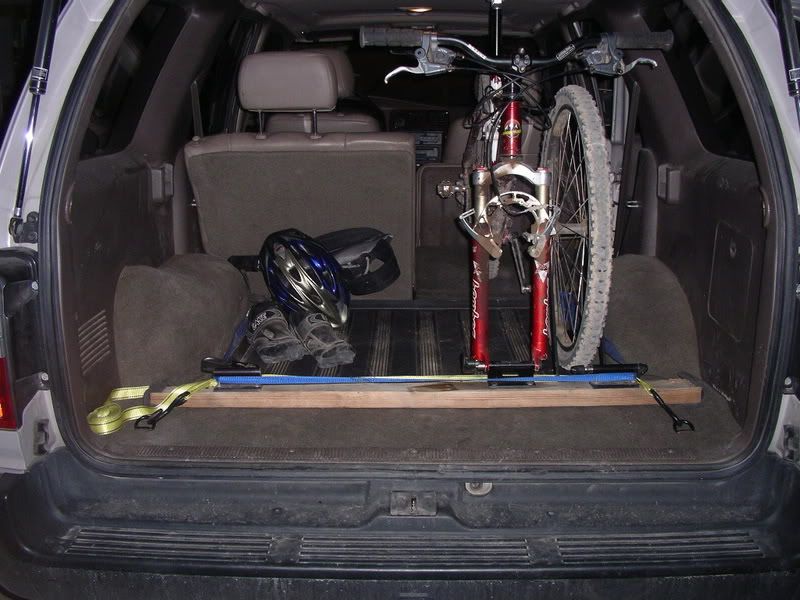
I suppose I should mention my home-made bike rack. I had this in my '99 ranger stepside and it worked very well, but I could just wedge it into the bed. It's just a 2x4 with three fork-mounts bolted to it. With my seat height, with about 1/8" clearance to the ceiling. I just take one ratcheting strap, connect it to both of the rear-most cargo tie-downs, and around the front-most side of the fork mounts. Then the opposite with another ratcheting strap. There is no appreciable motion while driving, and it's out of the elements, and it stays in my possession. At night I just throw a dark blanket over the bike and no one knows it's there. It's not compatible with my new cargo deck, so I'll have to buy a hitch mount now.
Aug 21, 2008 | 08:37 AM
#4
Thread Starter
Registered User
Joined: Feb 2007
Posts: 441
Likes: 0
From: Pleasant Grove, Utah
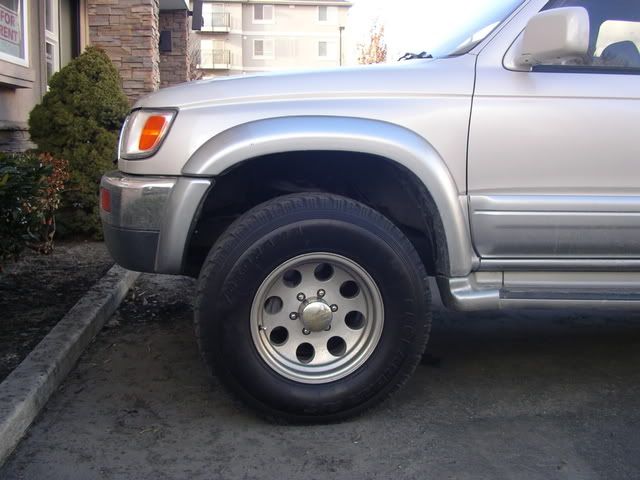
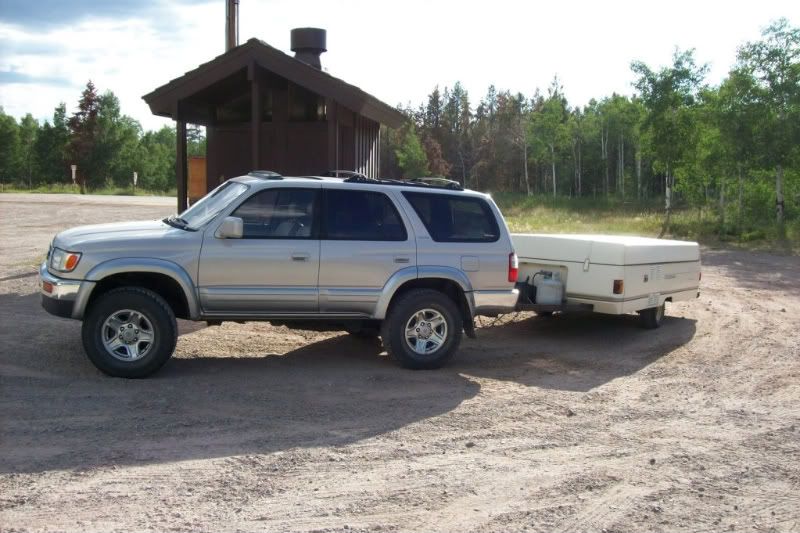
I was recently asked how my suspension setup looks (i.e. level, squat, or raked), so here is a picture taken 5 1/2 months after the install, with approximately 50lbs of cargo in the rear. I have been very pleased with my 881/906 setup, having towed a camp trailer, my family's boat (21', ~5000lbs), and loads of cargo since putting the suspension on.
I'll update with pictures of my dual battery setup with 1000W inverter, and my improved cargo platform soon.
I'll update with pictures of my dual battery setup with 1000W inverter, and my improved cargo platform soon.
Jun 6, 2009 | 05:29 PM
#5
Thread Starter
Registered User
Joined: Feb 2007
Posts: 441
Likes: 0
From: Pleasant Grove, Utah
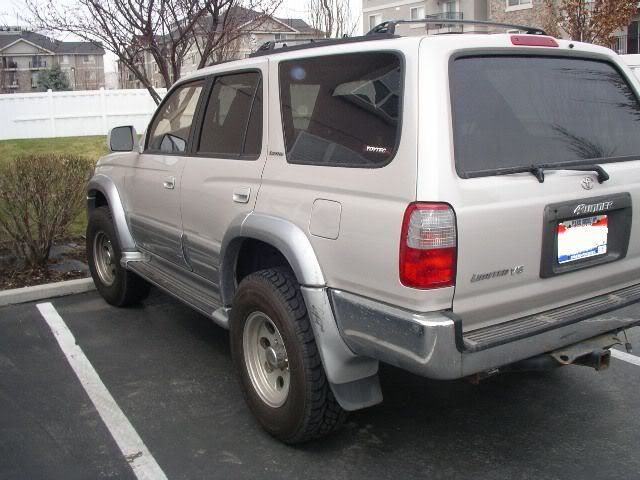
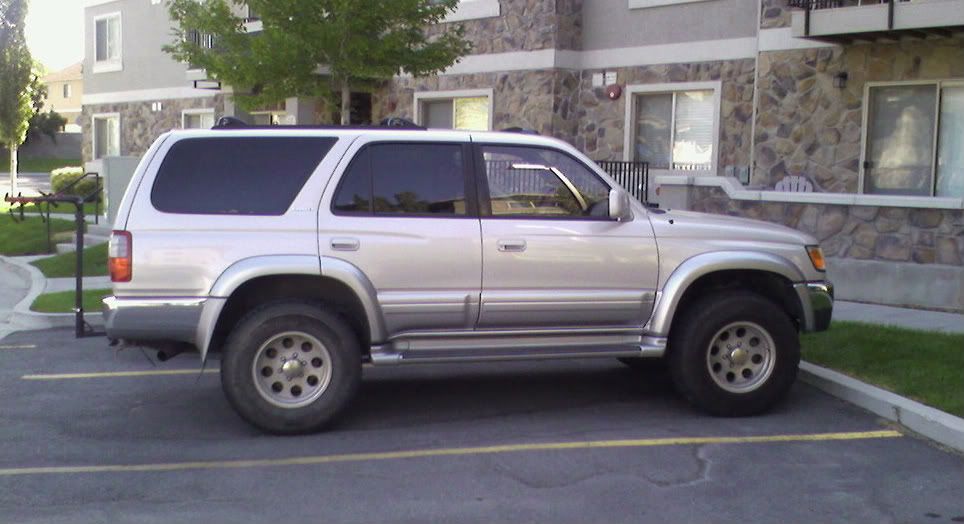
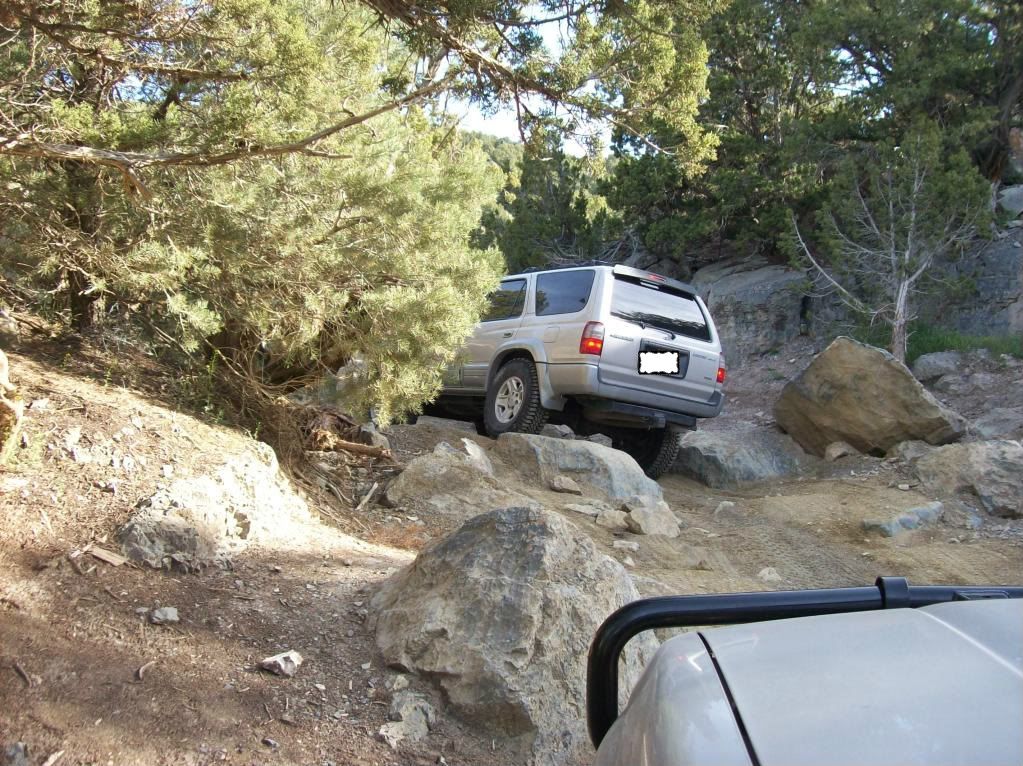
Well I need to update again as there have been some changes. I purchased some newer limited wheels and put my yokohamas on those. I used to get rubbing with the 8" wide wheels before, but now no rubbing. I think it looks better too. I also pulled off the running boards for a trip to Moab in April this year. Here are a couple of shots of the rig, and video from the trip. It's not much, but it gives you an idea anyway.


http://www.youtube.com/watch?v=FwPe9SUDLv0
http://www.youtube.com/watch?v=yBSXRCXyVas
That second one is the campground "H" hill on Fins, and it actually took me about 5 tries. This is the only one my wife actually closed her eyes on. If you listen closely you can hear the tires complaining on the sandstone during all of the failed attempts. I edited out my frustrated 4th try when I would have had it if I'd just stayed on the throttle. It's amazing what a 4runner with a rear locker can do.
Last edited by 4biker; Nov 17, 2009 at 12:16 PM.
Aug 9, 2009 | 03:08 PM
#6
Thread Starter
Registered User
Joined: Feb 2007
Posts: 441
Likes: 0
From: Pleasant Grove, Utah
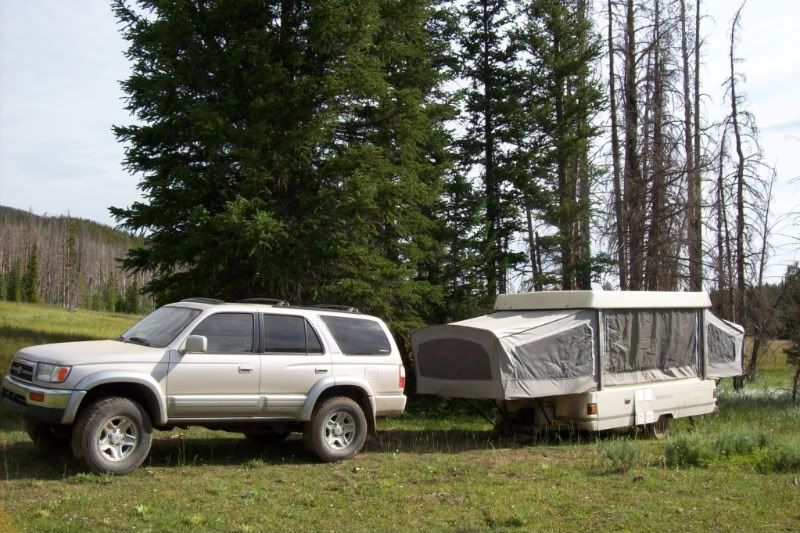
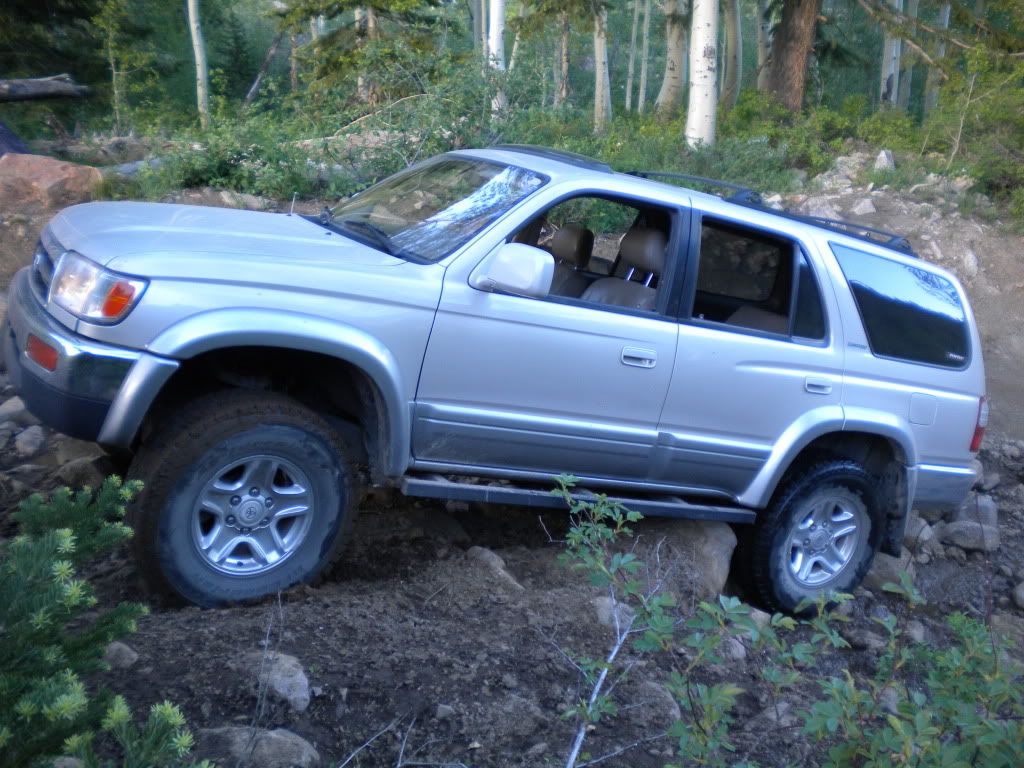
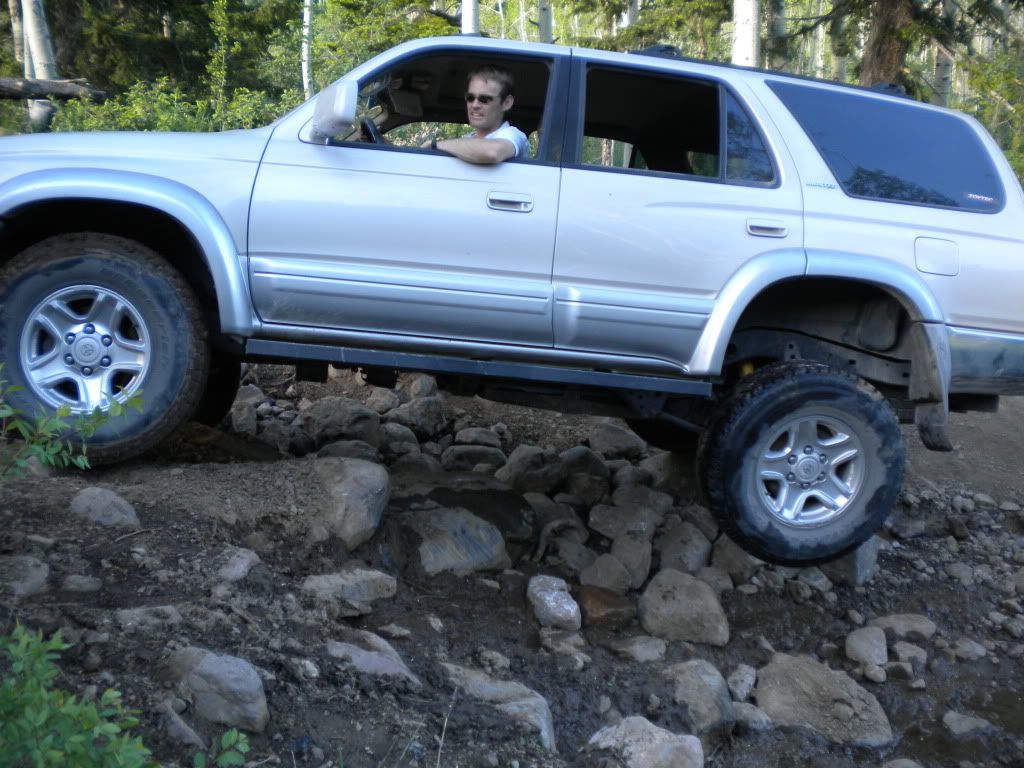
Here's a little additional suspension info. This summer has been busy for the 4Runner. It has been to Flagstaff, carrying 4 occupants, plus bags and our dog, then recently to the High Uintas, over some of the roughest fire-roads ever (pulling a pop-up trailer), and bumming around several day trips into the local canyons. Here are some pics:
These are the Uintas trip - the suspension performs very well, even with the little trailer on the hitch. Both of these pics show some squatting, but I think it's just due to the uneven ground. In reality there is a small amount of spring squat with this setup, but not enough to worry about.
A random shot at American Fork Canyon above Silver Lake
Here is a sharp corner in American Fork Canyon. The 4Runner is basically on two wheels, so it gives you an idea of the amount of flex in the suspension.
Last edited by 4biker; Feb 20, 2010 at 06:17 AM.
Aug 16, 2009 | 08:29 PM
#7
Thread Starter
Registered User
Joined: Feb 2007
Posts: 441
Likes: 0
From: Pleasant Grove, Utah
Okay, so I wanted to show my updated cargo space
I am a sometimes fanatical mountain biker, and with the bike on the hitch rack, I hate dropping the bike down to open the lift gate (four or five times is how it usually goes). So I cut up my cargo platform into three sections and put hinges on them so I can access them with the window down.
I put two cargo mats on top for two reasons: I want to disguise the cut lines, and I have a usually-muddy dog that sheds long black hair.
***EDIT***
I have since decided to permanently fix the larger panel in place because it's always flapping up and down when I hit potholes, etc. The smaller one is still useful to have working when the window is down, so I'll leave it mobile for now.
I have pulled my inverter and 2nd battery, as I felt uneasy about its safety from day one, and the battery never charged properly. I'll be looking into a dual battery setup in the engine compartment in the future, with a smaller, more manageable inverter.
Last edited by 4biker; Jan 26, 2011 at 11:11 AM.
Trending Topics
Jan 13, 2010 | 08:47 PM
#8
Thread Starter
Registered User
Joined: Feb 2007
Posts: 441
Likes: 0
From: Pleasant Grove, Utah
Treadwright tires
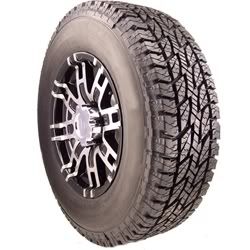
Well, my Yokohamas finally wore out (thanks especially to poor front end alignment). I had been debating for quite a while whether to pull the trigger on the retreads, but I really haven't been able to find any credible information saying they are unsafe. In fact, the overwhelming consensus is that they are just as safe as new tires (except for the wear on the casings), so I bought them. I purchased the "Sentinel" in a load rating D in the 265/75/16 size. I liked it for two reasons: It was running on special for $72 each, and it's loosely based (yeah, right - loosely) on the Bridgeston Dueler Revo that I liked so much. The stock photo is shown here:
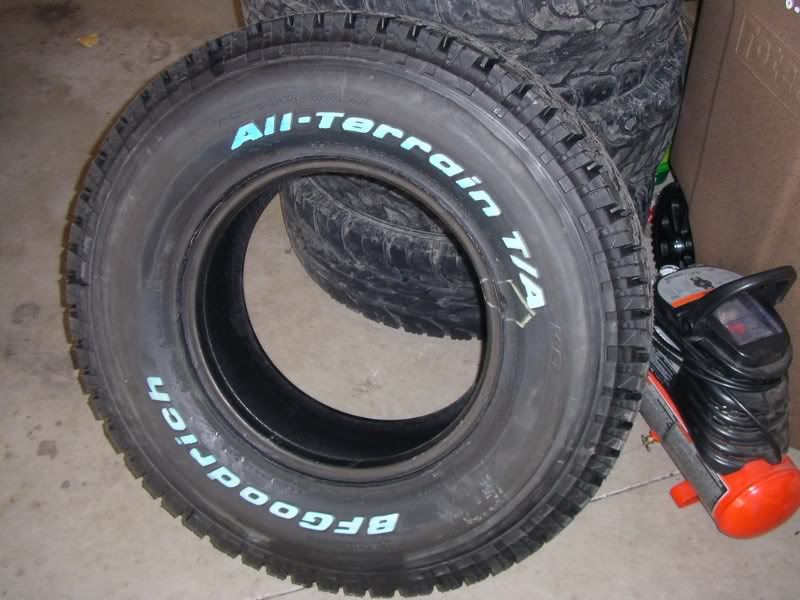
When I ordered them, they let me know that they were a little backordered, but they still showed up in about 6 business days. They were brought right to my door by the fed-ex guy, and overall I was pretty impressed. The tread is nice and deep, and they came on matching casings, which is pretty much a given any more. I was somehow expecting them to look brand new, but that it is asking a lot of casings with 50K miles on them. The casings are BF Goodrich AT-KO, with the white lettering pretty beat up. It actually looks like they buffed the white lettering, with the surface really roughed up, so I put that on the inside (I usually prefer white lettering out).
I took them to WalMart to have them mounted, and the service manager said he didn't want to mount one of them, because there was a chunk cut out of the outer bead surface, as he said it may not hold air.
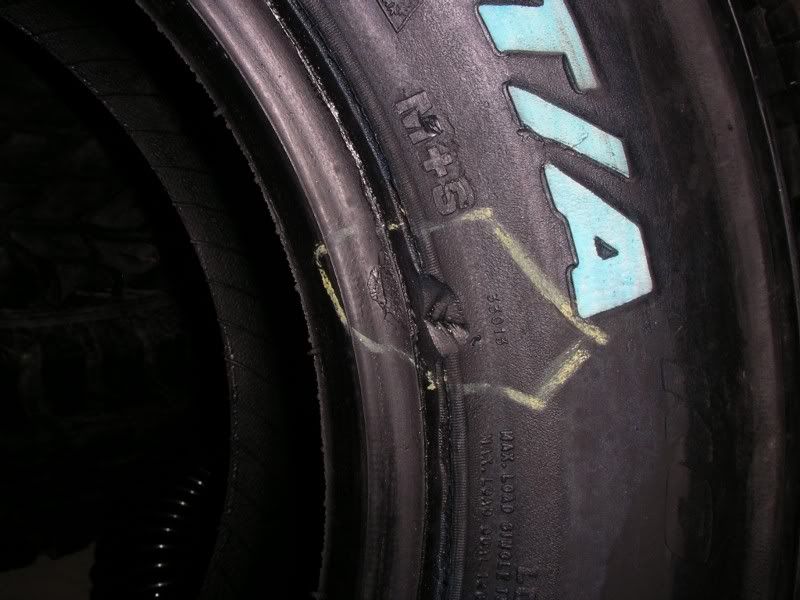
I called Treadwright about it, and emailed the pictures to them. Their tech looked at the pics and deemed it safe, but they volunteered to send a replacement tire anyway. I have since mounted the faulty tire on my spare rim, and used it while waiting for the replacement. It has held air just fine, and I have full confidence in it. The replacement tire showed up about 8 business days later, and WalMart had no problems with the new tire.
Here is my rig in the garage with the new tires. They are pretty comfortable on the road, and much quieter than my Yokohamas were. There is still a little bit of hum coming from them, but it's very acceptable for the aggressive tread. I'm sure I'll be posting up about some local trails, and I expect that these tires will be very useful as all-terrains. I have been very impressed with the wet-weather and snow traction, but I was expecting that from my experience with the Revos I had before. Plus, my Yokos were going pretty bald anyway. Cross your fingers for me, so I can see some good road-trips and off-roading this year, and give these tires some real feedback.
***UPDATE***
It's been about 13 months since I put these tires on, and they have been great. My wife drives this whenever it snows, because she feels confident about the grip from this great tread design. They are wearing like my old revos did, and I expect them to easily last 3 years before I WANT to replace them. It will probably be about 4 years before I NEED to replace them. If only they would retread a 255/85/16, I'd be all over that. I'd buy from Treadwright again no problem. At the very least, it's so far, so good.
When I ordered them, they let me know that they were a little backordered, but they still showed up in about 6 business days. They were brought right to my door by the fed-ex guy, and overall I was pretty impressed. The tread is nice and deep, and they came on matching casings, which is pretty much a given any more. I was somehow expecting them to look brand new, but that it is asking a lot of casings with 50K miles on them. The casings are BF Goodrich AT-KO, with the white lettering pretty beat up. It actually looks like they buffed the white lettering, with the surface really roughed up, so I put that on the inside (I usually prefer white lettering out).
I took them to WalMart to have them mounted, and the service manager said he didn't want to mount one of them, because there was a chunk cut out of the outer bead surface, as he said it may not hold air.
I called Treadwright about it, and emailed the pictures to them. Their tech looked at the pics and deemed it safe, but they volunteered to send a replacement tire anyway. I have since mounted the faulty tire on my spare rim, and used it while waiting for the replacement. It has held air just fine, and I have full confidence in it. The replacement tire showed up about 8 business days later, and WalMart had no problems with the new tire.
Here is my rig in the garage with the new tires. They are pretty comfortable on the road, and much quieter than my Yokohamas were. There is still a little bit of hum coming from them, but it's very acceptable for the aggressive tread. I'm sure I'll be posting up about some local trails, and I expect that these tires will be very useful as all-terrains. I have been very impressed with the wet-weather and snow traction, but I was expecting that from my experience with the Revos I had before. Plus, my Yokos were going pretty bald anyway. Cross your fingers for me, so I can see some good road-trips and off-roading this year, and give these tires some real feedback.
***UPDATE***
It's been about 13 months since I put these tires on, and they have been great. My wife drives this whenever it snows, because she feels confident about the grip from this great tread design. They are wearing like my old revos did, and I expect them to easily last 3 years before I WANT to replace them. It will probably be about 4 years before I NEED to replace them. If only they would retread a 255/85/16, I'd be all over that. I'd buy from Treadwright again no problem. At the very least, it's so far, so good.
Last edited by 4biker; Feb 14, 2011 at 06:37 AM.
Jan 26, 2011 | 10:51 AM
#9
Thread Starter
Registered User
Joined: Feb 2007
Posts: 441
Likes: 0
From: Pleasant Grove, Utah
I just realized I never put my slider pictures in here. I have been wanting sliders for a long time, but I don't have a welder, and I hate paying shipping on steel. A couple of great guys on the TTORA forum offered to help me build some, so we got to it.
I picked up a couple of long pieces of square 2"x.120 tubing and we chopped it into pieces (luckily the frame on the 4Runner is pretty straight, so it was easy to find a good length for the three legs.
I primed and painted them flat black (rustoleum) so I can just repaint any damage without being able to see the new vs. old paint.
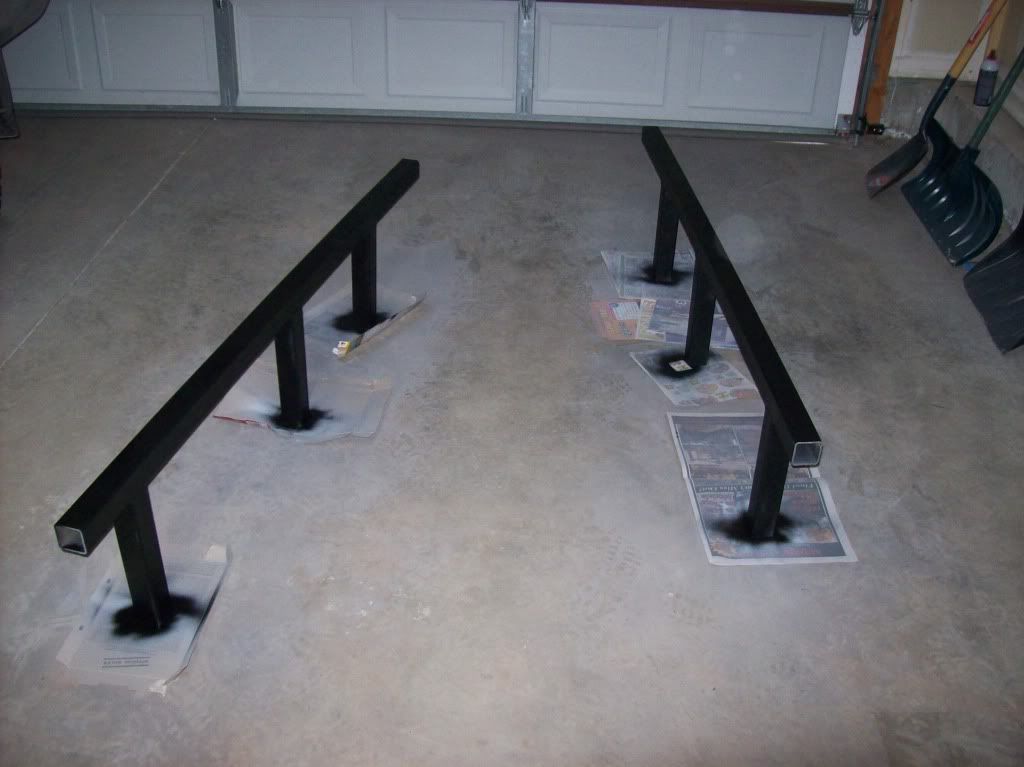
Then we cut some 3/16" plate into 4" mounting plates and some triangle gussets and mounted them up. Total cost (to me) was about $95 for steel, grinding and cutting wheels, primer, paint, and some simple plastic end caps. Many thanks to sixstringsteve and yotafan on TTORA for knocking this out for me.
I was initially going to tuck the sliders up under the body so it would be flush, but they talked me into pulling them out a few inches so I can use them as a step, and not tear up my precious, precious limited fender flares. Ultimately, I'm really glad I pulled them out a bit, but I think it looks a little awkward. I may cut them off and pick up some round tubing someday, but it's not a priority now.
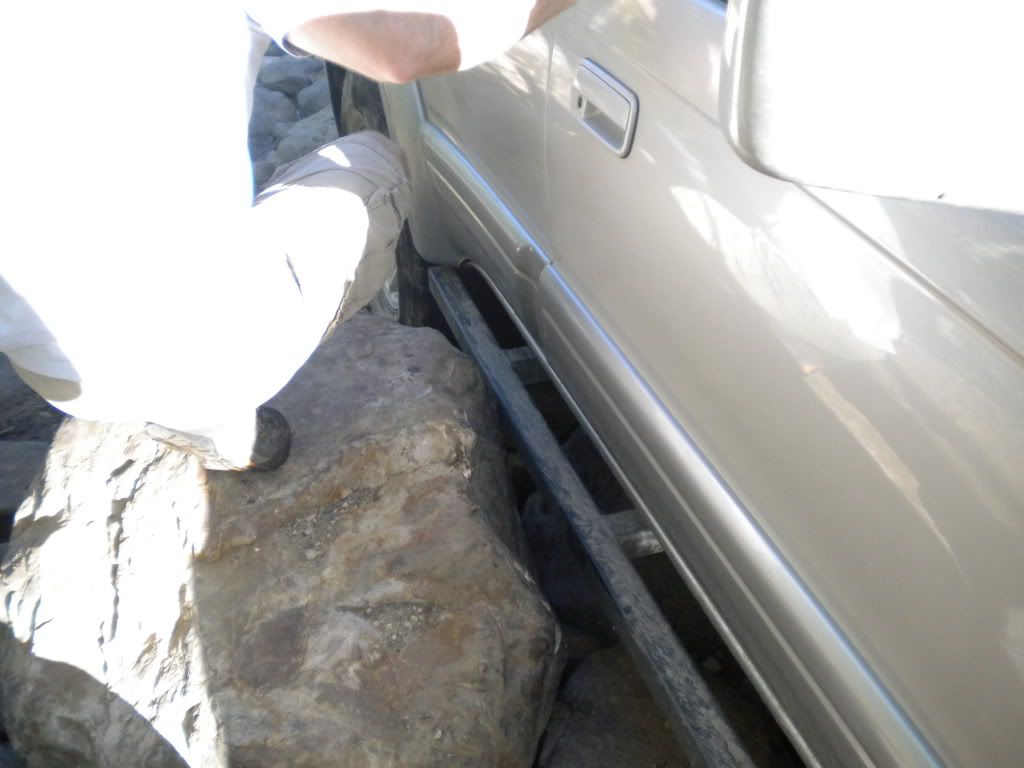
I've come down on them really hard, and they have help up really nicely
It's hard to tell but that rear tire is way off the ground here. I got out to assess my mess, and the slider was about the level of the bottom of my rib cage.
I'll let any hot girl drive my 'runner (as long as she's my wife).
I picked up a couple of long pieces of square 2"x.120 tubing and we chopped it into pieces (luckily the frame on the 4Runner is pretty straight, so it was easy to find a good length for the three legs.
I primed and painted them flat black (rustoleum) so I can just repaint any damage without being able to see the new vs. old paint.
Then we cut some 3/16" plate into 4" mounting plates and some triangle gussets and mounted them up. Total cost (to me) was about $95 for steel, grinding and cutting wheels, primer, paint, and some simple plastic end caps. Many thanks to sixstringsteve and yotafan on TTORA for knocking this out for me.
I was initially going to tuck the sliders up under the body so it would be flush, but they talked me into pulling them out a few inches so I can use them as a step, and not tear up my precious, precious limited fender flares. Ultimately, I'm really glad I pulled them out a bit, but I think it looks a little awkward. I may cut them off and pick up some round tubing someday, but it's not a priority now.
I've come down on them really hard, and they have help up really nicely
It's hard to tell but that rear tire is way off the ground here. I got out to assess my mess, and the slider was about the level of the bottom of my rib cage.
I'll let any hot girl drive my 'runner (as long as she's my wife).
Last edited by 4biker; Feb 14, 2011 at 06:39 AM.
Jan 26, 2011 | 11:33 AM
#10
Thread Starter
Registered User
Joined: Feb 2007
Posts: 441
Likes: 0
From: Pleasant Grove, Utah
Just a quick cautionary tale:
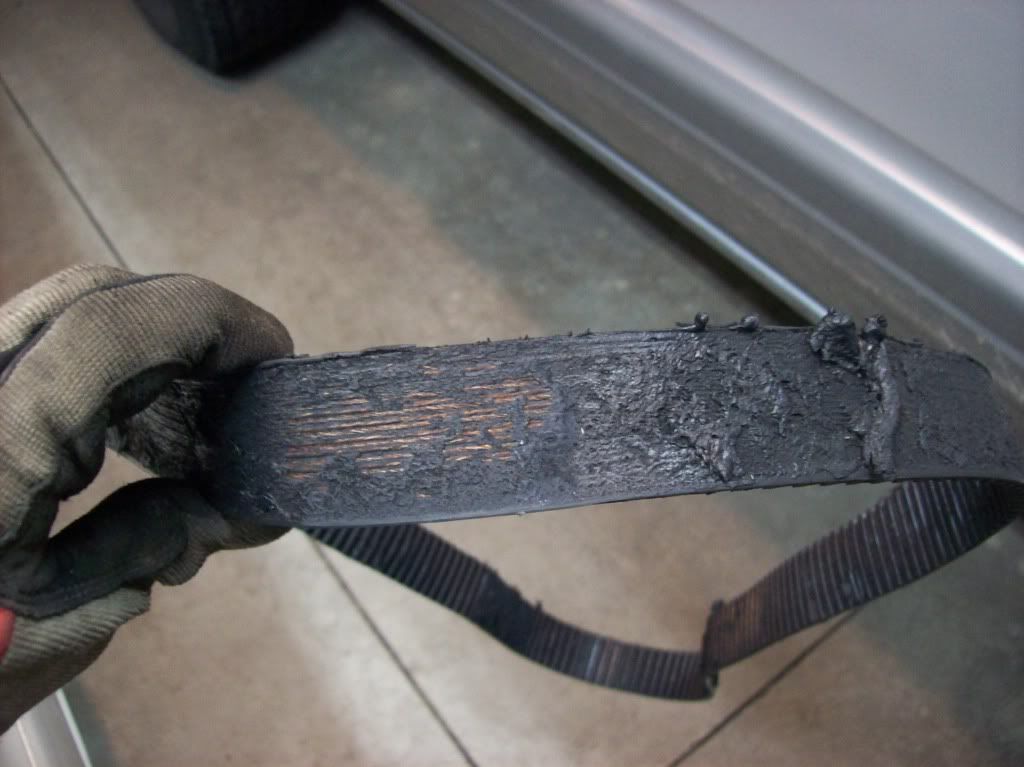
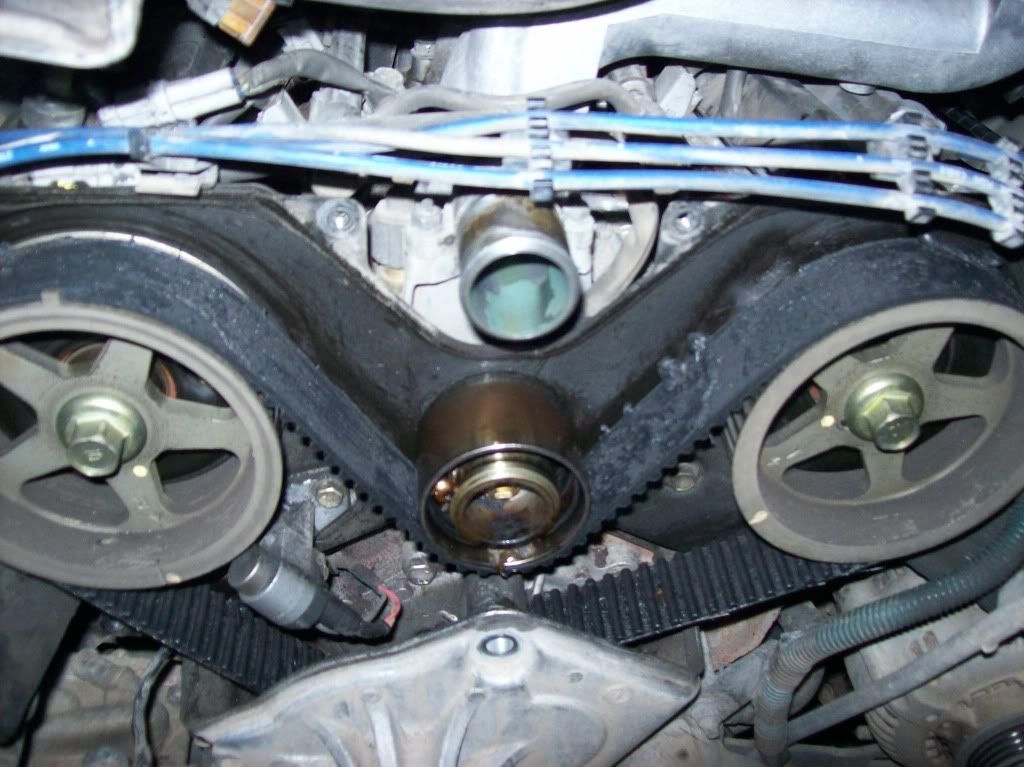
I was a good boy and changed my water pump and timing belt at 125k. The pulleys and tensioner were fine, so I left them in. At 165k (yes, only 40,000 miles later), I started hearing a strange rattling coming from the engine. I honestly thought it was something bouncing around the intake plenum (I had recently done my valve cover gaskets and that stupid plastic wire loom crumbled at every touch). I didn't know what to do, so I did nothing, like an idiot. Finally on the way home from work (1/2 hour commute) my engine stopped - just died in its tracks). It wouldn't even try to turn over, so I figured it had to be the timing belt. Turns out my water pump had seized. That rattling was the ridiculous Autozone water pump bearings tapping out of the fight. You can see what it did to the belt, and both pulleys.
You'll notice the timing marks on each cam are not quite lined up any more - thank you non-interference engine!
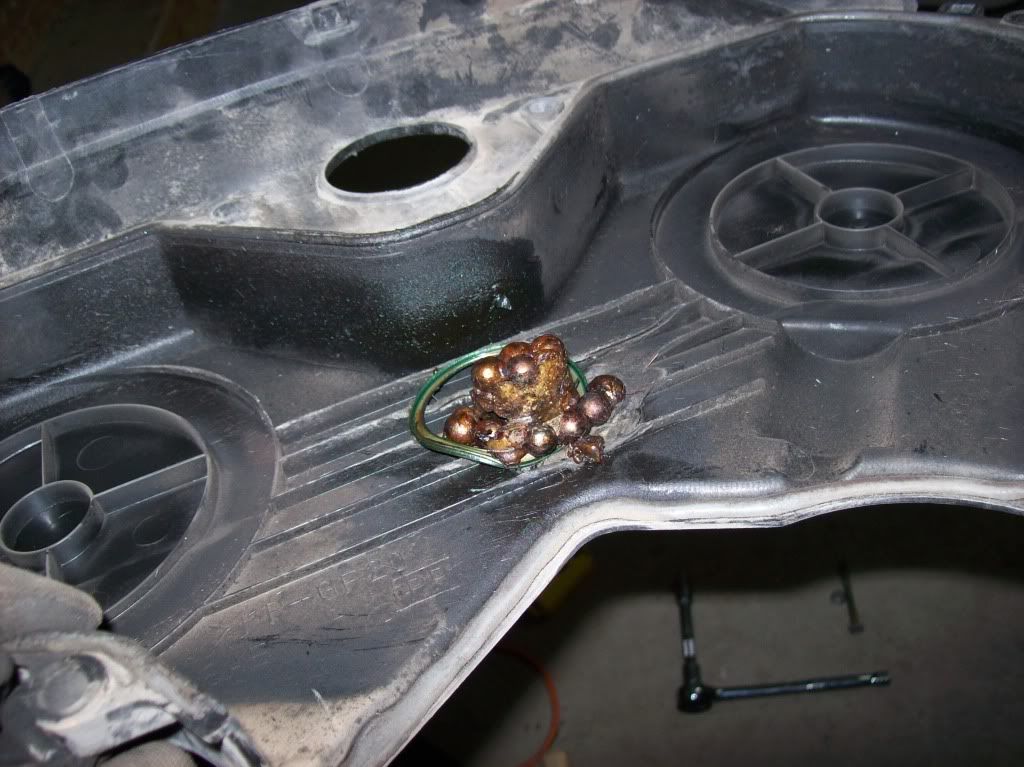
Here you can see the bearings from the idler pulley that exploded and melted into the timing cover
My advice: buy original equipment parts as often as possible!
I was a good boy and changed my water pump and timing belt at 125k. The pulleys and tensioner were fine, so I left them in. At 165k (yes, only 40,000 miles later), I started hearing a strange rattling coming from the engine. I honestly thought it was something bouncing around the intake plenum (I had recently done my valve cover gaskets and that stupid plastic wire loom crumbled at every touch). I didn't know what to do, so I did nothing, like an idiot. Finally on the way home from work (1/2 hour commute) my engine stopped - just died in its tracks). It wouldn't even try to turn over, so I figured it had to be the timing belt. Turns out my water pump had seized. That rattling was the ridiculous Autozone water pump bearings tapping out of the fight. You can see what it did to the belt, and both pulleys.
You'll notice the timing marks on each cam are not quite lined up any more - thank you non-interference engine!
Here you can see the bearings from the idler pulley that exploded and melted into the timing cover
My advice: buy original equipment parts as often as possible!
Last edited by 4biker; Jan 26, 2011 at 11:40 AM.
Jun 7, 2011 | 01:26 PM
#11
Thread Starter
Registered User
Joined: Feb 2007
Posts: 441
Likes: 0
From: Pleasant Grove, Utah
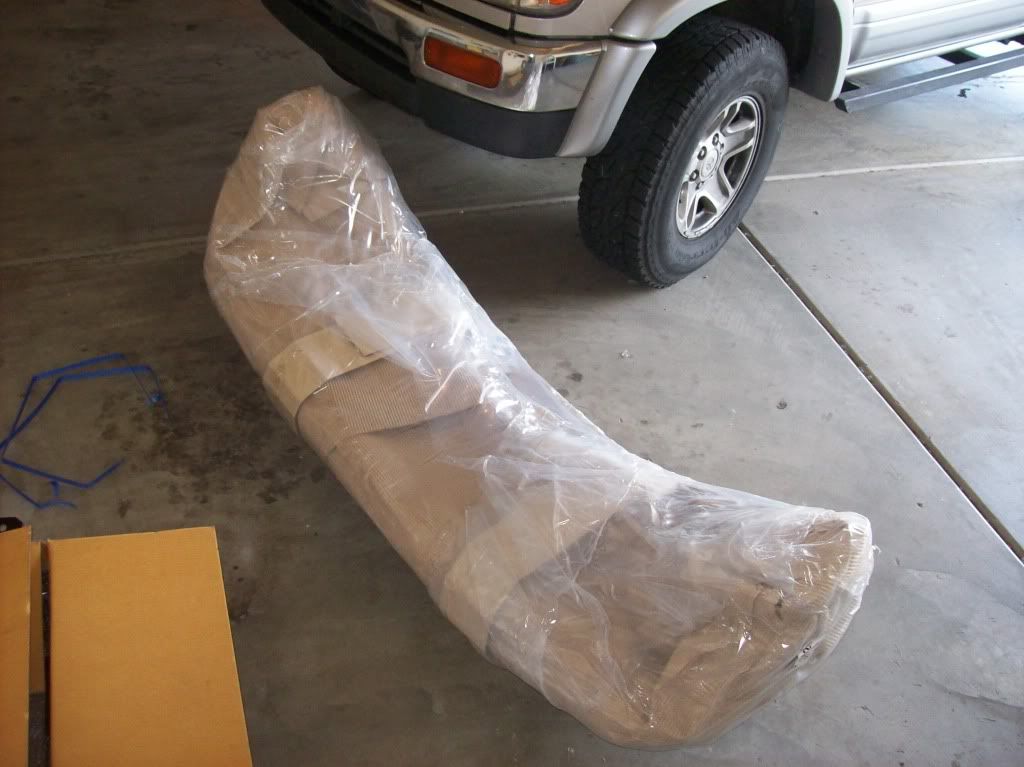
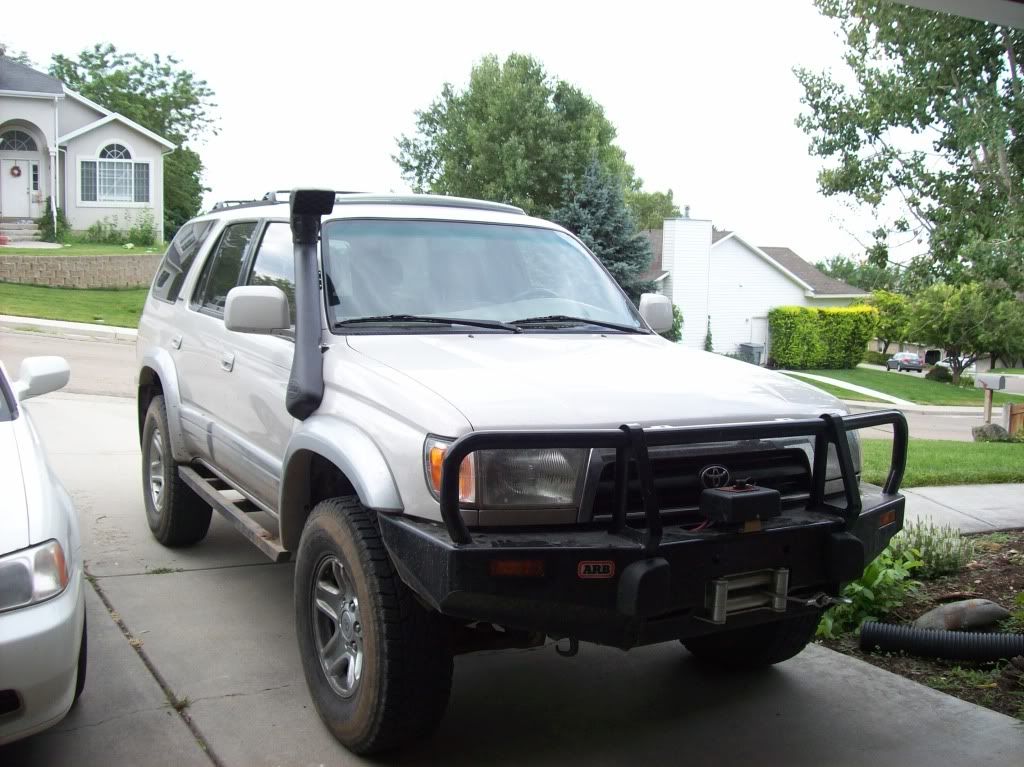
Well, I've reached a true milestone in my life. I've always enjoyed off-roading, and I've always wanted to modify my rig (whatever it is at the time) to make it as capable as I need it to be, and it's always been out of my reach.
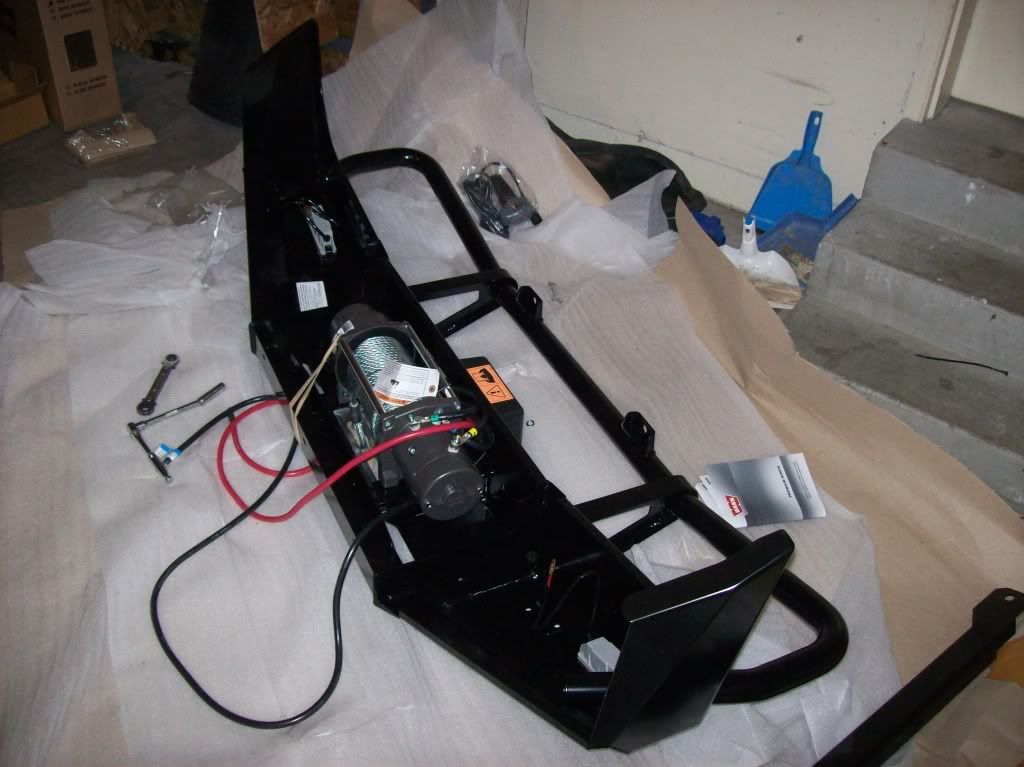
As of a couple of days ago, I have a winch and ARB bumper on my 4Runner. I actually went through the process of designing a beautiful bumper with BanditRunner, so I could build it myself for a fraction of the cost, but when I purchased the plans and looked over them, I realized that there is absolutely no way I could spend the time to do it right, and drive around all summer (and who knows how much longer) without any bumper on the front. I ultimately elected to purchase the ARB and just get it done. I got the winch off cragslist (brand new in the box), and the bumper from 4WheelParts. I ordered the bumper on Tuesday and it was here on Thursday, then installed on Friday. They also didn't charge shipping, so I highly recommend them.
These are the resources I used to supplement the instructions from ARB:
http://www.expeditionswest.com/equip...rb_bumper.html
http://www.toyota-4runner.org/3rd-ge...step-step.html
Here are some pics!

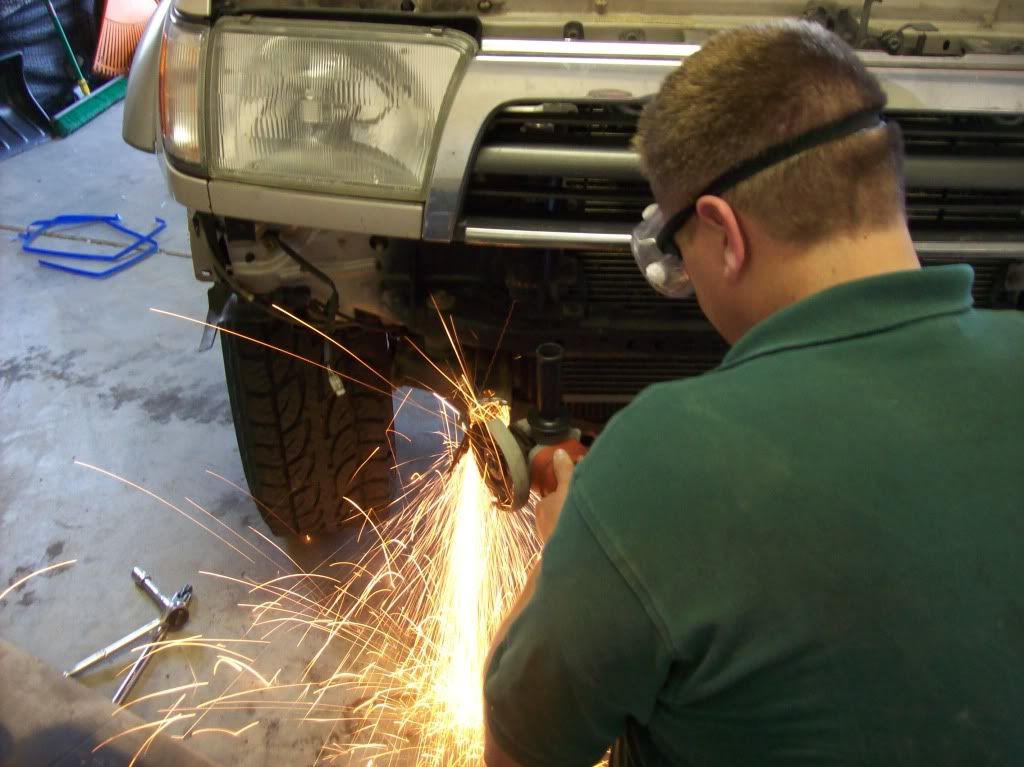
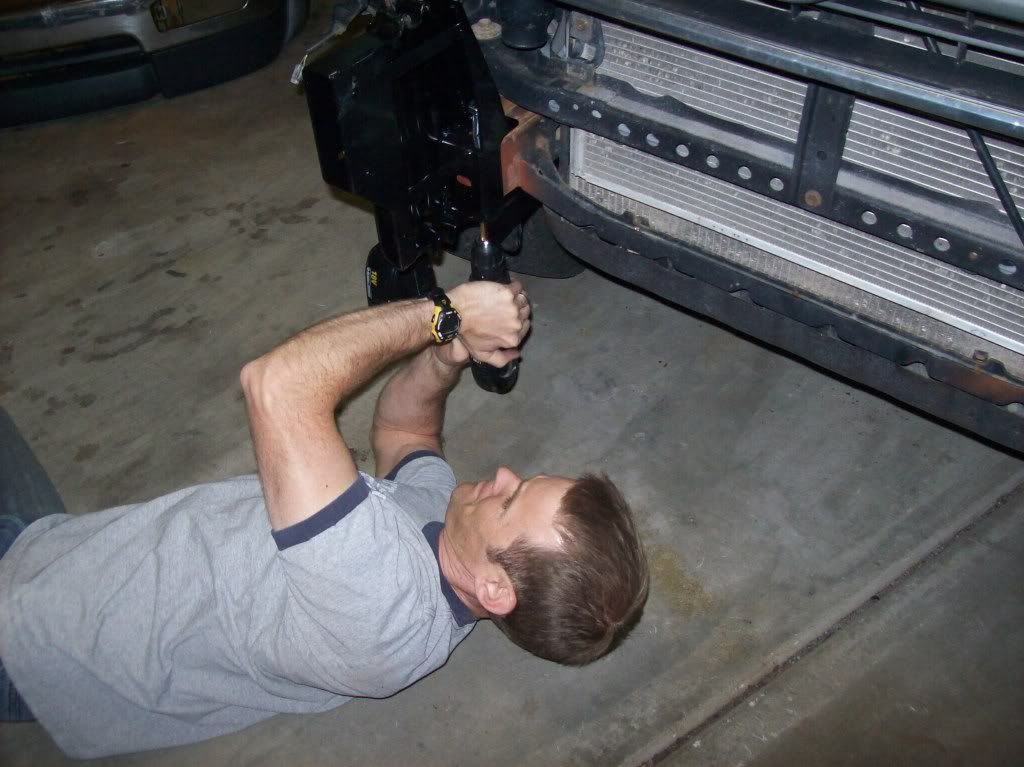
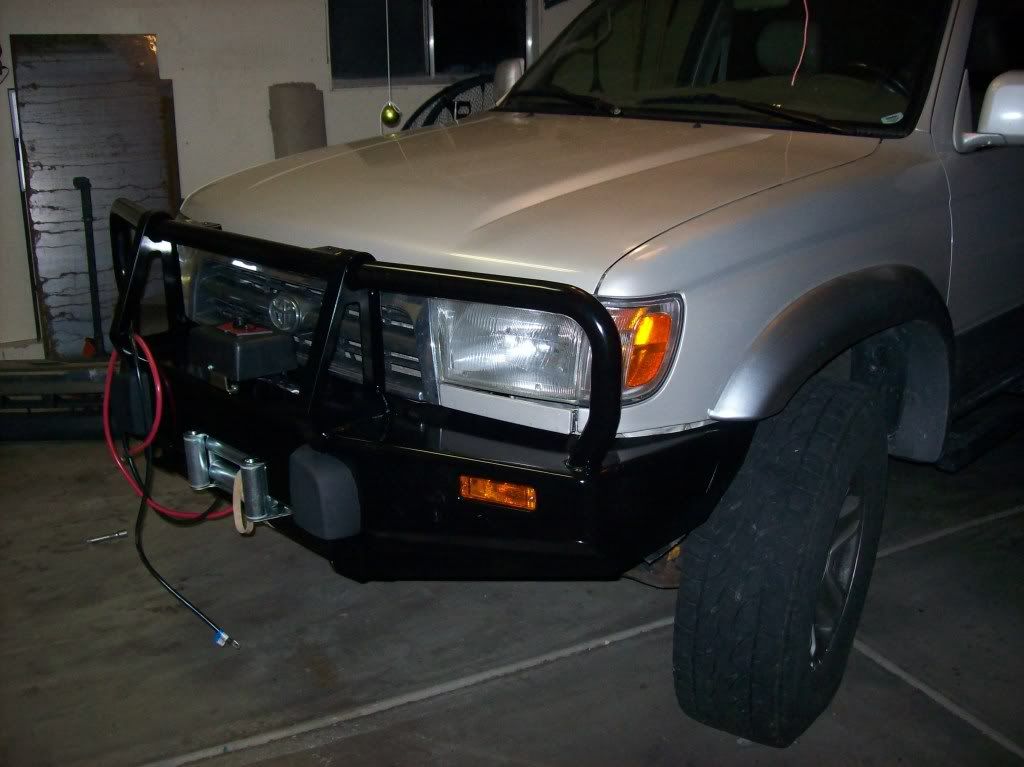
The install was longer than I expected (big surprise) at about 4 hours. That was with a big burley helper. The weight of the winch + bumper has got to be around 160lbs, and it sags the fronts a little bit, but I don't care. I took it out the next morning on a fun trail (Rattlesnake, west of Lehi, UT) and it didn't fall off or anything, so I'm calling it a win. It could use some off-road lights, but that will be sometime in the future. I'll add pics as they come.
Here's what it looks like from where I sit:
As of a couple of days ago, I have a winch and ARB bumper on my 4Runner. I actually went through the process of designing a beautiful bumper with BanditRunner, so I could build it myself for a fraction of the cost, but when I purchased the plans and looked over them, I realized that there is absolutely no way I could spend the time to do it right, and drive around all summer (and who knows how much longer) without any bumper on the front. I ultimately elected to purchase the ARB and just get it done. I got the winch off cragslist (brand new in the box), and the bumper from 4WheelParts. I ordered the bumper on Tuesday and it was here on Thursday, then installed on Friday. They also didn't charge shipping, so I highly recommend them.
These are the resources I used to supplement the instructions from ARB:
http://www.expeditionswest.com/equip...rb_bumper.html
http://www.toyota-4runner.org/3rd-ge...step-step.html
Here are some pics!
The install was longer than I expected (big surprise) at about 4 hours. That was with a big burley helper. The weight of the winch + bumper has got to be around 160lbs, and it sags the fronts a little bit, but I don't care. I took it out the next morning on a fun trail (Rattlesnake, west of Lehi, UT) and it didn't fall off or anything, so I'm calling it a win. It could use some off-road lights, but that will be sometime in the future. I'll add pics as they come.
Here's what it looks like from where I sit:
Last edited by 4biker; Jan 13, 2012 at 02:58 PM.
Jan 13, 2012 | 02:56 PM
#12
Thread Starter
Registered User
Joined: Feb 2007
Posts: 441
Likes: 0
From: Pleasant Grove, Utah
I went through a water crossing (I'll have to find the pictures), and the water was up to the bottom of the fender. I decided at that point a snorkel might help matters. It was a scary thing drilling through the fender with a hole saw, but I got it done. I don't have any action shots yet, since I'm always going somewhere in a hurry, but here's a shot with the bumper and the snorkel:

Thread
Thread Starter
Forum
Replies
Last Post
justdifferentials
Just Differentials
14
Sep 24, 2017 08:32 PM
Swampwalker
95.5-2004 Tacomas & 96-2002 4Runners
5
Oct 12, 2015 09:49 AM


