
Suspension explanation please... Three shocks on ONE side on the front . . .
 Mar 8, 2012 | 09:10 AM
#21
Thread Starter
Registered User
Joined: Jan 2012
Posts: 74
Likes: 0
From: Currently Virginia Beach, Va. Hopefully back to Wa. within the year...
My immediate thought was that the hoop is what would probably keep the BL from being able to go.
Would a diff drop allow me enough change in CV angle to keep from messing it up. Also, the shaft that goes into the front diff is at a pretty steep angle, I took a photo this morning:
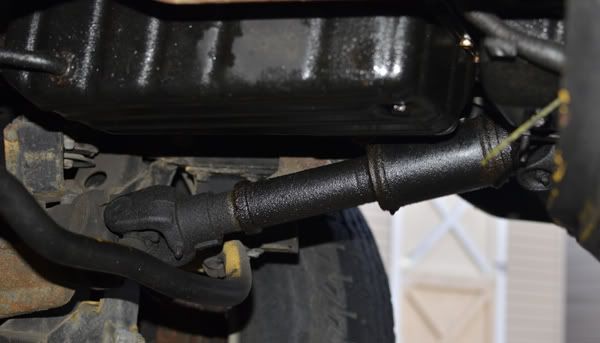
I am super paranoid about all the angles of everything now, putting the diff. drop in won't screw this up will it? (remember, I'm learning as I go, once I ask, I'll know, so don't laugh if this is stupid. At least not until after you have answered. ha.)
Damn problem vehicles. I guess better to have to fix a suspension than multiple seals and other various in-depth mechanical problems.
Mar 8, 2012 | 09:37 AM
#22

Registered User
Joined: Jan 2009
Posts: 175
Likes: 0
By what I can see in your picture there and in you previous pict.'s, your diff is already dropped. It appears you have a bracket lift thrown in the mix of all that other useless junk, (sorry), suspension mods.....When and if you ever get to removing you bl, remember to address your steering, brake lines, and bumper mounts, as well as your gear shifters (extended??). If the vehicle is a standard trans, check your clutch hydro line and radiator support.......
Mar 8, 2012 | 09:49 AM
#23
Thread Starter
Registered User
Joined: Jan 2012
Posts: 74
Likes: 0
From: Currently Virginia Beach, Va. Hopefully back to Wa. within the year...
It's an auto. If the body lift can in fact be taken off without dickin' the entire suspension set-up around, I'll probably take it into a shop. I don't have the time or resources to lift the body on it's own and do all that. If I can just have it done in a day or two and be back on the road... I'll fork over the $450 in labor costs. urgh. . .
And it's not junk. Thank you. It's... uh..... creative off-road artistic expression????
Damn junk.
If I have the shop ONLY do the body lift removal and re-install of OME size parts or whatev's. . . . Think I can save labor costs and do the other stuff on my own??? the brake lines will just hang long won't they??? I can get it home and then do all that. . .
Wow. I sound like a cheap-ass. But, in fact, in addition to being a cheap-ass, I want to learn to do all this stuff on my own.
Last edited by photoguy2354; Mar 8, 2012 at 09:52 AM.
Mar 8, 2012 | 11:41 AM
#24


if you want to learn - do it yourself, $450 is a good chunk of cash that could be spend somewhere else. this will be an easy enough task and shouldn't take too long. i believe the only thing that will prevent you from doing the body drop is the shock hoops. take off your extra 4 front shocks and bust out a cutoff wheel or sawzall on those hoops. cut off your shock hoops where they mount to the frame - no sense in destroying them since you may be able to salvage most of them for future use if you decide to SAS. if you don't have a sawzall or angle grinder yet, then take some of the $450 you're saving and buy one (or both  )
)
then the only stuff you'll need for the rest of the drop is replacement hardware (because the lift's bolts will be too long), some basic tools, and a system to help lower the body (blocks of wood, a few friends, etc.) you can just zip-tie the brake lines up closer and out of the way. your front diff angle is about as bad as it will ever get since you already have a 4" diff drop (from stock) on your 4" drop bracket, so it's fine.
do your homework and read up on body lift installs - the removal will be the reverse and the only thing different is your shock hoops. unless you have a source to buy the hardware (ace hardware is good for non-standard stuff), perhaps get some from 4crawler - and you can decide whether you want the BL completely gone or just reduced since he sells BLs as well. I once removed a 4" BL from a k5 blazer by myself - I just loosened all the body mounts, then wedged some stacked 2x4s in between - this allowed me to "step down" the body 1.5" at a time and keep the body somewhat level during the process. if you've got a few homies who like beer, it will be even easier!
) then the only stuff you'll need for the rest of the drop is replacement hardware (because the lift's bolts will be too long), some basic tools, and a system to help lower the body (blocks of wood, a few friends, etc.) you can just zip-tie the brake lines up closer and out of the way. your front diff angle is about as bad as it will ever get since you already have a 4" diff drop (from stock) on your 4" drop bracket, so it's fine.
do your homework and read up on body lift installs - the removal will be the reverse and the only thing different is your shock hoops. unless you have a source to buy the hardware (ace hardware is good for non-standard stuff), perhaps get some from 4crawler - and you can decide whether you want the BL completely gone or just reduced since he sells BLs as well. I once removed a 4" BL from a k5 blazer by myself - I just loosened all the body mounts, then wedged some stacked 2x4s in between - this allowed me to "step down" the body 1.5" at a time and keep the body somewhat level during the process. if you've got a few homies who like beer, it will be even easier!
Mar 8, 2012 | 12:57 PM
#25
Thread Starter
Registered User
Joined: Jan 2012
Posts: 74
Likes: 0
From: Currently Virginia Beach, Va. Hopefully back to Wa. within the year...
I'll start researching it. On the plus side, at least for me... The hoops are bolted onto the frame.
I do have one question though. Pulling those two shocks that connect from the hoop to the upper arm, can I do that and leave the crappy shock still on the lower arm there with no worries about anything else, i.e. it's not going to stress that one shock will it? I was planning on putting new shocks on it when I pulled the body lift off, but then I realized it would be like $500 with ALL those shocks, haha.
Also, I have some more GREAT news. My rear passenger drum is oh so slowly leaking brake fluid. I believe the popular phrase here is eff, EFFIN EFF EFF!!!!!

And I LOATHE ENTIRELY drum brakes. Hate. Despise. Holy shart.
So, that aside, I am thinking I should start a build-up thread, but not for building up, maybe call it a "save the yota" thread. Ha.
Side note, Inu:
It's not empty, There is this fancy pants whatever it is. So much to look at, so little to practically use. Maybe I should just pull EVERYTHING off the bottom and smash it down onto another 95. It's gotta be a better option than all this crap....
I do have one question though. Pulling those two shocks that connect from the hoop to the upper arm, can I do that and leave the crappy shock still on the lower arm there with no worries about anything else, i.e. it's not going to stress that one shock will it? I was planning on putting new shocks on it when I pulled the body lift off, but then I realized it would be like $500 with ALL those shocks, haha.
Also, I have some more GREAT news. My rear passenger drum is oh so slowly leaking brake fluid. I believe the popular phrase here is eff, EFFIN EFF EFF!!!!!
And I LOATHE ENTIRELY drum brakes. Hate. Despise. Holy shart.
So, that aside, I am thinking I should start a build-up thread, but not for building up, maybe call it a "save the yota" thread. Ha.
Side note, Inu:
It's not empty, There is this fancy pants whatever it is. So much to look at, so little to practically use. Maybe I should just pull EVERYTHING off the bottom and smash it down onto another 95. It's gotta be a better option than all this crap....
Mar 8, 2012 | 01:09 PM
#26
Thread Starter
Registered User
Joined: Jan 2012
Posts: 74
Likes: 0
From: Currently Virginia Beach, Va. Hopefully back to Wa. within the year...
And what the hell do I need to do to level out these CV joints and control arms. I am looking through the IFS lifts thread and starting to get a little pissy at HOW angled my stuff is. T-bars need adjusted, I know that, but, what else? Will that make the big difference? How are these guys running 3 and 4 inch lifts with damn near level control arms???? ugh. I am going to fix it. I am not going to sell it for fear of getting hip deep in a project I can't handle. These are the last sane words I will utter when referencing the projects I am about to take on. hahaha
Mar 8, 2012 | 01:15 PM
#27
Registered User
Joined: Jan 2007
Posts: 6,106
Likes: 27
Ya hear that BlazeN8? They're saying you're a meth head...

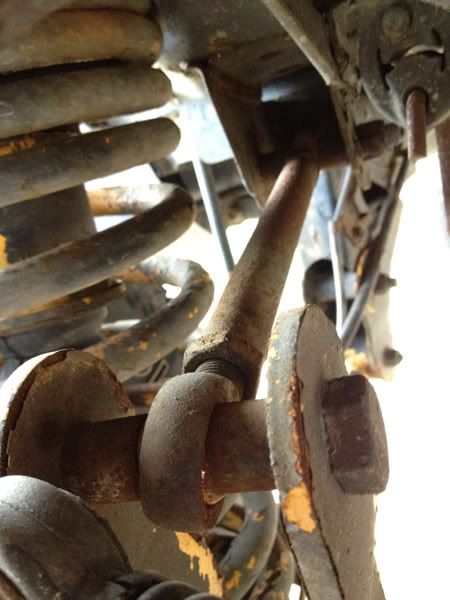
http://www.blazeland.us/Shock_Hoops.html
There's real reasons for building a suspension like that. Like being able to hit large bumps/holes at high-speed, and/or land after being airborne, and not having the suspension bottom out in the process. Which would lead to massive stresses on other parts of the vehicle not designed to absorbs such impacts.
BTW, that's your upper control arm. And with coils springs you need it, and the lower control arms, or it's gonna be axle wrap city.
Mar 8, 2012 | 02:28 PM
#28
Thread Starter
Registered User
Joined: Jan 2012
Posts: 74
Likes: 0
From: Currently Virginia Beach, Va. Hopefully back to Wa. within the year...
Driver side before shocks being taken off:

And after, it just LOOKS so much better and less cheeseballish:
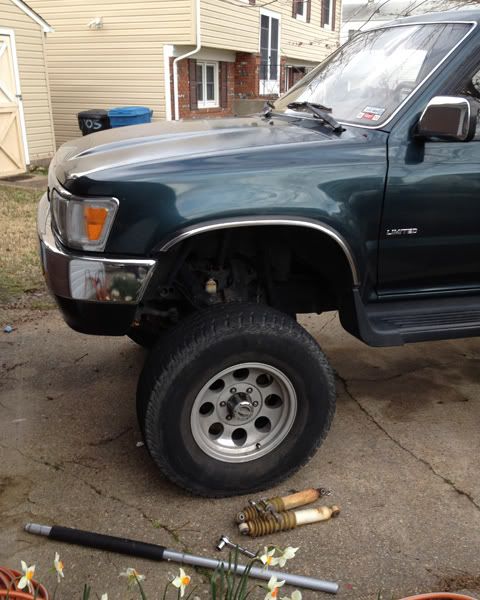
So. Driver's side was easy as jell-o. However.
Is this corrosion?????
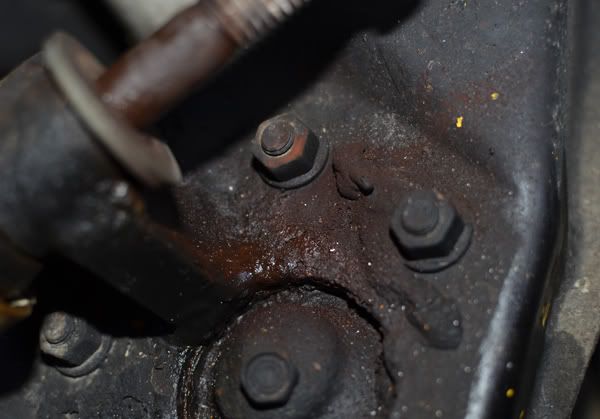
It;s NOT moving. See what was once a straight wrench:
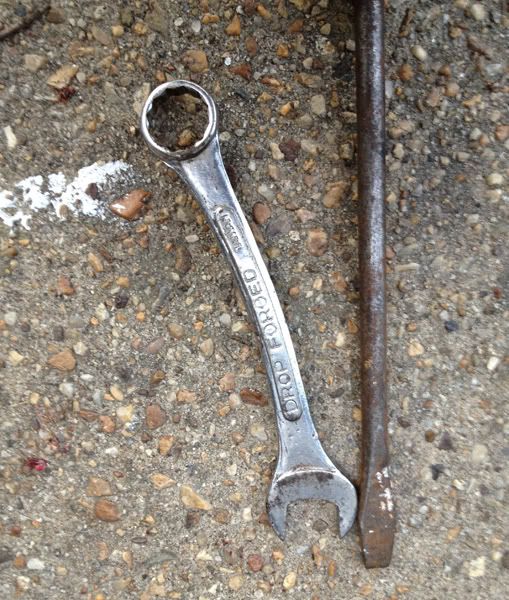
It will TURN, with a heavy cheater bar in use. But it's NOT coming out. I tried whackin it with a hammer, wd-40, the combination of turning and whacking (that was entertaining from a distance I am sure, note the jack handle on the ground? That would be my cheater bar. Awesome.)
So..... uh... I am thinking just say eff it and grind the thing off???? grind the head, pull the other shock and then grind both side even to the loop on the top of the control arm???
Also, should I start another thread with what I am doing to it??? I don't wanna be noob postin all over the place. . . . .
And after, it just LOOKS so much better and less cheeseballish:
So. Driver's side was easy as jell-o. However.
Is this corrosion?????
It;s NOT moving. See what was once a straight wrench:
It will TURN, with a heavy cheater bar in use. But it's NOT coming out. I tried whackin it with a hammer, wd-40, the combination of turning and whacking (that was entertaining from a distance I am sure, note the jack handle on the ground? That would be my cheater bar. Awesome.)
So..... uh... I am thinking just say eff it and grind the thing off???? grind the head, pull the other shock and then grind both side even to the loop on the top of the control arm???
Also, should I start another thread with what I am doing to it??? I don't wanna be noob postin all over the place. . . . .
Last edited by photoguy2354; Mar 8, 2012 at 02:30 PM.
Mar 9, 2012 | 02:26 AM
#31
Thread Starter
Registered User
Joined: Jan 2012
Posts: 74
Likes: 0
From: Currently Virginia Beach, Va. Hopefully back to Wa. within the year...
That was my final decision, I called a friend of mine up and asked if he had a grinder. I'm finishing it up today.
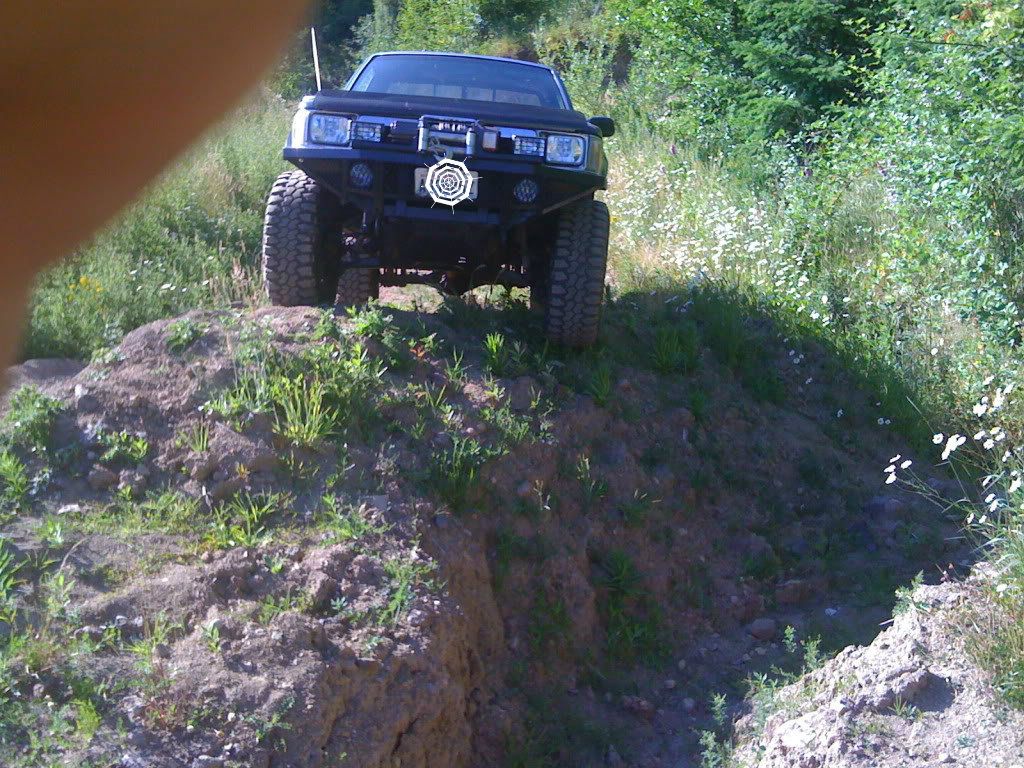
And MudHippy, does that set-up attach to the upper control arm???? There are a ton of potholes around here, maybe that's why they went with such an extreme set-up??? There isn't ANYWHERE to go ACTUAL wheelin in SE va. (in comparison to, you know, the cascades and the general Wa. area.) I don't think anyone was jumping it, the 3.0 isn't really known for it's ability to GO. haha.
And MudHippy, does that set-up attach to the upper control arm???? There are a ton of potholes around here, maybe that's why they went with such an extreme set-up??? There isn't ANYWHERE to go ACTUAL wheelin in SE va. (in comparison to, you know, the cascades and the general Wa. area.) I don't think anyone was jumping it, the 3.0 isn't really known for it's ability to GO. haha.
Last edited by photoguy2354; Mar 9, 2012 at 08:56 AM.
Mar 9, 2012 | 07:00 AM
#32
The setup mudhippy showed is for a long travel setup - longer arms = more leverage = needs more shock dampening. Your setup is like that because who knows why. Maybe they just thought it would look cool.
Remember - if you un-crank those tbars to level out your CVs you will not only change your camber and need an alignment, but you won't be lowering the rear to match - so you'll get a stink bug rake forward until you address the coils. I don't know much specifics on 4runner rear susp, so look through the 4runner lift guide on this site and figure out what springs most guys are using for 4" bracket lift. Probably going to be some landcruiser or jeep coils since they're cheap used. If you had coil spring spacers it would be different and you could just remove the spacer to drop the rear to match, but at least the PO didn't cheap out here! FYI Firstone has lifetime alignment plan which is great for anyone who wheels an IFS rig.
Before un cranking the tbars I would remove the BL and see if you like the height. If you want it that high up (4-6" lift) then maybe I'd suggest picking up some BJ spacers and installing those. Adding bj spacer will lift front 1.5" - so to compensate you will then un crank tbar to bring it down 1-2" and it should be close to level again. Since you just uncranked the tbars you will gain back better CV angles and actually have some down travel again. If you want it lower than 6" and more towards 4", you'll need those shorter springs to get rear to match. You can still run BJ spacers you'll just need more tbar drop.
As for shocks once everything is back to normal - I'm gonna take a guess and say the shocks you have are for 4" bracket lift, not the 6" suspension lift you're currently running. It should be fine, you just won't have as much down travel since 2" of "droop travel" is being used up at ride height. Shocks are "technically OK" when they limit down travel, but not ok when they limit up travel and the stem bottoms out inside the shock, damaging the valves/seals inside
Oh yeah - that's not corrosion in the pic...it's built up accumulation of dirt/debris stuck there with oil from a leak you have somewhere. More common to see that on everything below engine - crossmember, front diff, skid plate, etc.
Mar 9, 2012 | 07:38 AM
#33
Thread Starter
Registered User
Joined: Jan 2012
Posts: 74
Likes: 0
From: Currently Virginia Beach, Va. Hopefully back to Wa. within the year...
Ha, I meant the dark red powdery crap on top of all that. I wasn't sure if it was corrosion or maybe they covered that bolt in something to "keep it from moving" or something stupid. The oil pan does have a bit of a leak though, I found that yesterday along with the rear passenger drum leak discovery. I don't see how it would get oil that far up though. Maybe something else is leaking that I didn't see? I tried to check the whole thing over to make sure I didn't miss any other wet looking spots, it's been sitting unmoved for about a week, long enough to catch anything that might be slowly seeping I figured.
So much to do, learn and correct. It'll be worth it though. I've always wanted one of these things. Always did the yota trucks, but never had a 4runner.
So much to do, learn and correct. It'll be worth it though. I've always wanted one of these things. Always did the yota trucks, but never had a 4runner.
Mar 9, 2012 | 08:01 AM
#34
Registered User
Joined: Jan 2011
Posts: 1,746
Likes: 6
From: 46 50' 36.82'' N 122 19' 41.01'' W
Good points from "highonpottery" But IMO no matter what you do with lift, coils or BL, that front suspension needs to be lowered so it can actually function properly. Your only needing a couple inches to level that IFS out. Or its always going to perform like 
They actually ride very nice when the a-arms are close to level but just a little bit positive.
X2 on takin the BL first. Then fix the IFS, then its as simple as a measuring tape, and a computer, to figure out the rear.
They actually ride very nice when the a-arms are close to level but just a little bit positive.
X2 on takin the BL first. Then fix the IFS, then its as simple as a measuring tape, and a computer, to figure out the rear.
Last edited by ThatGuy1295; Mar 9, 2012 at 08:03 AM.

 Mar 9, 2012 | 08:39 AM
#36
Thread Starter
Registered User
Joined: Jan 2012
Posts: 74
Likes: 0
From: Currently Virginia Beach, Va. Hopefully back to Wa. within the year...
Whatever. Flaunt your fancy truck photo around on MY thread, will ya..... Ha.
I am looking into the 4crawler stock body mounts and whatnot. I read the directions on that site, I didn't realize it would only be like a 4 or 5 hour process. I was told it would be 8 hours. Effin' cheatin' a-- shops.
Anyways, I have a hi-lift, but it's old and i don't know if it even works. Gotta look into that when I get home. Try to lift my couch up for starters, make sure the mechanics work right. haha.
So, BL off, then adjust the T-bars and see where it sits front:back....? Then do an alignment. Can I do an alignment on my own? Is that another simple process that I just don't know about? I know a LOT of people use BJ spacers, is that something i should look into? If I am doing all this, I may as well look into getting it done RIGHT for being used as a DD AND the occasional trail, beach and back-road ride. . . .
I really can't begin to express my gratitude towards everyone for all the insight and help here.
Mar 9, 2012 | 09:02 AM
#38
Registered User
Joined: Jan 2011
Posts: 1,746
Likes: 6
From: 46 50' 36.82'' N 122 19' 41.01'' W
Sorry 
Sounds good.. Alaignment.. id take it to a shop, les schwab or whatever. Its like $70
Tires are 33 X 12.50 toyo M/T's But their load range E so kind of hard. I can air them down to like 6psi. Actually pretty quiet on the road.
So, BL off, then adjust the T-bars and see where it sits front:back....? Then do an alignment. Can I do an alignment on my own? Is that another simple process that I just don't know about? I know a LOT of people use BJ spacers, is that something i should look into? If I am doing all this, I may as well look into getting it done RIGHT for being used as a DD AND the occasional trail, beach and back-road ride. . . .
Tires are 33 X 12.50 toyo M/T's But their load range E so kind of hard. I can air them down to like 6psi. Actually pretty quiet on the road.
Mar 9, 2012 | 09:04 AM
#39
Registered User
Joined: Nov 2008
Posts: 85
Likes: 0
From: brooks alberta canada
I think those extra shocks are for clearing the speedbumps at the mall. 450 is a big chunk of change for sure, that would buy you new shocks. Body lifts arent that bad to remove use the 2x4 trick it works very well. I'de just cut those shock hoops out looking at the rest of the work done i doubt the welds are any better then the rest of their work. Get a poly bushing body mount kit nothing bigger then 2" imo 4crawlers are some of the best especially when he will make them to whatever size you want!!!. Get rid of all that garbage crap they added and do it right. Id pay to have the torsion bars lowered back down as im not to familiar with the process, but there are lots of people here who can help you there. That will bring all your angles back closer to where they should be.
Step 1: Remove Joe Mullet mall cruiser shocks
Step 2: Remove 4" body lift/Install stock-2" body lift. (Use poly bushings there so worth it)
Step 3: turn torsion bars down, install proper shocks in STOCK locations
Step 4 : wheel that beautiful toy all day long
Step 1: Remove Joe Mullet mall cruiser shocks
Step 2: Remove 4" body lift/Install stock-2" body lift. (Use poly bushings there so worth it)
Step 3: turn torsion bars down, install proper shocks in STOCK locations
Step 4 : wheel that beautiful toy all day long
Mar 9, 2012 | 09:05 AM
#40
Registered User
Joined: Jan 2011
Posts: 1,746
Likes: 6
From: 46 50' 36.82'' N 122 19' 41.01'' W
BJ spacer will definitely help it ride a little smoother. Like said earlier the more level the a-arms the better the ride. But id wait and see, you might not need it after you adjust t-bars.


