
bigwapiti's 2011 Tundra build ~ Big Nambe
 Feb 10, 2012 | 12:13 AM
#1
Thread Starter
Registered User
Joined: Jan 2007
Posts: 125
Likes: 0
bigwapiti's 2011 Tundra build ~ Big Nambe
All,
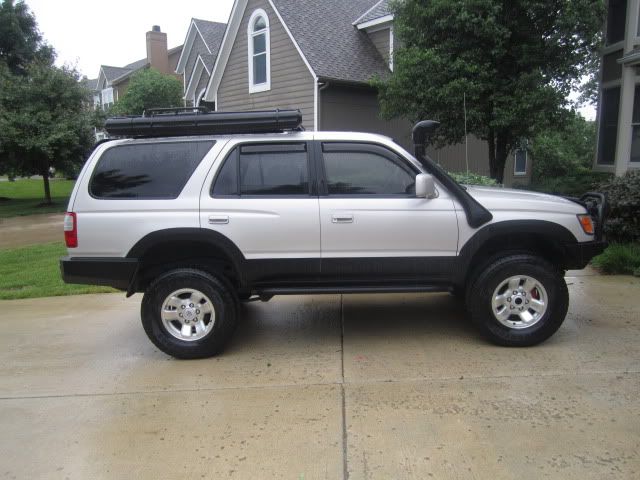
Well it's been over 7 months since I changed vehicle platforms. As you know I had a 3generation 4runner that was an exceptional vehicle. This rig owned me nothing because it was an excellent vehicle that served my family for 10 years and 170,000 miles. I'll always have fond memories of this vehicle not only for the years and miles, but also for the introduction to overlanding...
Anyway, here is one last pic of the rig on the way to the dealership...Farewell my old friend
Why the platform change? It boiled down to 2 things: room and power. In early May, my son and I participated in a Central Overland rally. It became obvious that the V6 was underpowered in hilly terrain. Our route took us through the Buffalo River in Northern Arkansas, and some of the passes were steep. Nothing compared to passes out west, but it was enough to make me aware and concerned that the rig was struggling...We had 2 in the rig towing a loaded Outlander Sherpa II (10 gallons of fuel / 15 gallons of water / food in the engel 45 for 2 days...).


I did consider a Land Cruiser 100 and 200 series, however, I really missed the utility of a pick-up. My previous rig before the 4runner was a pre-Tacoma p/u, and after consulting with my wife (CFO) I called my auto broker and was able to get a GREAT deal on a Toyota Tundra...
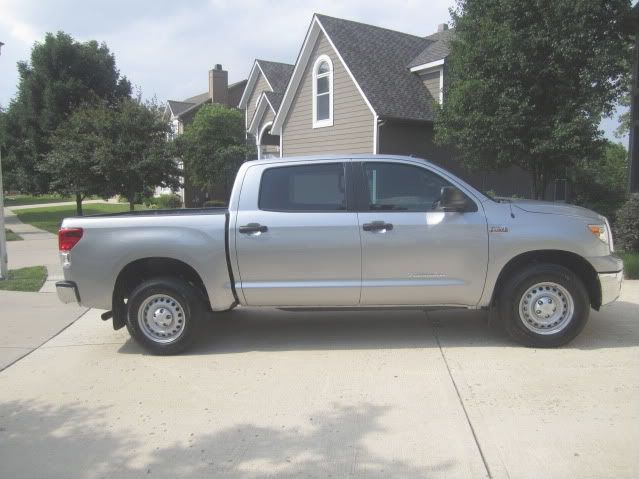
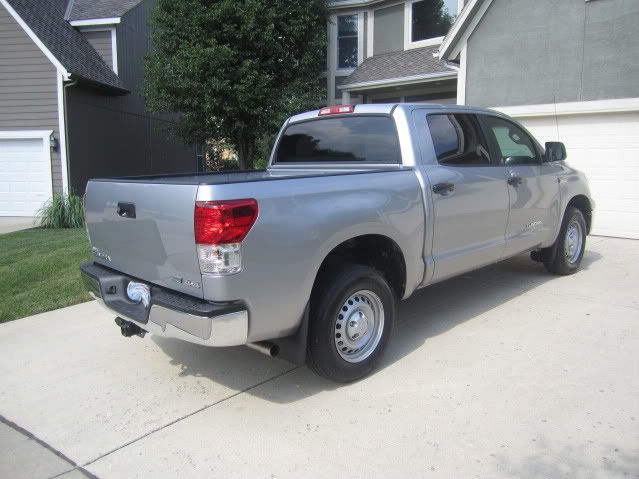
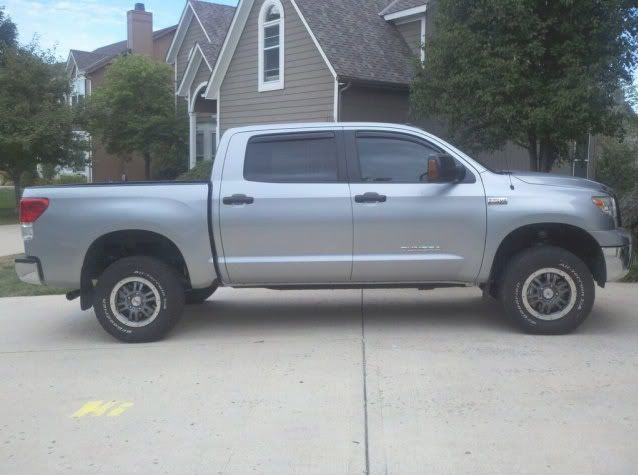
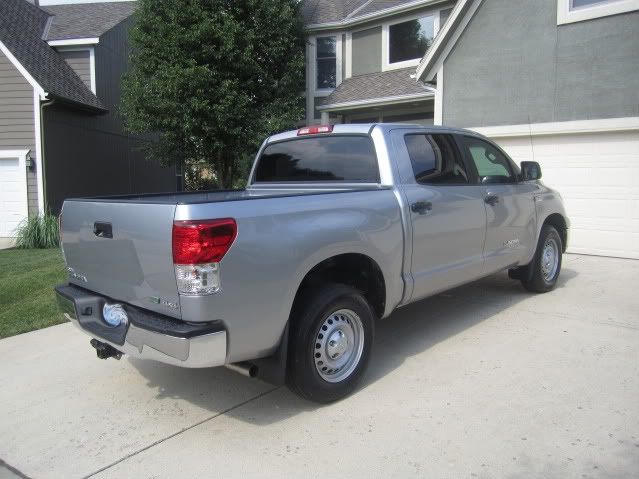
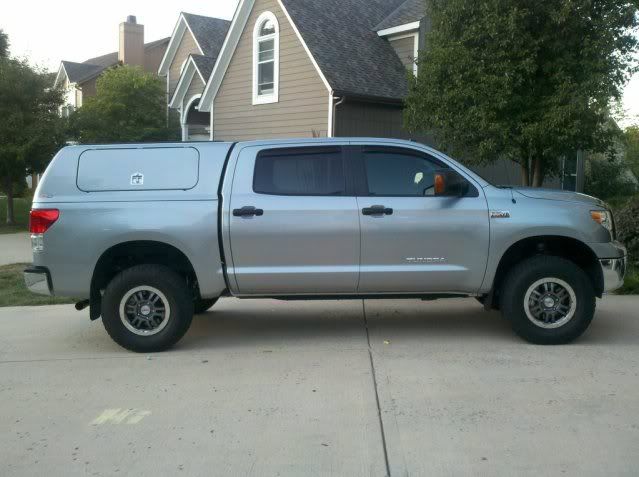
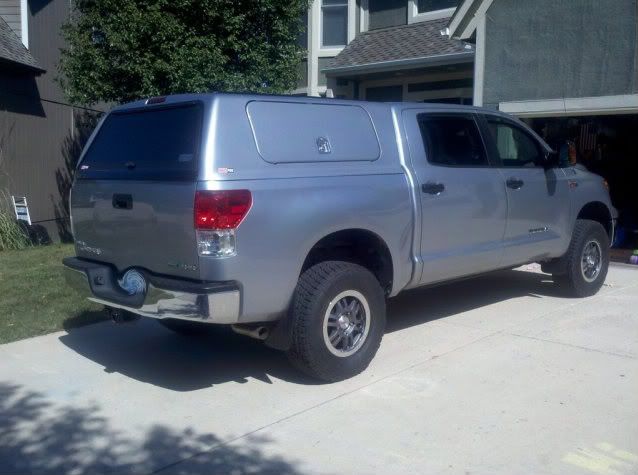
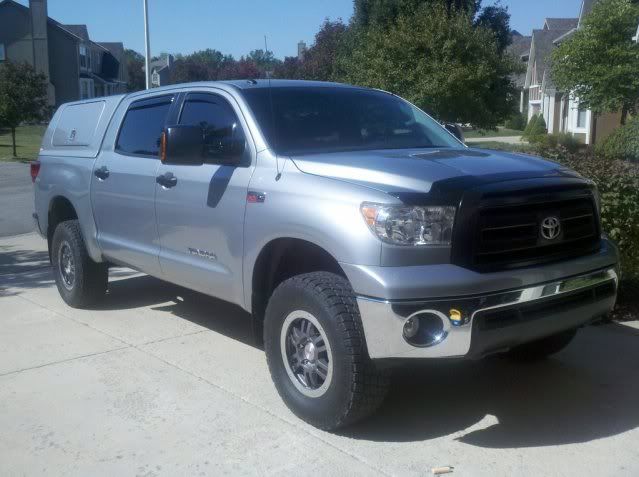
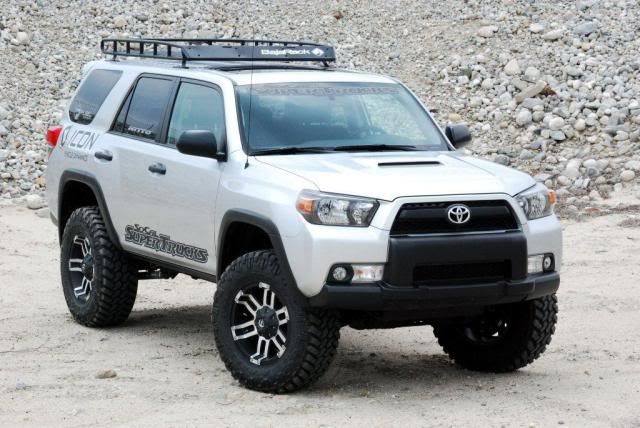
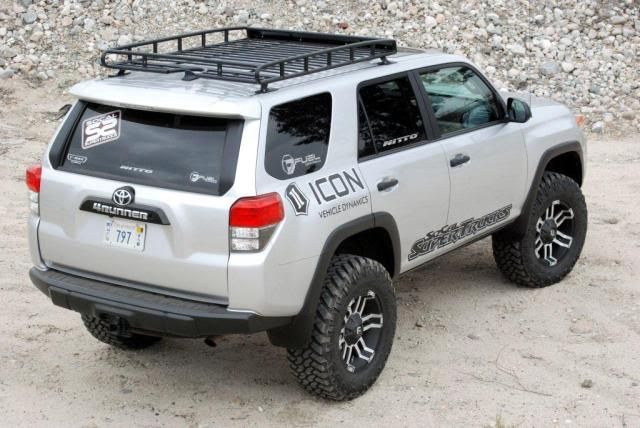
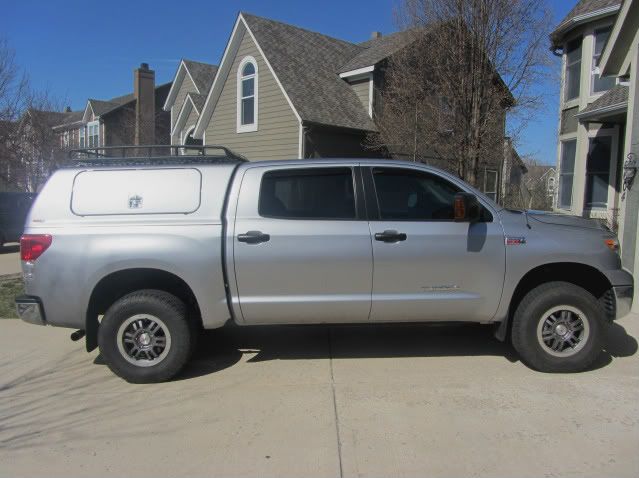
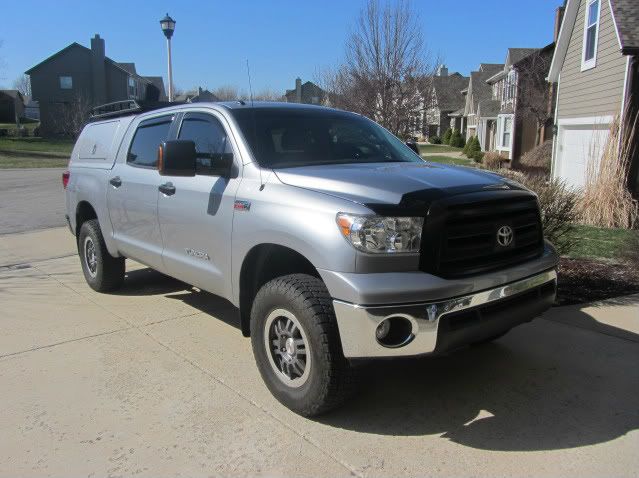
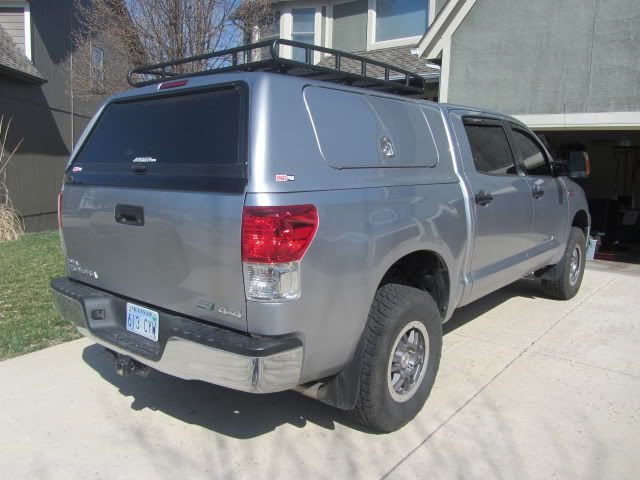
Here it is. 2011 Tundra CrewMax / 4x4 / 5.7L ~ 381 hp / 401 ft/lbs of torque. My broker lined up a great price for my rig and a great price on the Tundy. I found a tundra grade with a sunroof / upgraded stereo with BT technology / backup camera and some other stuff...Most Tundys with this setup retailed for 10K-12K more...
Anyway, on to the pics...
I sold my Wet Okole seat covers and ProComp wheels seperately, and I have some money...Let the mods begin...
Regards,
BWJ
Well it's been over 7 months since I changed vehicle platforms. As you know I had a 3generation 4runner that was an exceptional vehicle. This rig owned me nothing because it was an excellent vehicle that served my family for 10 years and 170,000 miles. I'll always have fond memories of this vehicle not only for the years and miles, but also for the introduction to overlanding...
Anyway, here is one last pic of the rig on the way to the dealership...Farewell my old friend
Why the platform change? It boiled down to 2 things: room and power. In early May, my son and I participated in a Central Overland rally. It became obvious that the V6 was underpowered in hilly terrain. Our route took us through the Buffalo River in Northern Arkansas, and some of the passes were steep. Nothing compared to passes out west, but it was enough to make me aware and concerned that the rig was struggling...We had 2 in the rig towing a loaded Outlander Sherpa II (10 gallons of fuel / 15 gallons of water / food in the engel 45 for 2 days...).
I did consider a Land Cruiser 100 and 200 series, however, I really missed the utility of a pick-up. My previous rig before the 4runner was a pre-Tacoma p/u, and after consulting with my wife (CFO) I called my auto broker and was able to get a GREAT deal on a Toyota Tundra...
Here it is. 2011 Tundra CrewMax / 4x4 / 5.7L ~ 381 hp / 401 ft/lbs of torque. My broker lined up a great price for my rig and a great price on the Tundy. I found a tundra grade with a sunroof / upgraded stereo with BT technology / backup camera and some other stuff...Most Tundys with this setup retailed for 10K-12K more...
Anyway, on to the pics...
I sold my Wet Okole seat covers and ProComp wheels seperately, and I have some money...Let the mods begin...
Regards,
BWJ
Feb 10, 2012 | 12:21 AM
#2
Thread Starter
Registered User
Joined: Jan 2007
Posts: 125
Likes: 0
Tire choice...
All,
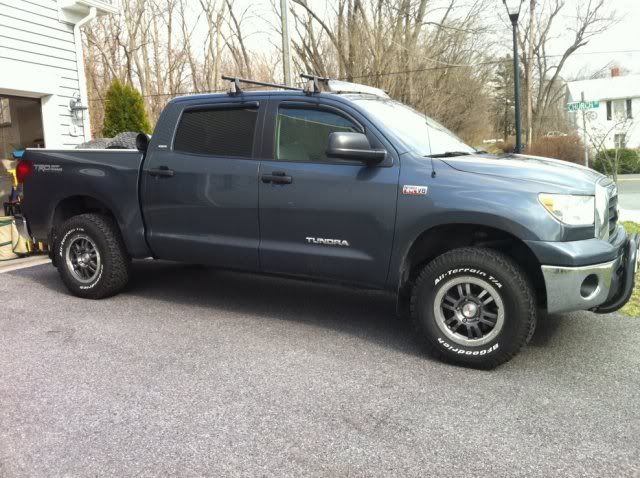
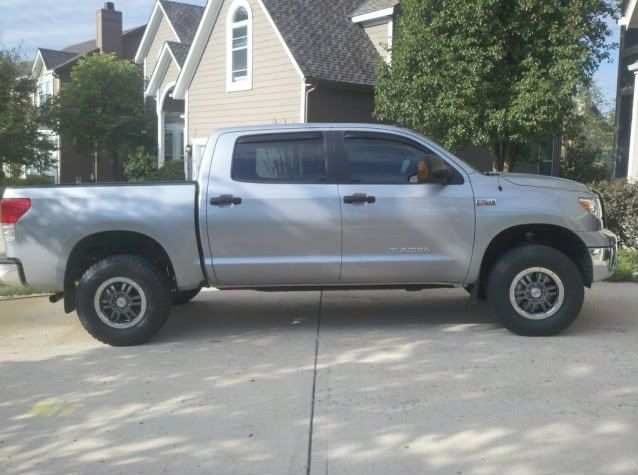
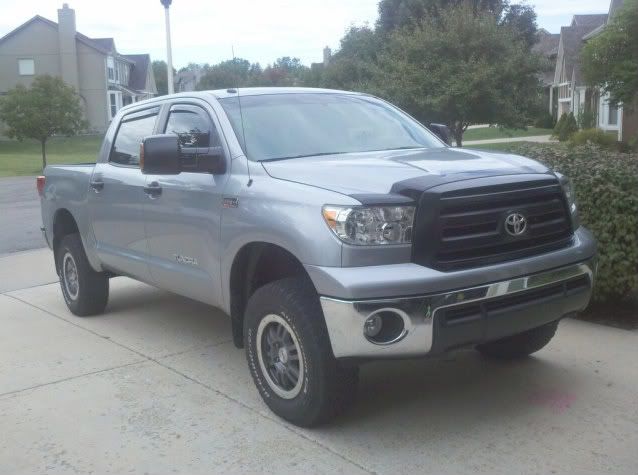
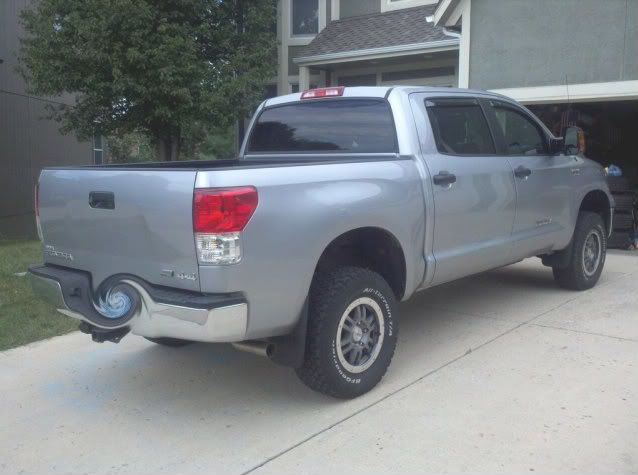
I have narrowed the tire sizes for big Nambe down to 2 possibilities. I don't want to go too big because it is my DD. Currently, the size wheel that came from the factory was 255/70r18. I really got a great deal on a set of new 17" TRD wheels, and I am going to get these laced with bigger tires ~ preferably a 33" tire. The TRD wheels come standard on the 'Rock Warrior' package with BFG AT (285/70r17 ~ 32.71" diameter / 7.85" width). Here is a pic of 'leveled' RWs with the factory wheels / tires and mild lift. **Alot of Tundra owners are going with a spacers up front and 1 inch blocks in the back. I will be going with heavy duty adjustable coilovers up front and blocks in the rear eventually.
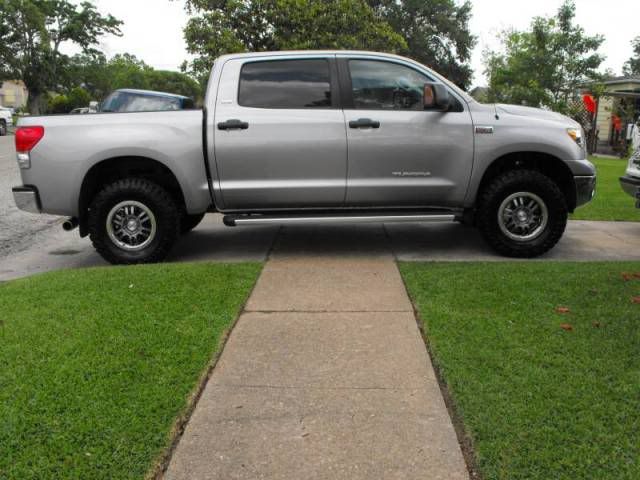
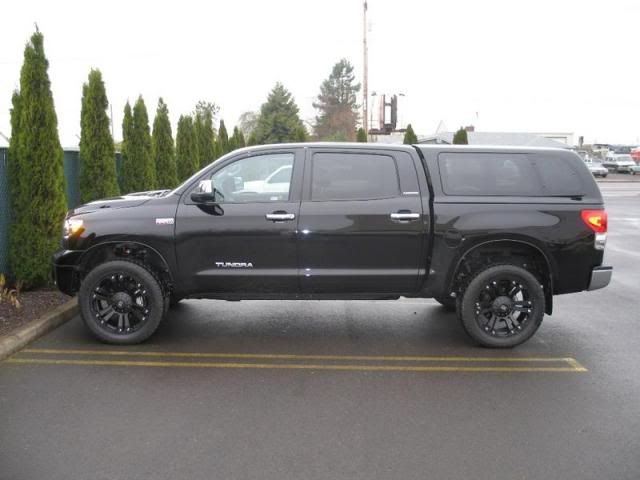
I would like to fill the wheel well a little more with either 295/70r17 or 285/75r17...I was not able to find pics of a RW with 295s on 17" wheels, however, I did find a Tundra running 295/55r20 (32.78" diameter / 6.39" width) of which, the 295/70r17 (33.26" diameter / 8.12" width) would be 1.48% bigger. I do prefer to have a little more sidewall than the 20" rim would afford me...
Here is a pic of 285/75 (33.83" diameter / 8.42" width) which is 3.83% bigger than the stock 285/70 size.
I had a set of Bridgestone Dueler Revo 2 in 265/75r16 on my 4runner. They were the p-rated and I thought that they were wearing faster than I had wanted. I didn't know if these were going to make it to 50,000 miles which was the warranty on them. So, I will try Nitto Terra Grapplers this time in an LT tire instead.
Anyway, if you have some additional insight into the tire / wheel madness, chime on in!
Regards,
BWJ
I have narrowed the tire sizes for big Nambe down to 2 possibilities. I don't want to go too big because it is my DD. Currently, the size wheel that came from the factory was 255/70r18. I really got a great deal on a set of new 17" TRD wheels, and I am going to get these laced with bigger tires ~ preferably a 33" tire. The TRD wheels come standard on the 'Rock Warrior' package with BFG AT (285/70r17 ~ 32.71" diameter / 7.85" width). Here is a pic of 'leveled' RWs with the factory wheels / tires and mild lift. **Alot of Tundra owners are going with a spacers up front and 1 inch blocks in the back. I will be going with heavy duty adjustable coilovers up front and blocks in the rear eventually.
I would like to fill the wheel well a little more with either 295/70r17 or 285/75r17...I was not able to find pics of a RW with 295s on 17" wheels, however, I did find a Tundra running 295/55r20 (32.78" diameter / 6.39" width) of which, the 295/70r17 (33.26" diameter / 8.12" width) would be 1.48% bigger. I do prefer to have a little more sidewall than the 20" rim would afford me...
Here is a pic of 285/75 (33.83" diameter / 8.42" width) which is 3.83% bigger than the stock 285/70 size.
I had a set of Bridgestone Dueler Revo 2 in 265/75r16 on my 4runner. They were the p-rated and I thought that they were wearing faster than I had wanted. I didn't know if these were going to make it to 50,000 miles which was the warranty on them. So, I will try Nitto Terra Grapplers this time in an LT tire instead.
Anyway, if you have some additional insight into the tire / wheel madness, chime on in!
Regards,
BWJ
Feb 10, 2012 | 12:23 AM
#3
Thread Starter
Registered User
Joined: Jan 2007
Posts: 125
Likes: 0
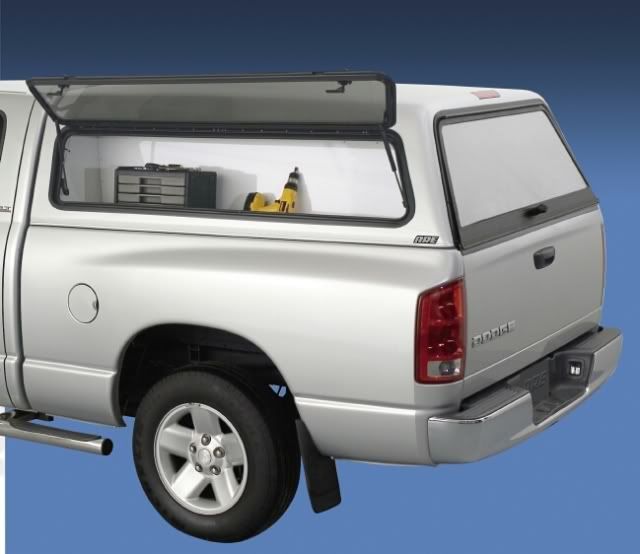
Shell choice...
All,
I have been mulling around on various shells for the rig. Due to the shorter box dimension of the CrewMax, I am trying to utilize the shell as efficiently as possible.
Cab high or higher? - I have decided to go with the cab high at this point. I have had a Leer crown series about 20 years ago on my first P/U, and I really liked it. Some say that it will look like a Sequioa, but you tell me if it does after the build is complete...
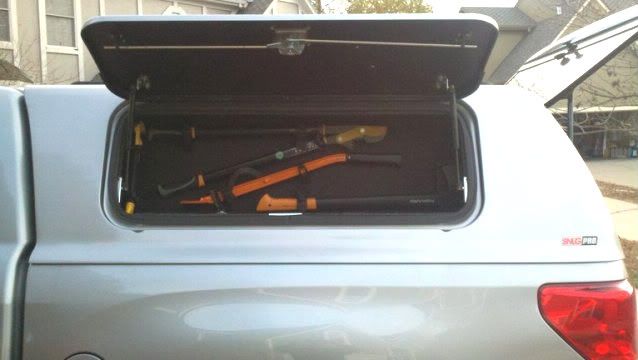
Here are some pics of some offerings that I was looking into available for the Crewmax configuration.
I am also going to go with side tool boxes instead of a custom drawer system. Here I will be able to store tools, winching supplies, etc�I am going to try to get the interior of these boxes sprayed with black Ameraguard bedliner.
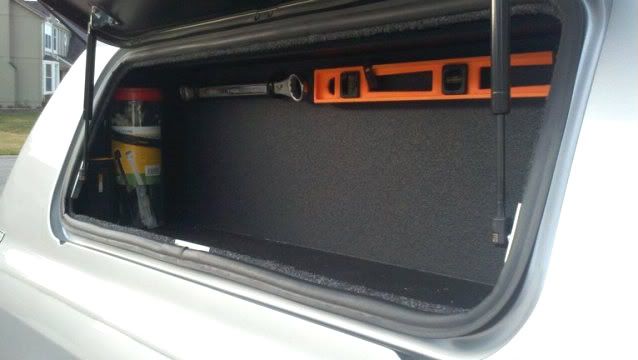
I am not a fan of the Windoor option. Instead, I am considering a fiberglass door painted black to give it the look of a window. The inside of the shell / tool boxes will look like this. I don't think that these boxes will be too restrictive in terms of visibility. I don't think that this space will be missed considering my needs for cargo space with the Sherpa II...

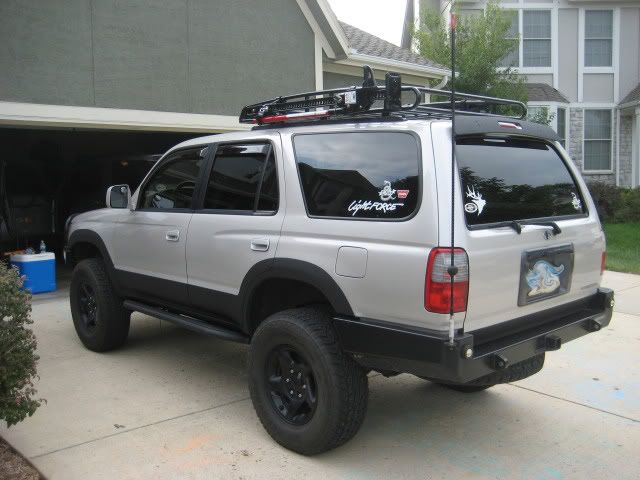
My vision is to incorporate a rack system for the shell. My needs for a rack system would be one that is low profile, strong, and modular. Several options for racks are available. I did have a Bajarack on my 4runner and really liked the utility of it. I'm looking into their more 'flat' style racks as compared to the mule style that I had. I am looking to mount at least an awning, Fiskars shovel, etc...
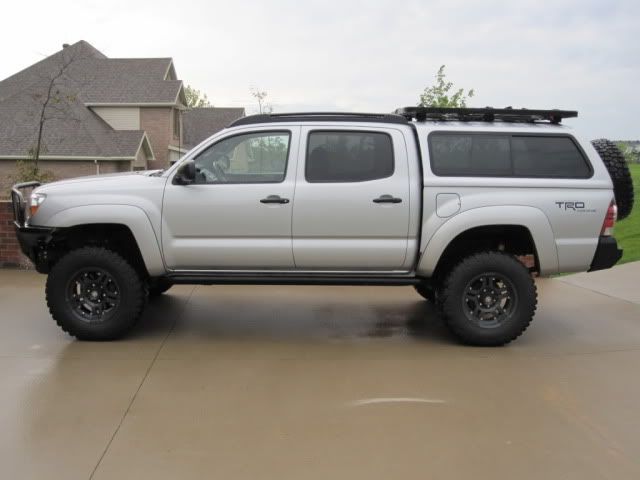
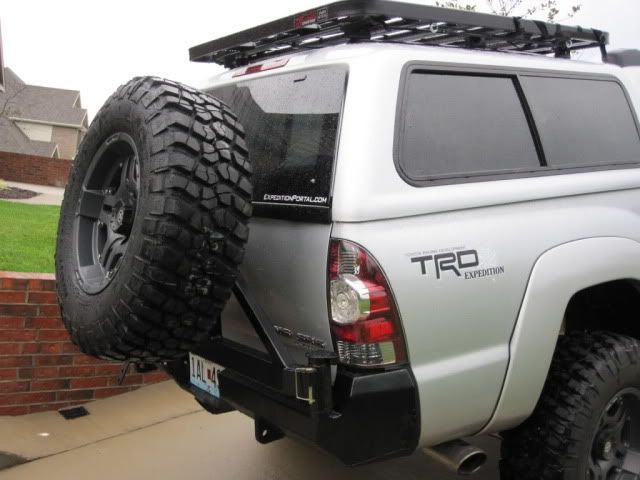
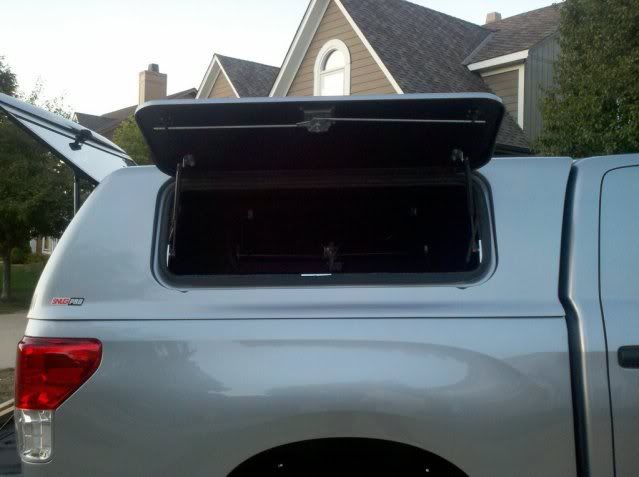
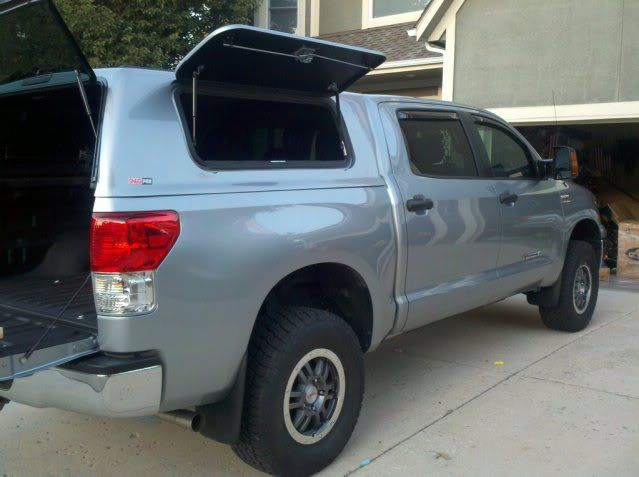
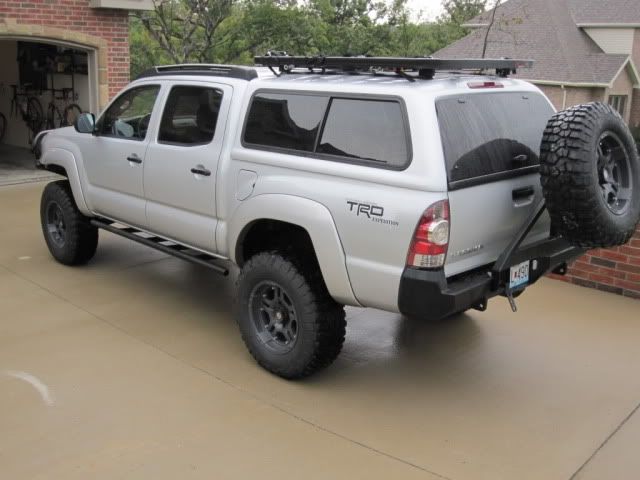
Another possible option is the Front Runner rack system. Props to TomesD for these pics ~ Albeit his rig is a Taco DC short bed. I have a PM out to him about the specifics of his solution. Thanks TomesD! I am intrigued with this option, and I have already been on the phone with Paul May at Equipt inquiring on this rack system...
Anyways, have a great day!
Regards,
BWJ
I have been mulling around on various shells for the rig. Due to the shorter box dimension of the CrewMax, I am trying to utilize the shell as efficiently as possible.
Cab high or higher? - I have decided to go with the cab high at this point. I have had a Leer crown series about 20 years ago on my first P/U, and I really liked it. Some say that it will look like a Sequioa, but you tell me if it does after the build is complete
...Here are some pics of some offerings that I was looking into available for the Crewmax configuration.
I am also going to go with side tool boxes instead of a custom drawer system. Here I will be able to store tools, winching supplies, etc�I am going to try to get the interior of these boxes sprayed with black Ameraguard bedliner.
I am not a fan of the Windoor option. Instead, I am considering a fiberglass door painted black to give it the look of a window. The inside of the shell / tool boxes will look like this. I don't think that these boxes will be too restrictive in terms of visibility. I don't think that this space will be missed considering my needs for cargo space with the Sherpa II...
My vision is to incorporate a rack system for the shell. My needs for a rack system would be one that is low profile, strong, and modular. Several options for racks are available. I did have a Bajarack on my 4runner and really liked the utility of it. I'm looking into their more 'flat' style racks as compared to the mule style that I had. I am looking to mount at least an awning, Fiskars shovel, etc...
Another possible option is the Front Runner rack system. Props to TomesD for these pics ~ Albeit his rig is a Taco DC short bed. I have a PM out to him about the specifics of his solution. Thanks TomesD! I am intrigued with this option, and I have already been on the phone with Paul May at Equipt inquiring on this rack system...
Anyways, have a great day!
Regards,
BWJ
Feb 10, 2012 | 12:26 AM
#4
Thread Starter
Registered User
Joined: Jan 2007
Posts: 125
Likes: 0
Well, things are not as they seem...I went back to the 'factory' store for ATC shells, and found out that the shell will not be available for quite some time. Also, the price seems to go up every time I talk them...
Moving on...I found another dealer that sells both the ATC and Snugtop lines. It looks like I am going to pull the trigger on a Snugtop SnugPro series. I chose this shell for the following reasons:
1) Commercial grade shell altogether with a 500 lbs roof rack capacity. I will have them put on Yakima tracks for the time being ~ only ones available. Then I will change that up later on.
2) Only shell that has a fiberglass side doors as an option instead of 'windoors' ~ more security. Comes with a T-handle 3 point locking system. Each tool box has a 100 lbs capacity.
3) All upgrades will be done at cost!
4) This shell is $800 less here...
5) The quality of the Snugtop is markedly better than the other brands that I was looking at...Leer, ARE, ATC, Unicover...
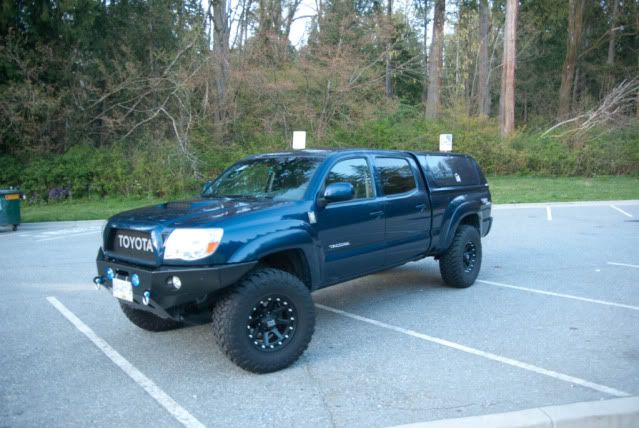
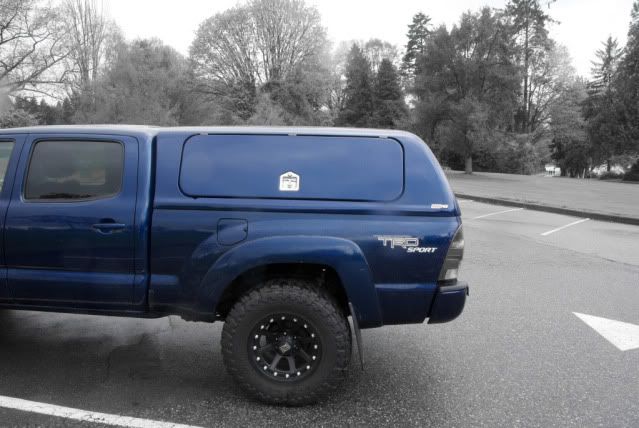
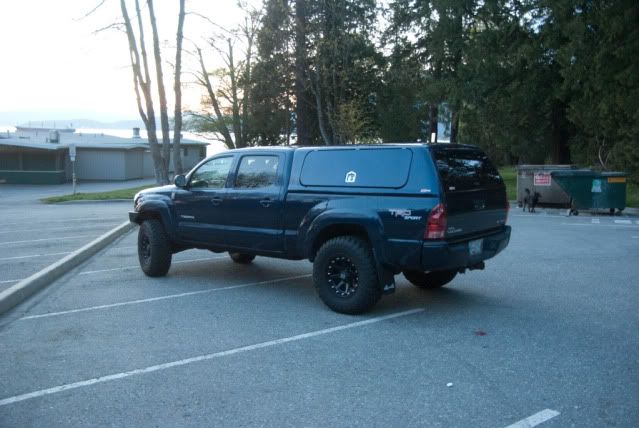
As usual, I was not able to find any pics of Tundras with this kind of shell...Closest pics I could find was a Taco...
I have since upgraded my mirrors to tow mirrors. They are the bomb. So solid doors on the sides will no longer be an issue. Eventually, I will add the Frontrunner rack overhead and slap an awning on it as well...I'm going to go see one of these in person in a couple of weeks. If I like it, it will be ordered.
Regards,
BWJ
Moving on...I found another dealer that sells both the ATC and Snugtop lines. It looks like I am going to pull the trigger on a Snugtop SnugPro series. I chose this shell for the following reasons:
1) Commercial grade shell altogether with a 500 lbs roof rack capacity. I will have them put on Yakima tracks for the time being ~ only ones available. Then I will change that up later on.
2) Only shell that has a fiberglass side doors as an option instead of 'windoors' ~ more security. Comes with a T-handle 3 point locking system. Each tool box has a 100 lbs capacity.
3) All upgrades will be done at cost!
4) This shell is $800 less here...
5) The quality of the Snugtop is markedly better than the other brands that I was looking at...Leer, ARE, ATC, Unicover...
As usual, I was not able to find any pics of Tundras with this kind of shell...Closest pics I could find was a Taco...
I have since upgraded my mirrors to tow mirrors. They are the bomb. So solid doors on the sides will no longer be an issue. Eventually, I will add the Frontrunner rack overhead and slap an awning on it as well...I'm going to go see one of these in person in a couple of weeks. If I like it, it will be ordered.
Regards,
BWJ
Feb 10, 2012 | 12:30 AM
#5
Thread Starter
Registered User
Joined: Jan 2007
Posts: 125
Likes: 0
All,
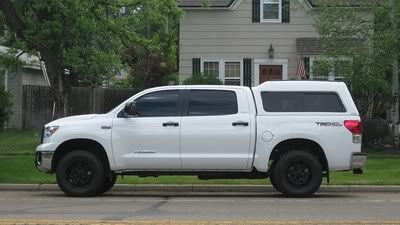
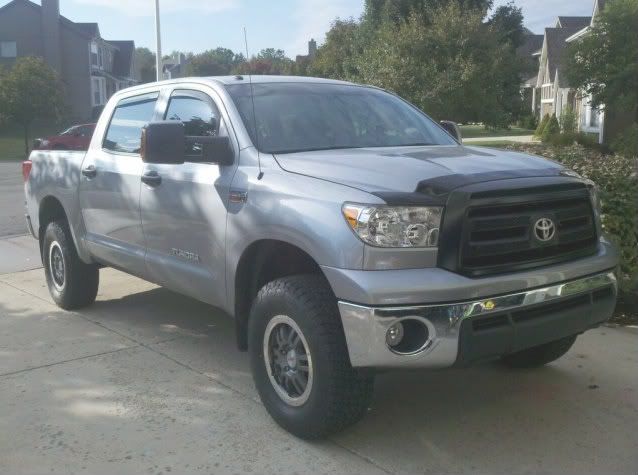
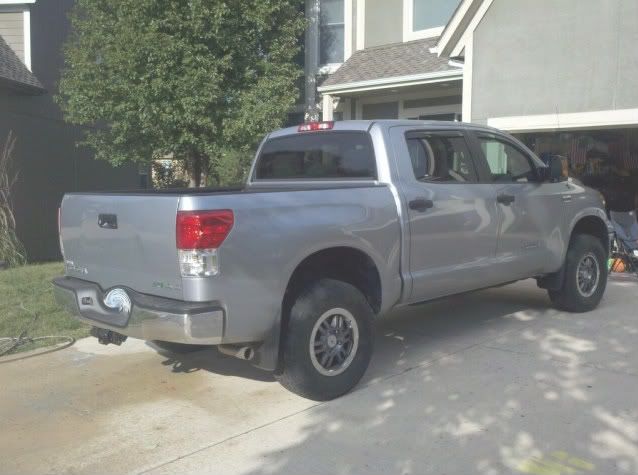
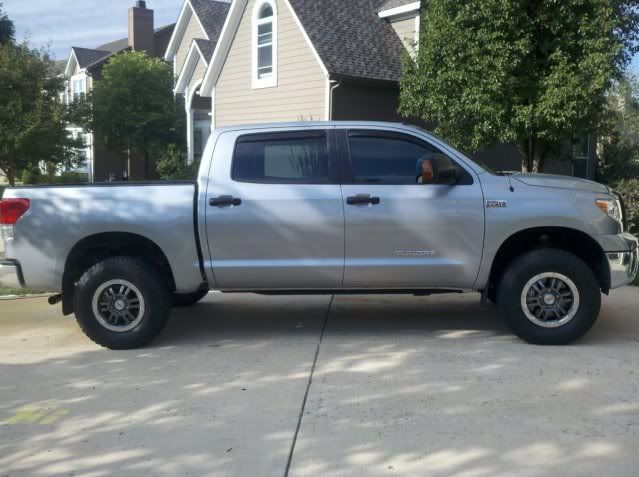
I recently got a Toytec Ultimate lift installed in Big Nambe. Ride is much improved and the components are beefy! I also had some 17" TRD forged alloy rims laying around and laced them up with some Nitto Terra Grapplers. Here she is with the 33s aligned. According to the tire calculator ~ http://ejelta.com/tiresize/, the 295/70 r17 is bigger by 1.69% than the 285/70 r17factory tires. I feel as though this tire size fills out the lifted 3/1 Tundra rather well. Alot different ~ AND BETTER than the stock wheel/tire combination.
Stock:
32s: Caveat ** These tires had 40% tread left on them...**
33s:
Stock:

32s:
33s:
Stock:
32s:
33s:
Enjoy!
Regards,BWJ
I recently got a Toytec Ultimate lift installed in Big Nambe. Ride is much improved and the components are beefy! I also had some 17" TRD forged alloy rims laying around and laced them up with some Nitto Terra Grapplers. Here she is with the 33s aligned. According to the tire calculator ~ http://ejelta.com/tiresize/, the 295/70 r17 is bigger by 1.69% than the 285/70 r17factory tires. I feel as though this tire size fills out the lifted 3/1 Tundra rather well. Alot different ~ AND BETTER than the stock wheel/tire combination.
Stock:
32s: Caveat ** These tires had 40% tread left on them...**
33s:
Stock:
32s:
33s:
Stock:
32s:
33s:
Enjoy!
Regards,BWJ
Feb 10, 2012 | 12:33 AM
#6
Thread Starter
Registered User
Joined: Jan 2007
Posts: 125
Likes: 0
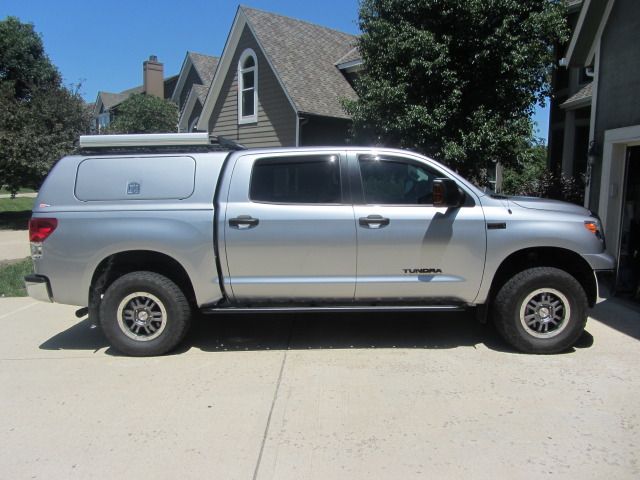
All,
Here is the SnugPRO shell on. I am very pleased with the fit and finish. I was not aware of all the small details that come with this shell. It is expensive, however, not too much more than the other commercial or lesser 'consumer' options. I won't bore you with the pics of the shell off the truck...Enjoy!
Finish is SPOT ON! From my understanding, SnugTOP has a very close working relationship with Toyota. The patterns for their fiberglass molds are digitized ensuring extact body contours. At one time, the SnugTOP shell was a factory option. Dealer warranty issues killed this though...This shell matches the lines of the Tundra perfectly, and the finish is exceptional. I could not be happier ~ Oh what a Marty McFly feeling!

Side profile:
Angle:
Front angle:
Yakima track system is installed at the factory. Roof weight capacity is 500 lbs. It is reinforced with wood, as well as, 2 honeycomb layers of fiberglass. Attachment points are rounded nylon nuts...I may scrub these and go with heavier duty hardware...
Solid fiberglass doors with locking T-handles.
Approximately 1" Fiberglass 'skirt' that overlaps the bed of the truck to minimize ingress of moisture.

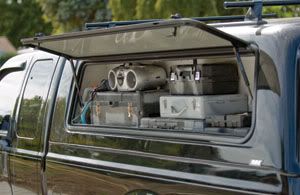
Next up is custom wood shelves to hold my armamentarium...Off to the cabinet shop.
Regards,
BWJ
Here is the SnugPRO shell on
. I am very pleased with the fit and finish. I was not aware of all the small details that come with this shell. It is expensive, however, not too much more than the other commercial or lesser 'consumer' options. I won't bore you with the pics of the shell off the truck...Enjoy!Finish is SPOT ON! From my understanding, SnugTOP has a very close working relationship with Toyota. The patterns for their fiberglass molds are digitized ensuring extact body contours. At one time, the SnugTOP shell was a factory option. Dealer warranty issues killed this though...This shell matches the lines of the Tundra perfectly, and the finish is exceptional. I could not be happier ~ Oh what a Marty McFly feeling!
Side profile:
Angle:
Front angle:
Yakima track system is installed at the factory. Roof weight capacity is 500 lbs. It is reinforced with wood, as well as, 2 honeycomb layers of fiberglass. Attachment points are rounded nylon nuts...I may scrub these and go with heavier duty hardware...
Solid fiberglass doors with locking T-handles.
Approximately 1" Fiberglass 'skirt' that overlaps the bed of the truck to minimize ingress of moisture.
Next up is custom wood shelves to hold my armamentarium...Off to the cabinet shop
.Regards,
BWJ
Feb 10, 2012 | 12:34 AM
#7
Thread Starter
Registered User
Joined: Jan 2007
Posts: 125
Likes: 0
Rack choices...
All,
I am currently considering options for racks on the SnugPRO shell. I have had a Bajarack on my 3rd generation 4runner, and it was great. I used to have a highlift jack and other implements on this rack, but I transferred this back onto the Sherpa II.
Initially, I was looking for a 'lower profile' rack than that of my original 3rd gen Bajarack. I was considering either the Frontrunner Windcheetah or the Rhino rack pioneer platform. However, after thinking about what my needs are going to be, I'm not sure if these systems are going to be the best option. I am going to utilize an awning and attach some longer logging implements on either side. Hmmmmmmm
After much thought, I am uneasy about having two awning brackets and the awning or logging tools serve as a 'wall' for the rack...Here is a pic of an expedition style Bajarack. As you can see, not much there in terms of a wall. I'm thinking a basket type configuration is going to be better. Perhaps the awning brackets for the Frontrunner and Rhino are more robust? I Don't know...
Update: I just got off the phone with Sergio at Bajarack, and he informed me that there are other offerings available that may suit my needs better. I'm going to send him the measurements of my shell / track system and we will go from there. Very pleased to be able to talk to Bajarack and let them know of my specific needs.
I'll keep you all posted...
Regards,
BWJ
Trending Topics
Feb 10, 2012 | 12:36 AM
#8
Thread Starter
Registered User
Joined: Jan 2007
Posts: 125
Likes: 0
Shelf project...
All,
Here is my shelf project completed for now. I ended up doing it myself after I talked to the cabinet maker. Albeit it took me about 5x longer...I found that woodworking is somewhat 'therapeutic' and relaxing. The price of the overall project was about the same as the cabinet shop quote, but this also included me buying a router :wings:. I got these coated with Ameraguard, and with QuickFist clamps, I think it turned out well...
There are two shelves that make up this system. One opens to the bed, the other opens to the side access doors.
Anyway, onto the pics. Sorry about the phone pics, they look alot better on my phone.
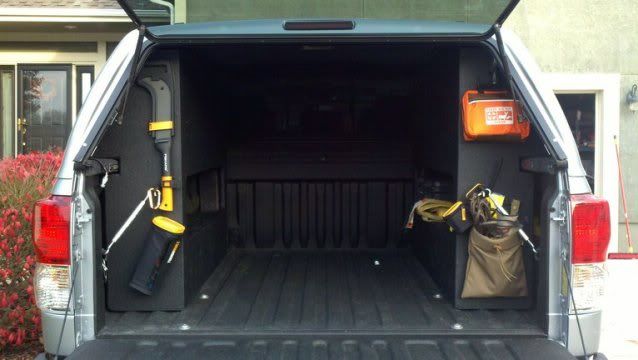
I wanted something that I can remove if I had too. These can be removed by simply loosening several turnbuckles. The cargo openings are going to be 'covered' with Powertye cargo nets. I chose this net due to the openings being 2x2 inch squares as opposed to the usual 3x3 inch squares. Hooks and other hardware is going to the powdercoater and will be gloss black...
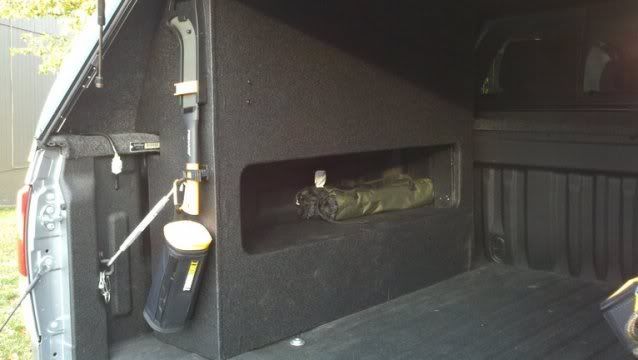
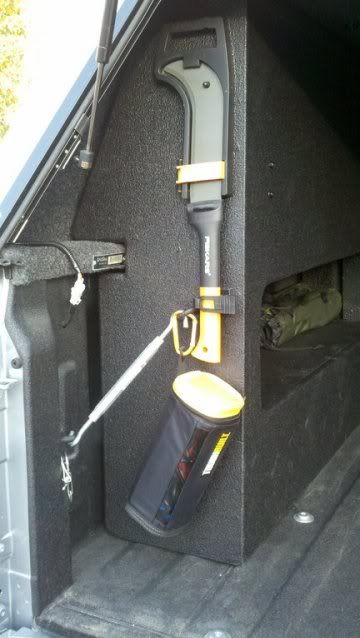
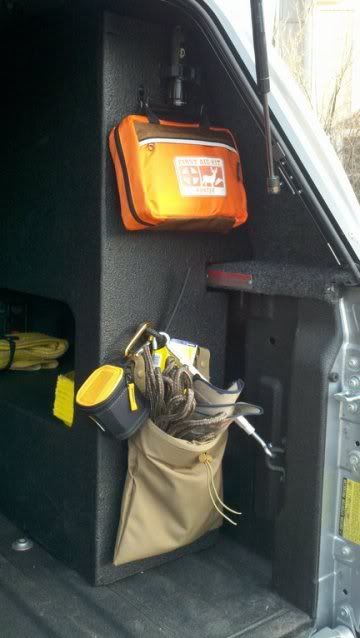
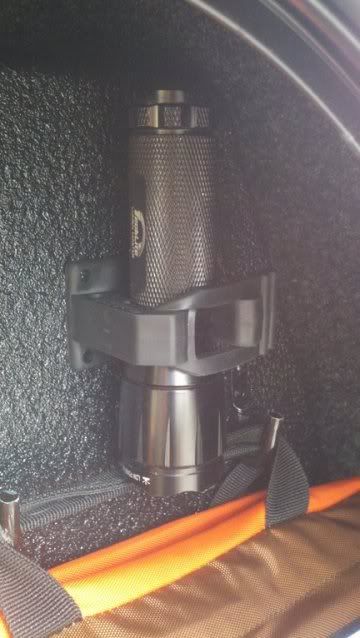
I found a Quikfist mini holder to mount a cheap Costco Tactical flashlight above the first aid kit.
Driverside tool shelf - I chose to mount my various camping armamentarium here...SORRY FOR THE POOR EXPOSURE!
I used both the QuickFist Mini 'Old style' / Mini / Original clamps. These are the bomb...
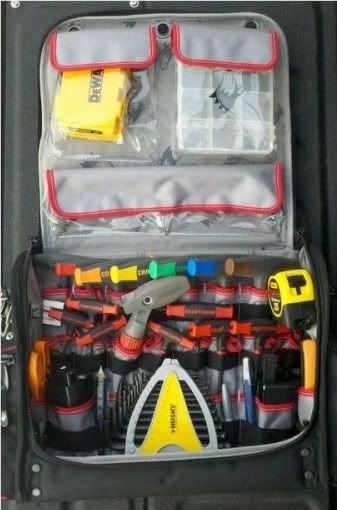
Passenger side tool shelf - I have my wrenches and other hand tools here. The depth of the shelves are about 13" at the base and then 5" at the crest. I found a tool bag at Home Depot that fits this to a tee. Also, my Pelican 1450 case is a perfect fit as well. Cam buckle straps will be ordered on Monday, and I'll cinch these down with 1" footman loops...
I had some time on my hands and mild weather so I knocked out some other projects as well. I'll post pics of this next...To be continued.
Regards,
BWJ
Here is my shelf project completed for now. I ended up doing it myself after I talked to the cabinet maker. Albeit it took me about 5x longer...I found that woodworking is somewhat 'therapeutic' and relaxing. The price of the overall project was about the same as the cabinet shop quote, but this also included me buying a router :wings:. I got these coated with Ameraguard, and with QuickFist clamps, I think it turned out well...
There are two shelves that make up this system. One opens to the bed, the other opens to the side access doors.
Anyway, onto the pics. Sorry about the phone pics, they look alot better on my phone.
I wanted something that I can remove if I had too. These can be removed by simply loosening several turnbuckles. The cargo openings are going to be 'covered' with Powertye cargo nets. I chose this net due to the openings being 2x2 inch squares as opposed to the usual 3x3 inch squares. Hooks and other hardware is going to the powdercoater and will be gloss black...
I found a Quikfist mini holder to mount a cheap Costco Tactical flashlight above the first aid kit.
Driverside tool shelf - I chose to mount my various camping armamentarium here...SORRY FOR THE POOR EXPOSURE!
I used both the QuickFist Mini 'Old style' / Mini / Original clamps. These are the bomb...
Passenger side tool shelf - I have my wrenches and other hand tools here. The depth of the shelves are about 13" at the base and then 5" at the crest. I found a tool bag at Home Depot that fits this to a tee. Also, my Pelican 1450 case is a perfect fit as well. Cam buckle straps will be ordered on Monday, and I'll cinch these down with 1" footman loops...
I had some time on my hands and mild weather so I knocked out some other projects as well. I'll post pics of this next...To be continued.
Regards,
BWJ
Feb 10, 2012 | 12:38 AM
#9
Thread Starter
Registered User
Joined: Jan 2007
Posts: 125
Likes: 0
All,
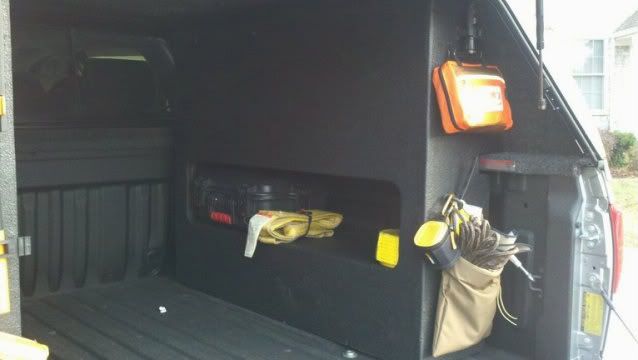
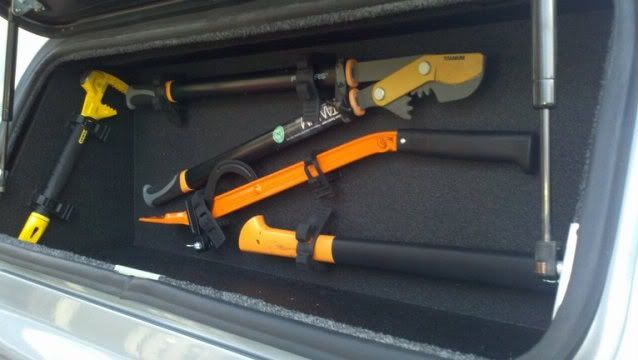
I knocked out some smaller tool projects that I had in the works along with my cabinet project. Mild midwestern weather (Upper 60's) in early November, I'll take it!...**If you have any additional suggestions for tools, please let me know!**
As stated earlier, my tool shelves are such that they are 13" at the base and 5" at the crest. I found a tool bag from Home Depot and a Pelican 1450 case that fits this shelf to a tee. I also have enough room to mount my level / wrenches behind this bag ~ bonus. My planning did not account for this, it was blind luck and coincidence...:bike_rider: It pays to be lucky at times...
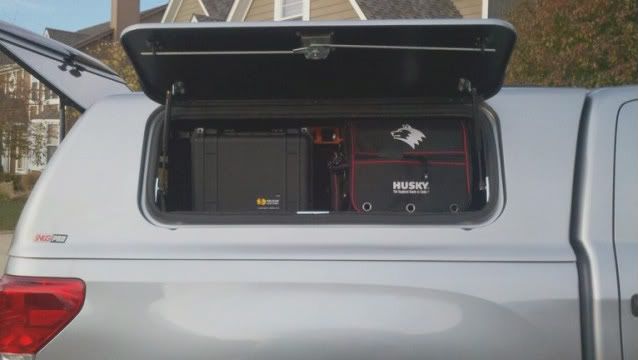
Home Depot bag ~ This is the hanging tool bag. It is made with 1600 weight Cordura, and has a 5 year warranty. Here it is opened up...Plenty of slots and pockets for everything.
Pelican case ~ I made a divider and added some 'Old Style Mini QuickFists' to hold my wrenches. The divider is 1/8" masonite material sprayed with anti-skid coating...
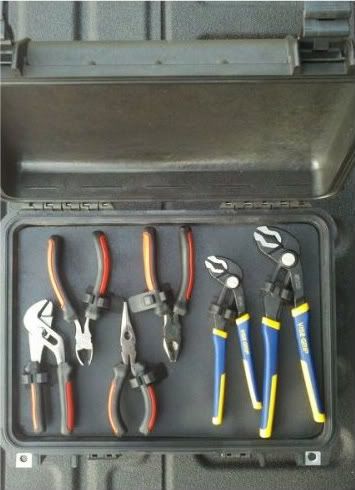
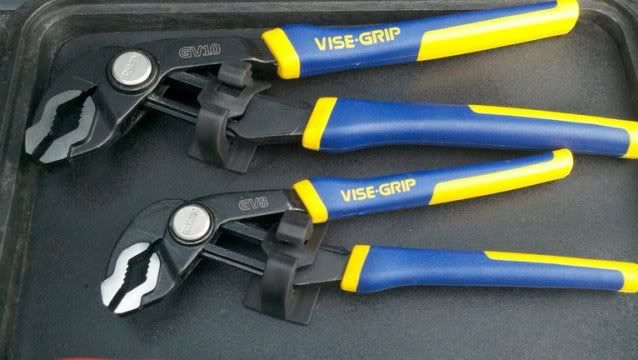
I considered some Knipex wrenches however, I think these Irwin Groove lock wrenches are going to be just fine (and cheaper too)...
I also found these new Craftsman 'universal' wrenches / sockets that will grip six different types of nuts and bolts (Hex 6pt, Square 4pt, Hex 12pt, External Torx�, Spline, and partially rounded hex 6pt). I bought both metric and SAE sockets. These are also the max axxess design so I supposedly don't need shallow and deep sockets. I got some ratcheting wrenches in metric as well...
Plano hard case ~ I picked this XL Plano gun case up at the Bass Pro Outlet for $50! (Kicking myself that I did not pick any more...) This case is ideal to use for my recovery gear. Pick'n'pluck foam is great!...Not bad for a Cheap solution, and it fits just inside my shelf...
Soooo Enjoy!
Regards,
BWJ
Next up: Custom Baja Rack / ShadyBoy awning / Stihl Cant hook...
I knocked out some smaller tool projects that I had in the works along with my cabinet project. Mild midwestern weather (Upper 60's) in early November, I'll take it!...**If you have any additional suggestions for tools, please let me know!**
As stated earlier, my tool shelves are such that they are 13" at the base and 5" at the crest. I found a tool bag from Home Depot and a Pelican 1450 case that fits this shelf to a tee. I also have enough room to mount my level / wrenches behind this bag ~ bonus. My planning did not account for this, it was blind luck and coincidence...:bike_rider: It pays to be lucky at times...
Home Depot bag ~ This is the hanging tool bag. It is made with 1600 weight Cordura, and has a 5 year warranty. Here it is opened up...Plenty of slots and pockets for everything.
Pelican case ~ I made a divider and added some 'Old Style Mini QuickFists' to hold my wrenches. The divider is 1/8" masonite material sprayed with anti-skid coating...
I considered some Knipex wrenches however, I think these Irwin Groove lock wrenches are going to be just fine (and cheaper too)...
I also found these new Craftsman 'universal' wrenches / sockets that will grip six different types of nuts and bolts (Hex 6pt, Square 4pt, Hex 12pt, External Torx�, Spline, and partially rounded hex 6pt). I bought both metric and SAE sockets. These are also the max axxess design so I supposedly don't need shallow and deep sockets. I got some ratcheting wrenches in metric as well...
Plano hard case ~ I picked this XL Plano gun case up at the Bass Pro Outlet for $50! (Kicking myself that I did not pick any more...) This case is ideal to use for my recovery gear. Pick'n'pluck foam is great!...Not bad for a Cheap solution, and it fits just inside my shelf...
Soooo Enjoy!
Regards,
BWJ
Next up: Custom Baja Rack / ShadyBoy awning / Stihl Cant hook...
 Mar 14, 2012 | 08:41 PM
#12
Thread Starter
Registered User
Joined: Jan 2007
Posts: 125
Likes: 0
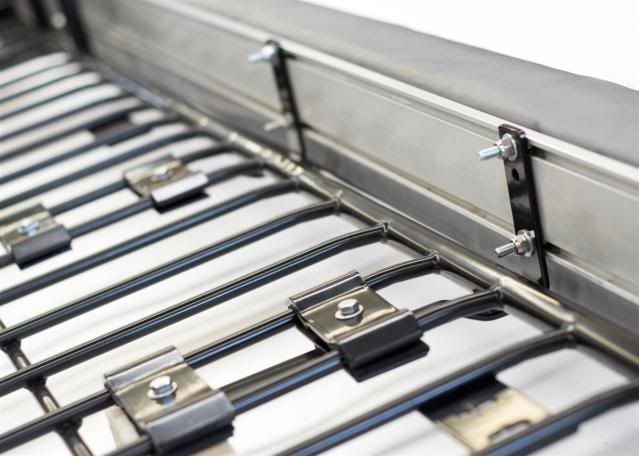
Baja Rack is on...
All,
I recently received my custom Baja Rack. I am VERY pleased with the results, and my expectations have been exceeded. Sergio and John are quality guys to work with, and they provided me an exceptional rack.
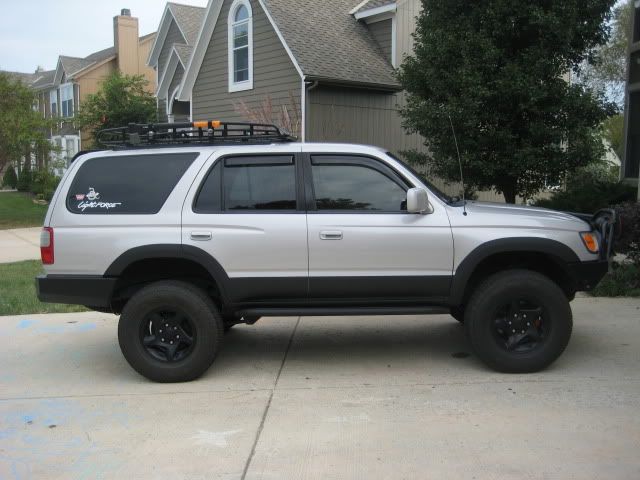
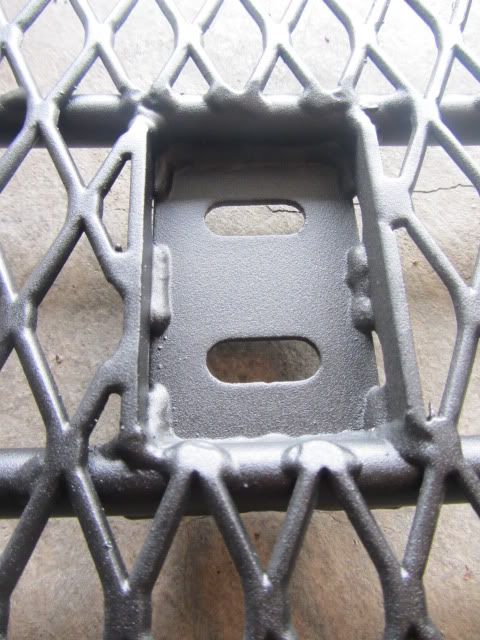
I became familiar with Baja Rack about 2 years ago. I was in search of a rack system to fit my 1998 4runner. I had taken off the factory bars, and was looking for a rack system to let me utilize the OEM tracks already on the roof. I was not having too much luck trying to find a system for a vehilcle over 10 years old...Then I found Baja Rack. Baja Rack was the only rack system available that fit the existing OEM tracks on my 3rd generation 4runner. The mounting system was very strong and utilized the existing tracks without compromising stability and/or strength.
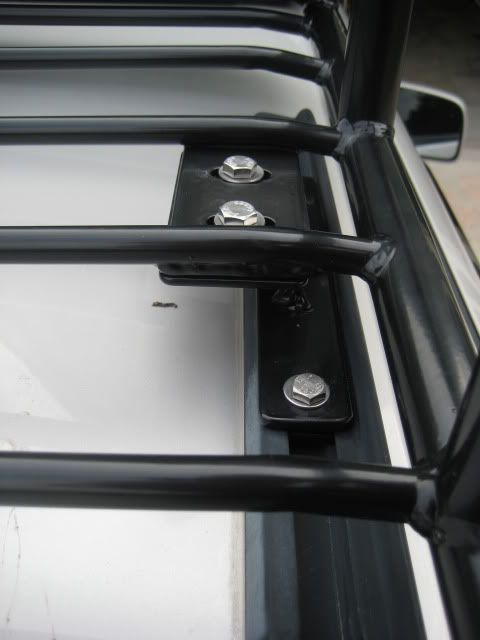
The current foot system is similar to the picture above...
I had a Yakima track system installed on my SnugTop SnugPro shell, knowing that I would eventually utilize an overhead rack. One of my criteria was for a lower profile rack system. I considered Rhino Rack, Frontrunner, Baja Rack and Yakima to name a few. After contacting the manufacturers, I found that the existing rack systems were retrofitted to fit into the track system, and then work up from there. I knew that Baja Rack had several offerings for Toyotas, however, not specifically for the 2nd generation Tundra. I was beginning to think that a custom rack was going to be the only route...
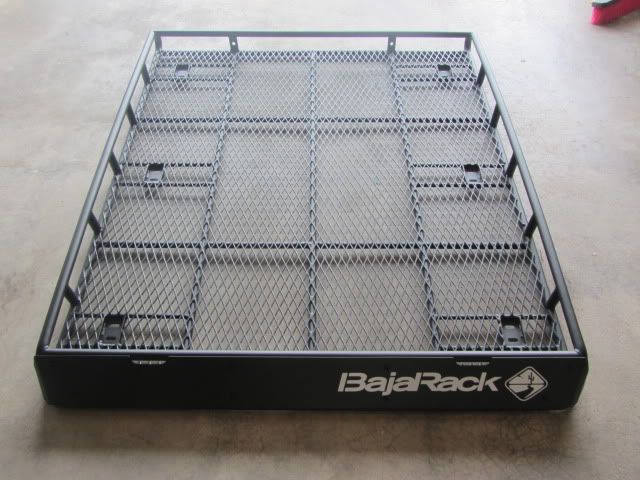
Since the Crewmax Tundra has a 5 1/2 foot bed, my options were limited in what I could use. After leaving inquiries with all the mentioned vendors above, I was contacted by John Gjata ~ Baja Rack's head engineer. We discussed my vision for the rack, what my needs were, and within several months, my custom rack was in my possession. I wanted a low profile rack to help as much as possible with mpgs ~ I know the Tundra is thirsty. This design is similar to that of their 5th generation 4runner offering. I wanted an expanded metal floor for more tie down options as opposed to the usual floor consisting of bars. My previous rack came with a smooth powder coat finish. This rack came with a textured, matte black finish - it is tougher that the old powder coating and is much better in my opinion.
If you are having to find a solution to your rack needs, custom or otherwise, I would highly recommend you give Baja Rack a call. Anyway, on to the pics!
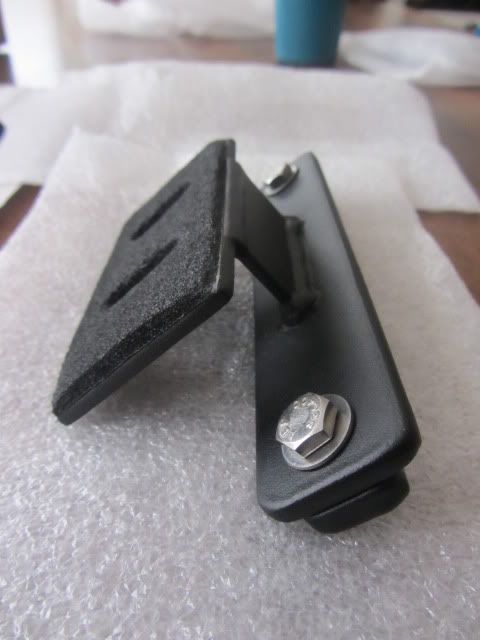
Feet - 3 per side. The middle feet are a touch shorter than the other two. I have three attachment points per side.
Rack itself - This rack is plenty stout. The feet attach to the rack in the recessed boxes, thus, not interfering with your cargo.
I got a chance to 'test' this out mounting my gear, I am north of 220 lbs. There was not any noticeable flex associated with me on top of the rack... I would say that it passed with flying colors.
I'll post up pics of the tools and Shadyboy awning soon...
Regards,
BWJ
I recently received my custom Baja Rack. I am VERY pleased with the results, and my expectations have been exceeded. Sergio and John are quality guys to work with, and they provided me an exceptional rack.
I became familiar with Baja Rack about 2 years ago. I was in search of a rack system to fit my 1998 4runner. I had taken off the factory bars, and was looking for a rack system to let me utilize the OEM tracks already on the roof. I was not having too much luck trying to find a system for a vehilcle over 10 years old...Then I found Baja Rack. Baja Rack was the only rack system available that fit the existing OEM tracks on my 3rd generation 4runner. The mounting system was very strong and utilized the existing tracks without compromising stability and/or strength.
The current foot system is similar to the picture above...
I had a Yakima track system installed on my SnugTop SnugPro shell, knowing that I would eventually utilize an overhead rack. One of my criteria was for a lower profile rack system. I considered Rhino Rack, Frontrunner, Baja Rack and Yakima to name a few. After contacting the manufacturers, I found that the existing rack systems were retrofitted to fit into the track system, and then work up from there. I knew that Baja Rack had several offerings for Toyotas, however, not specifically for the 2nd generation Tundra. I was beginning to think that a custom rack was going to be the only route...
Since the Crewmax Tundra has a 5 1/2 foot bed, my options were limited in what I could use. After leaving inquiries with all the mentioned vendors above, I was contacted by John Gjata ~ Baja Rack's head engineer. We discussed my vision for the rack, what my needs were, and within several months, my custom rack was in my possession. I wanted a low profile rack to help as much as possible with mpgs ~ I know the Tundra is thirsty. This design is similar to that of their 5th generation 4runner offering. I wanted an expanded metal floor for more tie down options as opposed to the usual floor consisting of bars. My previous rack came with a smooth powder coat finish. This rack came with a textured, matte black finish - it is tougher that the old powder coating and is much better in my opinion.
If you are having to find a solution to your rack needs, custom or otherwise, I would highly recommend you give Baja Rack a call. Anyway, on to the pics!
Feet - 3 per side. The middle feet are a touch shorter than the other two. I have three attachment points per side.
Rack itself - This rack is plenty stout. The feet attach to the rack in the recessed boxes, thus, not interfering with your cargo.
I got a chance to 'test' this out mounting my gear, I am north of 220 lbs. There was not any noticeable flex associated with me on top of the rack... I would say that it passed with flying colors.
I'll post up pics of the tools and Shadyboy awning soon...
Regards,
BWJ
Last edited by bigwapitijohnny; Mar 16, 2012 at 01:00 AM.
Mar 29, 2012 | 10:40 PM
#13
Thread Starter
Registered User
Joined: Jan 2007
Posts: 125
Likes: 0
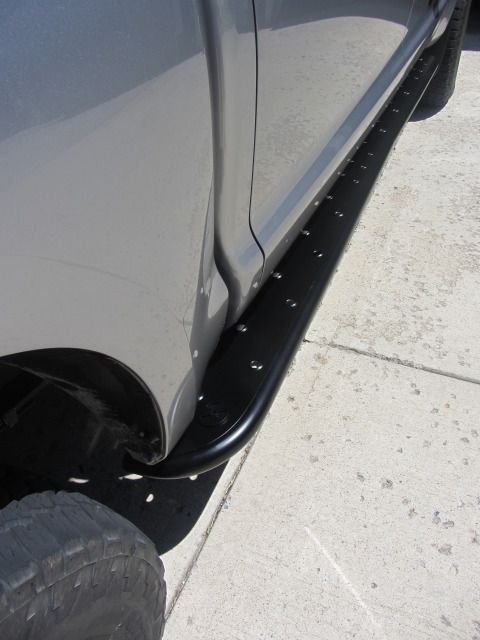
Sliders...
All,
I wanted to post up some pics of my slider project. I went with a local shop here in Olathe, KS ~ Atomic Fabworks. Atomic is a great shop to work with. I did look into some other designs available ~ Budbuilt, Slee and Beefed. However, I chose to give the guys at Atomic a shot. They were able to help me out quickly with some custom feet for my BajaRack.
I showed them my original sliders for my 3rd gen with the design of the single kickout. Originally, I went with Stubbs HDSKOs for the design and quality. However, Stubbs does not have sliders available for current Tundra.
My application for this rig is more for expedition travels versus rock crawling, so I am not in need of anything real heavy duty. I figure with the wheelbase that I have, I'm not going to take this, and my Sherpa II, on any tight trails...Here in Kansas, I'll be encountering mostly fire roads and fallen trees.
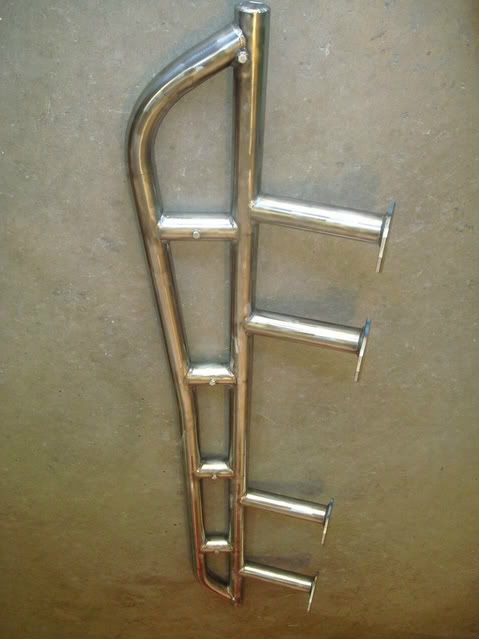
I had a design appointment with Atomic and had several objectives for the sliders:
1) be stout enough to use as a jack point if need be.
2) function as a step to get into the rig and load my BajaRack.
3) extend far enough to keep the door dingers and shopping carts honest.
4) look good.
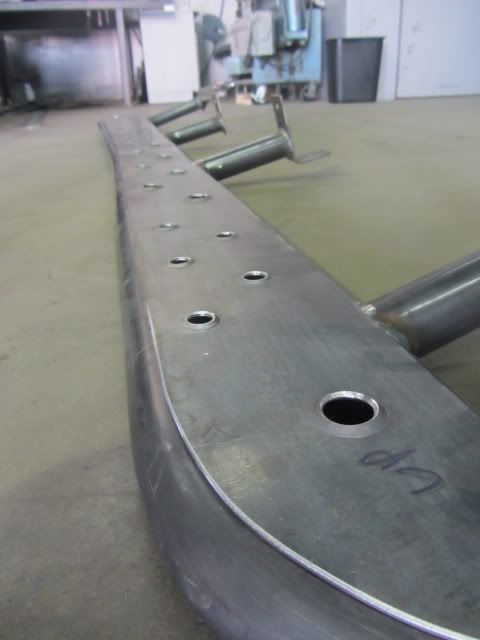
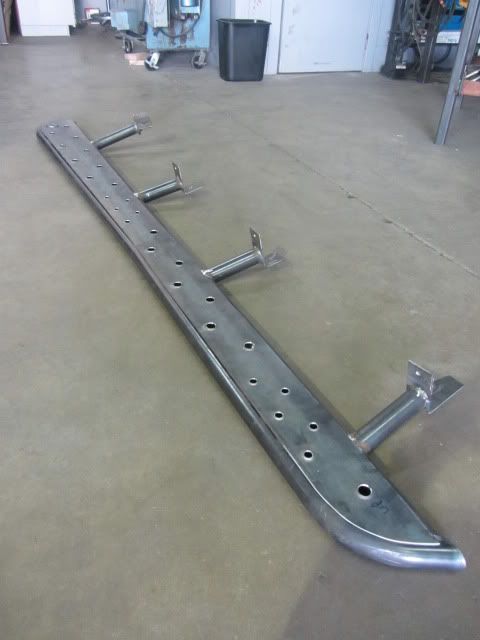
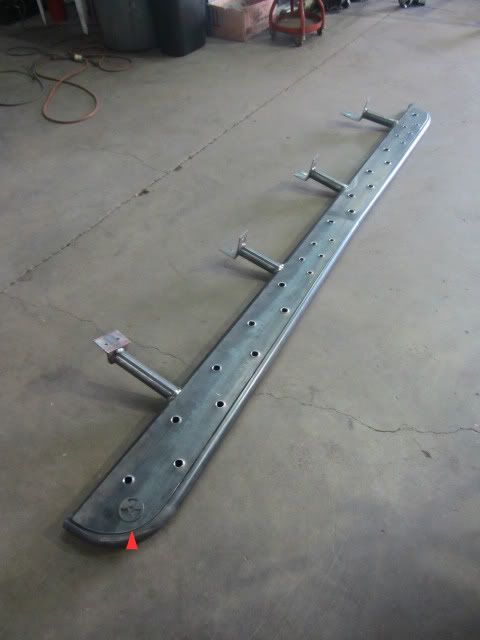
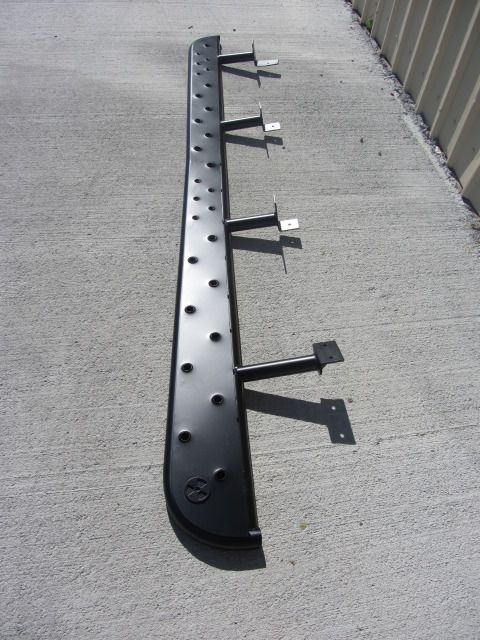
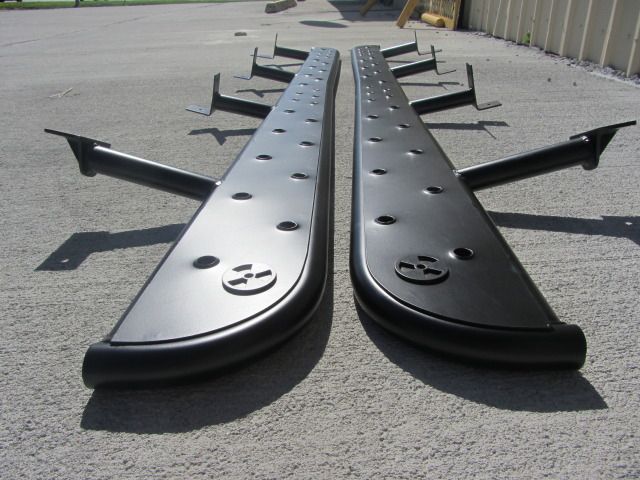
Here are some preliminary pics so far...I am glad that I gave Atomic a shot. They have exceeded my expectations thus far. These are 86" long, made from 1.75" tubing and bolt on. The overall profile is such that they sweep a total of 2" wider than the width in the front.
As you can tell, there is a slight bend in the rear of the slider as seen by the arrows. They did this to tuck the slider under the bed a little tighter...RIGHT ON!

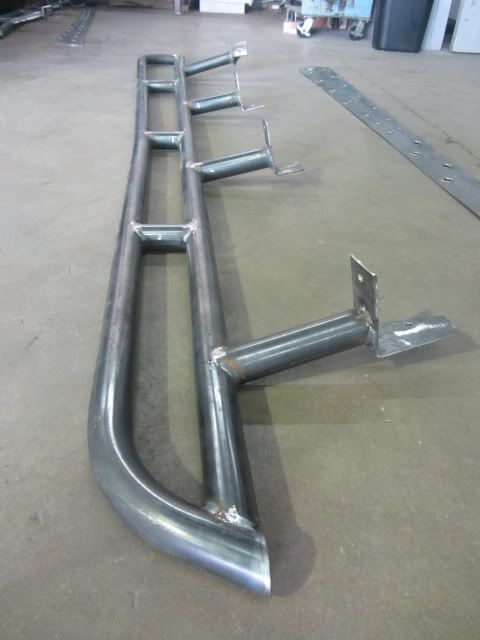
I wanted the slider to serve as a step as well. My son has dinged his shin several times getting in, and my wife wanted to push the slider project up due to difficulty getting into the truck ~ NICE. I went with aluminum five bar for my previous sliders, but after the bed liner coating, traction was not too good.
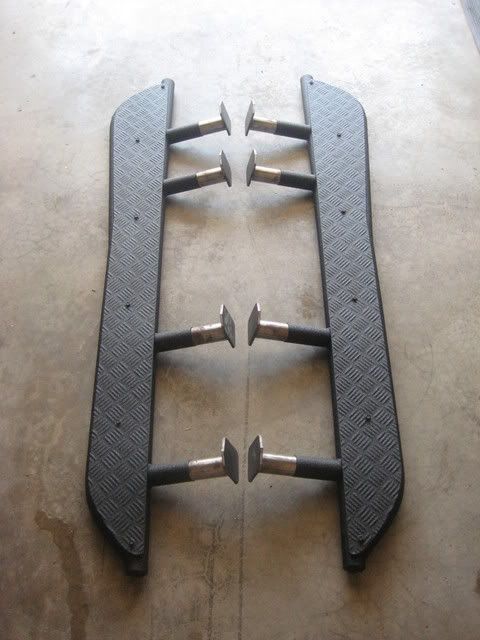
So, I decided to go with a raised dimple pattern along the entire length, and a more dense pattern where you would step to get into the rig...good traction for all.

Finally, there is a little schwag from Atomic. I had them CNC cut their logo and will have it welded by the radius bend to serve as a 'traction' puck ~ arrow again. This will afford me some traction when I want to access the BajaRack.
I'm going with a matte black powder coating this time. I get the sliders installed in 2 weeks. Cannot wait...I'll post up pics when I get them installed.
Regards,
BWJ
I wanted to post up some pics of my slider project. I went with a local shop here in Olathe, KS ~ Atomic Fabworks. Atomic is a great shop to work with. I did look into some other designs available ~ Budbuilt, Slee and Beefed. However, I chose to give the guys at Atomic a shot. They were able to help me out quickly with some custom feet for my BajaRack.
I showed them my original sliders for my 3rd gen with the design of the single kickout. Originally, I went with Stubbs HDSKOs for the design and quality. However, Stubbs does not have sliders available for current Tundra.
My application for this rig is more for expedition travels versus rock crawling, so I am not in need of anything real heavy duty. I figure with the wheelbase that I have, I'm not going to take this, and my Sherpa II, on any tight trails...Here in Kansas, I'll be encountering mostly fire roads and fallen trees.
I had a design appointment with Atomic and had several objectives for the sliders:
1) be stout enough to use as a jack point if need be.
2) function as a step to get into the rig and load my BajaRack.
3) extend far enough to keep the door dingers and shopping carts honest.
4) look good.
Here are some preliminary pics so far...I am glad that I gave Atomic a shot. They have exceeded my expectations thus far. These are 86" long, made from 1.75" tubing and bolt on. The overall profile is such that they sweep a total of 2" wider than the width in the front.
As you can tell, there is a slight bend in the rear of the slider as seen by the arrows. They did this to tuck the slider under the bed a little tighter...RIGHT ON!
I wanted the slider to serve as a step as well. My son has dinged his shin several times getting in, and my wife wanted to push the slider project up due to difficulty getting into the truck ~ NICE. I went with aluminum five bar for my previous sliders, but after the bed liner coating, traction was not too good.
So, I decided to go with a raised dimple pattern along the entire length, and a more dense pattern where you would step to get into the rig...good traction for all.
Finally, there is a little schwag from Atomic. I had them CNC cut their logo and will have it welded by the radius bend to serve as a 'traction' puck ~ arrow again. This will afford me some traction when I want to access the BajaRack.
I'm going with a matte black powder coating this time. I get the sliders installed in 2 weeks. Cannot wait...I'll post up pics when I get them installed.
Regards,
BWJ
Apr 8, 2012 | 02:00 PM
#14
Thread Starter
Registered User
Joined: Jan 2007
Posts: 125
Likes: 0
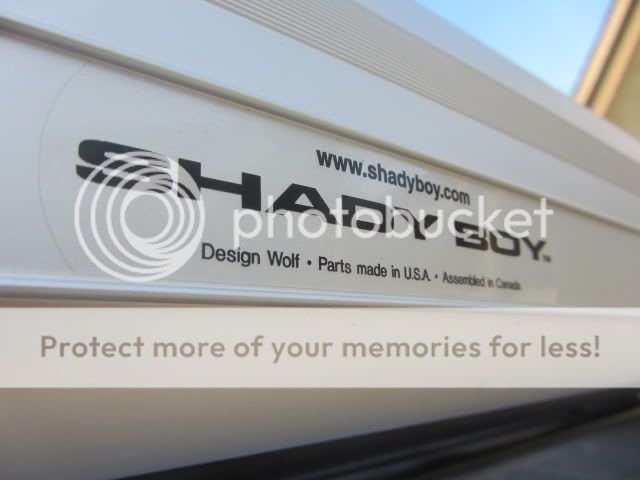
Rack Armamentaria ~ Shady Boy awning
All,
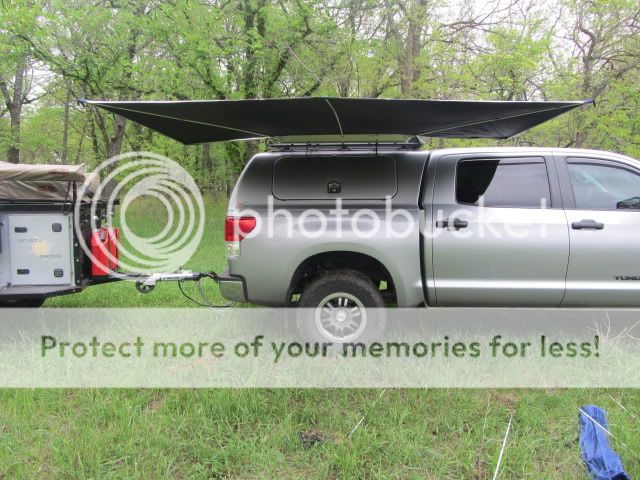
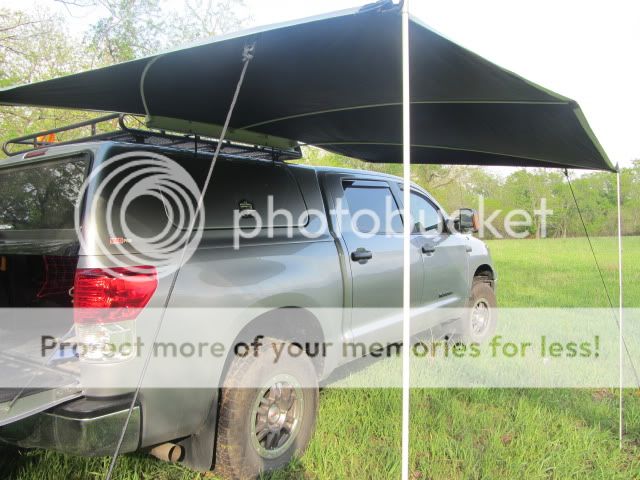
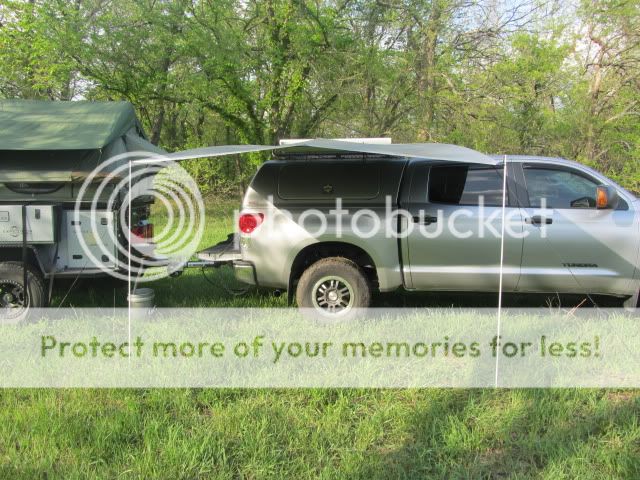
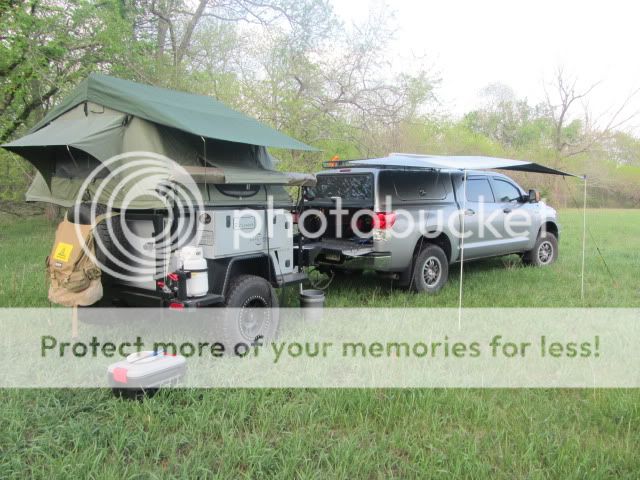
I have just returned from an Easter campout with my son. It was an incredible time to be had. I took some pics of the awning system that I am currently using. I chose to go with the SHADY BOY awning (http://www.shadyboy.com). I chose this system because of the extruded anodized aluminum case, and the compact dimensions allow it to fit the shorter bed / rack dimension of the Crewmax (5 1 /2 feet). I did not want an awning that would extend past the length of the rack, and this system fits the bill to a tee. Shady Boy is very popular with the Vanagon and Eurovan groups, but not the ExPo crowd. It is not as robust as other products available. However, if you are looking for an awning package in a compact, lightweight design (less than 15 lbs); this system should be strongly considered. No, there are no options for screen rooms or wall panels ~ it is too lightweight for that. It is just for providing shade and shade only. Onto the pics...
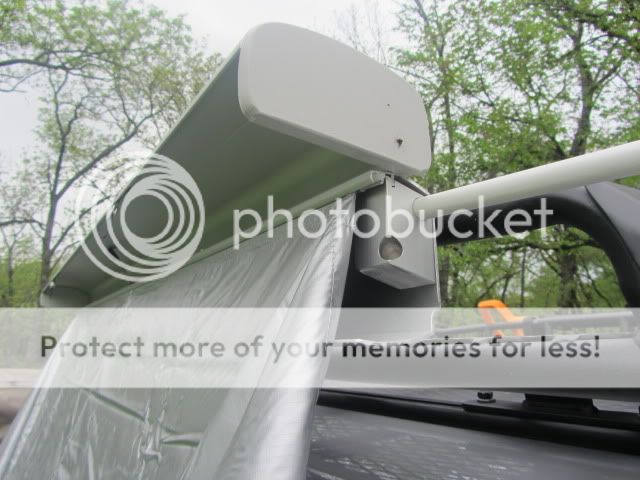
One thing I noticed is the engineering that went into this awning. The case opes up with a spring that keeps the clamshell open. Once opened, the awning and poles can be deployed. There are two button snaps that hold the awning down and when you are rolling it up, there are corresponding snaps, on the awning corners, that will hold the awning in place.
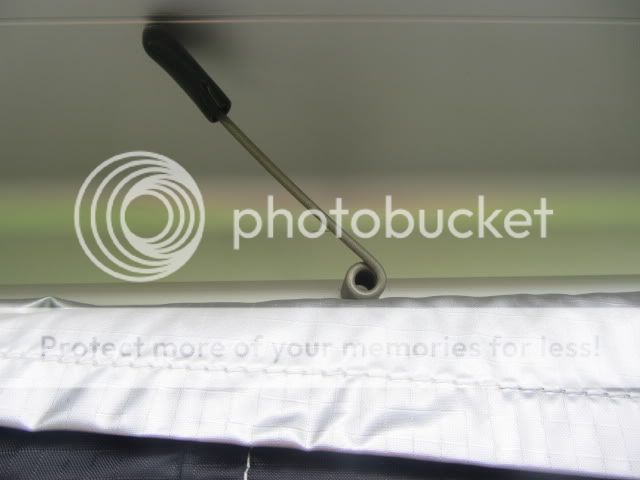

The material is a lightweight ripstop nylon that has a silver finish. This finish is said to be reflective, thus keeping the awning cooler (Somewhat skeptical about this claim...). Anyways, there are a total of 5 heavy duty fiberglass poles, 2 additional lighterweight downdraft poles (optional), and two tie down straps included.
Within the case, there are two milled aluminum blocks in each end, and a milled center block as well. The poles fit into these blocks and the fit is exceptional. So much so, that I struggled with the pole angulation during the initial assembly. These poles are oriented upwards at a slight angle to allow the fiberglass poles to bow out and give the awning some lift.

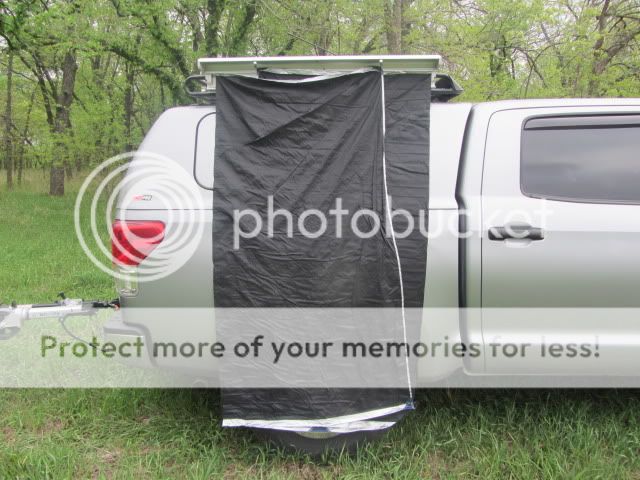
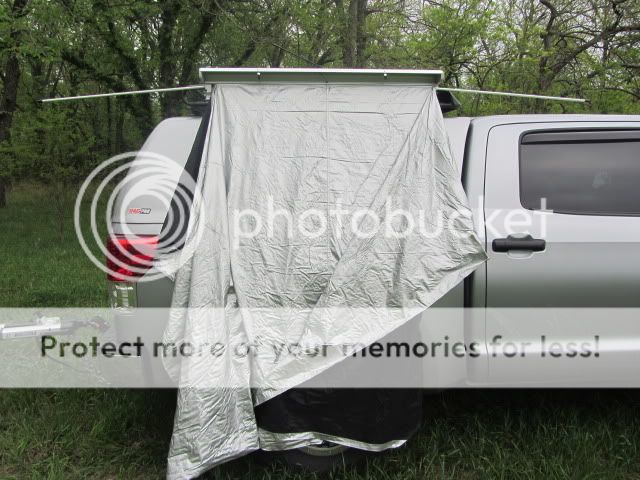
The awning size is 10' x 6' ~ not too bad for an awning that comes in a case that is only 49" in length...Here is the awning with all of the poles in place. As with other awnings, be careful in deploying this in windy conditions. The first time I did this, I saw the flexibility of these poles when the awning inverted and resembled a sail...:Wow1:
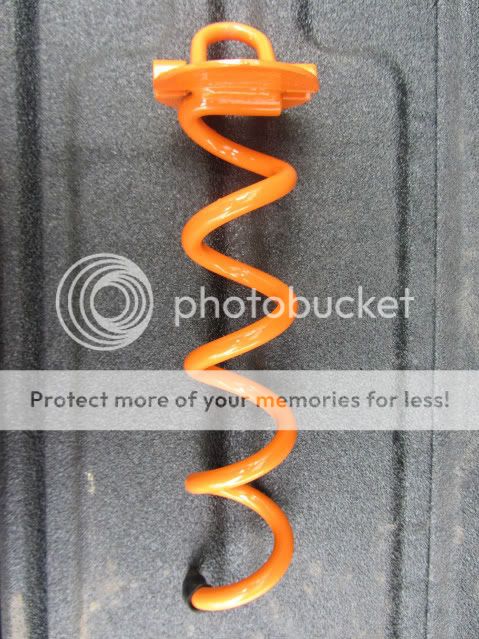
I found these 10" ground anchors at the Home Depot. These are really stout and will be able to widthstand quite alot of wind. I figure if it's too windy for these to anchor down the awning, it shouldn't be set up in the first place...
Here are some pics of the awning staked down and totally set up.
Peavey comes in next week, sliders are coming soon...Stay tuned!
Regards,
BWJ
I have just returned from an Easter campout with my son. It was an incredible time to be had. I took some pics of the awning system that I am currently using. I chose to go with the SHADY BOY awning (http://www.shadyboy.com). I chose this system because of the extruded anodized aluminum case, and the compact dimensions allow it to fit the shorter bed / rack dimension of the Crewmax (5 1 /2 feet). I did not want an awning that would extend past the length of the rack, and this system fits the bill to a tee. Shady Boy is very popular with the Vanagon and Eurovan groups, but not the ExPo crowd. It is not as robust as other products available. However, if you are looking for an awning package in a compact, lightweight design (less than 15 lbs); this system should be strongly considered. No, there are no options for screen rooms or wall panels ~ it is too lightweight for that. It is just for providing shade and shade only. Onto the pics...
One thing I noticed is the engineering that went into this awning. The case opes up with a spring that keeps the clamshell open. Once opened, the awning and poles can be deployed. There are two button snaps that hold the awning down and when you are rolling it up, there are corresponding snaps, on the awning corners, that will hold the awning in place.
The material is a lightweight ripstop nylon that has a silver finish. This finish is said to be reflective, thus keeping the awning cooler (Somewhat skeptical about this claim...). Anyways, there are a total of 5 heavy duty fiberglass poles, 2 additional lighterweight downdraft poles (optional), and two tie down straps included.
Within the case, there are two milled aluminum blocks in each end, and a milled center block as well. The poles fit into these blocks and the fit is exceptional. So much so, that I struggled with the pole angulation during the initial assembly. These poles are oriented upwards at a slight angle to allow the fiberglass poles to bow out and give the awning some lift.
The awning size is 10' x 6' ~ not too bad for an awning that comes in a case that is only 49" in length...Here is the awning with all of the poles in place. As with other awnings, be careful in deploying this in windy conditions. The first time I did this, I saw the flexibility of these poles when the awning inverted and resembled a sail...:Wow1:
I found these 10" ground anchors at the Home Depot. These are really stout and will be able to widthstand quite alot of wind. I figure if it's too windy for these to anchor down the awning, it shouldn't be set up in the first place...
Here are some pics of the awning staked down and totally set up.
Peavey comes in next week, sliders are coming soon...Stay tuned!
Regards,
BWJ
Last edited by bigwapitijohnny; Apr 9, 2012 at 07:16 AM.
May 10, 2012 | 01:52 PM
#15
Thread Starter
Registered User
Joined: Jan 2007
Posts: 125
Likes: 0
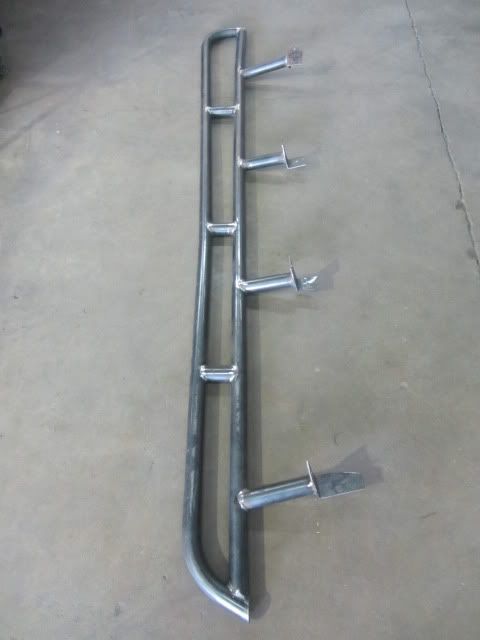
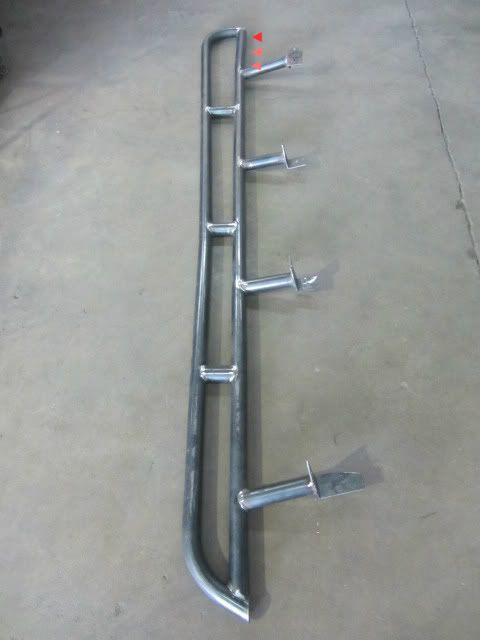
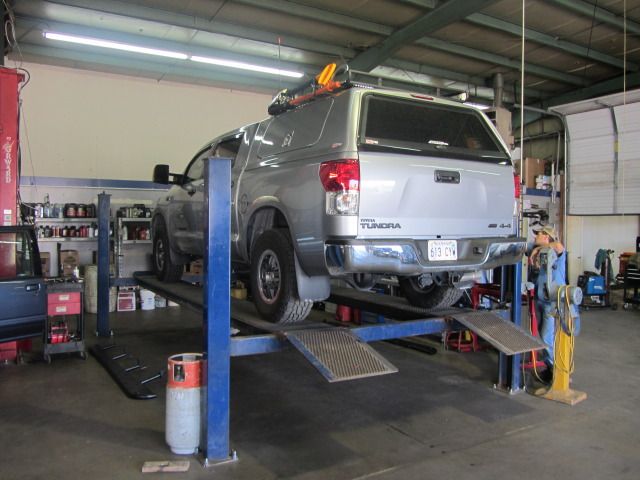
Atomic Fabworks sliders are on...
All,
I got the sliders bolted on yesterday at Atomic Fabworks. They got them back from the powdercoater, and they are exceptional. It's almost a shame that these are going to be beat on, but oh well. Anyway, ON TO THE PICS!

I had a choice between 3 different hole patterns for the top plate. Atomic drew them up and sent me a detailed schematic of each pattern. I am glad that I went with this pattern over anything else. The raised dimples provide great traction so far, I am curious to see if this will change in the rain. Access to the BajaRack now is no longer an issue.
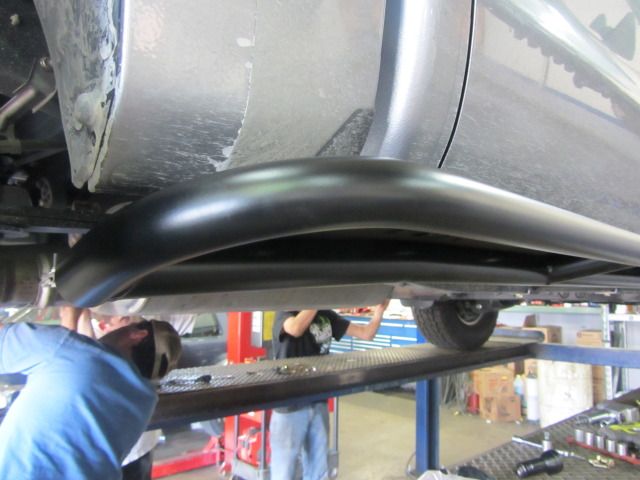
There is a slight bend in the rear of both sliders to sweep down and 'flow' where the bed dips down behind the cab. I wanted a kick-out in the rear, but I wanted one that kicked out gradually. To my eye, I really like how the kick-out sweeps outward over the rear half of the slider.
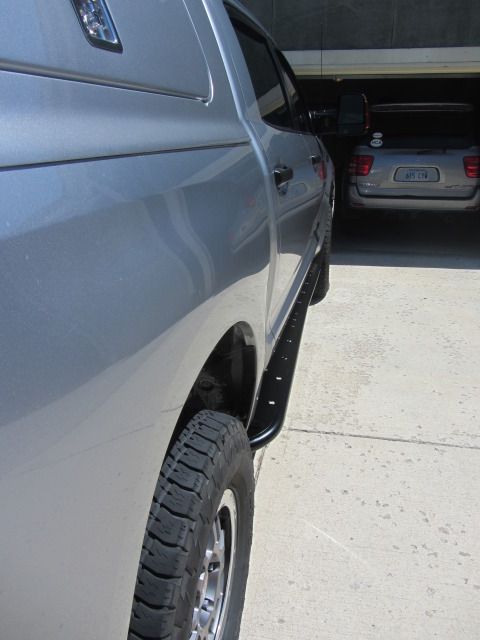
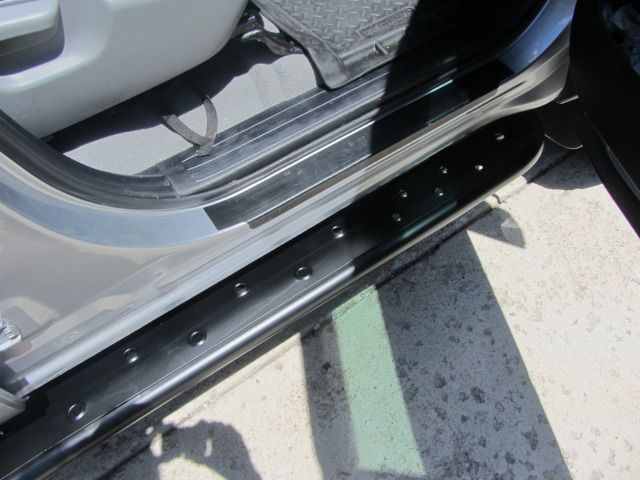

The sliders are 6 inches from the pinchweld up front and 8 inches at their widest. You can see that these accomodate my 'paw' well.
The sliders are mounted using grade 8 hardware and custom fabbed brackets. All in all, Atomic Fabworks did an excellent job. If you are in need of any kind of fabwork, give Atomic a call ~ http://www.atomicfabworks.com/. Ask for either Steve or Kelly.
Regards,
BWJ
I got the sliders bolted on yesterday at Atomic Fabworks. They got them back from the powdercoater, and they are exceptional. It's almost a shame that these are going to be beat on, but oh well. Anyway, ON TO THE PICS!
I had a choice between 3 different hole patterns for the top plate. Atomic drew them up and sent me a detailed schematic of each pattern. I am glad that I went with this pattern over anything else. The raised dimples provide great traction so far, I am curious to see if this will change in the rain. Access to the BajaRack now is no longer an issue.
There is a slight bend in the rear of both sliders to sweep down and 'flow' where the bed dips down behind the cab. I wanted a kick-out in the rear, but I wanted one that kicked out gradually. To my eye, I really like how the kick-out sweeps outward over the rear half of the slider.
The sliders are 6 inches from the pinchweld up front and 8 inches at their widest. You can see that these accomodate my 'paw' well.
The sliders are mounted using grade 8 hardware and custom fabbed brackets. All in all, Atomic Fabworks did an excellent job. If you are in need of any kind of fabwork, give Atomic a call ~ http://www.atomicfabworks.com/. Ask for either Steve or Kelly.
Regards,
BWJ
Jun 5, 2012 | 10:09 PM
#16
Registered User
Joined: Sep 2009
Posts: 322
Likes: 1
From: Moscow idaho
hey i just read through your whole thread, you got yourself a nice looking tundra there. i cant wait to see what else you do with it and how it all turns out. what are your next plans for the beast?
Jun 6, 2012 | 02:03 PM
#18
Thread Starter
Registered User
Joined: Jan 2007
Posts: 125
Likes: 0
Regards,
BWJ
Jul 22, 2012 | 04:39 PM
#19
Thread Starter
Registered User
Joined: Jan 2007
Posts: 125
Likes: 0
Pelican / Armstrong GMTK
All,
I just got back from acquiring the ultimate (my opinion) mobile toolkit available. It was a stroke of luck, and this was a gift from my wife ( :Wow1: ). It is an Armstrong GMTK (General Mechanics Tool Kit). This was a Craigslist find, and I am in shock as to how much I got it for. It is brand new and complete. The gentleman that I bought this from was given this kit overseas. He already had a comprehensive tool kit, and did not need this one. His loss is my substantial gain...For all of you ebay / craigslist hawks, he said that there were PALLETS of these kits remaining following all of the mechanics getting theirs. I figure its only a matter of time before these kits trickle down to ebay and craigslist...Happy hunting.
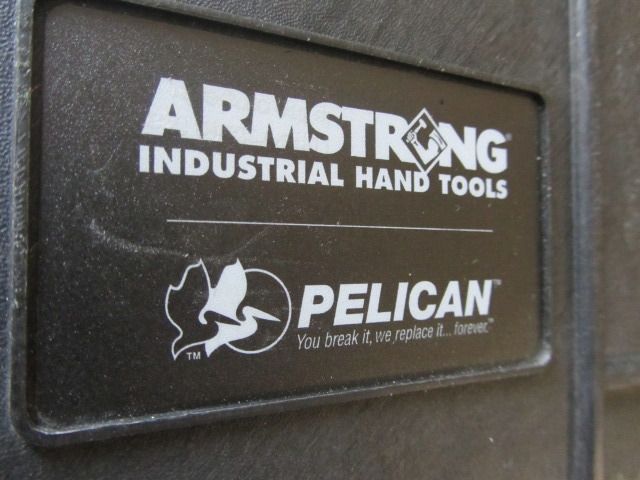
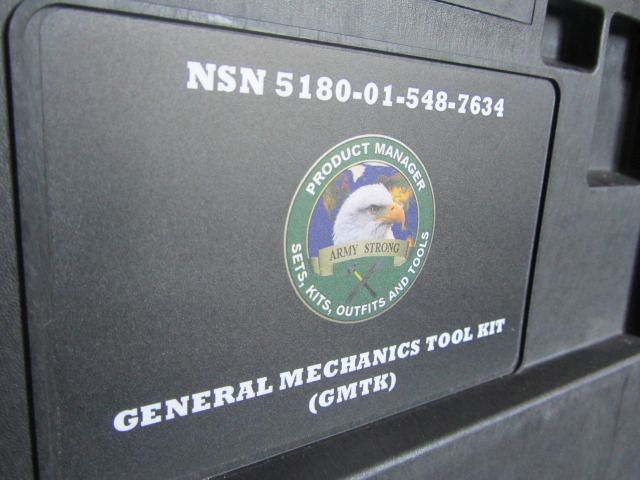
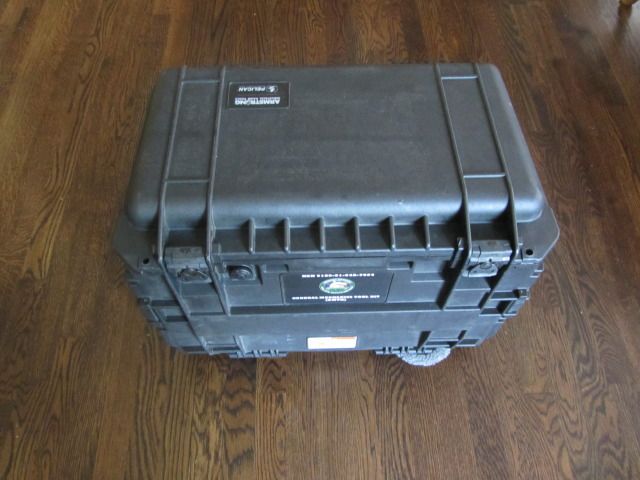
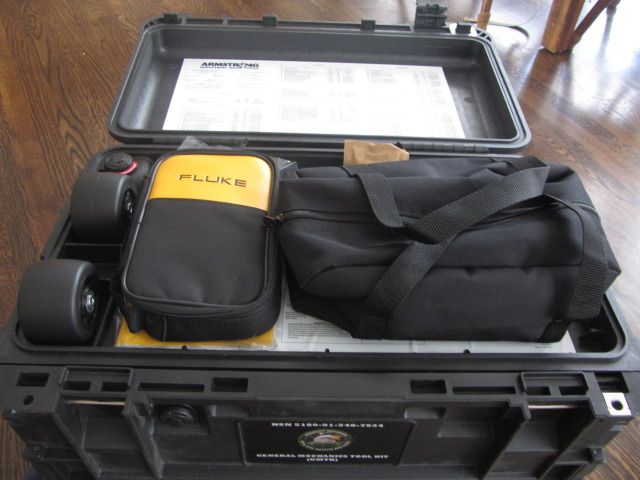
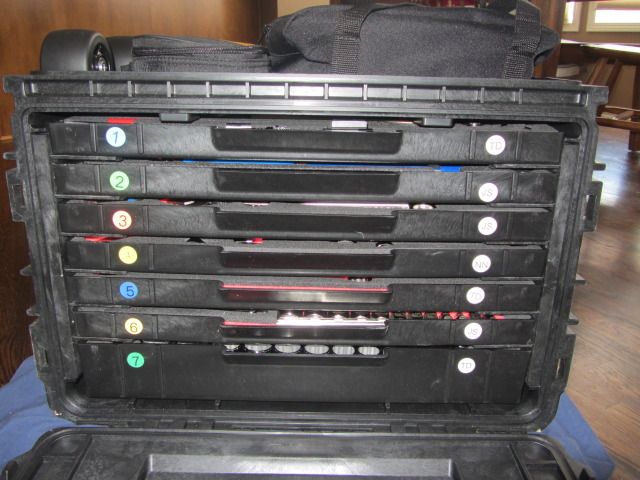
Case is the Pelican 0450. The tools are from Armstrong Industrial Hand Tools (subsidiary of the Danaher corporation). 7 drawer configuration. Laser cut outs and friction fit are exceptional...
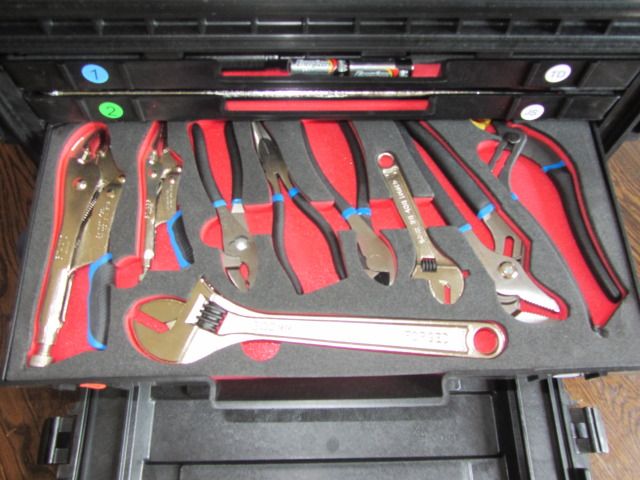
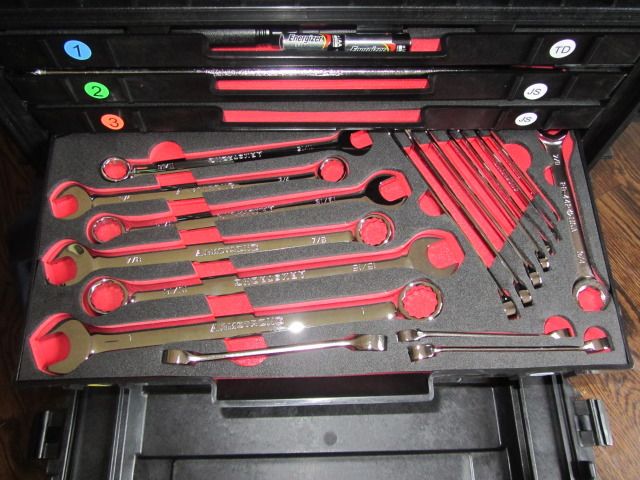
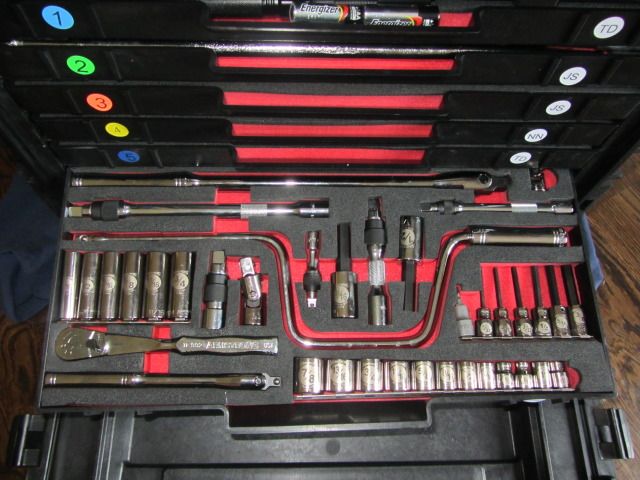
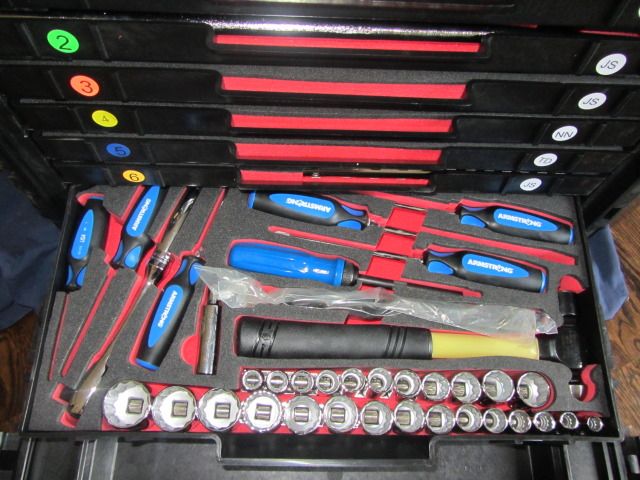
Again this acquisition was truly serendipitous...
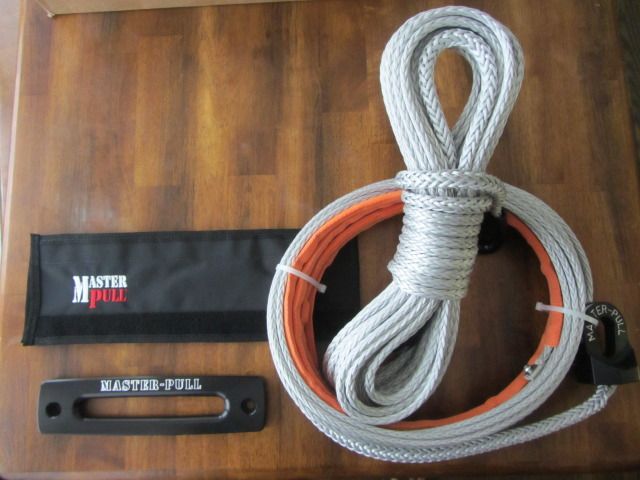
By the way, EXO (Expedition One) front / rear bumpers are shipped. Ordered a Warn VR-10000. Masterpull schwag is here...
As soon as the EXO bumpers arrive, I'll get the mock up pics posted up. Going to go with a rear tire carrier. Toying with the idea of mounting the GMTK on the swing out as well...Not sure, she is heavy...
Regards,
BWJ
I just got back from acquiring the ultimate (my opinion) mobile toolkit available. It was a stroke of luck, and this was a gift from my wife ( :Wow1: ). It is an Armstrong GMTK (General Mechanics Tool Kit). This was a Craigslist find, and I am in shock as to how much I got it for. It is brand new and complete. The gentleman that I bought this from was given this kit overseas. He already had a comprehensive tool kit, and did not need this one. His loss is my substantial gain...For all of you ebay / craigslist hawks, he said that there were PALLETS of these kits remaining following all of the mechanics getting theirs. I figure its only a matter of time before these kits trickle down to ebay and craigslist...Happy hunting.
Case is the Pelican 0450. The tools are from Armstrong Industrial Hand Tools (subsidiary of the Danaher corporation). 7 drawer configuration. Laser cut outs and friction fit are exceptional...
Again this acquisition was truly serendipitous...
By the way, EXO (Expedition One) front / rear bumpers are shipped. Ordered a Warn VR-10000. Masterpull schwag is here...
As soon as the EXO bumpers arrive, I'll get the mock up pics posted up. Going to go with a rear tire carrier. Toying with the idea of mounting the GMTK on the swing out as well...Not sure, she is heavy...
Regards,
BWJ
Last edited by bigwapitijohnny; Jul 26, 2012 at 06:50 AM.
Jul 27, 2012 | 10:06 AM
#20
Thread Starter
Registered User
Joined: Jan 2007
Posts: 125
Likes: 0
Expedition One bumper ~ front
All,
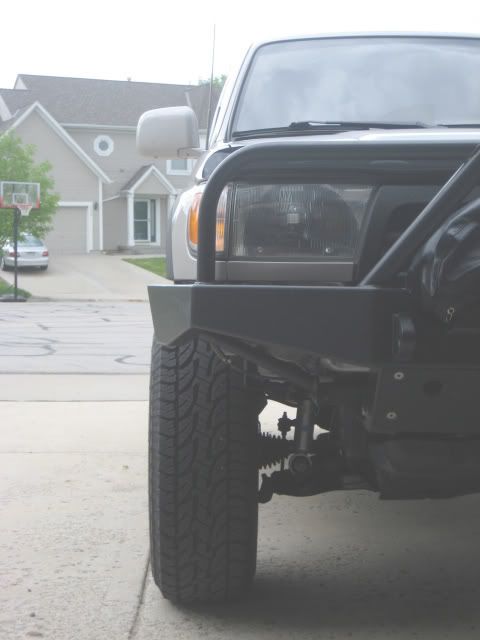
Here is the 'PICS OR IT DIDN'T HAPPEN' post. I just got back from Atomic Fabworks to start the bumper project. I only have the front bumper for now. The rear will be here soon ~ currently it is being 'tweaked' at EXO. Bumper is exceptional in every aspect - very clean and welds are bomber.
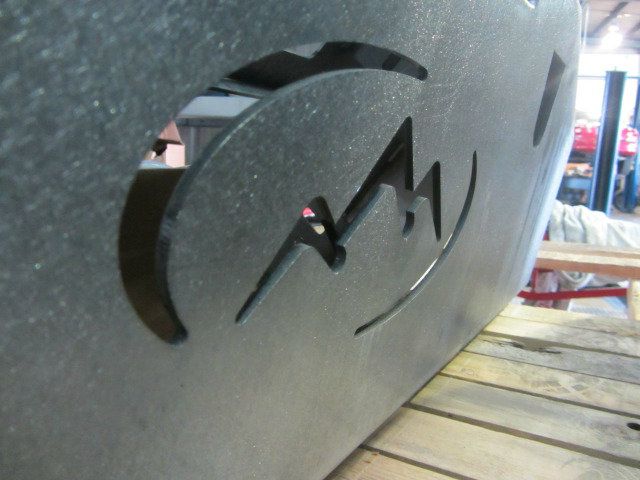
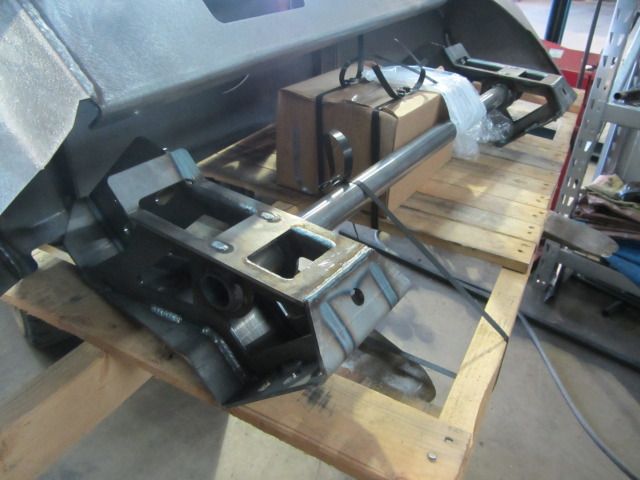
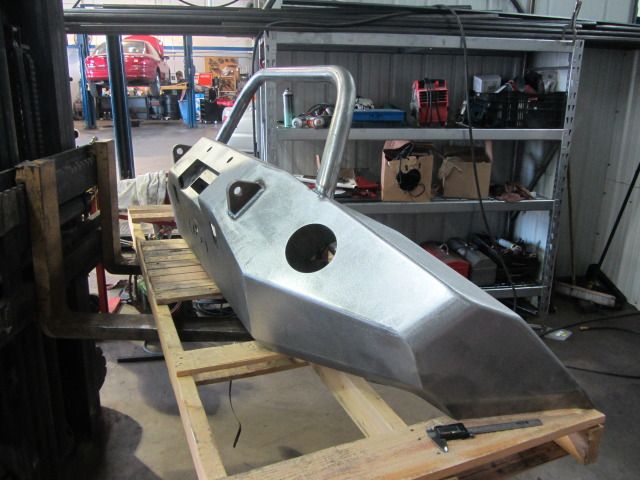
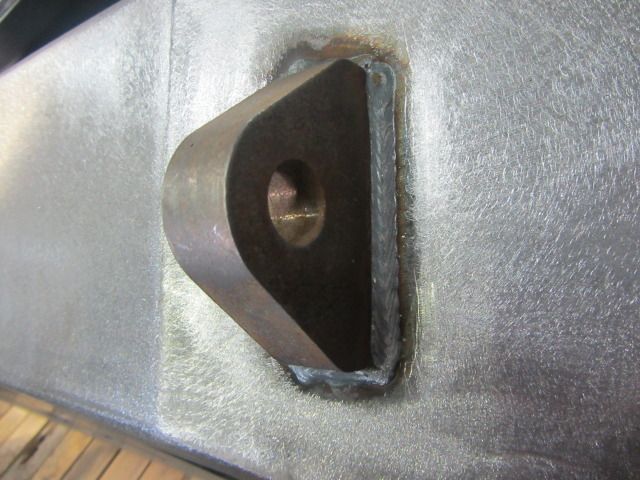
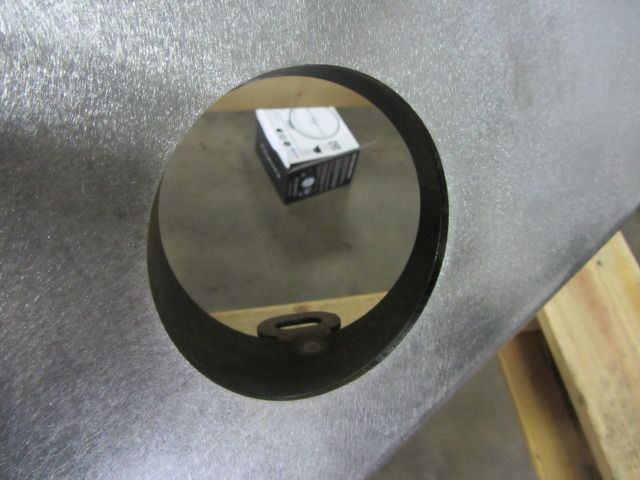
Plan was to measure 2 Fyrlyts and the Dually D2s to see if we need to make adjustments. Holes are perfect and can accomodate a 3rd light if necessary. Fyrlyts are 150W 12v Osram bulbs ~ Will Kuhns at Sierra Expeditions carry these exclusively. He says that these new lights will throw plenty of light. He assured me that I am going to see the output and my words will be 'Holy Shiiiaaat'.
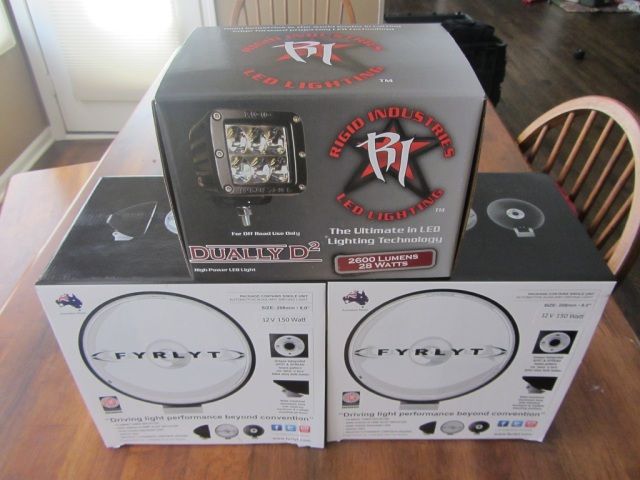
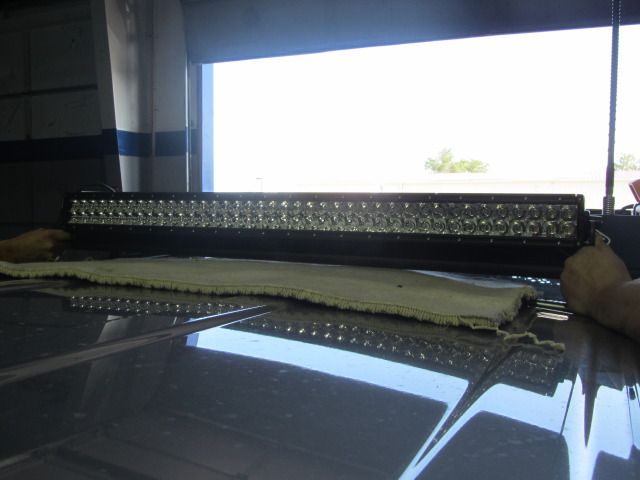
Also putting a Rigid industries 40" E series LED light bar on the Bajarack. Atomic is now working on fabricating tabs for the LED light bar / Bajarack and spacer mounts for the Dually D2s / EXO bumper...I will post a complete review of the lights at a later time complete with photos and video ~ stay tuned.
Going to powdercoat next week...Woot woot!
Regards,
BWJ
Here is the 'PICS OR IT DIDN'T HAPPEN' post. I just got back from Atomic Fabworks to start the bumper project. I only have the front bumper for now. The rear will be here soon ~ currently it is being 'tweaked' at EXO. Bumper is exceptional in every aspect - very clean and welds are bomber.
Plan was to measure 2 Fyrlyts and the Dually D2s to see if we need to make adjustments. Holes are perfect and can accomodate a 3rd light if necessary. Fyrlyts are 150W 12v Osram bulbs ~ Will Kuhns at Sierra Expeditions carry these exclusively. He says that these new lights will throw plenty of light. He assured me that I am going to see the output and my words will be 'Holy Shiiiaaat'.
Also putting a Rigid industries 40" E series LED light bar on the Bajarack. Atomic is now working on fabricating tabs for the LED light bar / Bajarack and spacer mounts for the Dually D2s / EXO bumper...I will post a complete review of the lights at a later time complete with photos and video ~ stay tuned.
Going to powdercoat next week...Woot woot!
Regards,
BWJ


