
bigwapiti's 2011 Tundra build ~ Big Nambe
 Aug 24, 2012 | 10:42 PM
#21
Thread Starter
Registered User
Joined: Jan 2007
Posts: 125
Likes: 0
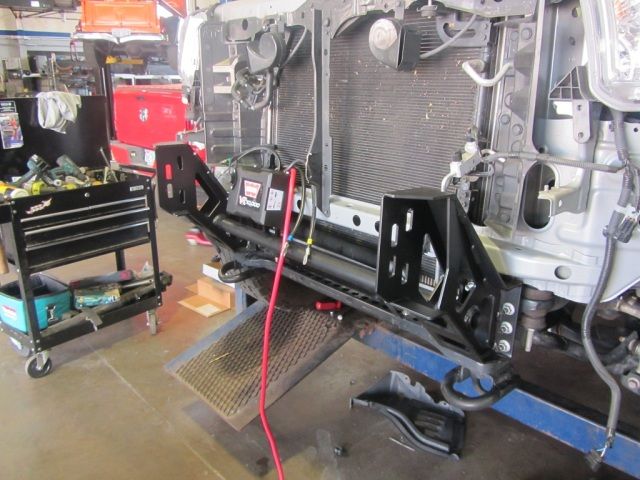
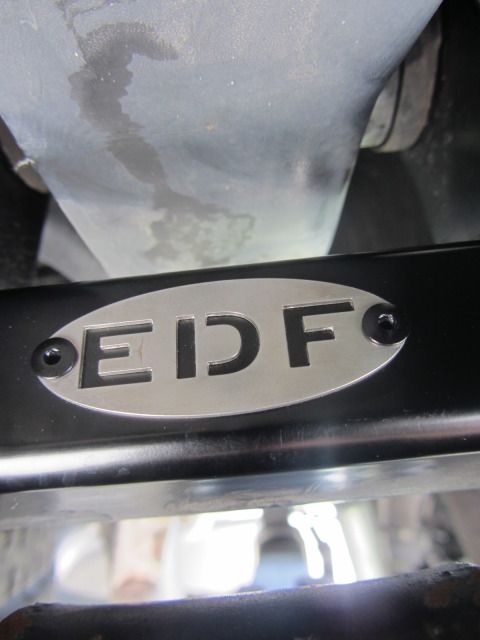
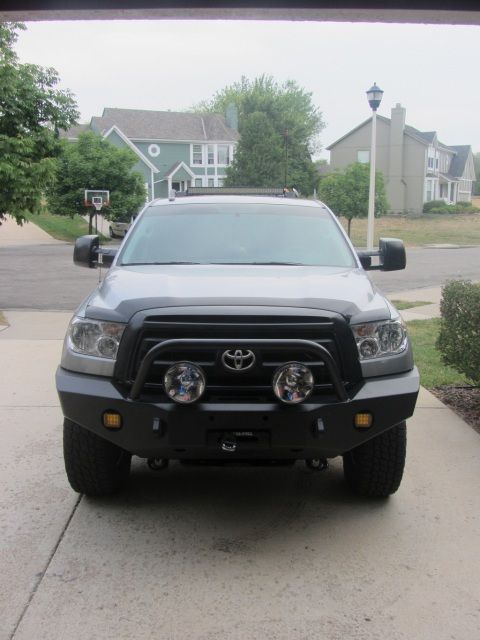
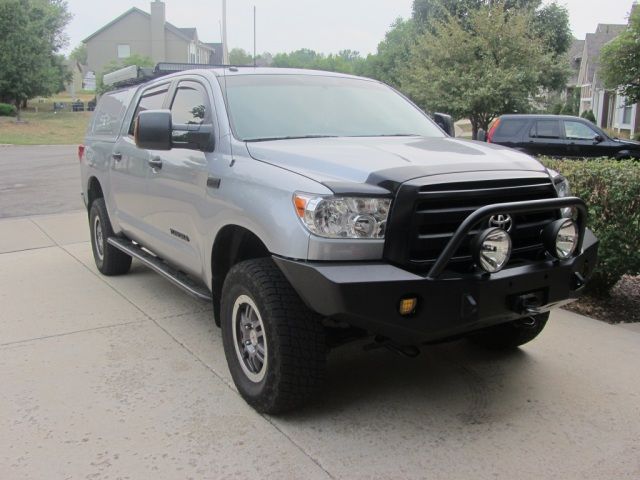
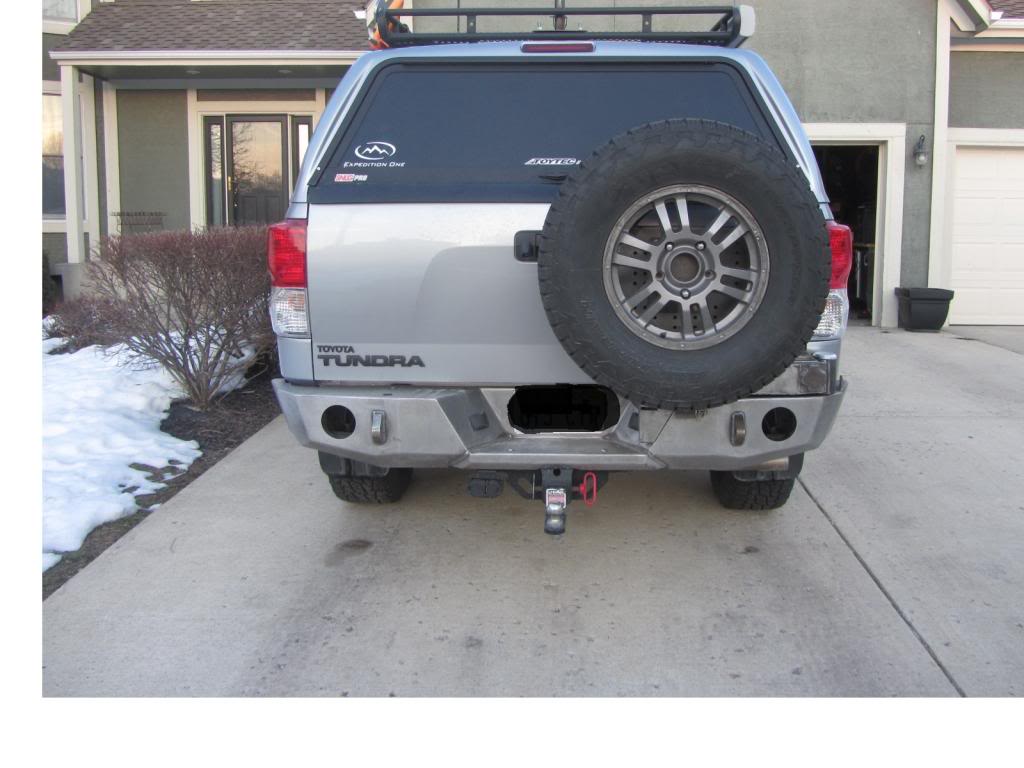
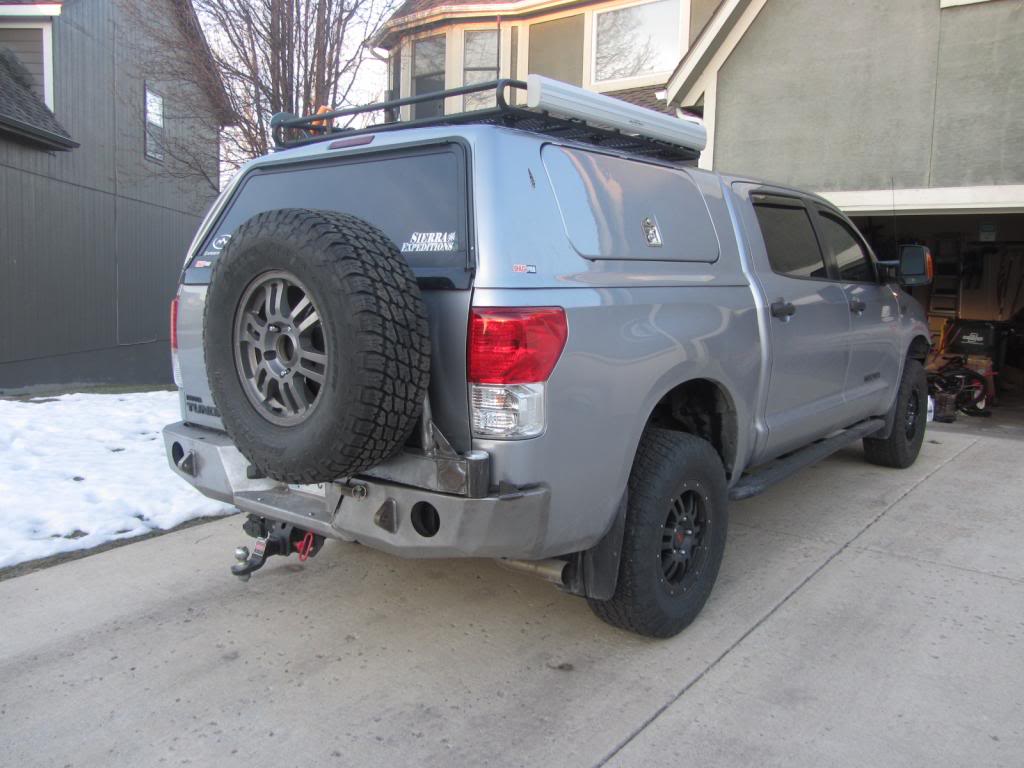
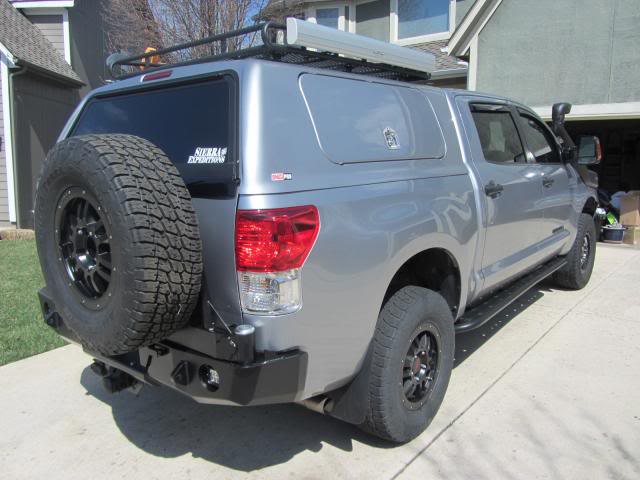
Expedition One (EXO) bumper is on...
All,
I just got my truck back from Atomic Fabworks. They installed the Expedition One front bumper with all the goods that go with it. Got the bumper back from RML powdercoating 2 weeks ago. Here is the 'pile' of goodies that needed to be installed. The guys at Atomic were great to work with, and they dove right in...
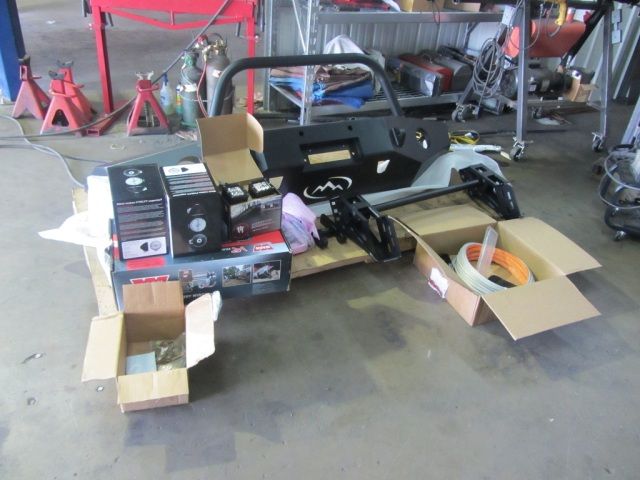
I chose to go with powdercoating this time as opposed to Ameraguard lining. I think that this powdercoating is more robust as opposed to the PC that I got from my previous Armorology bumper. I'll see how it lasts...Anyways, onto the install...The disassembly of my OEM bumper was quite an eye opener to me - IT IS A TIN CAN. All it seemed to be was a few 10mm bolts (4x) and a bunch of plastic clips...not good. I was able to sell the OEM bumpers / mirrors / grille to an auto parts salvage yard with one phone call. The proceeds of which almost covered the cost of the rear EXO bumper...woot woot!

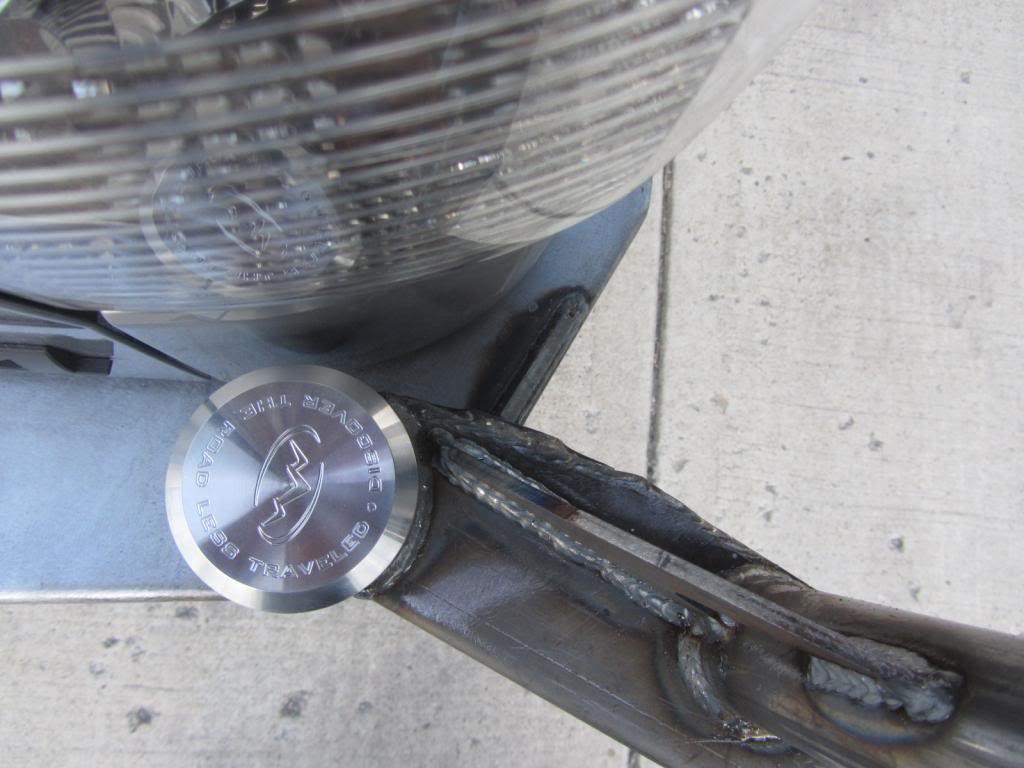
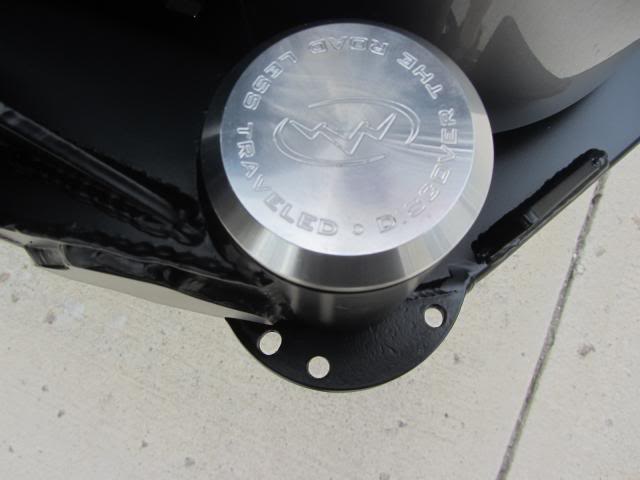
The Expedition One (EXO) bumper is very stout. The frame mounting bracket and re-inforcements are well engineered. We were all impressed as to how beefy this unit truly is. Compared to the OEM bumper, there is no comparison. If I were to hit a deer with my rig, I have no doubt that I will remain a few links above said deer, literally, on the food chain. Here is the solenoid pack mounted and ready to go.
Dream almost realized...

Overall, Atomic was excellent in the install and wiring. I am grateful to have such a fully functional installer / fabricator in close proximity. More pics later.
Regards,
BWJ
I just got my truck back from Atomic Fabworks. They installed the Expedition One front bumper with all the goods that go with it. Got the bumper back from RML powdercoating 2 weeks ago. Here is the 'pile' of goodies that needed to be installed. The guys at Atomic were great to work with, and they dove right in...
I chose to go with powdercoating this time as opposed to Ameraguard lining. I think that this powdercoating is more robust as opposed to the PC that I got from my previous Armorology bumper. I'll see how it lasts...Anyways, onto the install...The disassembly of my OEM bumper was quite an eye opener to me - IT IS A TIN CAN. All it seemed to be was a few 10mm bolts (4x) and a bunch of plastic clips...not good. I was able to sell the OEM bumpers / mirrors / grille to an auto parts salvage yard with one phone call. The proceeds of which almost covered the cost of the rear EXO bumper...woot woot!
The Expedition One (EXO) bumper is very stout. The frame mounting bracket and re-inforcements are well engineered. We were all impressed as to how beefy this unit truly is. Compared to the OEM bumper, there is no comparison. If I were to hit a deer with my rig, I have no doubt that I will remain a few links above said deer, literally, on the food chain. Here is the solenoid pack mounted and ready to go.
Dream almost realized...
Overall, Atomic was excellent in the install and wiring. I am grateful to have such a fully functional installer / fabricator in close proximity. More pics later.
Regards,
BWJ
Aug 27, 2012 | 08:36 PM
#22
Thread Starter
Registered User
Joined: Jan 2007
Posts: 125
Likes: 0
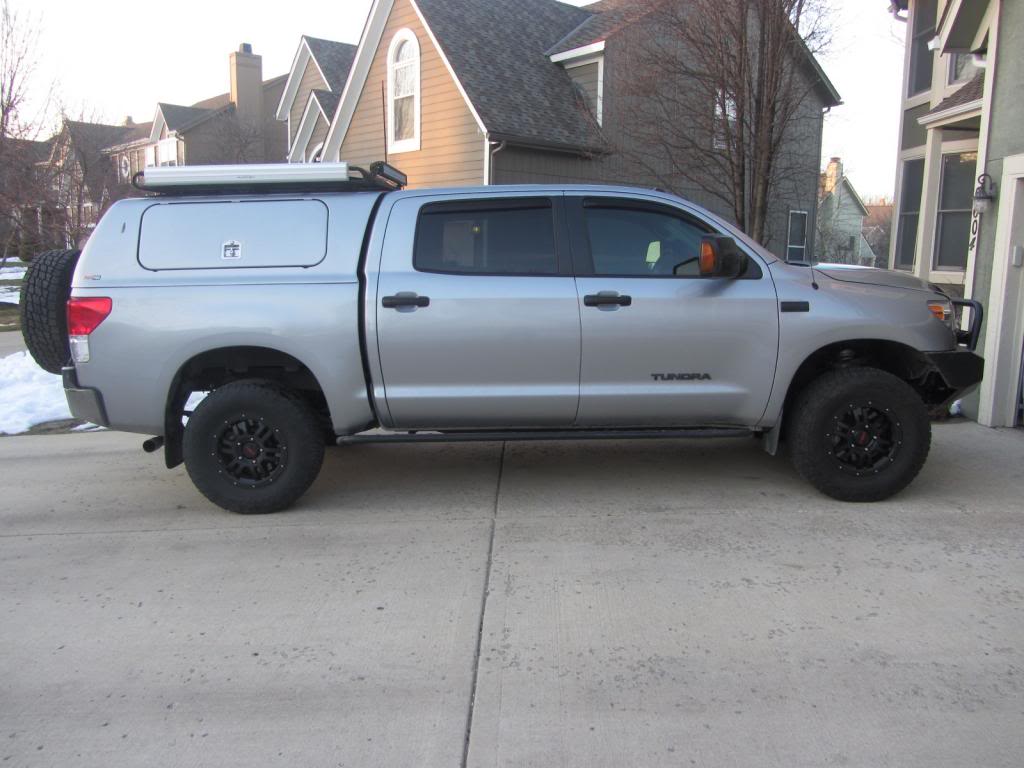
2" shackles are on...
All,
Along with getting the EXO front bumper put on, I also had 2" shackles put on as well. Originally, I upgraded to Deaver-add-a-leaf springs instead of 1" blocks due to my cargo needs. After all was said and done, I sat level driving daily and 'sagged' when I towed the Sherpa II.
I considered airbags, however, shackles seemed to be a solution with fewer headaches (moving parts) down the road. Anyway, I was able to acquire these from Coachbuilder1. He is out of Utah, and these are beefy to say the least. Here is a pictorial chronology of my rear suspension dilemma / solution...
Stock
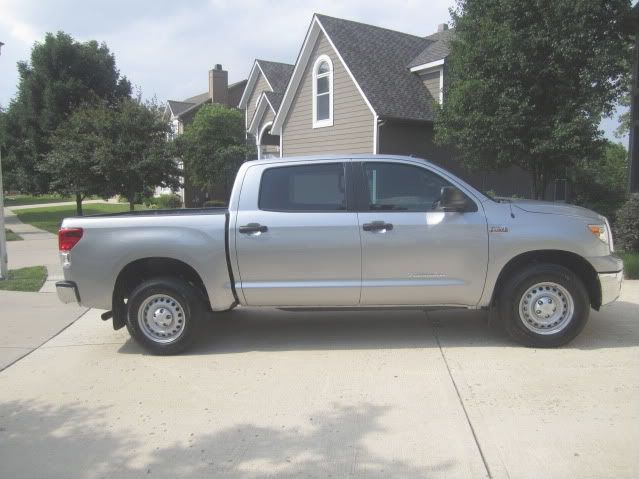
Toytec Ultimate 3/1 ~ used a Deaver-add-a-leaf instead of 1" block...
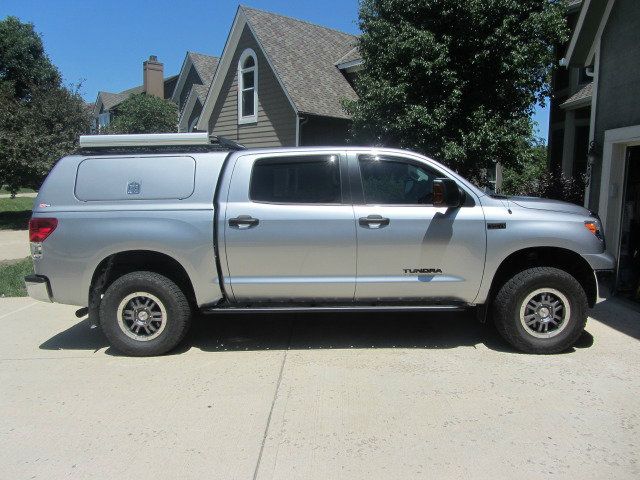
Coach's 2" shackles installed

More eye candy...
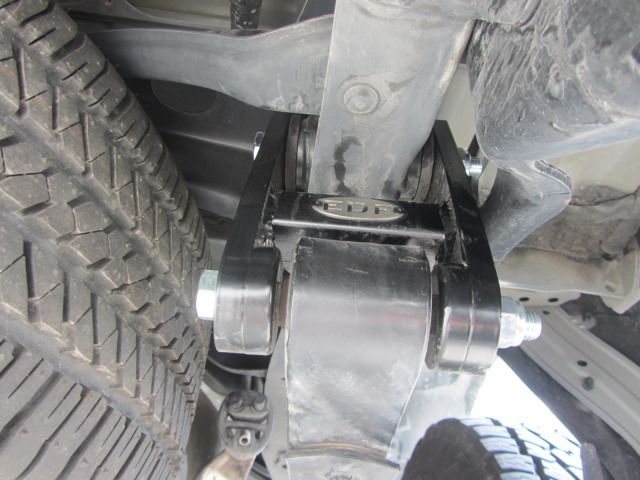
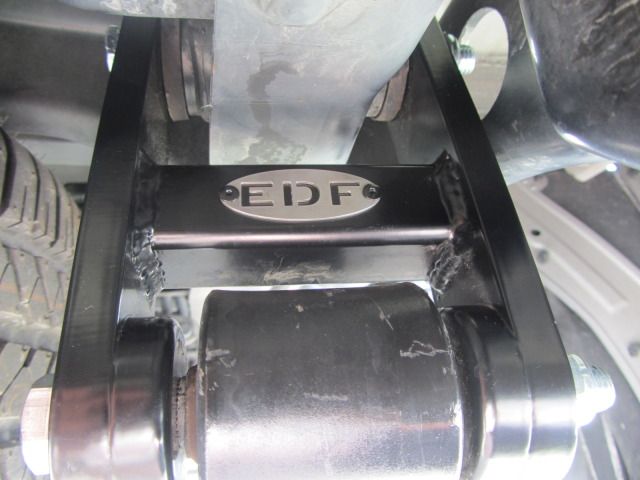
Ride is noticeably better than before. I have a rake now when I drive, and level / slightly raked when I tow. I may change the springs when they sag over time, however, it seems to work for right now...
Regards,
BWJ
Along with getting the EXO front bumper put on, I also had 2" shackles put on as well. Originally, I upgraded to Deaver-add-a-leaf springs instead of 1" blocks due to my cargo needs. After all was said and done, I sat level driving daily and 'sagged' when I towed the Sherpa II.
I considered airbags, however, shackles seemed to be a solution with fewer headaches (moving parts) down the road. Anyway, I was able to acquire these from Coachbuilder1. He is out of Utah, and these are beefy to say the least. Here is a pictorial chronology of my rear suspension dilemma / solution...
Stock
Toytec Ultimate 3/1 ~ used a Deaver-add-a-leaf instead of 1" block...
Coach's 2" shackles installed
More eye candy...
Ride is noticeably better than before. I have a rake now when I drive, and level / slightly raked when I tow. I may change the springs when they sag over time, however, it seems to work for right now...
Regards,
BWJ
Aug 30, 2012 | 09:26 PM
#23
Thread Starter
Registered User
Joined: Jan 2007
Posts: 125
Likes: 0
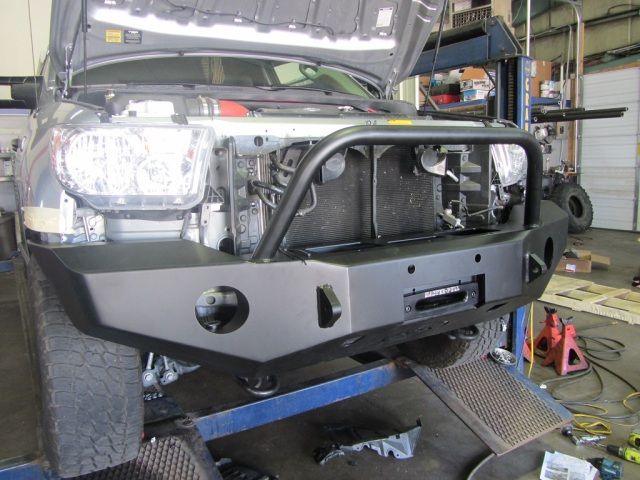
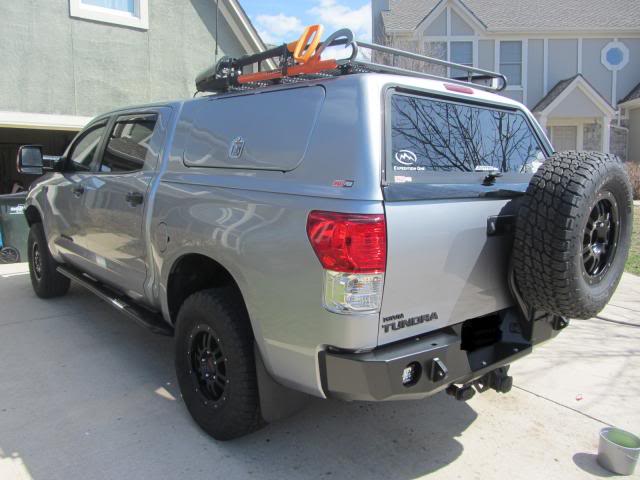
EXO bumper pics...
All,
Well it's been about 1 week since I had my EXO front bumper on. I am glad the front is on. Again, Atomic Fabworks did an INCREDIBLE job installing / wiring / and fabricating to make this dream a realization. EXO is currently developing a rear tire carrier for the Tundra. I may go with this as an option...
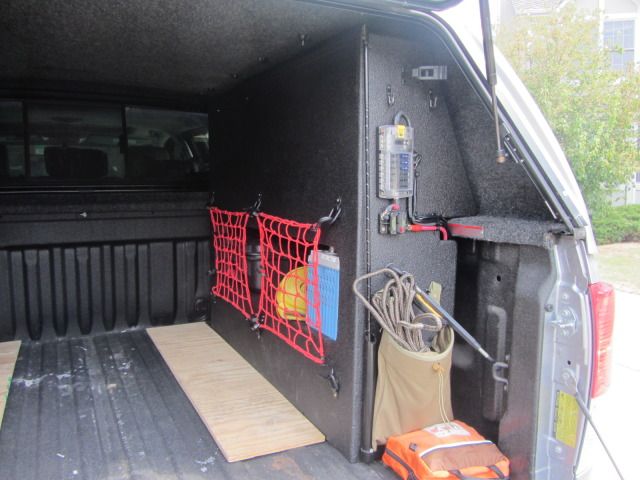
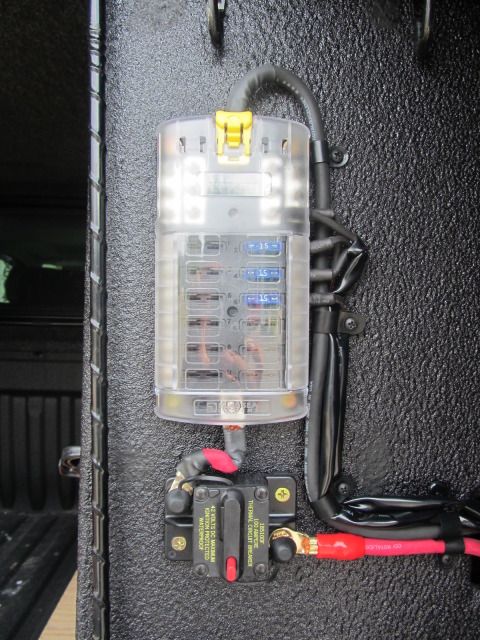
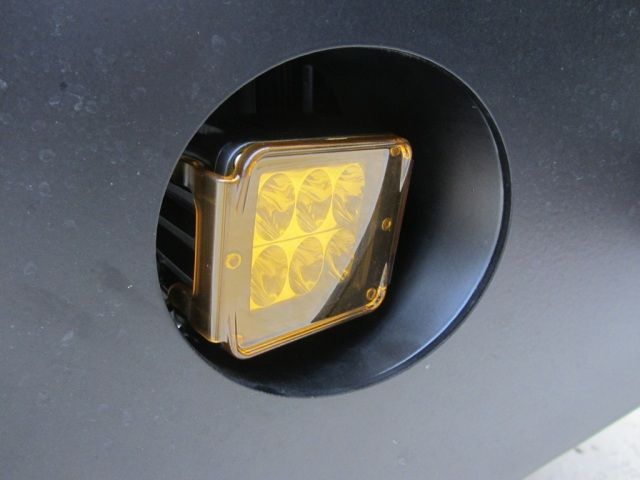
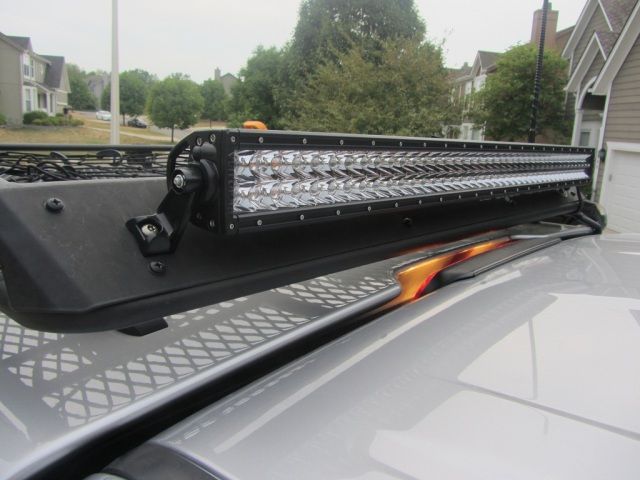
Initially, I purchased an IBS dual battery system from Sierra Expeditions. This system is elegant in its design, and It's has been bullet proof so far. As you know, I decided to mount the auxillary battery in the bed cabinet system. I also purchased a Blue Sea systems 12 fuse block and 100 amp resetable circuit breaker.
Note: Atomic Fabworks did the electrical wiring and I am going to meet with Steve to go over the wiring schematics / specifics soon. I am not familiar with electrical wiring, so please don't ask me questions about the ins and outs of the wiring...
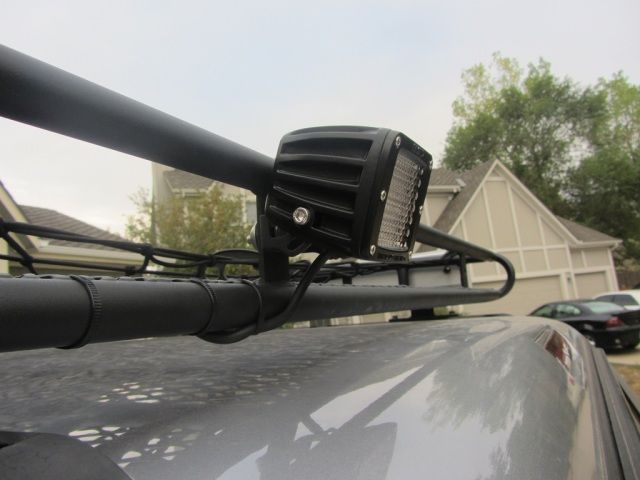
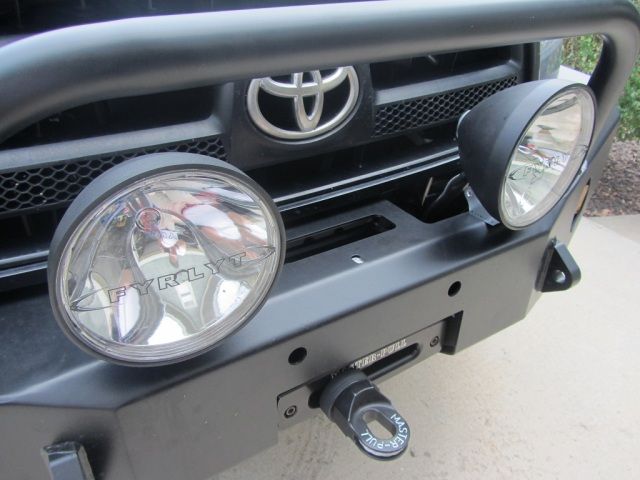
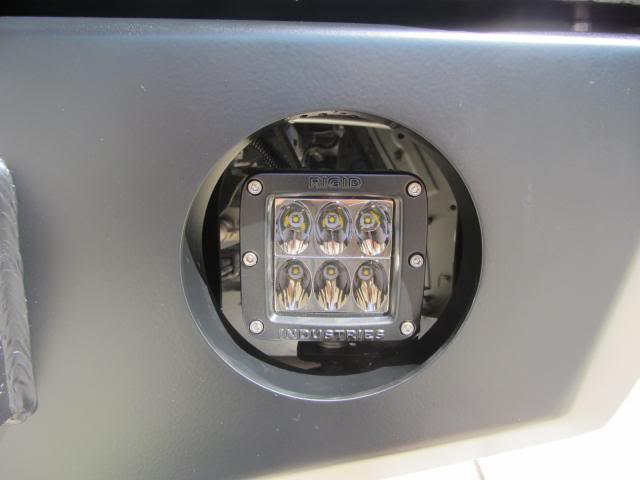
The LED lights are all wired to the auxillary while the winch and FRYLYTS are wired to the main. My lighting 'grouppo' consists of 2 FYRLYTs / 2 Rigid industries Dually D2s as fogs / a 40" Rigid LED light bar overhead on the Bajarack / and a Dually D2 diffused lens as a back up light. The light output on these lights are INSANE, however, they are different - Halogen vs. LED. I will post a comparison / night shot post soon...
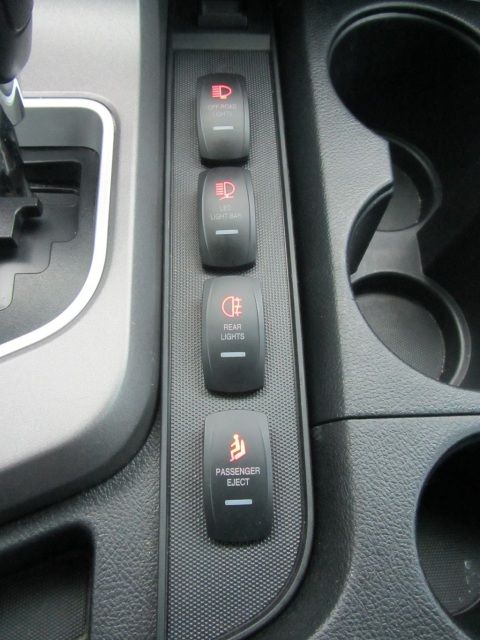
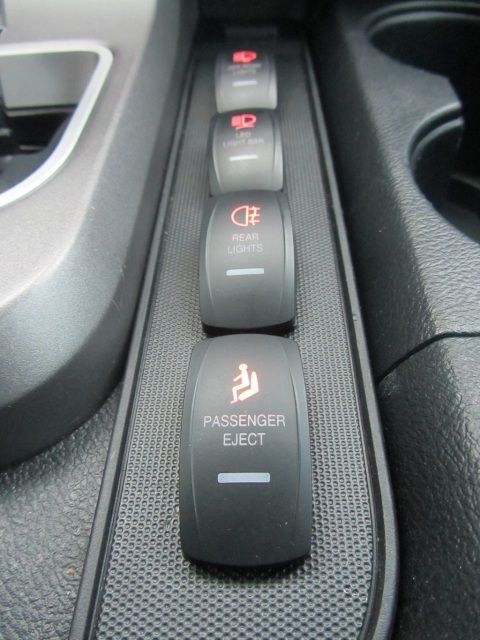
I decided to go with switches from OTRATTW. They laser cut all of their switches and they are crisp and clean. I had them mounted to a removable plate that fit into the console. The switch turns on when the interior lights are on, and the small LED indicating bar lights up when the switch is activated. I'm still working on the passenger eject button as to what to do when activated...
There is also a Warn VR 10,000 winch with 3/8" MasterPull Superline Winchline and a Winch Stop Thimble. In case you are wondering, this is a hockey puck that I bored out. Cheap mod = $ 1.60...

For security, I decided to use several different nuts and bolts. It's a shame that we have to spend anytime with this, however, it is a cruel, fallen world that we live in...I went with two different sized pin-in-torx screws and two different kinds of tamper resistant nuts. McMaster Carr sells these at a reasonable price. Cheaper that other retailers...
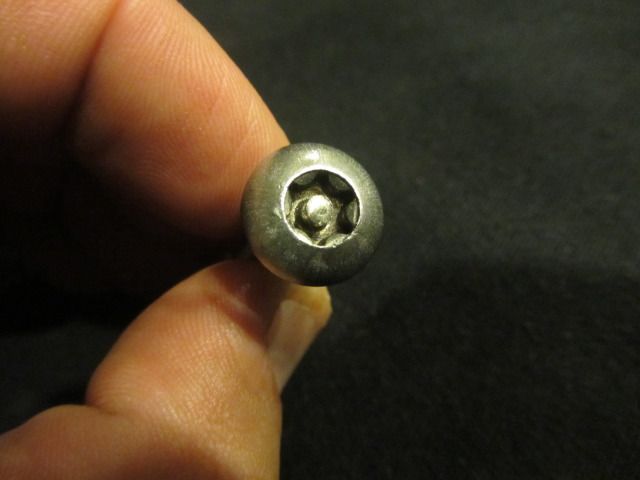
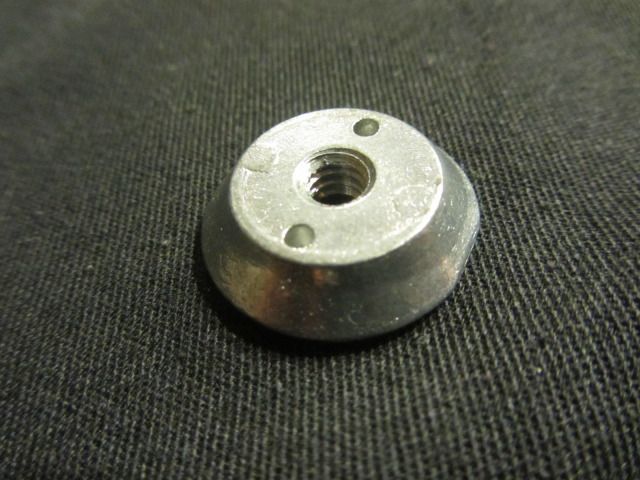
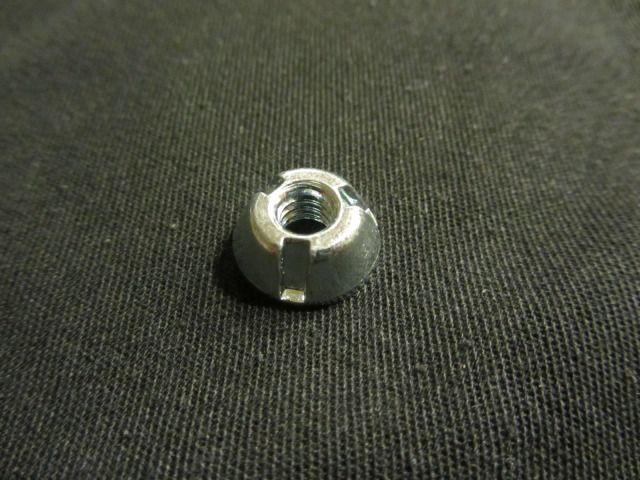
It is a combination of these nuts and bolts that will hopefully slow the thieves down and require too much time and effort. Overall, I am pleased with how the EXO front bumper with accessories turned out. I am currently waiting for Expedition One to put the finishing touches on my rear bumper with tire carrier...
Nights pics will come shortly...Stay tuned.
Regards,
BWJ
Well it's been about 1 week since I had my EXO front bumper on. I am glad the front is on. Again, Atomic Fabworks did an INCREDIBLE job installing / wiring / and fabricating to make this dream a realization. EXO is currently developing a rear tire carrier for the Tundra. I may go with this as an option...
Initially, I purchased an IBS dual battery system from Sierra Expeditions. This system is elegant in its design, and It's has been bullet proof so far. As you know, I decided to mount the auxillary battery in the bed cabinet system. I also purchased a Blue Sea systems 12 fuse block and 100 amp resetable circuit breaker.
Note: Atomic Fabworks did the electrical wiring and I am going to meet with Steve to go over the wiring schematics / specifics soon. I am not familiar with electrical wiring, so please don't ask me questions about the ins and outs of the wiring...
The LED lights are all wired to the auxillary while the winch and FRYLYTS are wired to the main. My lighting 'grouppo' consists of 2 FYRLYTs / 2 Rigid industries Dually D2s as fogs / a 40" Rigid LED light bar overhead on the Bajarack / and a Dually D2 diffused lens as a back up light. The light output on these lights are INSANE, however, they are different - Halogen vs. LED. I will post a comparison / night shot post soon...
I decided to go with switches from OTRATTW. They laser cut all of their switches and they are crisp and clean. I had them mounted to a removable plate that fit into the console. The switch turns on when the interior lights are on, and the small LED indicating bar lights up when the switch is activated. I'm still working on the passenger eject button as to what to do when activated...
There is also a Warn VR 10,000 winch with 3/8" MasterPull Superline Winchline and a Winch Stop Thimble. In case you are wondering, this is a hockey puck that I bored out. Cheap mod = $ 1.60...
For security, I decided to use several different nuts and bolts. It's a shame that we have to spend anytime with this, however, it is a cruel, fallen world that we live in...I went with two different sized pin-in-torx screws and two different kinds of tamper resistant nuts. McMaster Carr sells these at a reasonable price. Cheaper that other retailers...
It is a combination of these nuts and bolts that will hopefully slow the thieves down and require too much time and effort. Overall, I am pleased with how the EXO front bumper with accessories turned out. I am currently waiting for Expedition One to put the finishing touches on my rear bumper with tire carrier...
Nights pics will come shortly...Stay tuned.
Regards,
BWJ
Last edited by bigwapitijohnny; Aug 31, 2012 at 04:07 AM.
Nov 3, 2012 | 05:02 AM
#24
Thread Starter
Registered User
Joined: Jan 2007
Posts: 125
Likes: 0
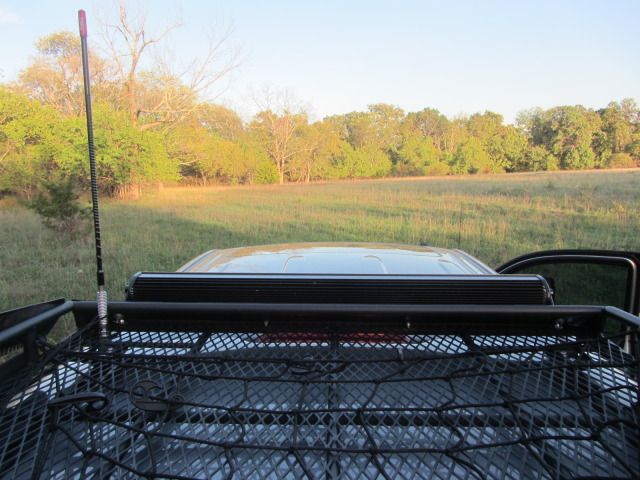
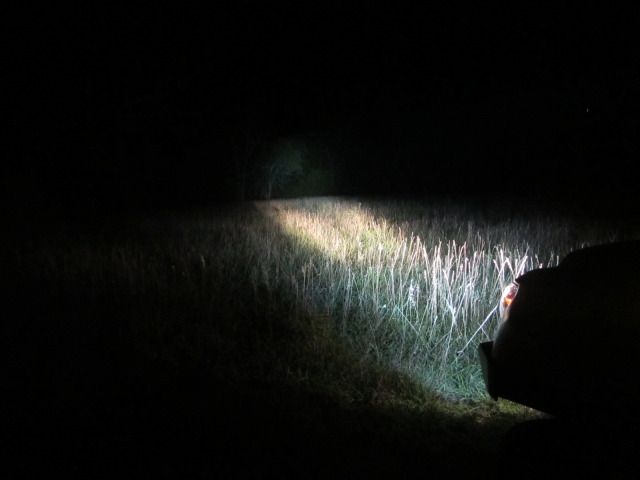
Night shots of lights...
All,
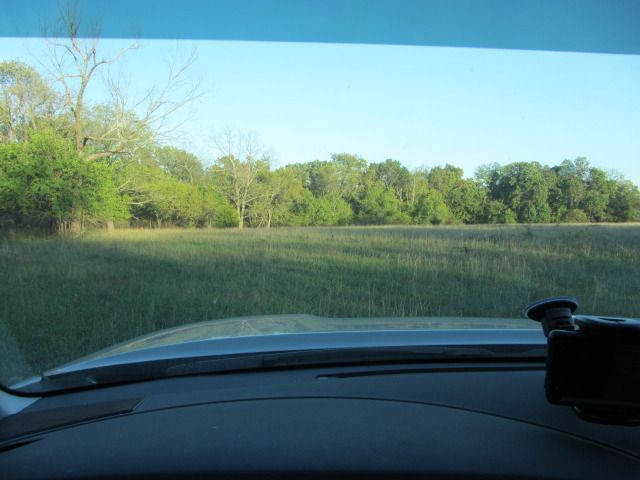
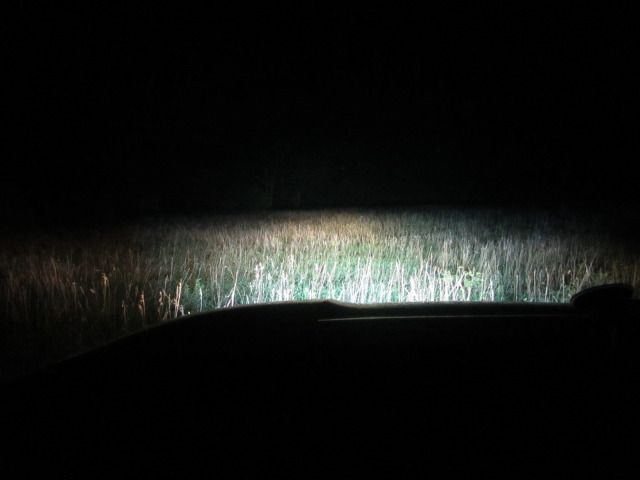
Here is my attempt at some night shots for the lights. Please note that these shots are 'dimmer' due to the limitations of my camera at night. I tried to 'standardize' the shots the best that I could. I took these earlier this year. The grass is about knee high in places and the treeline is about 150 yards away...
My impressions so far...
1) The combination of halogen (headlight / Fyrlyt) and LED (Dually D2 fogs / 40" light bar) needs some getting used to. The halogen lights seem to 'penetrate' more into the trees and surroundings while the LED light seems to be more diffused as the objects get further away. I believe that either light technology will be suitable, you just have to get used to them...
2) LED light is more reflective. I believe this to be from the temperature of the light itself. When driving through rain, I could see the drops clearly and the direction that they are coming from. In a downpour, this may hinder visibility. Having said that, this issue can be minimized by the use of the clip on filters that Rigid offers. It is significantly better with the amber filters on. I have not tried the blue filters at this time though.
3) Fyrlyts are bright as well. I had these set on the 'flood' setting. These lights put out some heat, you can feel the heat standing 8-10 feet away. One issue with the Fyrlyt is that there is a small leak on one of them. Fyrlyt has addressed this issue and is sending me 2 pair of seals from a new manufacturer.
I am blessed to be able to have both technologies on my rig. I will never be in want for more lighting.
Regards,
BWJ
Here is my attempt at some night shots for the lights. Please note that these shots are 'dimmer' due to the limitations of my camera at night. I tried to 'standardize' the shots the best that I could. I took these earlier this year. The grass is about knee high in places and the treeline is about 150 yards away...
Driver
Overhead
Driver with headlights only
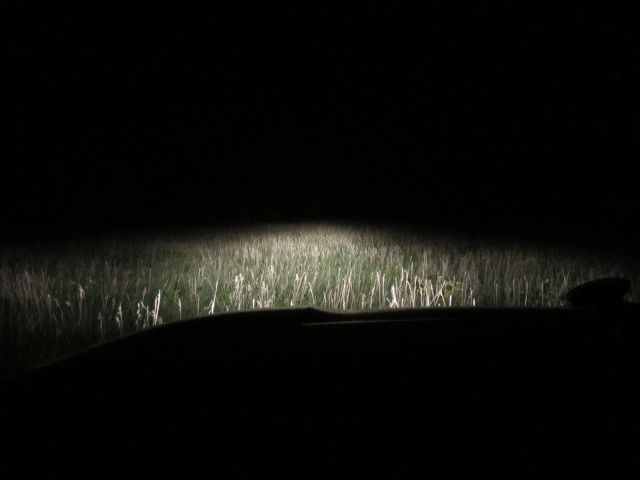
Overhead with headlights only
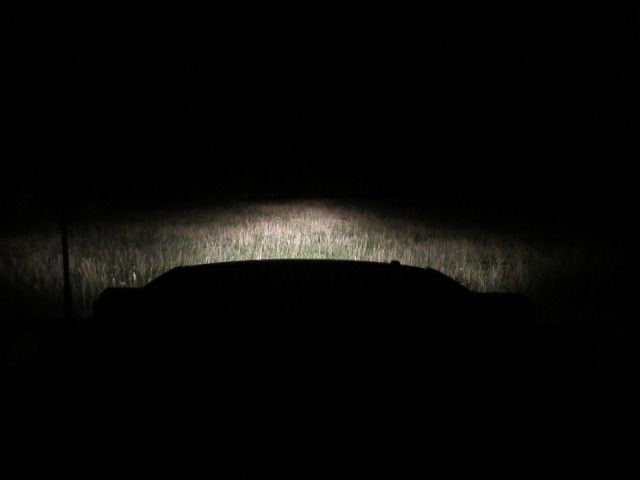
Driver with headlights + Rigid Industries Dually D2 fogs
Overhead with headlights + Rigid Industries Dually D2 fogs
Driver with headlights + Dually D2 fogs + Fyrlyts
Overhead with headlights + Dually D2 fogs + Fyrlyts
Driver with headlights + Dually D2 fogs + Fyrlyts + Rigid Industries 40" light bar
**You might be able to see the reflective nature of the LED light on this shot. We had a campfire close by and the wind blew some of the smoke into the beam of the light bar (1 o'clock position from the tree). I could not see the smoke from the headlights or Fyrlyts...

Overhead with headlights + Dually D2 fogs + Fyrlyts + Rigid Industries 40" light bar.
**I have reflection on my roof, however, this is not an issue to me at all. I do lose a little light from the position of the light bar, however, I believe this to be minimal, and I don't have to deal with glare on the hood...
Outside the driver's door
Overhead
Driver with headlights only
Overhead with headlights only
Driver with headlights + Rigid Industries Dually D2 fogs
Overhead with headlights + Rigid Industries Dually D2 fogs
Driver with headlights + Dually D2 fogs + Fyrlyts
Overhead with headlights + Dually D2 fogs + Fyrlyts
Driver with headlights + Dually D2 fogs + Fyrlyts + Rigid Industries 40" light bar
**You might be able to see the reflective nature of the LED light on this shot. We had a campfire close by and the wind blew some of the smoke into the beam of the light bar (1 o'clock position from the tree). I could not see the smoke from the headlights or Fyrlyts...
Overhead with headlights + Dually D2 fogs + Fyrlyts + Rigid Industries 40" light bar.
**I have reflection on my roof, however, this is not an issue to me at all. I do lose a little light from the position of the light bar, however, I believe this to be minimal, and I don't have to deal with glare on the hood...
Outside the driver's door
My impressions so far...
1) The combination of halogen (headlight / Fyrlyt) and LED (Dually D2 fogs / 40" light bar) needs some getting used to. The halogen lights seem to 'penetrate' more into the trees and surroundings while the LED light seems to be more diffused as the objects get further away. I believe that either light technology will be suitable, you just have to get used to them...
2) LED light is more reflective. I believe this to be from the temperature of the light itself. When driving through rain, I could see the drops clearly and the direction that they are coming from. In a downpour, this may hinder visibility. Having said that, this issue can be minimized by the use of the clip on filters that Rigid offers. It is significantly better with the amber filters on. I have not tried the blue filters at this time though.
3) Fyrlyts are bright as well. I had these set on the 'flood' setting. These lights put out some heat, you can feel the heat standing 8-10 feet away. One issue with the Fyrlyt is that there is a small leak on one of them. Fyrlyt has addressed this issue and is sending me 2 pair of seals from a new manufacturer.
I am blessed to be able to have both technologies on my rig. I will never be in want for more lighting.
Regards,
BWJ
Nov 5, 2012 | 11:05 AM
#25
Thread Starter
Registered User
Joined: Jan 2007
Posts: 125
Likes: 0
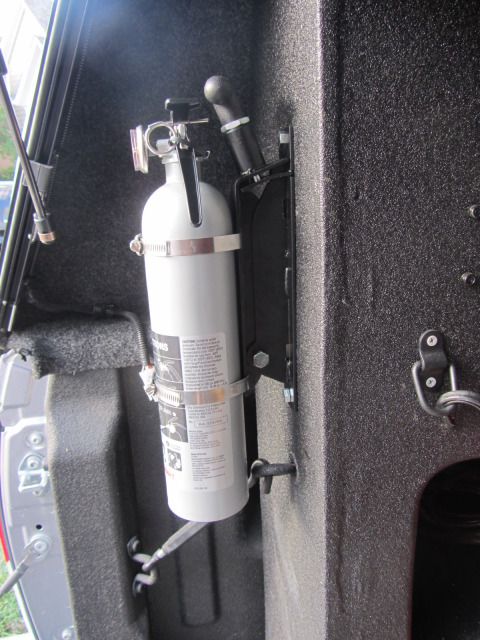
Atomic Fabworks fire extinguisher mount is on...
All,
In the relentless quest for efficiency, I now present to you the Atomic Fabworks fire extinguisher mount...Previously, I had my DD fire extinguishers attached with a combination of the factory mount + a Quikfist. Not anymore, Atomic has these little babies available. The design is simple and elegant. During a panic situation, I believe this will afford a quicker response than fiddling with the previous mounting system. Here is the scoop:
Regards,
BWJ
In the relentless quest for efficiency, I now present to you the Atomic Fabworks fire extinguisher mount...Previously, I had my DD fire extinguishers attached with a combination of the factory mount + a Quikfist. Not anymore, Atomic has these little babies available. The design is simple and elegant. During a panic situation, I believe this will afford a quicker response than fiddling with the previous mounting system. Here is the scoop:
This bracket comes in two seperate pieces that pivot around a bolt on the bottom and is held in place with a t-handle pull pin on top. There are several slots / holes located along the bracket itself for plenty of mounting options.
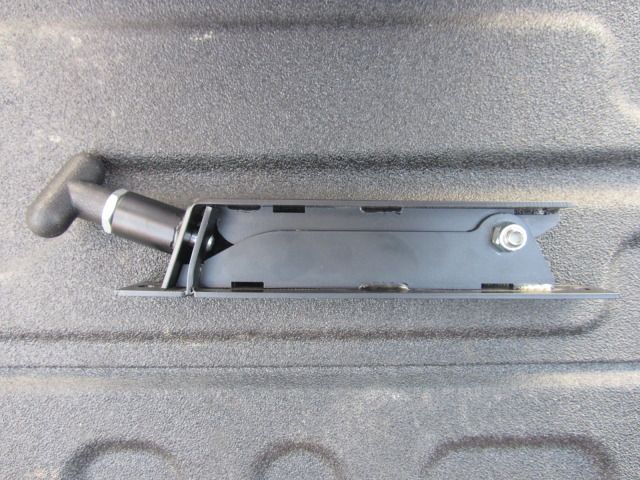
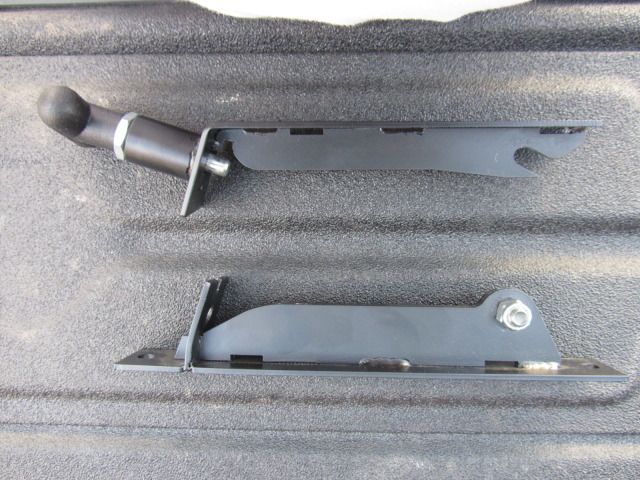
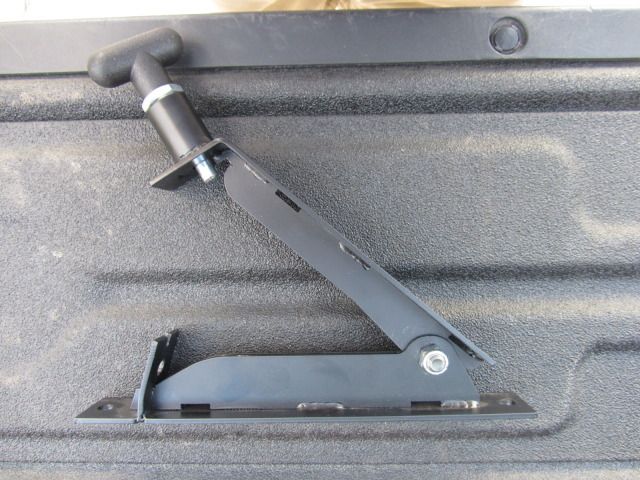
I chose to mount the fire extinguisher with hose clamps, and I bolted the mount to my cabinet system.
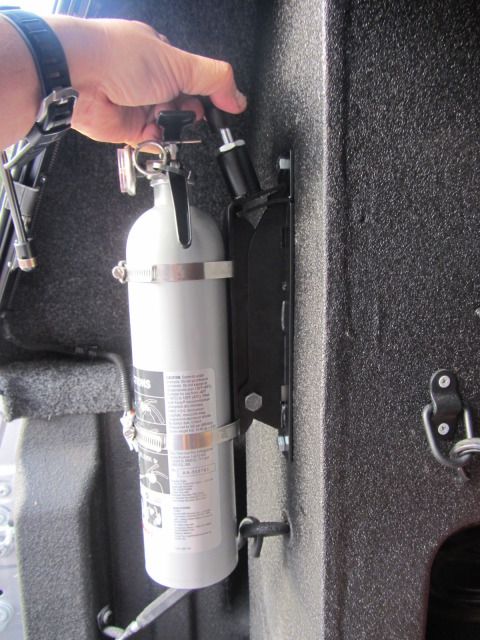
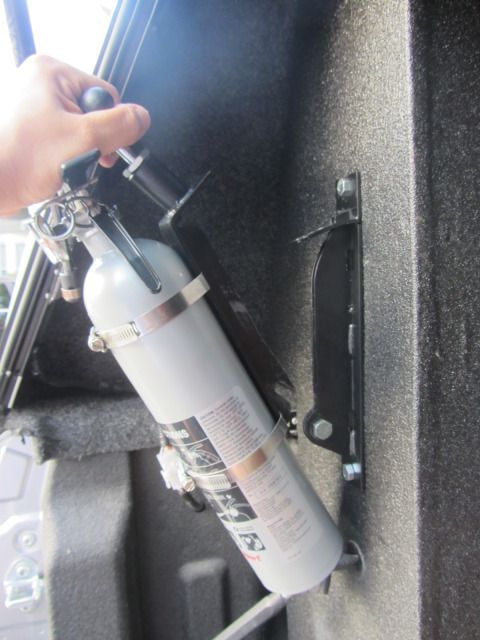

All it takes is a quick pull of the T-handle and you are ready to go. I have two mounts, one in the truck and one on the Sherpa II. Enjoy!
I chose to mount the fire extinguisher with hose clamps, and I bolted the mount to my cabinet system.
All it takes is a quick pull of the T-handle and you are ready to go. I have two mounts, one in the truck and one on the Sherpa II. Enjoy!
Regards,
BWJ
Nov 25, 2012 | 04:02 AM
#26
Thread Starter
Registered User
Joined: Jan 2007
Posts: 125
Likes: 0
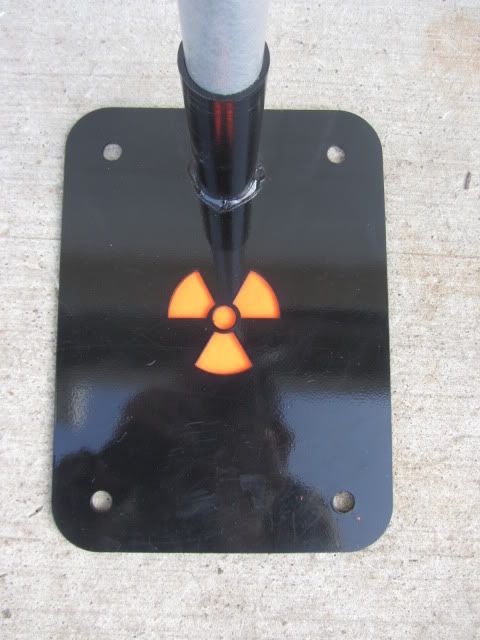
Camp light / locator project is done...
All,
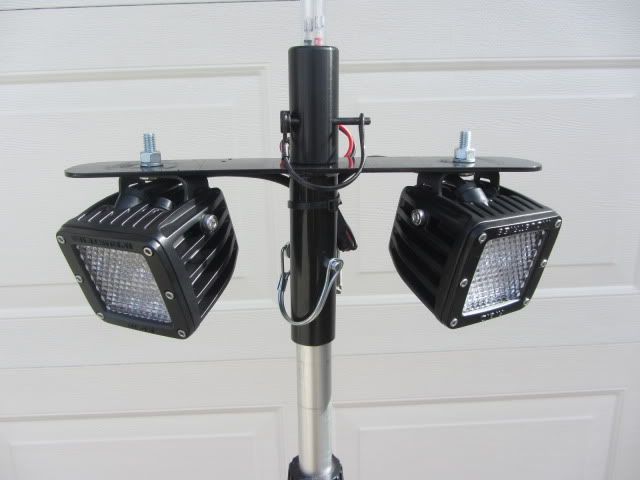
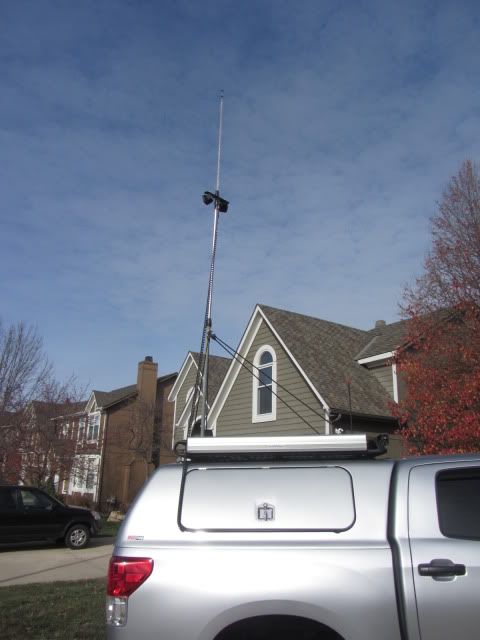
I have completed another project for my camping armamentaria. I noticed a couple of times this year, I was in need of additional overhead lighting. Since I have the IBS dual battery system, I dove right in. I was able to acquire a lockable 12 plug / adapter from Marinco, and I had Atomic Fabworks install the plug in the passenger side cabinet. I went with a pair of Rigid Industries Dually D2s (diffused lens), as well as a 6' LED lighted whip for a camp locator. I have daytime pics only at this time. I'll post up some night pics when I get a chance. Onto the pics...
The basic setup is as follows: I went with a 4' / 8' retractable painter's pole. The base and mounting bracket were fabbed up at Atomic. The adjustable pole is 'locked' in with wire pin fasteners at the base and the light mounting bar. The whole system is able to break down significantly. The base can be 'driven over' for stability, however, I chose to mount this on the roof rack.
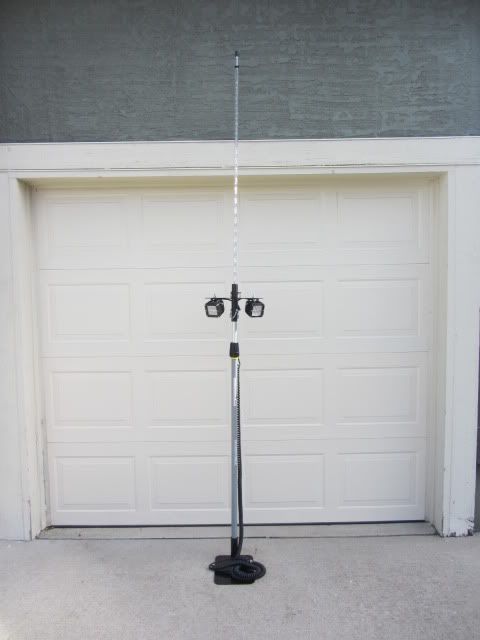
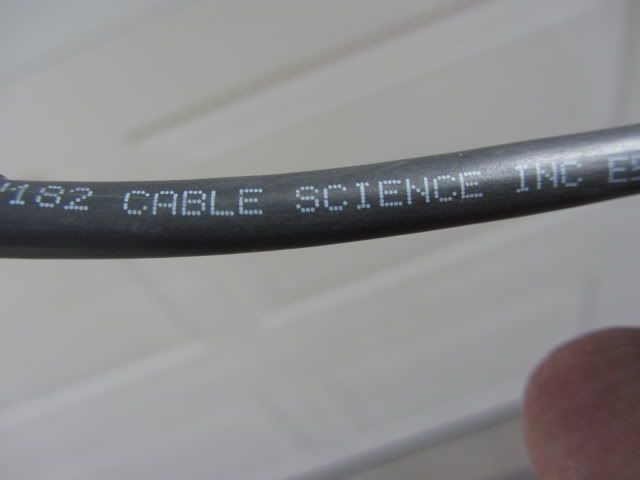
The coil cord was quite a problem since I could not locate exactly what I needed. I did not want to splice several short 'cobbled' sections together, rather, I was looking for a coil that was one piece. Cable science to the rescue. I ordered a 5 foot coiled cable that could stretch out to 30 feet if needed. The NCV182 is a 2 conductor / 18 gauge coil that can accomodate up to 300 volts if need be. Cable science offers this in any lenght that you need. Fabrication took 4 business days and it was shipped following completion. The coil is high quality. The rubberized coating appears very durable, and I am looing forward to many years of service. I recommend Cable Science highly.
As mentioned earlier, the lights are Rigid Industries Dually D2s in a diffused pattern, and the whip is from Tribal Whips. Both lights are able to be unplugged when needed, and they are quite bright to say the least.
I mounted the base on the Bajarack to gain as much height as possible. The total height of the Duallys are about 20 feet + the length of the whip. I have tied the pole with some heavy duty bungee straps, and they are hooked to the corners of the Bajarack.
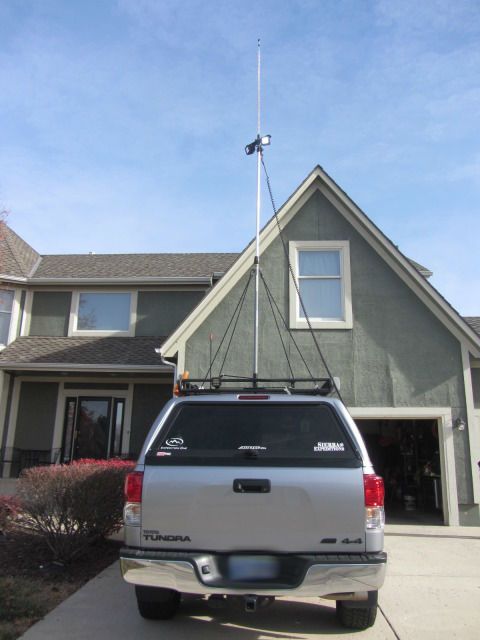
I'm working on becoming more proficient at setup and teardown. I'll post night pics when I am able to. Enjoy!
Regards,
BWJ
I have completed another project for my camping armamentaria. I noticed a couple of times this year, I was in need of additional overhead lighting. Since I have the IBS dual battery system, I dove right in. I was able to acquire a lockable 12 plug / adapter from Marinco, and I had Atomic Fabworks install the plug in the passenger side cabinet. I went with a pair of Rigid Industries Dually D2s (diffused lens), as well as a 6' LED lighted whip for a camp locator. I have daytime pics only at this time. I'll post up some night pics when I get a chance. Onto the pics...
The basic setup is as follows: I went with a 4' / 8' retractable painter's pole. The base and mounting bracket were fabbed up at Atomic. The adjustable pole is 'locked' in with wire pin fasteners at the base and the light mounting bar. The whole system is able to break down significantly. The base can be 'driven over' for stability, however, I chose to mount this on the roof rack.
The coil cord was quite a problem since I could not locate exactly what I needed. I did not want to splice several short 'cobbled' sections together, rather, I was looking for a coil that was one piece. Cable science to the rescue. I ordered a 5 foot coiled cable that could stretch out to 30 feet if needed. The NCV182 is a 2 conductor / 18 gauge coil that can accomodate up to 300 volts if need be. Cable science offers this in any lenght that you need. Fabrication took 4 business days and it was shipped following completion. The coil is high quality. The rubberized coating appears very durable, and I am looing forward to many years of service. I recommend Cable Science highly.
As mentioned earlier, the lights are Rigid Industries Dually D2s in a diffused pattern, and the whip is from Tribal Whips. Both lights are able to be unplugged when needed, and they are quite bright to say the least.
I mounted the base on the Bajarack to gain as much height as possible. The total height of the Duallys are about 20 feet + the length of the whip. I have tied the pole with some heavy duty bungee straps, and they are hooked to the corners of the Bajarack.
I'm working on becoming more proficient at setup and teardown. I'll post night pics when I am able to. Enjoy!
Regards,
BWJ
Dec 30, 2012 | 06:27 PM
#27
Thread Starter
Registered User
Joined: Jan 2007
Posts: 125
Likes: 0
EXO rear bumper pics...
All,
I just got a pic from EXO of a rear tire carrier for the Tacoma. My rear tire carrier will be similar to this. I am particularly liking the modularity of this system. I'll have my choice between a rear tire / gas cans / Armstrong GMTK toolchest / custom winch extension + recovery case...Too many options at this point. It will consist of a single swing only. I cannot wait...
Happy New Year everyone!
Regards,
BWJ
Feb 9, 2013 | 11:55 AM
#28
Thread Starter
Registered User
Joined: Jan 2007
Posts: 125
Likes: 0
EXO project as begun...
All,
Earlier, I was given some pics, from EXO, of their dual carrier for the Taco. This setup is similar to the Tundra. Initially, it seemed too 'crowded' and overbuilt. Don't get me wrong, I believe the EXO carrier system to be one of the more stout offerings out there, but to my eye, I am glad that the overall width of the Tundra is wider and stretch things out a bit.

I was wanting a modular approach, where I could have options in terms of choosing armamentaria. I feel as though a dedicated tire carrier would be one dimensional. EXO seemed to have understood this in their design. With the use of a grid configuration, There are many ways I can utilize this mount.
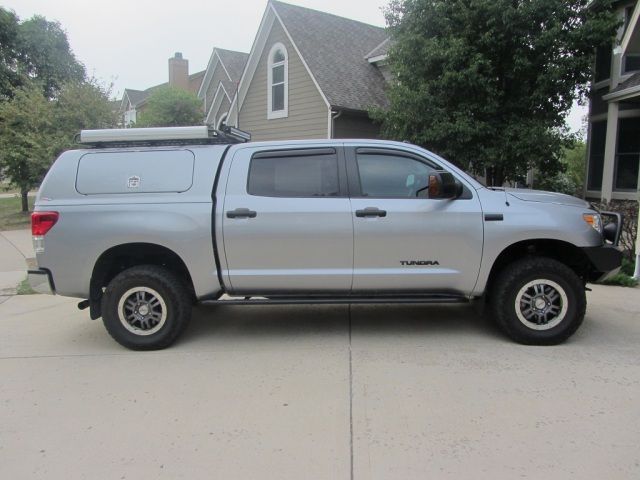
My initial concern is with the back-up camera / shroud. I have sent them a pic, with measurements, of what I needed to clear the factory back-up camera. I have grown to really appreciate this option ~ call me spoiled. I find it a major time saver when hooking up the trailer. In addition, it provides an added measure of safety when backing up with kiddos everywhere...My preference is to maintain the location of the camera, however, if I have to move it, so be it...Here are some initial pics of the EXO bumper for the Tundra. Yes, this is mine.
I did not want to go with dual carriers at this time. I feel as though the single is going to be fine for me. It will require some thought on what I end up with ~ good problems to have at this point. Needs are Hi-lift jack, pelican case with recovery gear, the Armstrong GMTK toolkit, or a Rotopax cell. Options, options, options. That is what I like to have.
Here is the Taco and Tundra pic for comparison...
Taco
Tundra
Also, I have decided to take the Rigid industries Dually D2 off the Baja Rack and I will place 2 D2s in the supplied light mounts. I found the Dually D2 with the diffused pattern to wash out when placed low, and I prefer a more directional beam when backing up. It is perfect for overhead lighting, but not for backing up. I'll see when I get the rig set up.
BEEF, IT'S WHATS FOR DINNER...
Regards,
BWJ
Earlier, I was given some pics, from EXO, of their dual carrier for the Taco. This setup is similar to the Tundra. Initially, it seemed too 'crowded' and overbuilt. Don't get me wrong, I believe the EXO carrier system to be one of the more stout offerings out there, but to my eye, I am glad that the overall width of the Tundra is wider and stretch things out a bit.
I was wanting a modular approach, where I could have options in terms of choosing armamentaria. I feel as though a dedicated tire carrier would be one dimensional. EXO seemed to have understood this in their design. With the use of a grid configuration, There are many ways I can utilize this mount.
My initial concern is with the back-up camera / shroud. I have sent them a pic, with measurements, of what I needed to clear the factory back-up camera. I have grown to really appreciate this option ~ call me spoiled. I find it a major time saver when hooking up the trailer. In addition, it provides an added measure of safety when backing up with kiddos everywhere...My preference is to maintain the location of the camera, however, if I have to move it, so be it...Here are some initial pics of the EXO bumper for the Tundra. Yes, this is mine.
I did not want to go with dual carriers at this time. I feel as though the single is going to be fine for me. It will require some thought on what I end up with ~ good problems to have at this point. Needs are Hi-lift jack, pelican case with recovery gear, the Armstrong GMTK toolkit, or a Rotopax cell. Options, options, options. That is what I like to have.
Here is the Taco and Tundra pic for comparison...
Taco
Tundra
Also, I have decided to take the Rigid industries Dually D2 off the Baja Rack and I will place 2 D2s in the supplied light mounts. I found the Dually D2 with the diffused pattern to wash out when placed low, and I prefer a more directional beam when backing up. It is perfect for overhead lighting, but not for backing up. I'll see when I get the rig set up.
BEEF, IT'S WHATS FOR DINNER...
Regards,
BWJ
Feb 23, 2013 | 06:39 AM
#30
Thread Starter
Registered User
Joined: Jan 2007
Posts: 125
Likes: 0
EXO bumper is shipped...
All,
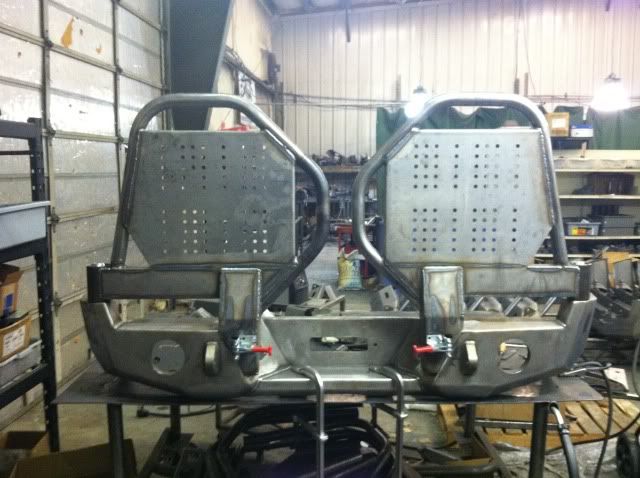
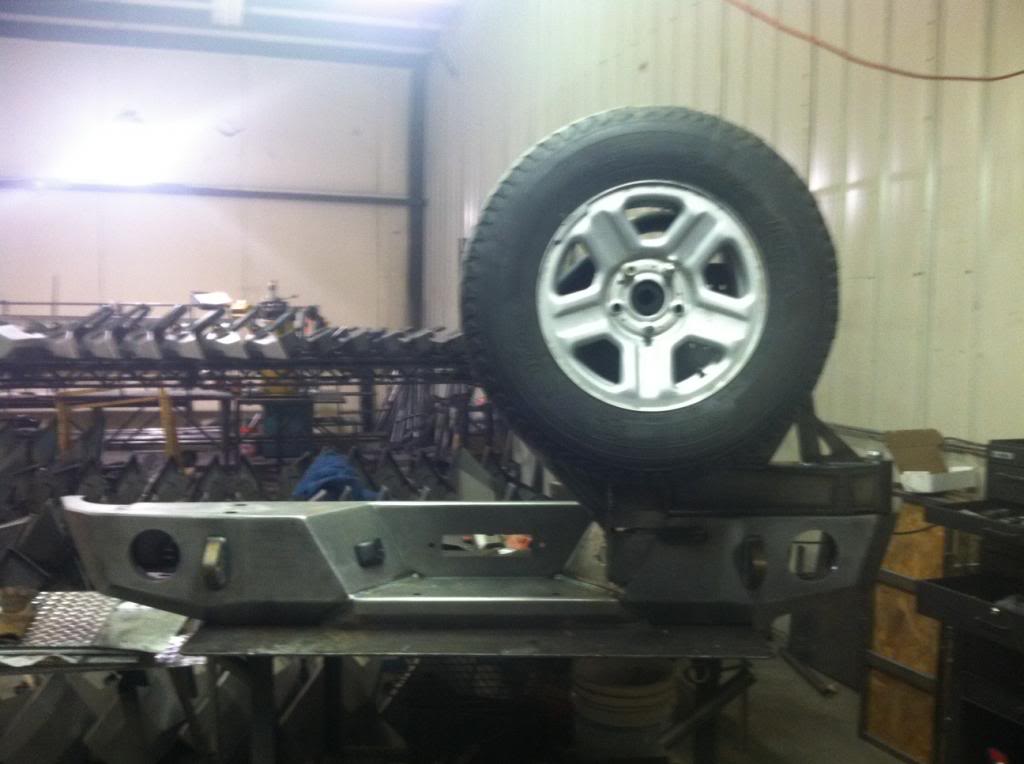
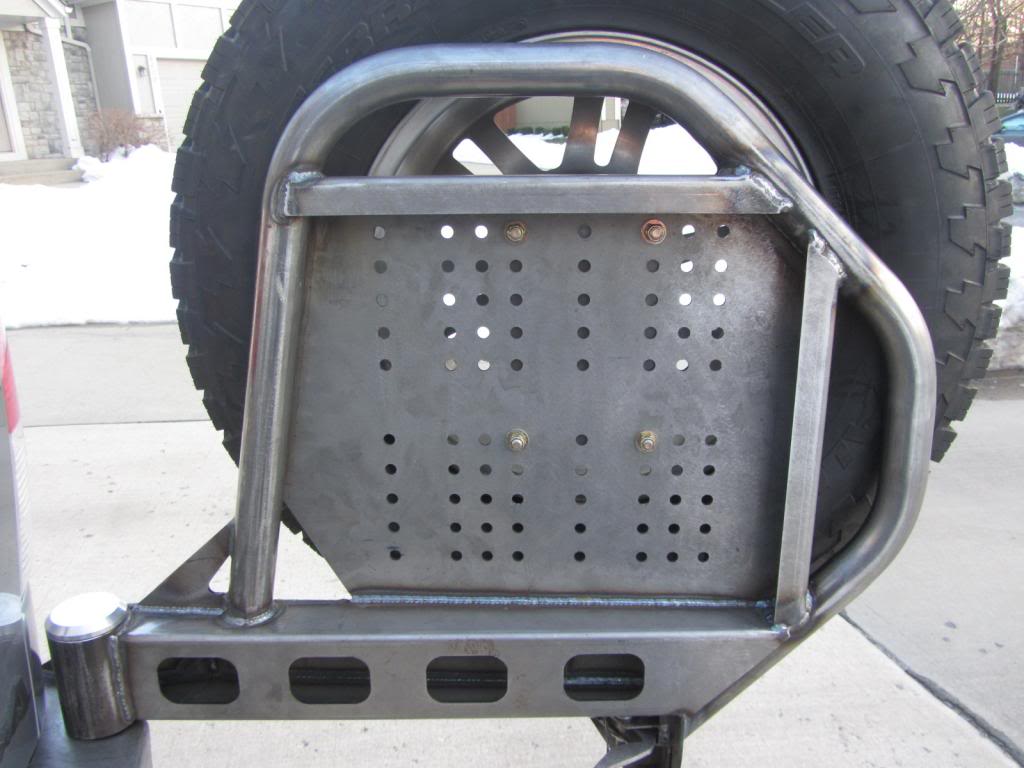
I just got some pics of the bumper and the latching system. This process has taken time, however, the end result is worth the wait. I am going to 'tweak' the carrier at Atomic fab, then to RML powdercoating, then installed. Tweaks will include a modular case rack ~ pelican with recovery gear, a swing down table and a rotopax. Also, I'm going to fab up a locking pin system so I can lock the tire carrier at various open positions. I'll have to see when it gets here...
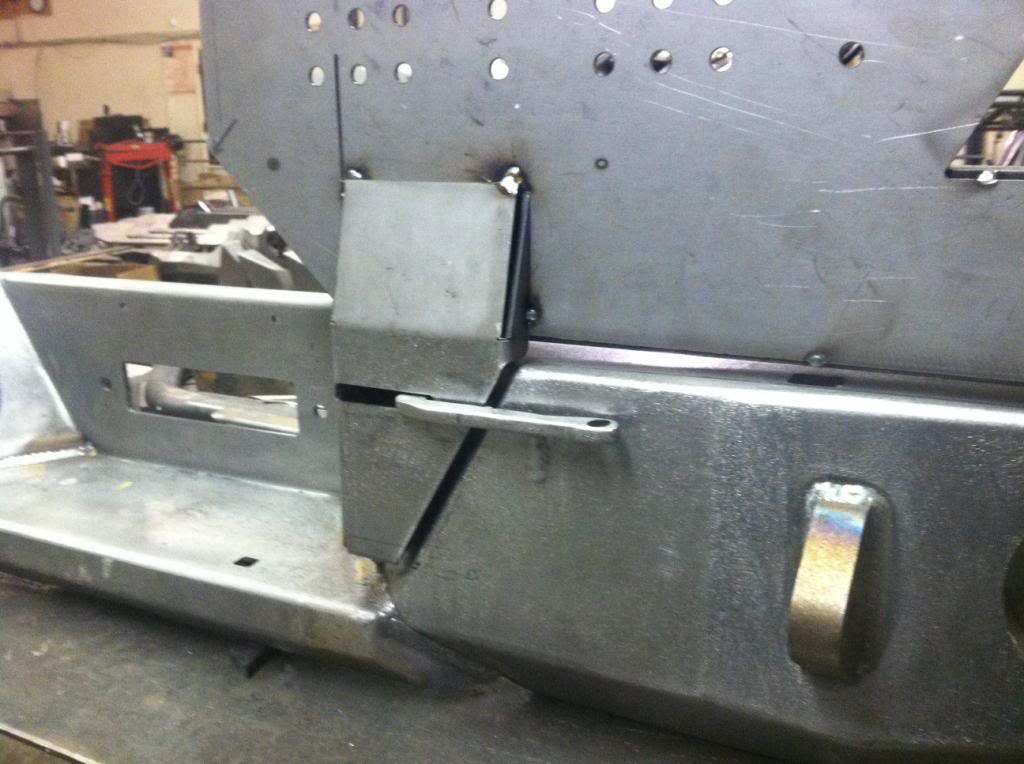
EXO fabbed up a custom latch system. Originally, the latching system on their ExPo Tundra was electric, and was riddled with problems. So this is their solution. From what I understand, it is mechanical and far more reliable. I'll be the judge of that. Here are the pics...**not the most focused pics in the world** I'll get better pics when its mocked up on my rig.


Regards,
BWJ
I just got some pics of the bumper and the latching system. This process has taken time, however, the end result is worth the wait. I am going to 'tweak' the carrier at Atomic fab, then to RML powdercoating, then installed. Tweaks will include a modular case rack ~ pelican with recovery gear, a swing down table and a rotopax. Also, I'm going to fab up a locking pin system so I can lock the tire carrier at various open positions. I'll have to see when it gets here...
EXO fabbed up a custom latch system. Originally, the latching system on their ExPo Tundra was electric, and was riddled with problems. So this is their solution. From what I understand, it is mechanical and far more reliable. I'll be the judge of that. Here are the pics...**not the most focused pics in the world** I'll get better pics when its mocked up on my rig.
Regards,
BWJ
Mar 7, 2013 | 05:35 PM
#31
Thread Starter
Registered User
Joined: Jan 2007
Posts: 125
Likes: 0
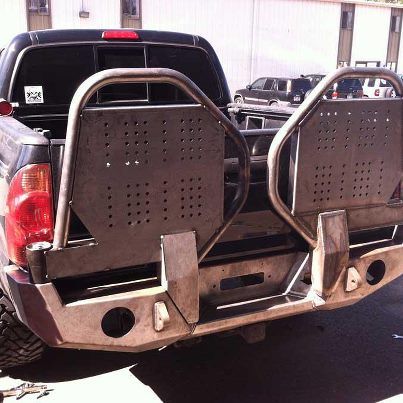
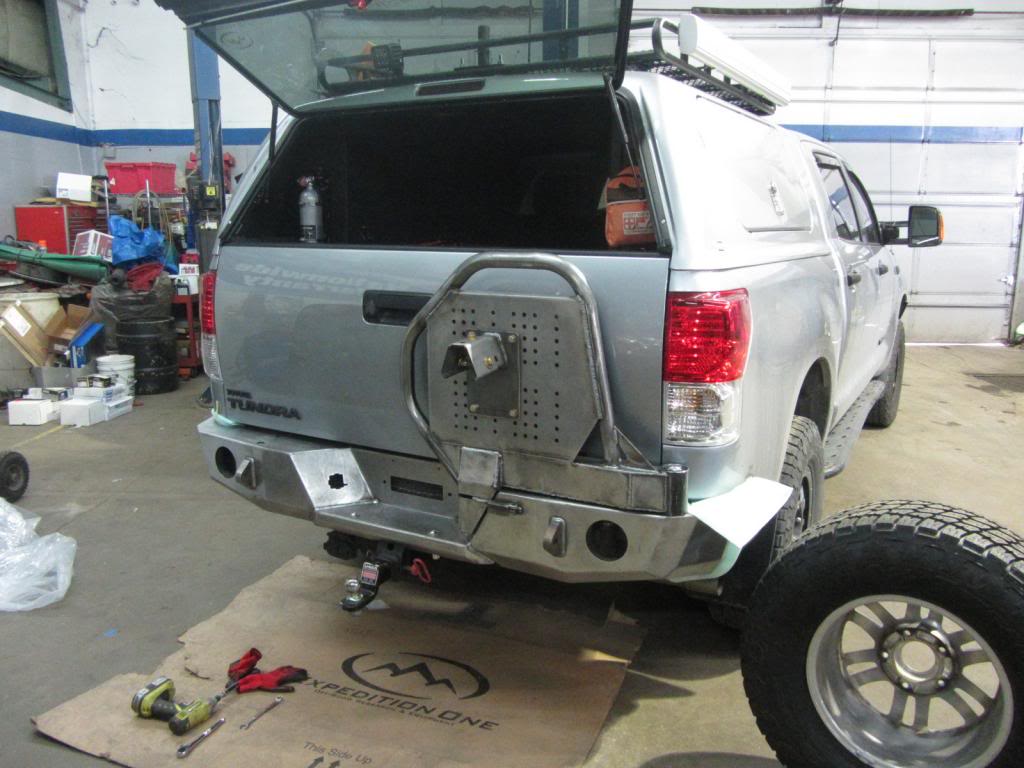
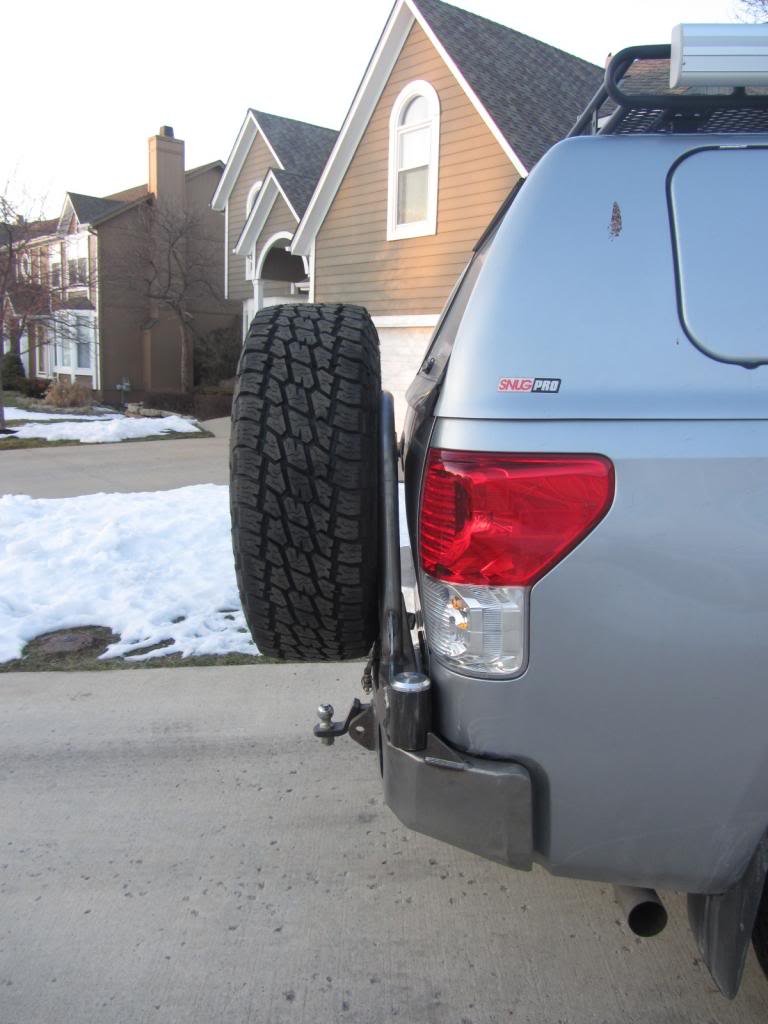
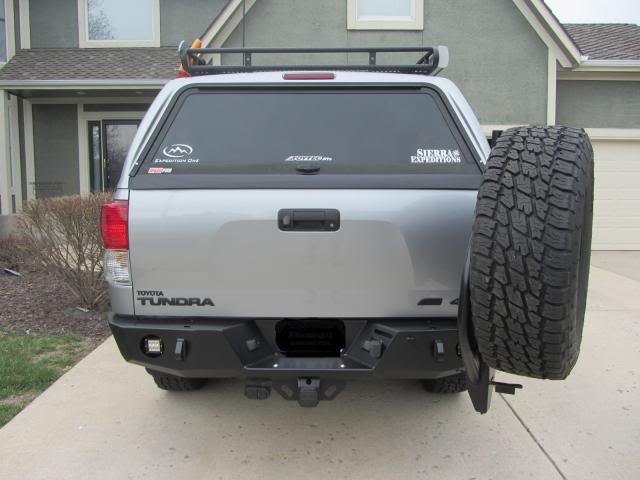
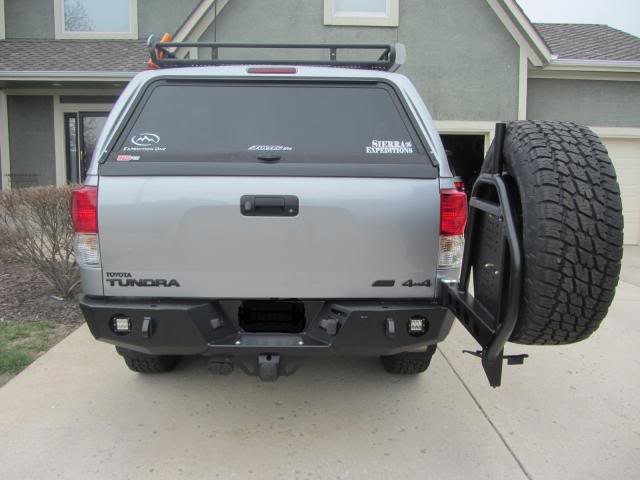
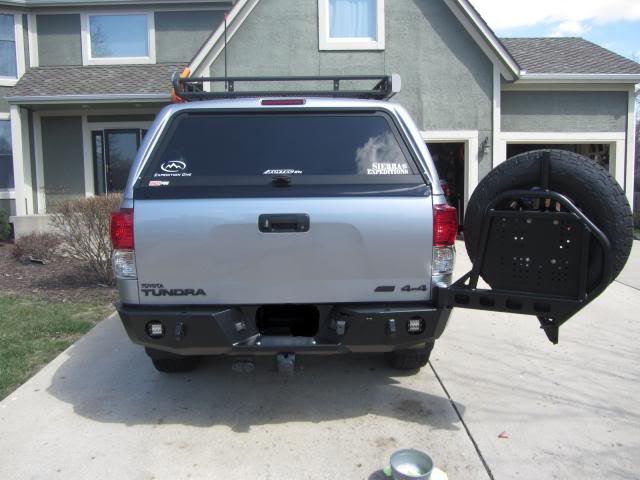
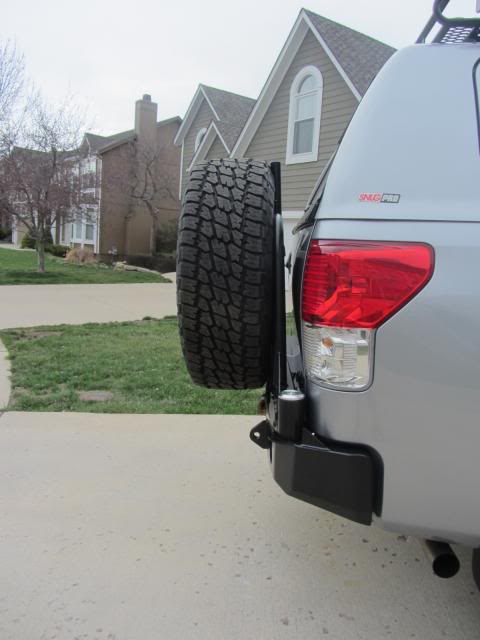
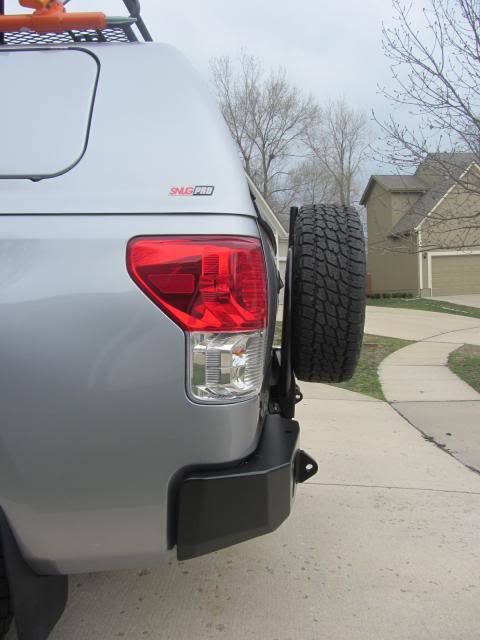
EXO bumper is on...Mock up
All,
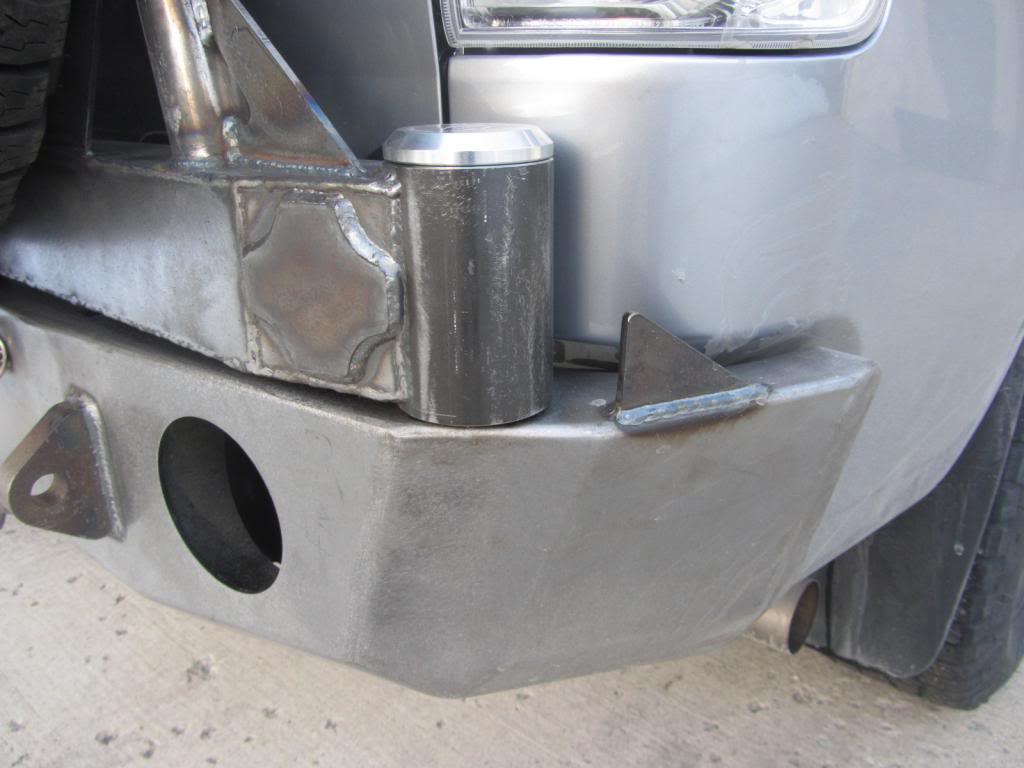
Here she is. I just got back from Atomic Fabworks and I have the bumper on in raw metal. Why? Well I wanted to have the bumper on my rig for a short amount of time to work out any 'bugs' that might exist. All in all, EXO makes an exceptional product, and I am VERY pleased with the results. I have waited patiently for 10 months now, and if I had to do it again, I would without hesitation. I would rather wait and get it done right, than get a product that was rushed to make a deadline.
A special shout out to the guys at Atomic Fabworks (Steve, Brandon and Kelly). They have exceeded my expectations once again. They really care about the installation ~ even down to the smallest details. They had the insight and expertise to avoid issues that I did not even think existed. That comes with experience and care...By the way, Atomic's race team placed 2nd overall (barely edged out of 1st) in the King of Hammer's stock UTV class. Not only do they work hard, they play hard as well. Congrats to them all.
Now back to the topic at hand. Every aspect of this bumper reflects quality, engineering and artistry in one stout package. It is overbuilt ~ PERIOD. What I appreciate are the simple lines, however, don't let that fool you. This bumper and swing out are BEEFY and I have no hesitation in winching with these bumpers on. They are that strong.
After the process of replacing my stock 'bumpers', I would like to offer a word of caution. The OEM bumpers that are on your rigs currently are WOEFULLY inadequate. I did not realize how thin the metal was that make up the OEM bumpers. It is all for cosmetics and having the ability to crumple at the first sign of resistance. Deer vs. Tundra OEM bumpers; the Tundra would win, however, you will have a TON of damage depending on the size of the deer...Just sayin'. The rear tow hitch is the only thing in the way between your family, frame and the rear ender...Yikes. Not anymore in my house.
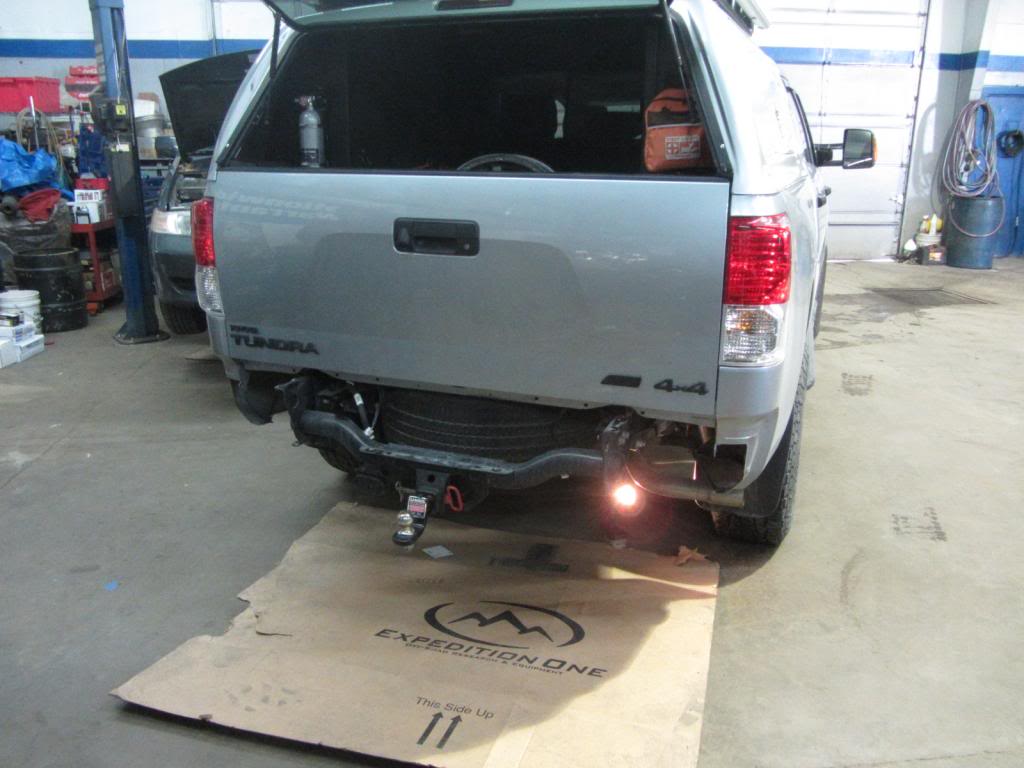
I chose to go with the single swing out because one is plenty for me. I like the utility of the single and it keeps the spare within close reach. I didn't snap any pics of the the bumper on the pallet. I was too excited to get this thing on and ready to go. Anyway, onto the pics...
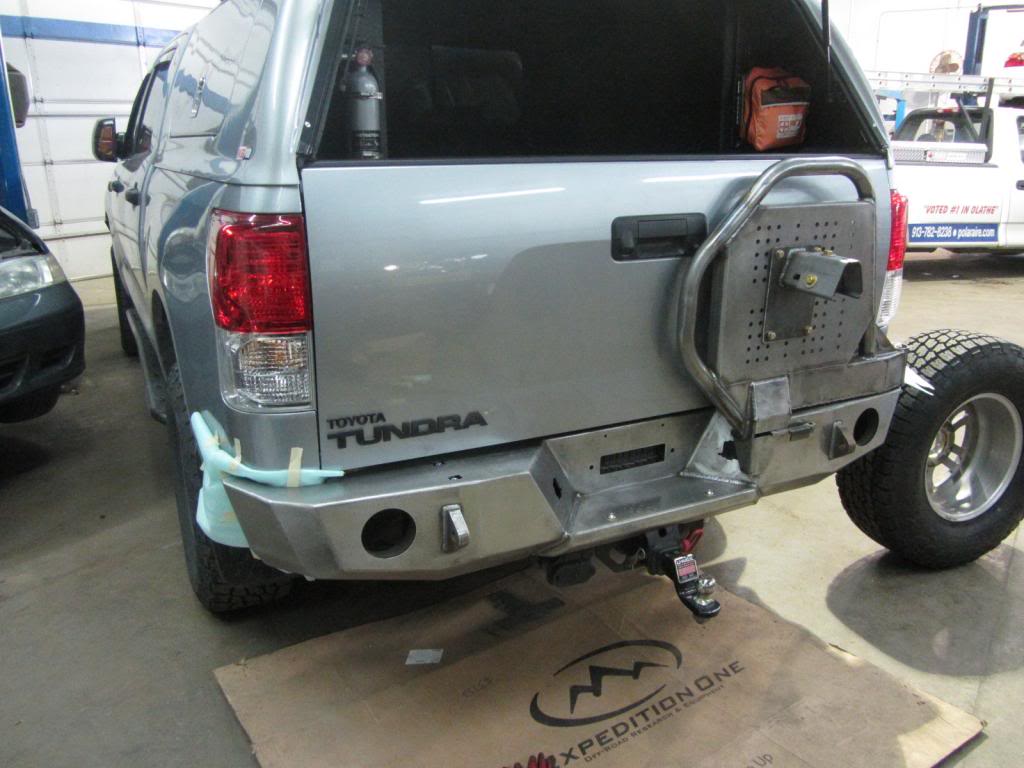
As with any install, we had to shim and tweak a bit. I don't think that this is avoidable. The tolerances of this bumper were as tight as a one-off custom job. I ought to know, I had custom bumpers installed on my previous rig that took 9 weeks to fabricate and install. I think that EXO's ability to maintain their tolerances while doing custom work is one of a kind. Don't let the fact that these are 'mass produced' scare you off. They are that good...
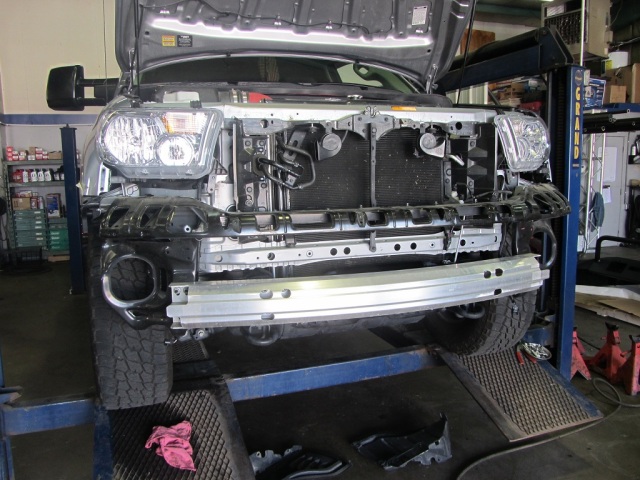
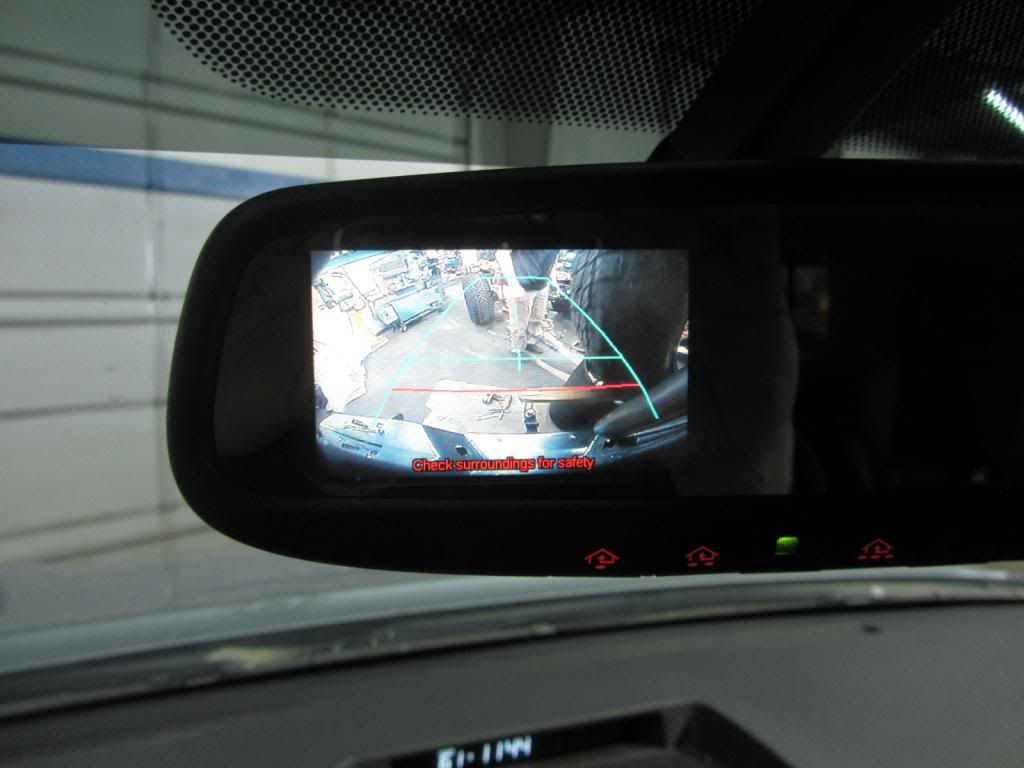
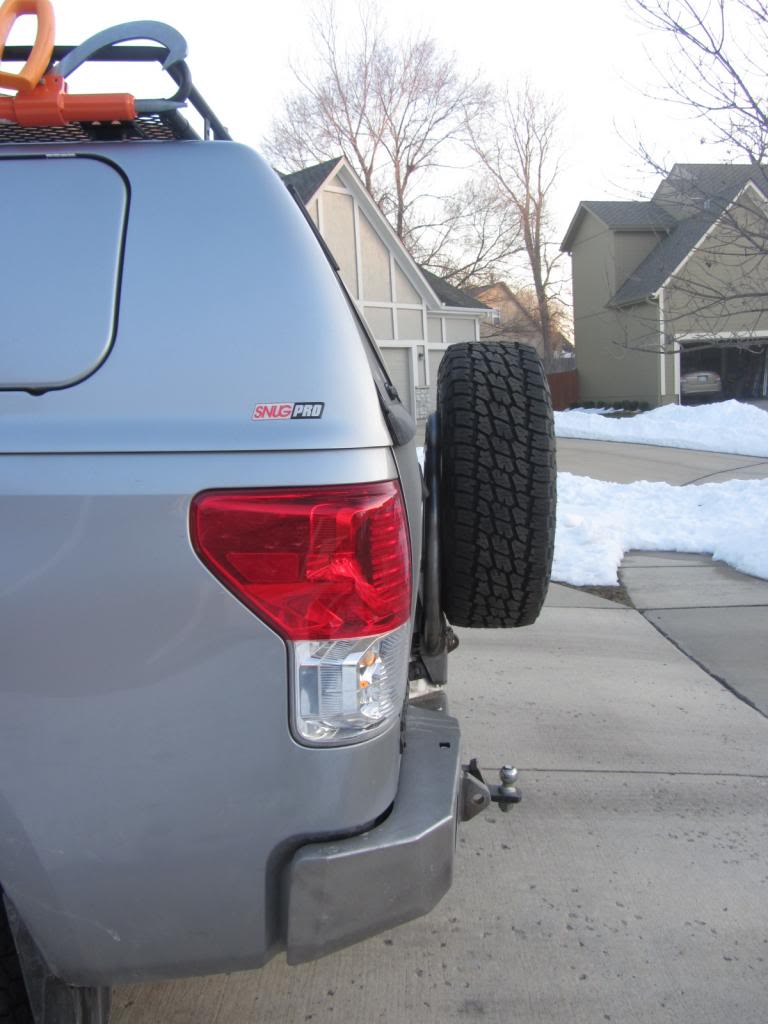
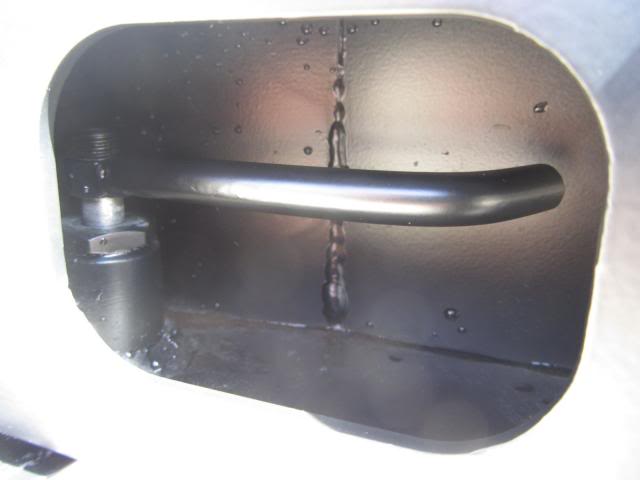
One concern that I had was the obstruction of the back-up camera with the spare tire. My tire is a 295/75 r17 (33") and I did not know how this was going to interfere with the camera. I will admit that I am SPOILED with this piece of technology ~ especially when I'm hooking up my SHERPA II. Here is a picture of my rear view camera. Not too bad in my opinion.
Finally, here are some driveway pics...
Prior to the trip to the powder coater, I will be having Atomic fab up a fold down table and a locking pin system that will prop the carrier at various open angles. As usual, I will post up pics when I get them.
I'll post up the post powder coat pics in a few weeks. After that: On board air / Camp, camp, camp...
Regards,
BWJ
Here she is. I just got back from Atomic Fabworks and I have the bumper on in raw metal. Why? Well I wanted to have the bumper on my rig for a short amount of time to work out any 'bugs' that might exist. All in all, EXO makes an exceptional product, and I am VERY pleased with the results. I have waited patiently for 10 months now, and if I had to do it again, I would without hesitation. I would rather wait and get it done right, than get a product that was rushed to make a deadline.
A special shout out to the guys at Atomic Fabworks (Steve, Brandon and Kelly). They have exceeded my expectations once again. They really care about the installation ~ even down to the smallest details. They had the insight and expertise to avoid issues that I did not even think existed. That comes with experience and care...By the way, Atomic's race team placed 2nd overall (barely edged out of 1st) in the King of Hammer's stock UTV class. Not only do they work hard, they play hard as well. Congrats to them all.
Now back to the topic at hand. Every aspect of this bumper reflects quality, engineering and artistry in one stout package. It is overbuilt ~ PERIOD. What I appreciate are the simple lines, however, don't let that fool you. This bumper and swing out are BEEFY and I have no hesitation in winching with these bumpers on. They are that strong.
After the process of replacing my stock 'bumpers', I would like to offer a word of caution. The OEM bumpers that are on your rigs currently are WOEFULLY inadequate. I did not realize how thin the metal was that make up the OEM bumpers. It is all for cosmetics and having the ability to crumple at the first sign of resistance. Deer vs. Tundra OEM bumpers; the Tundra would win, however, you will have a TON of damage depending on the size of the deer...Just sayin'. The rear tow hitch is the only thing in the way between your family, frame and the rear ender...Yikes. Not anymore in my house.
I chose to go with the single swing out because one is plenty for me. I like the utility of the single and it keeps the spare within close reach. I didn't snap any pics of the the bumper on the pallet. I was too excited to get this thing on and ready to go. Anyway, onto the pics...
As with any install, we had to shim and tweak a bit. I don't think that this is avoidable. The tolerances of this bumper were as tight as a one-off custom job. I ought to know, I had custom bumpers installed on my previous rig that took 9 weeks to fabricate and install. I think that EXO's ability to maintain their tolerances while doing custom work is one of a kind. Don't let the fact that these are 'mass produced' scare you off. They are that good...
One concern that I had was the obstruction of the back-up camera with the spare tire. My tire is a 295/75 r17 (33") and I did not know how this was going to interfere with the camera. I will admit that I am SPOILED with this piece of technology ~ especially when I'm hooking up my SHERPA II. Here is a picture of my rear view camera. Not too bad in my opinion.
Finally, here are some driveway pics...
Prior to the trip to the powder coater, I will be having Atomic fab up a fold down table and a locking pin system that will prop the carrier at various open angles. As usual, I will post up pics when I get them.
I'll post up the post powder coat pics in a few weeks. After that: On board air / Camp, camp, camp...
Regards,
BWJ
Mar 21, 2013 | 08:05 PM
#33
Thread Starter
Registered User
Joined: Jan 2007
Posts: 125
Likes: 0
MPGs report...
All,
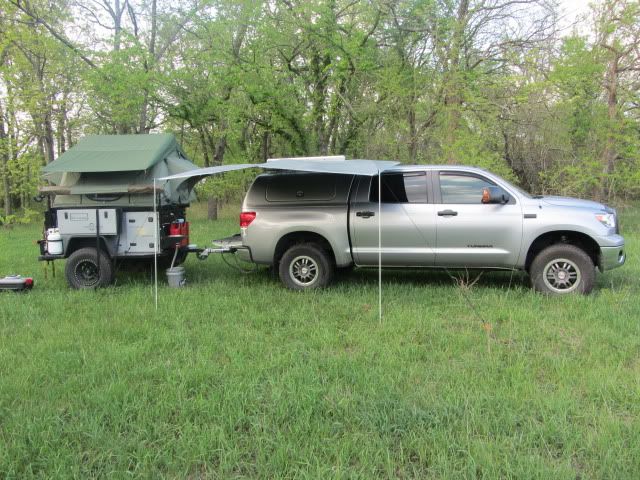
I just returned from a trip to Albuquerque, New Mexico. I drove 1500+ miles, and the Tundra did GREAT. I was curious to see what my rig was going to do mpgwise with the rear bumper on + spare. *Caveat ~ I've got 33" with 3" of lift + shell + cabinets + ethanol blended gasoline (I could not locate stations that served ethanol-free fuel).
Heading out I averaged 14.6 mpgs... My 4runner averaged about 14.2 on the highway ~ I am beyond thrilled with this performance. I returned home towing a 5'x8' enclosed Uhaul trailer that weighed 3750 lbs + cargo, and I averaged 12.7 mpgs. Knowing that my Sherpa II is 1,800 lbs fully loaded, I suspect that my performance will be better than 12.7. Needless to say, I am very pleased with the performance. Comfort, power, room all in one package...
Next week, Rear bumper goes to the powder coater. OBA gets installed. Foxwing awning gets installed on the Sherpa II. Then camp, camp, camp...
Regards,
BWJ
I just returned from a trip to Albuquerque, New Mexico. I drove 1500+ miles, and the Tundra did GREAT. I was curious to see what my rig was going to do mpgwise with the rear bumper on + spare. *Caveat ~ I've got 33" with 3" of lift + shell + cabinets + ethanol blended gasoline (I could not locate stations that served ethanol-free fuel).
Heading out I averaged 14.6 mpgs...
My 4runner averaged about 14.2 on the highway ~ I am beyond thrilled with this performance. I returned home towing a 5'x8' enclosed Uhaul trailer that weighed 3750 lbs + cargo, and I averaged 12.7 mpgs. Knowing that my Sherpa II is 1,800 lbs fully loaded, I suspect that my performance will be better than 12.7. Needless to say, I am very pleased with the performance. Comfort, power, room all in one package...Next week, Rear bumper goes to the powder coater. OBA gets installed. Foxwing awning gets installed on the Sherpa II. Then camp, camp, camp...
Regards,
BWJ
Apr 7, 2013 | 04:04 PM
#34
Thread Starter
Registered User
Joined: Jan 2007
Posts: 125
Likes: 0
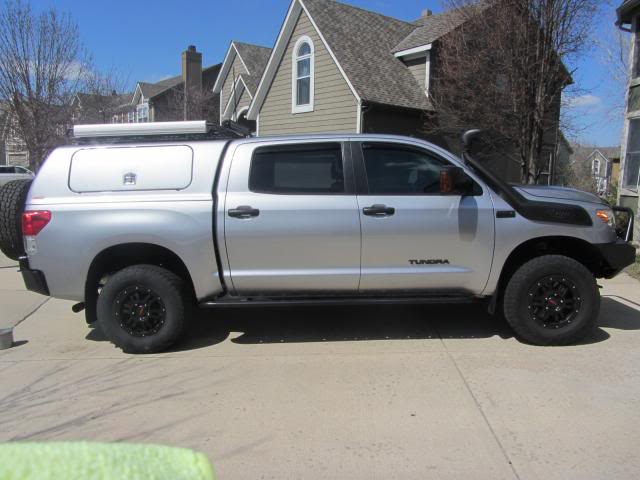
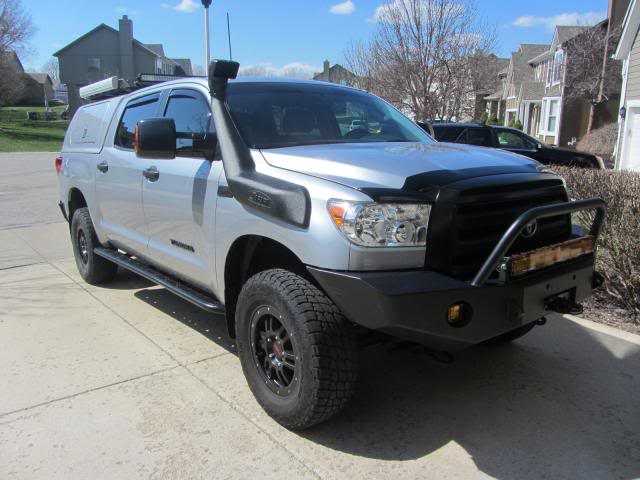
EXO bumper / OBA / Snorkel are on...
All,
Just got my rig back from Atomic Fabworks on Friday. I had the EXO bumper installed following completion of powder coating at RML powdercoating. During the trial period, my bumper rusted from the freak snow storm + KS salt. I had to hit it with naval jelly and WD-40 Specialist rust inhibitor to prevent the surface rust. I was surprised how fast surface rust builds. It took two days for it the turn a lovely matte burnt orange. In retrospect, I should have sprayed the inhibitor sooner, but live and learn. My next bumper on my next rig will be done differently :ylsmoke:...
RML premier powder coating has this new dustless hydro-blasting process available. It is an alternative to traditional sand blasting. My understanding of this process is that it enables the blaster more control of the media and pitting of the blasted surface is decreased dramatically. It consists of water, tiny glass particles and a rust inhibitor. The glass disintegrates when it hits the surface. The end result is a surface smoother and more accepting fo the powder coat. According to RML, it is far more efficient, and is approved by all major paint manufacturers. My bumper looks like a fine mirrored surface. I recommend this process highly. If you are not local, I recommend you ask your powder coater about it. It is the newest process available, and RML is one of the first in the country to implement it.
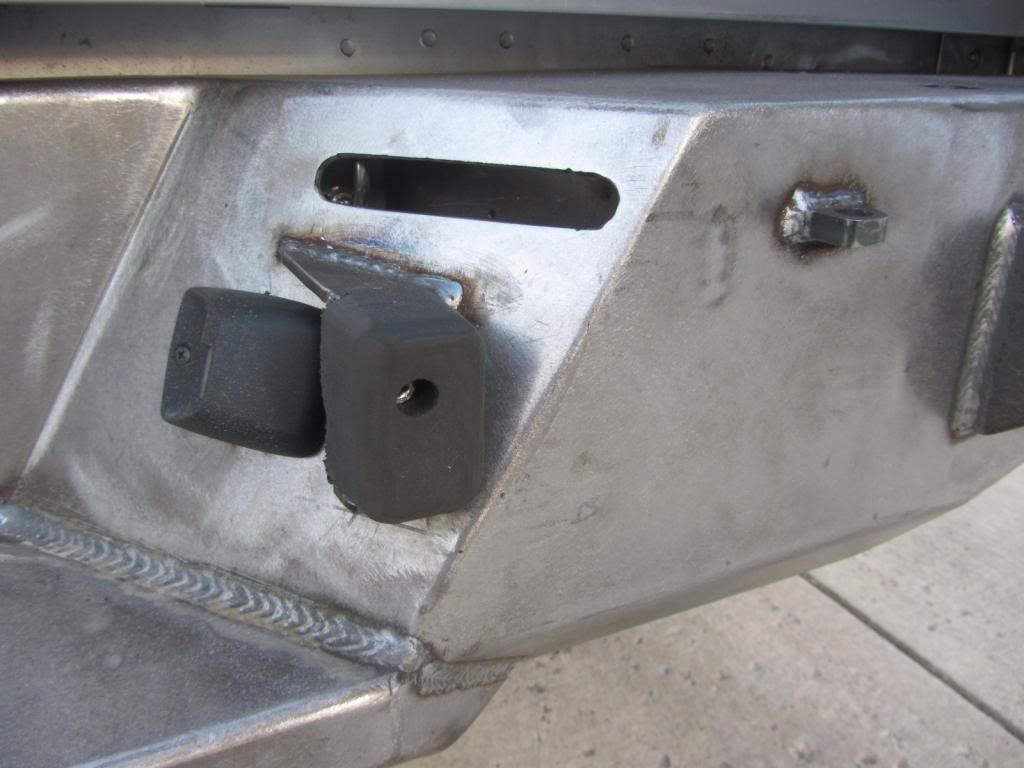
I had atomic tweak the EXO bumper before they installed it. Specifically, I had them weld a stop, a catch system (that would allow the tire carrier to be 'locked' in several positions), and a mount for my Dually D2 light stand. I wish I had done this for my Sherpa II trailer, however, I did not have any experience with tire carriers before my trailer build. Anyway, I wanted three positions available: 1) locked so that I could leave the tailgate up to gain access to the back with just the window open 2) 90[SUP].[/SUP] for the tailgate to fold down 3) open all the way without having the spare ding my tail light. The locking pin is a slick setup. It consists of a spring loaded pin welded to an L handle. This pin will pop down into one of the three holes in the locking plate.
I wanted to wait on putting a pic of the latching mechanism of the EXO bumper. As I said before, this is an engineering marvel, and props goes out to EXO for fabbing this up for me. This was a one-off system that the head fabricator (Robert) had thought up and developed. I'm glad that I waited. Knowing what I know now, if you are thinking of buying this bumper with tire carrier, DO IT. To my untrained eye, it looks complicated. Yet to every fabricator/mechanic that has seen this latch was impressed at the ingenuity required to do this. I believe the bar has been raised for rear custom bumpers with a spare tire carrier. I will put this latch up against any other fabricator out there doing this ~ period.

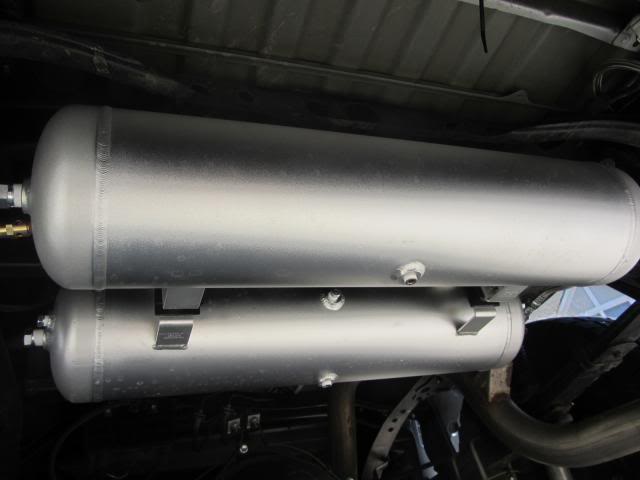
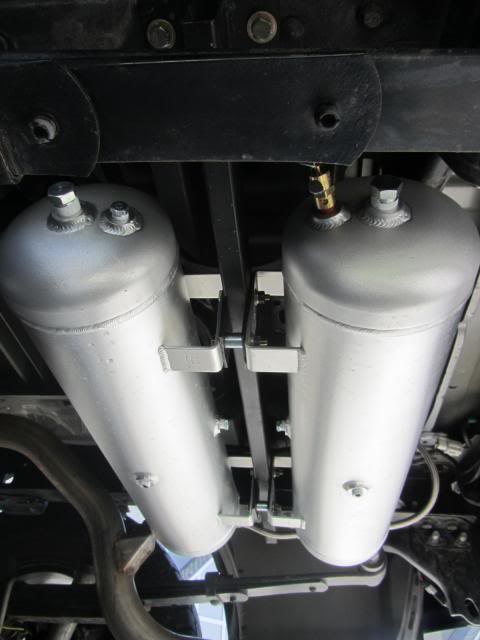
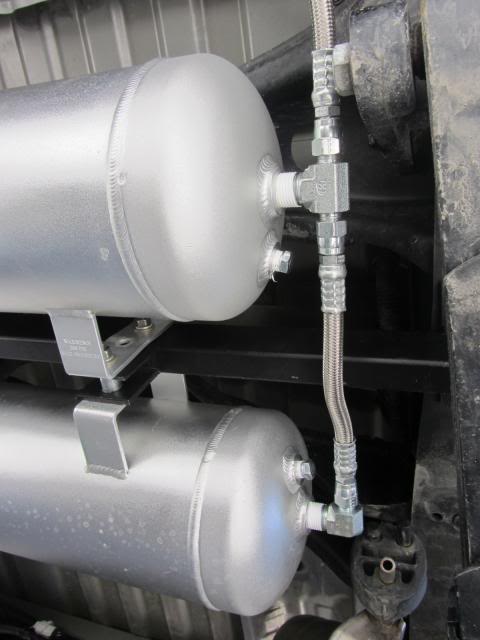
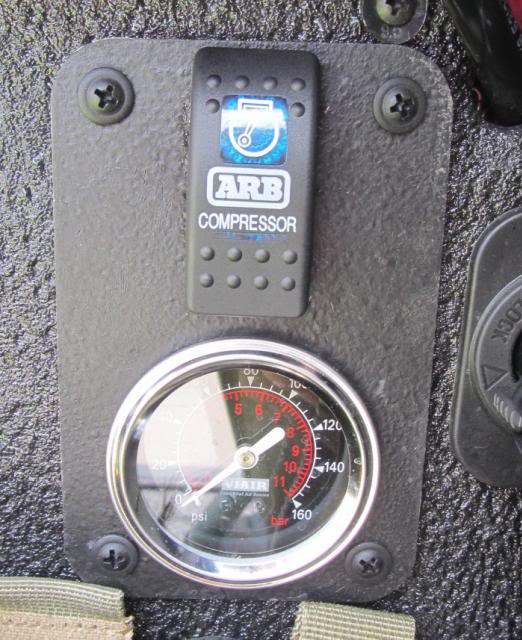
OBA: My wife bought me the ARB twin compressor (CKMTA12) for my birthday :wings: I am a blessed man. I coupled this with two 5 gallon anodized aluminum tanks. These were mounted in the spare compartment under the bed. I decided to go with the stainless steel braided hose for the entire system. After using this yesterday, I am surprised at how hot the hoses get. Anyway, Atomic fabbed up a custom bracket for the mounting and plumbed the whole system. They did a great job as usual.
Snorkel: I am a big fan of snorkels. I had one on my 3 gen 4runner and I found a screaming deal on one for the Tundra. I acquired it from Brian Jowett of Jowett engineering. THANKS BRIAN! This snorkel is made for the 200 series Land Cruiser, but, it can be made to fit the Tundra as well. Since not all Tundras are the same, we had to make a trip to the hardware store for some additional fittings. Finally, we got it to work. I can now participate in the Central Overland trips in Spring ~ High water mark + Yacht club...Many, many props out to Atomic for helping me out with these projects...Class guys that treated my rig like one of their own. Highly recommend them. Here are some eye candy pics of the snorkel and bumper. Enjoy!
Next mod in play ~ OME CS055R leaf springs + Air Lift Loadlifter 5000 kit...
Regards,
BWJ
Just got my rig back from Atomic Fabworks on Friday. I had the EXO bumper installed following completion of powder coating at RML powdercoating. During the trial period, my bumper rusted from the freak snow storm + KS salt. I had to hit it with naval jelly and WD-40 Specialist rust inhibitor to prevent the surface rust. I was surprised how fast surface rust builds. It took two days for it the turn a lovely matte burnt orange. In retrospect, I should have sprayed the inhibitor sooner, but live and learn. My next bumper on my next rig will be done differently :ylsmoke:...
RML premier powder coating has this new dustless hydro-blasting process available. It is an alternative to traditional sand blasting. My understanding of this process is that it enables the blaster more control of the media and pitting of the blasted surface is decreased dramatically. It consists of water, tiny glass particles and a rust inhibitor. The glass disintegrates when it hits the surface. The end result is a surface smoother and more accepting fo the powder coat. According to RML, it is far more efficient, and is approved by all major paint manufacturers. My bumper looks like a fine mirrored surface. I recommend this process highly. If you are not local, I recommend you ask your powder coater about it. It is the newest process available, and RML is one of the first in the country to implement it.
I had atomic tweak the EXO bumper before they installed it. Specifically, I had them weld a stop, a catch system (that would allow the tire carrier to be 'locked' in several positions), and a mount for my Dually D2 light stand. I wish I had done this for my Sherpa II trailer, however, I did not have any experience with tire carriers before my trailer build. Anyway, I wanted three positions available: 1) locked so that I could leave the tailgate up to gain access to the back with just the window open 2) 90[SUP].[/SUP] for the tailgate to fold down 3) open all the way without having the spare ding my tail light. The locking pin is a slick setup. It consists of a spring loaded pin welded to an L handle. This pin will pop down into one of the three holes in the locking plate.
I wanted to wait on putting a pic of the latching mechanism of the EXO bumper. As I said before, this is an engineering marvel, and props goes out to EXO for fabbing this up for me. This was a one-off system that the head fabricator (Robert) had thought up and developed. I'm glad that I waited. Knowing what I know now, if you are thinking of buying this bumper with tire carrier, DO IT. To my untrained eye, it looks complicated. Yet to every fabricator/mechanic that has seen this latch was impressed at the ingenuity required to do this. I believe the bar has been raised for rear custom bumpers with a spare tire carrier. I will put this latch up against any other fabricator out there doing this ~ period.
OBA: My wife bought me the ARB twin compressor (CKMTA12) for my birthday :wings: I am a blessed man. I coupled this with two 5 gallon anodized aluminum tanks. These were mounted in the spare compartment under the bed. I decided to go with the stainless steel braided hose for the entire system. After using this yesterday, I am surprised at how hot the hoses get. Anyway, Atomic fabbed up a custom bracket for the mounting and plumbed the whole system. They did a great job as usual.
Snorkel: I am a big fan of snorkels. I had one on my 3 gen 4runner and I found a screaming deal on one for the Tundra. I acquired it from Brian Jowett of Jowett engineering. THANKS BRIAN! This snorkel is made for the 200 series Land Cruiser, but, it can be made to fit the Tundra as well. Since not all Tundras are the same, we had to make a trip to the hardware store for some additional fittings. Finally, we got it to work. I can now participate in the Central Overland trips in Spring ~ High water mark + Yacht club...Many, many props out to Atomic for helping me out with these projects...Class guys that treated my rig like one of their own. Highly recommend them. Here are some eye candy pics of the snorkel and bumper. Enjoy!
Next mod in play ~ OME CS055R leaf springs + Air Lift Loadlifter 5000 kit...
Regards,
BWJ
 Oct 13, 2013 | 09:42 AM
#36

Registered User
Joined: Aug 2013
Posts: 62
Likes: 0


Thread
Thread Starter
Forum
Replies
Last Post
RedRunner_87
95.5-2004 Tacomas & 96-2002 4Runners (Build-Up Section)
84
Jun 1, 2021 01:51 PM
matrad
99+ Tundra, 00+ Sequoia, 98+ Land Cruiser/LX470
2
Aug 8, 2015 03:00 PM
Suprarossa
99+ Tundra, 00+ Sequoia, 98+ Land Cruiser/LX470
0
Jul 6, 2015 05:21 AM


