
Snowshredder's 1997 4Runner Build-up
 Jan 20, 2013 | 08:22 PM
#141
Thread Starter
Registered User
Joined: Nov 2007
Posts: 680
Likes: 0
From: Gilbert, Az.
Thanks Jason...at least you didn't ask me about installing an engine or a steering wheel. I've always believed that if you build it yourself with your own spin, then who cares if others like it or make fun of it. So, Thank you for the kind words. Now, I think I'm done with my TIG table as I've just dropped off the firebricks and wood for the lower platform for it at work tonight. Can't wait to start having that thing repay it self.
Last edited by snowshredder555; Jan 20, 2013 at 08:24 PM.
Jan 30, 2013 | 05:45 PM
#143
Thread Starter
Registered User
Joined: Nov 2007
Posts: 680
Likes: 0
From: Gilbert, Az.
So aside from the razzing, I was finally able to get started a long awaited project. Works been slow the last couple of days and I thought I might as well get a cracking!
The following pictures are a simple mock up and begining to my partial roll cage I've been putting off for almost a year now. If there's any comments or suggestions, please feel free to let em' fly. But please, let them pertain to the project at hand and not at how dirty the 4Runner is... I do appreciate the responses, even if they are at my own expense.
My thoughts: I wanted to make the main front bar hug the top and sides of the inside and just follow the lines naturally. However, while taking measurements, I found that the support to the frame rails were on the inside of the wheel wells. So to the inside it went.

As for the tubes heading to the rear I wanted those as close to the roof line as possible but to also follow the lines of the inside. I think I was able to accomplish this but still wanted to have enough body material to bolt into.


Initially it will be mounted to just the body but I will be making some mounts to the frame. So as I'll call this the first phase of the project, mounting it to the frame will be the final phase. There's some ideas about putting a shelf in above a spot I'd like to designate for the ice chest, but I'd some how like to be able to fit a place to mount a gun or two.
Thanks for looking and as before, comments are welcom.
Jan 30, 2013 | 09:20 PM
#145
Thread Starter
Registered User
Joined: Nov 2007
Posts: 680
Likes: 0
From: Gilbert, Az.
Racerflea....
I agree. Nothing has been tacked or welded yet and just after the point where the pictures were taken, Jimmy (a friend and co-worker) came out and actually pointed that out. I'll fiddle with it some more tomorrow, but I don't want them to out of line from the front. My thinking behind that is to help strengthen the whole cage and tie into the frame just underneath the body where the tubes actually come down. But then again, this is the first cage that I'm building by my-self. Hell, just to get to this point, I had a loss of 59" of steel tubing. So all in all, I'm happy with the progress and the loss, I have a feeling I'll be able to reuse a fare portion of it elsewhere.
By the way, thank you for your input and eyes on it.
By the way, thank you for your input and eyes on it.
Last edited by snowshredder555; Jan 30, 2013 at 09:24 PM.
Feb 1, 2013 | 01:18 PM
#146
Registered User
Joined: Jan 2010
Posts: 705
Likes: 0
From: seminary, mississippi
this is kinda what i was thinking would look good, offer great protection while staying out of the way

also this might help with the rear passengers
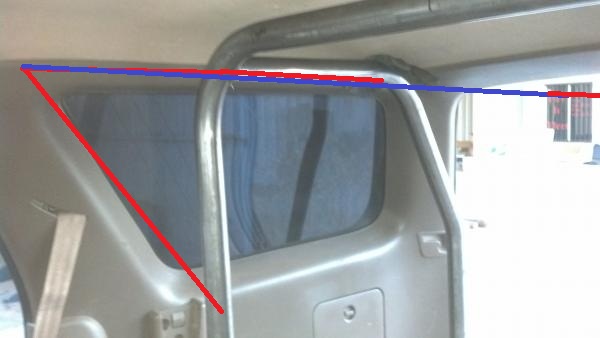
dunno why paint put that random red line it should have been blue anyways those are my ideas
also this might help with the rear passengers
dunno why paint put that random red line it should have been blue anyways those are my ideas
Feb 3, 2013 | 10:41 PM
#147
Thread Starter
Registered User
Joined: Nov 2007
Posts: 680
Likes: 0
From: Gilbert, Az.
Initially I thought about having something like that. But as I worked into it, that faded away. Aside from the safety issue of the rear passengers hitting their heads on the cage, I was quickly running out of steel. I'll have updated pic's on the completion of the first phase probably tomorrow.
Feb 3, 2013 | 10:53 PM
#148
Registered User
Joined: Aug 2009
Posts: 2,173
Likes: 0
From: hohenwald tn.
I think you could keep the legs more outboard, and then tie them into the frame with stub pipes. That's how we did the cage in my dirttrack car but I wouldn't say we knew what we were doing either. I'm sure it will turn out great what ever way you go.
 Feb 4, 2013 | 06:13 PM
#150
Thread Starter
Registered User
Joined: Nov 2007
Posts: 680
Likes: 0
From: Gilbert, Az.
Well as luck would have it, work kept me pretty busy all day and I didn't remember about grabbin some pics until it was already dark. So tomorrow hopefully I'll remember before I head in. Anyhow, MikeS saw it and from what he said, wants me to help build one for his..so he can chime in here until I get the pics up.
 Feb 4, 2013 | 06:20 PM
#152
Thread Starter
Registered User
Joined: Nov 2007
Posts: 680
Likes: 0
From: Gilbert, Az.
I know exactly how you feel...I'm getting that way about the front/ rear bumper. Though I keep seeing designs I like and trying to incorporate them all would look like a mangled bowl spaghetti...so I have to settle on something, but it's just so damn hard to decide. Also, a small body lift might have to be worked in before as tire clearance could be an issue...definitely gonna check it before a single piece of tubing gets cut.
Feb 4, 2013 | 08:50 PM
#154
Thread Starter
Registered User
Joined: Nov 2007
Posts: 680
Likes: 0
From: Gilbert, Az.
 couldn't help it but thanks man. Yeah, I was thinking maybe a little bubble gum and some spackle and I'd call it good.
Feb 4, 2013 | 08:59 PM
couldn't help it but thanks man. Yeah, I was thinking maybe a little bubble gum and some spackle and I'd call it good.
Feb 4, 2013 | 08:59 PM
#155
Thread Starter
Registered User
Joined: Nov 2007
Posts: 680
Likes: 0
From: Gilbert, Az.
PICS..update....
Alright, so I went out in the dark to see how the phone camera would do at night...
Again, I kept the rear legs closer in line because it's much closer to the frame and I will be tying into it in the next phase. Right now, it's just lightly tacked to the body for placement.


Questions, comments are welcomed.
Again, I kept the rear legs closer in line because it's much closer to the frame and I will be tying into it in the next phase. Right now, it's just lightly tacked to the body for placement.
Questions, comments are welcomed.
Last edited by snowshredder555; Feb 4, 2013 at 09:16 PM.
Feb 9, 2013 | 04:36 AM
#156
Registered User
Joined: Aug 2009
Posts: 2,173
Likes: 0
From: hohenwald tn.
Looks like its fitting really well, a cage is going to eat up room no matter how tight you keep it. Are you planning on running it on forward at some point I'm sure you said but I can't remember. Keep up the great work.
Feb 9, 2013 | 09:15 AM
#157
Registered User

Joined: Jan 2010
Posts: 953
Likes: 21
From: Imperial County CA
Looks really good. While you've got a bunch of the rear interior out it might be a good time to put the rear storage compartment from a 99+ in there, if you want more storage. There's a thread on the interweb out there somewhere on it (little bit more work than plug and play, but not much) but I can't find it right now. I'll post it up if I find it.
Feb 9, 2013 | 04:49 PM
#158
Thread Starter
Registered User
Joined: Nov 2007
Posts: 680
Likes: 0
From: Gilbert, Az.
Looks really good. While you've got a bunch of the rear interior out it might be a good time to put the rear storage compartment from a 99+ in there, if you want more storage. There's a thread on the interweb out there somewhere on it (little bit more work than plug and play, but not much) but I can't find it right now. I'll post it up if I find it.
Feb 9, 2013 | 04:58 PM
#159
Thread Starter
Registered User
Joined: Nov 2007
Posts: 680
Likes: 0
From: Gilbert, Az.
Alright...small update.... today I met up with TRDevelopment to pick up a present to the 4Runner...made the deal with AssyrianRocker (their cousins) handed the money to D and came home happy with a new little project.
If I'm anything I'm frugal and look at the potential someone else's discards may have. It needs some work but with the right pickings, it'll be all that I hope it to be.
Guess what it is? Roni/ D, need to let this play out a little.
Hint: Some 3rd gens had em and some didn't.
If I'm anything I'm frugal and look at the potential someone else's discards may have. It needs some work but with the right pickings, it'll be all that I hope it to be.
Guess what it is? Roni/ D, need to let this play out a little.
Hint: Some 3rd gens had em and some didn't.
Feb 9, 2013 | 05:36 PM
#160
Registered User
Joined: Jan 2010
Posts: 953
Likes: 21
From: Imperial County CA
Found it! I wish I could find a rear panel from a 99+ in blue. The tan seems more common on the newer 4runners.
https://www.yotatech.com/forums/f2/m.../#post51121358
https://www.yotatech.com/forums/f2/m.../#post51121358


