Operation: Re-build The PATYWGN!
 02-11-2013, 08:22 PM
#21
Registered User

Join Date: Feb 2007
Location: Santa Monica, Ca
Posts: 319
Likes: 0
Received 0 Likes
on
0 Posts
HAHA man, soo glad it worked out for you...& glad the frame is being "re-used". Those shipping guyes were really cool and i hope your project goes well. Good luck to you...& glad to be a part of it.
 02-13-2013, 05:40 PM
#22
I know you mentioned you did the epoxy on the frame, but it looks like you did something different for the axle, diff...etc. It looks to shine quite a bit. I'm using POR15 on mine which leaves quite a shine. I'm wondering what you did. I think we have just about the same crappy weather and road treatments so I'm interested.
I would have liked to use the epoxy primer and chassis black on everything, but I used up most of my supply on the frame and using the spray booth at work means I have to "rent" shop space due to air, electricity, and use of the filtering system so brushing on was a bit cheaper. We'll see if this stuff lasts, if so it might be my go to paint product for any future endeavors.
As an update on the PATYWGN...
My ProComp wheels came in on Monday, so I had the DuraTracs mounted to the wheels while I got a much needed alignment. I chose to put the wheels and tires on myself so I could see if there were any clearance issues instead of having someone else force them on without regard for my baby. So, I put the rears on first and they looked so bad ass. Moved to the front... OH! No dice Grandma! They were hitting the caliper and not seating. Only about a 1/4" off, man that sucks. So I get online and do a search, found a page on Wheeler's website dedicated to this very problem. Their website actually says "These 1/4" wheel spacers come in handy for fitting alloy wheels that won't fit your Toyota because they contact the front brake calipers. A lot of folks will only install these on the front, the rear brakes usually don't have wheel clearance issues." which is exactly what I ran into. I'll get some longer studs locally this weekend.
I am having a couple problems with the 4runner though. I drove her home last night (first long test drive) and had a pretty significant vibration when rolling above a few miles an hour. I heard/felt this same thing when I drove to get the alignment but I figured it was because the camber was pretty far off and I was riding mostly on the edge of the front tires. Well, it's still there. One thing I'm having done tomorrow is getting my drive shaft rebuilt and balanced. It took a pretty big hit during the accident and actually blew one of the grease caps off the rear part of the shaft so I'm hoping a full rebuild will solve the vibration problem. I'm also getting a little bit of a rubbing noise but only on left turns, but I see nothing making contact with the tire anywhere so I'll have to investigate that further. Lastly, I need to adjust the rear parking brake, which should be a quick fix.
My good buddy Sam asked me today when I was buying steel for the rear bumper. Couldn't be soon enough, but really I NEED SOME SLEEP!!!! I'm so freakin' tired and sore and I haven't taken a day off for about 5 weeks now. This weekend will be "Rebuild my aching body" time and I'll make preps for the rear bumper shortly.
I still have to repair the dent on the rear hatch, re-spray Raptor on the left corner that got dinged in the accident, and I also have the tint version of Raptor and some olive drab paint to mix and do the lower doors, rockers, and lower door jambs when I have time. My boss is asking when I'm building a basket for the roof!!! I'm about to pull my hair out, must sleep!!!
 04-06-2013, 12:54 PM
#23
Ok, a couple months later and I've made almost no progress since the last update. I can say that the Van Sickle paint I finished the rear end and various other pieces in SUCKS! It was advertised as being super heavy duty tough stuff that had built in corrosion resistance but two months of driving and it's chipped off and bleeding rust. I had prepped everything extremely well, cleaned, dried, and applied exactly as instructed and the results looked good at first but longevity is piss poor. POR 15 is all I'll use in the future from now on. The Eastwood epoxy primer and chassis black still look great, but the paint on the rear end ect is failing 100%.
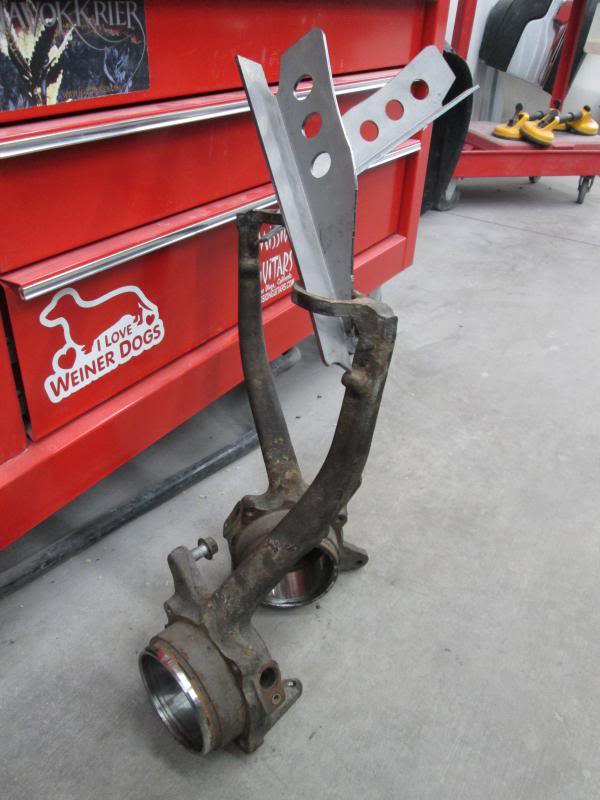
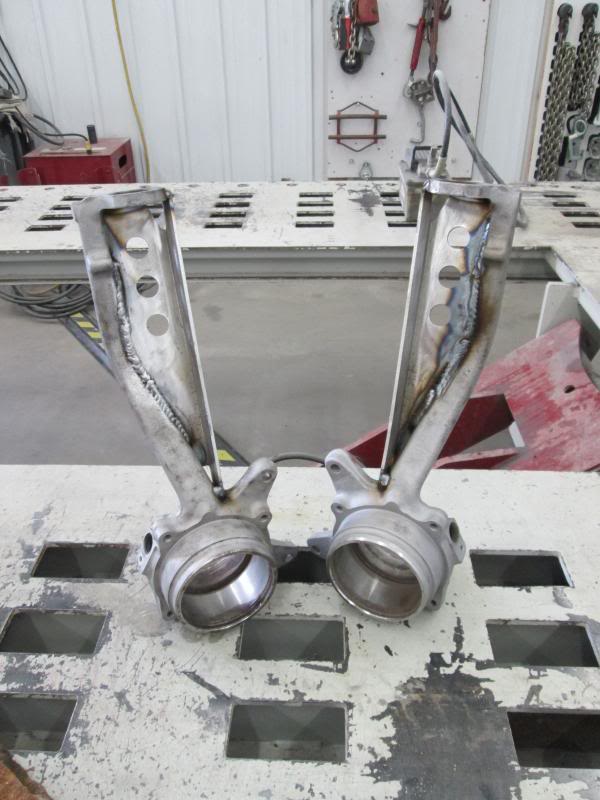
Good news and progress. I bought all the parts to rebuild my front spindles since I found out some or most of the noise I was hearing up front was bad bearings. It took forever for the shop to press out the old stuff on the spindles but they are finally bare. The other day I had some down time and sand blasted the spindles back down to bare metal and got all the corrosion off of them. They look brand new. Once that was done, I broke out the BIG welder at work and welded on some Total Chaos spindle gussets. Next week I'll have the bearings and all pressed back in the spindles and then go to town on them with some POR 15 and Metal Ready to keep them looking good. On to the pics!
Stripped down spindles and gussets waiting to be welded. (And yes, I do love weiner dogs)
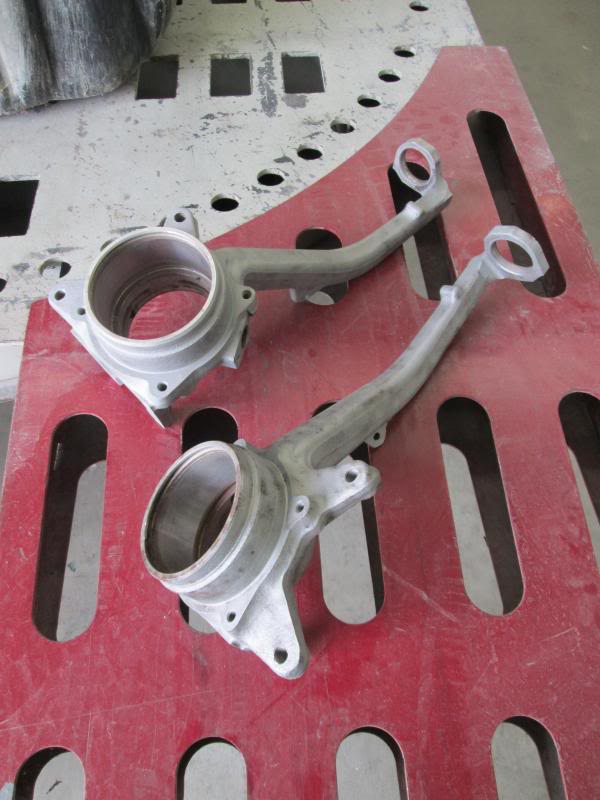
Spindles freshly sand blasted.
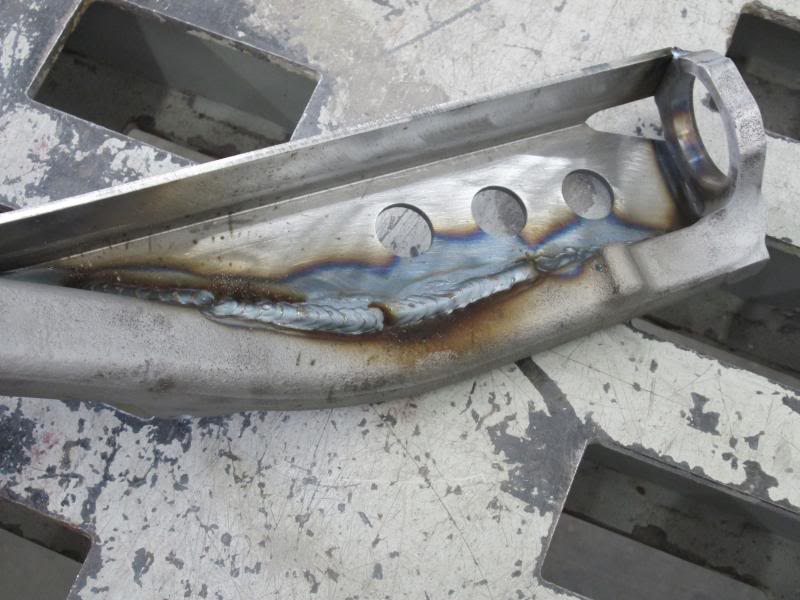
Some of my welds.
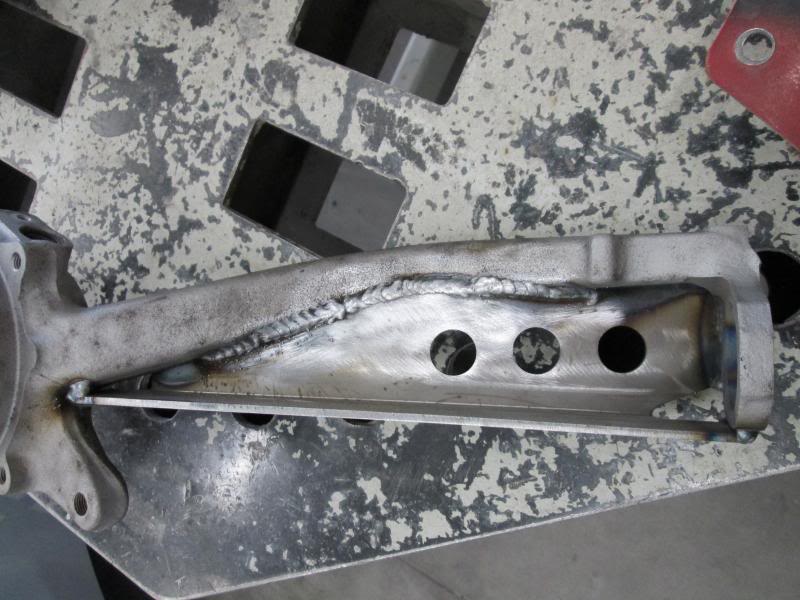
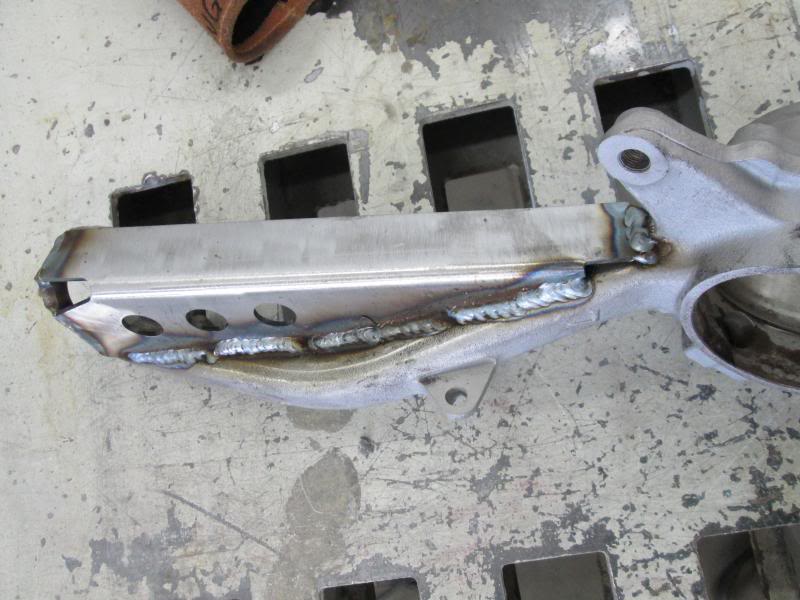
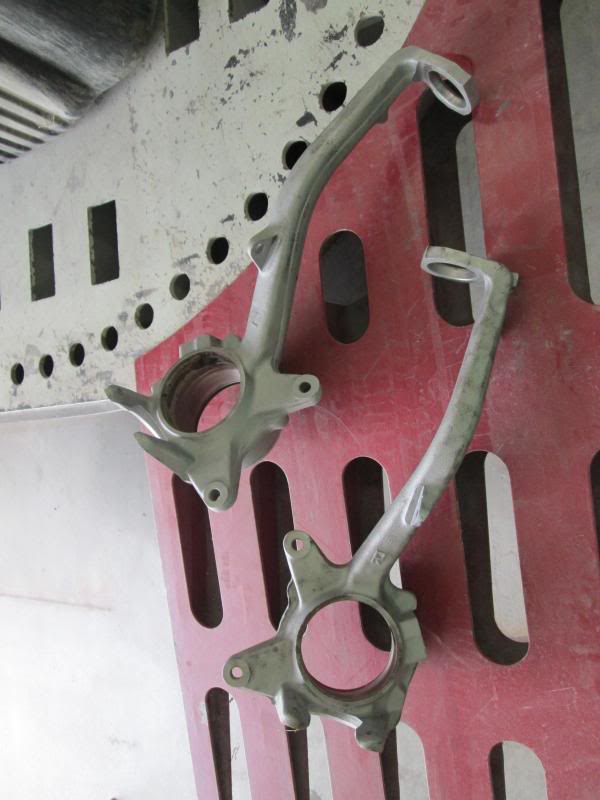
All welded up and looking good!
Good news and progress. I bought all the parts to rebuild my front spindles since I found out some or most of the noise I was hearing up front was bad bearings. It took forever for the shop to press out the old stuff on the spindles but they are finally bare. The other day I had some down time and sand blasted the spindles back down to bare metal and got all the corrosion off of them. They look brand new. Once that was done, I broke out the BIG welder at work and welded on some Total Chaos spindle gussets. Next week I'll have the bearings and all pressed back in the spindles and then go to town on them with some POR 15 and Metal Ready to keep them looking good. On to the pics!
Stripped down spindles and gussets waiting to be welded. (And yes, I do love weiner dogs)
Spindles freshly sand blasted.
Some of my welds.
All welded up and looking good!
04-11-2013, 02:20 PM
#26
Registered User
Join Date: Aug 2010
Posts: 242
Likes: 0
Received 0 Likes
on
0 Posts
Wow, now I see where your bearing questions were coming from. That is awesome that you have such access to a shop with all that equipment.
I have never seen those knuckle gussets, I wouldn't think those are very needed since there isn't high stress at the top of the knuckle. Either way, they look beefy now, but won't it be hard to press the UBJ's back in?
Looking forward to more progress.
I have never seen those knuckle gussets, I wouldn't think those are very needed since there isn't high stress at the top of the knuckle. Either way, they look beefy now, but won't it be hard to press the UBJ's back in?
Looking forward to more progress.
04-15-2013, 05:43 PM
#28
Yeah, they didn't cost much and I figured I would do it while I had the chance. As for the upper ball joints, I've got the Light Racing upper control arms that have a press in sleeve for the spindles that the ball joints attach to. I took the spindles in to the shop that will do the press work today and asked if having a little less access would cause a problem and the shop foreman said it might but he had several ideas of how to do it. He said it was easier last time but he'd figure it out. Once those sleeves are pressed in though I shouldn't need to worry about pressing anything back in since the ball joints bolt on the UCA now.
Last edited by pattycakes77; 04-15-2013 at 06:32 PM. Reason: seriously bad typos!
04-15-2013, 05:51 PM
#29
When I win the lottery, I'm going to do everything in this thread to my 4Runner. Seriously though, awesome work. I'm living vicariously through you, watching your rig torn down to the frame and all cleaned up, painted up, parts replaced and reinforced, it's pretty badass. Keep us updated when you get the chance. Thanks!
04-27-2013, 04:19 PM
#30
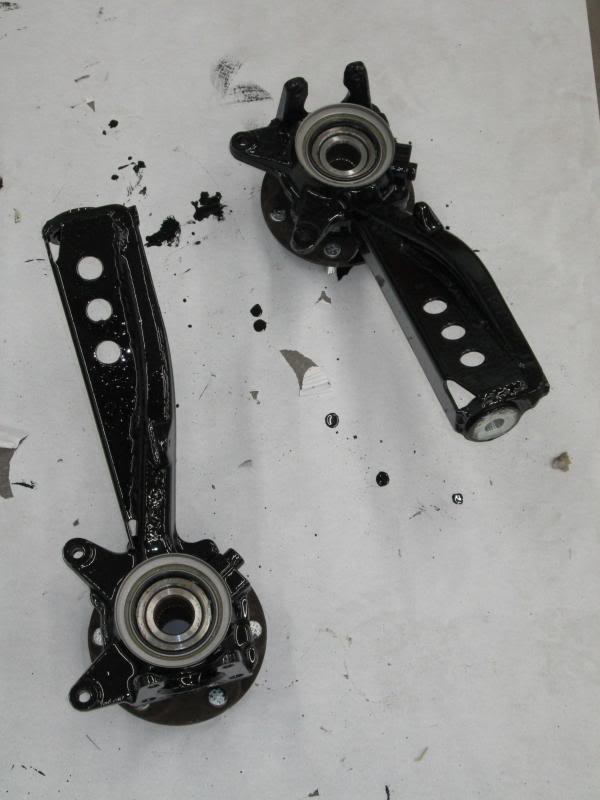
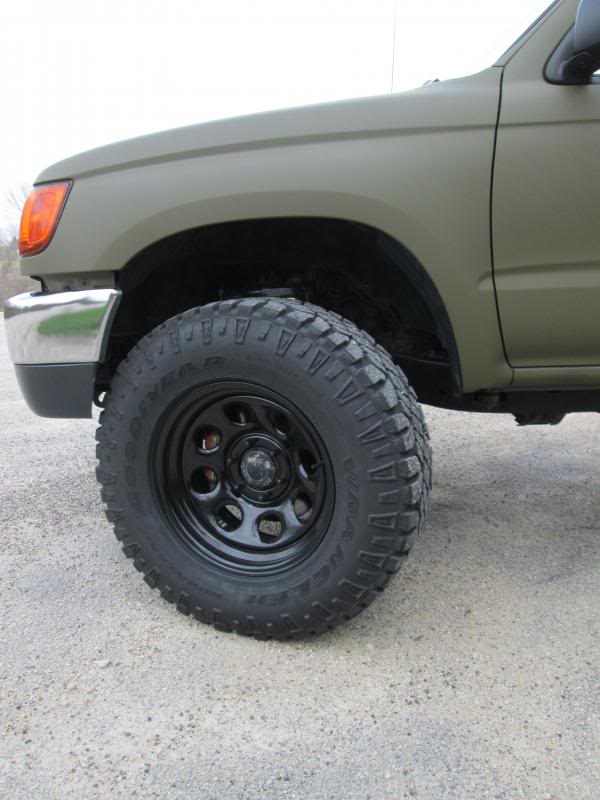
So, I got the new bearings, seals, Light Racing UCA bushings, and extended lug studs installed on the front spindles. Got them painted nice and purdy with some POR 15 and installed them.
I bought 1/4" spacers because they wouldn't clear the new 231mm calipers unfortunately. Then I put on my new Pro Comp 17" 98s and 285 75 17 DuraTracs. Gave them a spin on the lift and I was still having some clearance on the calipers, very minor but still contacting. Got out the grinder and flattened out a little hump and everything was smooth and quiet. Finally got around to giving my baby a bath yesterday and took her out for some glam shots again. Enjoy.
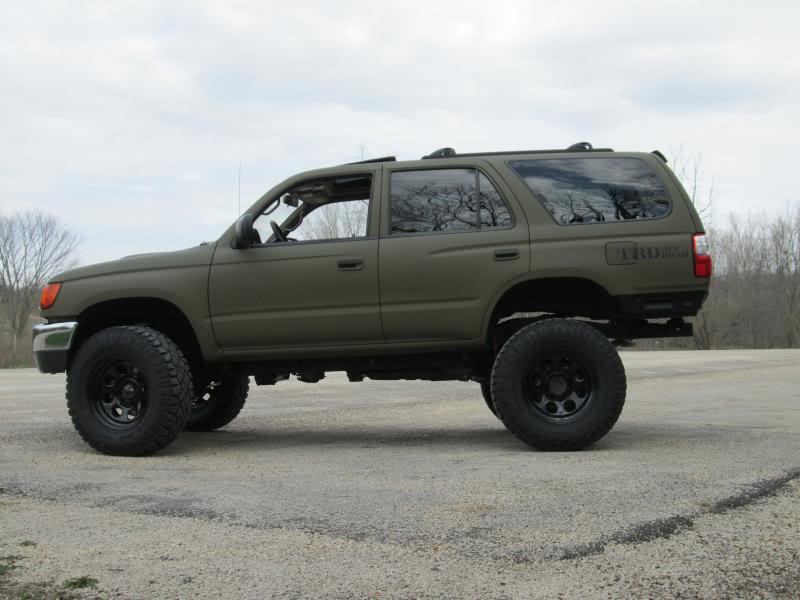
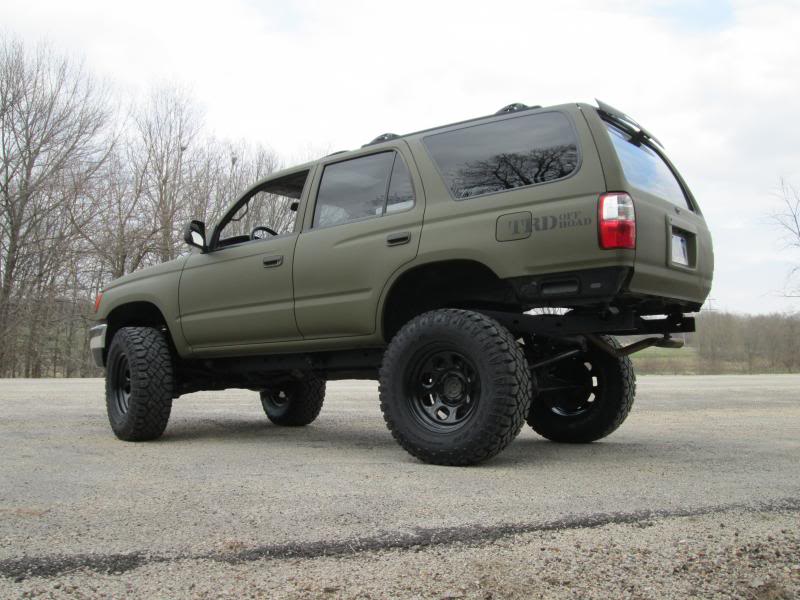
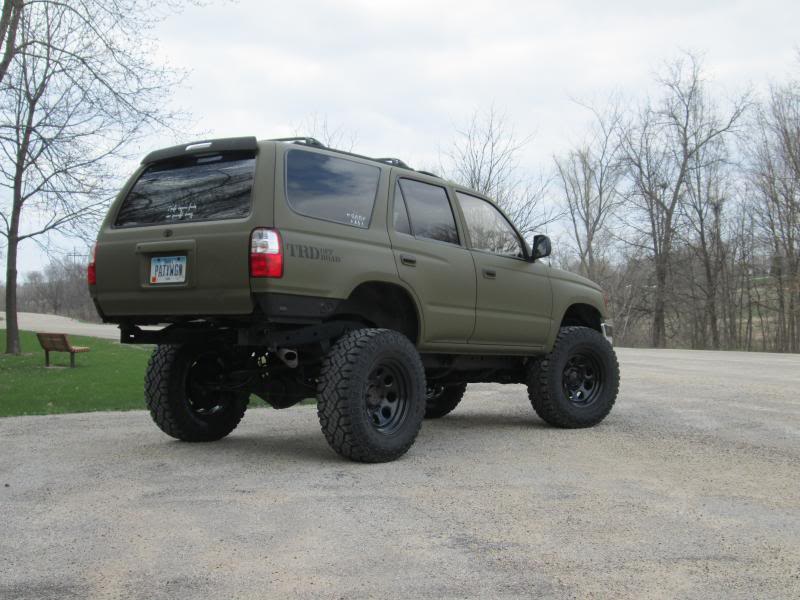
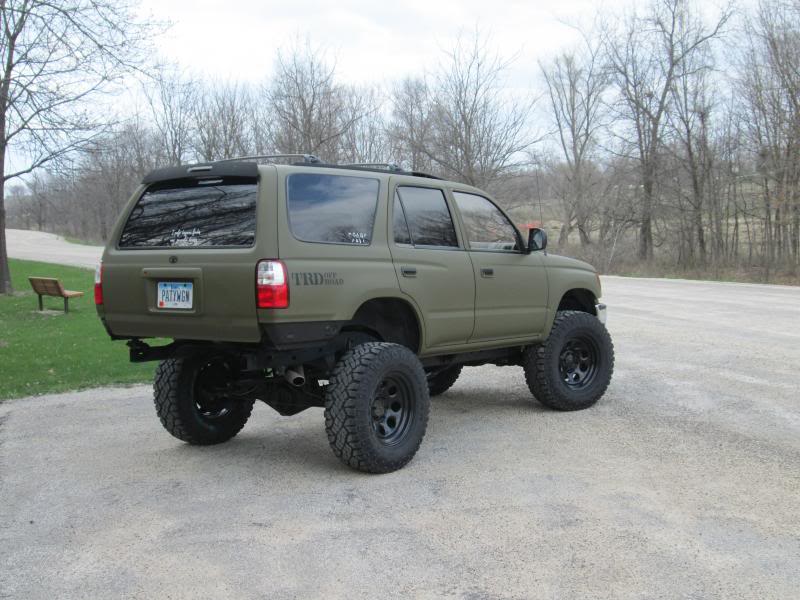
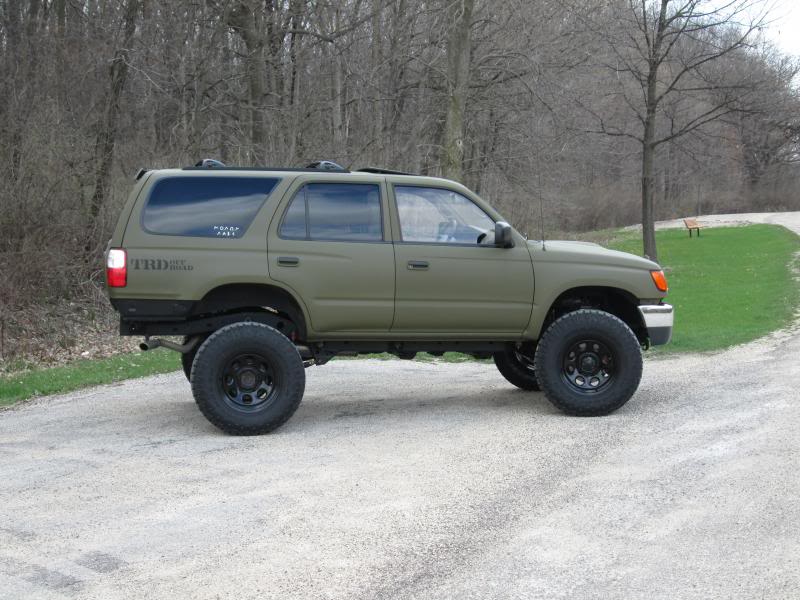
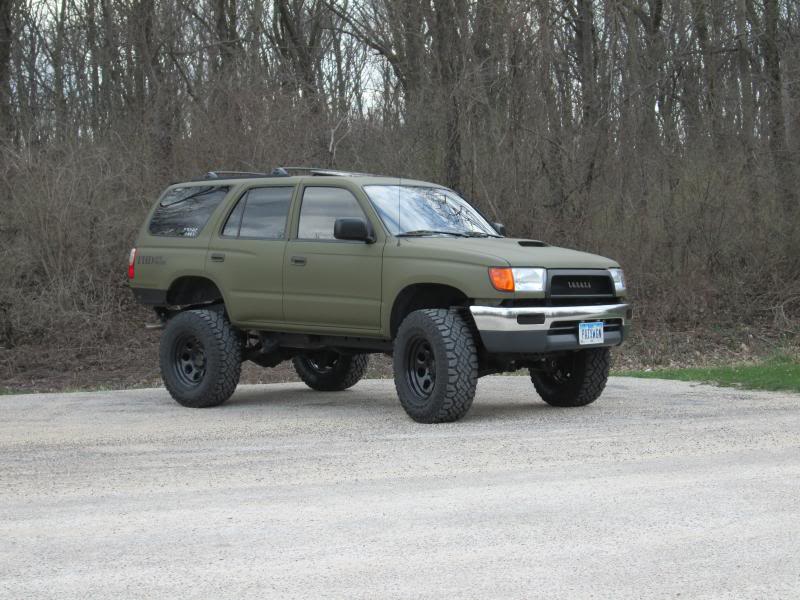
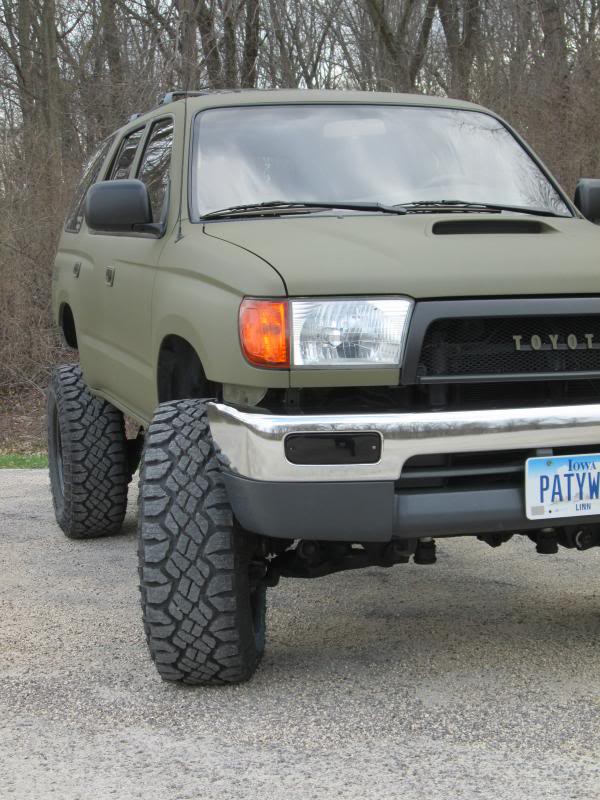
They stick out a bit but I like it. I think with the bigger wheels and tires, it fills up the wheel wells and makes it appear to sit lower now with a better stance. It's raked in the back but with a steel bumper it might sit down some, plus the front shocks could be changed out for something a little taller in the future. I had to cut the lower valence on the front bumper and at full lock the tread catches a little nub on the fender liner but it's nothing to worry about.
I took some welding wire and started to mock up a rear bumper at work yesterday. A little more prepping with that and I can order the steel and they'll even sheer it in the dimensions I want, then it's just a little welding and grinding after that. When that's done, I'll do the same for the front and finally get rid of that hideous drooping chrome!
Oh yeah, I bought a new deck with Sirius XM and that darn 80s on 8 and 1st Wave are just AWESOME!
I bought 1/4" spacers because they wouldn't clear the new 231mm calipers unfortunately. Then I put on my new Pro Comp 17" 98s and 285 75 17 DuraTracs. Gave them a spin on the lift and I was still having some clearance on the calipers, very minor but still contacting. Got out the grinder and flattened out a little hump and everything was smooth and quiet. Finally got around to giving my baby a bath yesterday and took her out for some glam shots again. Enjoy.
They stick out a bit but I like it. I think with the bigger wheels and tires, it fills up the wheel wells and makes it appear to sit lower now with a better stance. It's raked in the back but with a steel bumper it might sit down some, plus the front shocks could be changed out for something a little taller in the future. I had to cut the lower valence on the front bumper and at full lock the tread catches a little nub on the fender liner but it's nothing to worry about.
I took some welding wire and started to mock up a rear bumper at work yesterday. A little more prepping with that and I can order the steel and they'll even sheer it in the dimensions I want, then it's just a little welding and grinding after that. When that's done, I'll do the same for the front and finally get rid of that hideous drooping chrome!
Oh yeah, I bought a new deck with Sirius XM and that darn 80s on 8 and 1st Wave are just AWESOME!
The following users liked this post:
Road Bull (02-17-2020)
 08-11-2013, 12:40 PM
#32
More progress has been made but I'm getting a little burned out. I've been working almost every weekend on building my rear bumper and it's almost done minus the paint but I'll have a build thread on that when it's done. I also fixed the front bumper gap from the 1.5" body lift so it doesn't look so horrid anymore. But alas I have no pics of these things. However, I have two pretty cool pics I took one night that I'm pretty pleased with.
I like photography, I like lightning, I like my 4runner. Enjoy!
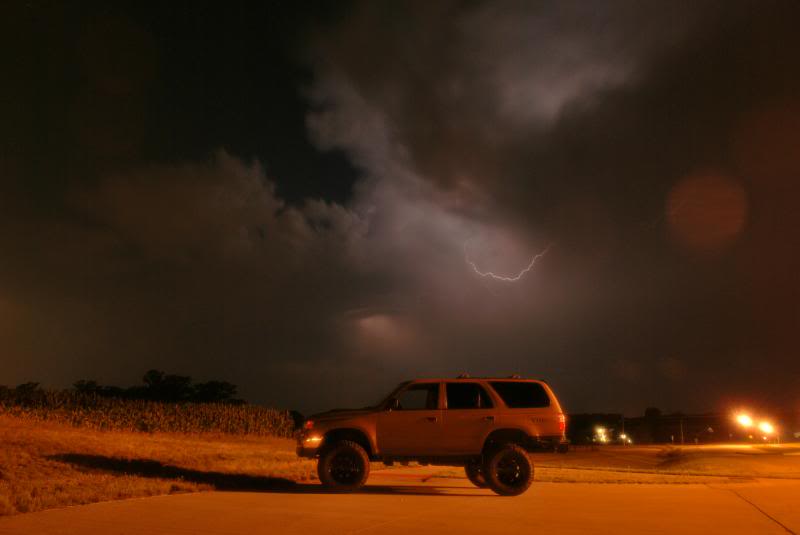

I like photography, I like lightning, I like my 4runner. Enjoy!

Thread
Thread Starter
Forum
Replies
Last Post
pattycakes77
95.5-2004 Tacomas & 96-2002 4Runners
16
11-12-2013 04:52 AM
pattycakes77
95.5-2004 Tacomas & 96-2002 4Runners
61
09-28-2013 01:30 PM


