
How To: DIY Retrofit Elocker Wiring
 May 14, 2011 | 11:30 AM
#1
Thread Starter
Registered User
iTrader: (1)
Joined: Jul 2009
Posts: 1,088
Likes: 0
From: Central, Arkansas
How To: DIY Retrofit Elocker Wiring
I figure I'd share my knowledge in how I did my elocker wiring since a few people have asked and I halfway started it in another thread anyways. So, 'without further ado' for those wanting to bypass the elocker computer and button here you go.
Items You Will Need
1) DPDT Momentary Switch Body These can be found at other sites as well, but make sure it is a 8 circuit DPDT *Momentary* Switch.
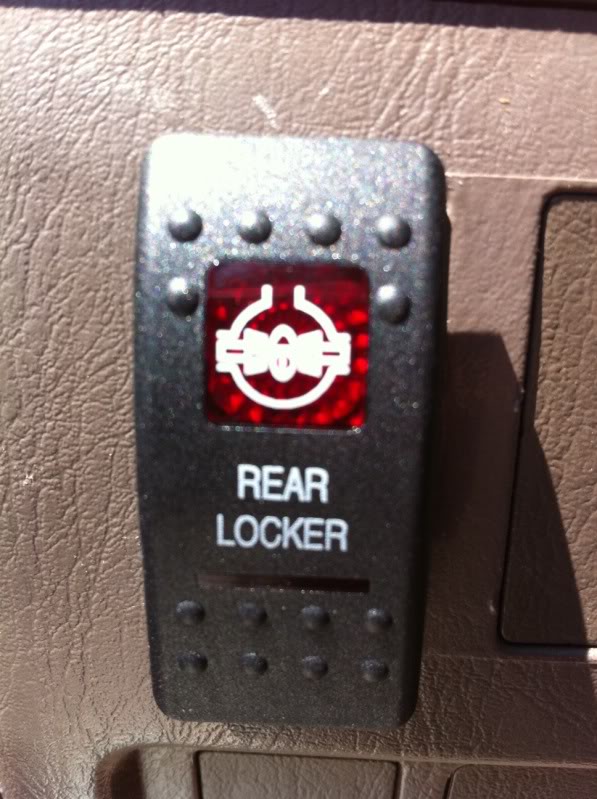
2) "Rear Locker" Switch lens of your choice color. These can be found on other sites as well, but your main colors are as followed.
Blue
Red
3) You will need around 20' of cable that is 18 gauge at least and you have enough to wire up the 6 wires coming from the elocker plug. You can make 3 runs of 2 conductor or one single run of 6 conductor (best solution). Some people buy the 6 or 7 conductor trailer wire but it can be pricey.
4) You will need around 10' of 16-18 guage 2 conductor to run from the switch to the battery.
5) Wire loom and zip ties to run the cable in under the truck.
6) You'll want to solder your cable to the wires off the plug of the elocker as well as use some shrink wrap to melt around the solder to secure it. If you don't have access to one, do the best you can in making these wires very secure. There needs to be play for when the body/axle flexes. Make sure you write down what color wire goes to what from the plug cus you will need this during installment of the switch. You DO NOT need any other kind of elocker harness other than the harness that plugs into the elocker motor itself.
7) At least 6 crimp on female connectors to connect cabling to switch.
Operation
Most likely if you're going this route the only thing your elocker came with was the harness that plugs into the elocker itself. On this harness you have two plugs. One plug with 2 wires that controls the locker detection switch and another plug with 5 wires that controls the locker motor and locker motor limit switch. On the other end of this harness you will have a couple more connectors that would plug into another harness. These you don't need, so cut them off and strip back the wiring. Begin soldering the wires to your provided cable. Please note you will have 7 wires total. You will have two white/black wires, one coming from the 5 wired plug and another from the 2 wired plug. These will be spliced together and ran as one wire. A good tip at this time would be to write down what color wires are corresponding with your wires off the elocker harness. You will need to know this later when installing the switch. If you are using 3 runs of 2 conductor I would suggest numbering both ends as of your provided cable so you know what red & black wire goes to what since you have 3 pairs of the same colored wire. 6 Conductor will have all separate colors so it makes it a bit easier.
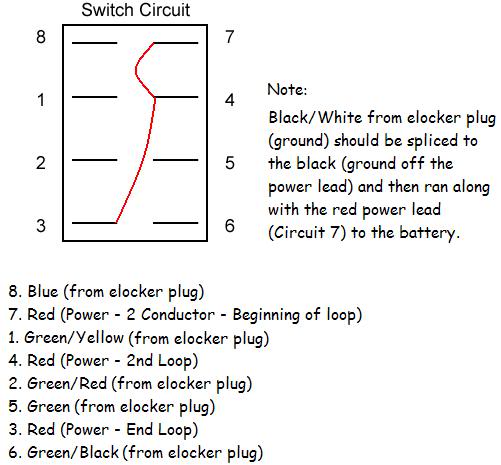
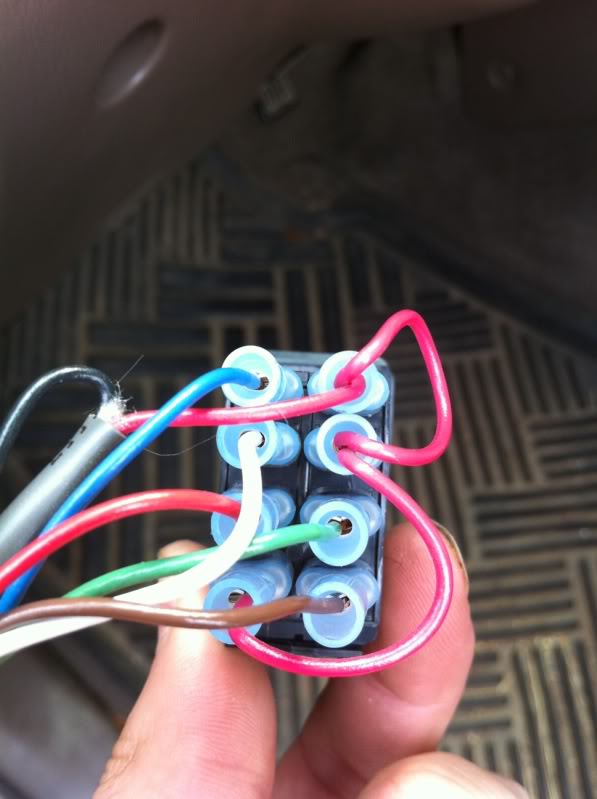
After you have successfully connected and ran your elocker cable to the front of the cab you need to run your 2 conductor for your power to the switch. When you have ran all the wires, now is the time to connect the negative wire lead from the elocker cable to the black negative wire lead coming from the 2 conductor that you ran to the battery. After this, begin connecting all your female connectors and finally install the connectors to the back of your switch and place in whichever spot you want. You will most likely have to cut a little bit of the edges on the location to get the switch to fit in there. Notice, you will need to make two small jumper wires for running your loops for the switch. See pictures and diagram below. These diagrams are based off the cabling I ran. Please DO NOT associate the colors I ran with yours unless they are exactly the same.
Here are a few other wirte-ups and itmes that might help you with the install or be worth reading. Some of the links might be dead.
Full write ups:
Toyota Electric Locker
E-locker
Retrofit Electric Locker
Toyota Electric Locker
Retrofitting a Factory Toyota Elocker
Toyota 4Runner SR5 Locker Install
87 Toyota Electric Locking differential install page
Wiring stuff:
Using a double pole double throw switch to run Locker
http://www.norcalttora.com/~****/Writeup%20Stuff/toyota_elock_control.pdf
Picasa Web Albums - Jerod - Pictures
http://home.off-road.com/~kemanuel/elocker/locker_wiring.jpg
http://www.ncttora.com/fsm/2000/Wiri...%20Diagram.pdf Page 38 and 42 of the PDF
http://www.ncttora.com/fsm/2003/Wiri...mci/039rdl.pdf
http://home.4x4wire.com/erik/diffs/e...ker_wiring.gif
Items You Will Need
1) DPDT Momentary Switch Body These can be found at other sites as well, but make sure it is a 8 circuit DPDT *Momentary* Switch.
2) "Rear Locker" Switch lens of your choice color. These can be found on other sites as well, but your main colors are as followed.
Blue
Red
3) You will need around 20' of cable that is 18 gauge at least and you have enough to wire up the 6 wires coming from the elocker plug. You can make 3 runs of 2 conductor or one single run of 6 conductor (best solution). Some people buy the 6 or 7 conductor trailer wire but it can be pricey.
4) You will need around 10' of 16-18 guage 2 conductor to run from the switch to the battery.
5) Wire loom and zip ties to run the cable in under the truck.
6) You'll want to solder your cable to the wires off the plug of the elocker as well as use some shrink wrap to melt around the solder to secure it. If you don't have access to one, do the best you can in making these wires very secure. There needs to be play for when the body/axle flexes. Make sure you write down what color wire goes to what from the plug cus you will need this during installment of the switch. You DO NOT need any other kind of elocker harness other than the harness that plugs into the elocker motor itself.
7) At least 6 crimp on female connectors to connect cabling to switch.
Operation
Most likely if you're going this route the only thing your elocker came with was the harness that plugs into the elocker itself. On this harness you have two plugs. One plug with 2 wires that controls the locker detection switch and another plug with 5 wires that controls the locker motor and locker motor limit switch. On the other end of this harness you will have a couple more connectors that would plug into another harness. These you don't need, so cut them off and strip back the wiring. Begin soldering the wires to your provided cable. Please note you will have 7 wires total. You will have two white/black wires, one coming from the 5 wired plug and another from the 2 wired plug. These will be spliced together and ran as one wire. A good tip at this time would be to write down what color wires are corresponding with your wires off the elocker harness. You will need to know this later when installing the switch. If you are using 3 runs of 2 conductor I would suggest numbering both ends as of your provided cable so you know what red & black wire goes to what since you have 3 pairs of the same colored wire. 6 Conductor will have all separate colors so it makes it a bit easier.
After you have successfully connected and ran your elocker cable to the front of the cab you need to run your 2 conductor for your power to the switch. When you have ran all the wires, now is the time to connect the negative wire lead from the elocker cable to the black negative wire lead coming from the 2 conductor that you ran to the battery. After this, begin connecting all your female connectors and finally install the connectors to the back of your switch and place in whichever spot you want. You will most likely have to cut a little bit of the edges on the location to get the switch to fit in there. Notice, you will need to make two small jumper wires for running your loops for the switch. See pictures and diagram below. These diagrams are based off the cabling I ran. Please DO NOT associate the colors I ran with yours unless they are exactly the same.
Here are a few other wirte-ups and itmes that might help you with the install or be worth reading. Some of the links might be dead.
Full write ups:
Toyota Electric Locker
E-locker
Retrofit Electric Locker
Toyota Electric Locker
Retrofitting a Factory Toyota Elocker
Toyota 4Runner SR5 Locker Install
87 Toyota Electric Locking differential install page
Wiring stuff:
Using a double pole double throw switch to run Locker
http://www.norcalttora.com/~****/Writeup%20Stuff/toyota_elock_control.pdf
Picasa Web Albums - Jerod - Pictures
http://home.off-road.com/~kemanuel/elocker/locker_wiring.jpg
http://www.ncttora.com/fsm/2000/Wiri...%20Diagram.pdf Page 38 and 42 of the PDF
http://www.ncttora.com/fsm/2003/Wiri...mci/039rdl.pdf
http://home.4x4wire.com/erik/diffs/e...ker_wiring.gif
 Dec 4, 2011 | 04:42 PM
#3
Registered User
Joined: Jun 2010
Posts: 69
Likes: 0
From: longmont, co
hey jwaldz. i got the same setup. i really like it however i have two questions i hope you can help me with. 1.) in order to lock the locker i have to push the switch down, how do i reverse this to the opposite position? 2.) is there a way to add an "in transition" light too? to let me know that its in the "locking" mode. cause right now it just lights when locked and no light when unlocked. thanks
Dec 10, 2011 | 12:23 PM
#4
Registered User

Joined: Jan 2009
Posts: 1,908
Likes: 5
From: Fresno, Ca.
hey jwaldz. i got the same setup. i really like it however i have two questions i hope you can help me with. 1.) in order to lock the locker i have to push the switch down, how do i reverse this to the opposite position? 2.) is there a way to add an "in transition" light too? to let me know that its in the "locking" mode. cause right now it just lights when locked and no light when unlocked. thanks
Mar 5, 2012 | 02:34 PM
#5
Registered User
Joined: Jun 2010
Posts: 69
Likes: 0
From: longmont, co
i found my answer to the switch reversal question. all i did was pop the plastic switch rocker off and install it the other direction and mounted the switch accordingly. theres two light windows on the switch, so now it just utilizes the skinny one. i like it better now.

Thread
Thread Starter
Forum
Replies
Last Post
Esibnitsud
86-95 Trucks & 4Runners
0
Jul 30, 2015 08:19 PM
vanion2
99+ Tundra, 00+ Sequoia, 98+ Land Cruiser/LX470
2
Jul 29, 2015 06:17 PM
crashburnoveride
86-95 Trucks & 4Runners
1
Jul 10, 2015 06:39 AM


