
Gauge and dash backlighting
 Feb 2, 2011 | 11:13 PM
#421

Registered User
Joined: Nov 2010
Posts: 102
Likes: 0
From: Saskatchewan
no need to remove those, just a bulb replace/install.
http://cgi.ebay.com/ebaymotors/Xenon...Q5fAccessories
something like that
http://cgi.ebay.com/ebaymotors/Xenon...Q5fAccessories
something like that
Feb 3, 2011 | 03:55 AM
#422

Banned
Joined: Jan 2011
Posts: 30
Likes: 0
no need to remove those, just a bulb replace/install.
http://cgi.ebay.com/ebaymotors/Xenon...Q5fAccessories
something like that
http://cgi.ebay.com/ebaymotors/Xenon...Q5fAccessories
something like that
Feb 16, 2011 | 06:38 AM
#425
Registered User
Joined: Aug 2002
Posts: 1,532
Likes: 0
From: Phoenix, AZ
Their bulbs are good. I had an issue last summer with a couple of them blowing out too quick, but they resolved the issues. I would and still use them.
Feb 16, 2011 | 12:01 PM
#426
Banned
Joined: Jan 2011
Posts: 30
Likes: 0
Its not a bad idea to order a extra or two..
Feb 16, 2011 | 12:05 PM
#427
Registered User
Joined: Nov 2010
Posts: 102
Likes: 0
From: Saskatchewan
did you have to ship back the defective ones at your own cost ? They had poor communication prior to me ordering it. and then I ordered them and from superbrightleds and even though I ordered from autolumination 2 weeks before i did from superbrightleds, autolumination came in 4 1/2 weeks later after superbrights came in. shipping was the same.
Last edited by OJ Simpson 4Runner; Feb 16, 2011 at 12:06 PM.
Feb 16, 2011 | 12:16 PM
#428
Registered User
Joined: Aug 2002
Posts: 1,532
Likes: 0
From: Phoenix, AZ
did you have to ship back the defective ones at your own cost ? They had poor communication prior to me ordering it. and then I ordered them and from superbrightleds and even though I ordered from autolumination 2 weeks before i did from superbrightleds, autolumination came in 4 1/2 weeks later after superbrights came in. shipping was the same.
Mar 2, 2011 | 06:40 PM
#429
Registered User
Joined: Jul 2007
Posts: 1,705
Likes: 12
From: Yotatech, because Pirate is too expensive. NorCal.
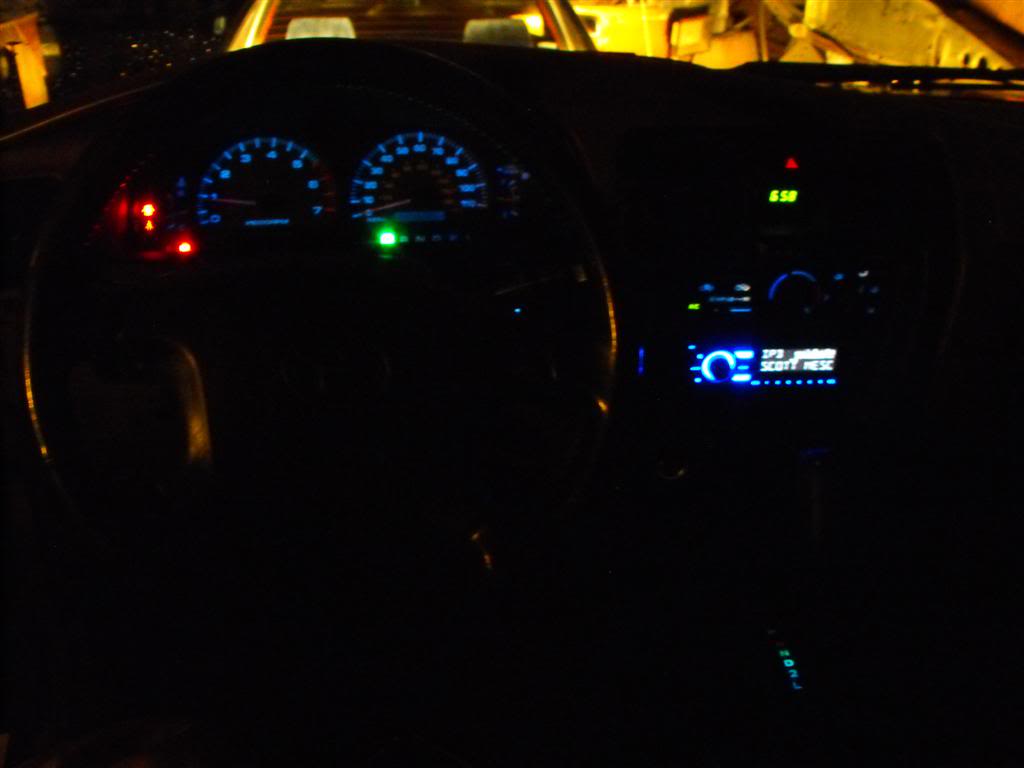
I ordered dyed incandescent bulbs to give a factory look. Not bright and vivid like leds. I am stumped as to why I have hot spots in my climate control. I may have to try to get back in there and seat the bulbs a little bit better. Though it is not as bad in person as it looks on the camera.
BTW I ordered from autoillumination on Sunday and received the product today. Although I did pay the extra for the priority shipping because of the horror stories I have heard about slow shipping times from them.
Blulbs...

And 2 bad pictures...

BTW I ordered from autoillumination on Sunday and received the product today. Although I did pay the extra for the priority shipping because of the horror stories I have heard about slow shipping times from them.
Blulbs...
And 2 bad pictures...
Mar 2, 2011 | 11:29 PM
#430
Registered User
Joined: Nov 2010
Posts: 102
Likes: 0
From: Saskatchewan
I ordered dyed incandescent bulbs to give a factory look. Not bright and vivid like leds. I am stumped as to why I have hot spots in my climate control. I may have to try to get back in there and seat the bulbs a little bit better. Though it is not as bad in person as it looks on the camera.
BTW I ordered from autoillumination on Sunday and received the product today. Although I did pay the extra for the priority shipping because of the horror stories I have heard about slow shipping times from them.
Blulbs...

And 2 bad pictures...


BTW I ordered from autoillumination on Sunday and received the product today. Although I did pay the extra for the priority shipping because of the horror stories I have heard about slow shipping times from them.
Blulbs...
And 2 bad pictures...
Also I just convered my HVAC from tri-leds to blue 3point smt's, the kind that are on a green chip and cover nearly 360 around. The problem is that one already burnt out!!! the other is starting to flicker and im getting very mad, I did what i could and put the blue working led on the left side for fan speed and put white on the vent control, it actually looks really good.
Mar 3, 2011 | 04:52 PM
#431
Registered User
Joined: Jul 2007
Posts: 1,705
Likes: 12
From: Yotatech, because Pirate is too expensive. NorCal.
The white fade is because the bulbs are cheap. The tips of the bulbs arent dyed as heavily as the the sides and the white points are where the bulbs are located behind the diffuser panel or whatever you wanna call it.
Mar 3, 2011 | 09:38 PM
#432
Registered User
Joined: Dec 2009
Posts: 110
Likes: 0
From: Sacramento, CA
Update
I got this all done, got my lights from autolumination.com. Kinda felt like the bulbs were expensive for how simple they ended up being. Also, heavy modification to get anything to fit, and by modification I mean grinding the piss out of all the bases on the bulbs. Everything that gets replaced is a tiny bulb with a condom that is half the size of the replacement LED you get from the website. I had to separate all the bulbs from the bases and reduce the bases to almost nothing then reassemble and install. The three way LEDs do reduce the hot spots in the HVAC based on some of the pics I saw. I don't really want to post my shopping list because I wouldn't recommend what I purchased because it was so much work to make it all fit. It does look good though. Pretty happy with the outcome, I didn't have a glove box or ask tray light before so, win. Here's some pics.... The hotspots are worse in the pics than they are in person.
Last edited by jbudhram015; Mar 3, 2011 at 09:41 PM.
Mar 4, 2011 | 12:42 AM
#434
Registered User
Joined: Feb 2004
Posts: 49
Likes: 0
From: Elk Grove, CA
If you want to get rid of the green on the A/C button you can take the face of the button off and carefully scratch the green tint off of it. I put it up against a light and only scratch green off where it said A/C. And put in a matching LED.
Mar 7, 2011 | 05:26 AM
#435
Registered User
Joined: Aug 2002
Posts: 1,532
Likes: 0
From: Phoenix, AZ
I got this all done, got my lights from autolumination.com. Kinda felt like the bulbs were expensive for how simple they ended up being. Also, heavy modification to get anything to fit, and by modification I mean grinding the piss out of all the bases on the bulbs. Everything that gets replaced is a tiny bulb with a condom that is half the size of the replacement LED you get from the website. I had to separate all the bulbs from the bases and reduce the bases to almost nothing then reassemble and install. The three way LEDs do reduce the hot spots in the HVAC based on some of the pics I saw. I don't really want to post my shopping list because I wouldn't recommend what I purchased because it was so much work to make it all fit. It does look good though. Pretty happy with the outcome, I didn't have a glove box or ask tray light before so, win. Here's some pics.... The hotspots are worse in the pics than they are in person.
 Jun 16, 2011 | 06:30 AM
#437
Registered User
Joined: Mar 2004
Posts: 223
Likes: 0
I do not think those will fit.
I got these http://www.speedhut.com/custom_gauge...number-430.htm
I Do not see any '97 model on there though but I am sure someone has posted that year's gauges somewhere in this thread.
I am replacing my brake lights with LED's because one of my parking lights burnt out the other day so I figure ill upgrade a couple more lights. Still not enough cash to upgrade all to LED's. Anyways, my question is for the brake lights. I do not no whether to get the white led's or the red led's. The cover plate is of course red. Just do not know of the whites would be to bright or if the red's wouldn't be bright enough.
Also another small question. My steering wheel leather is falling apart on top mostly. Has anyone found any replacements for cheap? All I can find now are leather covers that avrg. $50. I could have swore one time I was looking replacement wheels up and I was finding some for around $40 for a new wheel not just a cover. It's getting to the point now were I would really like to replace it.
Thanks all!
Last edited by Stive2699; Jun 16, 2011 at 06:32 AM.
Jun 20, 2011 | 12:46 PM
#438
Registered User
Joined: Apr 2010
Posts: 38
Likes: 0
From: Marietta Ohio
how hard is it to change the lights in the a/c control on a 86 pickup i took the dash off and looked down there and it looks like a bitch to get everything off and even think about getting back on. I did red on my dash lights look pretty sweet.
Jun 21, 2011 | 04:14 PM
#439
Registered User
Joined: Mar 2011
Posts: 107
Likes: 1
I switched all of mine from green gel bulbs to red LEDs , and changed to gauge cluster to dancing flames electro-luminescent audio activated printed film over lays it looks bad ass check out my avatar pic and my photo album. also changed all of the lamps in the cluster with the same red LED's and an orange one for the CEL
I couldn't strand the green as it was too bright and blue is just as much an offender for light pollution while driving around at night
I couldn't strand the green as it was too bright and blue is just as much an offender for light pollution while driving around at night
Aug 19, 2011 | 02:57 PM
#440

Registered User
Joined: Aug 2011
Posts: 2
Likes: 0
Blue-tint Clock Conversion
I decided to start the conversion with the hardest part. Took about 2 hours along with soldering the pins (springs lost connection).
Basically, I dremelled off the edge of the OEM clock cover to remove the tinted "tan" colored plastic faceplate from the sides. I wanted to retain the surrounding piece for easy re-mounting. Then flattened the cut edge with a file to create a good bonding surface for the new plexiglass piece.
As for the plexi, I used 1/16th inch and cut to shape with jigsaw. Then cut the button holes with a small dremel bit. Cut 3 pieces of blue "spotlight color film" (purchased from the local pro-music/lighting store), slightly smaller than the plexi to allow adhesion to each when gluing to the OEM "now-faceless" plastic trim piece. Cut the button holes in the blue tint, then traced the edge of the with acrylic cement and put the two together.
Snaps right back into place!
Installed:

Tools and supplies:

Before Install:

Basically, I dremelled off the edge of the OEM clock cover to remove the tinted "tan" colored plastic faceplate from the sides. I wanted to retain the surrounding piece for easy re-mounting. Then flattened the cut edge with a file to create a good bonding surface for the new plexiglass piece.
As for the plexi, I used 1/16th inch and cut to shape with jigsaw. Then cut the button holes with a small dremel bit. Cut 3 pieces of blue "spotlight color film" (purchased from the local pro-music/lighting store), slightly smaller than the plexi to allow adhesion to each when gluing to the OEM "now-faceless" plastic trim piece. Cut the button holes in the blue tint, then traced the edge of the with acrylic cement and put the two together.
Snaps right back into place!
Installed:
Tools and supplies:
Before Install:
Last edited by tylersphile; Aug 19, 2011 at 03:10 PM.


