
3.4 V-6 Engine Removal Install Tips
 Dec 23, 2009 | 07:03 PM
#1
Thread Starter
Registered User
Joined: Nov 2009
Posts: 62
Likes: 0
From: NorCO
3.4 V-6 Engine Removal Install Tips
Howdy folks,
Originally posted this query on ultimateyota.com, but I thought I'd post it up here too to gain and spread as much knowledge as possible.
I'll be pulling the 3.4L V-6 out of our 3rd gen 4Runner in the next week. This will be the first engine I've pulled EVER! Our 4Runner is a 4x4 and has a manual transmission.
I have the FSM (actually it's the FSM for the Tacoma - I do have a PDF of the 4Runner manual) and will be folllowing the instructions closely, but it's a little bit vague on a few points. Any tips or tricks in general or for the 3G 4Runner specifically are greatly appreciated.
Cheers,
Jeremy
Originally posted this query on ultimateyota.com, but I thought I'd post it up here too to gain and spread as much knowledge as possible.
I'll be pulling the 3.4L V-6 out of our 3rd gen 4Runner in the next week. This will be the first engine I've pulled EVER! Our 4Runner is a 4x4 and has a manual transmission.
I have the FSM (actually it's the FSM for the Tacoma - I do have a PDF of the 4Runner manual) and will be folllowing the instructions closely, but it's a little bit vague on a few points. Any tips or tricks in general or for the 3G 4Runner specifically are greatly appreciated.
- I'm curious if I'd be better off completely removing the transmission or leaving it in place. I suppose it would be a little easier to re-install the engine if the Tranny were out of the way. But that's extra work and I'm short on time. Maybe removing the tranny completely will save time and frustration in the long run?
- I've read that whenever you remove the transmission, the top two bolts on the bellhousing can be very tough to access, but are doable with a couple feet of extensions and a swivel socket or u-joint. To minimize the angle of the swivel/u-joint, your driver has to be way back, like at the back end of the transmission.
- If you leave the transmission in, do you need to loosen the rear engine mount to allow the trans a little more play?
- A mechanic friend who works on Toys suggests leaving the transmission in. He said once you get the engine up on the hoist it will likely raise the tranny an inch or two before they separate. Have the transmission jack ready and waiting for this so it doesn't fall on the front differential
- The same mechanic gave a tip for the install, you should have the tranny in neutral and you can rotate the crank *slightly* like 1/8" at a time to get the clutch and tranny to mesh.
- It seems like I read something about dowels that align the trans and the engine, but the FSM never mentions them. Does anybody know how many and where they are at?
Cheers,
Jeremy
Dec 27, 2009 | 11:46 AM
#2
Thread Starter
Registered User
Joined: Nov 2009
Posts: 62
Likes: 0
From: NorCO
Here's another question: the FSM doesn't say anything about removing the A/C compressor. Should I remove the bracket from the block and let it sit in the engine compartment? Or do I need to disconnect all the hoses, etc. from the compressor for removal?
Thanks!
Jeremy
Thanks!
Jeremy
Dec 28, 2009 | 11:21 PM
#3
Registered User
Joined: Apr 2009
Posts: 748
Likes: 2
From: Asheville, NC
I did this earlier this year and either way you go you have to take those top two bolts out which in my case meant dropping the back of the tranny to get to them.
The dowels that you mentioned there are two of them, they are on the lower half "either engine or tranny" one is on the left side and the other on the right.
I personally decided that the next time I have to do this job I was going to pull the engine and tranny together. it is a pain to get the tranny out and if you either pull or leave the tranny there are two o2 sensor plugs on the tranny one of which is on the top and a real pain to get to, and it complicates the problem further if you do not know how to unplug them. So if you have the ability I would definitely recommend pulling them together lots less frustration on the removal and installation as long as you have the equipment to pull them together "aka. a large enough engine hoist."
Not only will you not have to get those random wires disconnected and in places where hands just do not fit, but when you put the engine and tranny together you can see every thing that there is to see.
This is how Toyota out them in in the first place, of course the cab was not on when they did it.
other than that make sure that you replace the rear main seal $5 and the front seal on the tranny another $5 if it is a manual do the clutch kit and be sure that you will ot have to go through the hassle of pulling either any time soon.
if you get a used engine then the water pump and timing belt are easier to get to when it is out.
Dec 31, 2009 | 02:48 AM
#4

Registered User
Joined: Mar 2009
Posts: 32
Likes: 0
i just separated the compressor from the bracket and supported it in the engine bay with bungee chords.
did this with the starter and the ps pump too...
can prob see it in my pic(bottom left):
ready to drop back in...
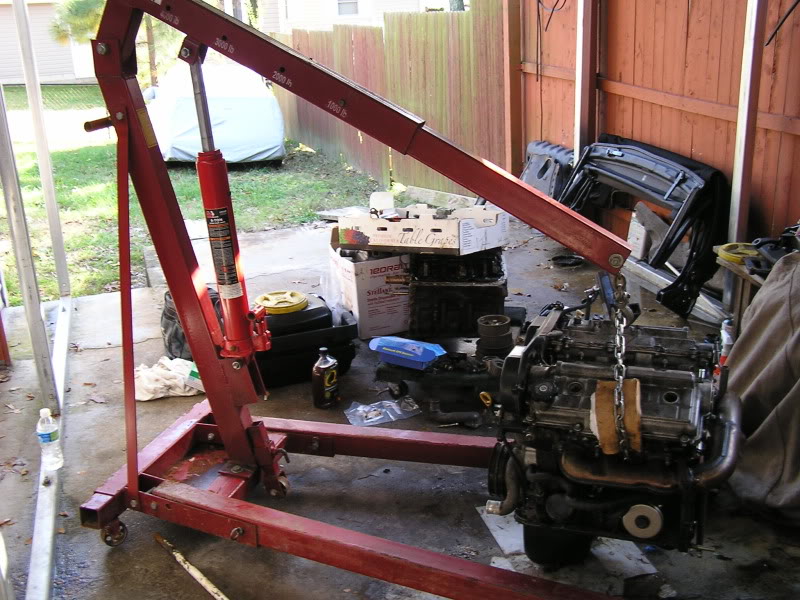
took about 15 minutes to get it matted to the tranny-thank god for the custom alignment pins as stated on your other thread...

oh and one thing...loosen up the engine mounts so you have "play" as it will be hard to line up the engine arm holes to the engine mount studs when being installed...
Last edited by vr4boy; Dec 31, 2009 at 02:52 AM.
Dec 31, 2009 | 05:44 AM
#5
Thread Starter
Registered User
Joined: Nov 2009
Posts: 62
Likes: 0
From: NorCO
Thanks for the pics and tips VR4! I tied off both the A/C and P/S just like you did 'cept I used baling wire. I just hope they're out of the way enough...
I just picked the engine up yesterday and will be swapping things over today. I get to test out my electric garage heater!!! Should be fun!
But first, I need some coffee!
Cheers,
Jeremy
I just picked the engine up yesterday and will be swapping things over today. I get to test out my electric garage heater!!! Should be fun!
But first, I need some coffee!
Cheers,
Jeremy
Dec 31, 2009 | 07:29 AM
#7
Contributing Member
Joined: Nov 2002
Posts: 10,666
Likes: 5
From: Oklahoma State
Look over the motor mount perches good while its out. Some guys (mostly Taco desert racers) have had the frame crack where the mounts weld to it.
Last edited by mt_goat; Dec 31, 2009 at 07:30 AM.
Trending Topics
Jan 1, 2010 | 04:47 PM
#8
Thread Starter
Registered User
Joined: Nov 2009
Posts: 62
Likes: 0
From: NorCO
Thanks for the tip Dale; I'll check 'em out tomorrow!
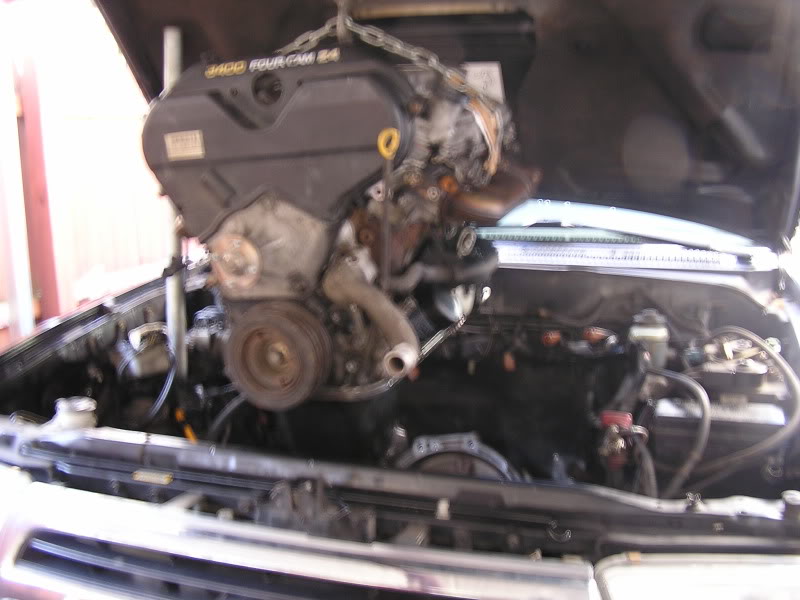
Well, the saga continues... Not wanting to deviate from my standard 'MO' it's taking alot longer than I had originally hoped. I did finally get the engine out of the 4Runner and now I'm starting to swap everything over... The engine is from a 2WD vehicle, so I get to swap the oil pan too! Yay!
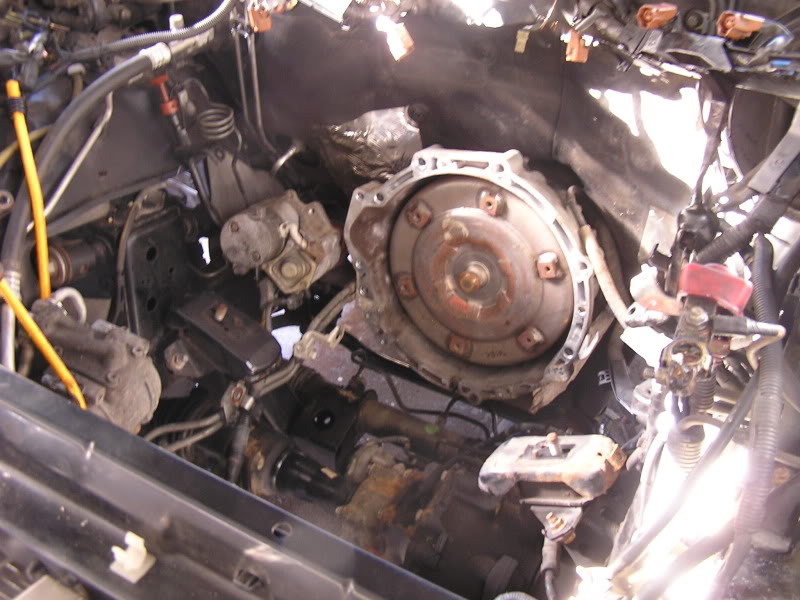
One small snafu when I pulled the existing engine though. I hadn't unplugged the ADD wire. That quickly got yanked out of its connector when I was hoisting the engine. See attached photo.
Anybody have ideas on how to fix this? I'm not even sure which wire goes to which side. One wire is green with black, the other is green with red. Hopefully the wires under the loom on the other side of the connector are the same. Probably not though. Is there a wiring diagram available online somewhere???
Thanks guys.
Cheers!
Jeremy
Well, the saga continues... Not wanting to deviate from my standard 'MO' it's taking alot longer than I had originally hoped. I did finally get the engine out of the 4Runner and now I'm starting to swap everything over... The engine is from a 2WD vehicle, so I get to swap the oil pan too! Yay!
One small snafu when I pulled the existing engine though. I hadn't unplugged the ADD wire. That quickly got yanked out of its connector when I was hoisting the engine. See attached photo.
Anybody have ideas on how to fix this? I'm not even sure which wire goes to which side. One wire is green with black, the other is green with red. Hopefully the wires under the loom on the other side of the connector are the same. Probably not though. Is there a wiring diagram available online somewhere???
Thanks guys.
Cheers!
Jeremy
Jan 1, 2010 | 06:42 PM
#9
Registered User
Joined: Apr 2005
Posts: 53
Likes: 0
From: Riverview, FL
I did this job last year and I left the transmission in-place. Two tips that saved me a TON of work:
1. To line up the new engine and the transmission I bought 4 cheap bolts with the same size/pitch as the bell-housing to engine block bolts. I cut the heads off of them and notched them with on top to accommodate a flathead screwdriver. Thread these headless bolts into your block, lower the engine in place, and use the headless bolts as long alignment dowels. Back them out one at a time and replace them with the actual toyota bolts. I think I found this tip here and it worked like a champ.
2. You can get to the two top bell housing bolts with long extensions from inside the cab if you remove the shifter boot. I was able to get them on/off with about 2 feet of extensions and a standard ratchet. Adding an elbow to the mix may have allowed me to use the air ratchet and/or impact to make the job faster.
Good luck and hope this helps!
Jan 1, 2010 | 08:57 PM
#10
Thread Starter
Registered User
Joined: Nov 2009
Posts: 62
Likes: 0
From: NorCO
So with a little patience, some small tools, and a lot of luck, I got the connector apart without breaking it!
Now I just gotta figure out which wire goes where. With any luck, the wires on the other side of the connector will be the same color. Will check it in the morning... Fingers crossed!
Still would be nice to locate a wiring diagram though. I'm sure it will come in handy in the future.
Cheers,
Jeremy
P.S. Thanks for the tips Bulldog! I used a swivel socket and an air ratchet from near the back end of the tranny to get to those top two bell housing bolts. Good to know you can access them from the cab as well! Those swivel sockets are awesome! Also, I saw those dowel screws in Dale's (aka mt_goat) transmission removal post. The only M12x1.25 bolts I have found so far are Grade 8 from Napa. I'm debating about going that route as I've heard mixed reviews/thoughts.
Last edited by ubermoto; Jan 1, 2010 at 09:11 PM.
Jan 2, 2010 | 05:22 AM
#11
Registered User
Joined: Mar 2009
Posts: 32
Likes: 0
hard part of the oil an swapp is cleaning the matting surfaces. i took my time and just really took my time lol
i used this product to reaseal the pan:
http://www.permatex.com/products/Aut...sket_Maker.htm
also,if you're swapping out oil seals and dont have a proper seal installer,i just brought all my seals to the regular home depot and looked in their PVC pipe fiiting isle.
you'll find the proper sizes there w/ adequate length(sp w/ the cam and crank seal) to drive your new seals in...they even had the correct size for the main seal lol...spent under $10 for all the fittings i needed...
BTW: did you have to relocate your dipstick and tube to the since the motor is off a 2wd?
i did and drilled a new hole in the oil pump to mount the tube and resealed the old previous one...
no oil leaks to report on my end
have fun w/ your swap
Jan 2, 2010 | 08:08 AM
#12
Thread Starter
Registered User
Joined: Nov 2009
Posts: 62
Likes: 0
From: NorCO
Thanks VR4... I got some of the 'right stuff' for sealing my oil pan... I'll also use it around the half-moons on the valve covers... Spendy at $20/4oz, but I hear it is the best stuff money can buy.
http://www.permatex.com/products/Aut...sket_Maker.htm
http://www.permatex.com/products/Aut...sket_Maker.htm
Jan 3, 2010 | 03:11 PM
#13
Contributing Member
Joined: Nov 2002
Posts: 10,666
Likes: 5
From: Oklahoma State
Jan 5, 2010 | 03:57 PM
#14
Thread Starter
Registered User
Joined: Nov 2009
Posts: 62
Likes: 0
From: NorCO
Here's a quick update...
Got the engine in, but not bolted down just yet. Just ran out of daylight.
I skipped the dowels.
I did jack up the rear axle and put the wheels on 4" blocks to tip the whole rig forward. That seemed to help with the alignment.
Just took getting the engine in about the right place and jiggling and prying and twisting back and forth.
Forecast is for snow tomorrow, so it may be a couple days before I get it fired up, but it should be pretty easy stuff from here.
Cheers,
Jeremy
Jan 7, 2010 | 06:21 PM
#15
Thread Starter
Registered User
Joined: Nov 2009
Posts: 62
Likes: 0
From: NorCO
Here's a few things I've learned in this project so far:
1) Make sure you unplug the ADD wire before you start picking the engine at all. The FSM doesn't mention this at all and I yanked the wires right out of the plug. It wasn't a big deal since I know how to solder, but was just another hurdle.
2) There are like four or five connections back to the tranny/exhaust that have to be undone. Mine has a manual transmission - auto trannys may have more...
3) The engine/trans mating bolts are M12x1.25 if you need some to mount to the engine stand or to make the dowels. They take a 17mm socket. Swivels/extensions work great from under the truck.
4) If you have a chance at all, take the truck to the carwash and give the engine compartment and undercarriage a good wash. In my case, I didn't have the option since it was delivered to our driveway by the tow truck. There was a bunch of mud and junk leftover from my hunting trip that kept falling into my eyes whenever I had to crawl under the truck. Not much fun... Anyway, at least the head gasket didn't blow when I was up in the high country. I wonder if State Farm would have covered that tow bill... =)
5) I had the front tires up on 3" blocks to make more room to slide under the rig on the creeper. Once I had the engine on the cherry picker and the front suspension relaxed, I realized that the front grill was too high to clear the oil pan. So I had to leave the engine suspended while I hastily jacked up the front end to remove the blocks and set it back down. It's better to have the back end up on blocks if you need clearance (both under the rig and over the front grill...
6) The 2-ton engine crane which I borrowed from a friend came from Harbor Freight. It worked just fine. My experience with Harbor Freight tools is that yes, they are Chinese made tools and the fit/finish isn't so great, but for brute force tools that you don't rely on to make a living, they work just fine.
7) The next time you're in the market for a house, make sure it has a nice big garage!!!
Hope this helps somebody else considering a similar project. As long as you are somewhat mechanically inclined, have patience to make sure you get the job done right and have the help of other members of this forum, you can usually figure the stuff out.
Cheers,
Jeremy
Jun 26, 2010 | 07:53 AM
#17

Registered User
Joined: Feb 2007
Posts: 319
Likes: 0
From: Santa Monica, Ca
V4 or ubermoto - did you guyes remove the radiator/fan/etc prior to pulling?
Im doing this today and am in the middle of taking out the bolts from the tranny. Glad to see you guyes left the tranny/transfer case in and just yanked the motor.
Im doing this today and am in the middle of taking out the bolts from the tranny. Glad to see you guyes left the tranny/transfer case in and just yanked the motor.


