
tinigunner11's 1986 4runner build
 Apr 17, 2013 | 12:17 AM
#61

Cleaning is very low cost or close enough to free if you can wrangle up soap and rags.
Recommend you fold the front of that canvas under and double it up. This will keep it from fraying in the wind and coming loose. It will also make it look more refined/clean.
You can get those exhaust studs and the tapered nuts at the local toyota dealer, think they're under 2$ a piece for a stud and nut. You might still have the studs if you dig around in your parts buckets/boxs. The nuts aren't ment to be reused, they are a tapered "lock" nut so either way it's best to source new ones.
The old white paint is showing thru some rub off. Aleast I think it was white at one time might be just dusty, and my lack of glasses This is also relatively cheap to fix, It's likely just spray can. Lots of prep work to that which outta keep you busy till it quits snowing. Look around there are lots of threads and youtube videos. I'll give you the short version. Wash well, scuff, wash again, degrease, mask, color, clear coat. Aslong as you don't sand to bare metal you don't need to do the primer. The generic paint from home depot would be my recommendation, walmart carries the same brand but they don't give a discount for buying a full case. If you stick with a flat finish you won't ned to spend the extra for a clear coat, but they have that also "Rustoleum automotive clear". Flat finish will hide all the minor dents and such it's also really easy to touch up, some people like it some do not you'll have to look around and make up your own mind on that.
Just cleaning all the interior outta keep you busy for awhile, but you can also do the signal and parking lamp light assemblies.
My post about my parking assemblies and rear turn signals is HERE. And the front signal lamps are in this post HERE. I didn't really get great before and after pictures, but it's night and day difference for much less than ordering new ones for just a little bit of effort and some supplies (Clear coat and wet/dry sand paper, cost less than a meal and McD's unless you shop at the local small town hardware shop).
Anyways lots of cleaning and reading and the wait will fly right by.
Recommend you fold the front of that canvas under and double it up. This will keep it from fraying in the wind and coming loose. It will also make it look more refined/clean.
You can get those exhaust studs and the tapered nuts at the local toyota dealer, think they're under 2$ a piece for a stud and nut. You might still have the studs if you dig around in your parts buckets/boxs. The nuts aren't ment to be reused, they are a tapered "lock" nut so either way it's best to source new ones.
The old white paint is showing thru some rub off. Aleast I think it was white at one time might be just dusty, and my lack of glasses
This is also relatively cheap to fix, It's likely just spray can. Lots of prep work to that which outta keep you busy till it quits snowing. Look around there are lots of threads and youtube videos. I'll give you the short version. Wash well, scuff, wash again, degrease, mask, color, clear coat. Aslong as you don't sand to bare metal you don't need to do the primer. The generic paint from home depot would be my recommendation, walmart carries the same brand but they don't give a discount for buying a full case. If you stick with a flat finish you won't ned to spend the extra for a clear coat, but they have that also "Rustoleum automotive clear". Flat finish will hide all the minor dents and such it's also really easy to touch up, some people like it some do not you'll have to look around and make up your own mind on that.Just cleaning all the interior outta keep you busy for awhile, but you can also do the signal and parking lamp light assemblies.
My post about my parking assemblies and rear turn signals is HERE. And the front signal lamps are in this post HERE. I didn't really get great before and after pictures, but it's night and day difference for much less than ordering new ones for just a little bit of effort and some supplies (Clear coat and wet/dry sand paper, cost less than a meal and McD's unless you shop at the local small town hardware shop).
Anyways lots of cleaning and reading and the wait will fly right by.
Apr 26, 2013 | 05:08 PM
#62
I mention in my threads occasionally that when funds are tight, to have a no spend or very little spend week. There is always something that can be done for cheap or free. I pull the carpets out of mine and take them to the carwash for about $2. You will be surprised at how dirty they get and how much fresher it makes the truck smell.Do this on warm or hot days for capet to dry.
Clean and paint parts with rattle can paint that you may have laying around. Change fluids if you have extra fluids laying around. Chase down rattles or squeaks or the annoying things while driving that might just need snugged down.
Several sensors just need a good scrubbing and can make your guages more accurate such as the temp sensor. Cold Start Timing Switch and Thermo Sensor are normally covered with hard water build up. You will be surprised at how busy to you can be with $5( cleaners,wire brushes,paint...) or less and what a difference it will make when done.
Apr 27, 2013 | 08:30 AM
#63
Thread Starter
Registered User
iTrader: (1)
Joined: Sep 2011
Posts: 194
Likes: 1
From: johnstown, Colorado
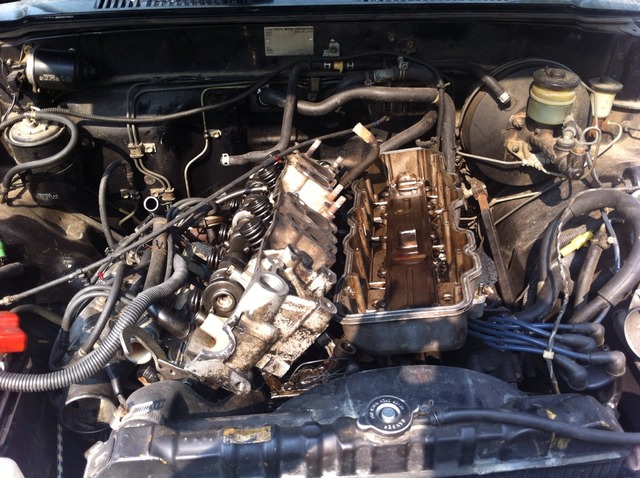
Dropping the oil pan.
Sorry guys it's been a while since I've done any real work on the truck. But I decided that I don't want to go through the pain of squeezing my new timing cover between the oil pan and head again. Just too much of a pain. So I'm tackling the task of dropping the oil pan. 92 toy had an excellent write up on the job so monkey see monkey do
https://www.yotatech.com/forums/f116...l#post51455027
Tools needed for the job:
2-3 bottle jacks
a floor jack
17 and 19 mm sockets
ratchet and according wrenches
a rubber mallet (to persuade the crossmember to get down)
jack stands
and good ole muscles
I didn't get as many pictures as I wanted to in the beginning because I forgot to grab the camera then was too focused to go get it. But anyways on to it. I'm borrowing these pictures from 92 toy's build.
unbolt the steering stabilizer leave it unhooked until after the job.
unbolt all the bolts that 92 circled for us. with the exception of the one in the top right. you dont have to but I loosened it.
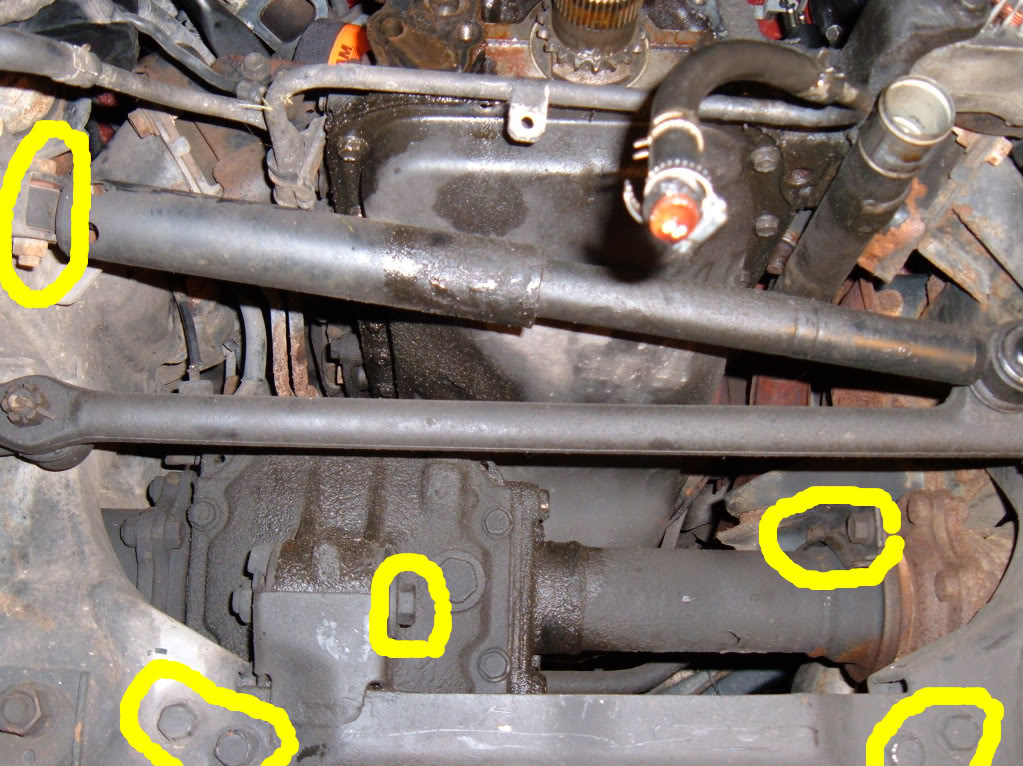
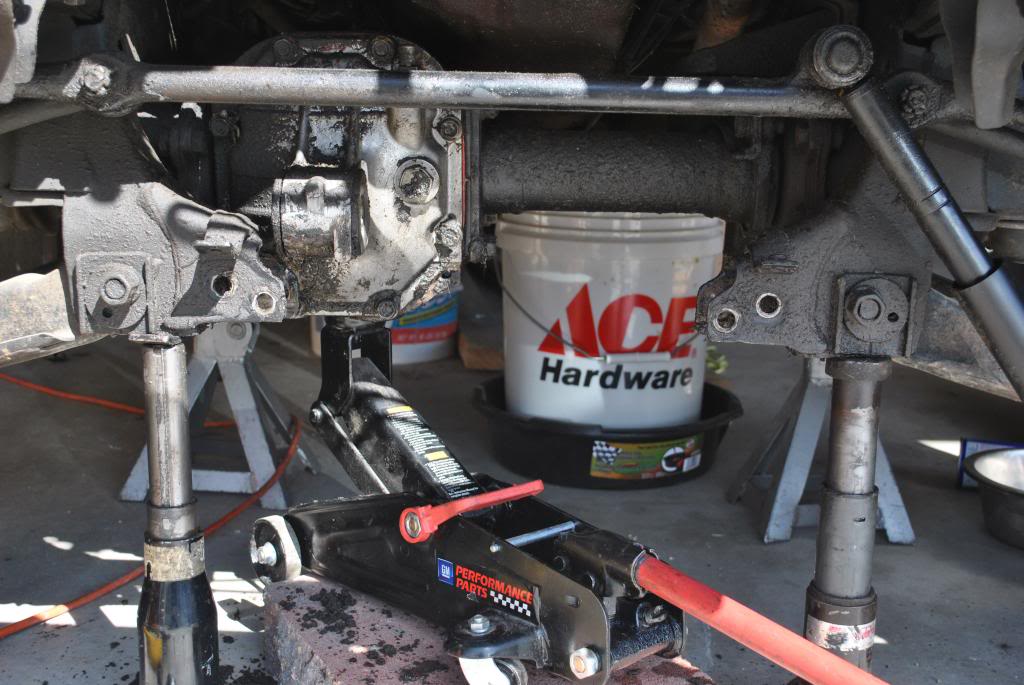
support the diff with the floor jack and support the truck with jack stands
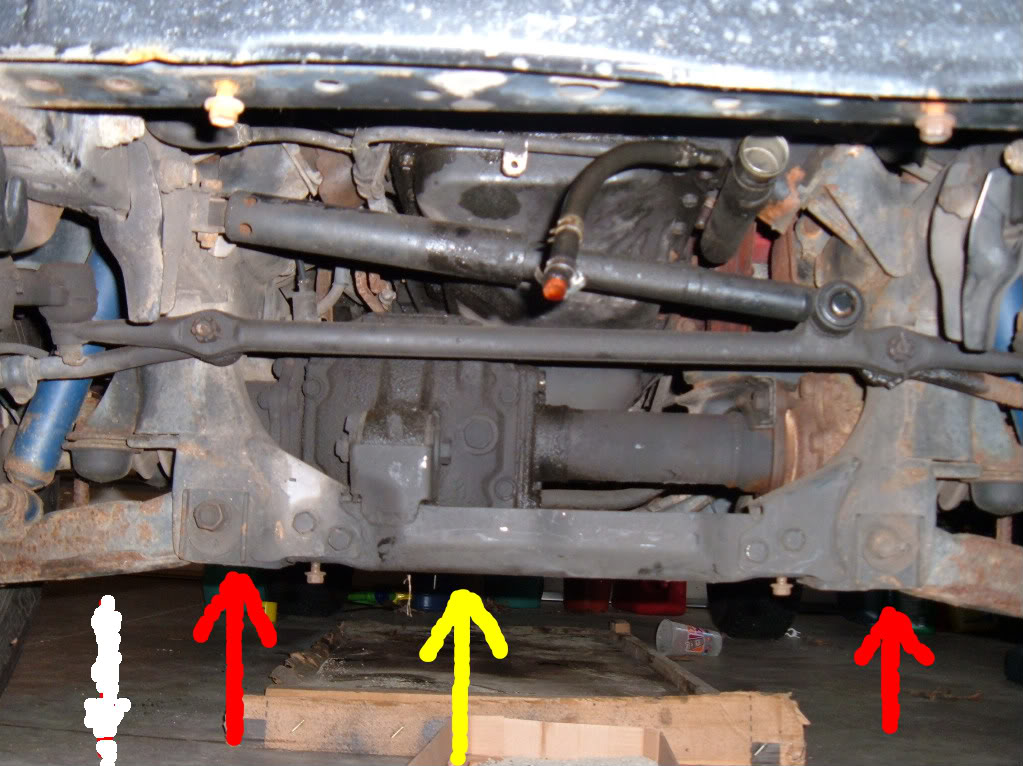
bottle jacks go where the red arrows are
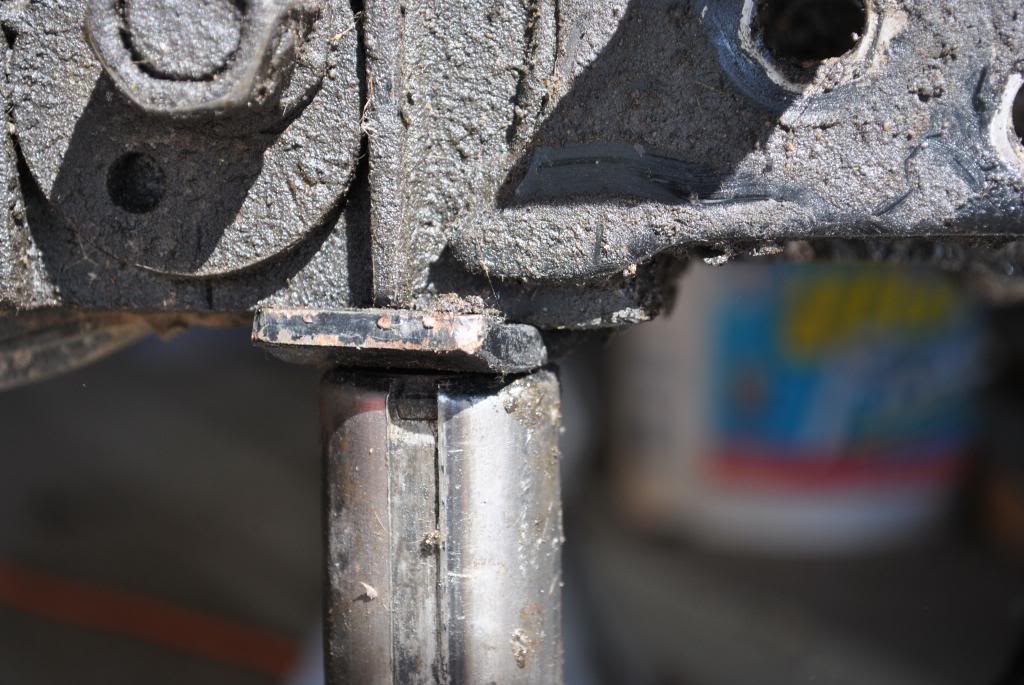
the 4 crossmember bolts were pretty tough to get out for me but I got them. the have nuts on the back so this is where the wrenches come in. As for the crossmember that thing too FOREVER to come out! Had to be persuaded with the mallet and finally gave up.
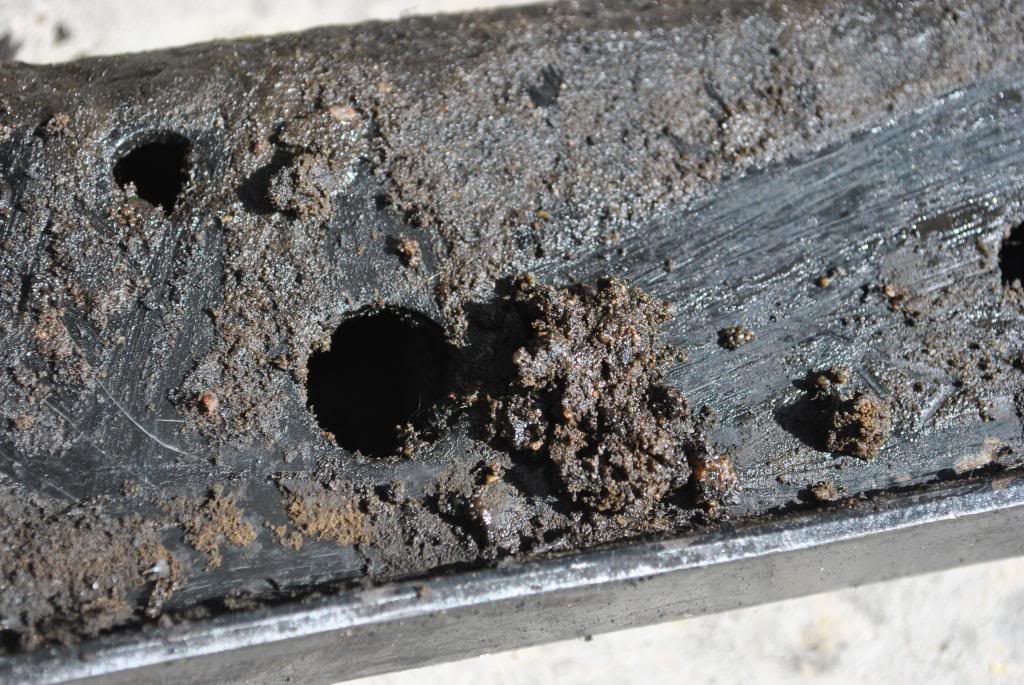
it's out!
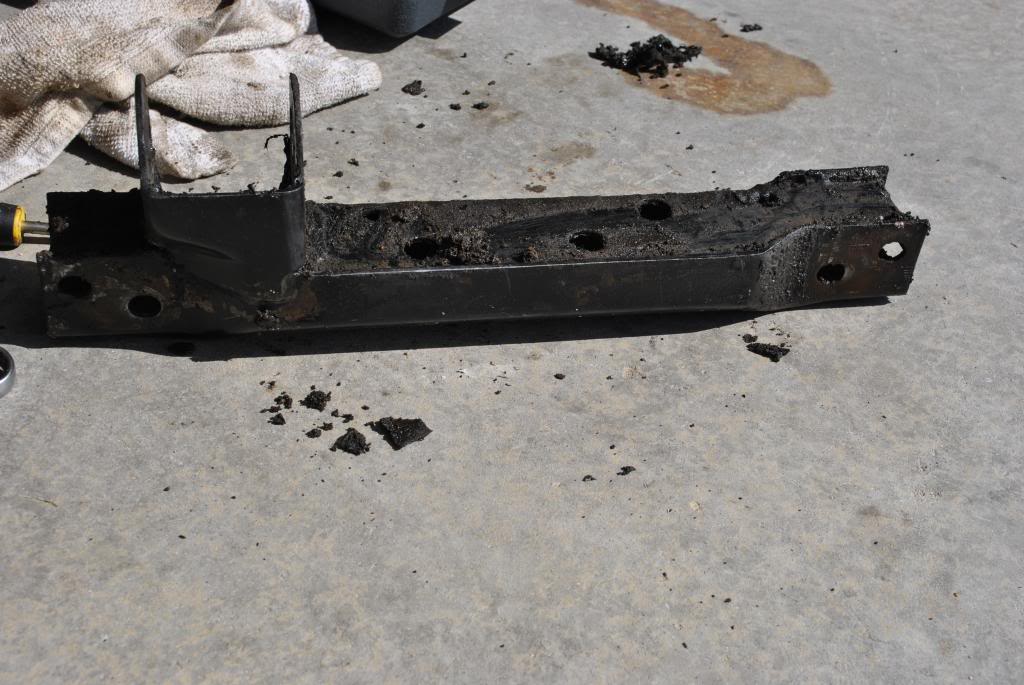
20 some odd years worth of crap and gunk
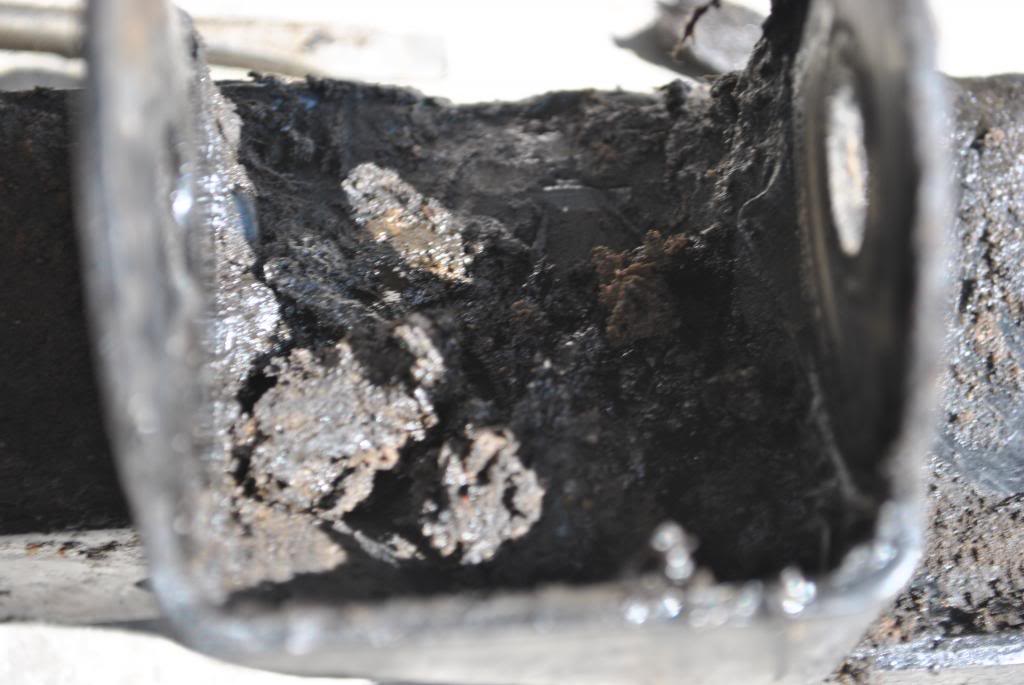
that's as far as I got before I had to leave and run do somethings with the family but I don't have anything planned for sunday afternoon and I'm off work monday so LOTS should get done. I'll edit this with the rest of the write up and pictures. Thanks for tuning in and thanks 92 toy for your great write up!
https://www.yotatech.com/forums/f116...l#post51455027
Tools needed for the job:
2-3 bottle jacks
a floor jack
17 and 19 mm sockets
ratchet and according wrenches
a rubber mallet (to persuade the crossmember to get down)
jack stands
and good ole muscles
I didn't get as many pictures as I wanted to in the beginning because I forgot to grab the camera then was too focused to go get it. But anyways on to it. I'm borrowing these pictures from 92 toy's build.
unbolt the steering stabilizer leave it unhooked until after the job.
unbolt all the bolts that 92 circled for us. with the exception of the one in the top right. you dont have to but I loosened it.

support the diff with the floor jack and support the truck with jack stands

bottle jacks go where the red arrows are


the 4 crossmember bolts were pretty tough to get out for me but I got them. the have nuts on the back so this is where the wrenches come in. As for the crossmember that thing too FOREVER to come out! Had to be persuaded with the mallet and finally gave up.
it's out!


20 some odd years worth of crap and gunk


that's as far as I got before I had to leave and run do somethings with the family but I don't have anything planned for sunday afternoon and I'm off work monday so LOTS should get done. I'll edit this with the rest of the write up and pictures. Thanks for tuning in and thanks 92 toy for your great write up!
 Good thing about an oil leak it keeps the rust at bay, can't oxidize it it can't breath
Apr 27, 2013 | 11:04 AM
Good thing about an oil leak it keeps the rust at bay, can't oxidize it it can't breath
Apr 27, 2013 | 11:04 AM
#65


Great write up. I agree on not squeezing the timing cover in. I would rather pull the head and pan and spend the extra $ on new gaskets just to not have a leak or issue later on.
I love the canopy you made. Might try something like that myself.
I love the canopy you made. Might try something like that myself.
Apr 29, 2013 | 08:02 PM
#67
Thread Starter
Registered User
iTrader: (1)
Joined: Sep 2011
Posts: 194
Likes: 1
From: johnstown, Colorado
Well didn't get nearly as much done as I wanted to I've been trying to get the diff mounting bolts out or even loose for two days with no luck. they're seized.....
 so instead the oil pan is now resting on the diff with about 3 1/2 inches between it and the block, so plenty of room for me to install the new cover with no problems. On the other hand though I think I have a problem. I bought new oil and a new oil filter about a month back when autozone was having a sale and I think the lady behind the counter gave me the wrong one. Compared to the napa one I pulled off the new stp one's not the same. It's short and fat.
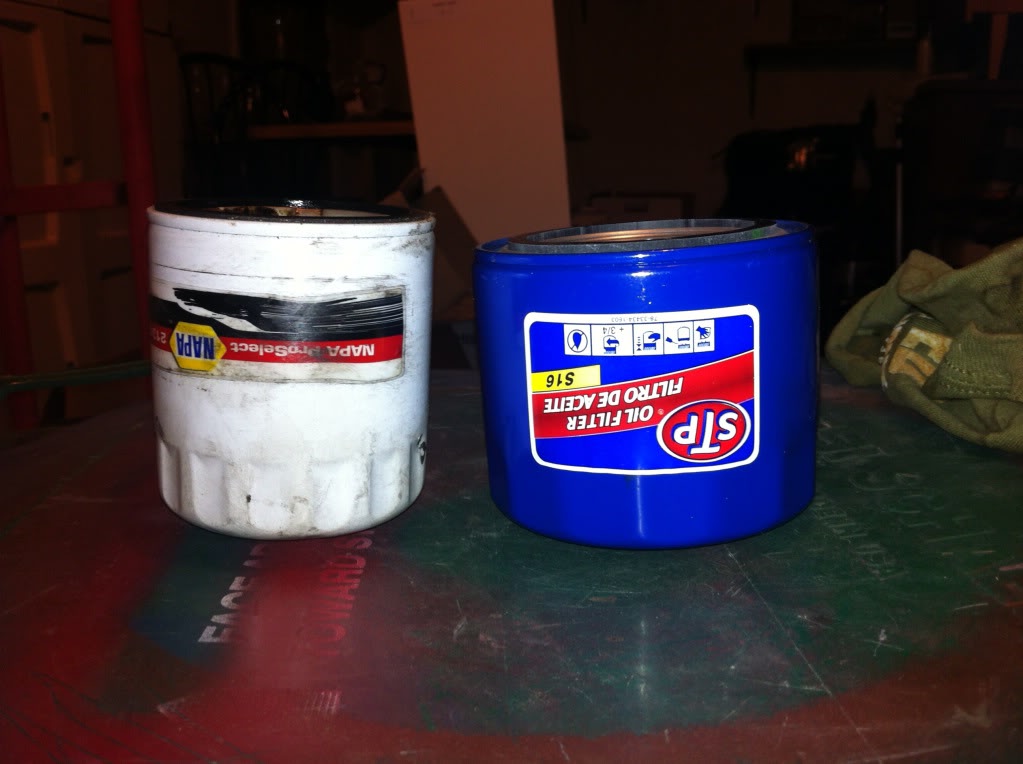
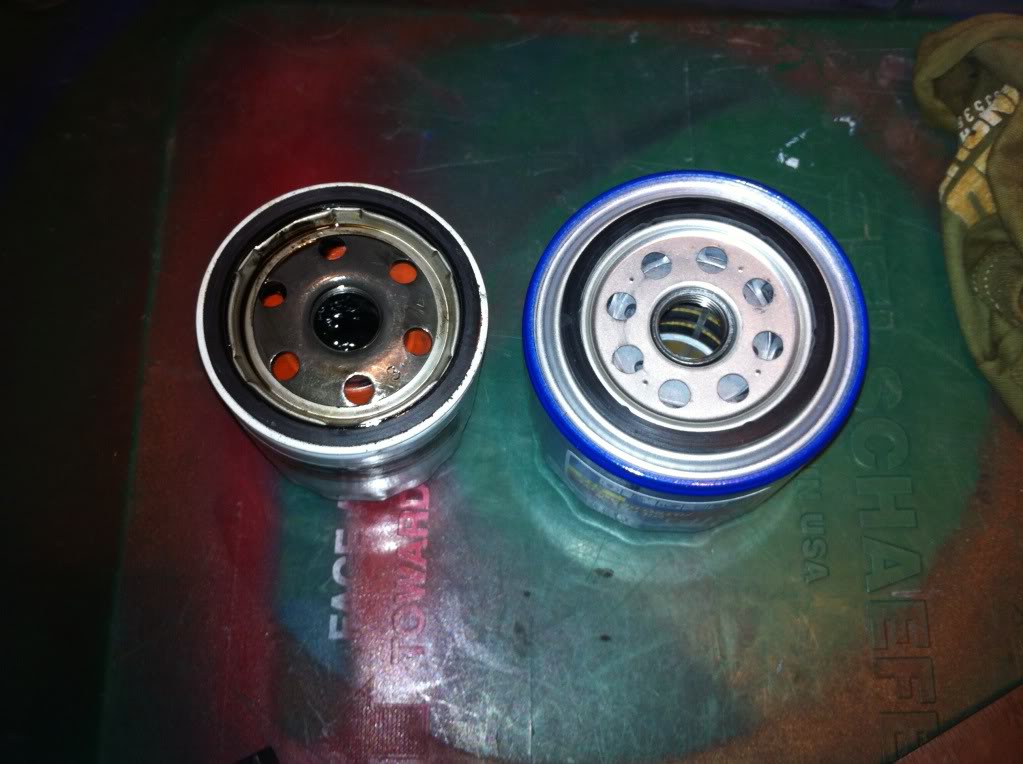
old
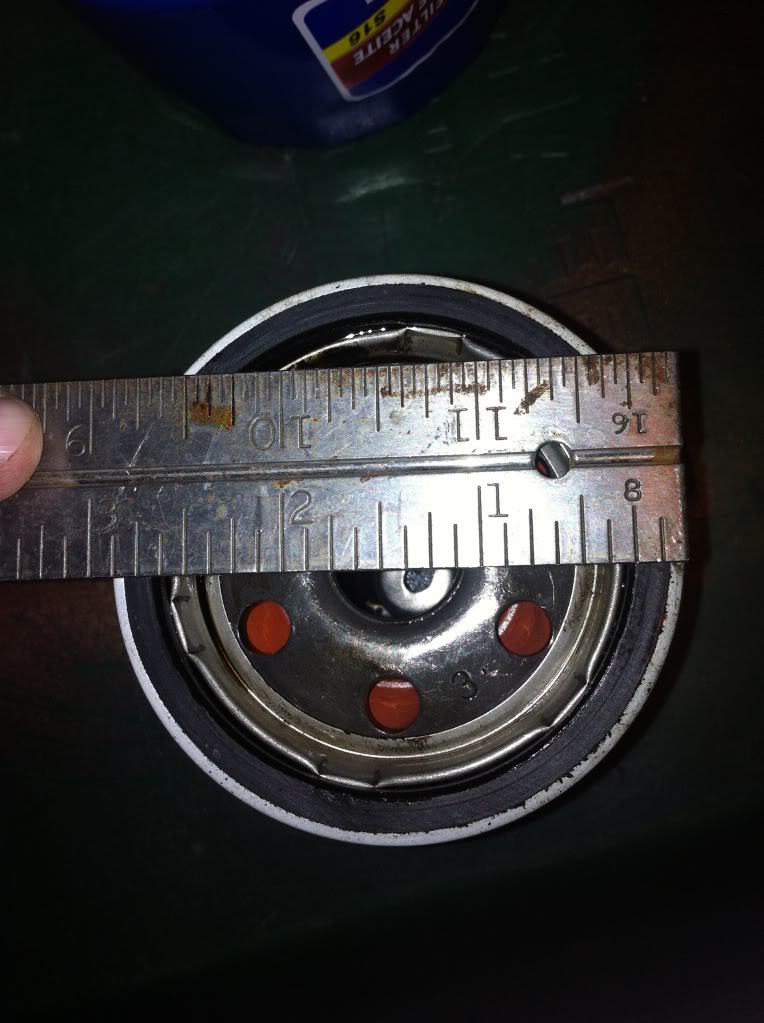
new
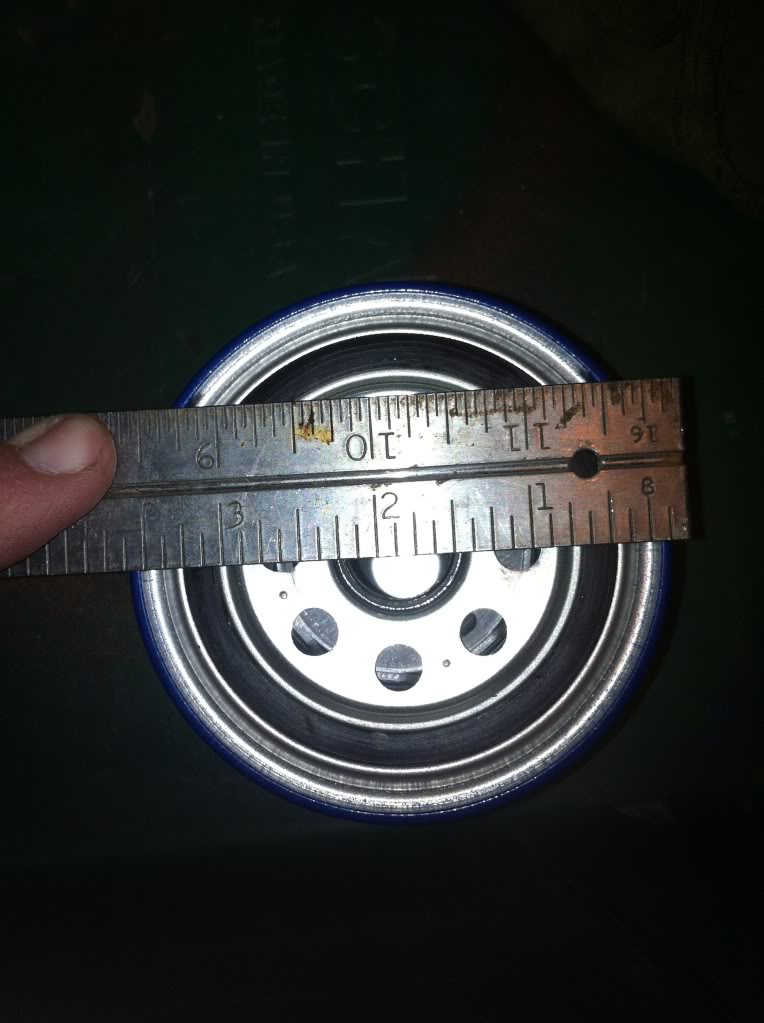

I've been saving all my receipts from the build so I can still take it back if i need to.
I've been trying to get the diff mounting bolts out or even loose for two days with no luck. they're seized..... so instead the oil pan is now resting on the diff with about 3 1/2 inches between it and the block, so plenty of room for me to install the new cover with no problems. On the other hand though I think I have a problem. I bought new oil and a new oil filter about a month back when autozone was having a sale and I think the lady behind the counter gave me the wrong one. Compared to the napa one I pulled off the new stp one's not the same. It's short and fat. 

old

new


I've been saving all my receipts from the build so I can still take it back if i need to.
Last edited by tinigunner11; Apr 29, 2013 at 08:03 PM.
May 7, 2013 | 08:37 PM
#70
Thread Starter
Registered User
iTrader: (1)
Joined: Sep 2011
Posts: 194
Likes: 1
From: johnstown, Colorado
 incase you didnt know, my parts came in! nothing really that special just a new timing chain cover. ordered it from ted at engnbldr, great place to order from, but you all already knew that


I'm excited to get this puppy on and get back to working on the truck!
May 22, 2013 | 07:44 PM
#72
Thread Starter
Registered User
iTrader: (1)
Joined: Sep 2011
Posts: 194
Likes: 1
From: johnstown, Colorado
Big update
BIG UPDATE!
been working like a dog for the past 4 days on the runner. Got a boatload of stuff done and finished putting the engine back together
painted the grill
before
after
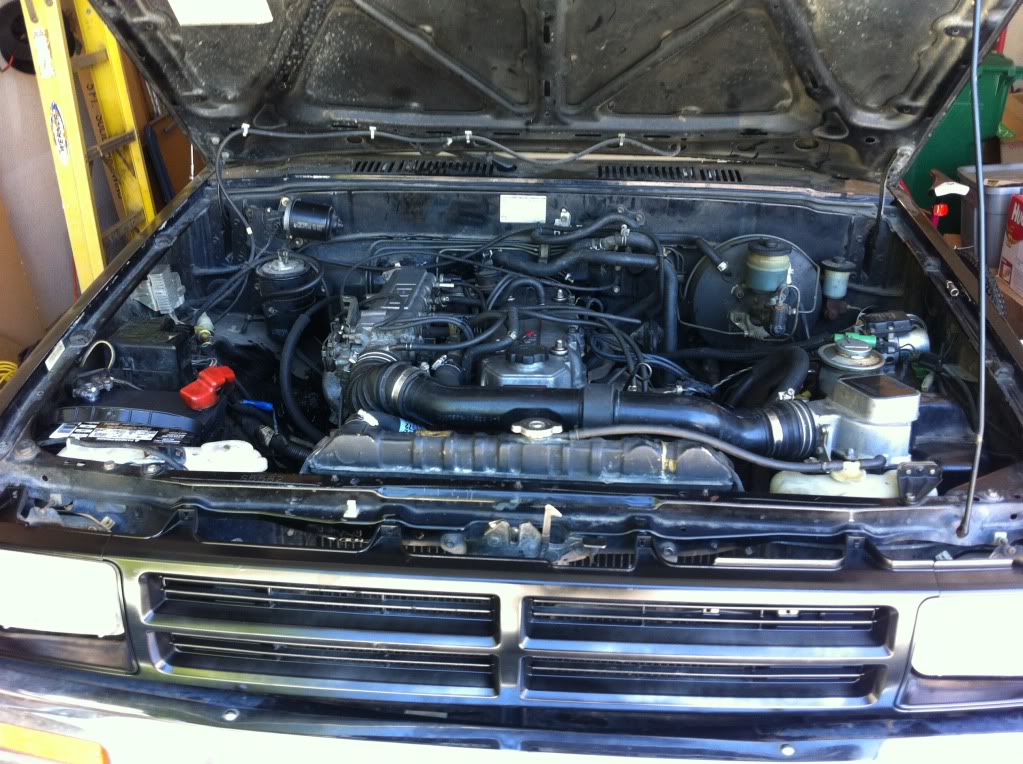
I bought a brand new timing cover from engnbldr and new studs for the intake and exhaust from lceperformance.
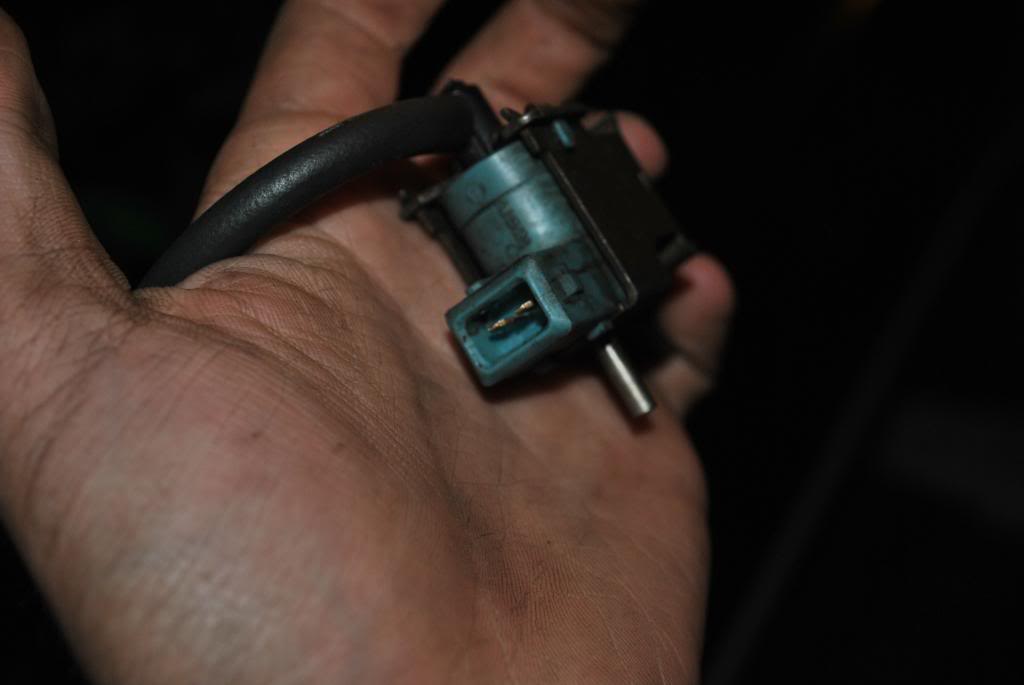
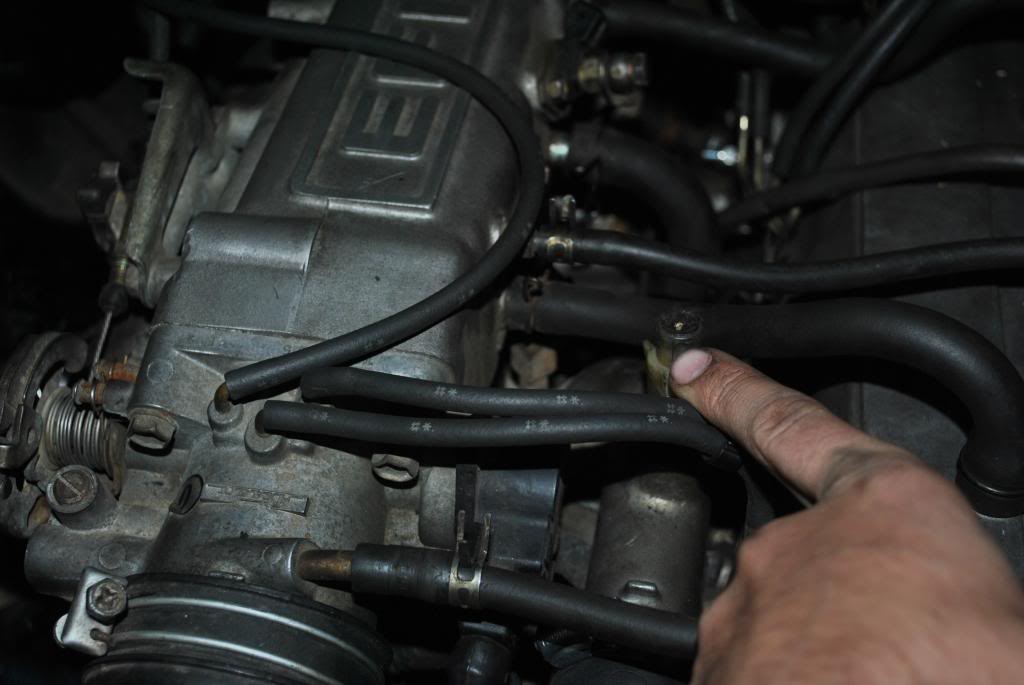
got it back together but I'm struggling with the wiring harness and vacuum lines. I dont get the privilege of knowing where they went because I didnt get to unhook them. But I have a problem. I just went to autozone and bought a brand new battery (the old one was dead and wouldnt charge) when I got home I hooked everything up and turned the key to accessory to see if I had any power, but sadly I was mistaken. I've made sure all 4 of the ground wires are hooked up and where they should be. I'm almost 100% positive that I've gotten all the connectors from the wiring harness plugged in the right places. the only ones I haven't connected are a light blue one that two vacuum lines plug into and go to the charcoal canister and the upper intake/throttle body, a green one that im not quite sure where it goes, its underneath the intake, and a brown one that I'm pretty sure is the oil pressure sensor. so my question is, what would make it so I i dont have any electric power at all? really noobish question but I need some help.
light blue connector
does anyone know the name of this plug? it's a female connector with a single green wire coming out.
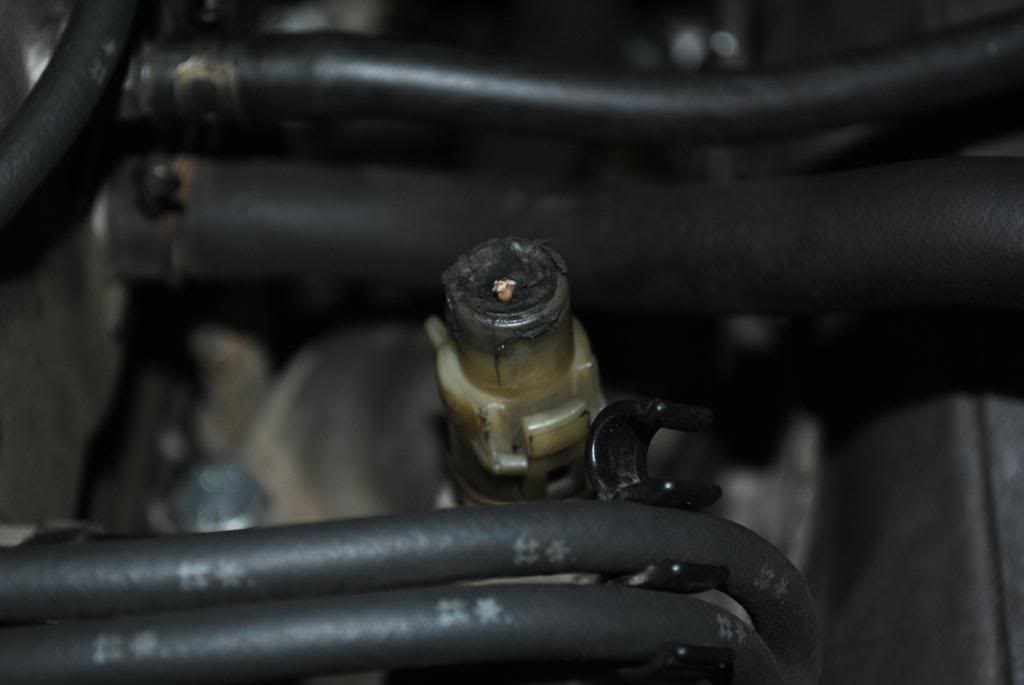
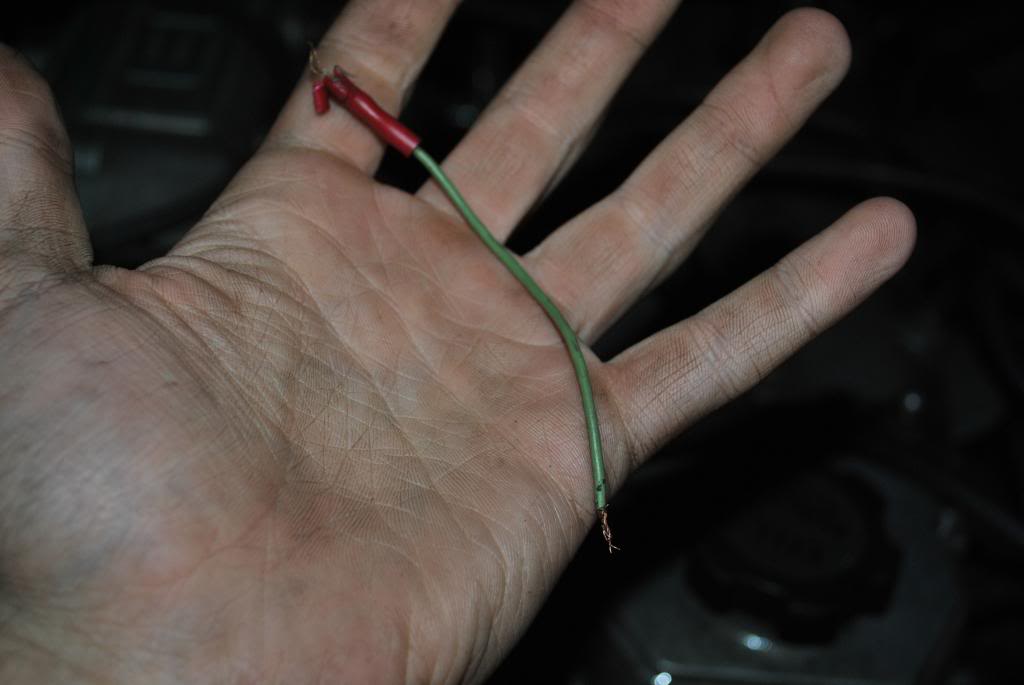
the PO broke the wire off so I need to buy a new one.
thank for tuning in guys.
been working like a dog for the past 4 days on the runner. Got a boatload of stuff done and finished putting the engine back together
painted the grill

before

after

I bought a brand new timing cover from engnbldr and new studs for the intake and exhaust from lceperformance.
got it back together but I'm struggling with the wiring harness and vacuum lines. I dont get the privilege of knowing where they went because I didnt get to unhook them. But I have a problem. I just went to autozone and bought a brand new battery (the old one was dead and wouldnt charge) when I got home I hooked everything up and turned the key to accessory to see if I had any power, but sadly I was mistaken. I've made sure all 4 of the ground wires are hooked up and where they should be. I'm almost 100% positive that I've gotten all the connectors from the wiring harness plugged in the right places. the only ones I haven't connected are a light blue one that two vacuum lines plug into and go to the charcoal canister and the upper intake/throttle body, a green one that im not quite sure where it goes, its underneath the intake, and a brown one that I'm pretty sure is the oil pressure sensor. so my question is, what would make it so I i dont have any electric power at all? really noobish question but I need some help.
light blue connector

does anyone know the name of this plug? it's a female connector with a single green wire coming out.


the PO broke the wire off so I need to buy a new one.
thank for tuning in guys.
May 24, 2013 | 08:49 AM
#74
I think the lit blue connector is like the fuel injector connectors, not 100% sure as there maybe some differences. The one for the fuel injectors on these trucks are usually called EV1.
The plug on top of the water thermostat housing, if you take the plug off, sometimes you can push back the rubber cork like piece and solder the wire back together. very easy fix.
The plug on top of the water thermostat housing, if you take the plug off, sometimes you can push back the rubber cork like piece and solder the wire back together. very easy fix.
May 24, 2013 | 08:58 AM
#75
Registered User
iTrader: (2)
Joined: Dec 2009
Posts: 2,159
Likes: 7
From: Pleasanton, CA - SF Bay Area
The one on top of the termostat is a temp sender for models with A/C - not critical. Mine broke and I used a spade connector and some heat shrink to re-connect.
The blue thing looks like one of these things on top of the valve cover like a VSV ar VTV. The metal cylinder is missing a black plastic filter/cap.
Something like this:

The blue thing looks like one of these things on top of the valve cover like a VSV ar VTV. The metal cylinder is missing a black plastic filter/cap.
Something like this:
May 28, 2013 | 04:00 PM
#76
Thread Starter
Registered User
iTrader: (1)
Joined: Sep 2011
Posts: 194
Likes: 1
From: johnstown, Colorado
Thanks for your help guys. I've since experienced another problem. Got the lights and everything to turn on but can not get it to start. The starter relay does click, the fuel pump does engage, just the starter/solenoid does not click. anyone know/heard of this problem? am i missing a plug that needs to be plugged in? or do I need a new starter? I've read rad4runners write up https://www.yotatech.com/forums/f199...ild-up-252300/ post 19 and 20 and cant figure it out. I have the connector shown here:https://www.yotatech.com/members/rad...rter-relay.jpg but I cant figure out where it plugs into.
Jan 17, 2014 | 11:37 AM
#77
Thread Starter
Registered User
iTrader: (1)
Joined: Sep 2011
Posts: 194
Likes: 1
From: johnstown, Colorado
Sorry to dig up an old thread, but I sold this 4runner. I finally got everything put together and got the engine to the point where it would crank but it wouldn't ever fire
 so instead of just throwing money and parts into it like crazy onto craigslist it went. The truck was a great learning experience for me and now i can tear down a 22re in my sleep and after a few months of searching craigslist and testing anything I finally found another 1986 4runner sr5 I'm starting a build shortly. thanks for tuning in everyone.
pic on the trailer. that's the last I'll ever see of her
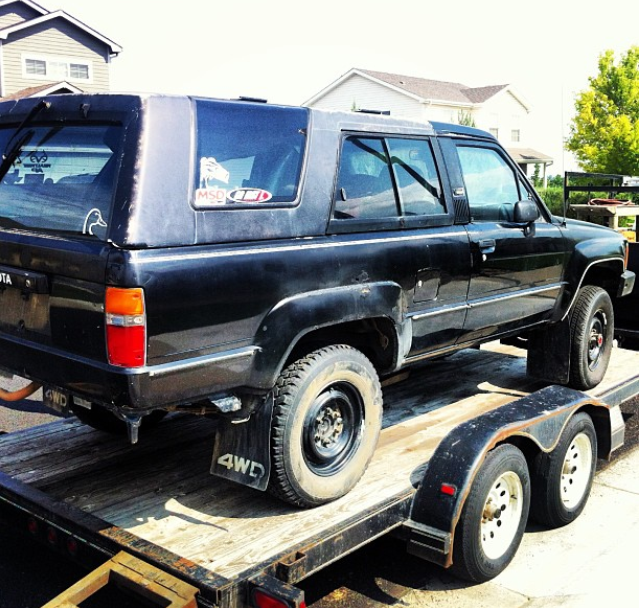
I finally got everything put together and got the engine to the point where it would crank but it wouldn't ever fire so instead of just throwing money and parts into it like crazy onto craigslist it went. The truck was a great learning experience for me and now i can tear down a 22re in my sleep and after a few months of searching craigslist and testing anything I finally found another 1986 4runner sr5 I'm starting a build shortly. thanks for tuning in everyone.pic on the trailer. that's the last I'll ever see of her


Thread
Thread Starter
Forum
Replies
Last Post
RedRunner_87
95.5-2004 Tacomas & 96-2002 4Runners (Build-Up Section)
84
Jun 1, 2021 01:51 PM


