
BEGINNER'S 22re Timing Chain Failure / replacement / head gasket replacement
 May 26, 2010 | 05:43 AM
#21
Thread Starter
YotaTech Milestone-Two Millionth Post
Joined: Jan 2009
Posts: 12,009
Likes: 122
From: Northeast Pennsylvania
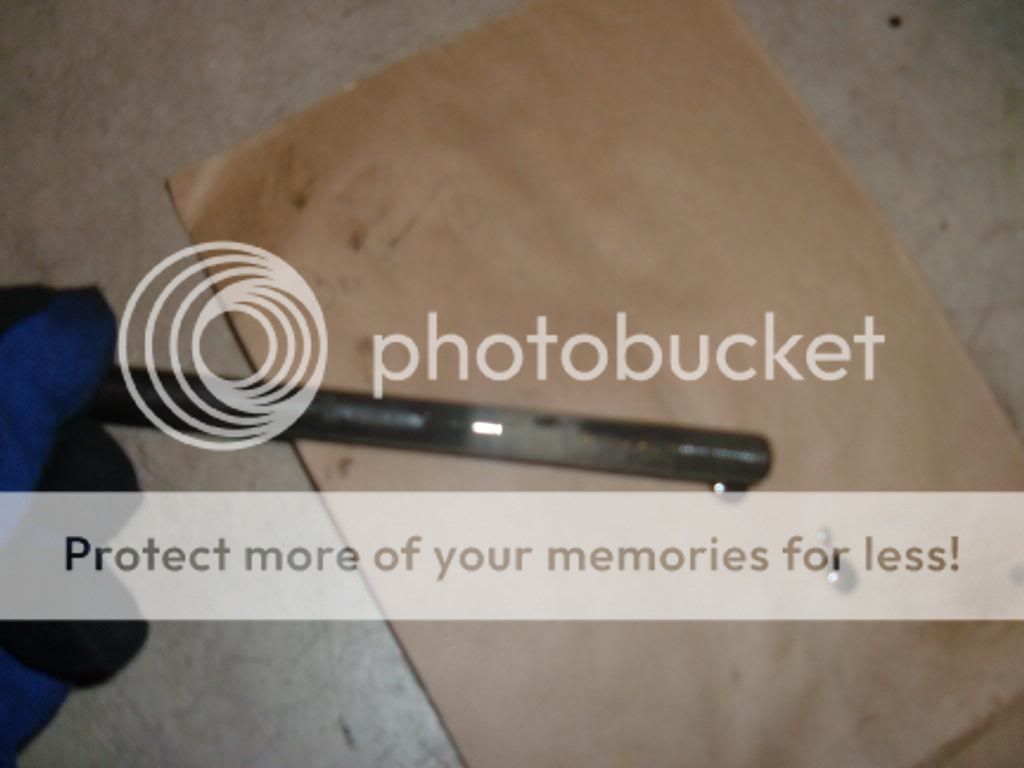
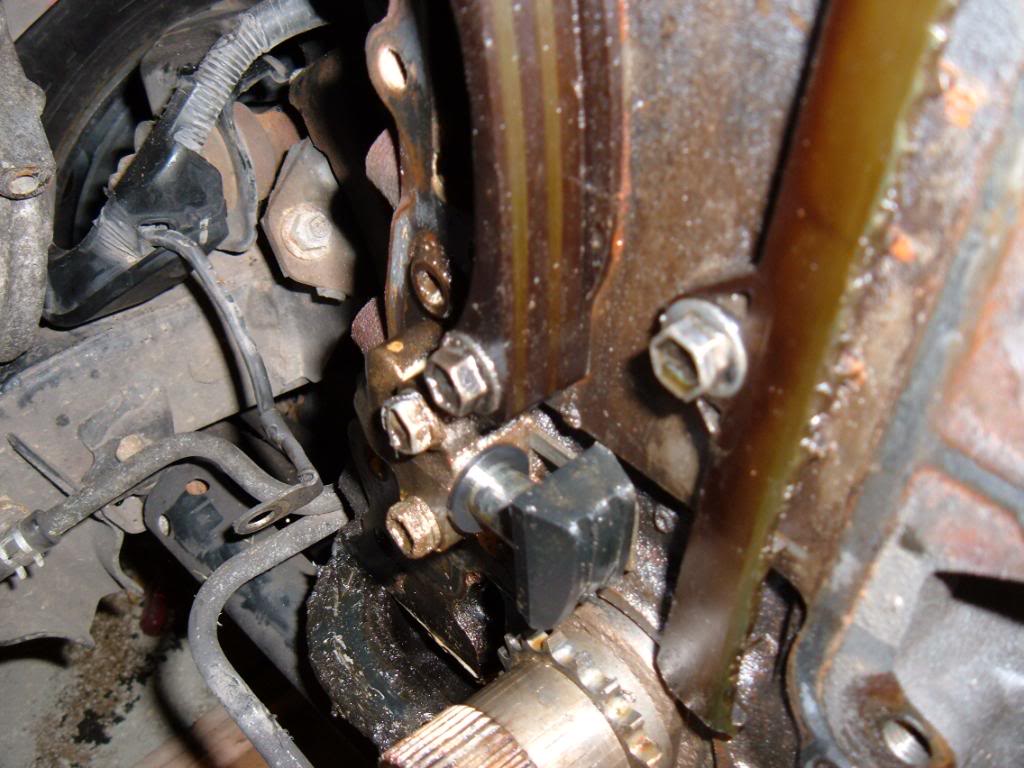
this is where the cold start injector is...buy a gasket from the dealer

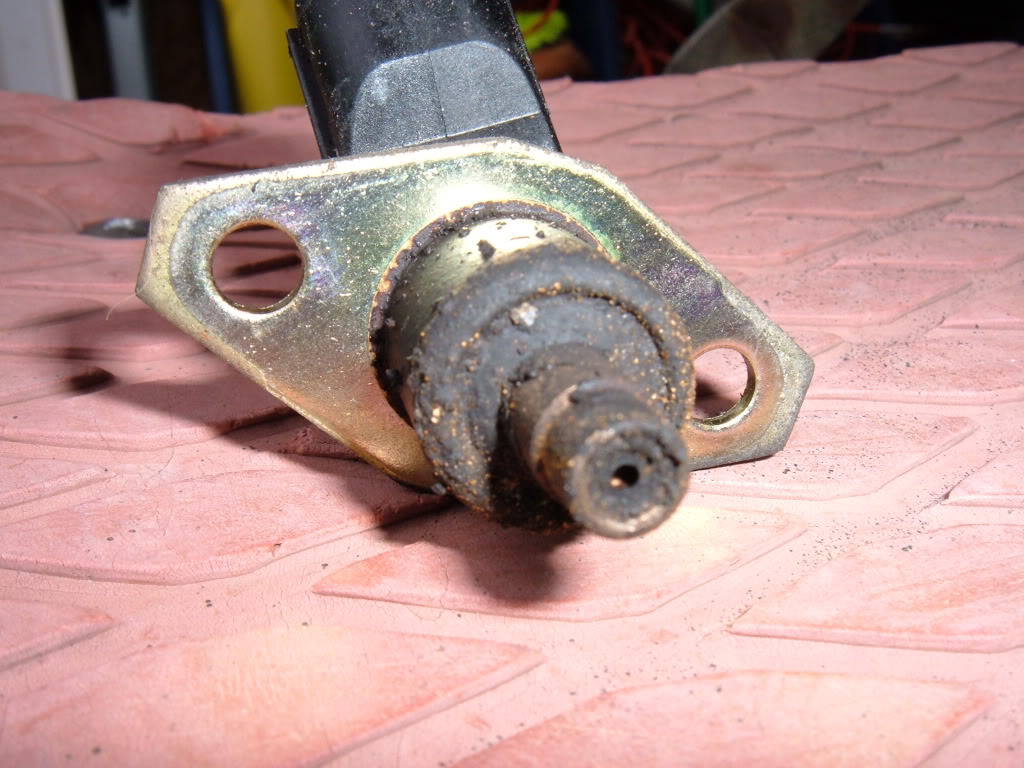
UGLY!!!
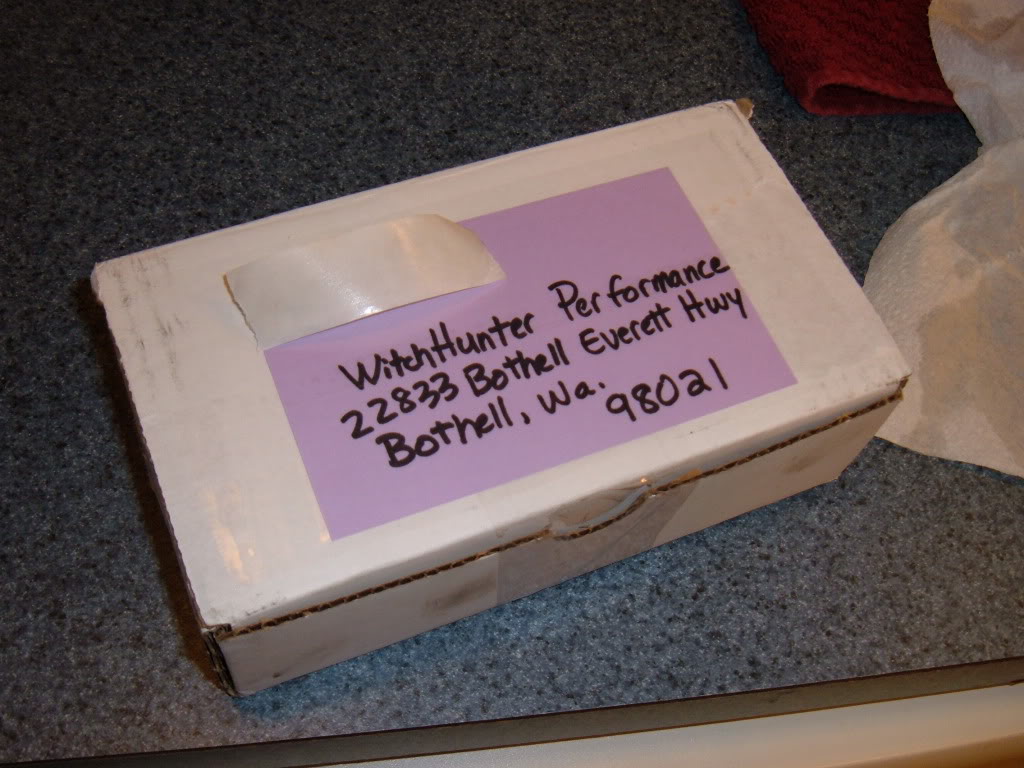
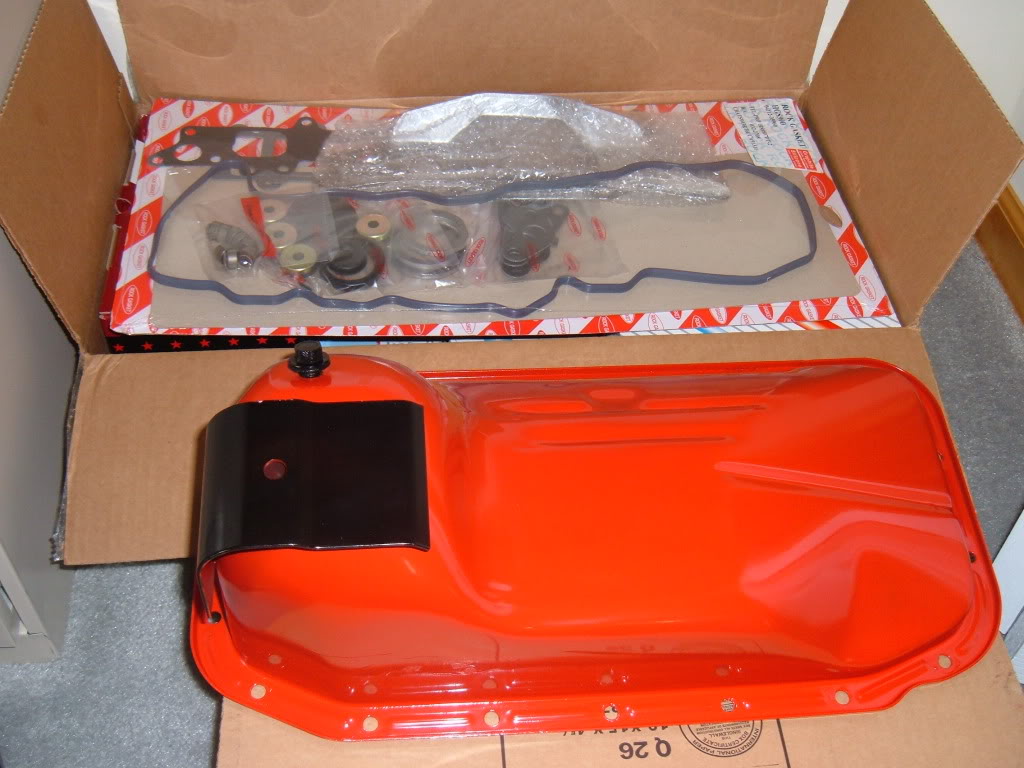
packed up nice....
mailed them on a Thursday, had them back on a Monday or Tuesday...but i believe it was Monday...Pennsylvania to Washington state and back...not so shabby
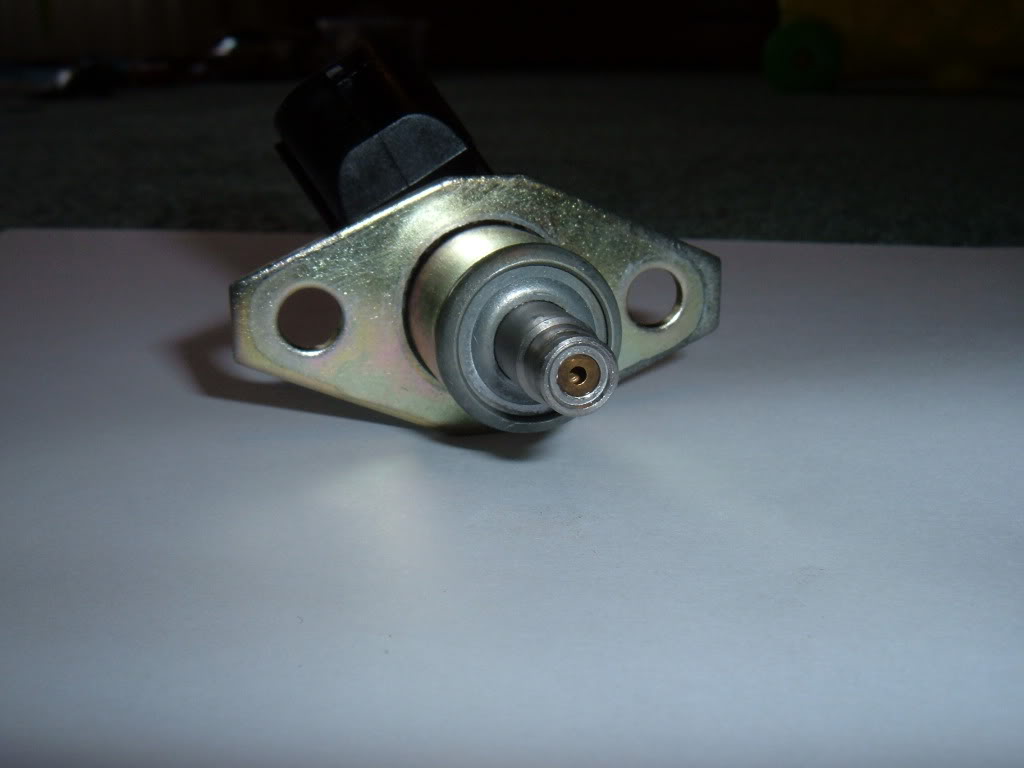
nice and new looking
UGLY!!!
packed up nice....
mailed them on a Thursday, had them back on a Monday or Tuesday...but i believe it was Monday...Pennsylvania to Washington state and back...not so shabby
nice and new looking
May 26, 2010 | 05:57 AM
#22
Thread Starter
YotaTech Milestone-Two Millionth Post
Joined: Jan 2009
Posts: 12,009
Likes: 122
From: Northeast Pennsylvania
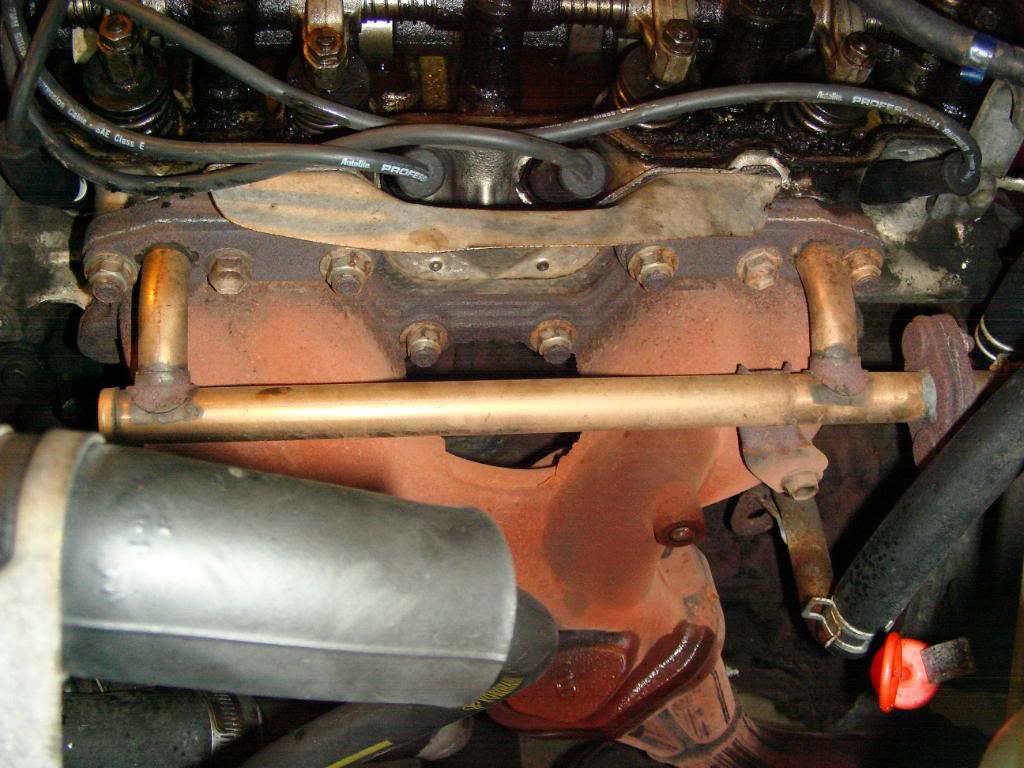
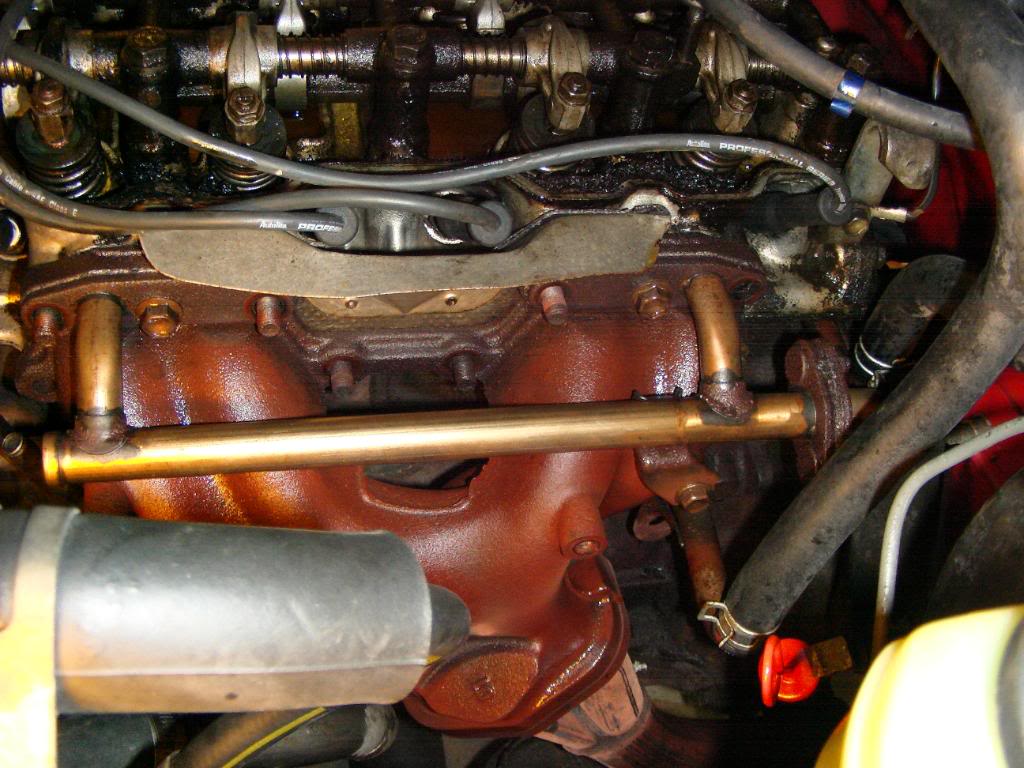
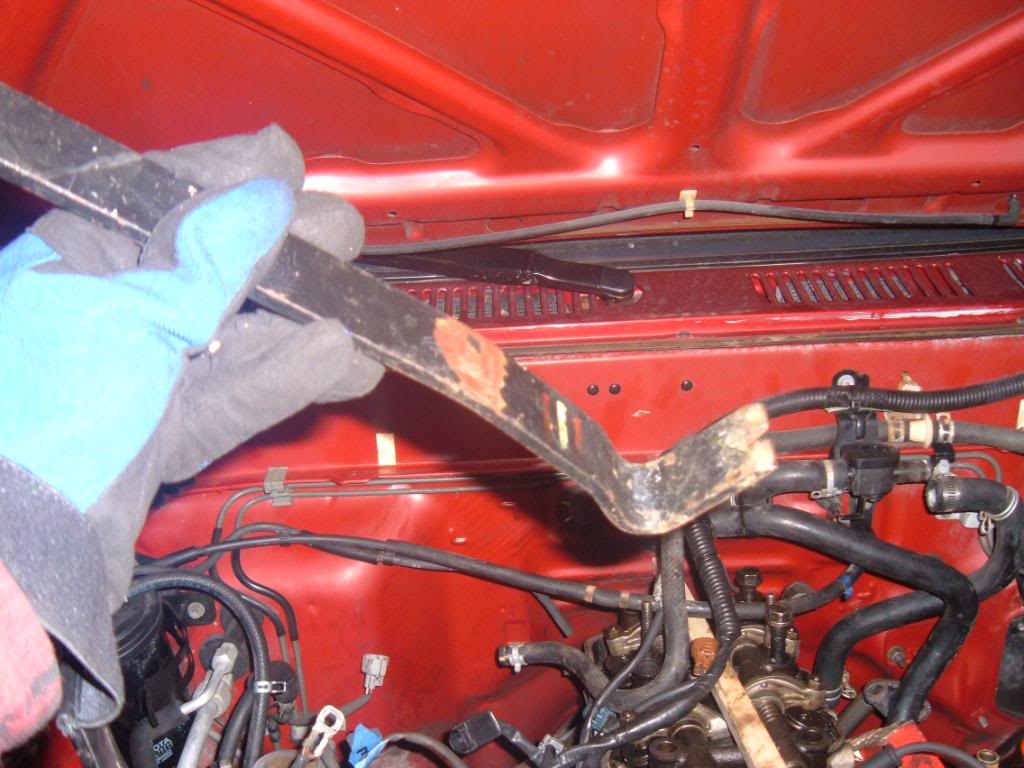
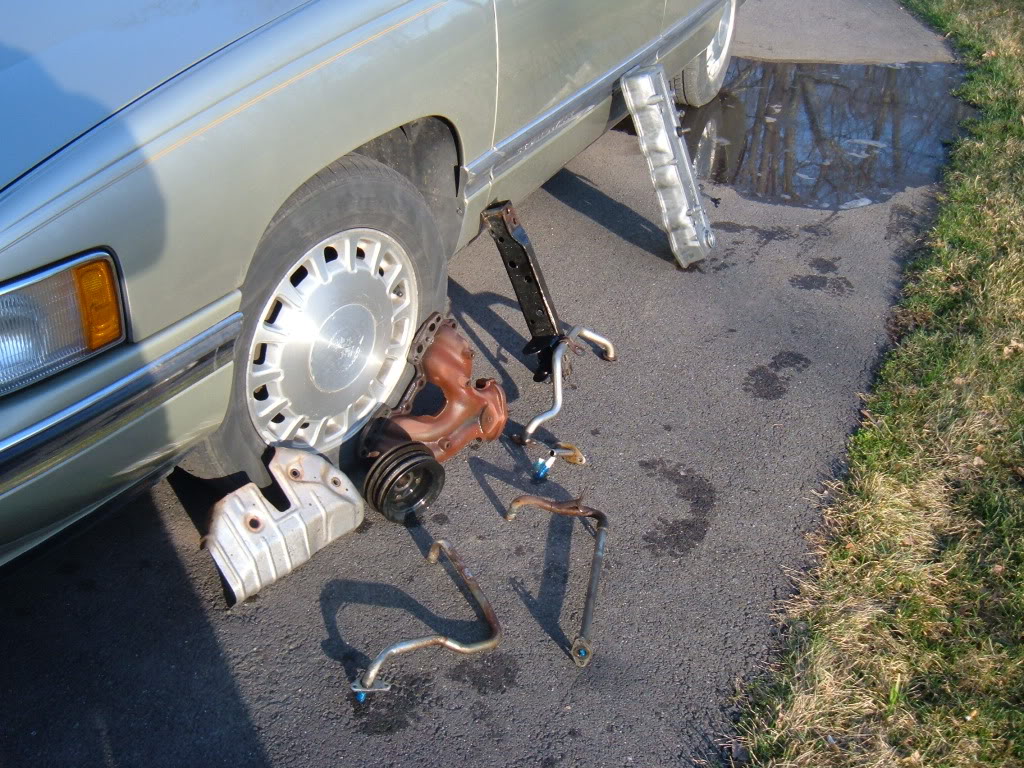
Exhaust manifold removal
I was nervous as all hell to do this part...as i had read several times about people breaking studs....but it didn't happen to me...so i assume i was lucky.
3 bolts remove the shield....no pic for you..
and this is what you are looking at after that.
liberally (i mean pretty much soaked) applied PB Blaster...stuff starts out smelling pretty good..like progress...but quickly would sicken the crap outta me
just have to get at all the bolts...can take some finesse and such, but eventually they will all be loosened enough or off.
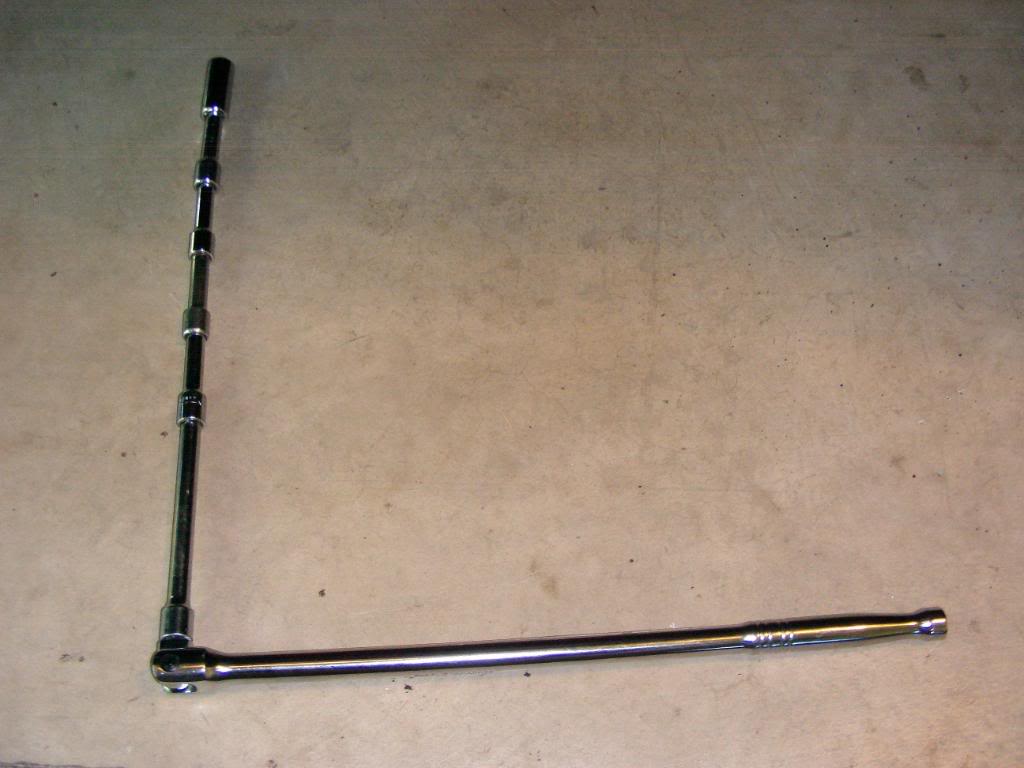
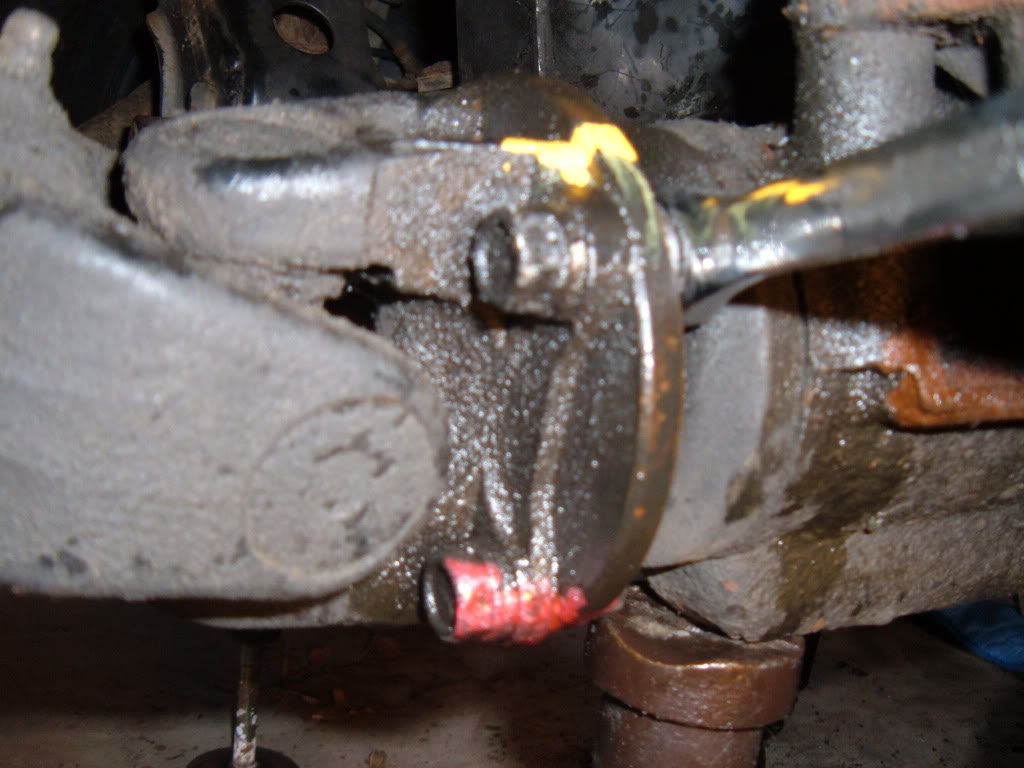
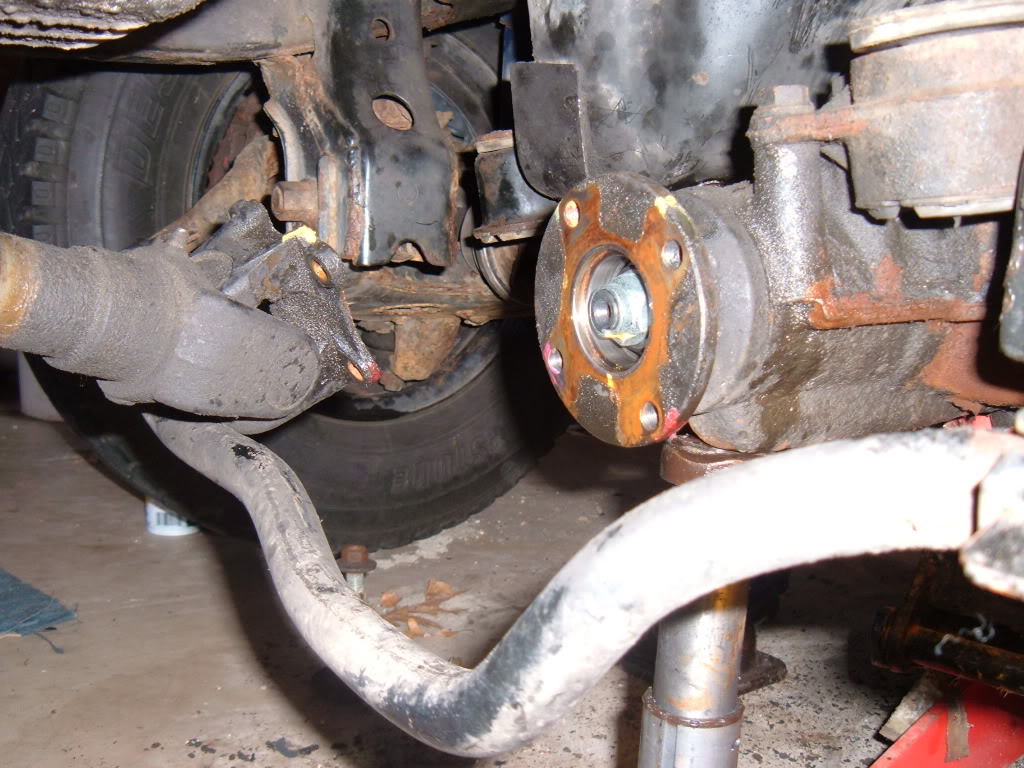
for the manifold to down-pipe connection (for me) there were 3 nuts facing downward...this necessitated making up my own tool by combining several extensions....it's also necessary for eye protection and to loosen and move the brace that holds the down-pipe securely to the transmission. you also have to spray PB Blaster up from under the truck....tastes like crap.
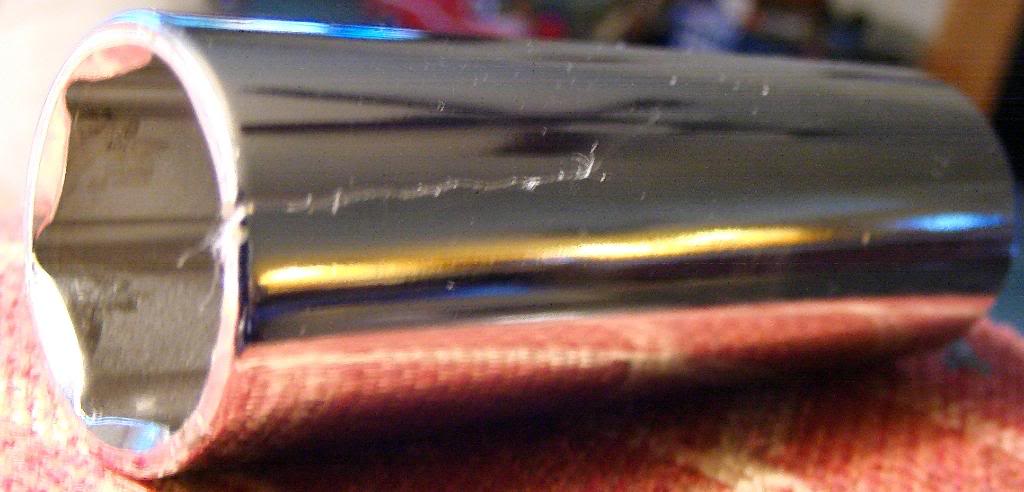
The tool...this is where i needed the deep socket (14mm i believe)
and you end up like this
3 bolts remove the shield....no pic for you..
and this is what you are looking at after that.
liberally (i mean pretty much soaked) applied PB Blaster...stuff starts out smelling pretty good..like progress...but quickly would sicken the crap outta me
just have to get at all the bolts...can take some finesse and such, but eventually they will all be loosened enough or off.
for the manifold to down-pipe connection (for me) there were 3 nuts facing downward...this necessitated making up my own tool by combining several extensions....it's also necessary for eye protection and to loosen and move the brace that holds the down-pipe securely to the transmission. you also have to spray PB Blaster up from under the truck....tastes like crap.
The tool...this is where i needed the deep socket (14mm i believe)
and you end up like this
May 26, 2010 | 06:16 AM
#23
Thread Starter
YotaTech Milestone-Two Millionth Post
Joined: Jan 2009
Posts: 12,009
Likes: 122
From: Northeast Pennsylvania
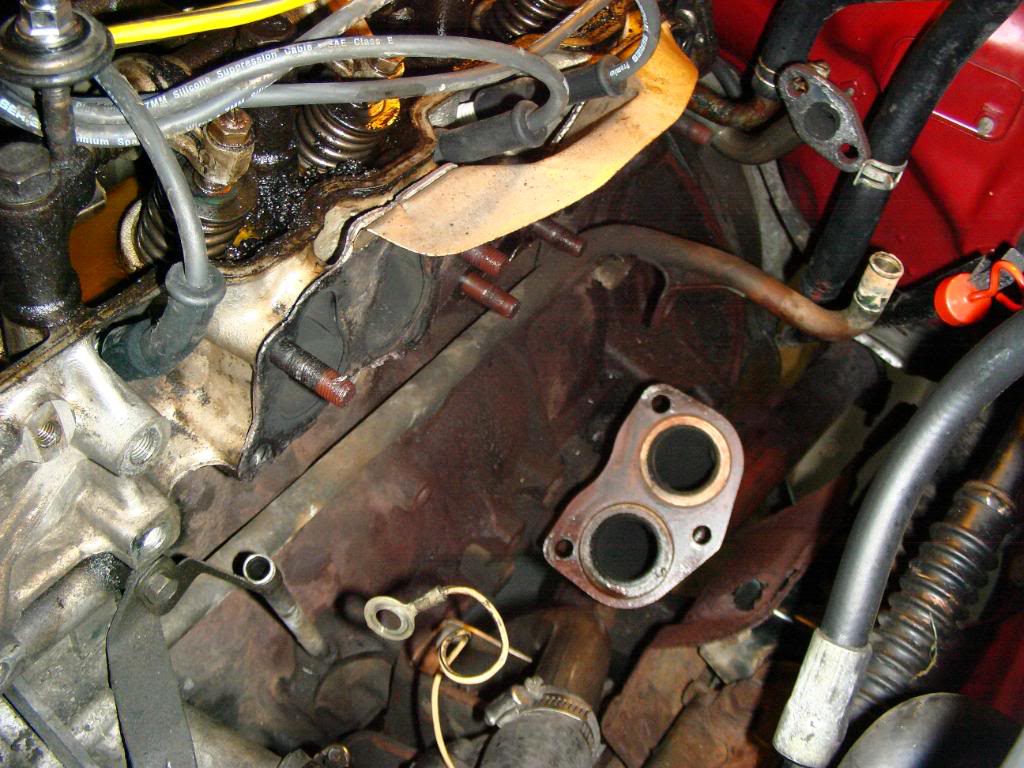
Head removal
at this point i had to use my PULLEY HOLDER.
in reality i had tried several times by now to remove my crankshaft bolt as well without any success....but i will get back to that.
19mm socket and the cam gear came off.
have to get that gear out of the way to reach the bolt that mates the timing cover to the head UNDER that gear.
it's hidden in the puddle of oil and apparently easily overlooked
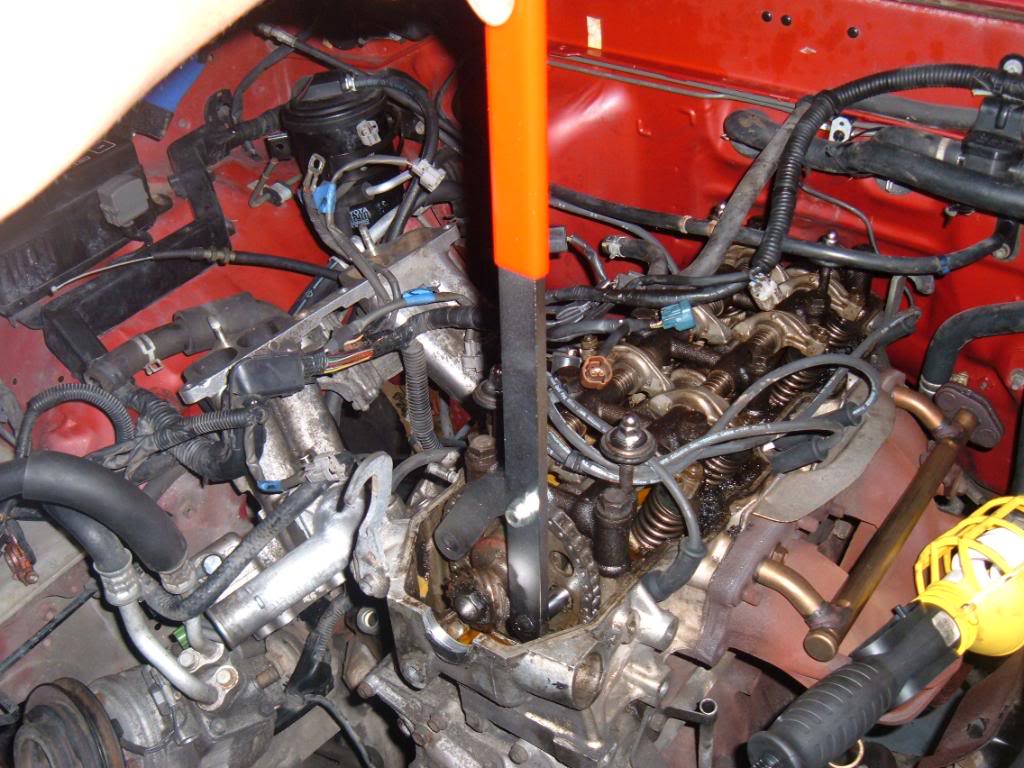
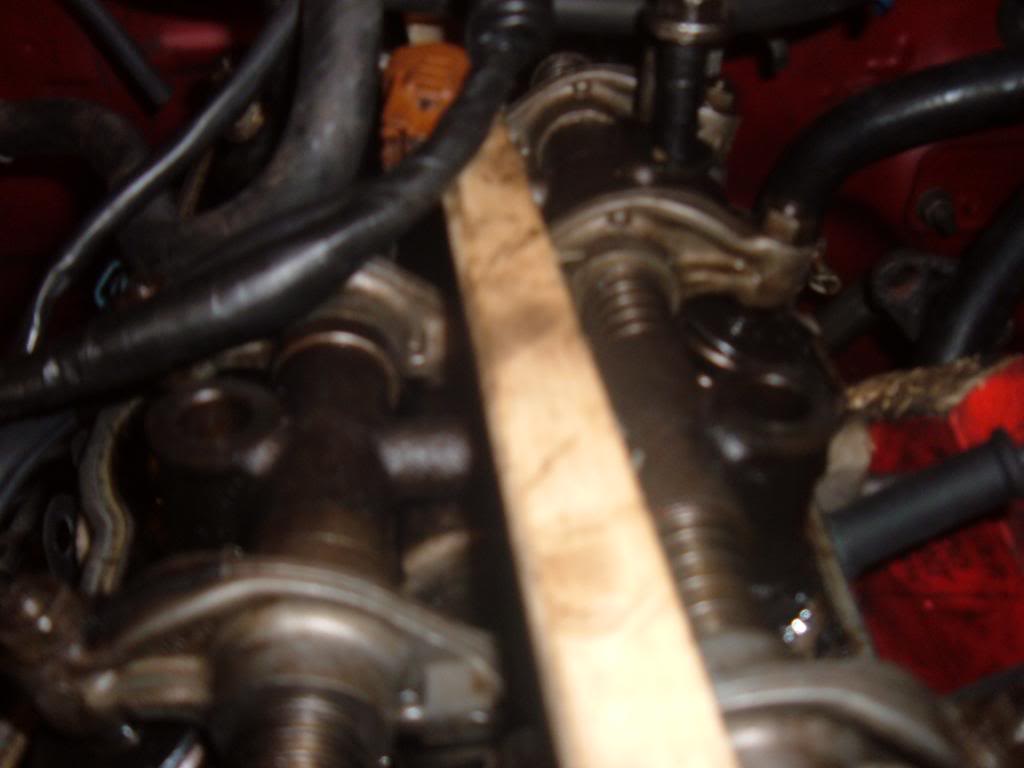
for the life of me, i had a beech of a time getting some of the head bolts out...they were so caked with oil and sludge that they were essentially held in by their own vacuum...had to use a piece of wood to exert upward force while loosening some of the bolts.
some bolts came out looking like this....
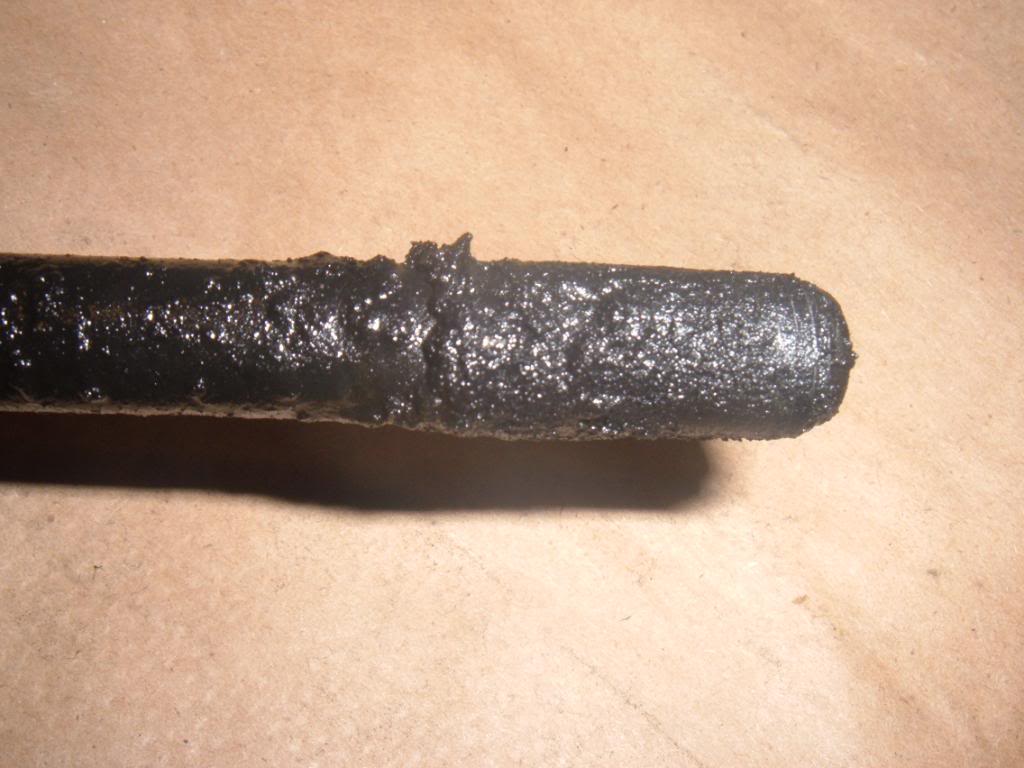
some dripping, like this
all in all it was a struggle, for me, to get those bolts out...so that was a little sub-project......several of those along the way.
oh yeah, and a prybar against the piece of wood to provide the upward force while turning the bolts...need 8 arms...but i did it by myself

eventually, all the bolts were removes and the head was pryed (at the specified location near the distributor) and removed...it's kinda heavy, but more awkward than heavy
and my 1st look at a block, let alone my block
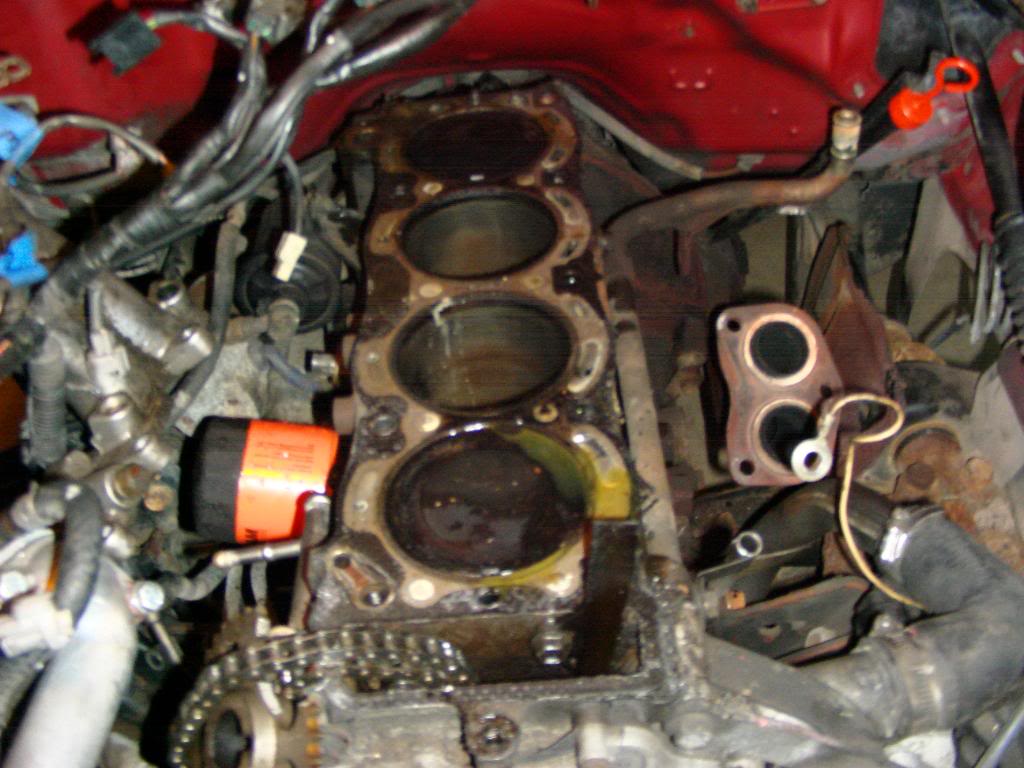

a superficial inspection of the head gasket did not reveal any failure.....this came to be true in the end as well.
in reality i had tried several times by now to remove my crankshaft bolt as well without any success....but i will get back to that.
19mm socket and the cam gear came off.
have to get that gear out of the way to reach the bolt that mates the timing cover to the head UNDER that gear.
it's hidden in the puddle of oil and apparently easily overlooked
for the life of me, i had a beech of a time getting some of the head bolts out...they were so caked with oil and sludge that they were essentially held in by their own vacuum...had to use a piece of wood to exert upward force while loosening some of the bolts.
some bolts came out looking like this....
some dripping, like this
all in all it was a struggle, for me, to get those bolts out...so that was a little sub-project......several of those along the way.
oh yeah, and a prybar against the piece of wood to provide the upward force while turning the bolts...need 8 arms...but i did it by myself
eventually, all the bolts were removes and the head was pryed (at the specified location near the distributor) and removed...it's kinda heavy, but more awkward than heavy
and my 1st look at a block, let alone my block
a superficial inspection of the head gasket did not reveal any failure.....this came to be true in the end as well.
Last edited by 92 TOY; May 26, 2010 at 06:30 AM.
May 26, 2010 | 06:34 AM
#25
Thread Starter
YotaTech Milestone-Two Millionth Post
Joined: Jan 2009
Posts: 12,009
Likes: 122
From: Northeast Pennsylvania
I had asked why some bolts were wet, some downright dry, some a mix...i don;t hink i got an answer, but i read that same thing in other threads and realized it wasn't just me with that concern.
i'm not so good at labeling pics, but this is what i had done to show what bolts were in what condition.
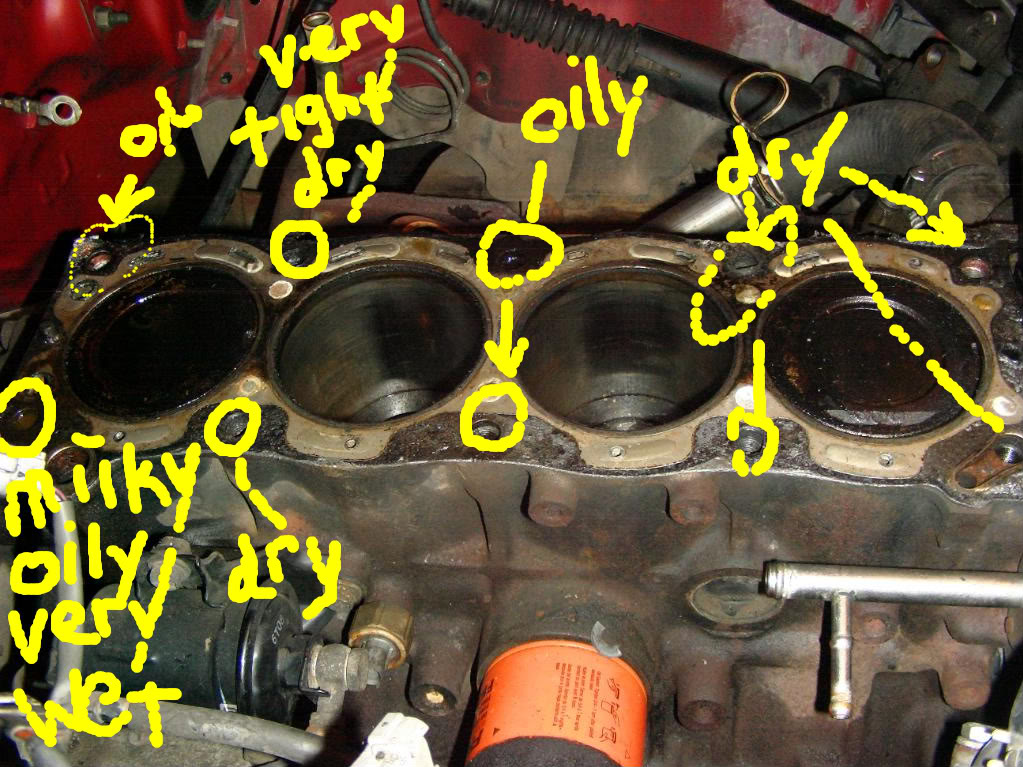
i'm not so good at labeling pics, but this is what i had done to show what bolts were in what condition.
May 26, 2010 | 06:50 AM
#26
Thread Starter
YotaTech Milestone-Two Millionth Post
Joined: Jan 2009
Posts: 12,009
Likes: 122
From: Northeast Pennsylvania
Crankshaft bolt removal
here's the tool you are supposed to use on an AUTOMATIC transmission
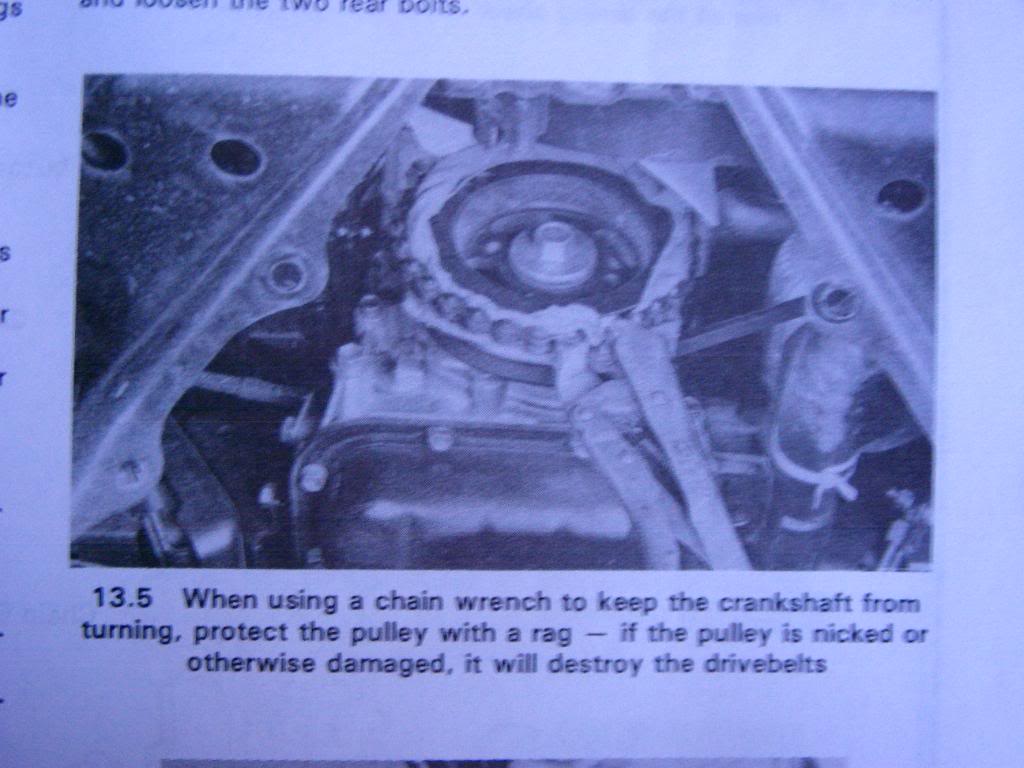
good luck finding that...
so i came up with my own way of doing this job....
NOPE this isn't right!!!!
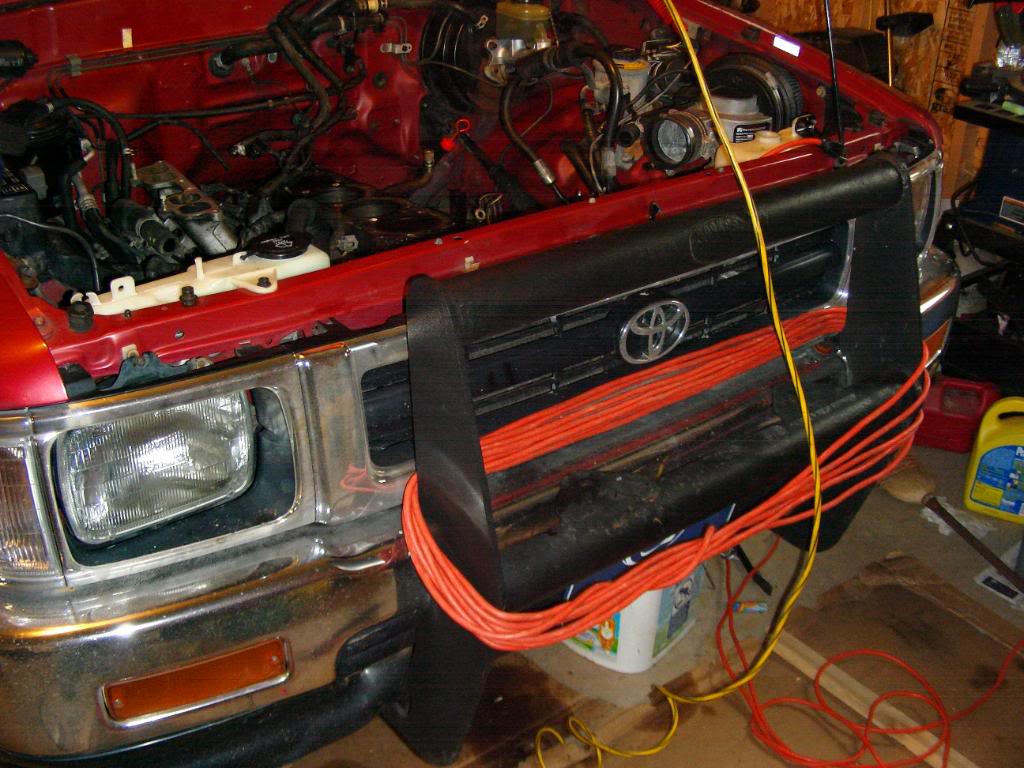
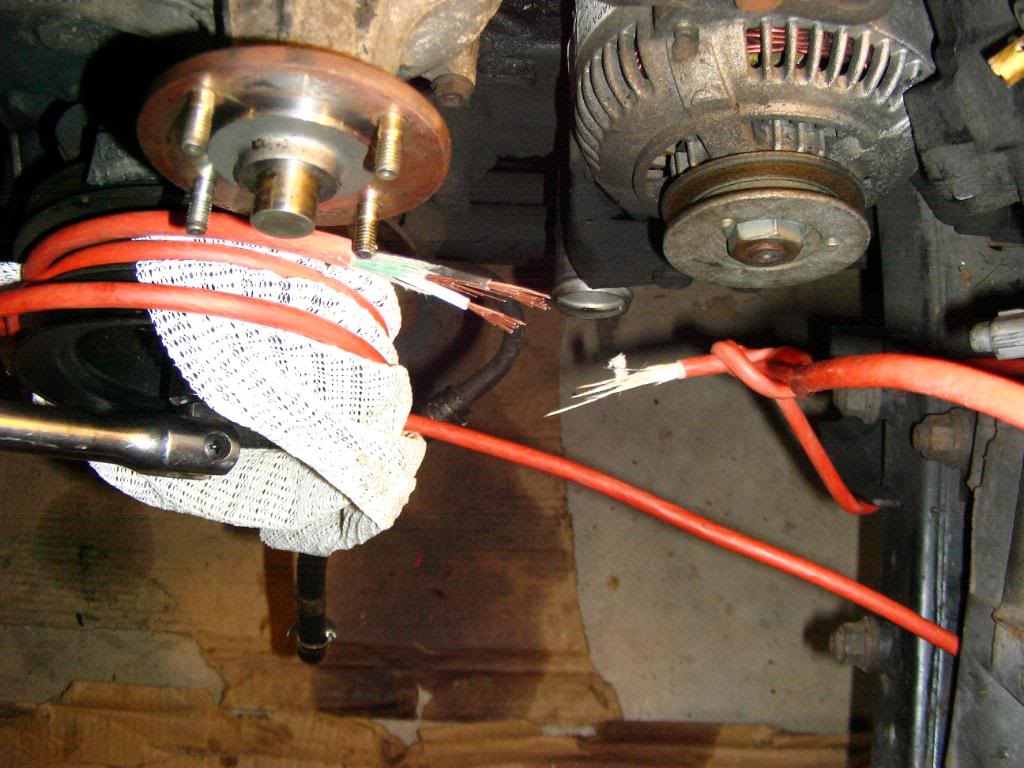
so i dug into my bag of gear from when i was in the fire department / rescue / medic unit days and we used to go rappelling and stuff like that...
about a 20 foot piece of webbing
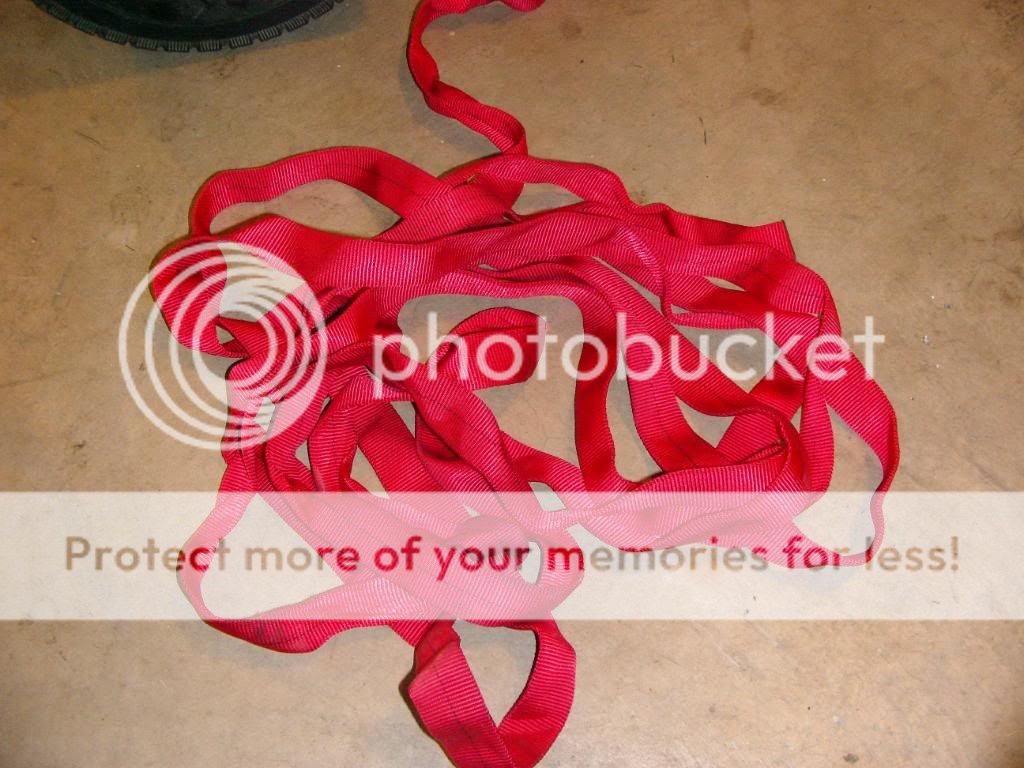
wrapped around a pad intended to put under a carpet to keep it from sliding (see what i'm getting at?)
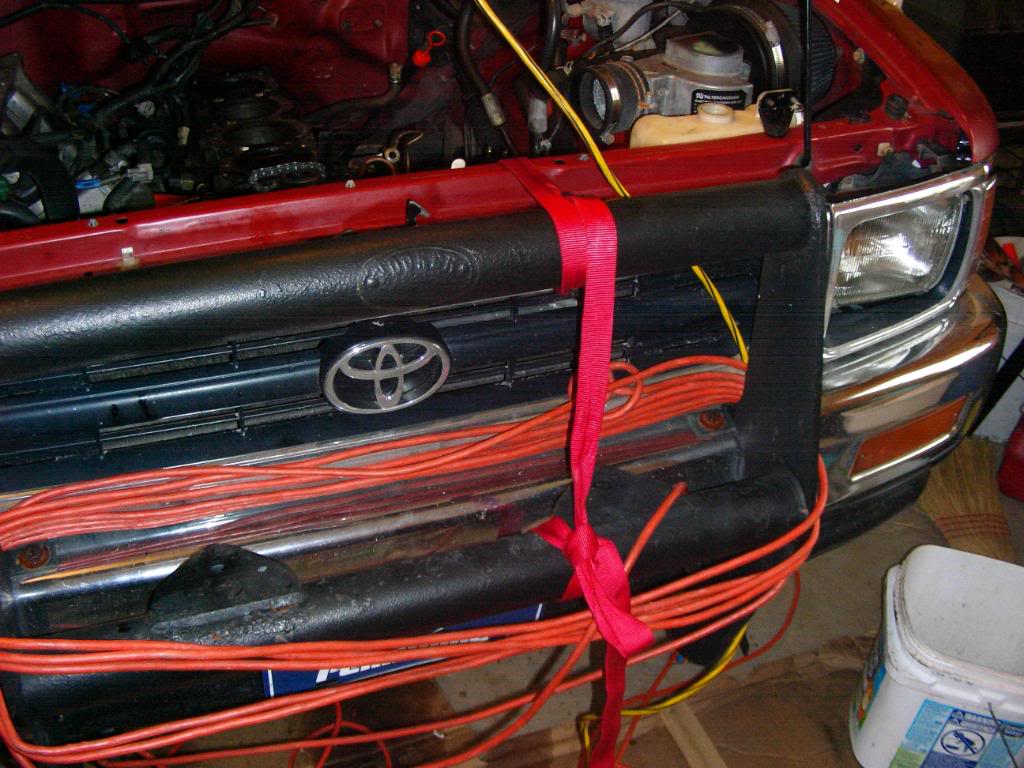
tied off to the driver's side frame
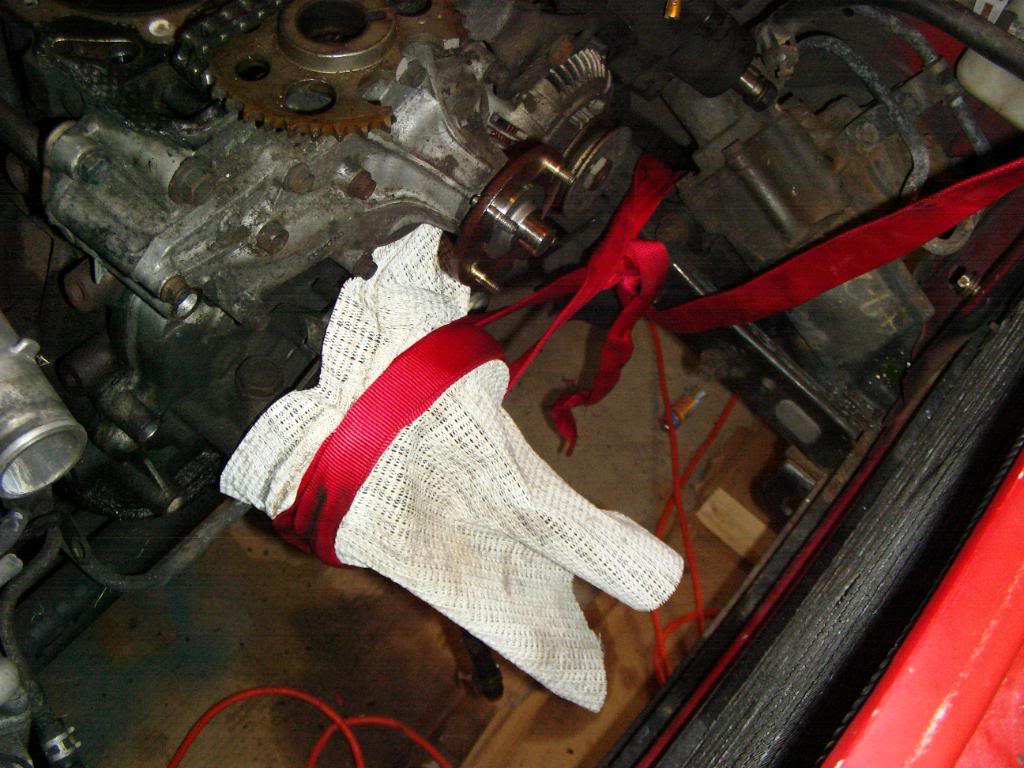
and looped around a few times and anchored elsewhere...in my case, my push bar
and then using a 6-point socket and a breaker bar.....you get this...
whoops!

this S.O.B. is on there better than i thought......so that's when i bought a real breaker bar (1/2'' drive) and a 3 foot piece of black pipe and a 6-point, impact socket from SEARS.
all this for this little bolt
and now with the pulley securely held still, the right tools and some assistance from my son to hold the hood up because i was sure i was going to be knocked unconscious by knocking the hood prop out and smashing my head.....with a little effort and alot of leverage, "click" it was done...
Is this the best way to do it.....probably not....but it did the trick for me and same trick in reverse to get the bolt tight again for reassembly. i read several times about the "tap the starter" trick but was nervous to try that....i like to figure stuff out myself too....so i was quite proud i came up with this way of doing it.
good luck finding that...
so i came up with my own way of doing this job....
NOPE this isn't right!!!!
so i dug into my bag of gear from when i was in the fire department / rescue / medic unit days and we used to go rappelling and stuff like that...
about a 20 foot piece of webbing
wrapped around a pad intended to put under a carpet to keep it from sliding (see what i'm getting at?)
tied off to the driver's side frame
and looped around a few times and anchored elsewhere...in my case, my push bar
and then using a 6-point socket and a breaker bar.....you get this...
whoops!
this S.O.B. is on there better than i thought......so that's when i bought a real breaker bar (1/2'' drive) and a 3 foot piece of black pipe and a 6-point, impact socket from SEARS.
all this for this little bolt
and now with the pulley securely held still, the right tools and some assistance from my son to hold the hood up because i was sure i was going to be knocked unconscious by knocking the hood prop out and smashing my head.....with a little effort and alot of leverage, "click" it was done...
Is this the best way to do it.....probably not....but it did the trick for me and same trick in reverse to get the bolt tight again for reassembly. i read several times about the "tap the starter" trick but was nervous to try that....i like to figure stuff out myself too....so i was quite proud i came up with this way of doing it.
May 26, 2010 | 07:14 AM
#27
Thread Starter
YotaTech Milestone-Two Millionth Post
Joined: Jan 2009
Posts: 12,009
Likes: 122
From: Northeast Pennsylvania
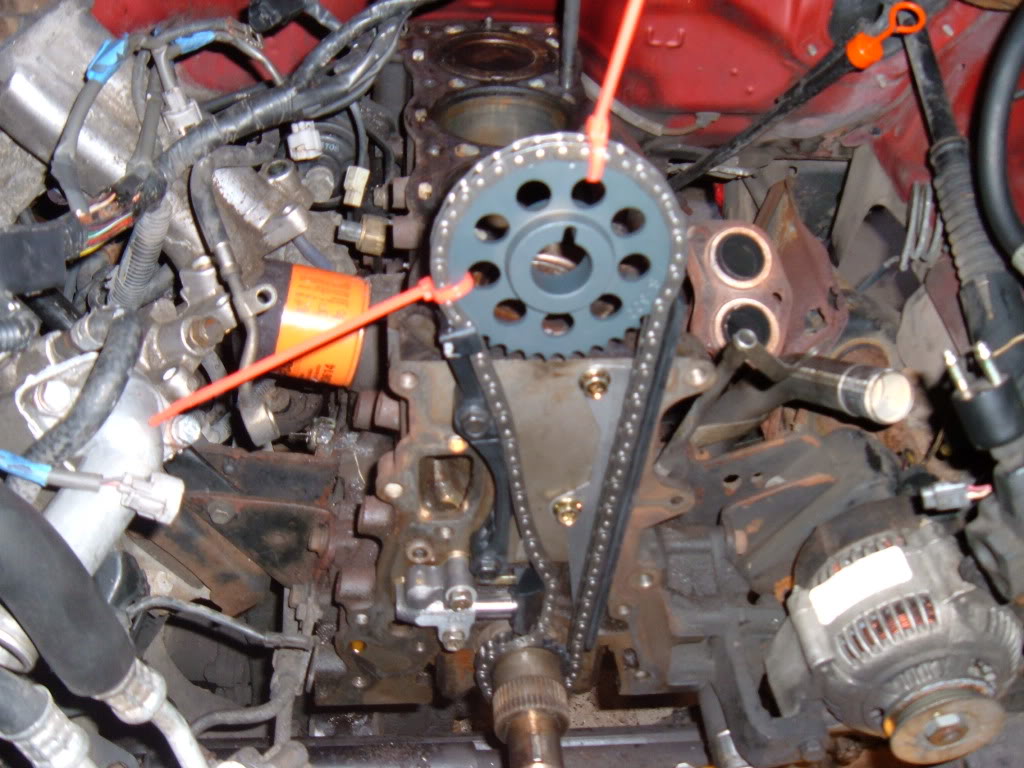
TIMING COVER removal
with the major accomplishment of removing the crankshaft bolt behind me and feeling quite full of myself, it was now time to concentrate on the timing cover.
SEARCHING this forum yielded alot of info / pictures / hints etc.....
but 2 of the best write-ups i saw were unfortunately elsewhere.....
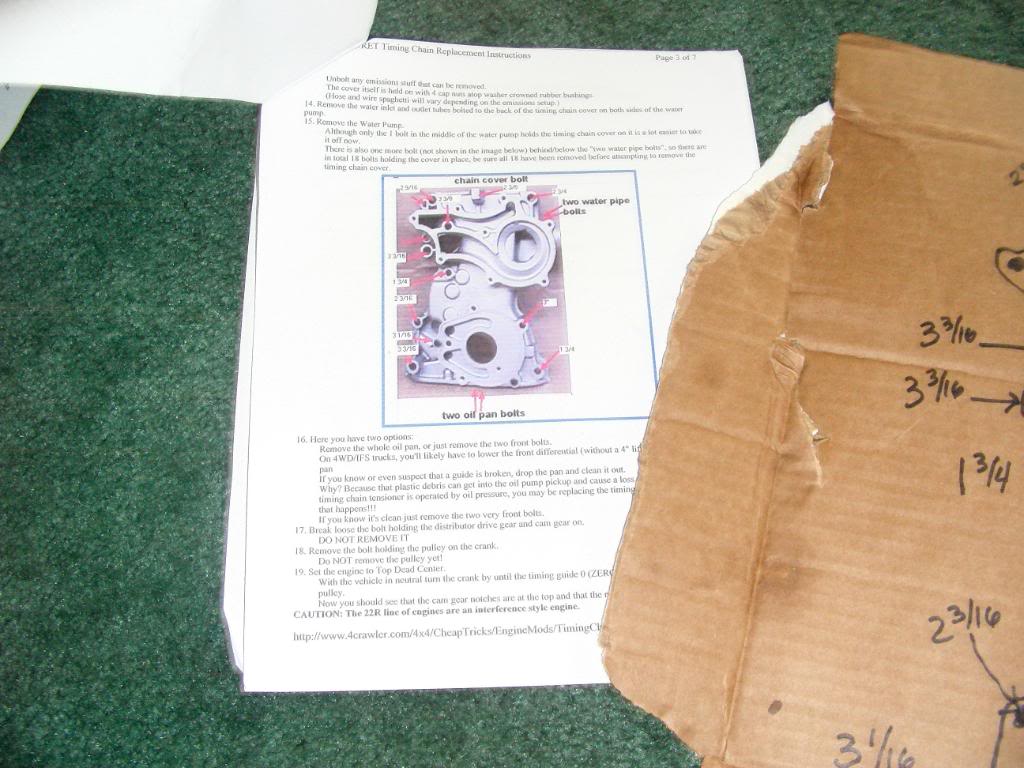
Roger...AKA 4Crawler has his own site which is a cornucopia of hint and tips and all good stuff like that....i'm pretty sure my link doesn't work anymore for is site but i will post it anyway....his write-up on timing chain replacement became another one of the instructions i followed...again, between asking questions here and reading the FSM and the other manuals and searching, i had all the info i needed.
http://www.4crawler.com/4x4/CheapTri...mingChain.shtm
the other write-up, i believe was from 4x4wire...it mirrored Roger's, so really i used Roger's.
so i sat down with my copy of his write-up....one of the most important parts was him reminding how most, if not all the Timing cover bolts were different lengths and sizes and to not mess that part up when putting them back in.....so nervous as hell about screwing that part up...i did some drawing...on another pizza box....hehehehehe
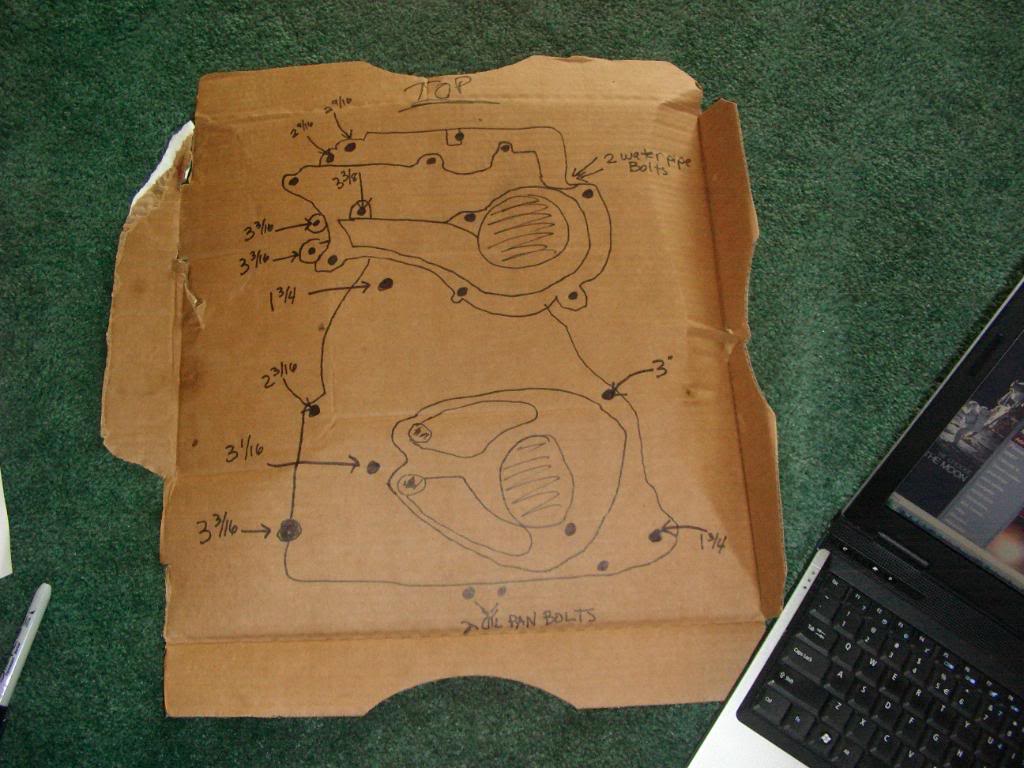
and when i had all the bolts out it looked like this.....yes they are taped in place....notice some holes weren't used, that made me nervous, but it was because they were bagged and labeled and stored already from prior disassembly.
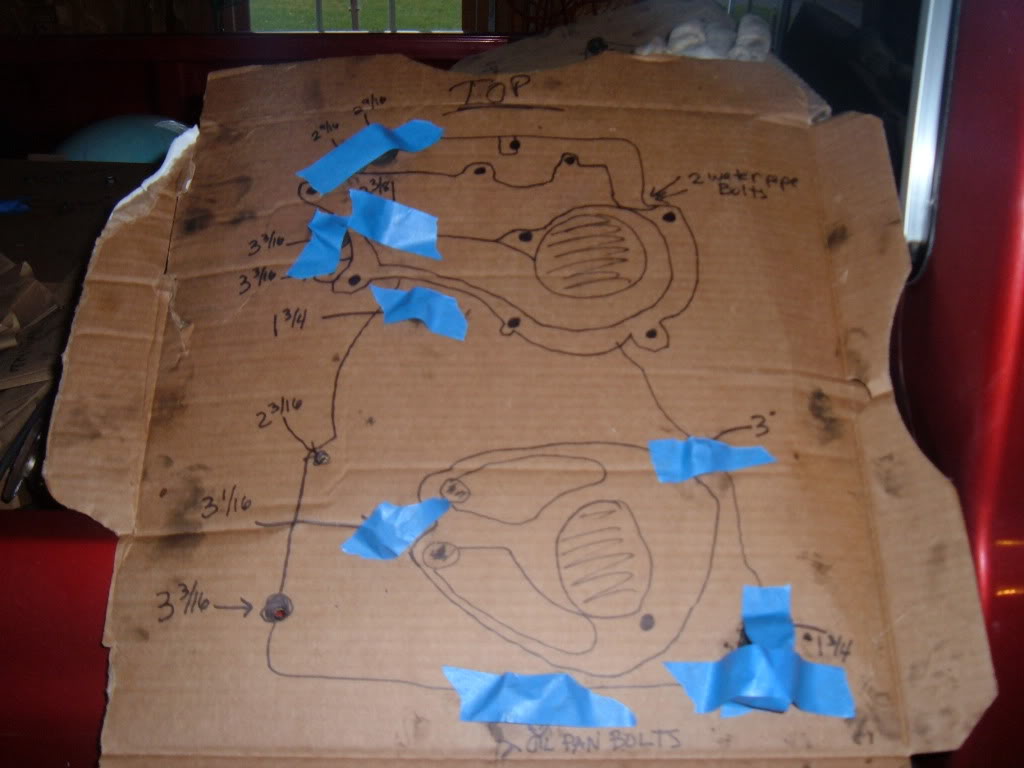
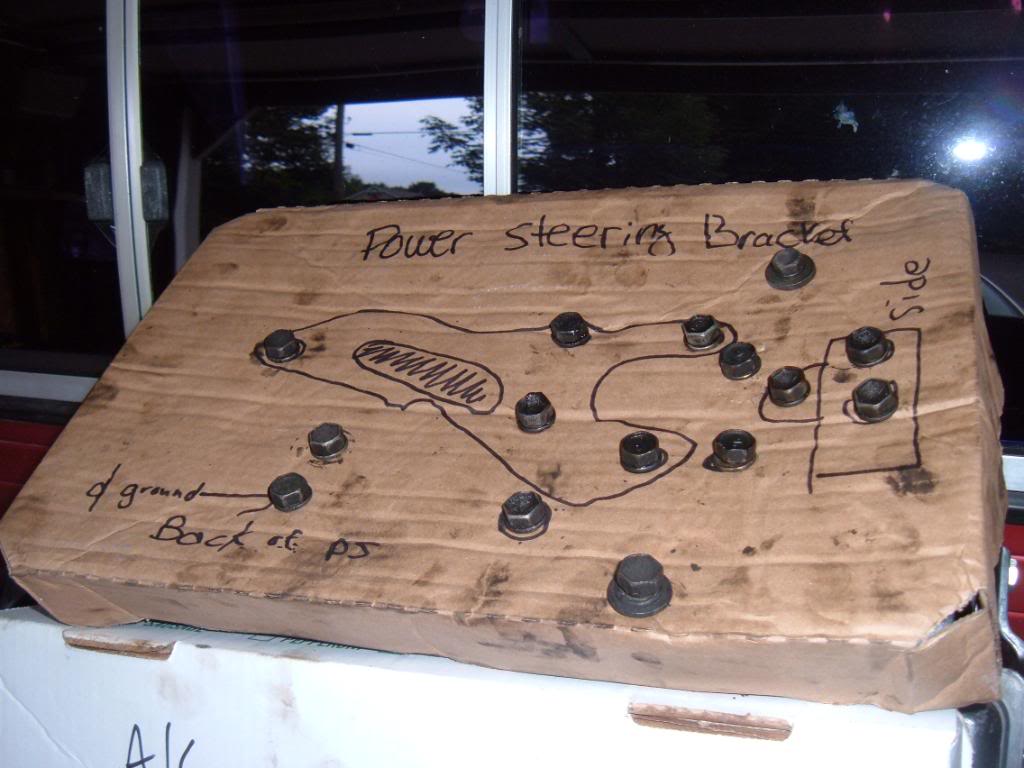
kinda had already done similar for the power steering pump etc.....do a better job than this if you are doing this.....this template hepled out alot, but wasn't quite as labeled as it should have been
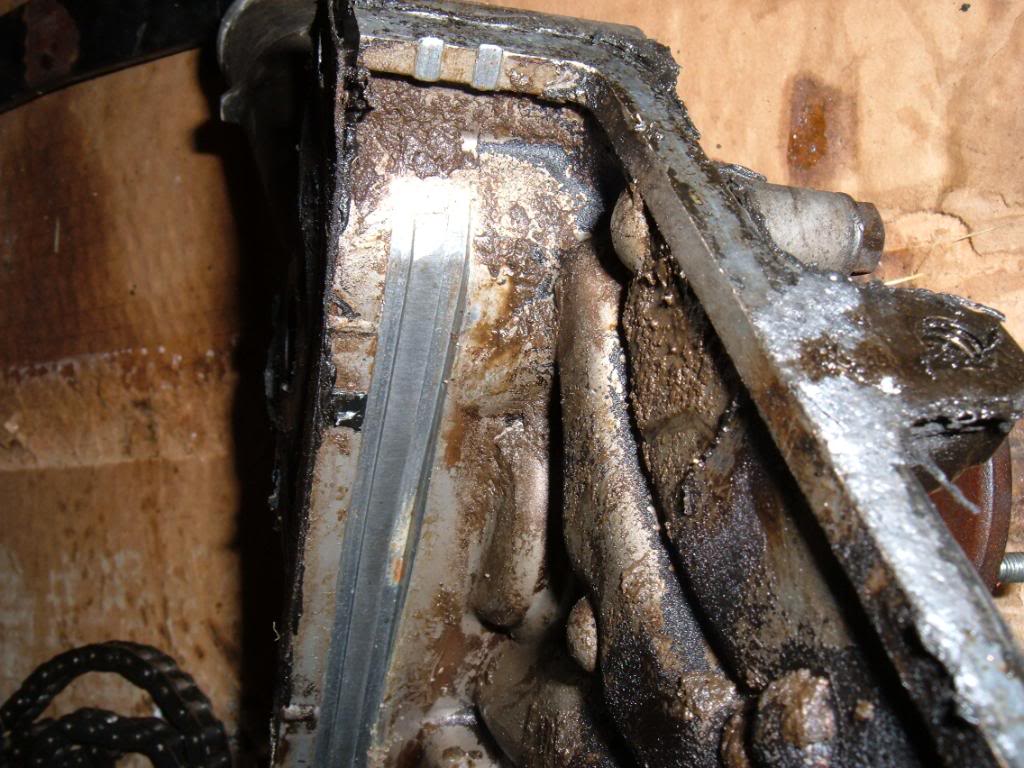
so then...i was able to get the cover off....PUKE!
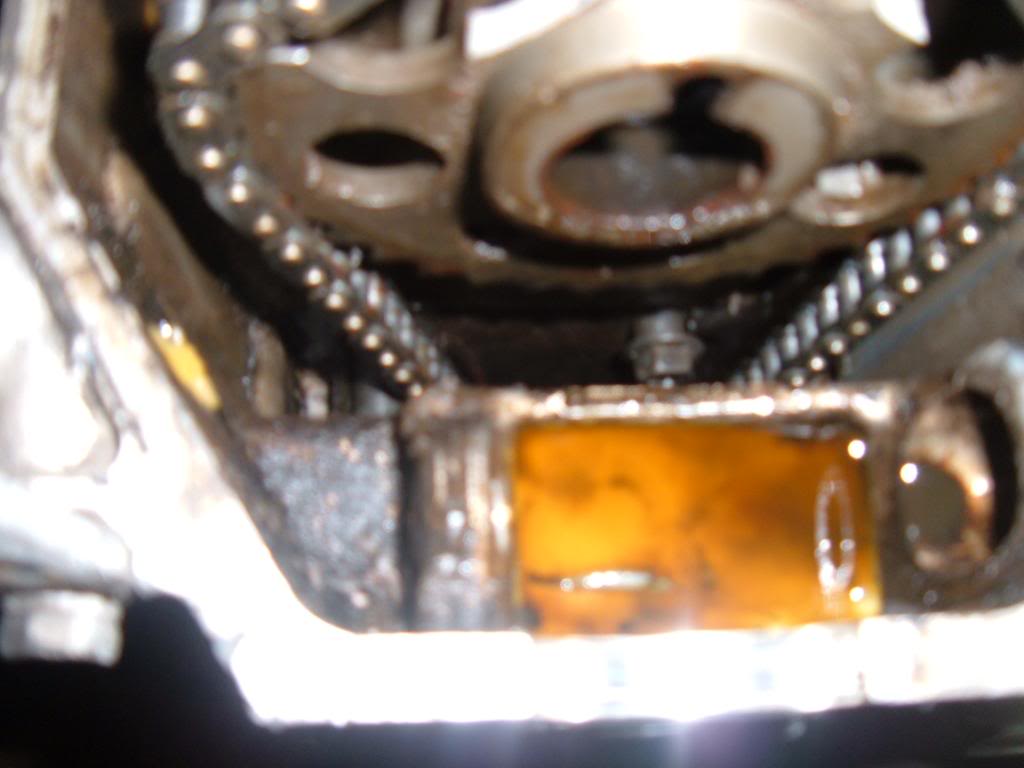
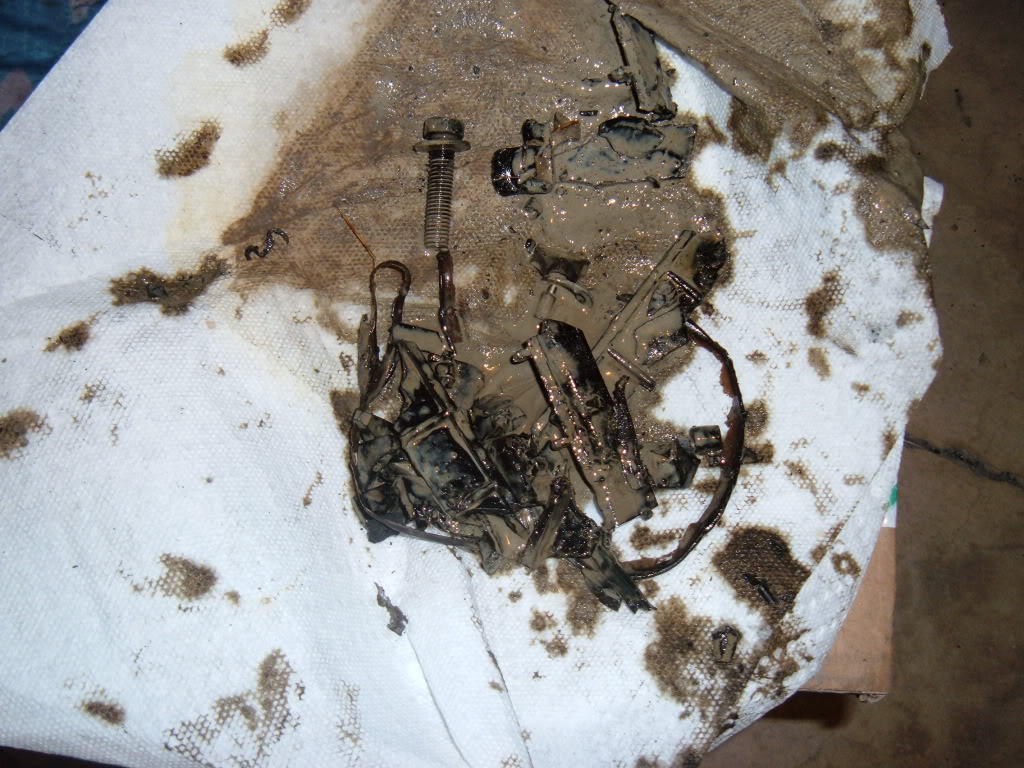
was the 1st look at exactly what damage the chain / broken guide had done....
tensioner really grooved
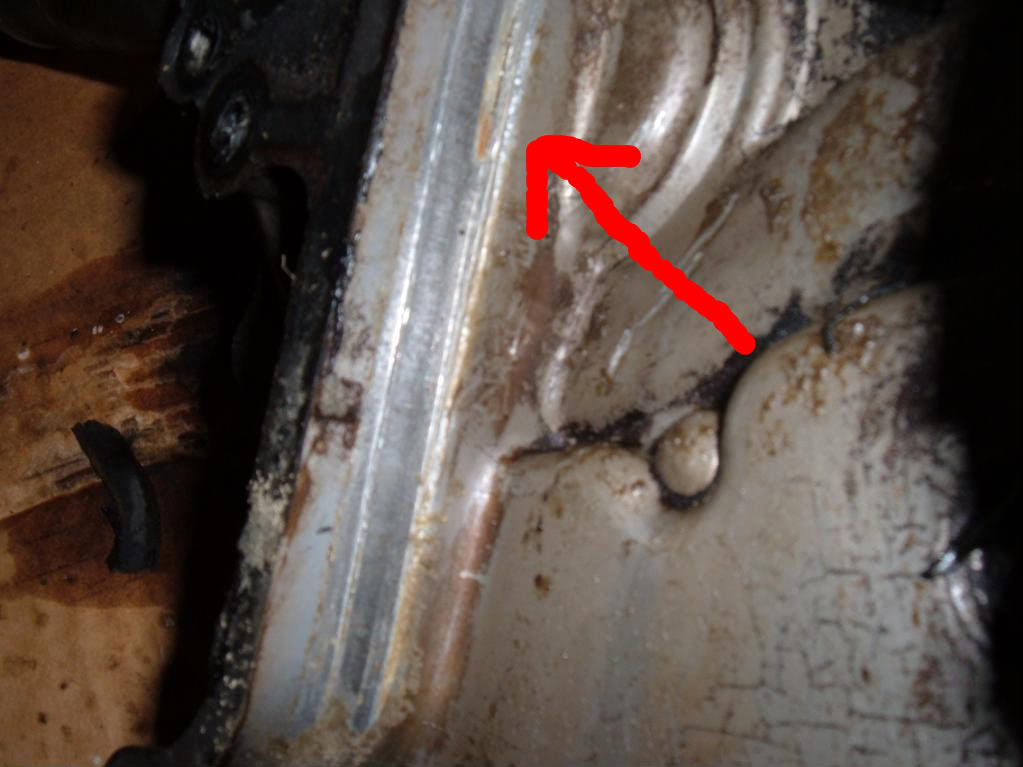
likewise, seeing the cover from the inside, revealed much more damage than i thought
the area where it eroded into the water pump causing the failure
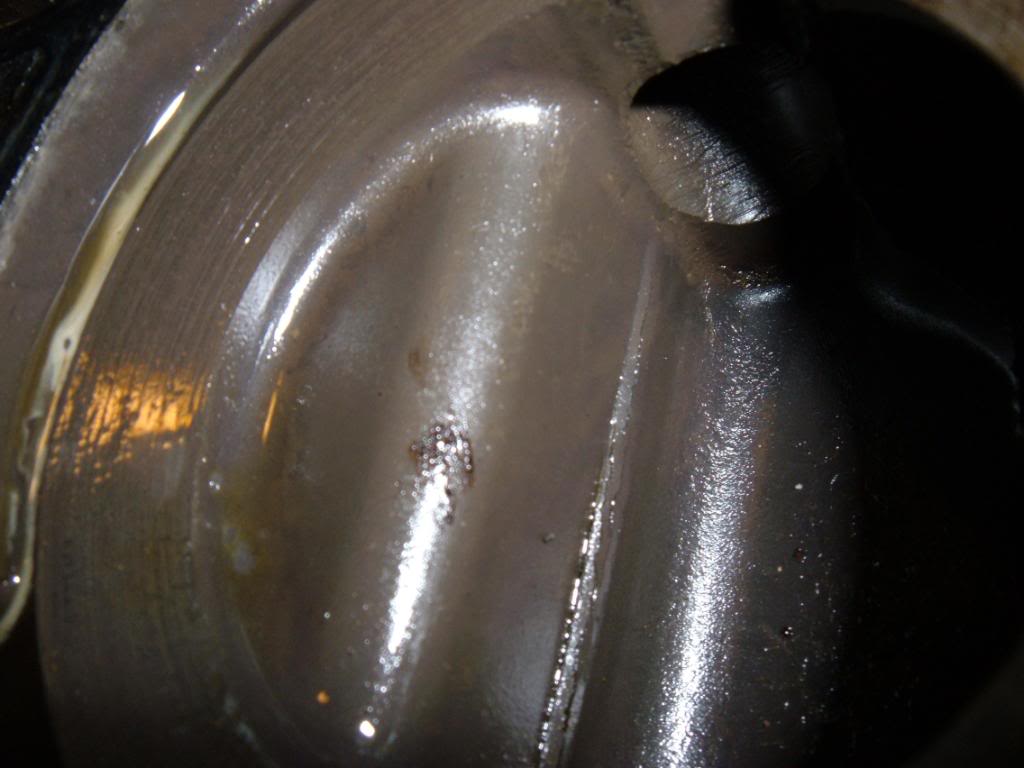
and with the actual water pump off the cover it was easy to see the breech
SEARCHING this forum yielded alot of info / pictures / hints etc.....
but 2 of the best write-ups i saw were unfortunately elsewhere.....
Roger...AKA 4Crawler has his own site which is a cornucopia of hint and tips and all good stuff like that....i'm pretty sure my link doesn't work anymore for is site but i will post it anyway....his write-up on timing chain replacement became another one of the instructions i followed...again, between asking questions here and reading the FSM and the other manuals and searching, i had all the info i needed.
http://www.4crawler.com/4x4/CheapTri...mingChain.shtm
the other write-up, i believe was from 4x4wire...it mirrored Roger's, so really i used Roger's.
so i sat down with my copy of his write-up....one of the most important parts was him reminding how most, if not all the Timing cover bolts were different lengths and sizes and to not mess that part up when putting them back in.....so nervous as hell about screwing that part up...i did some drawing...on another pizza box....hehehehehe
and when i had all the bolts out it looked like this.....yes they are taped in place....notice some holes weren't used, that made me nervous, but it was because they were bagged and labeled and stored already from prior disassembly.
kinda had already done similar for the power steering pump etc.....do a better job than this if you are doing this.....this template hepled out alot, but wasn't quite as labeled as it should have been
so then...i was able to get the cover off....PUKE!
was the 1st look at exactly what damage the chain / broken guide had done....
tensioner really grooved
likewise, seeing the cover from the inside, revealed much more damage than i thought
the area where it eroded into the water pump causing the failure
and with the actual water pump off the cover it was easy to see the breech
May 26, 2010 | 07:54 AM
#29
Thread Starter
YotaTech Milestone-Two Millionth Post
Joined: Jan 2009
Posts: 12,009
Likes: 122
From: Northeast Pennsylvania
Oil pan removal
I'm pretty sure i probably did alot of other stuff i this time period, but this was the next needed step....
i had read a few write-ups on this part but most were either incomplete as far as a pictures go, or you had to have some massive knowledge base / special tools to get them done.
so with that being the case, i came up with my own way...even the FSM is mostly worthless for this part.
i'm proud to say, i came up with my own way, and i believe it to be easier, if not safer.
so here's what you need 1st...
and these
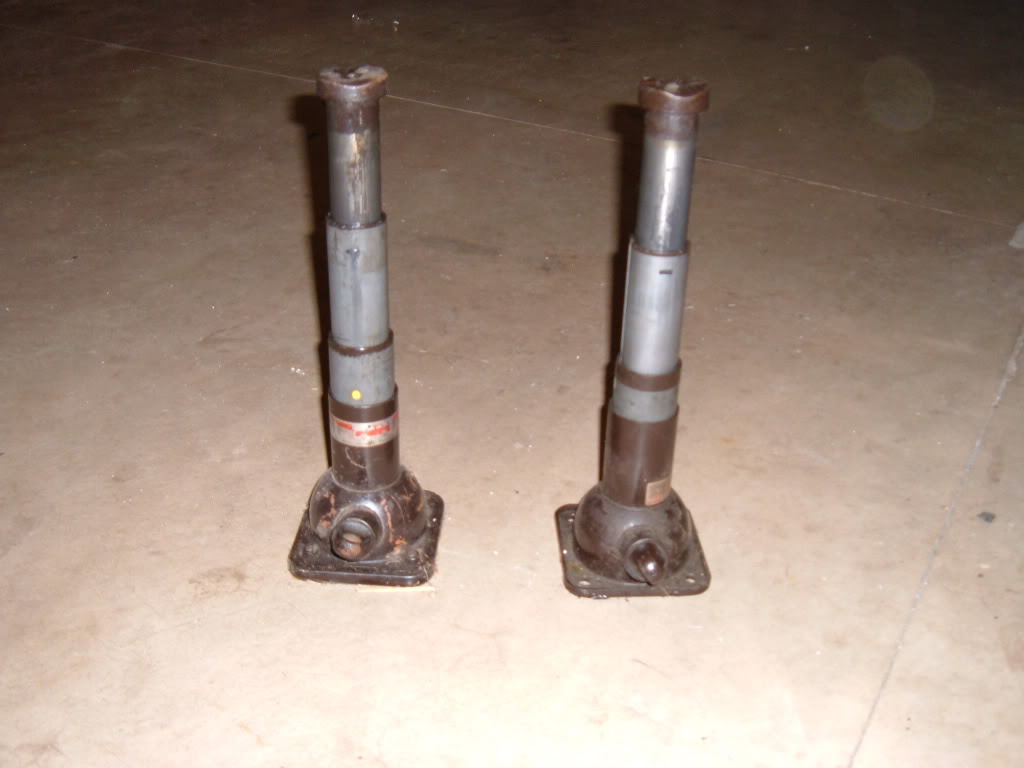
and a floor jack
unhook the seering damper (and leave it off until you have the pan back on as i found out)
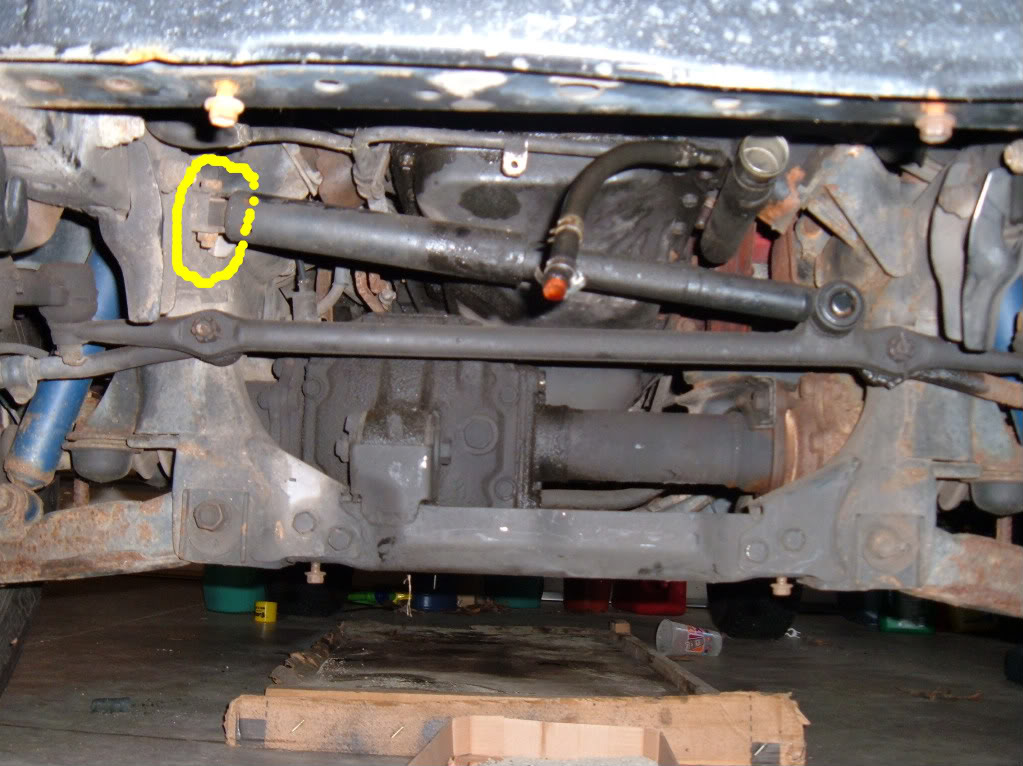
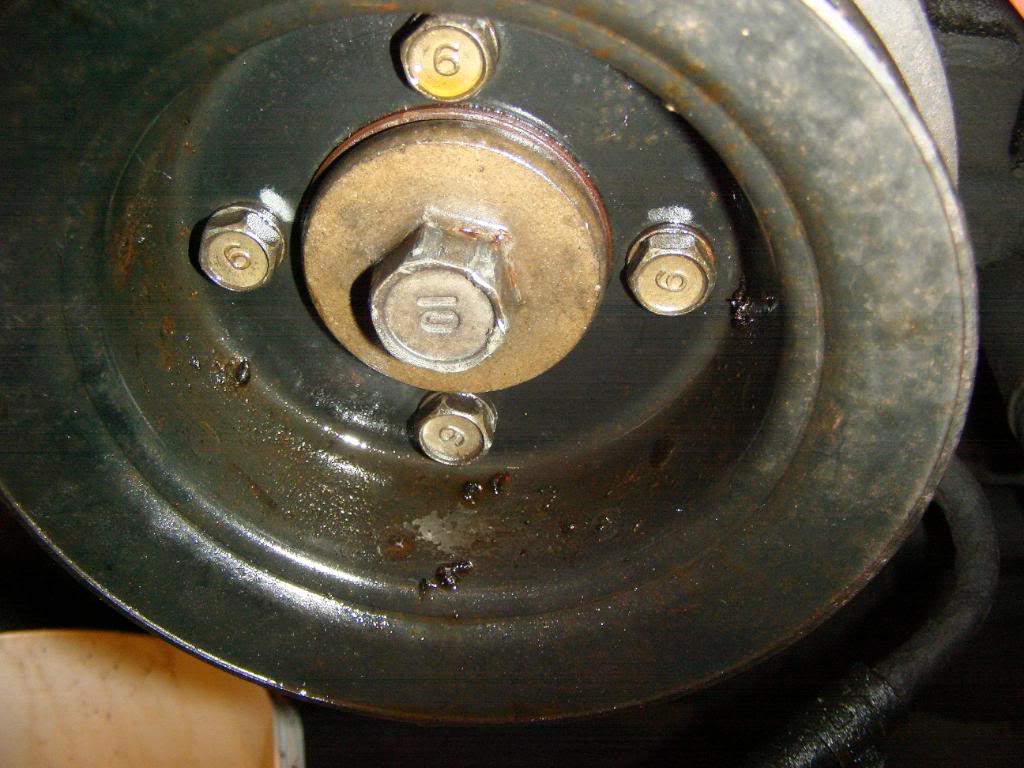
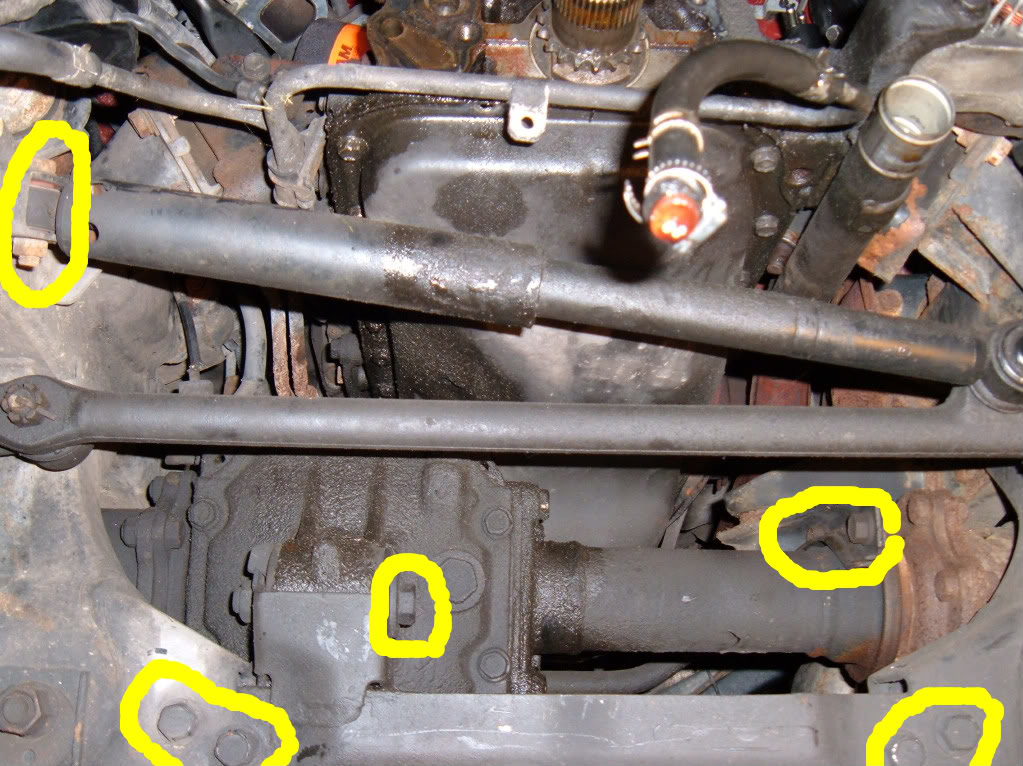
unbolt all of these....with the exception of the top right circled one...you don't need to, and i did not loosen these.
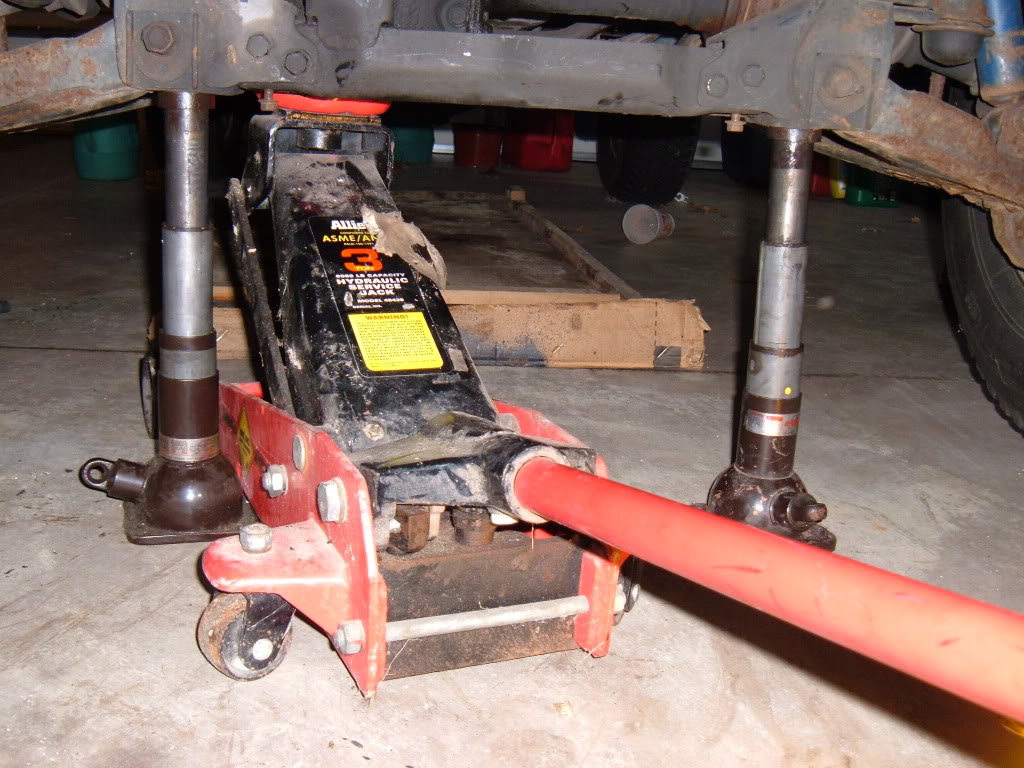
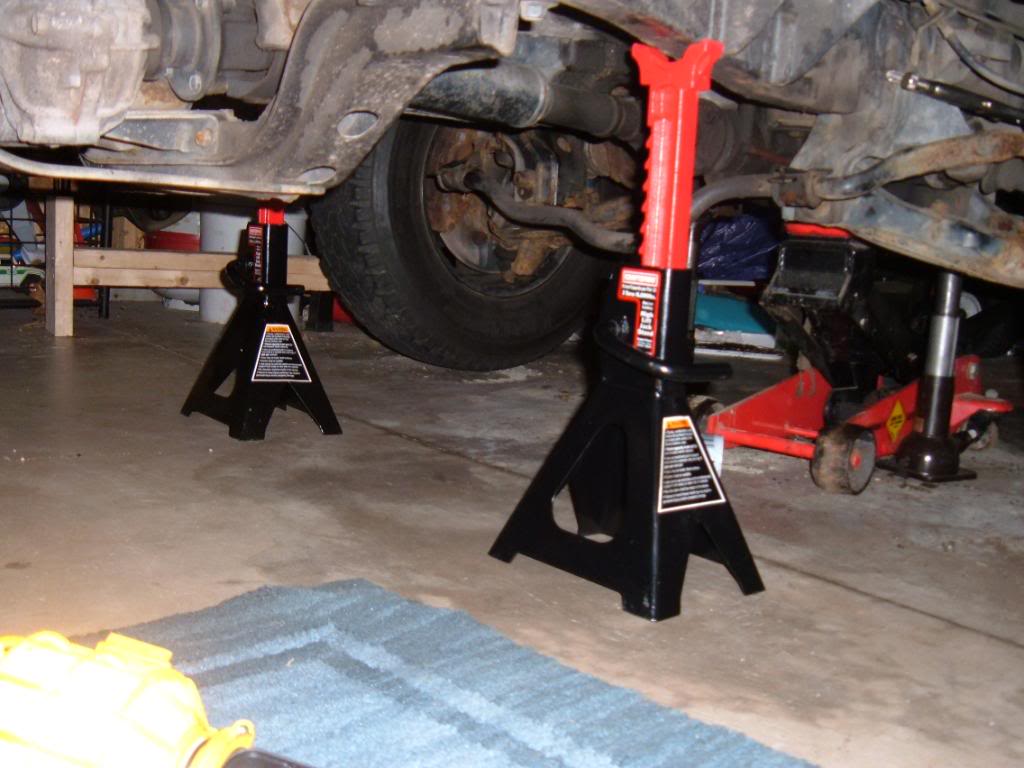
support the diff before loosening anything (as seen in the pic with the floor jack).
support the truck up in the air
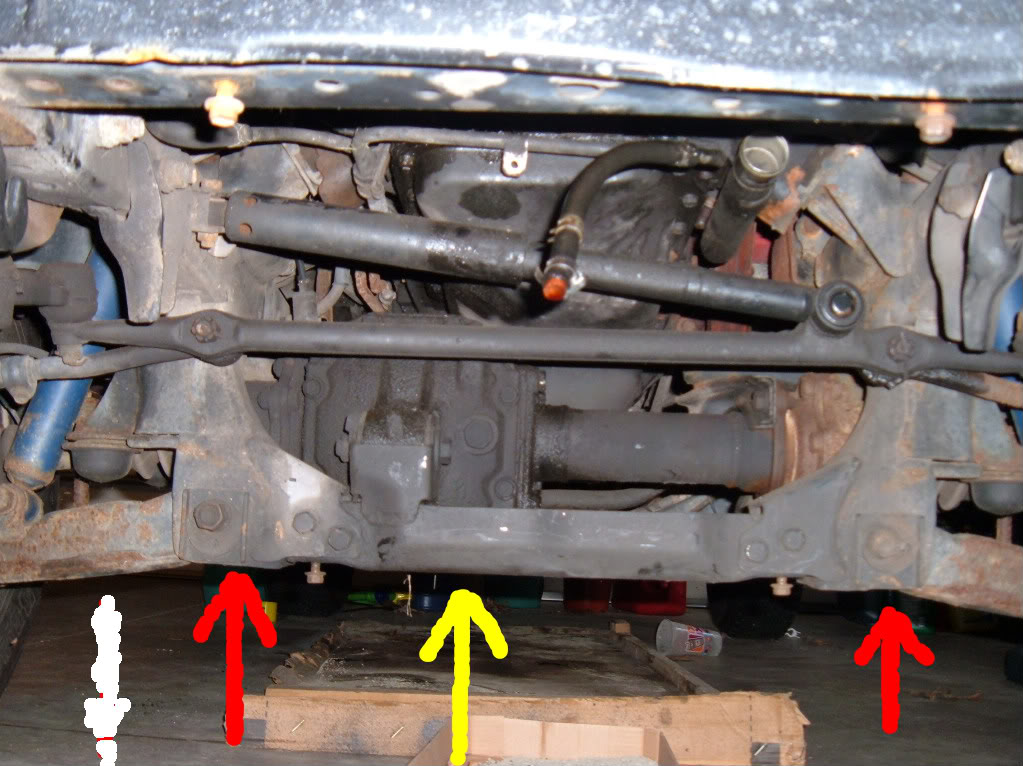
bottle jacks go where the red arrows are
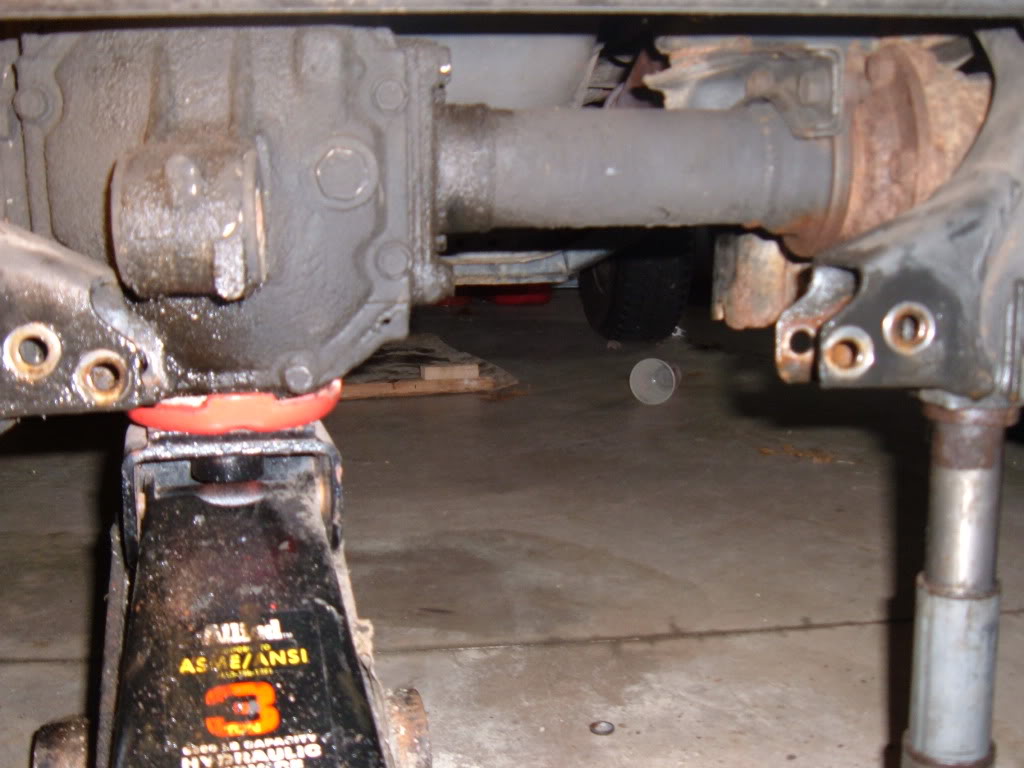
the 4 bolts come out of the crossmember pretty OK.... the one long bolt that goes through the diff comes out kinda easily as well.....the crossmember had to be "convinced" with a small sledge to come off.
and then...wishing i had another jack, i borrowed one from under one of the lower control arms to support the diff where the driveshaft attached...

"matchmarks" were made as per the FSM, or rather different colored model paints were used....not sure why that is so important, but i was following that part of the FSM instructions.
after some struggling and using my legs to turn the wrench because i could not fit a socket here, i was able to remove the front driveshaft from the diff.
***by the way....i attempted to remove my swaybar to do this part....didn't work out and snapped all 4 bolts and as of yesterday failed to remove the remnants of the bolts, so i used a sawzall to cut the bar off at the lower control arms****...is that a bad thing??? i will find out.....
NOT MY TRUCK...but a borrowed pic to show the driver's side mount for the diff....

and another borrowed pic to show the passenger's side

these 2 mounts need to be unbolted now...get ready because the DIFF is eternally unstable and will want to take a nosedive....your best bet is a little help working both jacks at the same time to lower it straight down...
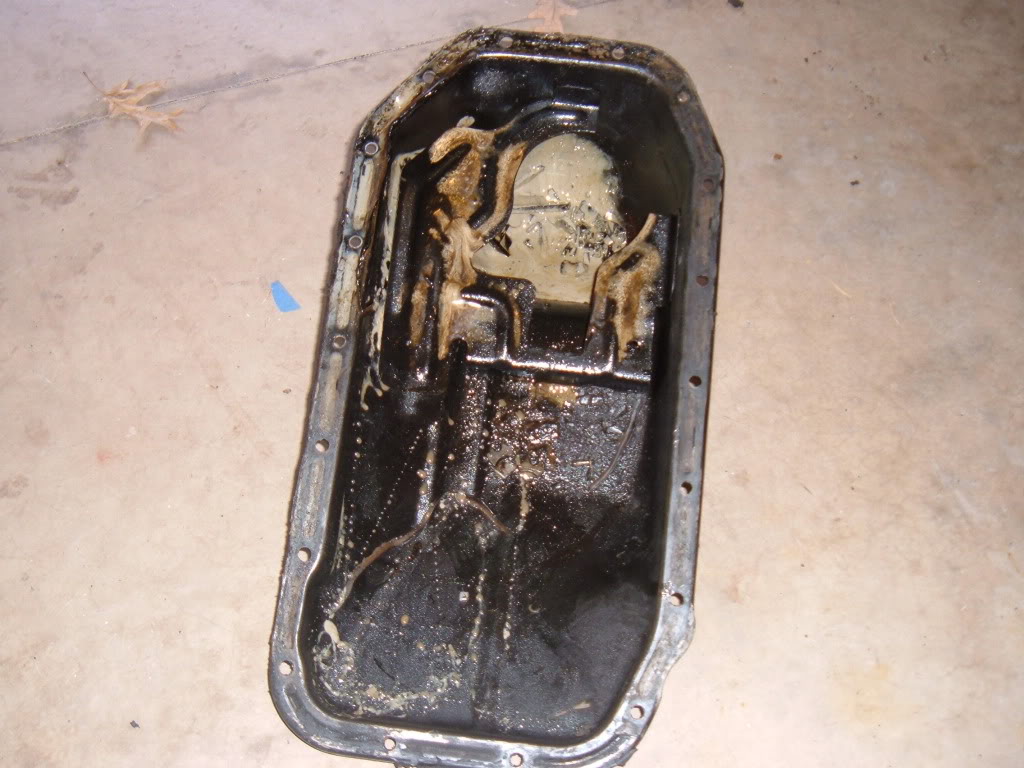
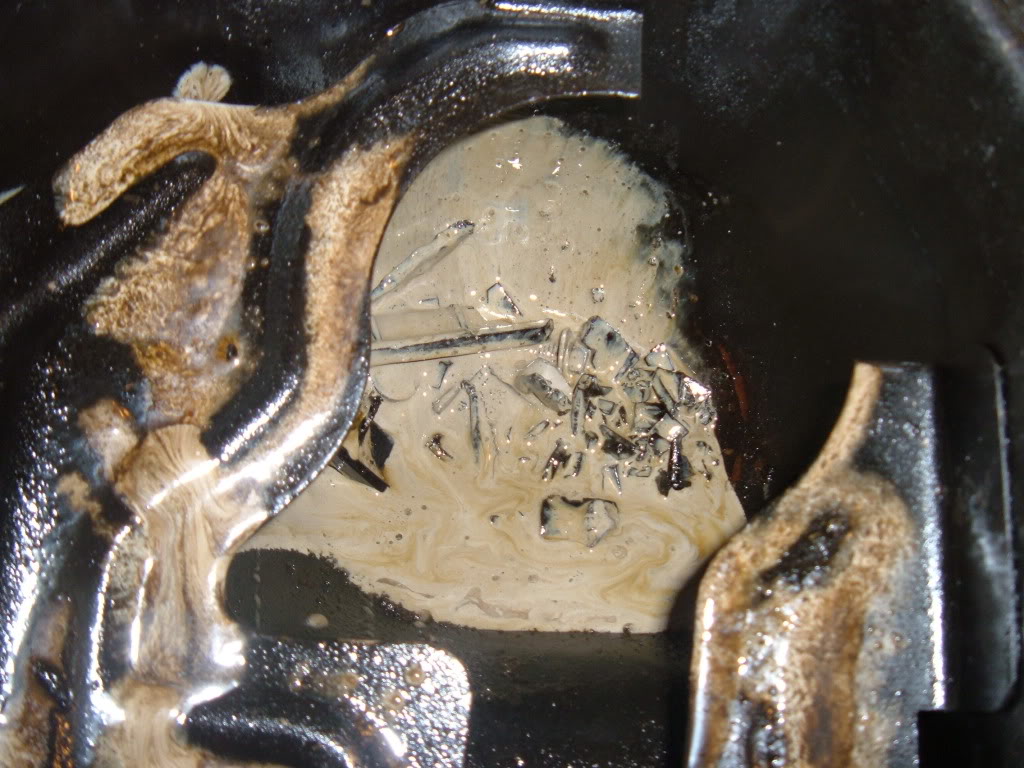
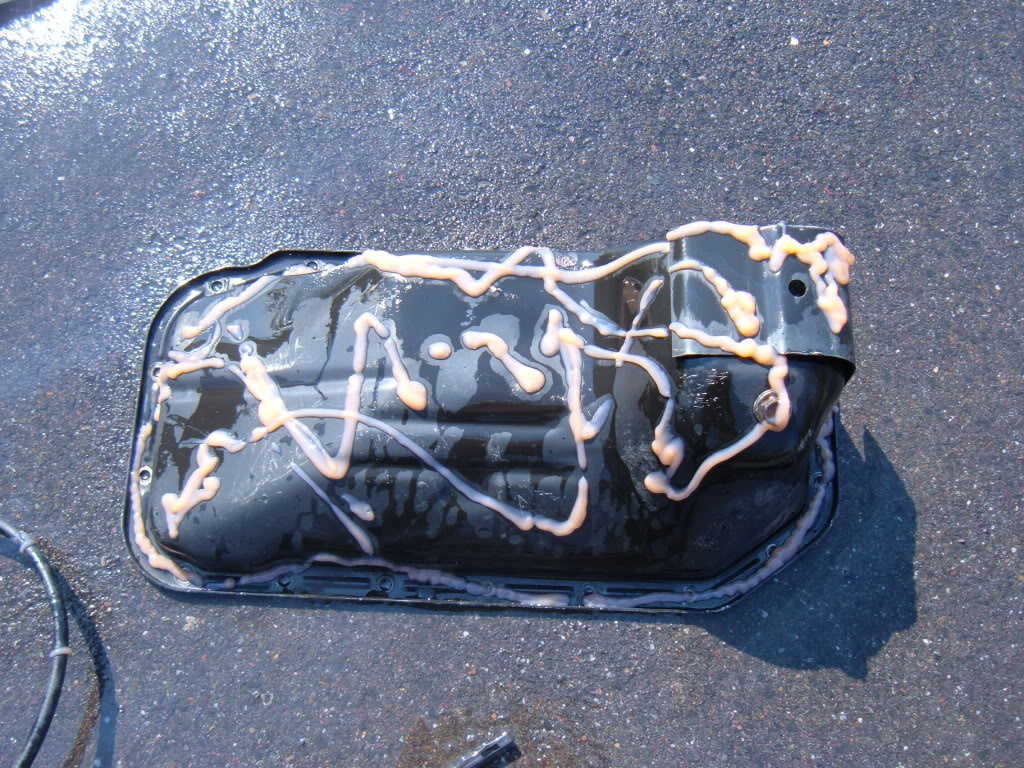
prior to doing any of this i had already removed all the bolts / nuts from the pan and the pan was just laying there, trapped.......once i lowered the diff, it was able to fall out.
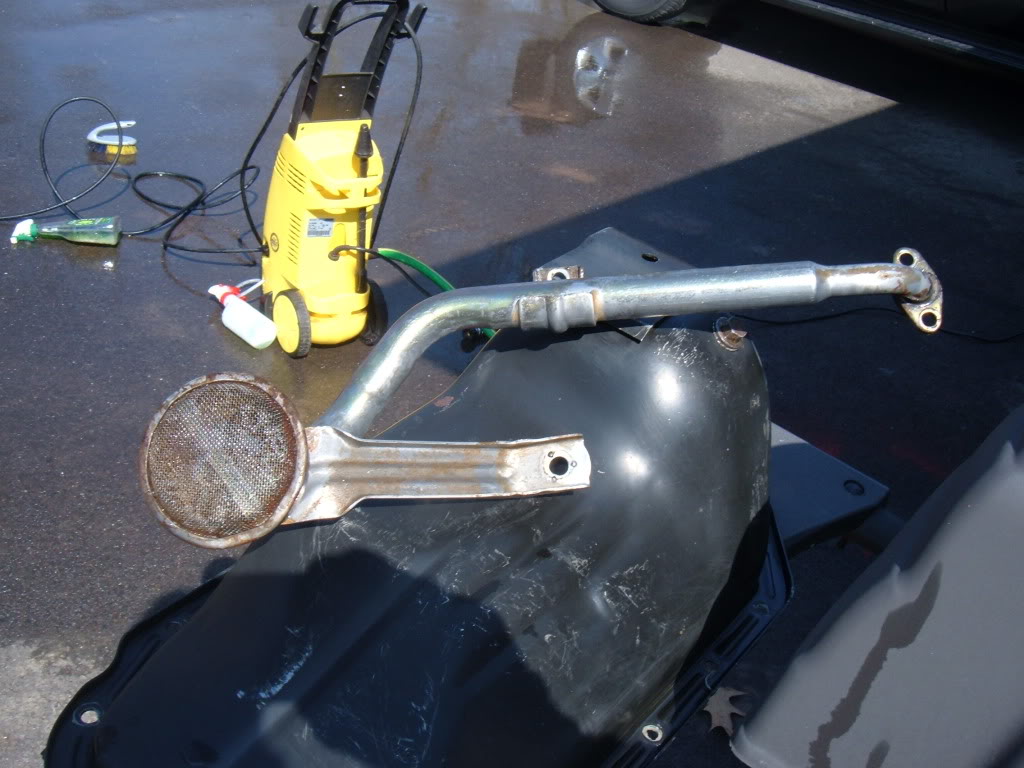
a part that i also did was removed the oil pickup tube and let it fall into the pan......not the easiest thing, but by far, not the hardest either....getting it back on is no treat either.
i had read a few write-ups on this part but most were either incomplete as far as a pictures go, or you had to have some massive knowledge base / special tools to get them done.
so with that being the case, i came up with my own way...even the FSM is mostly worthless for this part.
i'm proud to say, i came up with my own way, and i believe it to be easier, if not safer.
so here's what you need 1st...
and these
and a floor jack
unhook the seering damper (and leave it off until you have the pan back on as i found out)
unbolt all of these....with the exception of the top right circled one...you don't need to, and i did not loosen these.
support the diff before loosening anything (as seen in the pic with the floor jack).
support the truck up in the air
bottle jacks go where the red arrows are
the 4 bolts come out of the crossmember pretty OK.... the one long bolt that goes through the diff comes out kinda easily as well.....the crossmember had to be "convinced" with a small sledge to come off.
and then...wishing i had another jack, i borrowed one from under one of the lower control arms to support the diff where the driveshaft attached...
"matchmarks" were made as per the FSM, or rather different colored model paints were used....not sure why that is so important, but i was following that part of the FSM instructions.
after some struggling and using my legs to turn the wrench because i could not fit a socket here, i was able to remove the front driveshaft from the diff.
***by the way....i attempted to remove my swaybar to do this part....didn't work out and snapped all 4 bolts and as of yesterday failed to remove the remnants of the bolts, so i used a sawzall to cut the bar off at the lower control arms****...is that a bad thing??? i will find out.....
NOT MY TRUCK...but a borrowed pic to show the driver's side mount for the diff....
and another borrowed pic to show the passenger's side
these 2 mounts need to be unbolted now...get ready because the DIFF is eternally unstable and will want to take a nosedive....your best bet is a little help working both jacks at the same time to lower it straight down...
prior to doing any of this i had already removed all the bolts / nuts from the pan and the pan was just laying there, trapped.......once i lowered the diff, it was able to fall out.
a part that i also did was removed the oil pickup tube and let it fall into the pan......not the easiest thing, but by far, not the hardest either....getting it back on is no treat either.
 May 26, 2010 | 08:00 AM
#31
Thread Starter
YotaTech Milestone-Two Millionth Post
Joined: Jan 2009
Posts: 12,009
Likes: 122
From: Northeast Pennsylvania
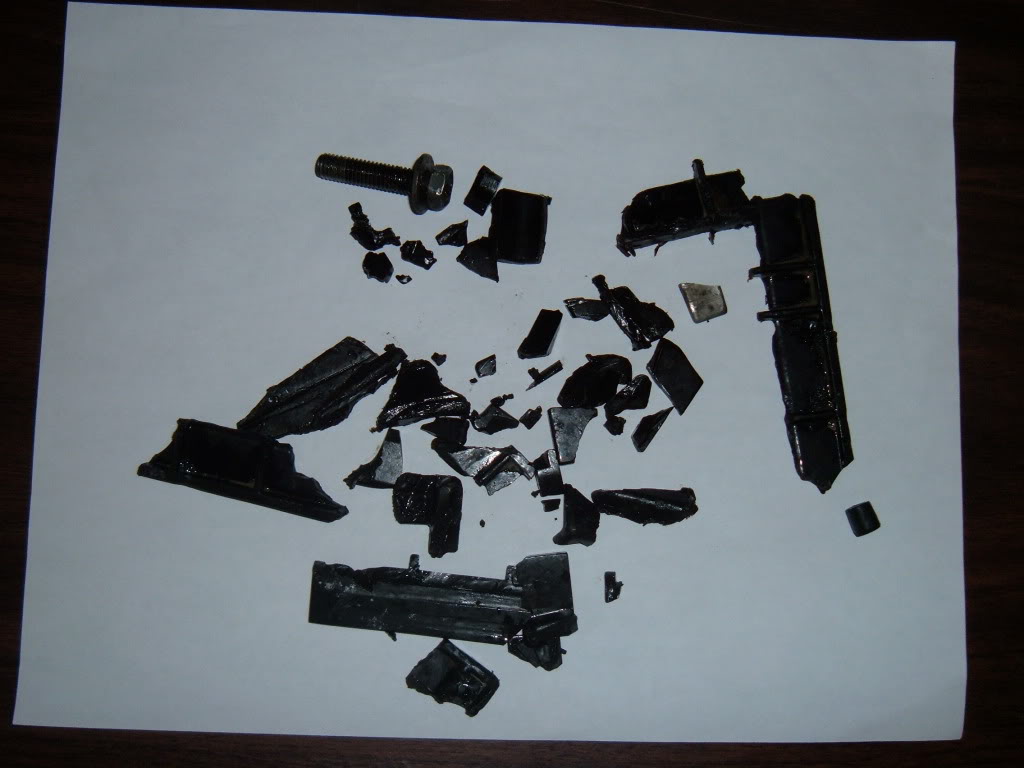
that bolt was actually from the pickup tube...i didn't realize that until it was time to put it back on and was missing a bolt.
luckily i cleaned all those scraps up and have them in a jar on my desk to serve as a reminder of why i did all this.
luckily i cleaned all those scraps up and have them in a jar on my desk to serve as a reminder of why i did all this.
May 26, 2010 | 08:04 AM
#32
Thread Starter
YotaTech Milestone-Two Millionth Post
Joined: Jan 2009
Posts: 12,009
Likes: 122
From: Northeast Pennsylvania
i'm not going to bore you with every pic i have of cleaning and painting...
but, for cleaning, i used ORANGE GOOP....some generic form of hand cleaner that i can't remember where i bought it.....simple green and the like did not cut it for cleaning, but this stuff did.....and unlike FAST ORANGE or GOJO, it has no pumice in it or ALOE...so it leaves no residue..
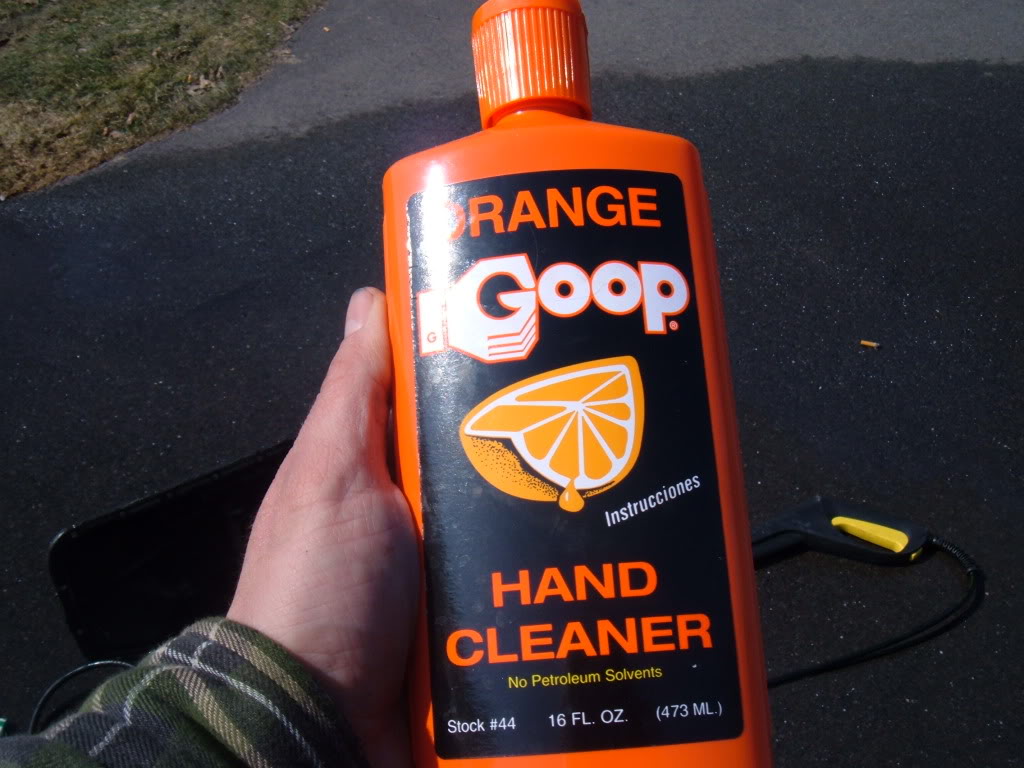
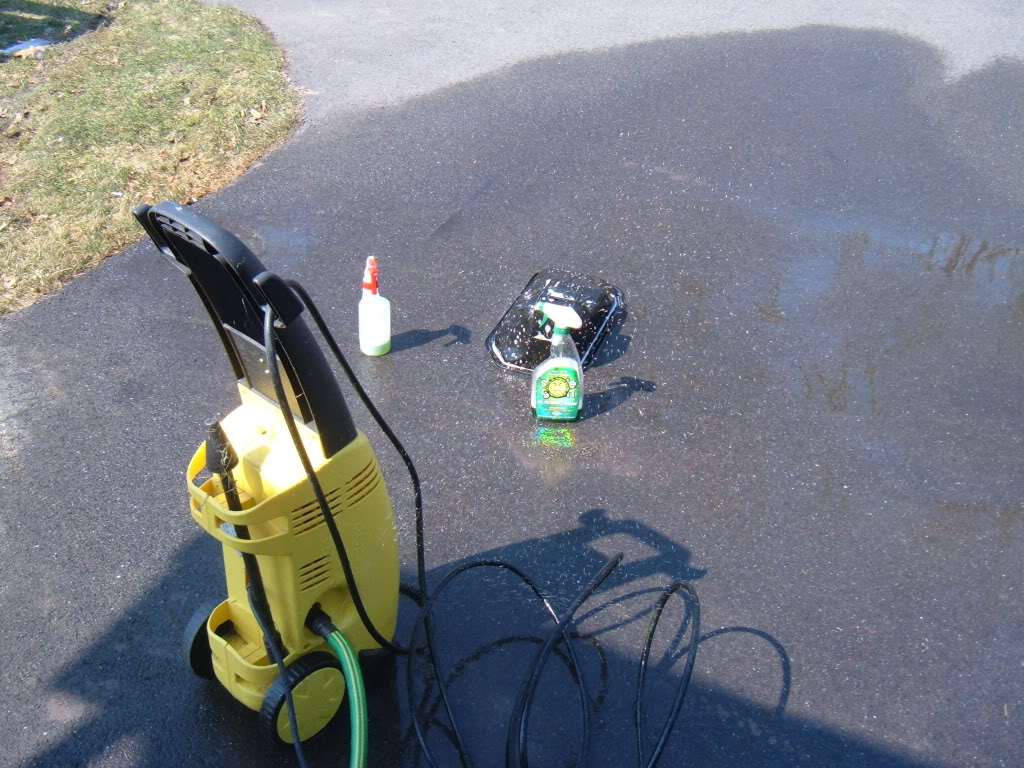
but, for cleaning, i used ORANGE GOOP....some generic form of hand cleaner that i can't remember where i bought it.....simple green and the like did not cut it for cleaning, but this stuff did.....and unlike FAST ORANGE or GOJO, it has no pumice in it or ALOE...so it leaves no residue..
May 26, 2010 | 08:07 AM
#33
Thread Starter
YotaTech Milestone-Two Millionth Post
Joined: Jan 2009
Posts: 12,009
Likes: 122
From: Northeast Pennsylvania
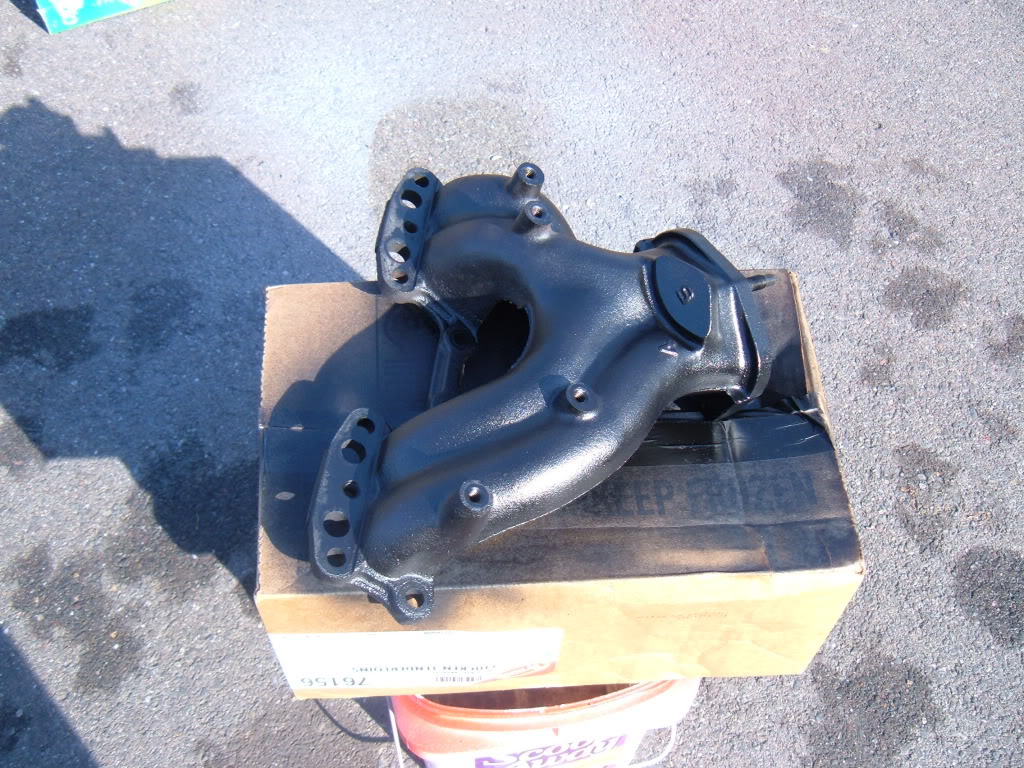
Feeling that i had crested the hill as far as this went, it was finally time for fun stuff....
PAINTING
and even the new timing cover etc...got painted (except the oil pump...too oily)
PAINTING
and even the new timing cover etc...got painted (except the oil pump...too oily)
May 26, 2010 | 08:09 AM
#34
Thread Starter
YotaTech Milestone-Two Millionth Post
Joined: Jan 2009
Posts: 12,009
Likes: 122
From: Northeast Pennsylvania
as an EDIT:
let me add.....i've been told what i was doing as far as doing this repair with the block in the truck was definitely doing hings the hard way...i have to agree......if i had to do it again, and dear God, i hope i don't, i will pule the engine out of the truck......i will swallow my pride and get help and do this the "easy" way.
but doing things the hard way,not only builds character, it forces alot of problem solving.
again i say, the truck is complete, the engine is running and all is well, so hang in there to the end
oh yeah, let me add a few things too:
if was not the original owner of this truck and if i was unsure of the abuse that has been brought upon this engine , i definitely would have sent the head out to be surfaced / cleaned etc...
i read enough horror stories that quite frequently i wondered if i should have at the very least sent my head off to be checked / cleaned and reassembled......and likely the same for the block....which of course, brings ya back to it would be easier to do this the right way by pulling the engine.
so , no flaming on what i should have done.....OK, i had plenty of that. i'm just showing what i did, what worked for me etc.......but, again i had NO CLUE when i started all this......COMPRESSION CHECK???...what was that?....i know now......so there alot of steps i skipped, due to ignorance or because i could vouch for the condition of this engine........if i were to rebuild a stray 22re engine, you bet your butt i will be getting a NEW head and getting the block serviced and bored and new crank etc...
Last edited by 92 TOY; May 29, 2010 at 03:42 AM.
May 29, 2010 | 02:33 AM
#35
Thread Starter
YotaTech Milestone-Two Millionth Post
Joined: Jan 2009
Posts: 12,009
Likes: 122
From: Northeast Pennsylvania
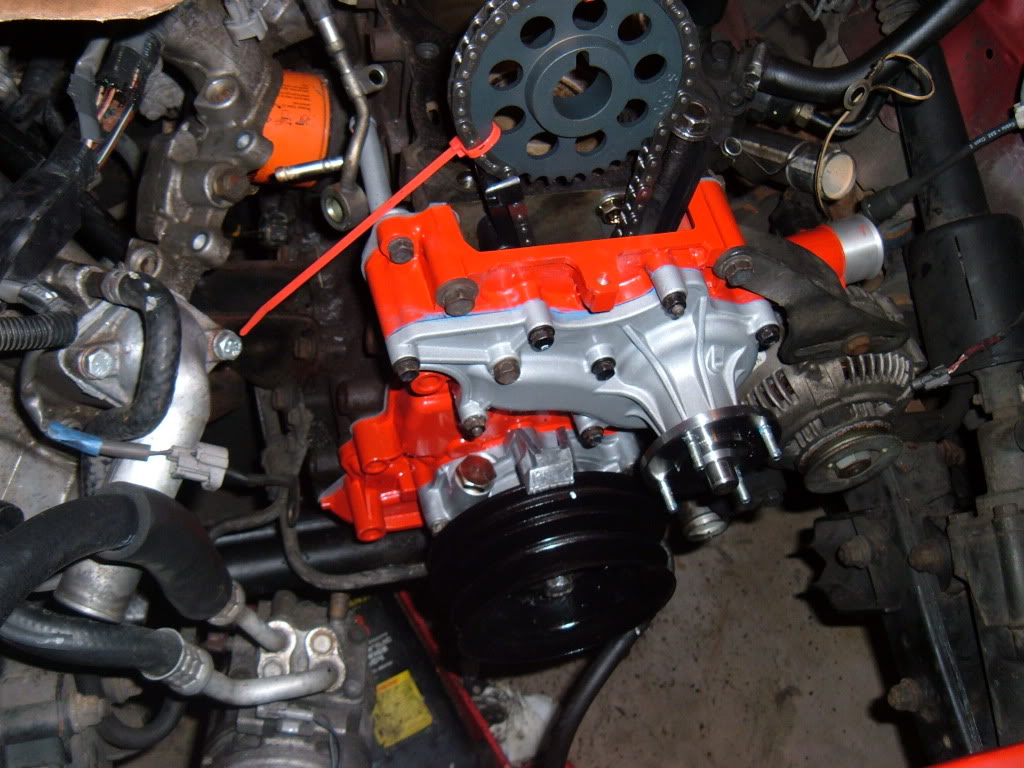
Timing cover assembly
Now I can clearly remember this was a part that had me kinda nervous too.....for some reason, it's prety hard to find a straight answer for simple questions in the FSM or the other manuals......such as "what is the torque for the bolts for the water pump?" ........I am going to have to go back and re-read my thread to see what it was i decided on, but (and feel free to chime in here) i tend to want to agree with the comment of "tight, but not real tight"......
i coated the gasket with BLUE RTV......did I have to?, yes and no was the answer......so i went with a thin film of it.
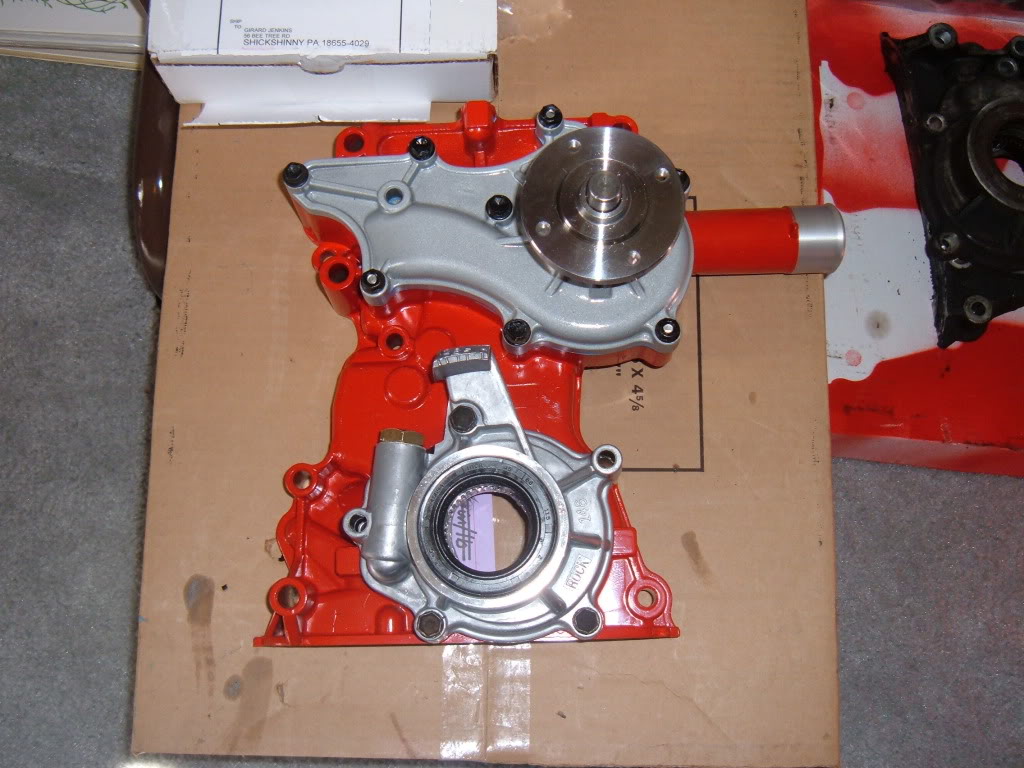
as far as the parts from TED at ENGNBLDR.....very nice stuff.....i did mess up initially because on the pump itself are 3 studs for, i guess, intially setting the pump on and the rest are bolts......those studs are NOT included in the kit.....i found this out the hard way when i was using 3 of the 4 included studs and had an issue with one of them stripping out the hole when i went to torque down.....i was told by another member those 4 studs i found were actually for the fan clutch mount....so i cannibalized (reused) the studs from my old water pump and then properly used TED's included studs for the fan clutch....used a little thread locker on the stripped hole.....it's holding, let's hope it holds.
OIL PUMP
as far as that goes, i wasn't really sure what i was looking at here.....the gears (from shipping TED said) were all askew and were kinda stuck there....he basically said the pop them out of there and lay them back in nicely....was actually easy once i figured out how to do that......there are (on mine at least) 2 stamped triangles on the gears....i thought maybe these had to line up or something on assembly...TED said, nope, they just have to face out......i got recommendations as far as packing the gears up with this or that grease and then i just went with liberal application of vaseline.....i mounted it on using nothing more than the included rubber gasket....then took it apart because I could not say 100% that the "triangles" were facing out.....they were, and so i re-assembled and the timing cover assembly was complete.

i coated the gasket with BLUE RTV......did I have to?, yes and no was the answer......so i went with a thin film of it.
as far as the parts from TED at ENGNBLDR.....very nice stuff.....i did mess up initially because on the pump itself are 3 studs for, i guess, intially setting the pump on and the rest are bolts......those studs are NOT included in the kit.....i found this out the hard way when i was using 3 of the 4 included studs and had an issue with one of them stripping out the hole when i went to torque down.....i was told by another member those 4 studs i found were actually for the fan clutch mount....so i cannibalized (reused) the studs from my old water pump and then properly used TED's included studs for the fan clutch....used a little thread locker on the stripped hole.....it's holding, let's hope it holds.
OIL PUMP
as far as that goes, i wasn't really sure what i was looking at here.....the gears (from shipping TED said) were all askew and were kinda stuck there....he basically said the pop them out of there and lay them back in nicely....was actually easy once i figured out how to do that......there are (on mine at least) 2 stamped triangles on the gears....i thought maybe these had to line up or something on assembly...TED said, nope, they just have to face out......i got recommendations as far as packing the gears up with this or that grease and then i just went with liberal application of vaseline.....i mounted it on using nothing more than the included rubber gasket....then took it apart because I could not say 100% that the "triangles" were facing out.....they were, and so i re-assembled and the timing cover assembly was complete.
May 29, 2010 | 02:54 AM
#36
Thread Starter
YotaTech Milestone-Two Millionth Post
Joined: Jan 2009
Posts: 12,009
Likes: 122
From: Northeast Pennsylvania
Timing chain installation
so, very excited that i was actually on the assembly part of this "project", i was anxious to install the chain.......line this up with that and this and that and so on......EEK!
so i started simple......
a pic.
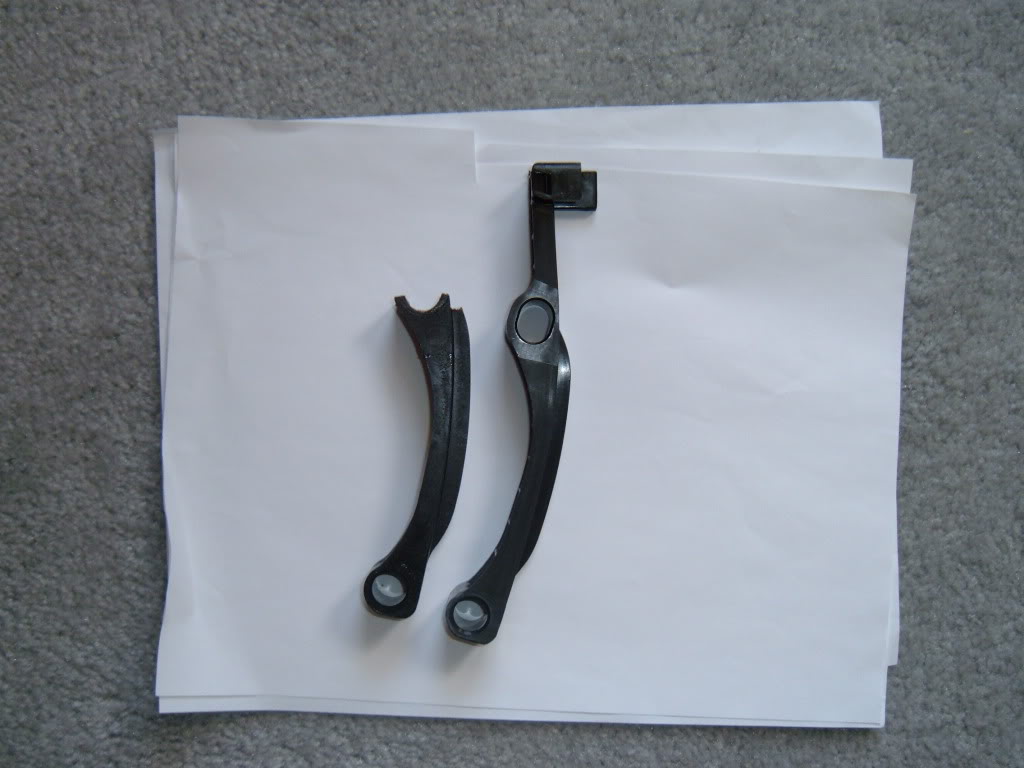
PASSENGER's SIDE GUIDE.
YEP....mine was broken....hehehehehe....go figure...i didn't realize tat until after i took it off and i looked at it compared to the new one.....so i guess the missing piece from this one was part of the mess in the pan.
tensioner and guides installed as per TED's instructions.....i believe 12ft/lbs.......i can edit that if i'm wrong, i will check my other thread...but anyway, checked the tensioner for function and installed it and the 2 metal backed guides.
TIMING CHAIN INSTALLATION
so, this is an aggravating part, and one that takes some finesse...
again, this is one of those things that would have been sooooooooo much easier to do if the engine was out of the truck..
after trying several times to get the "bright links" to line up right.....GRRRRRR...and realizing that depending upon the lighting makes a difference as far as ifyou can actually see the bright links.......so i decided to help myself a little and put a dab of white model pat on the bright links, the dimple on the cam sprocket and on the oil pump sprocket (?correct name, but that's what i will call it) .....because when you are peeking through the valence and up and down a million times to see if it's all lining up...that(model paint) was the best idea i could come up with.
the top sprocket has to sit with the dimple at about the 11:30 mark and the lower sprocket at 12:00......slack on the driver's side constantly made the chain droop down enough that i was doubtful i could get this on properly.
so i came up with another trick to help me....again, realize that physically, i am doing this all myself....as a newbie and needing to get it right the 1st time.......zipties....i zip-tied the chain in the proper position on the upper sprocket......figured out how much slack to pull on the driver's side of the chain and wedged it in place with a headbolt...ziptied to the sprocket......
feeling like i aced this portion of the test, i felt confident enough to install the timing cover........this was going to be where i see if i screwed up my template of bolts.......some bolts get 9ft/lbs others more.....have to study the FSM for exactly what bolts get what for that answer.
so i started simple......
a pic.
PASSENGER's SIDE GUIDE.
YEP....mine was broken....hehehehehe....go figure...i didn't realize tat until after i took it off and i looked at it compared to the new one.....so i guess the missing piece from this one was part of the mess in the pan.
tensioner and guides installed as per TED's instructions.....i believe 12ft/lbs.......i can edit that if i'm wrong, i will check my other thread...but anyway, checked the tensioner for function and installed it and the 2 metal backed guides.
TIMING CHAIN INSTALLATION
so, this is an aggravating part, and one that takes some finesse...
again, this is one of those things that would have been sooooooooo much easier to do if the engine was out of the truck..
after trying several times to get the "bright links" to line up right.....GRRRRRR...and realizing that depending upon the lighting makes a difference as far as ifyou can actually see the bright links.......so i decided to help myself a little and put a dab of white model pat on the bright links, the dimple on the cam sprocket and on the oil pump sprocket (?correct name, but that's what i will call it) .....because when you are peeking through the valence and up and down a million times to see if it's all lining up...that(model paint) was the best idea i could come up with.
the top sprocket has to sit with the dimple at about the 11:30 mark and the lower sprocket at 12:00......slack on the driver's side constantly made the chain droop down enough that i was doubtful i could get this on properly.
so i came up with another trick to help me....again, realize that physically, i am doing this all myself....as a newbie and needing to get it right the 1st time.......zipties....i zip-tied the chain in the proper position on the upper sprocket......figured out how much slack to pull on the driver's side of the chain and wedged it in place with a headbolt...ziptied to the sprocket......
feeling like i aced this portion of the test, i felt confident enough to install the timing cover........this was going to be where i see if i screwed up my template of bolts.......some bolts get 9ft/lbs others more.....have to study the FSM for exactly what bolts get what for that answer.
May 29, 2010 | 03:00 AM
#37
Thread Starter
YotaTech Milestone-Two Millionth Post
Joined: Jan 2009
Posts: 12,009
Likes: 122
From: Northeast Pennsylvania
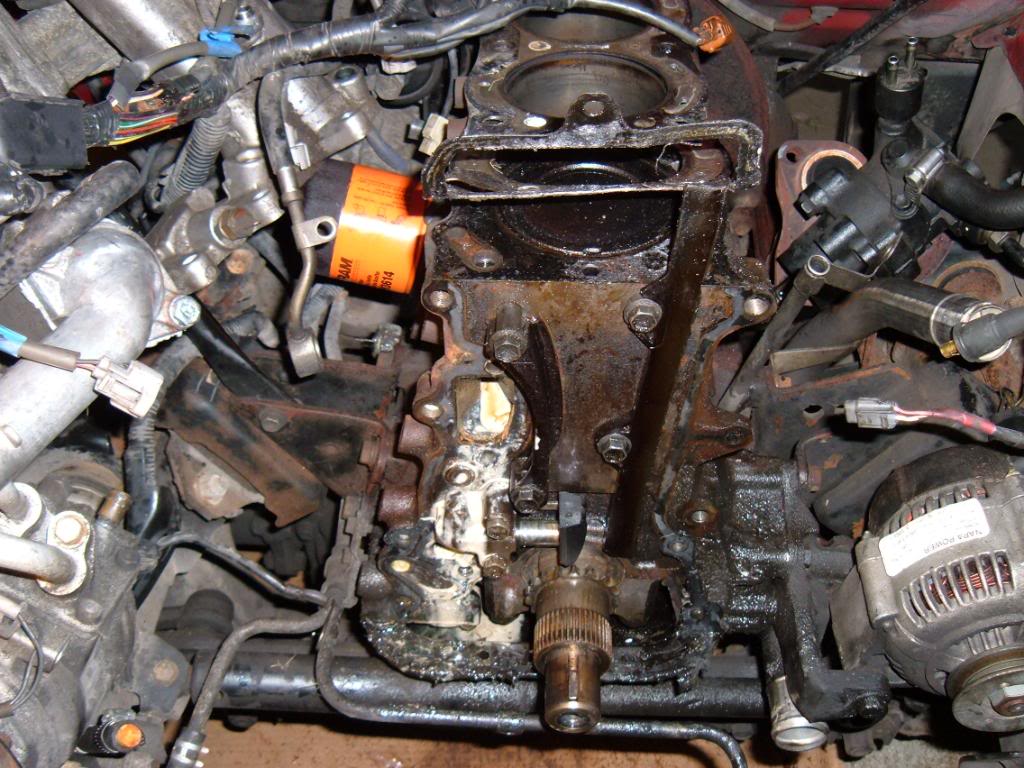
as far as installing the timing cover gaskets.....debate about dry or with black RTV went on.....i did i dry with a smear of BLACK RTV in some spots to hold the gasket still.
by the way.....the front of the block was gently scraped with a razor blade (or 10) and wiped clean with acetone.......i had paper towels stuffed in the hole where the water pump enters the block to try to "wick" some of the yuck out of there.
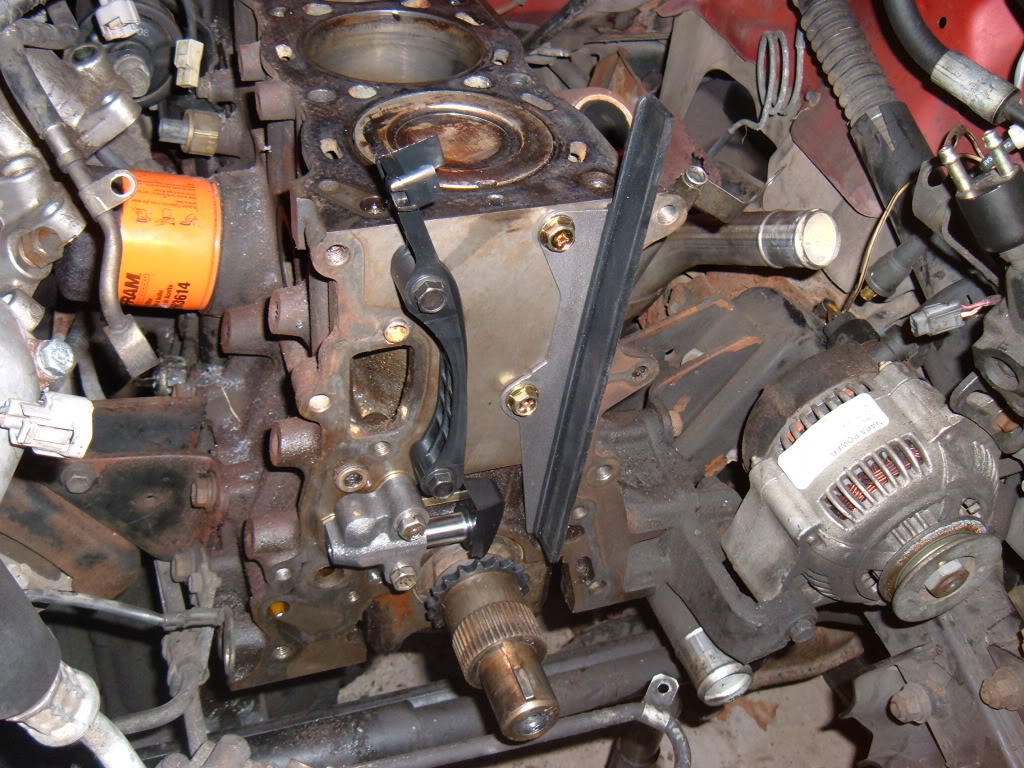
be very slow and methodical about he timing cover bolts.....there are quite a few bolts...some very tucked out of view...this is where it's very important not to rush....the one bolt holding the arm of the alternator also serves as a bolt fastening the timing cover.
by the way.....the front of the block was gently scraped with a razor blade (or 10) and wiped clean with acetone.......i had paper towels stuffed in the hole where the water pump enters the block to try to "wick" some of the yuck out of there.
be very slow and methodical about he timing cover bolts.....there are quite a few bolts...some very tucked out of view...this is where it's very important not to rush....the one bolt holding the arm of the alternator also serves as a bolt fastening the timing cover.
May 29, 2010 | 03:04 AM
#38
Thread Starter
YotaTech Milestone-Two Millionth Post
Joined: Jan 2009
Posts: 12,009
Likes: 122
From: Northeast Pennsylvania
so at this point i felt like i was getting somewhere....still lots and lots to do to button this up, but definitely closer to the end than the beginning.
so again it was time to paint some parts after thoroughly cleaning.....cuz i wanted to.
parts cleaned and drying
BAR-B-Q grill black paint...why not?.....hehehehehe
so again it was time to paint some parts after thoroughly cleaning.....cuz i wanted to.
parts cleaned and drying
BAR-B-Q grill black paint...why not?.....hehehehehe
May 29, 2010 | 03:13 AM
#39
Thread Starter
YotaTech Milestone-Two Millionth Post
Joined: Jan 2009
Posts: 12,009
Likes: 122
From: Northeast Pennsylvania
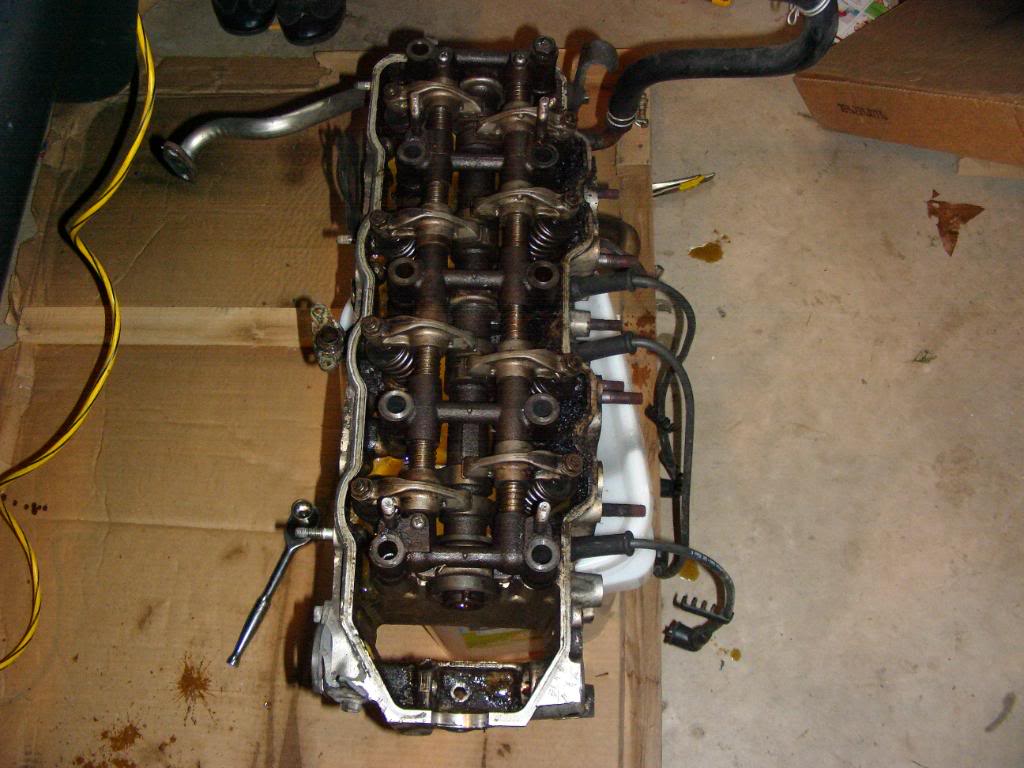
Head cleaning
few months ago, i emptied about 3 cans of brake cleaner scrubbing and scraping and picking sludge out of the head.
i was intimidated by the rocker arm assembly / valves and i was happy to just clean it up nice and be done with it........NOT!!!......admonishments ensued and peer pressure was applied to me and i gave in.....very happy i did......i took it all apart
YUCK....i'm glad i listened to all you guys...this looked like hell
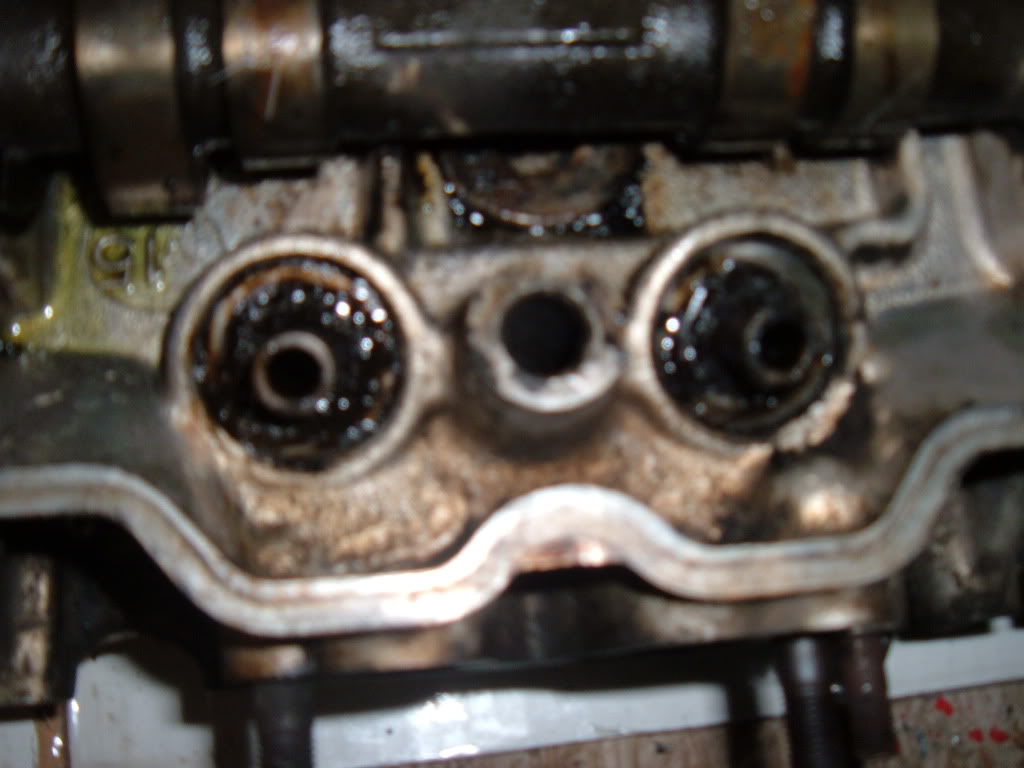
and blah-blah-blah...i used a few more cans of brake cleaner and cleaned up the top of the head very well.....wear glasses....ricochet'd brake cleaner in the eye, not so good.
and really, this is not hard...(getting the rocker arm rail off)...just takes some gentle prying.
this is the part of the episode, that if i was putting a different cam in, this i what i would have needed to do.....i kept m cam.....cleaned it up nice, check the ??bearings?? on the head and was satisfied.
i was intimidated by the rocker arm assembly / valves and i was happy to just clean it up nice and be done with it........NOT!!!......admonishments ensued and peer pressure was applied to me and i gave in.....very happy i did......i took it all apart
YUCK....i'm glad i listened to all you guys...this looked like hell
and blah-blah-blah...i used a few more cans of brake cleaner and cleaned up the top of the head very well.....wear glasses....ricochet'd brake cleaner in the eye, not so good.
and really, this is not hard...(getting the rocker arm rail off)...just takes some gentle prying.
this is the part of the episode, that if i was putting a different cam in, this i what i would have needed to do.....i kept m cam.....cleaned it up nice, check the ??bearings?? on the head and was satisfied.
May 29, 2010 | 03:24 AM
#40
Thread Starter
YotaTech Milestone-Two Millionth Post
Joined: Jan 2009
Posts: 12,009
Likes: 122
From: Northeast Pennsylvania
Valve service
I really did not want to do this part at all......i realy was anxious to get my truck started....but i listened again to my conscience and YOTATECH flunkies and decided i wold take the valves out to service them.......and yes you should too......i wonder how much would they charge for this service???
Had to buy a VALVE SPRING COMPRESSOR tool...about $18 at Auto-Zone if i recall correctly.........it worked, but not without needing to argue with it on each use......there is a better tool that compresses the vavle from te valve end as well as the spring end.....if i were to do it again i would buy or make (no, i'd buy or rent) that tool.
there's the tool, laying to the right of the head...
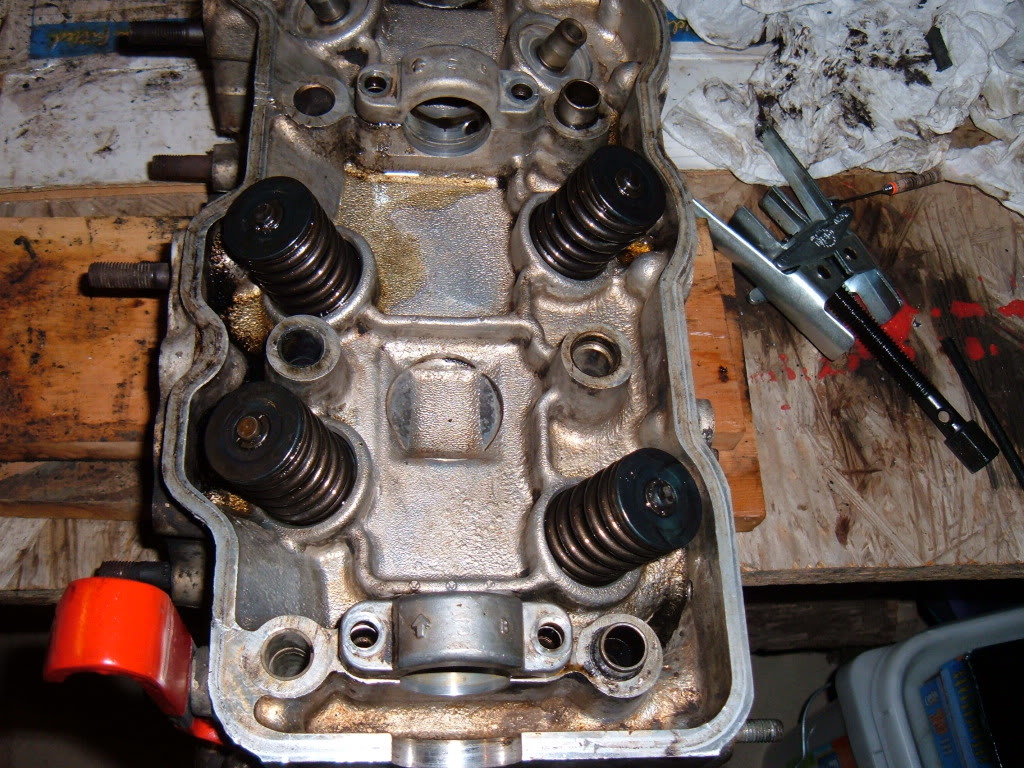
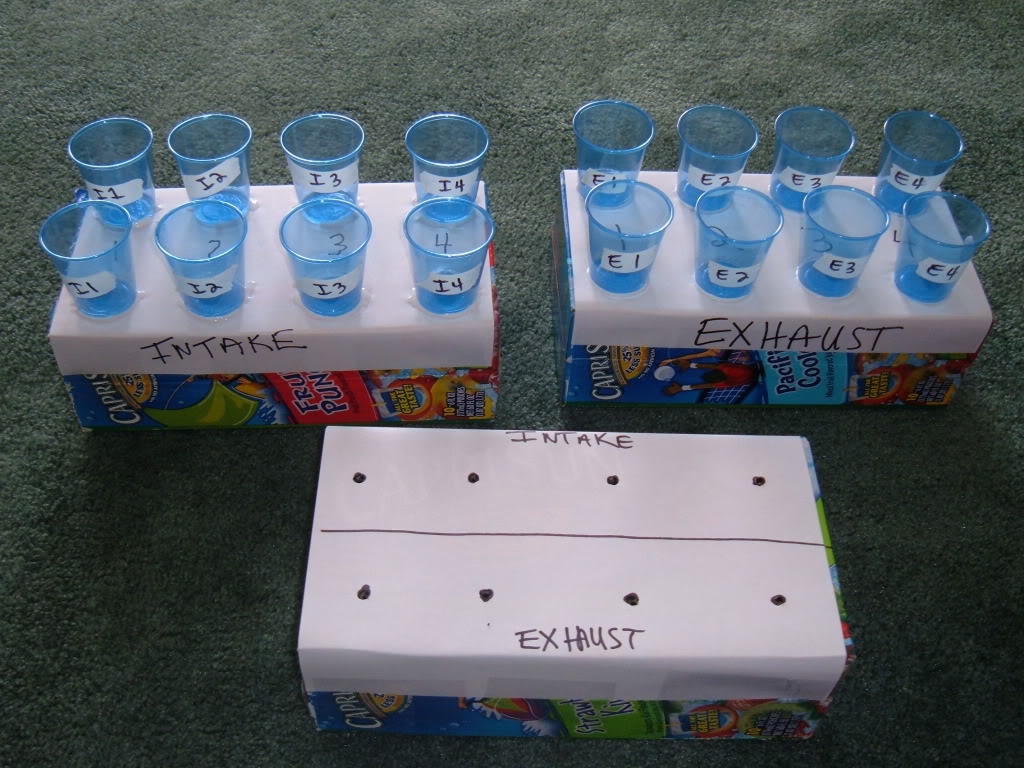
But before i went crazy just undoing stuff, i knew i had to, or should (but i'm pretty sure i had to) keep everything organized....not just so i didn't lose anything, but to make sure each valve goes bac whee it came fromand springs as well.
so....being OCD heavily and paranoid, i made a little reation in my "arts and crafts" afternoon one day.......DO THIS!!!!! ABSOLUTELY!!!!.....it was sooooooo helpful
some capri sun boxes, paper and plasic water cups and some elmer's glue.......heehehehehe
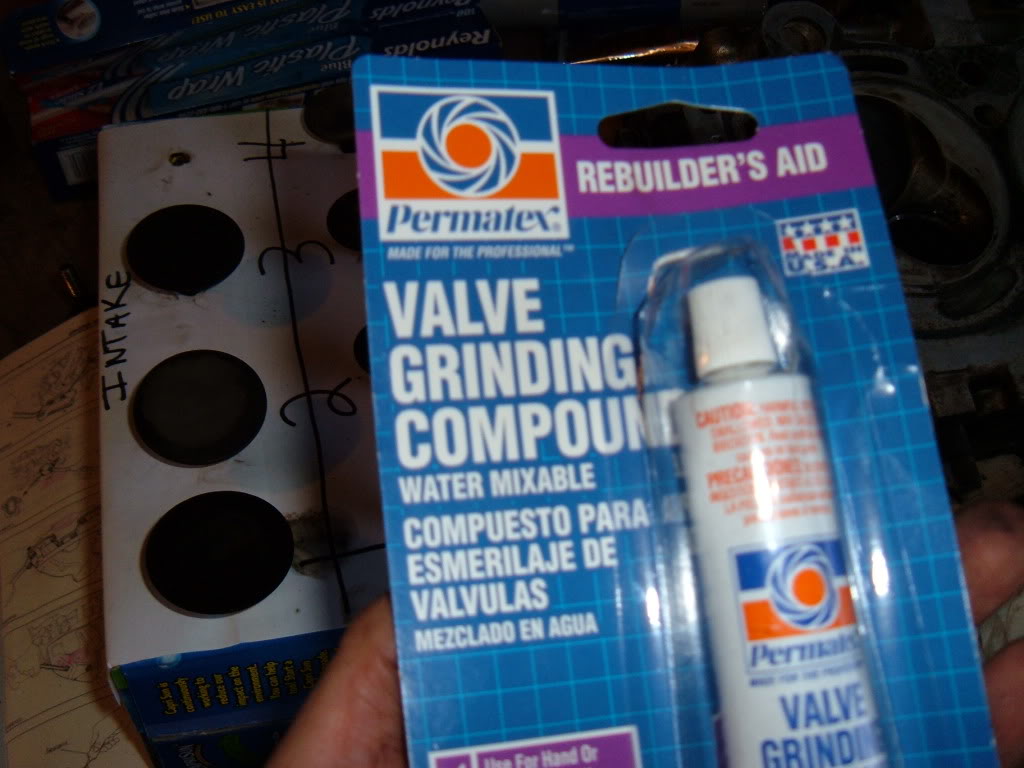
oh yeah, and you have to buy this stuff.....and a valve lapping tool (??$7)
Had to buy a VALVE SPRING COMPRESSOR tool...about $18 at Auto-Zone if i recall correctly.........it worked, but not without needing to argue with it on each use......there is a better tool that compresses the vavle from te valve end as well as the spring end.....if i were to do it again i would buy or make (no, i'd buy or rent) that tool.
there's the tool, laying to the right of the head...
But before i went crazy just undoing stuff, i knew i had to, or should (but i'm pretty sure i had to) keep everything organized....not just so i didn't lose anything, but to make sure each valve goes bac whee it came fromand springs as well.
so....being OCD heavily and paranoid, i made a little reation in my "arts and crafts" afternoon one day.......DO THIS!!!!! ABSOLUTELY!!!!.....it was sooooooo helpful
some capri sun boxes, paper and plasic water cups and some elmer's glue.......heehehehehe
oh yeah, and you have to buy this stuff.....and a valve lapping tool (??$7)


