
Skippycoyote's 1989 4Runner Build Up
 Jun 10, 2014 | 10:11 PM
#1
Thread Starter
Registered User
Joined: May 2014
Posts: 17
Likes: 0
From: Mesa, AZ
Skippycoyote's 1989 4Runner Build Up
Last week I bought this 1989 4Runner from a guy in Tucson. Here is what it looked like when I got it home:
[IMG] [/IMG]
What it is: A 1989 4Runner DLX 5 speed with a 22RE
What the previous owner had done to it: new rear tires, cam and crank sprocket, timing chain, tensioner, metal guides, oil pump, and timing chain cover. He had replaced the factory seats with seats from a car (Honda Civic?).
What it needed at bare minimum (from what I noticed and based on what he told me): a driver's side mirror (missing), a windshield (it was severely cracked), a sliding window latch (missing), windshield wiper arms (missing), a new exhaust (it was mangled and squished to the point that it sounded funny), a speedometer cable, a hood release cable (snapped), a map light bulb (missing), probably a valve adjustment and a tune up.
Still, it ran, drove, and shifted fine. Against my better judgement, I followed my husband home (about 100 miles), only to discover that it would only limp along at 55mph on the highway. We'll have to see if it does better after a tune up.
What I have done so far: Replaced the sliding window latch (found on ebay). Installed a new cheap driver's side mirror (found on amazon)
[IMG] [/IMG] [IMG]
 [/IMG]
Just had the windshield replaced today.
[IMG] [/IMG] [IMG]
 [/IMG]
I bought a new map light bulb, but the light still doesn't work. I'll add troubleshooting that to my list. The first order of business is to get it street legal again. Next, I want to make it into a nice camping rig, for taking myself and the kids (and sometimes my husband) out of the scorching heat of the desert. After that, I have a few ideas of what it could turn into, I just haven't narrowed it down yet. Needless to say, I have a Miller (and a Lincoln, and a Victor, etc.) and I know how to use it!
[IMG]
 [/IMG]
What it is: A 1989 4Runner DLX 5 speed with a 22RE
What the previous owner had done to it: new rear tires, cam and crank sprocket, timing chain, tensioner, metal guides, oil pump, and timing chain cover. He had replaced the factory seats with seats from a car (Honda Civic?).
What it needed at bare minimum (from what I noticed and based on what he told me): a driver's side mirror (missing), a windshield (it was severely cracked), a sliding window latch (missing), windshield wiper arms (missing), a new exhaust (it was mangled and squished to the point that it sounded funny), a speedometer cable, a hood release cable (snapped), a map light bulb (missing), probably a valve adjustment and a tune up.
Still, it ran, drove, and shifted fine. Against my better judgement, I followed my husband home (about 100 miles), only to discover that it would only limp along at 55mph on the highway. We'll have to see if it does better after a tune up.
What I have done so far: Replaced the sliding window latch (found on ebay). Installed a new cheap driver's side mirror (found on amazon)
[IMG]
 [/IMG] [IMG]
 [/IMG]
Just had the windshield replaced today.
[IMG]
 [/IMG] [IMG]
 [/IMG]
I bought a new map light bulb, but the light still doesn't work. I'll add troubleshooting that to my list. The first order of business is to get it street legal again. Next, I want to make it into a nice camping rig, for taking myself and the kids (and sometimes my husband) out of the scorching heat of the desert. After that, I have a few ideas of what it could turn into, I just haven't narrowed it down yet. Needless to say, I have a Miller (and a Lincoln, and a Victor, etc.) and I know how to use it!
Jun 10, 2014 | 10:22 PM
#2
Welcome to Yotatech. Looks like you got a solid project to start on. Previous owners are a little rough on these trucks. A lot of issues with these are fairly easy to fix and just require a little time. Looking forward to your build. Been building two first gen runners and looking forward to using them to go camping with the wife and kids this summer. Great site for keeping track of your work and learning what others have done for camping ideas.
Jun 16, 2014 | 10:13 AM
#3
Thread Starter
Registered User
Joined: May 2014
Posts: 17
Likes: 0
From: Mesa, AZ
Windshield wipers
The 4Runner is now street legal! I found some used windshield wiper arms on Ebay for a decent price. Since there were no wipers on the truck when I got it, I had no idea what type of nuts to use to secure the wiper arms. I searched online and the best that I could find is that they should be lock nuts. My husband measured the bolts and figured out what size nuts I needed. In case anybody else is wondering, I went with M8-1.25 lock nuts (with the nylon ring inside). They seem to be working just fine.
[IMG] [/IMG]
On a less related note, we figured out that the map light does in fact work. However, it only works on the "door" setting when the passenger side door is opened. It does not work if you open the driver side door or if you turn the switch to "on".
[IMG]
 [/IMG]
On a less related note, we figured out that the map light does in fact work. However, it only works on the "door" setting when the passenger side door is opened. It does not work if you open the driver side door or if you turn the switch to "on".
Jun 16, 2014 | 11:34 PM
#4
One step closer to getting it to where you want it to be. On the light not working in most cases, the previous owner removed or unplugged the door buzzer alarm, just above the brake pedal to stop the annoying alarm. The circuit runs thru that box. You may need to get another one out of the boneyard. On my 88 thread, I show how to disable that annoying alarm and still keep the light working. It will be listed on my 88 Runner build link on the link below and show where to find it on the first page and first post.
Jun 17, 2014 | 04:54 PM
#6
Thread Starter
Registered User
Joined: May 2014
Posts: 17
Likes: 0
From: Mesa, AZ
Sawing off the tailpipe, fixing fuses and fixing the rear window
When I bought the 4Runner, I noticed that the exhaust sounded funny. It sounded more like my neighbor's Baja bug than a proper 4Runner. I took a look at the exhaust and saw this:
[IMG] [/IMG]
I am going to replace the exhaust anyway, but here was my quick fix:
[IMG] [/IMG]
This was my first time playing with a reciprocating saw. It sounds better, but so much mud, rust, and crap fell out of the tailpipe. It DEFINITELY needs a new exhaust.
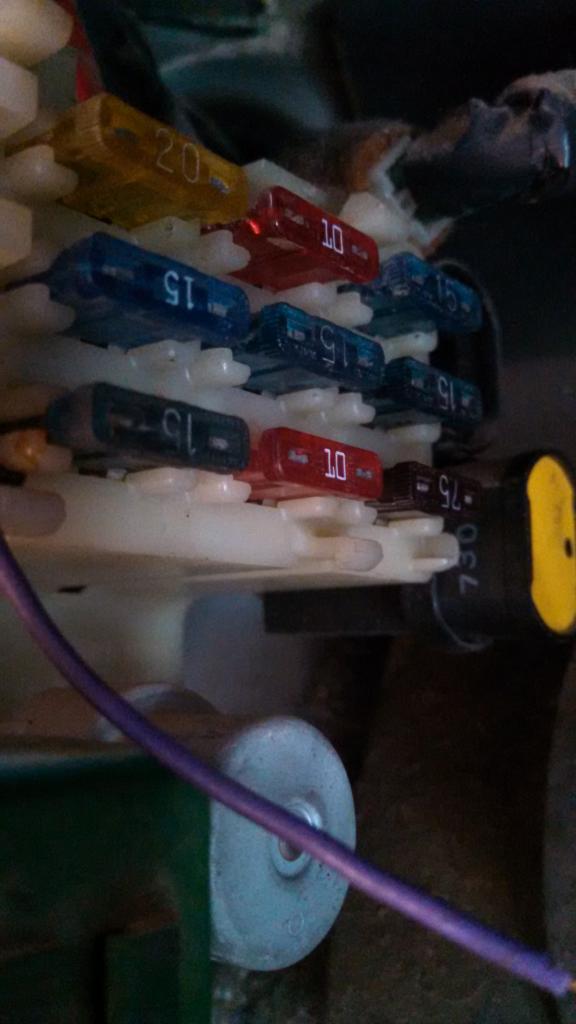
Since I had the 4Runner in the drive way, I decided to have a look at the fuses. Here is what I found in the engine compartment:
[IMG] [/IMG]
The bottom right 7.5A fuse was blown, and the bottom left fuse was missing.
I figured I should also check the fuses in the driver's side cab area. Here is what I found there:
All of the fuses were there, but many of them had the wrong amperage fuse in it. So, I used the information from Roger Brown's website http://www.4crawler.com/4x4/4R_TechInfo.shtml and replaced all of the fuses with the proper ones.
When I bought the truck, the previous owner told me that the rear window used to work, but didn't anymore. I confirmed this when I test drove it. He said it might need a new switch. Since I had just fixed some fuses, I had an "I wonder..." moment. For kicks and giggles, I tried the switch and IT WORKED! I got the window down, opened the tailgate, and cleaned out the back of the truck a bit. By then, it was getting late and I was filthy, so I decided to roll it back up and head in. The window rolled up only part way and GOT STUCK. It would go back down, but would only go up a few inches before making a clunk noise and freezing. It sounded like something was hitting something else. We put lubricant on the gears, but it didn't seem to help. To make a long story short, I probably spent at least an hour trying to figure out what was wrong with it. Even the next door neighbor had a go at it, to no avail. So, the next morning, this was first on my list of tasks. I got some silicone lubricant and lubed the tracks the window rolls up into. It still didn't work (though it seemed to work much smoother until the "clunk" point). Since it was now daylight, I got a better look on the inside and finally realized that there was a metal bracket of some sort that was rubbing on the glass. At some point, it looked like somebody backed the 4Runner into something really big and immovable and dented up the tailgate pretty bad. I read up a little on disassembling the tailgate, but I really didn't want to go through all of that hassle, especially since everything else mechanical and electrical was working fine. I didn't really have the proper tools to pull out the dent. I even tried a toilet plunger, but the surface was not smooth and flat enough to get a seal. So, I drilled a small hole, then threaded a screw through the hole. I grabbed the screw with a pair of welder's clamps, and gave it a few good pulls. It popped the dent out quite a bit. I repeated this at another location on the tailgate with another hole.
[IMG] [/IMG]
It doesn't look perfect, but there is now plenty of clearance between the outside of the tailgate and the rear glass. I'll fill in the holes with the welder later.
[IMG]
 [/IMG]
I am going to replace the exhaust anyway, but here was my quick fix:
[IMG]
 [/IMG]
This was my first time playing with a reciprocating saw. It sounds better, but so much mud, rust, and crap fell out of the tailpipe. It DEFINITELY needs a new exhaust.
Since I had the 4Runner in the drive way, I decided to have a look at the fuses. Here is what I found in the engine compartment:
[IMG]
 [/IMG]
 The bottom right 7.5A fuse was blown, and the bottom left fuse was missing.
I figured I should also check the fuses in the driver's side cab area. Here is what I found there:

All of the fuses were there, but many of them had the wrong amperage fuse in it. So, I used the information from Roger Brown's website http://www.4crawler.com/4x4/4R_TechInfo.shtml and replaced all of the fuses with the proper ones.
When I bought the truck, the previous owner told me that the rear window used to work, but didn't anymore. I confirmed this when I test drove it. He said it might need a new switch. Since I had just fixed some fuses, I had an "I wonder..." moment. For kicks and giggles, I tried the switch and IT WORKED! I got the window down, opened the tailgate, and cleaned out the back of the truck a bit. By then, it was getting late and I was filthy, so I decided to roll it back up and head in. The window rolled up only part way and GOT STUCK. It would go back down, but would only go up a few inches before making a clunk noise and freezing. It sounded like something was hitting something else. We put lubricant on the gears, but it didn't seem to help. To make a long story short, I probably spent at least an hour trying to figure out what was wrong with it. Even the next door neighbor had a go at it, to no avail. So, the next morning, this was first on my list of tasks. I got some silicone lubricant and lubed the tracks the window rolls up into. It still didn't work (though it seemed to work much smoother until the "clunk" point). Since it was now daylight, I got a better look on the inside and finally realized that there was a metal bracket of some sort that was rubbing on the glass. At some point, it looked like somebody backed the 4Runner into something really big and immovable and dented up the tailgate pretty bad. I read up a little on disassembling the tailgate, but I really didn't want to go through all of that hassle, especially since everything else mechanical and electrical was working fine. I didn't really have the proper tools to pull out the dent. I even tried a toilet plunger, but the surface was not smooth and flat enough to get a seal. So, I drilled a small hole, then threaded a screw through the hole. I grabbed the screw with a pair of welder's clamps, and gave it a few good pulls. It popped the dent out quite a bit. I repeated this at another location on the tailgate with another hole.
[IMG]
 [/IMG]
It doesn't look perfect, but there is now plenty of clearance between the outside of the tailgate and the rear glass. I'll fill in the holes with the welder later.
Jun 26, 2014 | 10:47 AM
#7
Thread Starter
Registered User
Joined: May 2014
Posts: 17
Likes: 0
From: Mesa, AZ
Why won't it be mine!
My 4Runner seems determined not to get titled and registered. At first, the problem was that the previous owner gave me the title, but he had started to fill out his information on it. So, when I tried to title it in my name, the MVD said I had to have him fill out a power of attorney on the vehicle. But, they said I shouldn't have to get it emissions tested until October. I sent it to him to be filled out (he took a week or two to get it done). I just got it in the mail a few days ago, so I went back to the MVD to get my title and registration. They punched in the numbers, and SURPRISE, I have to have in emissions tested now. It sounded like it was misfiring a bit, so I replaced the spark plugs, plug wires, cap, and rotor. It sounds better now, but still lacks power. Oh well...let's see if it will pass emission. If it fails, it should at least give me an idea of what needs to be fixed or adjusted. The guy starts the test, and it is sounding and running pretty good. Then he gets to a point where he has to slow down quickly. "Brakes!" he yells. He has another guy try it with the same result. Sure enough, my truck has no rear brakes. I relied on front brakes alone all the way up from Tucson! So, now I have to get the brakes fixed before I can get it emissions tested. I guess the bright side is that I just got my brakes checked for free! I'm glad my husband knows about brakes, because I have very limited experience.
Trending Topics
Jun 26, 2014 | 01:55 PM
#8
Registered User
Joined: Jul 2005
Posts: 1,224
Likes: 1
From: Chandler AZ
Look into the LSPV - Mine went out a few years ago and I had no rear brakes either. I replaced mine with one I got from a junkyard in AJ but I see a lot of people using the by-pass valve thing:
http://www.summitracing.com/search/p...oning%20Valves
http://www.summitracing.com/search/p...oning%20Valves
Jul 1, 2014 | 11:21 PM
#9
Thread Starter
Registered User
Joined: May 2014
Posts: 17
Likes: 0
From: Mesa, AZ
Why I never want to hear the phrase "fix drum brakes" again
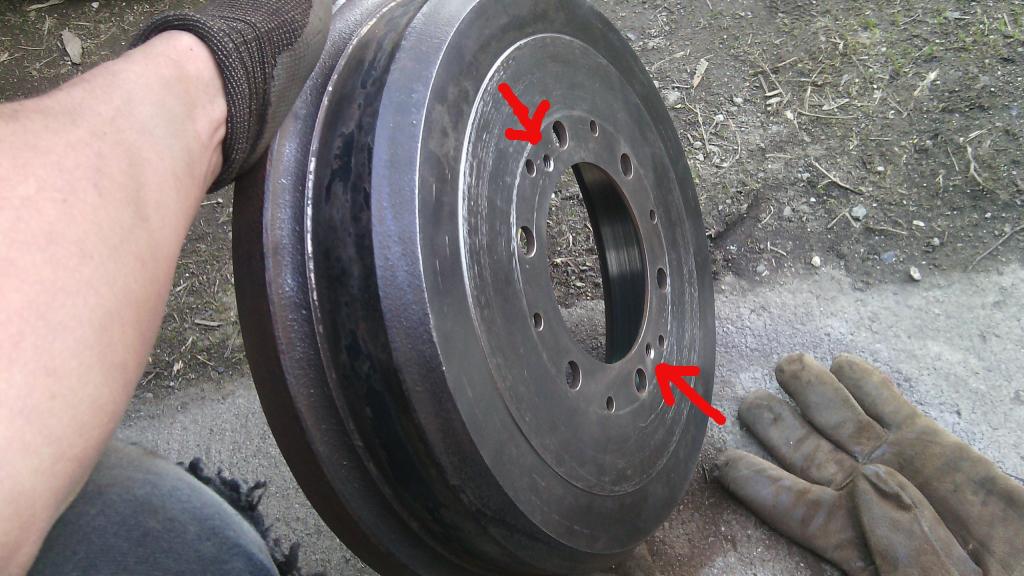
We figured we ought to have a look at the rear brakes. The passenger side looked the worst. [IMG] [/IMG]
The brakes were clearly in need of attention, anyway, so we decided to replace the shoes and wheel cylinders. I have NEVER done brakes before. I was always the "help me by pumping the brakes so I can bleed this thing" part of a brake job. Still, my husband had faith in me. He told me to read the Chilton's manual, watch a video on YouTube, and I would be ready. "Brakes are easy!" he insisted. "I could do that in probably 20 minutes." It took me ALL DANG DAY! I guess there are tools that make it easier, but of course we didn't have those. I managed to do it with a few sets of pliers, a pair of locking pliers, a screwdriver, a 10mm socket and wrench, and no small amount of swearing (only one smashed finger and no bloody knuckles, on the plus side). Needless to say, if I ever have to change drum brakes again, we are getting the proper tools! Here is what the driver's side looked like afterwards: [IMG] [/IMG] I am going to pass on a few words of wisdom that I learned from the internet, my husband, my neighbor, and personal experience.
1. Take pictures! After you remove the drum and before you start disassembling the chaos that is drum brakes, take plenty of pictures. I would at least take a picture from a top angle and a picture from a bottom angle. This will help you tremendously when you reassemble the brakes, as you can get a much better idea of where that spring went and which way this doo-dad was facing. The diagrams in the repair manuals are handy, but lack the detail of an actual photo.
2. Have a second person handy to help. Removing and replacing the large return spring is extremely difficult (without the proper tools). It took myself and a grown man quite a bit of effort to stretch that spring. Also, if there is a magical trick to holding the shoe in place and keeping the parking brake assembly from falling out, all while pushing the pin through the back, squishing the spring, putting the pin head through the slot and then turning it with only ONE person, I want to hear it in case I ever have to do this again. It is also much easier to bleed the brakes with two people.
3. Make sure the person doing the disassembly also does the assembly. My neighbor helped to remove the parking brake mechanism from the old brake shoe on the driver's side. When I put the new spring on, I attached the spring on the wrong place on the brake shoe. It was probably no big deal, but I realized my mistake after I disassembled the other side and had already replaced everything on the driver's side. This spring is on the back side, so it didn't show in my photo.
4. Have the correct tools for the job. After watching videos of how easily people removed the springs with a spring removal tool, I want to scream.
5. Other materials that are handy to have: brake lubricant (brush it on the raised surfaces of the backing plate, where it will contact the sides of the shoes), grease (for the parking brake bolt), and brake cleaner.
6. Core charge! This is probably a no-brainer for most of you, but I wasn't expecting it. When you buy new brake shoes, you will probably have to pay a core charge on top of the actual cost of the shoes. You can get this charge back if you bring in your old shoes. If I would have known this ahead of time, I probably would have just taken off the old shoes first and brought them with me when I bought the new ones.
 [/IMG]
 The brakes were clearly in need of attention, anyway, so we decided to replace the shoes and wheel cylinders. I have NEVER done brakes before. I was always the "help me by pumping the brakes so I can bleed this thing" part of a brake job. Still, my husband had faith in me. He told me to read the Chilton's manual, watch a video on YouTube, and I would be ready. "Brakes are easy!" he insisted. "I could do that in probably 20 minutes." It took me ALL DANG DAY! I guess there are tools that make it easier, but of course we didn't have those. I managed to do it with a few sets of pliers, a pair of locking pliers, a screwdriver, a 10mm socket and wrench, and no small amount of swearing (only one smashed finger and no bloody knuckles, on the plus side). Needless to say, if I ever have to change drum brakes again, we are getting the proper tools! Here is what the driver's side looked like afterwards: [IMG]
 [/IMG] I am going to pass on a few words of wisdom that I learned from the internet, my husband, my neighbor, and personal experience.
1. Take pictures! After you remove the drum and before you start disassembling the chaos that is drum brakes, take plenty of pictures. I would at least take a picture from a top angle and a picture from a bottom angle. This will help you tremendously when you reassemble the brakes, as you can get a much better idea of where that spring went and which way this doo-dad was facing. The diagrams in the repair manuals are handy, but lack the detail of an actual photo.
2. Have a second person handy to help. Removing and replacing the large return spring is extremely difficult (without the proper tools). It took myself and a grown man quite a bit of effort to stretch that spring. Also, if there is a magical trick to holding the shoe in place and keeping the parking brake assembly from falling out, all while pushing the pin through the back, squishing the spring, putting the pin head through the slot and then turning it with only ONE person, I want to hear it in case I ever have to do this again. It is also much easier to bleed the brakes with two people.
3. Make sure the person doing the disassembly also does the assembly. My neighbor helped to remove the parking brake mechanism from the old brake shoe on the driver's side. When I put the new spring on, I attached the spring on the wrong place on the brake shoe. It was probably no big deal, but I realized my mistake after I disassembled the other side and had already replaced everything on the driver's side. This spring is on the back side, so it didn't show in my photo.
4. Have the correct tools for the job. After watching videos of how easily people removed the springs with a spring removal tool, I want to scream.
5. Other materials that are handy to have: brake lubricant (brush it on the raised surfaces of the backing plate, where it will contact the sides of the shoes), grease (for the parking brake bolt), and brake cleaner.
6. Core charge! This is probably a no-brainer for most of you, but I wasn't expecting it. When you buy new brake shoes, you will probably have to pay a core charge on top of the actual cost of the shoes. You can get this charge back if you bring in your old shoes. If I would have known this ahead of time, I probably would have just taken off the old shoes first and brought them with me when I bought the new ones.
Jul 1, 2014 | 11:25 PM
#10
Thread Starter
Registered User
Joined: May 2014
Posts: 17
Likes: 0
From: Mesa, AZ
Look into the LSPV - Mine went out a few years ago and I had no rear brakes either. I replaced mine with one I got from a junkyard in AJ but I see a lot of people using the by-pass valve thing:
http://www.summitracing.com/search/p...oning%20Valves
http://www.summitracing.com/search/p...oning%20Valves
I just had a thought...since the LSPV is supposed to sense load based on spring movement, could the truck having a lift throw this out of whack?
Last edited by skippycoyote; Jul 1, 2014 at 11:29 PM.
Jul 2, 2014 | 09:28 AM
#11
Registered User
Joined: Jul 2005
Posts: 1,224
Likes: 1
From: Chandler AZ
 Jul 4, 2014 | 05:20 PM
#12
Thread Starter
Registered User
Joined: May 2014
Posts: 17
Likes: 0
From: Mesa, AZ
Painting the top
Since I have not been able to do much to the truck mechanically lately, I did the next best thing. I painted the top. The fiberglass was exposed and icky. I tried to smooth it down some, but didn't have much luck. So, I primed it with a dark grey and was going to paint the top black, like it originally was. But, black is boring and gets really hot in the Arizona summer. After looking at a few threads, I decided to use Rustoleum Satin paint. I was originally thinking blue, but then settled on hunter green. I used two cans, and rolled it on with a foam roller. I did the first coat, and got a great deal of bubbles. With the second coat, I rolled on the paint first, then waited about 30 seconds, and then lightly rolled over it again. This seemed to take care of most of the bubbles. It was also more than 100 degrees F outside, so the paint got tacky very fast. The top still looks "fuzzy", but at least the fiberglass is covered up so you won't get fiberglass splinters. The green came out brighter than I thought it was. I think it looks more "John Deere" green, but I still like it. Now I'm thinking about doing the whole truck green, but I think I'll take care of some of the dents, first.
[IMG] [/IMG]
[IMG]
 [/IMG]
Jul 4, 2014 | 06:55 PM
[/IMG]
Jul 4, 2014 | 06:55 PM
#13
Registered User
Joined: Jun 2013
Posts: 363
Likes: 0
From: kelowna BC
nice progress, and i think the green would look sick on the whole truck
like this
http://www.pirate4x4.com/forum/toyot...-vehicles.html
like this
http://www.pirate4x4.com/forum/toyot...-vehicles.html
Last edited by Yota; Jul 4, 2014 at 06:57 PM.
 Jul 10, 2014 | 12:15 PM
#15
Thread Starter
Registered User
Joined: May 2014
Posts: 17
Likes: 0
From: Mesa, AZ
nice progress, and i think the green would look sick on the whole truck
like this
http://www.pirate4x4.com/forum/toyot...-vehicles.html
like this
http://www.pirate4x4.com/forum/toyot...-vehicles.html
Jul 10, 2014 | 12:36 PM
#16
Thread Starter
Registered User
Joined: May 2014
Posts: 17
Likes: 0
From: Mesa, AZ
Checking and adjusting the timing
The last time I visited my friendly neighborhood emissions testing station, I failed again due to no brakes. Plus, the 4Runner didn't have enough power to follow the trace. I knew it had a power problem, but I didn't think it would be that bad. My husband was going to take it to his work and have one of the guys there help him tune it up, but it hadn't happened yet and I am impatient (seriously...it has been WEEKS!). So, I borrowed a timing gun from my dad and checked the timing. According to the sticker under the hood, I had to jump two terminals in the diagnostic check connector. It took me awhile to find this, but I finally realized it was hanging out near the battery. Here is how it looked:
[IMG] [/IMG]
YUUUUCK! What is that stuff? I cleaned it with a toothbrush and a paper towel, and it looked better afterwards:
[IMG] [/IMG]
I am guessing that this part is supposed to have some sort of cover to keep the gunk out. I'll try to find one or at least make something up. I couldn't find a paper clip (I probably have thousands in my desk at work), so I used a piece of thin welding rod to jump the terminals. I discovered that the timing was WAAAAY too advanced. I couldn't even read it on the timing tab, but I would guess it was about 30 degrees BTDC. It is now correctly set at 5 degrees BTDC. It definitely seems to have more power and I managed to get it up to 62 mph on the freeway fairly easily (before I could barely get it up to 55). It still seems a little under powered, though.
[IMG]
 [/IMG]
YUUUUCK! What is that stuff? I cleaned it with a toothbrush and a paper towel, and it looked better afterwards:
[IMG]
 [/IMG]
I am guessing that this part is supposed to have some sort of cover to keep the gunk out. I'll try to find one or at least make something up. I couldn't find a paper clip (I probably have thousands in my desk at work), so I used a piece of thin welding rod to jump the terminals. I discovered that the timing was WAAAAY too advanced. I couldn't even read it on the timing tab, but I would guess it was about 30 degrees BTDC. It is now correctly set at 5 degrees BTDC. It definitely seems to have more power and I managed to get it up to 62 mph on the freeway fairly easily (before I could barely get it up to 55). It still seems a little under powered, though.
Last edited by skippycoyote; Jul 10, 2014 at 06:39 PM.

Thread
Thread Starter
Forum
Replies
Last Post
RedRunner_87
95.5-2004 Tacomas & 96-2002 4Runners (Build-Up Section)
84
Jun 1, 2021 01:51 PM
XtraCab
Solid Axle Swaps, All Years
18
Apr 12, 2020 05:25 AM


