
ROCKGUY76's 1987 4Runner Build-Up Thread
 Aug 18, 2012 | 10:21 AM
#1
Thread Starter
Registered User
Joined: Jul 2011
Posts: 81
Likes: 0
From: Grande Prairie, Alberta, Canada.
ROCKGUY76's 1987 4Runner Build-Up Thread
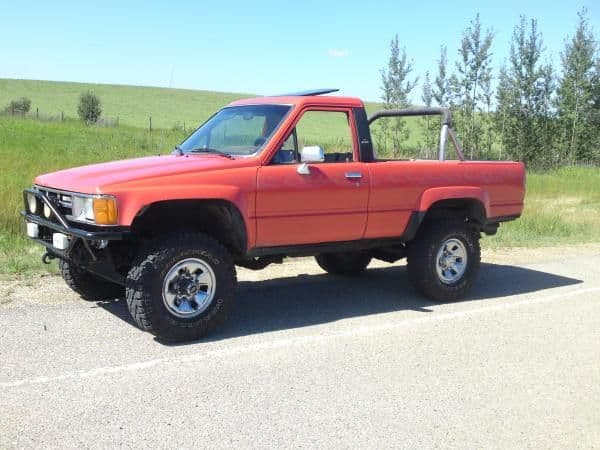
Hey good day. It's time for a build thread of my own.
A little history on me. Ive been a proud Toyota 4X4 owner since my first truck in 1996, it was a grey 85' regular cab long box, 22r, which I lifted, ran 33's and a lincoln locker in. I beat this little truck relentlessly, and the love affair was born.
Over the years I have built too many trucks and runners to list. But the highlights include an 85' Xtra cab factory sunroof, 22re, metallic blue with the ZZ-top stripes down the side, ARB locked 33's; an 85' 4Runner factory sunroof, 22re, 31' BFG's; 1984 Xtra cab 22r back to the future replica truck, lincoln locked with 33's; and my current runner. As a note, I build my trucks.
This runner was bought by me off of the daughter of the original owner, she drove it until the head gasket popped. I went with a $3 tube of aluminum rad flakes and dumped it into the radiator. The exhaust was blowing plumes of white steam, it puffed, puffed again, then stopped. I drove it home, and drove it for the next two weeks beating the snot out of it in pits and trails.
One morning I was looking at my 85' fuel injected, solid axle, factory sunroof runner and parked beside it was my $250 floppy that I had relentlessly beaten on for two weeks. I realized it was time to move on from my 85' and that day, the 87' floppy was pulled into my garage and we stripped it down to bare steel.
I cut out the firewall behind the front tires and relocated it back 2.5 inches. To do this and keep it stock looking inside and out was tough but doable. All the original brackets on the floor were cut off and tacked back in once the floor was re-plated. I cut down the kick panels so that they fit again. Had to slightly relocate the ECM and other minor stuff.
Then I cut 2 inches out of the fenders and made a new lip out of 20 gauge sheet metal and a cardboard template. I then cut over 2 inches out of the rear wheel wells and clearanced out the steel that could hang up on tires.The result is that I can run 33's with no lift and no rub!!! The best part is that most people don't even notice that there has been modifications done.
I've been doing alot of high mileage repairs to my runner and have big plans for it as well. The paint is 1970 GM hugger orange with 14 grams of orange pearl. The flames are done with a gram of gold dust that I bought from a jeweler, we then cut flame templates in three sizes. Using the inner and outer templates (totaling 6) we would mix up some gold dust with an activator, hardener and a reducer, and airbrush on flames, using one template at a time and going from front to back alternating the templates position. It took 8 hours to complete the flames. The effect is a 'ghost flame' look that people often don't even see when they are first looking at it.
I have lots of pics of my recent work done lately that I will soon post. And lot's of stuff coming in the future.
Travis...
Last edited by ROCKGUY76; Aug 13, 2015 at 04:26 PM.
Aug 18, 2012 | 12:19 PM
#2
That's a sweet looking 4runner! Nice work, can hardly tell you clearanced the inner wheelwell/ fenders! I always love orange, if I ever repaint mine I will probably go with some shade of orange, lol. Look forward to seeing some more pic!
Aug 19, 2012 | 06:06 PM
#3
Thread Starter
Registered User
Joined: Jul 2011
Posts: 81
Likes: 0
From: Grande Prairie, Alberta, Canada.
Thanx Ed. Ya I needed a color to go with the brown interior, plus orange is just cool!!! Dare to be different.
Aug 19, 2012 | 06:52 PM
#4
Thread Starter
Registered User
Joined: Jul 2011
Posts: 81
Likes: 0
From: Grande Prairie, Alberta, Canada.
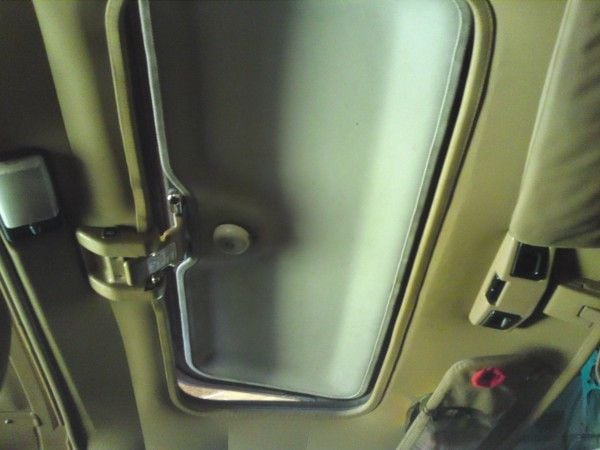
L.E.D under hood mod.
Recently I became interested in L.E.D interior lighting for my runner. I wasn't sure if I should go with single led's, multiple switches for front rear, that kinda thing. I did some research and found led's in flexible strip. I was leery but have read some threads and heard good things about them. I wanted to light up the engine compartment because finding that goofy 22R dipstick hole in the dark is brutal.
I called around and had prices as high as $150 for a 5 meter strip of the bright white 3528's. I bought mine through Amazon shipped to my door for $24. Here's the link: http://www.amazon.ca/gp/product/B008...ls_o01_s00_i00


Sorry it's upside down.

They come in a roll and can be cut every three led's. This kind of freaked me out a bit as the strip is coated with a thick layer of a clear flexible rubber type stuff.
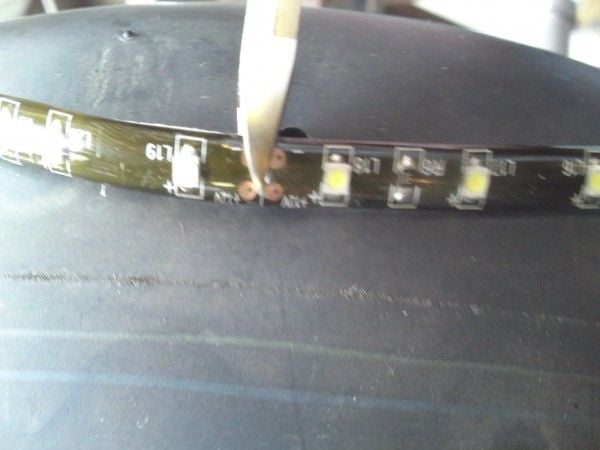
As you can see, there are contacts to tap into to link up the strips.
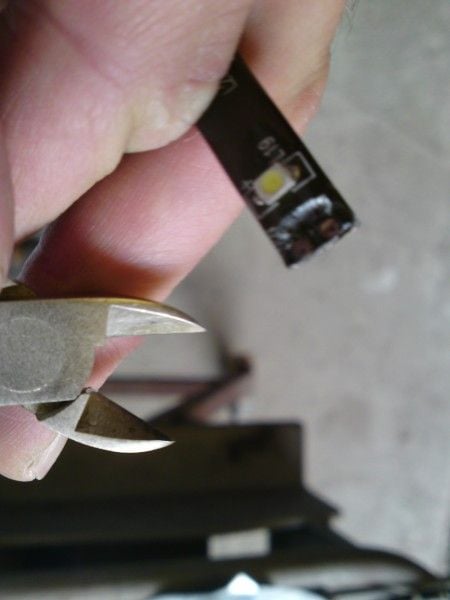
I used side cutters to carefully widdle down the rubber and expose the contacts. This was easier than I expected, but still had to go slow.
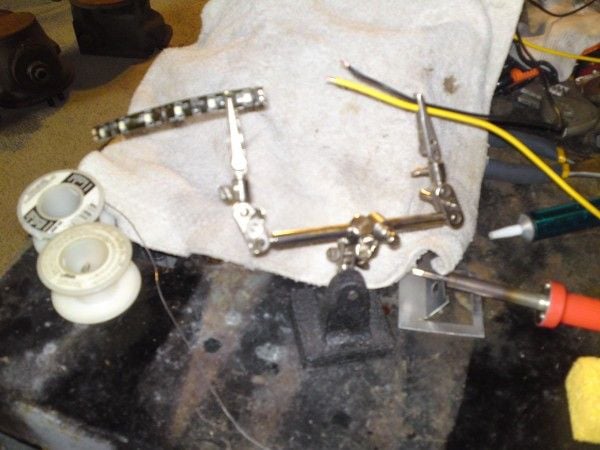
Handy tool for soldering.
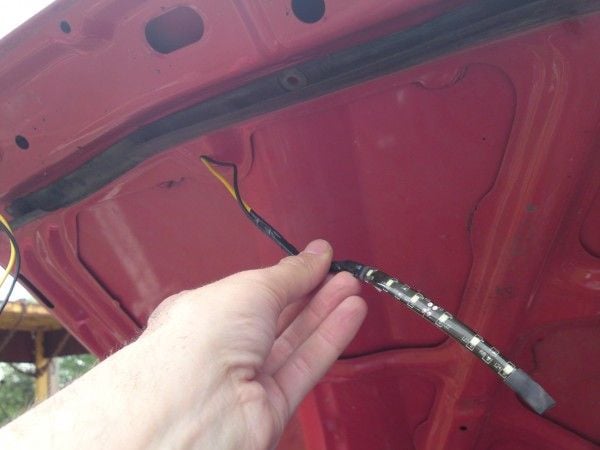
I used some appropriate sized heat shrink to cover the now exposed and soldered wires. Taped up a harness, and stuffed them through holes already in the hood.
The wiring for each separate LED strip just gets connected pos to pos, neg to neg. Each 3 LED strip has it's own resistor inline to drop the voltage down from 12V
I decided to use two strips of six led's each, mounted on the back side of the rib on the hood facing straight downwards. I couldn't mount them in the middle because when the hood closes, they would be right up against the radiator.
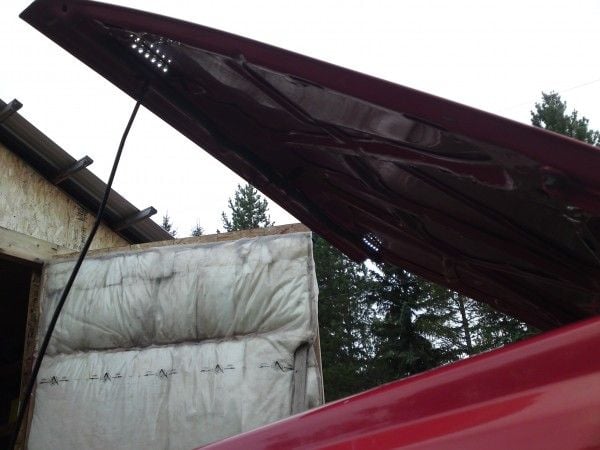
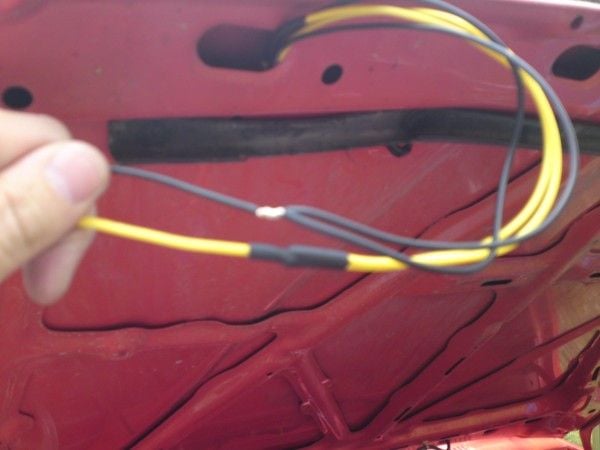
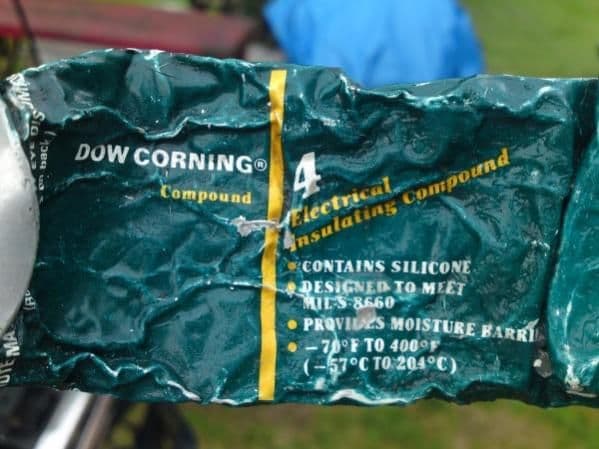
The strips are self adhesive, the wires are somewhat flexible but I taped them up into place to allow the strips to stick better. I plan on putting a dab of silicone or autobody seam sealer on the back sides of the wires to keep them tucked up cleanly away.

I kept all the wiring inside the ribs of the hood, sometimes using an auto antenna shoved through from side to side and taping the wires on to pull them through. The wires come out at the bottom of the hood near the firewall. I ran plastic loom up inside the passenger side and followed the windshield washer hose down.
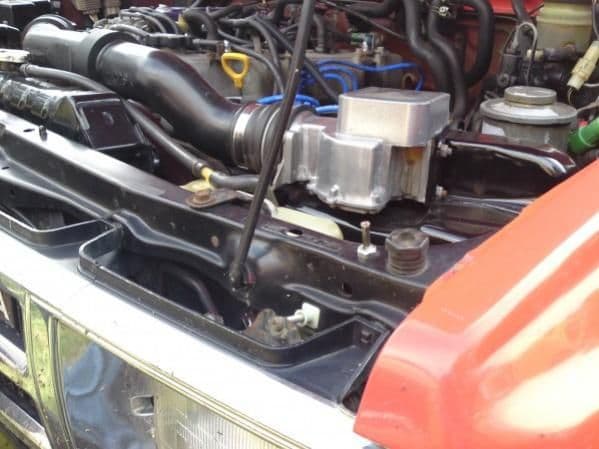
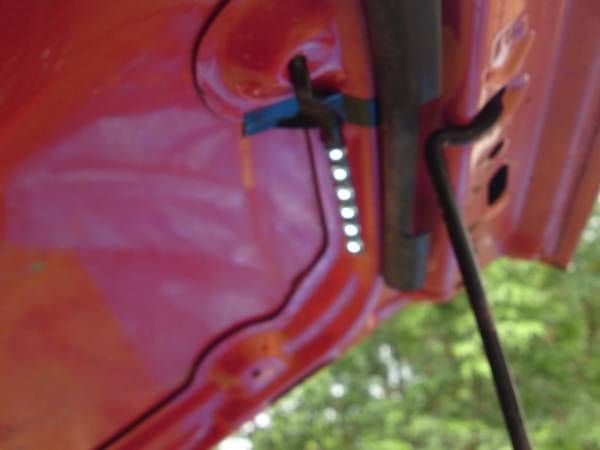
I mounted a hood pin on the drivers side on the rad support. I tried going pass side at first but the pin wasn't working there. It's important to make sure that the hood kills the lights. I opted out of going with a switch partly because I pressure wash my engine compartment so everything must be sealed, and I like the idea of an automated light.
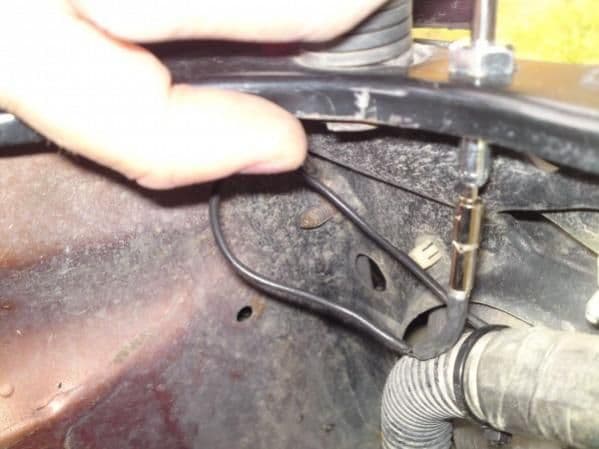
Hood pins work off of ground, so no power is running through them. I left a loop of wire for servicing purposes and ran the hood pin wire inside the factory wire loom that runs between the radiator and rad support. Power comes from the battery with a fuse right of the terminal.
My positive post has soooo many wires coming off of it already for two amps, two sets of driving lights, head unit, alarm, and the factory stuff. My battery is a top and side post battery, so I went and bought a side post positive battery terminal for $4 bucks at NAPA. That's where I tapped into.
I greased the hoodpin with dialectric grease. This stuff is awesome and I try to grease all my connections that are outside the cab, including light sockets. It protect from the dust and water that I subject my runner to regularly and makes everything last longer.

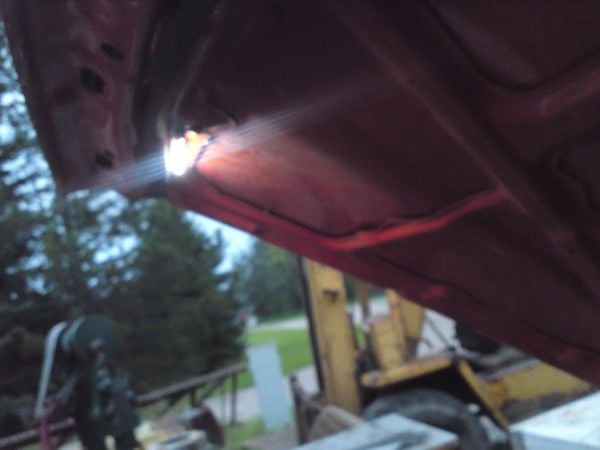
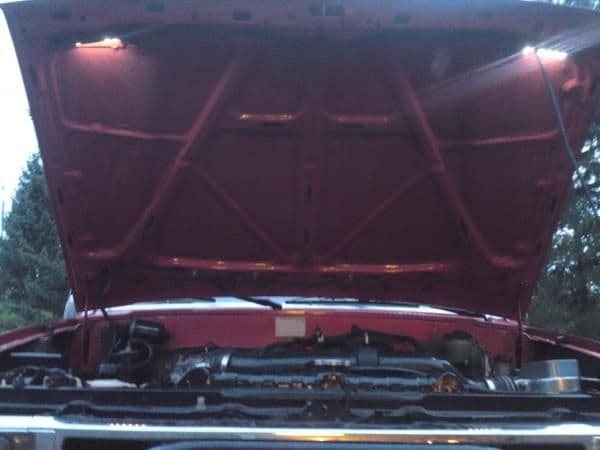
Finally a night pic!!!
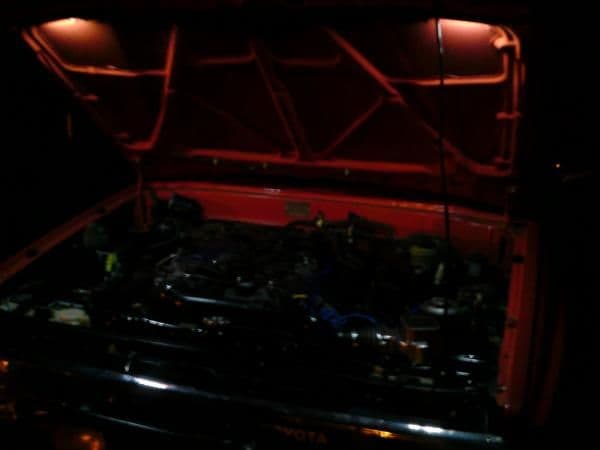
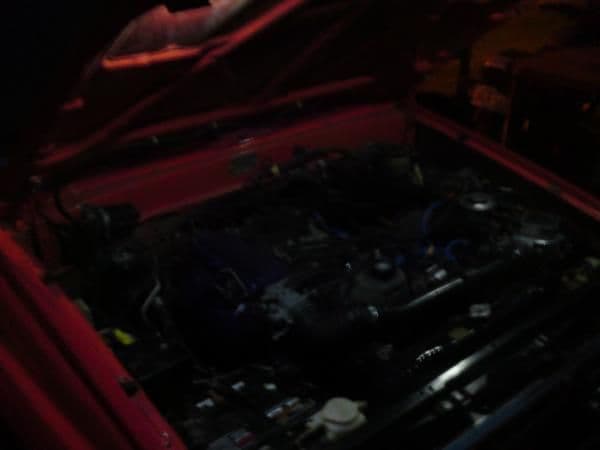
As you can see, using only 12 led's was adequate but somewhat questionable to begin with. Mounting locations and a clean installation are high on my priority list. Fortunately, they light up nicely at night.

They are actually brighter than this show, I had a hard time getting my camera to get decent night shots.
They cast a decent shadow on the ground and provide plenty of light for those dark nights talking around an open hood. This has been my favorite mod in a while. I keep popping the hood to show it off every chance I get, haha. This is the first Toy I've had with a hood light.
I would recommend this to anyone, keep in mind you can use many more led's if you want more light.
I called around and had prices as high as $150 for a 5 meter strip of the bright white 3528's. I bought mine through Amazon shipped to my door for $24. Here's the link: http://www.amazon.ca/gp/product/B008...ls_o01_s00_i00
Sorry it's upside down.
They come in a roll and can be cut every three led's. This kind of freaked me out a bit as the strip is coated with a thick layer of a clear flexible rubber type stuff.
As you can see, there are contacts to tap into to link up the strips.
I used side cutters to carefully widdle down the rubber and expose the contacts. This was easier than I expected, but still had to go slow.
Handy tool for soldering.
I used some appropriate sized heat shrink to cover the now exposed and soldered wires. Taped up a harness, and stuffed them through holes already in the hood.
The wiring for each separate LED strip just gets connected pos to pos, neg to neg. Each 3 LED strip has it's own resistor inline to drop the voltage down from 12V
I decided to use two strips of six led's each, mounted on the back side of the rib on the hood facing straight downwards. I couldn't mount them in the middle because when the hood closes, they would be right up against the radiator.
The strips are self adhesive, the wires are somewhat flexible but I taped them up into place to allow the strips to stick better. I plan on putting a dab of silicone or autobody seam sealer on the back sides of the wires to keep them tucked up cleanly away.
I kept all the wiring inside the ribs of the hood, sometimes using an auto antenna shoved through from side to side and taping the wires on to pull them through. The wires come out at the bottom of the hood near the firewall. I ran plastic loom up inside the passenger side and followed the windshield washer hose down.
I mounted a hood pin on the drivers side on the rad support. I tried going pass side at first but the pin wasn't working there. It's important to make sure that the hood kills the lights. I opted out of going with a switch partly because I pressure wash my engine compartment so everything must be sealed, and I like the idea of an automated light.
Hood pins work off of ground, so no power is running through them. I left a loop of wire for servicing purposes and ran the hood pin wire inside the factory wire loom that runs between the radiator and rad support. Power comes from the battery with a fuse right of the terminal.
My positive post has soooo many wires coming off of it already for two amps, two sets of driving lights, head unit, alarm, and the factory stuff. My battery is a top and side post battery, so I went and bought a side post positive battery terminal for $4 bucks at NAPA. That's where I tapped into.
I greased the hoodpin with dialectric grease. This stuff is awesome and I try to grease all my connections that are outside the cab, including light sockets. It protect from the dust and water that I subject my runner to regularly and makes everything last longer.
Finally a night pic!!!
As you can see, using only 12 led's was adequate but somewhat questionable to begin with. Mounting locations and a clean installation are high on my priority list. Fortunately, they light up nicely at night.
They are actually brighter than this show, I had a hard time getting my camera to get decent night shots.
They cast a decent shadow on the ground and provide plenty of light for those dark nights talking around an open hood. This has been my favorite mod in a while. I keep popping the hood to show it off every chance I get, haha. This is the first Toy I've had with a hood light.
I would recommend this to anyone, keep in mind you can use many more led's if you want more light.
Aug 20, 2012 | 01:44 AM
#5
Nice looking runner, I like the stance it has. I envy you guys with welding skills. Hoping to have a welder soon in my shop and start learning.
Seen on Eds thread about using interior paint. I was always against it, but I am thinking people were using regular paint. It has to be interior paint. I tried this when I did my 88 runner build and have been really happy with the results. Later I seen Stacey David on Gearz do this to Ted Nuggents Bronco. He used a different cleaning agent then I do, but if done right it does alot for an interior.
I have it listed on the first page of my 88 Runner build or starting on page 30 of the same build I did it again. The paint store told what their sales were on interior paint alone and I was shocked. Any questions feel free to ask. Great looking runner.
Aug 22, 2012 | 08:24 PM
#6
Thread Starter
Registered User
Joined: Jul 2011
Posts: 81
Likes: 0
From: Grande Prairie, Alberta, Canada.
Thanx Terry. I can't take all the credit for the work done. I recruit help wherever and whenever I can.
I've been reading your thread and like the way your interior turned out, excellent job! You've given me new ideas to work with.
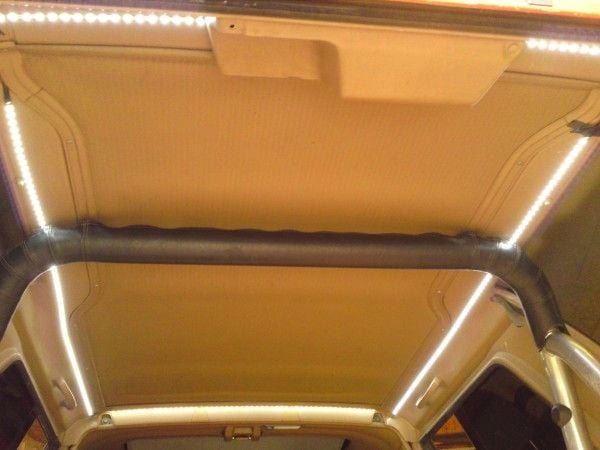
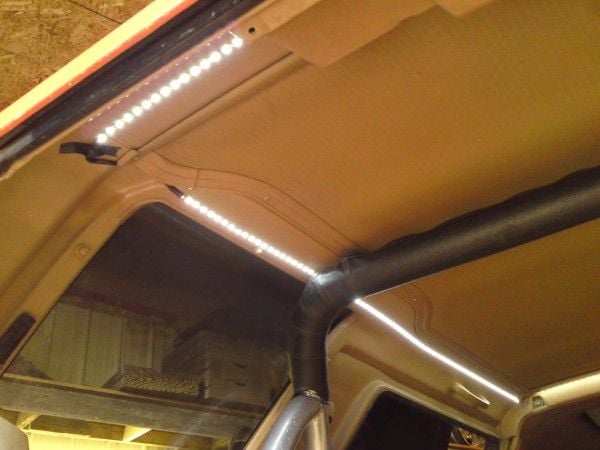
My job for this coming weekend is to use the same LED strip to do interior lighting in the rear. I plan to hot wire the rear cargo light switch so it no longer needs the running lights on to work. And to tap into it at the rear bulb itself and run wires up to the LED's that I will mount on the roof of the hardtop running length wise inside to light up my life.
I plan to tap into the wiring and re-use the factory plug that connect up to the rear wiper motor. I have disabled it anyways and don't plan on resurrecting it. This way I won't have to actually plumb wires up to the wiper motor and I figure that will be a good place to run the LED's from.
Once I get some more done, I'll update with pictures. I invested in some 31mm 4 SMD 5050 LED replacement interior bulbs as well, ones the cool white and one is the warm white. I wanted to see the difference between the two. Hopefully they'll be in this week.
I've been reading your thread and like the way your interior turned out, excellent job! You've given me new ideas to work with.
My job for this coming weekend is to use the same LED strip to do interior lighting in the rear. I plan to hot wire the rear cargo light switch so it no longer needs the running lights on to work. And to tap into it at the rear bulb itself and run wires up to the LED's that I will mount on the roof of the hardtop running length wise inside to light up my life.
I plan to tap into the wiring and re-use the factory plug that connect up to the rear wiper motor. I have disabled it anyways and don't plan on resurrecting it. This way I won't have to actually plumb wires up to the wiper motor and I figure that will be a good place to run the LED's from.
Once I get some more done, I'll update with pictures. I invested in some 31mm 4 SMD 5050 LED replacement interior bulbs as well, ones the cool white and one is the warm white. I wanted to see the difference between the two. Hopefully they'll be in this week.
Aug 25, 2012 | 09:13 AM
#7
Thread Starter
Registered User
Joined: Jul 2011
Posts: 81
Likes: 0
From: Grande Prairie, Alberta, Canada.
 I finally got my back window working again. I had replaced the switch in the console last year, and thought that may be the problem again.
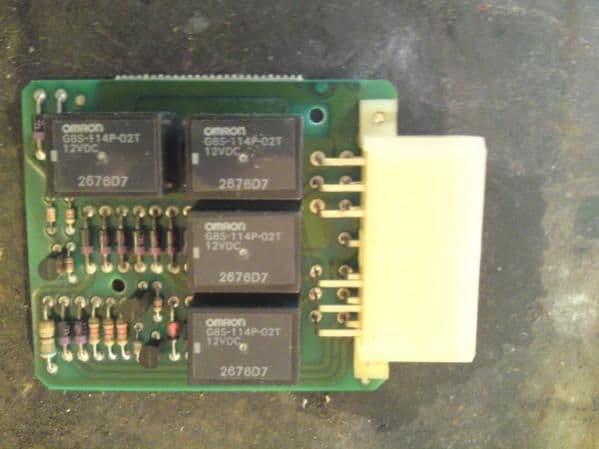
 It took open heart surgery to fix it this time. I ended up buying 4 new relays and soldering them onto the board of the power window control module. All my switches including the infamously sticky 'window lock switch' got soaked in white vinegar and work like new now.
The back door got a disassemble and overall lubrication. I've never seen a Toyota window move that quickly before!!!
Now on to interior lighting.
Trending Topics
Aug 25, 2012 | 05:43 PM
#8
Thread Starter
Registered User
Joined: Jul 2011
Posts: 81
Likes: 0
From: Grande Prairie, Alberta, Canada.
Rear L.E.D lighting mod
This has been a project that I've been pondering for years. This was the reason that I bought the LED strip mentioned earlier. There are some awesome references available for peoples ideas and tips and tricks.
A big thanx to the 'cheap tricks' section and guys that I'm trying to learn how to quote on here. Has anyone used linkbacks?
I did the 'always powered' mod on the cargo lights switch on the dash. I wired the green/black (I think) wire on the dash side of the plug to a constant, fused battery source. This allowed me to use the dash switch to power the rear stock cargo light, a light that is less than sufficient.
https://www.yotatech.com/attachment....1&d=1345957144

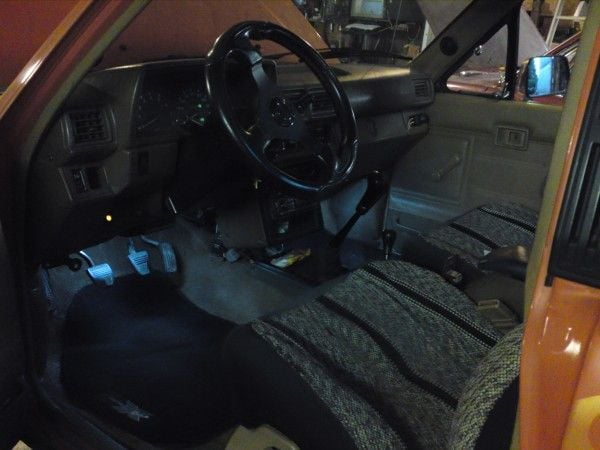
I'm just showing that brown interior with the right accents can look good. The blue LED's are old led's that I've had kicking around and figured may
as well use them. The black on the steering wheel, stereo bezel, console boot, console top, and shifters knobs use to all be a hideous brown. I think the black cleans up the look alot.
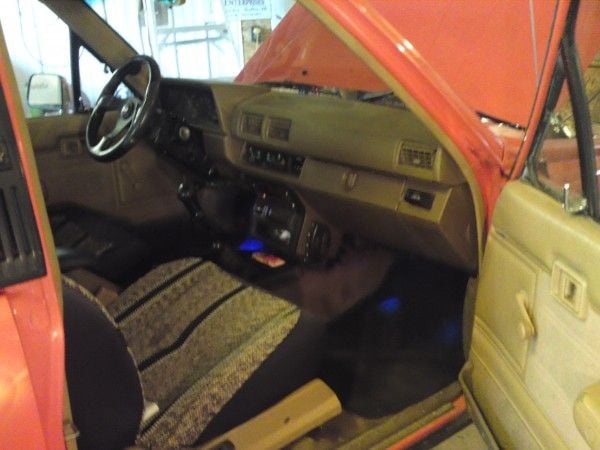
There are alot of mis-colored interior pieces on my Runner as well. But this hard to find factory sunroof cover is one of my pride and joys. I'm considering ideas on matching up it's color with the brown or??? Any ideas are appreciated.
I then tapped into the wiring on the truck side of the plug (so the light can be removed still) to gain power once the switches are on and the bulb is lit. I think they were the white/black and green/yellow. These wires I made jumpers for then routed them to the factory plug which disconnects the rear wiper wiring from the truck for hardtop removal. My wiper has never worked and when I owned Runners where it did, I had nothing but problems and never liked it anyways.
Final step is to tap into those wires up in the hardtop at the wiper and voila! A factory switched rear lighting setup with both front and rear switches, and can be turned on regardless of key position.
Sorry about the blurry pic. I'll try and get better ones tonight, just too stoked and wanted to get them posted.
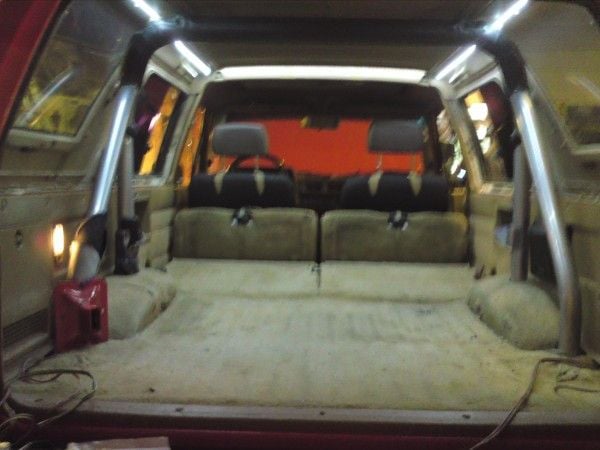
Its definitely the limo lighting effect and adds a touch of class to an already pretty kick ass truck. Us runner guys understand. Now camping or wheeling at night is a brighter event.
The black tape I'm using is to try and get the ends of the self adhesive backing to stick. I may have to use a dab of glue on the ends to keep them in place. The rest of the strip holds perfectly and are easy to instal.
I'm pretty happy and thanx to YotaTech, I'm getting my butt in gear and getting things done again.
A big thanx to the 'cheap tricks' section and guys that I'm trying to learn how to quote on here. Has anyone used linkbacks?
I did the 'always powered' mod on the cargo lights switch on the dash. I wired the green/black (I think) wire on the dash side of the plug to a constant, fused battery source. This allowed me to use the dash switch to power the rear stock cargo light, a light that is less than sufficient.
https://www.yotatech.com/attachment....1&d=1345957144
I'm just showing that brown interior with the right accents can look good. The blue LED's are old led's that I've had kicking around and figured may
as well use them. The black on the steering wheel, stereo bezel, console boot, console top, and shifters knobs use to all be a hideous brown. I think the black cleans up the look alot.
There are alot of mis-colored interior pieces on my Runner as well. But this hard to find factory sunroof cover is one of my pride and joys. I'm considering ideas on matching up it's color with the brown or??? Any ideas are appreciated.
I then tapped into the wiring on the truck side of the plug (so the light can be removed still) to gain power once the switches are on and the bulb is lit. I think they were the white/black and green/yellow. These wires I made jumpers for then routed them to the factory plug which disconnects the rear wiper wiring from the truck for hardtop removal. My wiper has never worked and when I owned Runners where it did, I had nothing but problems and never liked it anyways.
Final step is to tap into those wires up in the hardtop at the wiper and voila! A factory switched rear lighting setup with both front and rear switches, and can be turned on regardless of key position.
Sorry about the blurry pic. I'll try and get better ones tonight, just too stoked and wanted to get them posted.
Its definitely the limo lighting effect and adds a touch of class to an already pretty kick ass truck. Us runner guys understand. Now camping or wheeling at night is a brighter event.
The black tape I'm using is to try and get the ends of the self adhesive backing to stick. I may have to use a dab of glue on the ends to keep them in place. The rest of the strip holds perfectly and are easy to instal.
I'm pretty happy and thanx to YotaTech, I'm getting my butt in gear and getting things done again.
Last edited by ROCKGUY76; Aug 26, 2012 at 04:15 PM. Reason: Pictures aren't showing up.
Aug 25, 2012 | 10:19 PM
#9
Thread Starter
Registered User
Joined: Jul 2011
Posts: 81
Likes: 0
From: Grande Prairie, Alberta, Canada.
AAAAHHHH, whoops! I realized that all my thread pics were stored in a private folder. Haha. Sorry about that, geez. Those would have been some boring threads without the pictures.
It's fixed now, enjoy!!!
Thanx Ed for your help in solving that issue.
It's fixed now, enjoy!!!
Thanx Ed for your help in solving that issue.
Last edited by ROCKGUY76; Aug 25, 2012 at 10:20 PM.
Aug 25, 2012 | 10:57 PM
#10
Hey Travis, no problem, glad i could help! Those led lights in the cargo area look amazing! I'm going to have to do something like that!!! I like how you did the ones under the hood also, nice work!
Aug 26, 2012 | 04:05 PM
#11
Thread Starter
Registered User
Joined: Jul 2011
Posts: 81
Likes: 0
From: Grande Prairie, Alberta, Canada.
Hi lift mounting question???
Hey guys. I need some advice. I want to mount my hi-lift jack to my factory roll-bar.

It fits nicely with the front of the jack tucked into the back of the rear seats when they are in the up position.
If I knew what size the thread is on the lower seat belt bolt I can fab up something there. I think it 10 X 1.5 ??? Anybody confirm or deny? I'm considering using the mount at http://www.4crawler.com/4x4/ForSale/HiLiftMount.shtml.
But if I can make one, I save myself some hard to come by cash. Also I will need some kind of mount to secure the jack to the back portion on the roll bar. I don't want to sacrifice safety as a jack this heavy would make for a nasty projectile in a hard front end collision. I see some brackets available online for alot of cash. Any thoughts or links or help would be very much appreciated.
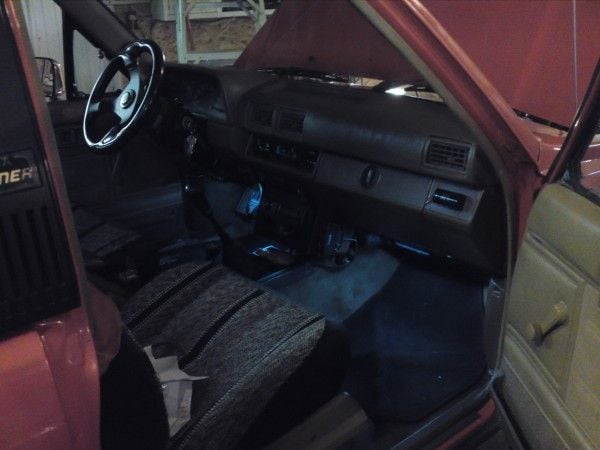
Here's some more interior pics of the roof mounted LED's.
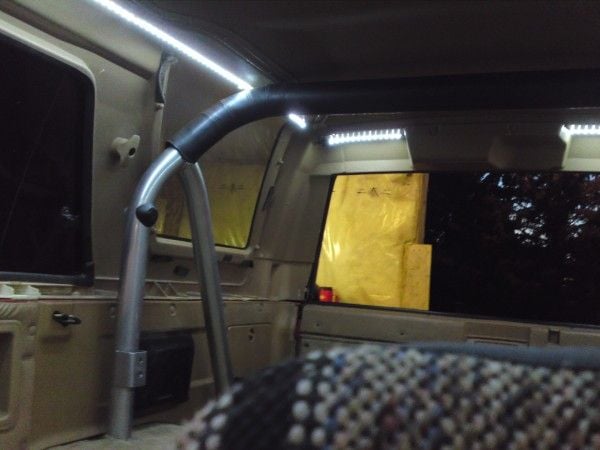
And off.
And on.
And from the outside. good shot of the ghost flames too.

And my buddies 66' Stang that we are restoring. It's so close to being finished!

Off topic again, haha, whoops. Ya anyways any thoughts on the roll bar hi-lift mount would be appreciated.
Thanx.
It fits nicely with the front of the jack tucked into the back of the rear seats when they are in the up position.
If I knew what size the thread is on the lower seat belt bolt I can fab up something there. I think it 10 X 1.5 ??? Anybody confirm or deny? I'm considering using the mount at http://www.4crawler.com/4x4/ForSale/HiLiftMount.shtml.
But if I can make one, I save myself some hard to come by cash. Also I will need some kind of mount to secure the jack to the back portion on the roll bar. I don't want to sacrifice safety as a jack this heavy would make for a nasty projectile in a hard front end collision. I see some brackets available online for alot of cash. Any thoughts or links or help would be very much appreciated.
Here's some more interior pics of the roof mounted LED's.
And off.
And on.
And from the outside.
good shot of the ghost flames too.And my buddies 66' Stang that we are restoring. It's so close to being finished!
Off topic again, haha, whoops. Ya anyways any thoughts on the roll bar hi-lift mount would be appreciated.
Thanx.
Aug 26, 2012 | 08:20 PM
#12
Thread Starter
Registered User
Joined: Jul 2011
Posts: 81
Likes: 0
From: Grande Prairie, Alberta, Canada.
Did some routine maintenance today. Changed the tranny/transfer case fluids. My exhaust is in the way from me easily being able to fill the transmission at the fill plug, so I pulled the console and shifter boot and dumped it in the top! Not excellent but clean fluids all around.
My dad always told me when it comes to changing these kind of fluids, 'if you can't remember when you did it last, it's a good time to do it now!' Haha. He has a valid point.
Looks like my roll bar mount hi-lift is coming along, thanx to Ed https://www.yotatech.com/members/69882.html and Chefyota4X4 https://www.yotatech.com/members/49045.html for your advice. I'll post some pics when I get it mounted.
I replaced all four relays in my power rear window module.
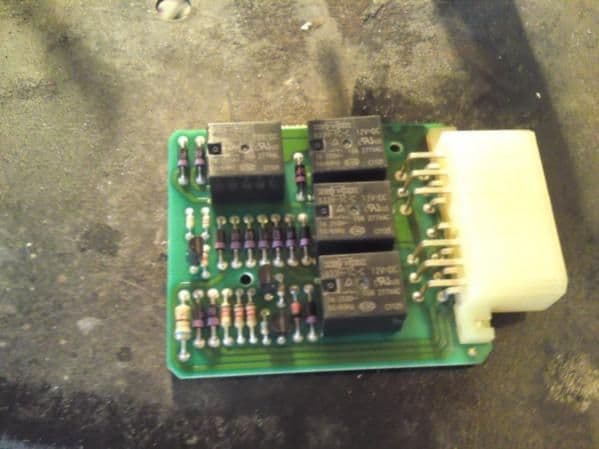
Before.
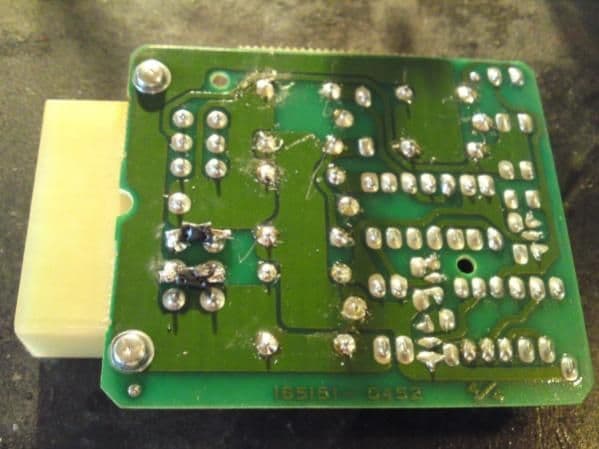
After.
Not perfect solders but it'll work. This window has been a thorn in my side for at least a year now!!!
My dad always told me when it comes to changing these kind of fluids, 'if you can't remember when you did it last, it's a good time to do it now!' Haha. He has a valid point.
Looks like my roll bar mount hi-lift is coming along, thanx to Ed https://www.yotatech.com/members/69882.html and Chefyota4X4 https://www.yotatech.com/members/49045.html for your advice. I'll post some pics when I get it mounted.
I replaced all four relays in my power rear window module.
Before.
After.
Not perfect solders but it'll work. This window has been a thorn in my side for at least a year now!!!
Aug 27, 2012 | 05:56 PM
#13
Thread Starter
Registered User
Joined: Jul 2011
Posts: 81
Likes: 0
From: Grande Prairie, Alberta, Canada.
My LED interior replacement lights came in today. I ordered them from LED wholesalers and they sent me the wrong LED's. Lame. I waited two weeks to get some weird led's that are not going to work in my Runner. Talked to them and in two more weeks, my proper led's should be here.
I'm going to be doing a GM alternator swap this week. I have an 80amp 2 wire alternator. Does anyone know how to bench test this thing to see if it's good?
Also, for anyone who's wired this, did you run the heavy gauge wire straight out to the battery from the alternator with a fuse? Or go through the original location in the under hood fuse box? I already know what to do with the two wire plug, just unsure of what others have done with the main power wire.
Aug 27, 2012 | 06:27 PM
#14
Hey Travis, man you've been going to town on interior upgrades! Nice work! I'll definately be using your build thread for ideas! That sucks about them sending you the wrong LED's! I hate it when that happens. I haven't done the GM alt swap, but it seems like you'd be good using the original location on the underhood fuse box... I'm sure someone who's done it will chime in for some more info! Look forward to see how it turns out!
Aug 28, 2012 | 01:26 AM
#15
First car I worked on was a 68 Mustang. Always had a soft spot for the 64-66. One day would like to have one again. Never did the alternator upgrade so cant help you there. I actually like the tan interiors myself. Yours is looking great.
Aug 29, 2012 | 09:26 AM
#16
Thread Starter
Registered User
Joined: Jul 2011
Posts: 81
Likes: 0
From: Grande Prairie, Alberta, Canada.
Hey Travis, man you've been going to town on interior upgrades! Nice work! I'll definately be using your build thread for ideas! That sucks about them sending you the wrong LED's! I hate it when that happens. I haven't done the GM alt swap, but it seems like you'd be good using the original location on the underhood fuse box... I'm sure someone who's done it will chime in for some more info! Look forward to see how it turns out!
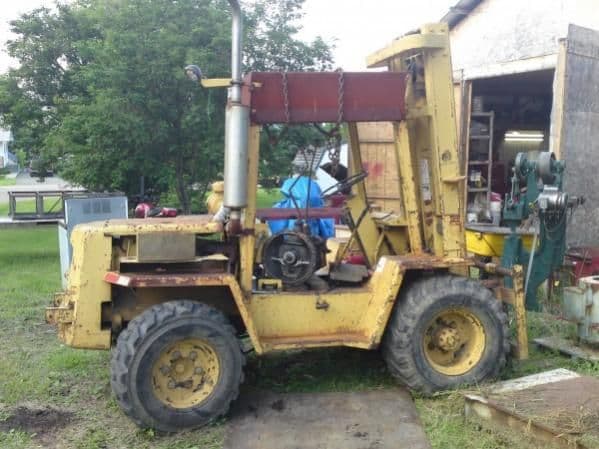
Yesterday, we got the new clutch in the forklift. This thing has been dogging us for a while now. With the shop move comes alot of heavy lifting. It's so nice to have the forklift running again!
Also, Thanx Terry. I'm pretty happy with how well the interior is holding up. And my recent mods have breathed new life into this old truck once again!
My valve cover gaskets arrive today, so within the next day or so I should pull the cover and adjust the valves. Any ideas on how I can clean this ugly valve cover up? I thought about sandblasting, but am worried about residual sand getting stuck in the baffles and working loose into my engine eventually. Any ideas would be appreciated?!?
Plus I need to run my GM alternator in to town to get it bench tested before I go through the job of swapping brackets and wiring. I'm waiting on the brackets from T.G.
School starts again next Wednesday. So I only have a week to finishing all the T.L.C. that I can do on the Runner, and get my tools and wiring gear into storage. I'm pretty sure I'm planning on bringing my tool box into my downtown apartment in Edmonton. Haha, it's safer for the tool to be stored somewhere dry than risk my other option, which is a dirt floor equipment shed. I just have too much invested to allow moisture to mess with my tools! With any luck, the perfect property will come along soon so that we can simply relocate our shop into something that's already built. Realistically we will be buying property and building another shop.
My buddy has a small machine shop here, with 2 lathes, a C&C machine, mig welder, plasma cutter, and all sorts of other good stuff. We got into buying and selling as a way to make extra money, but we quickly ran out of room here, and need to expand. A cash offer came in on this property so take the money and run. We had to buy a 40' seacan, which was delivered yesterday. Now we can safely store the shop equipment until we can get set up again. I'm definitely going to miss the extra income this winter.
Aug 29, 2012 | 08:31 PM
#18
Registered User
iTrader: (4)
Joined: May 2010
Posts: 720
Likes: 16
From: People's Republic of California
Glad I stopped by your build...I want to do LED strips like yours on my can-back frame. I'll have to stop by again to read up on how you wired it up. I think I may need some made for boats though...probably should be waterproof since it's not the interior for my application.
I answered your question about the valve cover on the thread if you were talk'n to me. Just cleaned up the grease and painted. Don't be in a rush to start it up, give it time to dry.
I answered your question about the valve cover on the thread if you were talk'n to me. Just cleaned up the grease and painted. Don't be in a rush to start it up, give it time to dry.
Last edited by Grego92; Aug 29, 2012 at 08:32 PM.
Aug 29, 2012 | 09:07 PM
#19
Thread Starter
Registered User
Joined: Jul 2011
Posts: 81
Likes: 0
From: Grande Prairie, Alberta, Canada.
Glad I stopped by your build...I want to do LED strips like yours on my can-back frame. I'll have to stop by again to read up on how you wired it up. I think I may need some made for boats though...probably should be waterproof since it's not the interior for my application.
I answered your question about the valve cover on the thread if you were talk'n to me. Just cleaned up the grease and painted. Don't be in a rush to start it up, give it time to dry.
I answered your question about the valve cover on the thread if you were talk'n to me. Just cleaned up the grease and painted. Don't be in a rush to start it up, give it time to dry.

As far as the LED strips go, they are completely waterproof. The strips are coated with a flexible rubbery stuff. The only place that water would be a problem is where you need to cut the strips and solder the wires on. If you solder properly, heatshrink AND tape all your connections, as I did, I would expect water to be a non-issue. PS, I'm jealous of your Canback

 Aug 30, 2012 | 08:21 PM
#20
Thread Starter
Registered User
Joined: Jul 2011
Posts: 81
Likes: 0
From: Grande Prairie, Alberta, Canada.
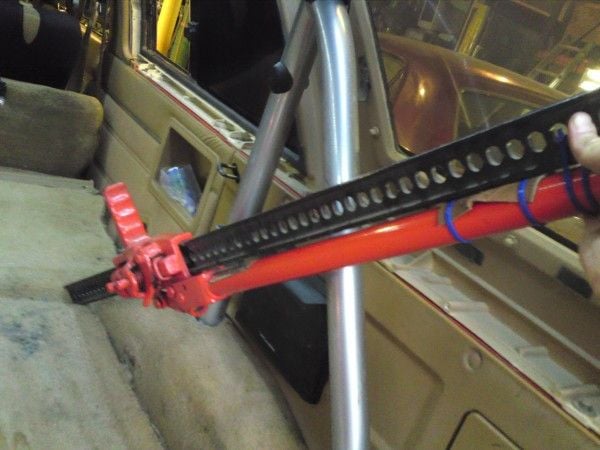
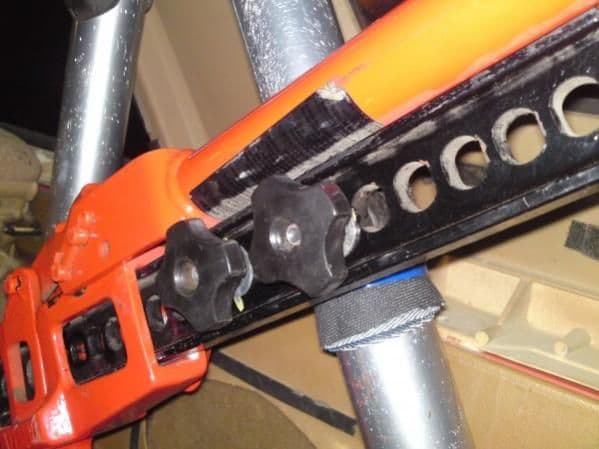
Hi-lift jack roll bar mount.
I finally got my hi-lift Jack mounted!!! This has been an ongoing project for over a year now. I wanted to have it very securely mounted but also fairly easily assessable. Most importantly was I wanted it secure, and not impeding dangerously within head height of rear passengers if it was sticking up at the front.
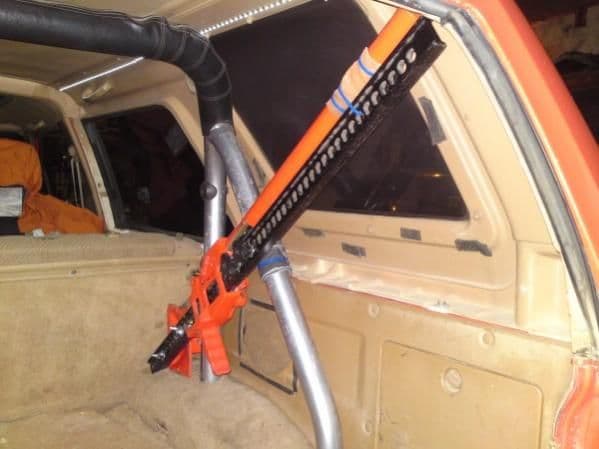
My jack fit perfectly using the lower factory seatbelt bung on the roll bar, facing down into the passenger side rear seat. The top stuff's cleanly up into the rear roof area, and doesn't impede loading from the back window area.
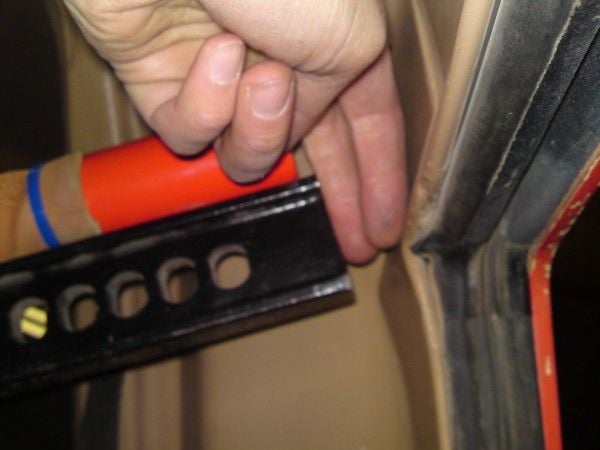
The bottom bolt used for the factory spot is a 7/16 fine thread, 2"long. Yes really, it's not metric. To eliminate rattles, I separated the roll bar from the jack using a piece if rubber bushing cut down to fit it snugly.
I opted to mount the base of the jack on wingnuts to the shaft of the jack itself. This was kind of the only solidly mounted option to base storage. The one drawback of this mount is that I can't store the base on the end of the jack. The idea is that this thing is for emergencies and not a regular use item (I hope )
)
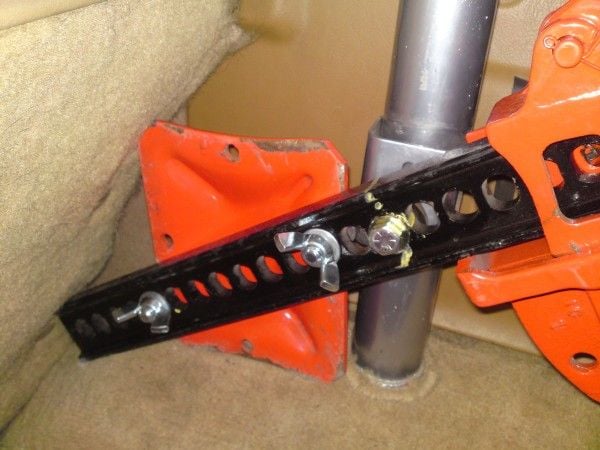
The top bracket I made out of a muffler clamp, bolted the clamp securely to the roll bar, and used the black handled easy off knobs. These I just tapped to the same size as the muffler clamp thread. This setup is also isolated by a modified rubber bushing. I like the fact that I can unbolt the jack and the clamp remains secure to the roll-bar.
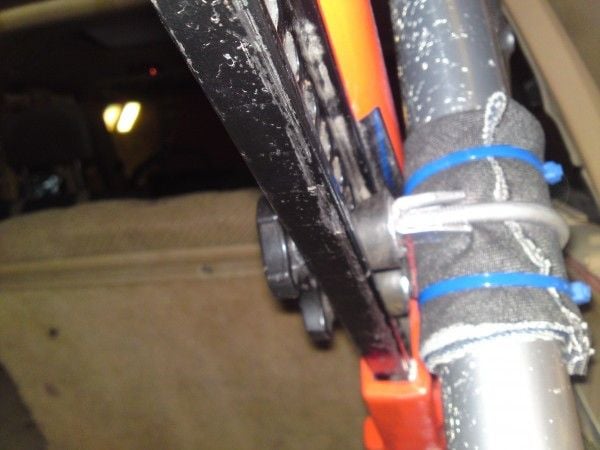
The blue zap-straps and material is just there so the clamp doesn't dig away into the powder coat on the rollbar. I did that 10 years ago, tried something other than a black rollbar.
I also added some more LED strips off of the same cargo light circuit. I liked how when the cargo light is on, the cargo light switch illuminates. I found the wire that delivers power to the switch light, and tapped into that for my front LED power.
LED's us so little current that I didn't need to use relays for high current, so much easier to use. Plus I leave the LED's on for hours while I'm working in the shop and it's made no difference to battery voltage when I checked the battery with a multi meter.
I love the extra light!!!
I'm still messing around with the GM alternator. Hoping tomorrow or Sat things will come together and I cant make that happen.
My jack fit perfectly using the lower factory seatbelt bung on the roll bar, facing down into the passenger side rear seat. The top stuff's cleanly up into the rear roof area, and doesn't impede loading from the back window area.
The bottom bolt used for the factory spot is a 7/16 fine thread, 2"long. Yes really, it's not metric. To eliminate rattles, I separated the roll bar from the jack using a piece if rubber bushing cut down to fit it snugly.
I opted to mount the base of the jack on wingnuts to the shaft of the jack itself. This was kind of the only solidly mounted option to base storage. The one drawback of this mount is that I can't store the base on the end of the jack. The idea is that this thing is for emergencies and not a regular use item (I hope
)The top bracket I made out of a muffler clamp, bolted the clamp securely to the roll bar, and used the black handled easy off knobs. These I just tapped to the same size as the muffler clamp thread. This setup is also isolated by a modified rubber bushing. I like the fact that I can unbolt the jack and the clamp remains secure to the roll-bar.
The blue zap-straps and material is just there so the clamp doesn't dig away into the powder coat on the rollbar. I did that 10 years ago, tried something other than a black rollbar.
I also added some more LED strips off of the same cargo light circuit. I liked how when the cargo light is on, the cargo light switch illuminates. I found the wire that delivers power to the switch light, and tapped into that for my front LED power.
LED's us so little current that I didn't need to use relays for high current, so much easier to use. Plus I leave the LED's on for hours while I'm working in the shop and it's made no difference to battery voltage when I checked the battery with a multi meter.
I love the extra light!!!
I'm still messing around with the GM alternator. Hoping tomorrow or Sat things will come together and I cant make that happen.


