
RBx 1988 4Runner Build-Up Thread
 May 15, 2013 | 06:23 AM
#1441
Thread Starter
Registered User

Joined: Jan 2010
Posts: 3,795
Likes: 33
From: Bloodymore
^^^ $$$, plain and simple.
While it may be close to the same price, you cannot buy the FROR in pieces. The FROR kit is really great since you get all the pieces you need, and it is priced competitively when you figure all the parts you need.
I am planning on doing a write up on measurements, axle shafts and seal issues once I am finished, because there are a bunch of variables that most FF conversion threads don't detail.


 May 16, 2013 | 03:55 AM
#1445
Registered User
Joined: Apr 2011
Posts: 1,947
Likes: 1
From: Monkton, MD

But really, at least he didn't use a hi-lift jack as his main support

The stands welded to the ramps isn't a bad idea.
May 16, 2013 | 04:59 AM
#1446
Either way it is a great idea plenty of room to work and get around.
May 16, 2013 | 05:11 AM
#1447
Thread Starter
Registered User
Joined: Jan 2010
Posts: 3,795
Likes: 33
From: Bloodymore
Cinderblocks...NO...pavers/bricks to hold the trans in place...YES.
I had to gain enough lift to clear 30" from the floor to the frame. I have seen people use pipe-fitter stands(tall adjustable jack-stands), and jacks welded to old rims. I welcome anyone to come over and TRY to knock this truck off a stand, it's not going anywhere, I tried before i pulled the tires. And besides, my life insurance is paid up!
I had to gain enough lift to clear 30" from the floor to the frame. I have seen people use pipe-fitter stands(tall adjustable jack-stands), and jacks welded to old rims. I welcome anyone to come over and TRY to knock this truck off a stand, it's not going anywhere, I tried before i pulled the tires. And besides, my life insurance is paid up!
May 16, 2013 | 07:41 AM
#1448
Cinderblocks...NO...pavers/bricks to hold the trans in place...YES.
I had to gain enough lift to clear 30" from the floor to the frame. I have seen people use pipe-fitter stands(tall adjustable jack-stands), and jacks welded to old rims. I welcome anyone to come over and TRY to knock this truck off a stand, it's not going anywhere, I tried before i pulled the tires. And besides, my life insurance is paid up!
I had to gain enough lift to clear 30" from the floor to the frame. I have seen people use pipe-fitter stands(tall adjustable jack-stands), and jacks welded to old rims. I welcome anyone to come over and TRY to knock this truck off a stand, it's not going anywhere, I tried before i pulled the tires. And besides, my life insurance is paid up!
May 22, 2013 | 04:47 AM
#1450
Thread Starter
Registered User
Joined: Jan 2010
Posts: 3,795
Likes: 33
From: Bloodymore
Full Floater update
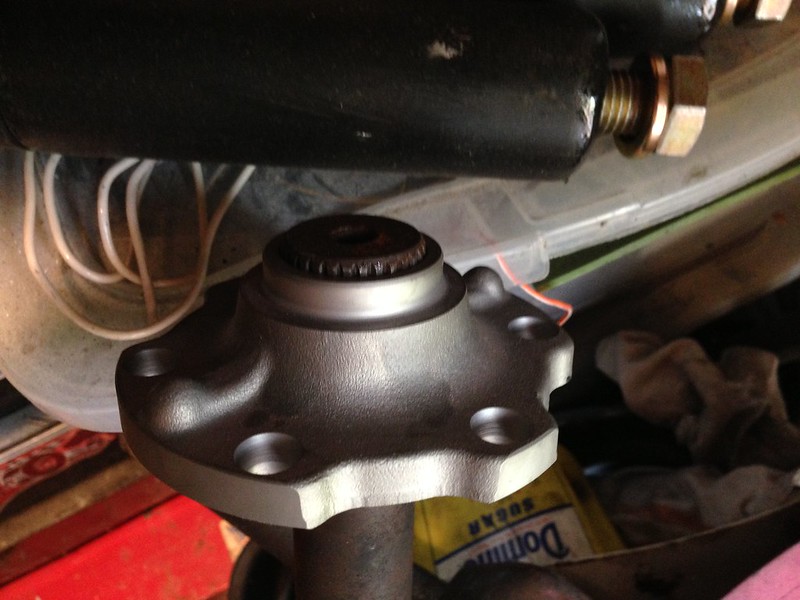
Small update on the full float rear. should use Trail-Gear Drive Flange kit or Toyota P/N: 43421-60020..DO NOT USE P/N: 43421-60040, unless you are buying custom axle shafts.
I went and bought the FJ80 drive flanges, new style 43421-60040. While it has more length to the spline area to decrease wear(30mm), it makes getting an off the shelf axle shaft near impossible. I may either martack the shaft , use some Loctite 660 or machine down the top of the flange returning it to the old style so i can get a cirlip in. The clip is needed to keep the shaft from walking into the pin in the 3rd, so little force is needed to keep it in place.
The drive flange one should use for this set-up is either the Trail-Gear flanges or the older style FJ80 DF # 43421-60020 (old # was 60022)

Old vs. New

Drive Flange test fit on the mini-truck birf. The DF is so thick it bottoms out on the splines, notice I cannot get a circlip on the end...
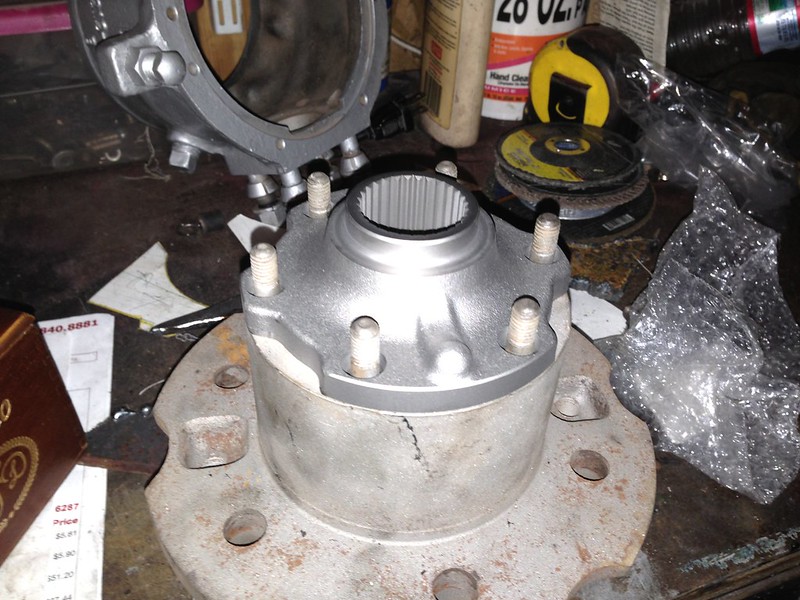
Hard to see here, but the measurement to where the circlip needs to be on the new axle shaft is 32.5"

All the way down to the pin, i was able to see the tape measure actually hit the pin, and then grab the end of the splines, clearing about 1/8" from the pin for an accurate measurement.

Just the hub and flange
Supra Brakes mounted, still need to be completely burned in:
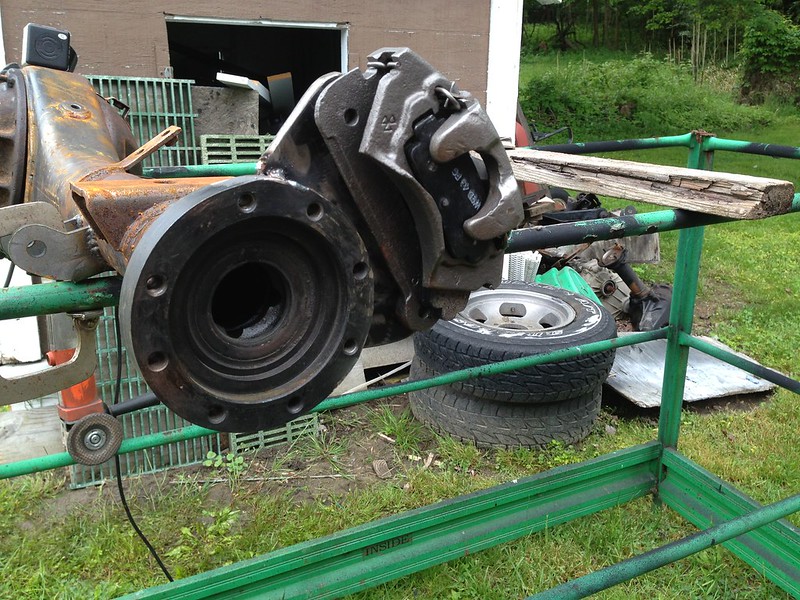
You can see by the above picture that the old axle seals for the semi-float won't work here, to overcome this a member on pirate4x4 has a reducer made so that i can use the front axle seals here to match the front axle inner shafts to make this a full-float rear.
There are some small issues some builds don't address..
axle seal
axle shaft length, and spline engagement length
Ruff Stuff flanges need to welded on so that an overall WMS-WMS length is 58.5"
I'll be sure to post a more complete 'Here is how I built my Full-Float with part numbers, and lessons learned.
I went and bought the FJ80 drive flanges, new style 43421-60040. While it has more length to the spline area to decrease wear(30mm), it makes getting an off the shelf axle shaft near impossible. I may either martack the shaft , use some Loctite 660 or machine down the top of the flange returning it to the old style so i can get a cirlip in. The clip is needed to keep the shaft from walking into the pin in the 3rd, so little force is needed to keep it in place.
The drive flange one should use for this set-up is either the Trail-Gear flanges or the older style FJ80 DF # 43421-60020 (old # was 60022)
Old vs. New
Drive Flange test fit on the mini-truck birf. The DF is so thick it bottoms out on the splines, notice I cannot get a circlip on the end...
Hard to see here, but the measurement to where the circlip needs to be on the new axle shaft is 32.5"
All the way down to the pin, i was able to see the tape measure actually hit the pin, and then grab the end of the splines, clearing about 1/8" from the pin for an accurate measurement.
Just the hub and flange
Supra Brakes mounted, still need to be completely burned in:
You can see by the above picture that the old axle seals for the semi-float won't work here, to overcome this a member on pirate4x4 has a reducer made so that i can use the front axle seals here to match the front axle inner shafts to make this a full-float rear.
There are some small issues some builds don't address..
axle seal
axle shaft length, and spline engagement length
Ruff Stuff flanges need to welded on so that an overall WMS-WMS length is 58.5"
I'll be sure to post a more complete 'Here is how I built my Full-Float with part numbers, and lessons learned.
Last edited by RBX; Sep 18, 2015 at 12:28 PM. Reason: updating information
May 22, 2013 | 05:55 AM
#1451

fawsome.
also, did you cut off the ruff-stuff caliper mounts to place your own?
and what keeps the axle shaft from coming out of the axle? a c-clip?
looking good. i have free time this weekend, so if you wanted some help, i could do a day trip.
You can see by the above picture that the old axle seals for the semi-float won't work here, to overcome this a member on pirate4x4 has a reducer made so that i can use the front axle seals here to match the front axle inner shafts to make this a full-float rear.
link?
There are some small issues some builds don't address..
axle seal
axle shaft length, and spline engagement length are you going to account for the e-locker spline-engagement problem? how does that compare with the v6 pumpkin?
Ruff Stuff flanges need to welded on so that an overall WMS-WMS length is 58.5" so what's the length from flange face to flange face?
and what keeps the axle shaft from coming out of the axle? a c-clip?
looking good. i have free time this weekend, so if you wanted some help, i could do a day trip.
May 22, 2013 | 06:05 AM
#1452
Thread Starter
Registered User
Joined: Jan 2010
Posts: 3,795
Likes: 33
From: Bloodymore
Thanks Ian, I think my weekend is booked, might be able to get an hour or two here or there.
The reducer you asked about for a link....I'm checking on it now for you, a member on pirate contacted me, so there is no link.
Trail-Gear hasn't had any reports of the shaft not having enough engagement on the spider gears for the e-locker. I have not compared it to the v6.
I'll have to measure the flange to flange distance.
Yes I cut off the ears on the flanges, I do not know if Ruff Stuff sells flanges sans brake tabs.(cutting them off was no fun)
to anyone doing an SAS, get a grinder, earplugs and shield....and get used to wearing them for a long time if you plan on removing all the welds and brackets from the IFS. I have about 5hrs of grinding and cleaning with probably 4hrs more to go. some of the brackets don't need to be cleaned off completely to complete my 3-link SAS, but I'm not doing all this work to not have a clean frame...maybe a bit OCD.
May 23, 2013 | 04:25 AM
#1454
Thread Starter
Registered User
Joined: Jan 2010
Posts: 3,795
Likes: 33
From: Bloodymore
4Wheel Underground 3-Link install
These are terrible pics I posted over on 4Wheel Underground to show Brian the clearance issues i have on my 85' SFA. Nothing majorly wrong, just need to get clarification on clearancing them before i tack them in place.
I hope to get better daylight pictures today,
Passenger side Axle Bracket Fitment


Driver Side Axle Bracket Fitment


Back of Panhard bracket

I hope to get better daylight pictures today,
Passenger side Axle Bracket Fitment
Driver Side Axle Bracket Fitment
Back of Panhard bracket
Last edited by RBX; Sep 22, 2015 at 09:25 AM. Reason: udated image host

 May 23, 2013 | 05:44 AM
#1456
Thread Starter
Registered User
Joined: Jan 2010
Posts: 3,795
Likes: 33
From: Bloodymore
The desired Supra/Celica calipers were from 79-mid 81, I think the casting number is 1402 IIRC, and you need the mounting bracket. They are very hard to come by. After the 81 production run, Toyota switched to the popular rotor/drum e-brake combo.
I fabbed my own brackets, they are simple 139mm bolt spacing on 3/8" steel. Hardest part is mocking it up with the hub and rotor to make sure everything is straight and clears.
I fabbed my own brackets, they are simple 139mm bolt spacing on 3/8" steel. Hardest part is mocking it up with the hub and rotor to make sure everything is straight and clears.
May 29, 2013 | 07:11 AM
#1457
Thread Starter
Registered User
Joined: Jan 2010
Posts: 3,795
Likes: 33
From: Bloodymore
If anyone is interested my progress to the 4 Wheel Undergound SAS is located here:
http://chat.4wheelunderground.com/in...p?topic=246.15
I'll update this thread with more progress when it gets burned in.
http://chat.4wheelunderground.com/in...p?topic=246.15
I'll update this thread with more progress when it gets burned in.


