
Quest for a more bulletproof 22RE - 89 4runner engine build
 Nov 5, 2014 | 01:43 PM
#43
Thread Starter
Registered User
Joined: Apr 2014
Posts: 415
Likes: 0
From: Dallas, Tx
I haven't made an enclosed compartment yet, but that's on the list of upcoming mods. Those pics were just of the few I've seen others do. I'll post progress on mine when I get around to it.
I'm just ready to get the girl back on the road. Minor mods like an enclosed cold air intake / snorkel will have to come later =(
I'm just ready to get the girl back on the road. Minor mods like an enclosed cold air intake / snorkel will have to come later =(
Nov 5, 2014 | 06:38 PM
#44

Registered User
Joined: Nov 2014
Posts: 2
Likes: 0
From: Chi-town
Dude!!!......very awesome and impressive. I read every part of your rebuild. I'm no mechanic but I am mechanically inclined so most of it I was and am able to understand. I hope to be able to do that on my own some day.....and if not, you are exactly the type of person I would love to by a vehicle from. Someone that thinks ahead of a possible new owner and does things the right way the first time to not screw somebody. That motor of yours is flat out sexy. Can't wait to see how it all turns out.
Last edited by Jgomez32174; Nov 5, 2014 at 06:50 PM.
Nov 5, 2014 | 06:49 PM
#46
Registered User
Joined: Nov 2014
Posts: 2
Likes: 0
From: Chi-town
Nice! Lol, I feel ya. Not single....but not married.shes a good girl though. I have a 65 Chevy ll as my side toy. I'm toying around the idea of another vehicle which would definitely be a 1st gen 4runner myself.
Nov 14, 2014 | 08:04 AM
#47
Thread Starter
Registered User
Joined: Apr 2014
Posts: 415
Likes: 0
From: Dallas, Tx
Got the rest of the Vibrant Silicone heater hoses in this week, along with some Lucas ZDDP additive, and should have a brand new all aluminum radiator delivered tomorrow from Low Range Offroad. Not 100% sure about the quality of this $120 radiator, but I'll keep you posted. ANYONE using an all aluminum radiator MUST use the RED or PINK antifreeze to keep the thing from deteriorating. It's also very important to ground the Radiator. I know that sounds a little crazy, but some people will use rubber washers as cushion mounts for the radiator, and forget about the whole electrolysis process that can take place and totally eat the aluminum up.
I'll make sure to take a ton of pictures this weekend, and upload them as I fire her up for the first time. I also ordered the Borla Turbo XL muffler with 2 1/4" inlet / outlet, but it won't be in till the end of the month. SO.......I guess I'm just going to have to do the initial cam break in with just the header.
I've used Comp Cams assembly lube (red super sticky oil) for the build, and will be using 10w30 Royal Purple break in oil for the first 500 miles. I also picked up some extra Lucas ZDDP additive. After reading a post by Bobistheoilguy, I learned that modern oils don't have nearly as much zinc as they used to. Although break in oil is pure mineral oil with a ton of zinc in it, when you change over to standard oil, it's a good idea to add a little ZZDP to the mix to bring the zinc levels up. This "coats" the entire internals of the engine in a thin layer of zinc, which helps protect everything from severe wear. I wouldn't go overboard with it, and don't plan on adding any extra in for the initial break in, but with each oil change I do after that, I plan on using 1/5 of the bottle or so of the Lucas.
Here's to hoping Monday morning I have a ton to post about....especially since my Baylor Bears are off this week in Football - Might actually be a productive 40 degree weekend.
Nov 19, 2014 | 06:57 PM
#48
Registered User
Joined: Feb 2010
Posts: 205
Likes: 0
From: Medford Oregon
awesome build
I am all about clean but every time I make my motor and parts all shiny clean I end up smashing through mud and no matter how much I clean its dirty and it never looks as good again. I am by no means knocking your work though as it is very well organized. I learned when working over gravel to use cheap plywood to not only move the lift around but it makes it easier to find bolts if they were to fall. I am in the middle of my third 22r(e) as I have done both r and re. I am going to steal a few ideas that you had. If you don't mind do you know what the cost was on your build? I have an awesome machine shop that I through a lot their way so I get a decent deal there. I used to be all about the 4runner but after driving a 85 ex cab truck the overall responsiveness was much better as there is a lot less weight. I am working on almost a homemade 4runner with seats in the back and a lightweight aluminum shell. all that is missing would be the open walk through cab. Which I don't really miss as I am able to still lock the cab with the bed exposed lol. I am subscribed and hope to see more mods in the future.
Nov 28, 2014 | 10:25 PM
#49
Registered User
Joined: Jul 2013
Posts: 129
Likes: 4
I really like your build and style. Wire marker books would be a good organizational choice for hoses etc.
https://www.google.com/search?q=wire...tm%3B250%3B200
Is that you in the avatar?
Interested to see your mpg. My goals are similar to yours. Dependable, repairable, large following for parts and mods, MPG, utility, comfort, lifetime ride. I hope to be building a 22re spring. My block is an 85 carburetor. I will want to mate the EFI from an 88 to it. Perhaps I could go weber but no longer have the computer. Continue please I am very interested in the OM617 swap as well.
https://www.google.com/search?q=wire...tm%3B250%3B200
Is that you in the avatar?
Interested to see your mpg. My goals are similar to yours. Dependable, repairable, large following for parts and mods, MPG, utility, comfort, lifetime ride. I hope to be building a 22re spring. My block is an 85 carburetor. I will want to mate the EFI from an 88 to it. Perhaps I could go weber but no longer have the computer. Continue please
I am very interested in the OM617 swap as well.
Last edited by papawhellie; Nov 28, 2014 at 10:27 PM.
Dec 1, 2014 | 02:26 PM
#50
Thread Starter
Registered User
Joined: Apr 2014
Posts: 415
Likes: 0
From: Dallas, Tx
Almost there
With the extended Thanksgiving weekend, I was able to finally get some work done. I ended up re-installing the Radiator with some Rubber shock mounts, added a ground to protect from Electrolosis, and bought a new Stant Lev-r-vent radiator cap.
I got all of the hoses swapped out with extremely high grade Vibrant Silicone hoses. This included the power steering hoses as well. I had to take a 4 1/2" angle grinder and cut the hose fittings and just slip the hose over with a clamp, but I was able to re-use the factory clamps (and had some extras from the graveyard), so I'm not worried about those leaking. Here's an idea of what the power steering and the rear heater hoses look like now.

Here's a look at the rear heater hoses cleaned up and replaced as well...

I went ahead and slapped on the old intake and MAF. However, I had an 85 Supra pop up at a local junkyard from my notifications at www.Row52.com and went to steal the much larger 5MGE Mass Air Flow off the Celica / Supra. However, by the time I got there, it was the only part missing from the car. I did a quick search of what else was in their inventory and was able to score the same part from a Cressidia. I'll have to swap the guts / computer out of my MAF into the new one, but the size of the intake port door, and much larger airflow that I will be able to get out of it was definitely worth the morning trip and $17 they charged me. I'll post some more comparison pictures of the two intakes later, but for now, here's a shot of the overall motor greased up and ready to fire.

Sadly, when relocating the fuel filter for easier access, I must have cracked the fuel line from the filter to the fuel rail, because as I turned the motor over, fuel went everywhere. I tried tightening it, removing it and replacing the crush washers, etc., but no luck, still a ton of gas pouring out of the fuel rail right where the banjo fitting goes in. I may have a vacuum line hooked up wrong to the fuel pressure modulator, so I'm going to check that, looking into having a custom hose made ($160 at the dealership), use barbed banjo fittings and some high pressure hose, or just change the fittings to AN and be done with it. Here's a shot of the new fuel filter location. I really don't know where it's supposed to mount, because every 22RE I've ever seen has had the fuel filter just dangling below the intake, bouncing around on the IFS.

I also went ahead and dropped the cash on a new Optima Red top that will probably get relocated soon.

Here's a little bit better shot of the VSV vacuum switches relocated to the firewall and off of the top of the valve cover.

I've got to get this fuel situation under wraps so I can drive the beast over to the muffler shop and have them finish it up. I have an old muffler laying around I may strap on just so I don't piss off the neighbors while breaking in the Cam and seating the rings.
I've got a huge TA not too far from where I live with a Inland Truck Parts full service truck repair place next door. They actually make custom hydraulic hoses and high pressure banjo fittings, and I have a feeling that will be much cheaper than the $160 the dealership wants for their precious 23901 fuel hose.
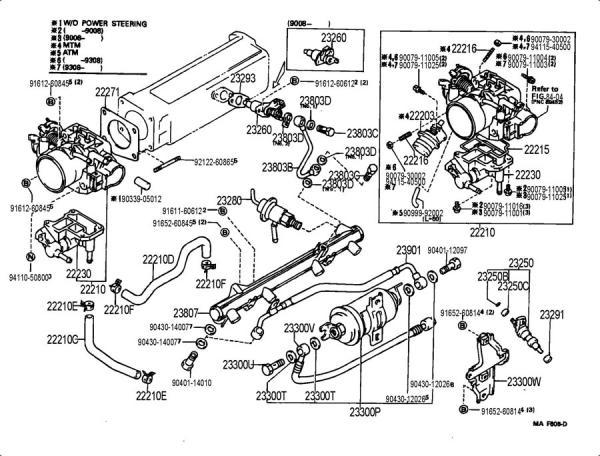
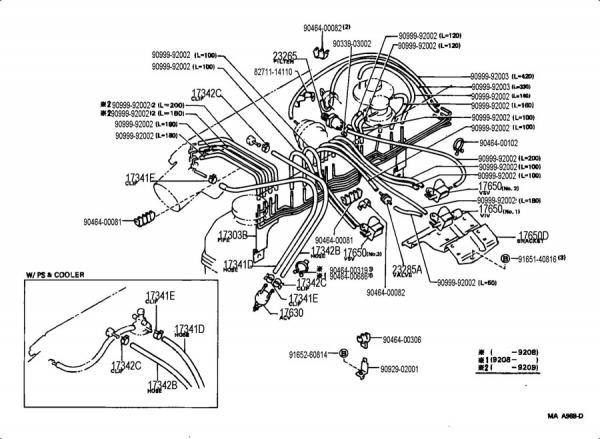
Here's a random shot of the dealership's fuel injection layout (for anyone needing it) and some Vacuum diagrams as well....All taken from google images.
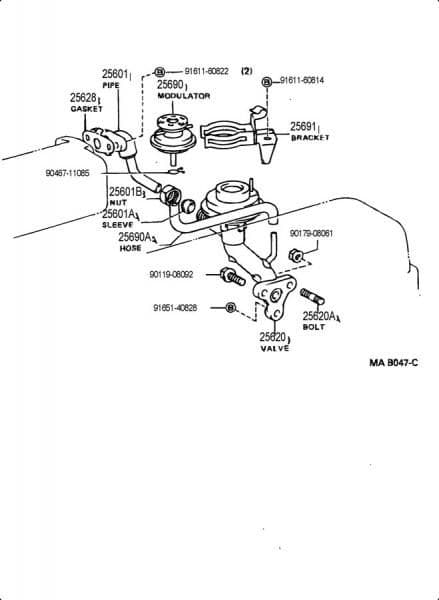
And Although I deleted it, I figured I'd throw in the EGR setup for anyone needing it as well.
I got all of the hoses swapped out with extremely high grade Vibrant Silicone hoses. This included the power steering hoses as well. I had to take a 4 1/2" angle grinder and cut the hose fittings and just slip the hose over with a clamp, but I was able to re-use the factory clamps (and had some extras from the graveyard), so I'm not worried about those leaking. Here's an idea of what the power steering and the rear heater hoses look like now.
Here's a look at the rear heater hoses cleaned up and replaced as well...
I went ahead and slapped on the old intake and MAF. However, I had an 85 Supra pop up at a local junkyard from my notifications at www.Row52.com and went to steal the much larger 5MGE Mass Air Flow off the Celica / Supra. However, by the time I got there, it was the only part missing from the car. I did a quick search of what else was in their inventory and was able to score the same part from a Cressidia. I'll have to swap the guts / computer out of my MAF into the new one, but the size of the intake port door, and much larger airflow that I will be able to get out of it was definitely worth the morning trip and $17 they charged me. I'll post some more comparison pictures of the two intakes later, but for now, here's a shot of the overall motor greased up and ready to fire.
Sadly, when relocating the fuel filter for easier access, I must have cracked the fuel line from the filter to the fuel rail, because as I turned the motor over, fuel went everywhere. I tried tightening it, removing it and replacing the crush washers, etc., but no luck, still a ton of gas pouring out of the fuel rail right where the banjo fitting goes in. I may have a vacuum line hooked up wrong to the fuel pressure modulator, so I'm going to check that, looking into having a custom hose made ($160 at the dealership), use barbed banjo fittings and some high pressure hose, or just change the fittings to AN and be done with it. Here's a shot of the new fuel filter location. I really don't know where it's supposed to mount, because every 22RE I've ever seen has had the fuel filter just dangling below the intake, bouncing around on the IFS.
I also went ahead and dropped the cash on a new Optima Red top that will probably get relocated soon.
Here's a little bit better shot of the VSV vacuum switches relocated to the firewall and off of the top of the valve cover.
I've got to get this fuel situation under wraps so I can drive the beast over to the muffler shop and have them finish it up. I have an old muffler laying around I may strap on just so I don't piss off the neighbors while breaking in the Cam and seating the rings.
I've got a huge TA not too far from where I live with a Inland Truck Parts full service truck repair place next door. They actually make custom hydraulic hoses and high pressure banjo fittings, and I have a feeling that will be much cheaper than the $160 the dealership wants for their precious 23901 fuel hose.
Here's a random shot of the dealership's fuel injection layout (for anyone needing it) and some Vacuum diagrams as well....All taken from google images.
And Although I deleted it, I figured I'd throw in the EGR setup for anyone needing it as well.
Dec 2, 2014 | 06:54 AM
#52
Thread Starter
Registered User
Joined: Apr 2014
Posts: 415
Likes: 0
From: Dallas, Tx
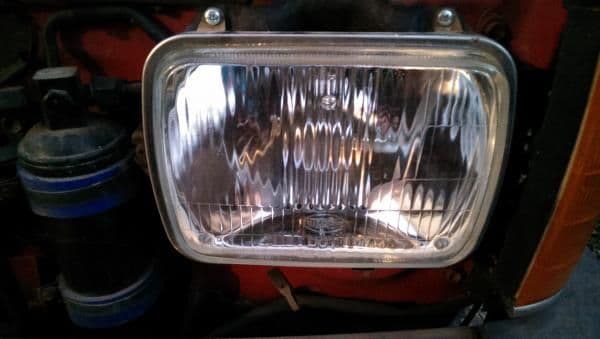
H4 Headlight Conversion
I've already gathered several different Piaa Lights I will be incorporating into the upcoming Plate Bumper / Roof Rack projects, and I was also looking into changing out the outdated sealed beam headlights to the more modern H4 setup. I wanted to do this for two reasons
1) you get much better usable light from the H4 style bulbs and non sealed beam lenses
2) it's much easier to carry an extra bulb instead of an extra sealed beam headlight if you're like me and always have extra hoses, belts, bulbs, and fuses onboard.
Here's a few shots of the headlight install. I wanted to go with the Hella upgrade kit, but couldn't justify spending $90 on headlights (after I've already spent $$$ on craigslisted Piaa lights). I found some guy on ebay selling a complete conversion kit with bulbs for about $20. This was direct plug and play and definitely seems like quality parts and worth every penny. I will probably upgrade the bulbs at some point to some higher quality whiter light, but for now that'll do pig.
Dec 2, 2014 | 07:05 AM
#53
Thread Starter
Registered User
Joined: Apr 2014
Posts: 415
Likes: 0
From: Dallas, Tx
I really like your build and style. Wire marker books would be a good organizational choice for hoses etc.
https://www.google.com/search?q=wire...tm%3B250%3B200
Is that you in the avatar?
Interested to see your mpg. My goals are similar to yours. Dependable, repairable, large following for parts and mods, MPG, utility, comfort, lifetime ride. I hope to be building a 22re spring. My block is an 85 carburetor. I will want to mate the EFI from an 88 to it. Perhaps I could go weber but no longer have the computer. Continue please I am very interested in the OM617 swap as well.
https://www.google.com/search?q=wire...tm%3B250%3B200
Is that you in the avatar?
Interested to see your mpg. My goals are similar to yours. Dependable, repairable, large following for parts and mods, MPG, utility, comfort, lifetime ride. I hope to be building a 22re spring. My block is an 85 carburetor. I will want to mate the EFI from an 88 to it. Perhaps I could go weber but no longer have the computer. Continue please
I am very interested in the OM617 swap as well.Hi Papawhellie, Although I was really adamant about labeling everything when I tore it down, I quickly came to the realization that the previous owner had so much stuff connected wrong, I basically had to start over with an original Vacuum diagram and hose layout, so although wire markers would have been nice, a roll of blue tape and a sharpie was what I had at the time and ended up working out o.k.
That is me in the Avatar, or at least an old picture tossed into Illustrator and vector traced to black and white - (art major in undergrad).
I'm was getting really decent MPG before any of the mods, and am hoping for much better low end torque as well as highway cruising with the upgraded AFM, Bored out TB, TB Spacer with venturi spiral, LCE header, no CAT or EGR, and high performance muffler. My next project is going to be to 3D model a front and rear plate bumper and then have them lasercut to be able to fit the pieces together like a puzzle. This will add a bunch of weight to the rig (although engine protecting weight =) so I'll make sure to note the MPG before I finish that project.
BTW, I've got an extra '88 Computer when you decide to go EFI. I definitely like the later style (I think it's 89-95) Throttle body setup because it doesn't have potentially failing linkage and a downward facing intake like the earlier models, but it's totally up to you.
Dec 2, 2014 | 10:36 AM
#54
Registered User


Joined: Mar 2012
Posts: 7,125
Likes: 681
Awesome build, clean, robust and highly field-serviceable. I currently have Autopal H4 housings, but may upgrade to Trucklites. When I do, I'll post my current Autopal;s here on site.
Sending oily air back into the throttle body just does not make sense to me. I notice the filters installed on top of the valve cover. I think that's a good idea. I wish I could do that, but that may not work in California, though.
Sending oily air back into the throttle body just does not make sense to me. I notice the filters installed on top of the valve cover. I think that's a good idea. I wish I could do that, but that may not work in California, though.
Dec 2, 2014 | 10:43 AM
#55
Thread Starter
Registered User
Joined: Apr 2014
Posts: 415
Likes: 0
From: Dallas, Tx
Luckily I live in Texas and have it registered in a county with one stoplight, so they're really not all that concerned with smog tests. She also turned 25 this year and is smog exempt - which makes me regret not getting the "offroad" header from LCE that's just a little bit bigger.
Dec 3, 2014 | 05:28 AM
#56

Great build so far man! I love the attention to detail you have with your Engine build. Lots and Lots of Info, which I like to see in a build thread. I always try to document everything and have a decent write-up in the event that someone else will need to use the same info.
Keep up the good work man!
Keep up the good work man!
Dec 3, 2014 | 09:35 AM
#57
Thread Starter
Registered User
Joined: Apr 2014
Posts: 415
Likes: 0
From: Dallas, Tx
Great build so far man! I love the attention to detail you have with your Engine build. Lots and Lots of Info, which I like to see in a build thread. I always try to document everything and have a decent write-up in the event that someone else will need to use the same info.
Keep up the good work man!
Keep up the good work man!
I'm actually considering doing a similar quick fix and just clamping an old exhaust on until I can get it over to the muffler shop.
My goal is to be driving it around by this weekend.
Dec 19, 2014 | 12:47 PM
#59
Thread Starter
Registered User
Joined: Apr 2014
Posts: 415
Likes: 0
From: Dallas, Tx
Not quite there
Sorry Skoob,
I spent all day last Saturday and Sunday trying to get the timing down right. At first I had absolutely no throttle response, so I checked the cable to see if it was broken, it wasn�t. I even tried taping the MAF open to see if there was an issue with it�no difference. So I ended up having to take the TB off to get at the TPS to check it. I quickly realized there�s a reason they sell an allen head bolt upgrade for that little bugger�It�s impossible to get off with a screwdriver without taking the TB off, so a trip to Ace Hardware (best place for screws next to Fastenal), I quickly changed out the screws as well as swapped those fancy acorn nuts out to wing nuts because I had the Valve cover on and off about 8 times. Here�s a shot of the TB with the �Venturi� pattern from LCE�s TB spacer continued down the throat of the Upper Plenum.


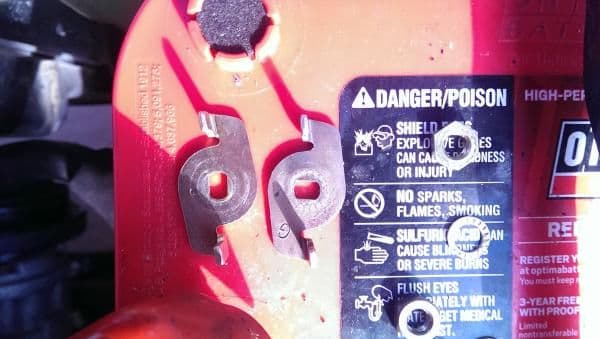
If something doesn�t make sense, it usually isn�t right. The TPS I had didn�t line up with the little piece of metal that was supposed to turn it � it looked like it was a full 90 degrees off, and I couldn�t figure out what had possibly happened. After some research, I realized there are TPS sensors that are set up horizontally and those that are set up vertically. The PO had an 83 Celica motor in it originally, but it had the EFI setup and harness from the �89, however, � way through �89 they changed the TPS to be horizontal. I don�t know how or why it ran before, but I ended up stealing the little piece off the 86 sitting in my drive so it would line up correctly. Here�s a shot of those two Throttle Position Sensor �drivers�. You can clearly see that the one I had on there was set up for the 90 degree different TPS.
I got the parts swapped out and got the thing to run with some throttle response. However, I couldn�t get it to idle under 2K to be able to get the timing right. I messed with it for a couple of days and finally just took it into my local mechanics. They said there�s a massive leak in the intake somewhere because they blocked off the entire TB and it was still running. I�m going to take the intake off and see if there is a sensor or something I forgot to install and see if I can�t get it running. I�m pretty sure I might have poked a hole in the neck of the intake when making the �venturi� spiral, which I�ll close off with some JB weld. Then I�ll check take the whole intake off and re-install it as one unit (had it off several times with the fuel leak and probably didn�t get it back on all the way. There's also a good chance I've got some of the vacuum hoses hooked up wrong, and I'm definitely going to re-route the ones around the front of the engine that are going to the power steering pump so I don't have to remove them when taking off the valve cover
I also just about freaked out when I saw oil pouring out of the joint between the Tranny and the block. I don�t think I blew the rear seal on a backfire, but I may have. I definitely didn�t have the rear rubber half-moon stopper in one time I was running it, and the oil pressure was set way too high (LCE adjustable oil pressure valve) so it was pouring oil out the back. Hopefully that�s the issue, but I could totally see it being the rear seal, or the damn machine shop didn�t put in that rear plug, or freeze plug right. We�ll just have to see. I�m not really keen on $14 a quart RP Break in oil leaking anywhere, especially since I was extremely careful when I sealed everything up�.IN MY LIVINGROOM!
Sadly, we're doing Christmas at my parents this weekend, so I won't get a chance to work on it till later. And of course, I finally got the battery in and rolled down the rear window to toss in the spare, and couldn't get the window back up, so I've got something to work out there as well.
I spent all day last Saturday and Sunday trying to get the timing down right. At first I had absolutely no throttle response, so I checked the cable to see if it was broken, it wasn�t. I even tried taping the MAF open to see if there was an issue with it�no difference. So I ended up having to take the TB off to get at the TPS to check it. I quickly realized there�s a reason they sell an allen head bolt upgrade for that little bugger�It�s impossible to get off with a screwdriver without taking the TB off, so a trip to Ace Hardware (best place for screws next to Fastenal), I quickly changed out the screws as well as swapped those fancy acorn nuts out to wing nuts because I had the Valve cover on and off about 8 times. Here�s a shot of the TB with the �Venturi� pattern from LCE�s TB spacer continued down the throat of the Upper Plenum.
If something doesn�t make sense, it usually isn�t right. The TPS I had didn�t line up with the little piece of metal that was supposed to turn it � it looked like it was a full 90 degrees off, and I couldn�t figure out what had possibly happened. After some research, I realized there are TPS sensors that are set up horizontally and those that are set up vertically. The PO had an 83 Celica motor in it originally, but it had the EFI setup and harness from the �89, however, � way through �89 they changed the TPS to be horizontal. I don�t know how or why it ran before, but I ended up stealing the little piece off the 86 sitting in my drive so it would line up correctly. Here�s a shot of those two Throttle Position Sensor �drivers�. You can clearly see that the one I had on there was set up for the 90 degree different TPS.
I got the parts swapped out and got the thing to run with some throttle response. However, I couldn�t get it to idle under 2K to be able to get the timing right. I messed with it for a couple of days and finally just took it into my local mechanics. They said there�s a massive leak in the intake somewhere because they blocked off the entire TB and it was still running. I�m going to take the intake off and see if there is a sensor or something I forgot to install and see if I can�t get it running. I�m pretty sure I might have poked a hole in the neck of the intake when making the �venturi� spiral, which I�ll close off with some JB weld. Then I�ll check take the whole intake off and re-install it as one unit (had it off several times with the fuel leak and probably didn�t get it back on all the way. There's also a good chance I've got some of the vacuum hoses hooked up wrong, and I'm definitely going to re-route the ones around the front of the engine that are going to the power steering pump so I don't have to remove them when taking off the valve cover
I also just about freaked out when I saw oil pouring out of the joint between the Tranny and the block. I don�t think I blew the rear seal on a backfire, but I may have. I definitely didn�t have the rear rubber half-moon stopper in one time I was running it, and the oil pressure was set way too high (LCE adjustable oil pressure valve) so it was pouring oil out the back. Hopefully that�s the issue, but I could totally see it being the rear seal, or the damn machine shop didn�t put in that rear plug, or freeze plug right. We�ll just have to see. I�m not really keen on $14 a quart RP Break in oil leaking anywhere, especially since I was extremely careful when I sealed everything up�.IN MY LIVINGROOM!
Sadly, we're doing Christmas at my parents this weekend, so I won't get a chance to work on it till later. And of course, I finally got the battery in and rolled down the rear window to toss in the spare, and couldn't get the window back up, so I've got something to work out there as well.
Dec 19, 2014 | 01:09 PM
#60
Thread Starter
Registered User
Joined: Apr 2014
Posts: 415
Likes: 0
From: Dallas, Tx
Reading about it, it's probably the Idle Air Control Valve (Remember I had water pouring out of my air filter, so it's probably stuck open which would cause the high idle).
I may go ahead and swap the guts out of the '86's MAF into the supra one I picked up, but will leave that off until I can get this stupid thing to idle right.
I'll try to do a better job of taking pictures and updating the work.
I may go ahead and swap the guts out of the '86's MAF into the supra one I picked up, but will leave that off until I can get this stupid thing to idle right.
I'll try to do a better job of taking pictures and updating the work.


