
NYChopshop's 1994 4Runner Build-Up Thread
 Feb 4, 2009 | 07:36 PM
#21
Thread Starter
Registered User
Joined: Oct 2008
Posts: 468
Likes: 0
From: Back in New York City!
The pillage of a former corperate giant!
So, this past weekend, brought about by the death of Circuit City and their wholesale liquidation, I got myself two subs, a box and an amplifier. I got the dual 12" MTX Terminator subs in a box with the matching monoblock amp for the ballpark of $200. I already had purchased a Kenwood Excelon KDC-X592 in December, and had soldered together the wiring harnesses.
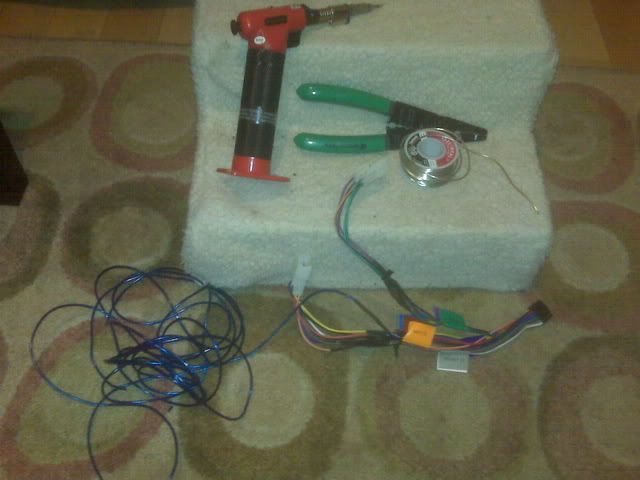
Here's the rats nest. I'm a little compulsive, that whole roll on the left is the amplifier power-on signal wire, aka 'remote' wire.
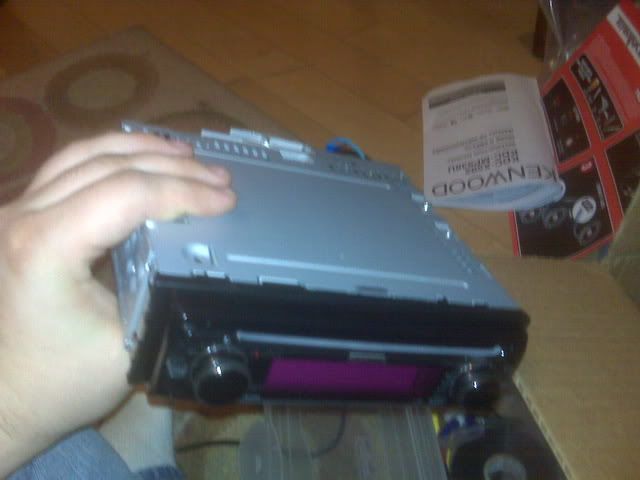
This is my kenwood head unit. It has everything I was looking for in a simple and durable head unit as best as I could formulate: it has 3 sets of RCA outputs, all hard mounted into the chassis of the head unit, it has a 3.5mm female socket (a headphone plug style also recessed into the chassis) for aux-in, it does NOT have a motorized face to break on me, and the internal amplifier can be turned off if and when I opt for a 4-channel amplifier to power my speakers.
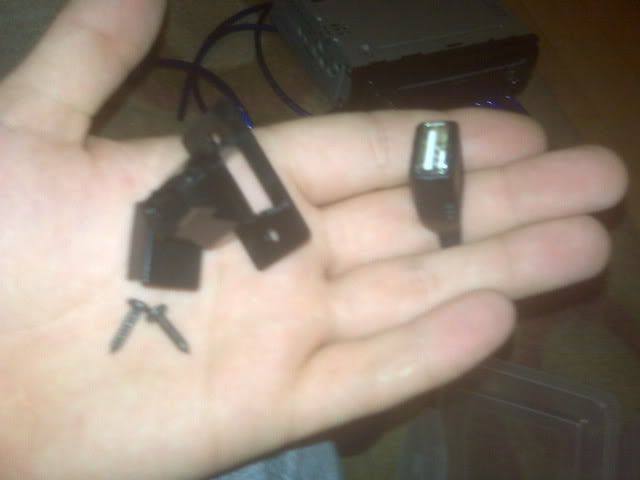
The head unit also comes with this USB wire hard mounted into the back of the chassis. It has a bracket and two screws if hole cutting and permanent mounting is your thing. I just (temporarily at least) ran the usb cable into the hole in the top of my glove box that seemed to be begging for it.
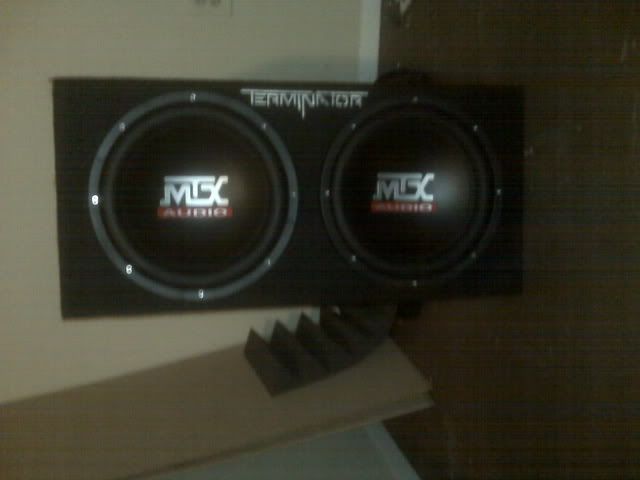
Here is the box loaded with 2 subs. I got it at a very deep discount. It was their last one and was the floor model. I saw nothing wrong with it, and I had the overworked guy on the floor switch the system to the subs to hear them romp. Of course, it was an amplifier 10 times more powerful than the one I got with it, but hey. Sounded very nice.
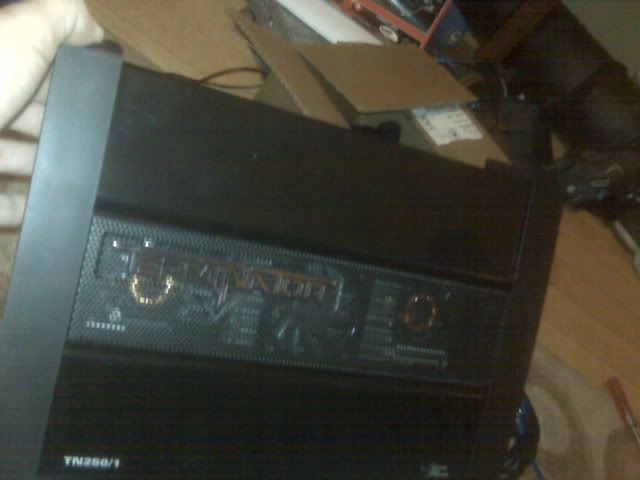
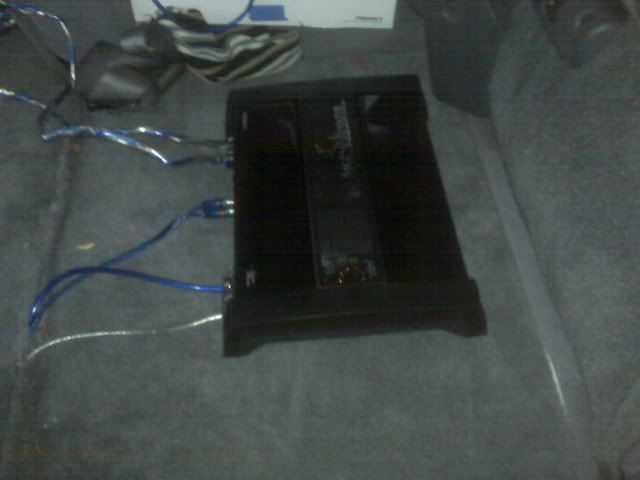
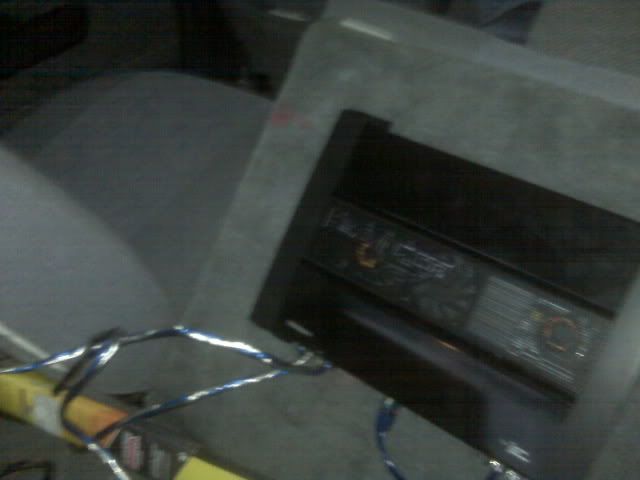
Matching terminator amp. Does the job. Active fan cooling. I screwed it to the back of one of the rear seats. Good enough for me for now. I can therefore keep my paper towels, spare windshield wipers, and other unwieldy items tucked behind the sub box under the amp. Still gotta mount my hi-lift somewhere.
I'll post pictures of the cleaned up trunk when I get some daylight. I had all my tools out and crap everywhere when I finished the job and cleaned up after myself after dark. I will say, the Kenwood software isn't very intuitive, and takes some getting used to. Getting down to two knobs and about four buttons (excluding the full-function remote control thats a godsend!) makes for a clean looking stereo but everything you would normally do to get a result out of a stereo (change channels, go AM/FM, whatever) is totally wrong in terms of the kenwood. I'll get a hang of it and shut my griping mouth soon enough. Sounds great, tho, and I tuned it considerably with the help of the manual.
Here's the rats nest. I'm a little compulsive, that whole roll on the left is the amplifier power-on signal wire, aka 'remote' wire.
This is my kenwood head unit. It has everything I was looking for in a simple and durable head unit as best as I could formulate: it has 3 sets of RCA outputs, all hard mounted into the chassis of the head unit, it has a 3.5mm female socket (a headphone plug style also recessed into the chassis) for aux-in, it does NOT have a motorized face to break on me, and the internal amplifier can be turned off if and when I opt for a 4-channel amplifier to power my speakers.
The head unit also comes with this USB wire hard mounted into the back of the chassis. It has a bracket and two screws if hole cutting and permanent mounting is your thing. I just (temporarily at least) ran the usb cable into the hole in the top of my glove box that seemed to be begging for it.
Here is the box loaded with 2 subs. I got it at a very deep discount. It was their last one and was the floor model. I saw nothing wrong with it, and I had the overworked guy on the floor switch the system to the subs to hear them romp. Of course, it was an amplifier 10 times more powerful than the one I got with it, but hey. Sounded very nice.
Matching terminator amp. Does the job. Active fan cooling. I screwed it to the back of one of the rear seats. Good enough for me for now. I can therefore keep my paper towels, spare windshield wipers, and other unwieldy items tucked behind the sub box under the amp. Still gotta mount my hi-lift somewhere.
I'll post pictures of the cleaned up trunk when I get some daylight. I had all my tools out and crap everywhere when I finished the job and cleaned up after myself after dark. I will say, the Kenwood software isn't very intuitive, and takes some getting used to. Getting down to two knobs and about four buttons (excluding the full-function remote control thats a godsend!) makes for a clean looking stereo but everything you would normally do to get a result out of a stereo (change channels, go AM/FM, whatever) is totally wrong in terms of the kenwood. I'll get a hang of it and shut my griping mouth soon enough. Sounds great, tho, and I tuned it considerably with the help of the manual.
Feb 4, 2009 | 07:58 PM
#22
Thread Starter
Registered User
Joined: Oct 2008
Posts: 468
Likes: 0
From: Back in New York City!
more stereo install pics
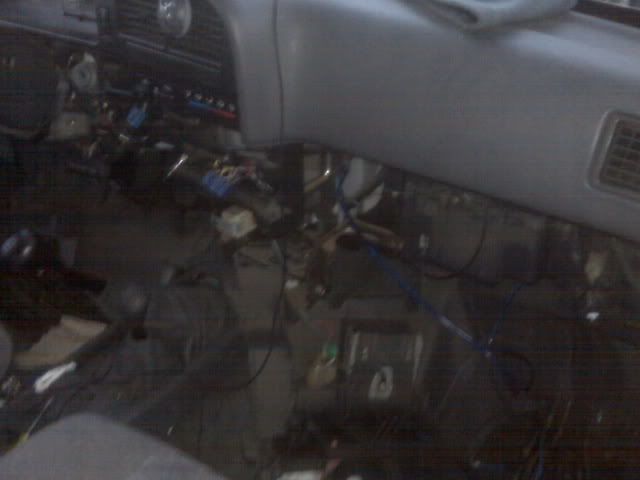
Ripping the guts out! Damn dash board! obviously, my dash has been taken apart before, half of the screws necessary for taking the parts off were missing. I'll have to see about that. I also found out why my passenger side dashboard speaker wasnt working - the idiot hadn't plugged the speaker clip back in. there's a pair of speakers I don't have to buy immediately as yet!
Good riddance, stupid stock tape deck!

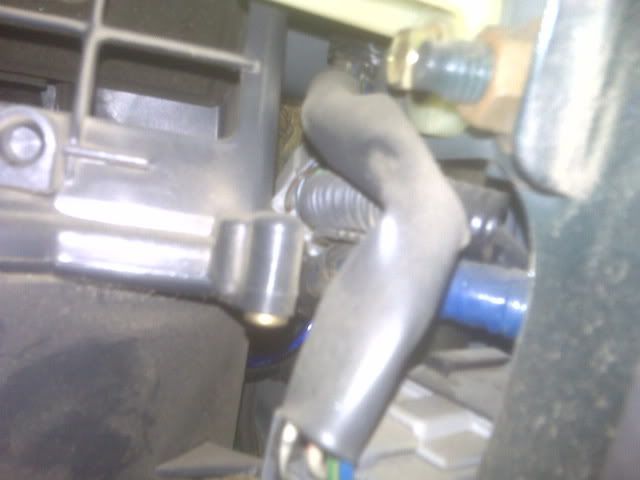
Here is where I ran the power wire for the amp through the firewall. I cut a small slit in the rubber grommet and ran the wire through. I guarantee it will never arc out there.

I wasnt intending on swapping in the new stereo that day, but I had to take the dash apart to see where the power wire was coming through the firewall. Right between the AC components in the back of the dash. Pain in the ass without taking everything out.
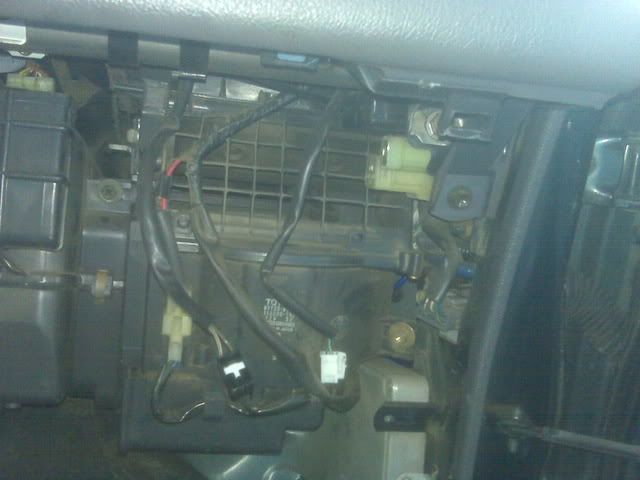
Here is a zoomed in view of where the rubber grommet comes through behind the dash. You can see the AC component (or heat - whatever) with the plastic grill on it in the corner. My power wire is the blue one in the shadows. Impossible to get out of the back there without pulling the glove box out.
Ran the wires all under the carpet by the door on the passenger side. Turns out there is a plastic channel with a bunch of wires there already. I didn't use it, couldn't see a way in easily. I just ran the wires inside of that under the carpet. Power, remote, and stereo RCAs. Here is where I mounted the amp. Screwed it into the back of the rear passenger side seat. I actually used the passenger side seat mounting bolt to ground out this tiny 250 watt amp. I scuffed the paint off the base of the bolt and put the ring terminal straight on there. Works great.
Good riddance, stupid stock tape deck!
Here is where I ran the power wire for the amp through the firewall. I cut a small slit in the rubber grommet and ran the wire through. I guarantee it will never arc out there.
I wasnt intending on swapping in the new stereo that day, but I had to take the dash apart to see where the power wire was coming through the firewall. Right between the AC components in the back of the dash. Pain in the ass without taking everything out.
Here is a zoomed in view of where the rubber grommet comes through behind the dash. You can see the AC component (or heat - whatever) with the plastic grill on it in the corner. My power wire is the blue one in the shadows. Impossible to get out of the back there without pulling the glove box out.
Ran the wires all under the carpet by the door on the passenger side. Turns out there is a plastic channel with a bunch of wires there already. I didn't use it, couldn't see a way in easily. I just ran the wires inside of that under the carpet. Power, remote, and stereo RCAs. Here is where I mounted the amp. Screwed it into the back of the rear passenger side seat. I actually used the passenger side seat mounting bolt to ground out this tiny 250 watt amp. I scuffed the paint off the base of the bolt and put the ring terminal straight on there. Works great.
Feb 4, 2009 | 08:51 PM
#24
Thread Starter
Registered User
Joined: Oct 2008
Posts: 468
Likes: 0
From: Back in New York City!
I may keep the amp to power a pair of 6" JL audio subs to put in the trunk stock speaker locations. I want to snip out the overhead tweeters and put component sets in the doors in the rear leaving the trunk for bass. I could get a bigger amp first now and use it on the subs and box I do have, allowing me to save up for the big momma of the whole deal: the JL 13w7 with matching box (drool at will):

However, thats like a grand I dont got on bass I can get by with now. My next purchase will probably be a set of 4" component MB quart speakers for the dashboard (tweeters mounted on the pillars or doors, havn't decided) stock locations. I've decided on the MB quarts because you can ADD a 6" component driver to up the wattage and midbass up front. I'd be putting the components in the lower front corners of the front doors in angled spacers (to allow window usage!), moving the map pocket to the rear of the door and it will still fit! I can get the 6" component add on, the rear door components, a 4-channel JL audio 400/4 amp and the 2 JL audio subs for the trunk for $600 or $700 or so when the time comes and really up my stereo all in one go. Then again, I'd need to get a big fat sub amp to keep up with that, I love the JL 1000/1 v2s, and a capacitor or two, some expensive wiring doo-hickies... I guess that'll really set me back significantly.
EDIT:
I think I've tweaked, and will continue to tweak, the plan I have for the stereo. I have a thread that I started looking for specific information about 2nd gen 4runner and 3rd gen pickup stereo installs: https://www.yotatech.com/forums/f116.../#post51187580
I also did a lot of gum-flapping on the 'proper' place for stereo talk, in a board about off-road audio so to speak. What to do about CD players always breaking and so on. https://www.yotatech.com/forums/f96/...eivers-184615/
Last edited by NYChopshop; Jul 21, 2009 at 04:56 PM.
Feb 4, 2009 | 09:22 PM
#25
Thread Starter
Registered User
Joined: Oct 2008
Posts: 468
Likes: 0
From: Back in New York City!
Oh, if someone happens to have a 2nd gen parts truck sitting around and you happen to read this thread with any detail (for some reason!?) please contact me. I find crap that former owners have left out of my truck for all kinds of dumb reasons. See idiot intake above. Apparently the last owner couldn't figure out where to hide the alarm box, so he REMOVED the air duct that goes under the dashboard right under over the driver's legs to give air to the far drivers side vents. Now when I turn on my AC, my legs freeze. A stupid problem to have, but a problem nonetheless. I could buy interior bolts and screws by the POUND, just send me all of them! Secretly broken trim pieces hanging on by a thread, body parts (if you have a green 4runner in southern california, please! I need a door!), a tailgate and bits for a swing out tire mod, the list goes on neverending! I'm sure there are better places to post my needs, but I try to contain my madness as best as possible. OOH! forgot to mention I need a front bumper from a 90-91 4runner with end caps and mounting brackets, even the bumper lights and wire harnesses if you gottem. I want to ditch my lower valance and I think it looks funny on 92+ 2nd gens (don't hurt me).
Last edited by NYChopshop; Feb 4, 2009 at 09:25 PM.
Mar 6, 2009 | 05:21 PM
#26
Thread Starter
Registered User
Joined: Oct 2008
Posts: 468
Likes: 0
From: Back in New York City!
blown 4" front dash speaker replacement
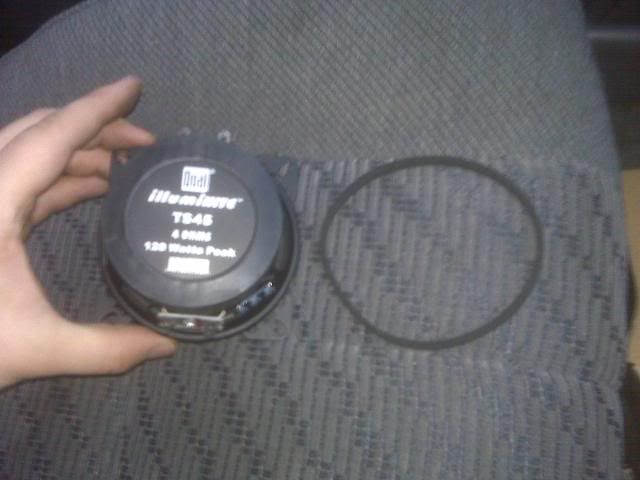
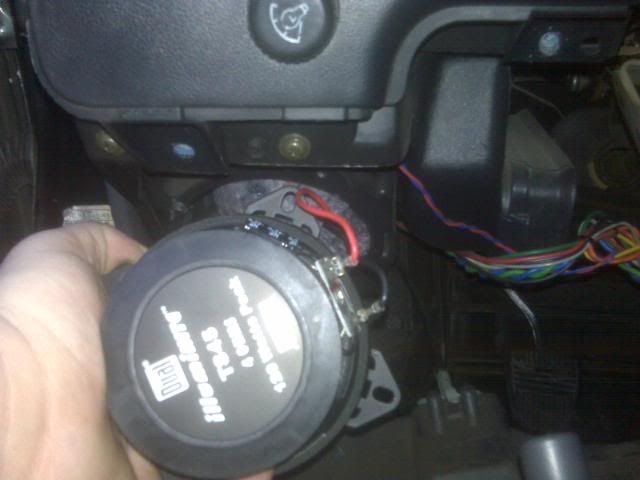
Since I had purchased my truck, the passenger side dash board speaker did not function at all. When I installed my head unit, I found that the speaker was just unplugged, so I went ahead and plugged it back in. I quickly grew to wish that I hadn't. The speaker had blown all the way around the surround and sounded like rattly garbage. As an audiophile of sorts, this was a no-no. I drove straight to the only store open at that time (devil-mart) and picked up a cheapo set of 4" Dual TS45 speakers. Get this, they light up with the music if I supply fused power and a ground. Garbage. However, they otherwise came well stocked with screws and pins and whatnot that I didnt need at all, but they also included these nice little foam rubber gaskets to go on the mounting surface.
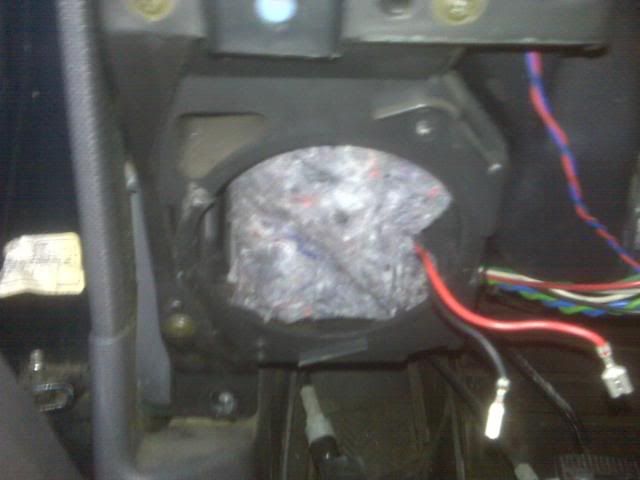
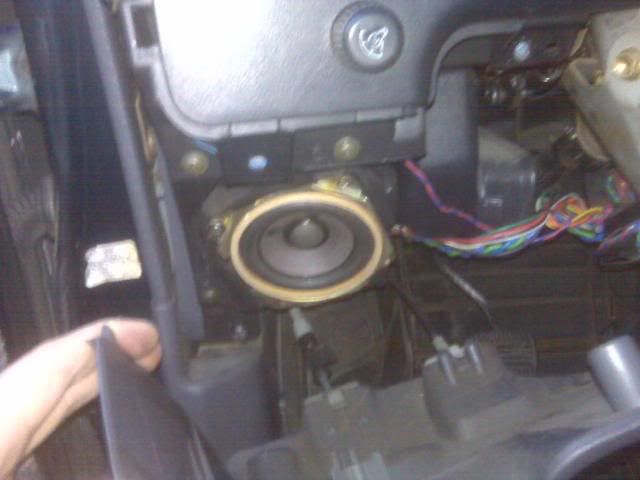
In order to remove the old speaker on the drivers side, I pulled off the lower dash board under the steering column which exposed the speaker enough to do the work (without removing the clips to the fuel door or hood release). With the old speakers out, this shows the standard sized speaker connection wires and the foam insulation inside the speaker hole. As a sound engineer, I always recommend putting material inside of speaker boxes, and toyota obviously did some homework when designing the speaker boxes in the dash.
With the wires installed on the speaker (no modification whatsoever):
The driver's side stocker still installed:
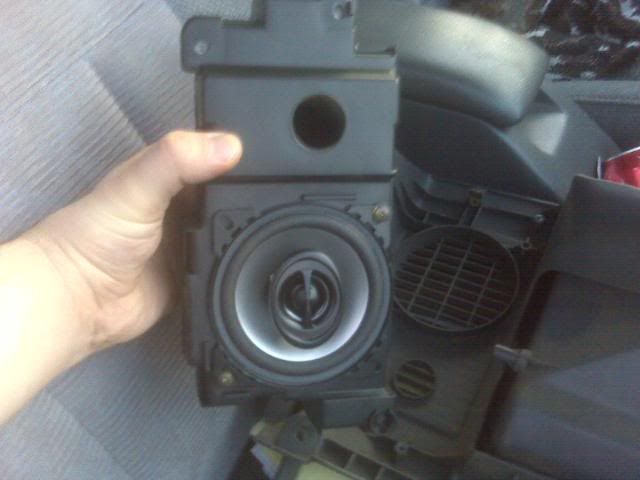
The passenger side speaker, the actual reason I bought the hasty replacements, is in a ported box mounted to to the back of the glove box panel. Very easy to remove and replace. More foam padding inside, and the same red and black wires that connect straight to the speakers. The total install took me about 20 minutes with hand tools.
System sound 100 times better, and when the recession fades and I have some cash I'll throw some better speakers in there, but at least what I have now works and sounds good! And no, I didn't hook up the stupid light rings on the speakers.
In order to remove the old speaker on the drivers side, I pulled off the lower dash board under the steering column which exposed the speaker enough to do the work (without removing the clips to the fuel door or hood release). With the old speakers out, this shows the standard sized speaker connection wires and the foam insulation inside the speaker hole. As a sound engineer, I always recommend putting material inside of speaker boxes, and toyota obviously did some homework when designing the speaker boxes in the dash.
With the wires installed on the speaker (no modification whatsoever):
The driver's side stocker still installed:
The passenger side speaker, the actual reason I bought the hasty replacements, is in a ported box mounted to to the back of the glove box panel. Very easy to remove and replace. More foam padding inside, and the same red and black wires that connect straight to the speakers. The total install took me about 20 minutes with hand tools.
System sound 100 times better, and when the recession fades and I have some cash I'll throw some better speakers in there, but at least what I have now works and sounds good! And no, I didn't hook up the stupid light rings on the speakers.
Last edited by NYChopshop; Mar 6, 2009 at 05:22 PM.
Apr 13, 2009 | 09:39 PM
#27
Thread Starter
Registered User
Joined: Oct 2008
Posts: 468
Likes: 0
From: Back in New York City!
subs in a while ago, lazy on the pic postin
I finished this a while ago. I've been listening to the stereo and fine tuning the EQ settings and I'm finally really happy with the sound (for the money). I put the amp on the back of the rear passenger side seat, and the amp box sits right in the back of the back seats. Its not how I want the amp to sit forever, I'm just happy to have bass from a securely mounted piece of electronics. Here is how the trunk looks:
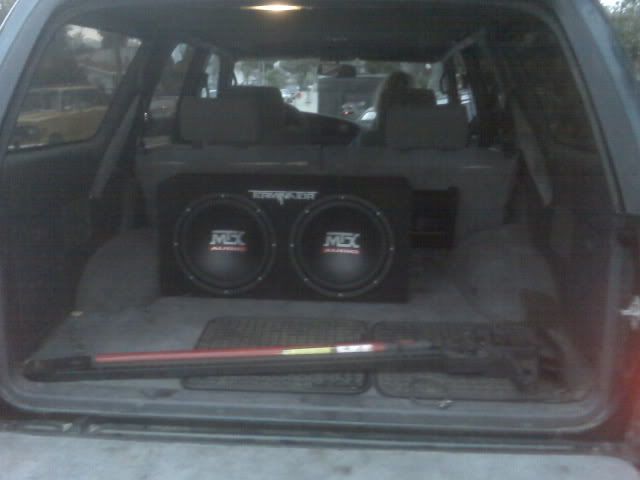
Those blue and white dangly-cables are to my subs. I'm now using the space behind the sub box to store windshield wiper blades, paper towls, etc. and that's what the junk is in the second picture.
Those blue and white dangly-cables are to my subs. I'm now using the space behind the sub box to store windshield wiper blades, paper towls, etc. and that's what the junk is in the second picture.
Last edited by NYChopshop; Apr 13, 2009 at 09:41 PM.
Mar 2, 2010 | 04:24 AM
#29
Thread Starter
Registered User
Joined: Oct 2008
Posts: 468
Likes: 0
From: Back in New York City!
When I was recording a demo album in my garage studio in LA I nailed up some woodland camo moving blankets for some mild rudamentary soundproofing. I use one of them now to cover up the contents of my truck, 'goodies' included / especially.
Apr 9, 2010 | 10:00 AM
#31
Thread Starter
Registered User
Joined: Oct 2008
Posts: 468
Likes: 0
From: Back in New York City!
'bout time I did some updating...
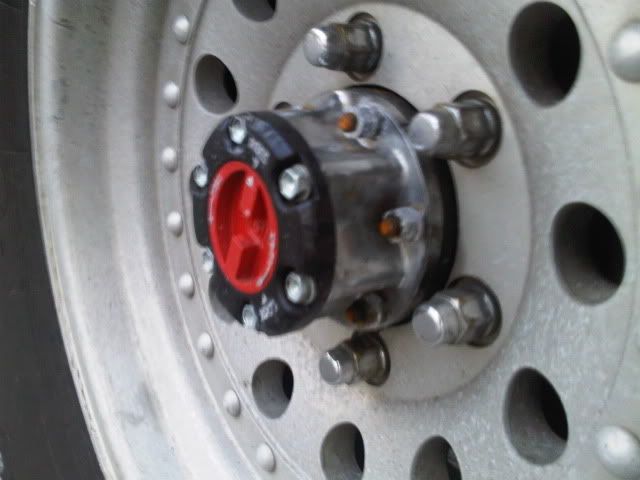
It's been a long winter. I ordered remanufactured hubs from Wabfab, and when they arrived, I did the install along with new bearings and axle assemblies as my boots were shot and the axles whining. The shipping took a while, but nothing I didn't expect. The quality of the item was outstanding, and I would recommend Wabfab to anyone that doesn't need their parts... like... yesterday.
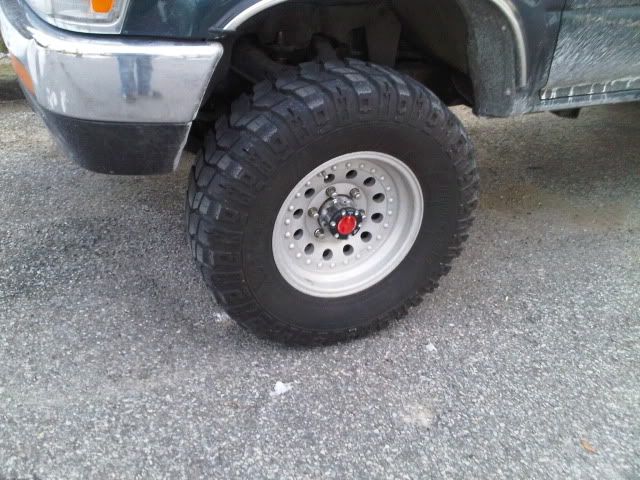
Then at some point about a month ago, someone in my tech school decided it would be nice to drive a drywall screw through one of the sidewalls of my procomp x-terrains (probably jealous that my tires are worth more than his entire existence) so I couldn't patch it. My undercarriage teacher decided to try to patch it anyway, and it seemed to work, but my tires had some SERIOUSLY bad cupping due to the bad ball joints I had to replace (not to mention every last steering component: pitman arm, idler arm, inner and outer tie rod ends, adjusting sleeves...) so I just wound up replacing the tires. I just noticed that you can see how bad the cupping is in the previous picture of the manual hubs. Every other tread is worn down so much that it didnt even pick up the lighter color dirt in front of my driveway. I'm going to sell them to a buddy of mine for his bronco. Busted arse tires are all a ford deserves, anyway. I picked up a new set of BFG MT KM2s in 31x10.5r15. I'm sure that prick at my school is seething with resentment.
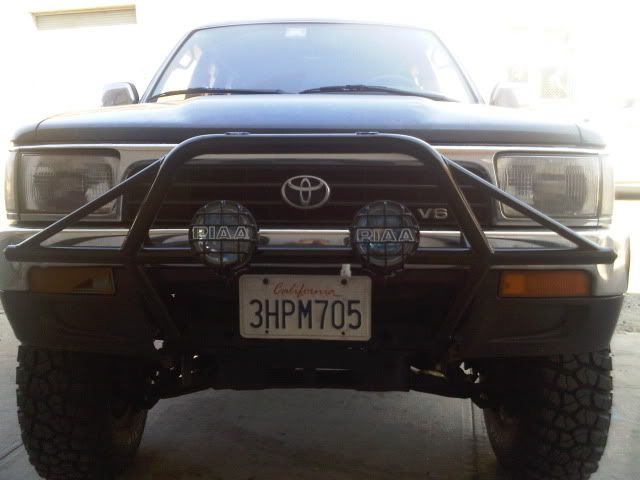
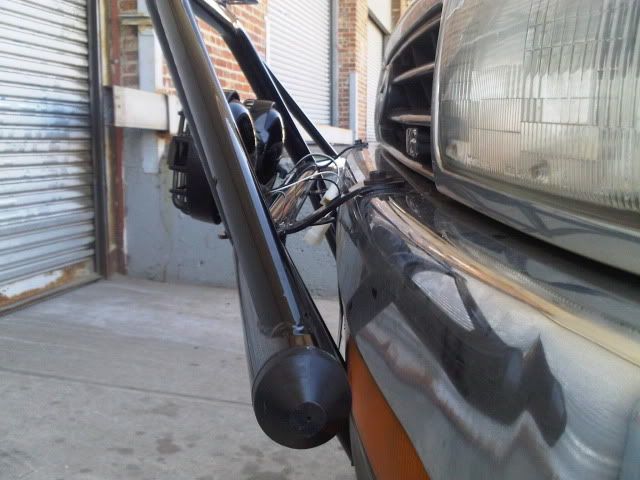
I finally installed the procomp light bar I had sitting in my garage for the better part of a year. I also threw on my PIAA lights, I forget which model exactly - its been a while. The upper bumper tie bars required that I take the light bar to the anvil and beat the crud out of it to put a nice S-bend in them so they reach the bumper. Not a tough thing to do, but technically didn't "bolt on". Toasted part of the powder coating on the mount too. The lower valance on my front bumper had two circular holes punched in it from where the impact cups had cut through from parking mishaps the previous owner must have had. When I removed the cups, I just cut the lower valance portion between the cup holes with a whiz wheel. I'll be trimming it up a bit better soon. All in all, I'm very happy. I've already replaced my middle finger at night with the high beams. Some guy cut me off and I gave him a little slice of daylight. Endlessly satisfying.
There will be much stereo work forthcoming, stay tuned.
Then at some point about a month ago, someone in my tech school decided it would be nice to drive a drywall screw through one of the sidewalls of my procomp x-terrains (probably jealous that my tires are worth more than his entire existence) so I couldn't patch it. My undercarriage teacher decided to try to patch it anyway, and it seemed to work, but my tires had some SERIOUSLY bad cupping due to the bad ball joints I had to replace (not to mention every last steering component: pitman arm, idler arm, inner and outer tie rod ends, adjusting sleeves...) so I just wound up replacing the tires. I just noticed that you can see how bad the cupping is in the previous picture of the manual hubs. Every other tread is worn down so much that it didnt even pick up the lighter color dirt in front of my driveway. I'm going to sell them to a buddy of mine for his bronco. Busted arse tires are all a ford deserves, anyway. I picked up a new set of BFG MT KM2s in 31x10.5r15. I'm sure that prick at my school is seething with resentment.
I finally installed the procomp light bar I had sitting in my garage for the better part of a year. I also threw on my PIAA lights, I forget which model exactly - its been a while. The upper bumper tie bars required that I take the light bar to the anvil and beat the crud out of it to put a nice S-bend in them so they reach the bumper. Not a tough thing to do, but technically didn't "bolt on". Toasted part of the powder coating on the mount too. The lower valance on my front bumper had two circular holes punched in it from where the impact cups had cut through from parking mishaps the previous owner must have had. When I removed the cups, I just cut the lower valance portion between the cup holes with a whiz wheel. I'll be trimming it up a bit better soon. All in all, I'm very happy. I've already replaced my middle finger at night with the high beams. Some guy cut me off and I gave him a little slice of daylight. Endlessly satisfying.
There will be much stereo work forthcoming, stay tuned.
Last edited by NYChopshop; Apr 9, 2010 at 10:02 AM.

 Oct 18, 2010 | 03:33 PM
#34

Registered User
Joined: Jan 2010
Posts: 96
Likes: 0
From: Northwest Arkansas
As for the Procomp light bar, i too would like to see how it mounts, etc.
the rear speakers are accessed behind each rear panel. Stock are 5.25" and most of use take the dremel to the baffled factory plastic speaker boxes and customize them to fit 6" or 6.5" speakers. there is what appears to be a crossover factory in back of each of my rear spkr boxs. Since i was installing component speakers, i took that out and sealed it with a thin piece of plywood and silicone and then I covered most the plastic box with "ulta-mat" - dynamat alternative.
Oct 18, 2010 | 07:47 PM
#35
Thread Starter
Registered User
Joined: Oct 2008
Posts: 468
Likes: 0
From: Back in New York City!
Well, if you want to do the spring lift, I can personally recommend it. However, I bought the truck with the suspension already done. If you're considering ball joint spacers, I'd go online and pick up a new full set of steering bits. I picked up a set that came to me with a grease fitting on almost every part, made in canada, for like $250 shipped. I got it on ebay. I bolted that stuff on, aligned it (to the very limits of the factory adjustments by the way, and the caster wasnt totally perfect, but acceptable), and immediately noticed the difference. The spacers go through joints and bigger tires really put a hurtin on tie rods and things like pitman arms.
If you are just talking about the rear, make sure you pick up a panhard bar drop bracket from 4crawler. Again, something I own and couldn't recommend any higher. It gets your rear geometry back in line.
As for the procomp, I'm becoming more and more sure that the PO of my truck actually snuck a small body lift onto it, and I havnt picked up on it by now. The light bar was pretty simple, I'm sure all of our plastic lower valances have been smacked and the circles of the bumper support cups have started eating through to the outside world. In my case they had totally done so. The cups have a bolt in the center keeping them on. remove the bolts, the cups fall off. The light bar lower mounting holes secure to where the cups were removed. Procomp sent me bolts that worked. On the top, I had to use a hammer and anvil to put those s-bends in the upper mounting tabs to fit on the top of my bumper, but I don't think you will otherwise. Also, I imagine that if you have no body lift the bars will stick just a little bit further in front. Drill 2 holes in the top of the bumper, bolt in place. donesky. 4 bolts. clearly its not meant to hit anything, but its kept all my lights in place just fine. I just have the fear that if I hit something the two top mounting tabs are going directly though my AC condenser.
More updates to come: I am setting about removing the stupid white pinstripe from the side, and I've modified my front AND rear door panels to fit speakers. As soon as I wire it to my new 4-channel amp, I'll post a wiring layout and pics. In the next week or two.
Jul 31, 2015 | 01:36 AM
#36

Registered User
Joined: Sep 2013
Posts: 56
Likes: 1
I dont care in the least about blocking those reverse lights. I am looking at a set of tail lights from ebay.co.uk (even though they are like $130 shipped) for the 'hilux surf' of the same year that have reverse lamps built in, so I'd be moving the lights (or splicing in and upping the fuse) anyway. I'm not entirely sure about the swing out tire carrier conversion anymore, because I realized that it wont fit with the marlin crawler rear bumper I fully intend to purchase and install. I'll probably just man up and cough up the money to have someone fab up a can carrier and weld it to that bumper when I get it.

Thread
Thread Starter
Forum
Replies
Last Post
RedRunner_87
95.5-2004 Tacomas & 96-2002 4Runners (Build-Up Section)
84
Jun 1, 2021 01:51 PM
Road Bull
86-95 Trucks & 4Runners
23
Oct 10, 2015 04:55 PM
jon.r
General Vehicle Related Topics (Non Year Related)
8
Jul 11, 2015 03:34 PM


