
irab88's 1993 PickUp Build-Up Thread


 Sep 5, 2011 | 12:15 PM
#823

he, thanks guys. the concert was fun. i'm glad i got to see a band i like, before it's too late (you know what i mean, right?)
anyhow, i had almost forgotten that i still had yet to install my e-fan. so while it's raining, i'm getting that together
anyhow, i had almost forgotten that i still had yet to install my e-fan. so while it's raining, i'm getting that together
 teaser:
 Sep 5, 2011 | 07:07 PM
#825
so i put in my electric mercury villager fan today. actually fairly easy, and it would have been easier if i had all the parts. but anyway, on a scale from 1-10 (1= changing a fuse, 10= engine swap), this would be about a 5.
i didn't take too many "in-between" pics because i was working on the thing. so here's what i did:
step one was to measure how much space i had to work with. when measuring, be sure to measure from the mounting points on the radiator to the nut that's most forward. i had 3.5 inches. so i measured the fan, and it was waaay more than that. i trimmed off the lip to give me a flat back and the shortest possible set-up (at ~3.75") with the villager fan shroud. then i test fit it, and found the fan has 4 inches of clearance if turned upside-down. the measurements i cut the shroud to are 41.5 cm tall by 54.5 cm wide (this does not line up with the bolt holes. the shroud itself is too short. i was prepared for that). also, i notched out a small area for the upper radiator hose.
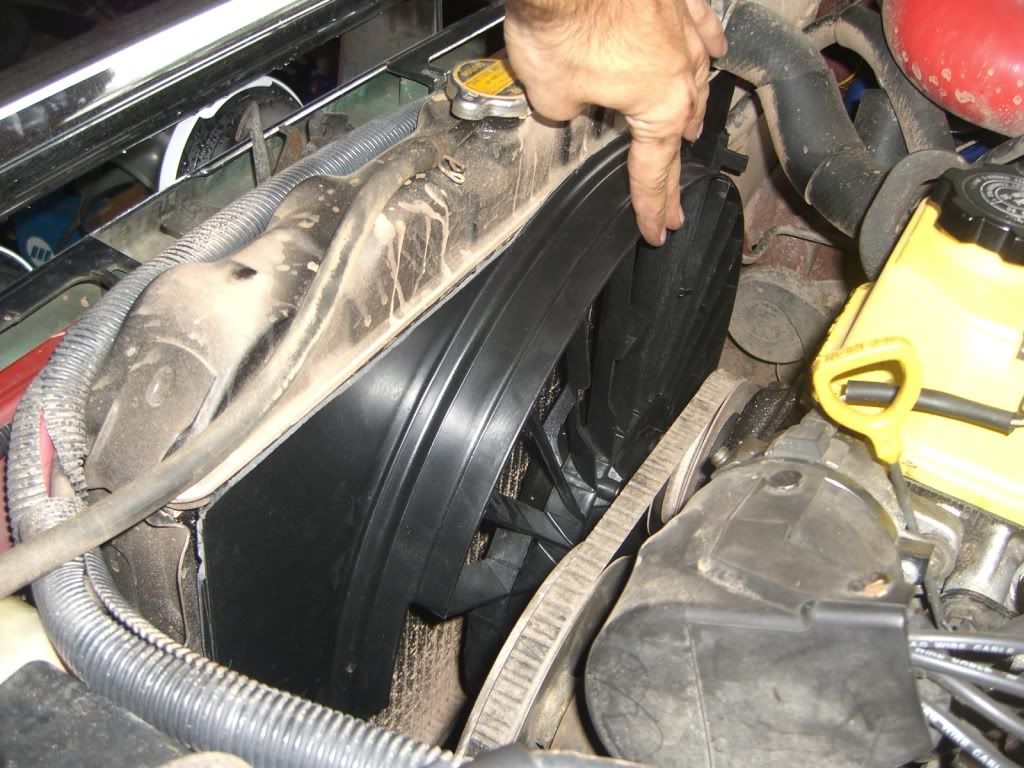


later, i realized the fan was rubbing on the radiator frame, at the edges. not good. the shroud had a bit of clearance on the inside, and i still had ~.5" behind the fan. i added washers to the fan mounts to move the motor (and fan) back about .25". worked perfect. the fan rotated freely and the shroud had little to no "leaks" around the edges. do this before you mount the fan on the radiator!!!! it was a pita to add the washers once it was all hooked up
(i used 2 fairly thick washers)


final clearance (might be able to gain some more room soon):

don't forget to mount the temp sensor before installing the fan. i got mine to fit snugly in the fins, held in with the shroud.
control circuit:

a/c tap-in:

easily added a permanent connection to my electrical system, using my bus-bar system!

i'll get a few more pics of the mounts that i had to add, but i just used some of the scrap plastic
i didn't take too many "in-between" pics because i was working on the thing. so here's what i did:
step one was to measure how much space i had to work with. when measuring, be sure to measure from the mounting points on the radiator to the nut that's most forward. i had 3.5 inches. so i measured the fan, and it was waaay more than that. i trimmed off the lip to give me a flat back and the shortest possible set-up (at ~3.75") with the villager fan shroud. then i test fit it, and found the fan has 4 inches of clearance if turned upside-down. the measurements i cut the shroud to are 41.5 cm tall by 54.5 cm wide (this does not line up with the bolt holes. the shroud itself is too short. i was prepared for that). also, i notched out a small area for the upper radiator hose.
later, i realized the fan was rubbing on the radiator frame, at the edges. not good. the shroud had a bit of clearance on the inside, and i still had ~.5" behind the fan. i added washers to the fan mounts to move the motor (and fan) back about .25". worked perfect. the fan rotated freely and the shroud had little to no "leaks" around the edges. do this before you mount the fan on the radiator!!!! it was a pita to add the washers once it was all hooked up
(i used 2 fairly thick washers)
final clearance (might be able to gain some more room soon):
don't forget to mount the temp sensor before installing the fan. i got mine to fit snugly in the fins, held in with the shroud.
control circuit:
a/c tap-in:
easily added a permanent connection to my electrical system, using my bus-bar system!
i'll get a few more pics of the mounts that i had to add, but i just used some of the scrap plastic
Sep 6, 2011 | 03:54 AM
#826
YotaTech Milestone-Two Millionth Post
Joined: Jan 2009
Posts: 12,009
Likes: 122
From: Northeast Pennsylvania
YES!
this happened to me. those 3 nuts are 1-time use nuts.....and...well I re-used mine. have 3 new ones now, but too dang lazy to put them on. have a noticeable leak and gas mileage took a poo because of it being PRE-O2-SENSOR. not sure if any harm could have happened to my (or your's) donut gasket because of this, but I am not going to disassemble the whole thing. tighten it up....trow some threadlocker on there if you are re-using the nuts and buy new nuts. clamp that exhaust to the bellhousing.....I imagine, if you don't, stress will find it's way somewhere there and you will have a bigger issue down the road with cracking of the pipe or at the manifold.
I like the VILLAGER fan mod......but can't justify it for myself right now.
Sep 6, 2011 | 06:54 AM
#829
actually, i have a good amount of room between the fan and the belts (or i will, once i remove some spacers i don't need). the hard part was trimming the villager shroud to size. it worked best if i started the cut with a hack saw and scored the rest of the cut with a knife, breaking it off by bending it back
trip report after being on the highway: i don't think the fan came on at all, though i couldn't hear the fan over the road noise (it used to be the other way around). i turned the temp range down 1/2 a turn, and the fan kicks on about every 30 seconds, on for ~10, repeat. with the fan at the initial setting, it won't turn on when idling. good radiator. and the a/c function works well.
and i figured out a way to prevent the fan from generating electricity to any indication led's. instead of a direct connection, use a current-sensing circuit. if the fan is powered, a bunch of juice will flow, but if the fan is spun under no load, only residual or no amps will be present
also, anyone know when the high-speed is supposed to activate?
Sep 6, 2011 | 07:08 AM
#830
Registered User

Joined: Jan 2010
Posts: 3,795
Likes: 33
From: Bloodymore
1st, i need an exanple for the current switch, to run my LED's since they are on when the efan generates power under hwy driving.
2nd, Hi-Speed fan should come on when you turn on the A/C. It should also turn on when your rad can't cool quick enough...ie..idling in 100f+ on my way back from OBX for 9 freeeaaakin hours!! I was nice and frosty though. The Lo-speed always turns on first, then the hi-speed kicks in , the controller is made to 'ramp up' so the initial draw on the battery/electrical system is reduced.
Running on the the hwy, on the east coast atleast, you probably will never see the fan turn on.
Sep 6, 2011 | 07:25 AM
#831
basic circuit:
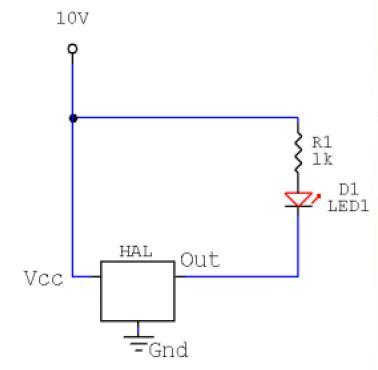
the heart of it is a hall-effect sensor. in the diagram below, they've added a transistor for increased sensitivity and a relay, which can be taken out (in which case the diode is no longer needed)
http://www.circuitsfinder.com/contro...witch_280.html

best thing about this? it's cheap. the sensors go for less than a buck
the heart of it is a hall-effect sensor. in the diagram below, they've added a transistor for increased sensitivity and a relay, which can be taken out (in which case the diode is no longer needed)
http://www.circuitsfinder.com/contro...witch_280.html
best thing about this? it's cheap. the sensors go for less than a buck
 Sep 6, 2011 | 09:16 AM
#833
Hey Ian, .....
I PROMISE, I'm NOT posting just to get a response from you on your Camper thread....Actually, I'm apparently having issues with my posts disappearing and some of my PM's not coming through.... So just curious if you see my post on the camper one. I had 2 guys tell me, "I saw you posted on my thread, but then you deleted it?".... Which I had NOT, lol. Has me a lil freaked out, lol.
Let me know when you can if you can see my post? Thanks, Ian, have a great day, man!
Sep 6, 2011 | 03:00 PM
#836
so the fan seems to run even after the truck is turned off (yellow wire hooked to my switched fuse box). it runs for just a bit, but just enough to warrent looking into the situation
Sep 7, 2011 | 04:36 AM
#837
Registered User
Joined: Jan 2010
Posts: 3,795
Likes: 33
From: Bloodymore
Is it running, or just spinning down? Mine spins for a bit after power is cut. That fan should not run if you have the switched power correct. I first set mine up with battery/constant power, and it would run for a few minutes after i parked her. I have since moved the yellow wire to the proper switched/ignition power.
Sep 7, 2011 | 05:21 AM
#838
yellow wire is switched, blue to a/c, and black to ground. i ran into a store and when i came back out about 5 mins later, it was running. i know it spun down when i took the key out. and when i got back in the truck, i quickly tapped the key to acc, giving power to the fuse box/yellow wire, then removed the key. the fan turned off. i also sat in the parking lot at school to see if it would happen again, but it didn't. i'll try again today.
that controller (except for the afore-mentioned) works great. and the fan itself is incredibly quiet. road noise drowns it out
that controller (except for the afore-mentioned) works great. and the fan itself is incredibly quiet. road noise drowns it out
Sep 7, 2011 | 06:08 AM
#839
Registered User
Joined: Jan 2010
Posts: 3,795
Likes: 33
From: Bloodymore
Something doesn't sound right. If that yellow wire is run to switched power, the relay cannot activate and send power to the relay unless the key is turned. I experienced the same thing you have, but as i mentioned, i was hooked to 12v constant. I'd shoot Brian Baskins at DCC an email, he should be able to help you diagnose the issue.


