
the genera_lee slo_build - 91 single cab
 Jul 12, 2018 | 12:07 PM
#41
Thread Starter
Registered User
Joined: Jun 2017
Posts: 175
Likes: 34
From: Reno/Tahoe Area
picked up an SR5 cluster from another member. gonna be installing it soon. truck is sitting at 133000 so i figure thats a good round number to swap clusters. dont worry, i wont connect the oil pressure sender til i put a new one on.
edit 9/5: still havent done this, i'm waiting til i get my new head unit so i only have to pull the dash apart one more time in the foreseeable future...
edit 1/2/19: pulled it apart and i've figured out how to repaint the needles. thats the next mini project on this to get it installed. then find some decent lights to put in it cause hte low range kit i currently have turned out to be pretty much garbage. then i need the correct oil pressure sender. then button it up.
Last edited by Genera_lee; Jan 2, 2019 at 11:36 AM.
Sep 5, 2018 | 10:40 AM
#42
Thread Starter
Registered User
Joined: Jun 2017
Posts: 175
Likes: 34
From: Reno/Tahoe Area
been a while since i posted.
i moved back to Austin from Reno about a month ago. work was just not doing it for me and i had the opportunity to move back so i took it. couldnt be happier about the decision!
recently, i let someone drive Shirlee, against my better judgment. they were talking all big about how they've driven standards their whole life and done some racing and whatnot. i gave them what i thought was a good primer on the clutch feel for this truck. then they proceeded to pull out of the parking lot (with me in the passenger seat) and never fully let off the clutch through first, second, and third with the engine pinned against the rev limit, just cooking my clutch. it was 100% fine before this too.
needless to say they wont get a secnd chance.
now, ~$400 later i have a marlin 1600 pound HD cluth kit, flywheel, stainless braided clutch line, and new flywheel and bolts being shipped to me.
i also plan to replace the started contacts while i have easy access to it.
should i look at replacing anything else while i'm in there? the clutch kit comes with a pilot and throwout bearing already, and i dont currently have a leaky transmission or transfer case.
Oct 26, 2018 | 10:30 PM
#43
Thread Starter
Registered User
Joined: Jun 2017
Posts: 175
Likes: 34
From: Reno/Tahoe Area
finally i have some stuff to update.
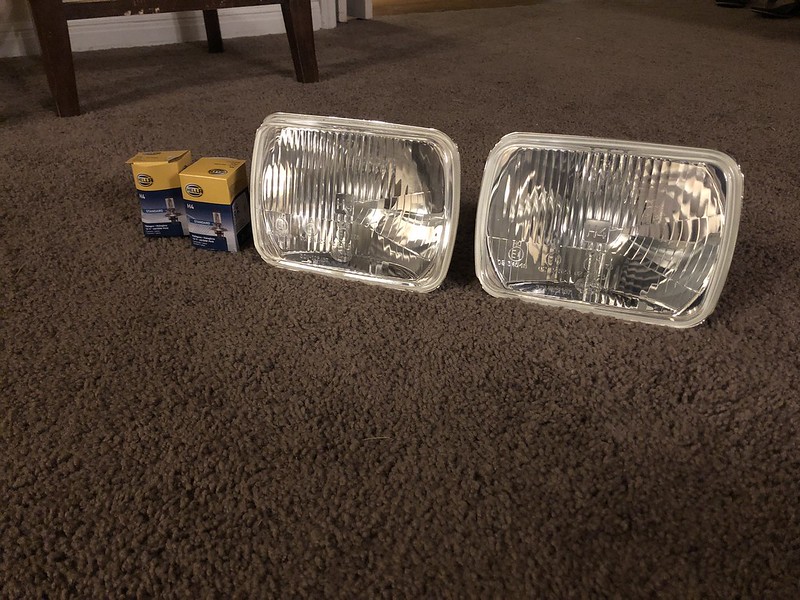
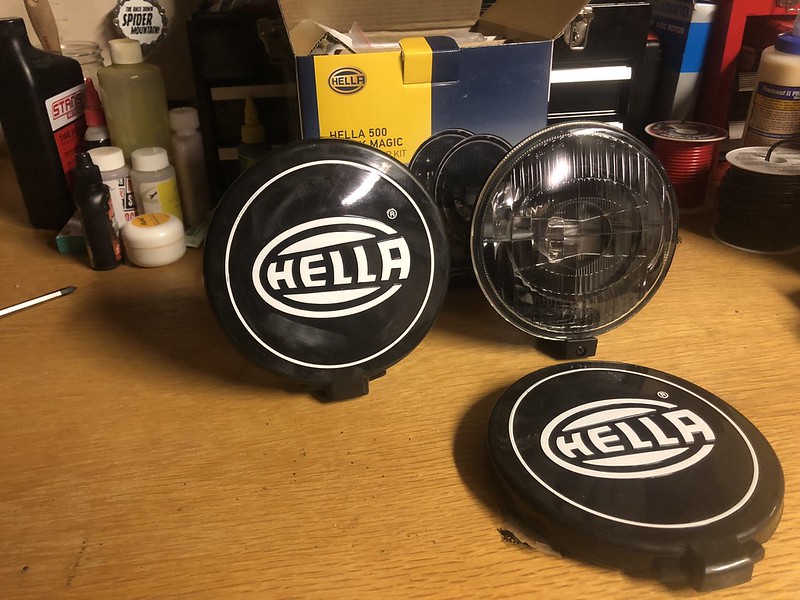
had a headlight go out so replaced both with a set of hella conversions. maybe 20% higher output than stock-ish stuff with the bulbs they come with. later i'll put some of those osram 100w bulbs in with a new wiring harness and ceramic plugs to up the output some more. cut off and distribution is definitely better. i'm just still not happy with the output overall but i know i can fix it so no big,
so naturally, since i'm less than pleased with the current lighting situation, ESPECIALLY on the trail, i wanted a solution. one that is in line with the build theme, and keeps a clean, oem style look to the truck. and one that is somewhat unique.
i'm thinking about 2 different ways of mounting them
Here's a mock up using a disc the same diameter as the lights.
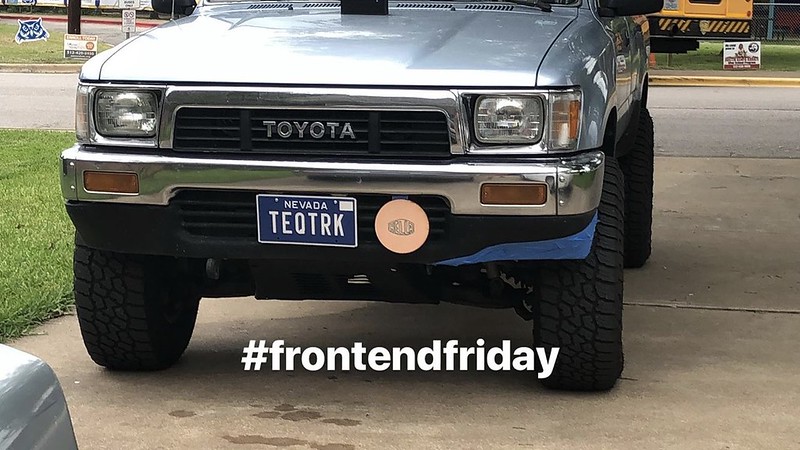
I'm leaning toward this option
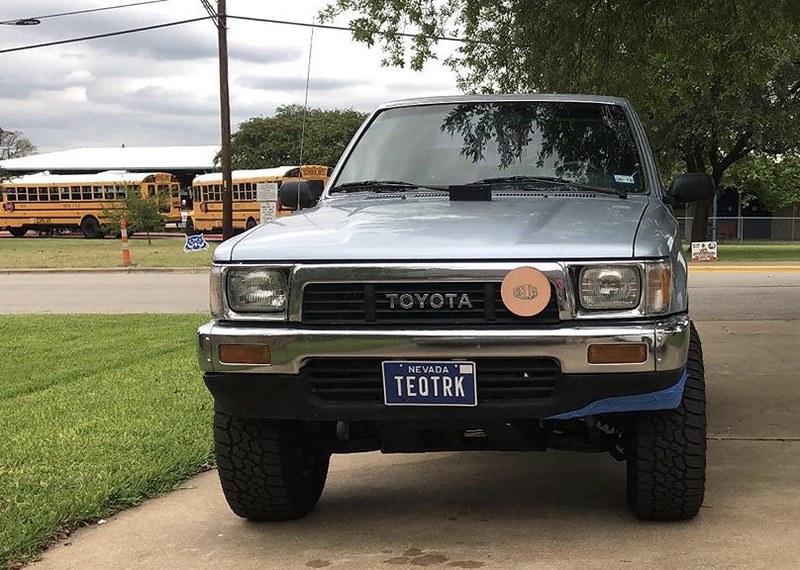
This is also an option. I like it lower tho
I also recently got a dual action orbital polisher attachment for my drill. tried it out on the (oxidized) roof to see how it would do. i need some practice but i'll say it was certainly effective. She'll still be a 10 footer, but at least the paint between the big scratches will look good. I'm going panel by panel as I have time. Clean, clay, compound, polish, wax. Here's the test on the worst panel on the truck, the roof:

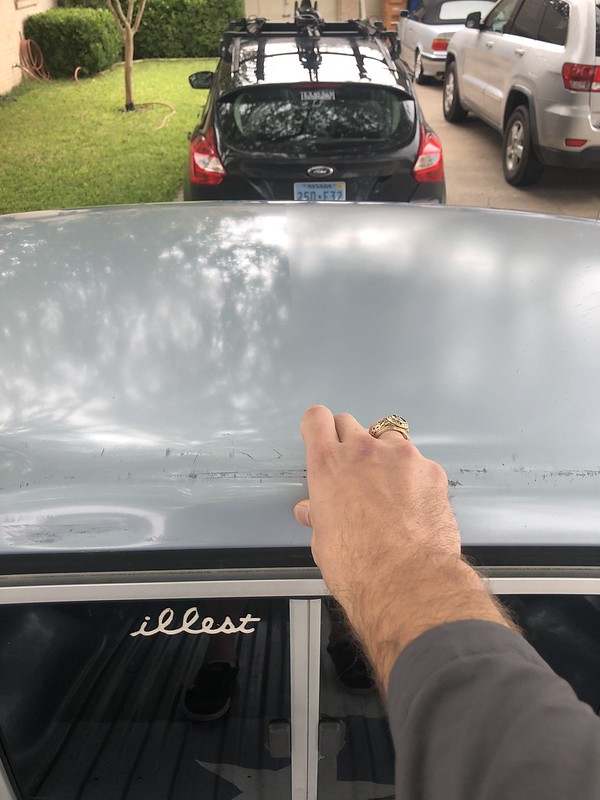
The left side is compounded and polished. The right side is untouched.
It's really gonna pop once I finish it all up and put some wax/sealant/(maybe)ceramic-coating on there. I do love the color of this truck. it's unique and it's held up for 28 years really well.
had a headlight go out so replaced both with a set of hella conversions. maybe 20% higher output than stock-ish stuff with the bulbs they come with. later i'll put some of those osram 100w bulbs in with a new wiring harness and ceramic plugs to up the output some more. cut off and distribution is definitely better. i'm just still not happy with the output overall but i know i can fix it so no big,
so naturally, since i'm less than pleased with the current lighting situation, ESPECIALLY on the trail, i wanted a solution. one that is in line with the build theme, and keeps a clean, oem style look to the truck. and one that is somewhat unique.
i'm thinking about 2 different ways of mounting them
Here's a mock up using a disc the same diameter as the lights.
I'm leaning toward this option
This is also an option. I like it lower tho
I also recently got a dual action orbital polisher attachment for my drill. tried it out on the (oxidized) roof to see how it would do. i need some practice but i'll say it was certainly effective. She'll still be a 10 footer, but at least the paint between the big scratches will look good. I'm going panel by panel as I have time. Clean, clay, compound, polish, wax. Here's the test on the worst panel on the truck, the roof:
The left side is compounded and polished. The right side is untouched.
It's really gonna pop once I finish it all up and put some wax/sealant/(maybe)ceramic-coating on there. I do love the color of this truck. it's unique and it's held up for 28 years really well.
Nov 22, 2018 | 12:02 PM
#44

Registered User
Joined: Oct 2015
Posts: 11
Likes: 1
From: Reno,Nevada
I recognized the parking lot from your job in Reno. I park in that same dirt lot daily. Im in the middle of ordering parts to put my 90 Toy 4X4 back on the road. Plans are to save miles from being put on the Subaru. Pena or Tesla ?
Last edited by Reno90Toy; Nov 22, 2018 at 12:03 PM. Reason: typo
Dec 16, 2018 | 10:56 AM
#45
Thread Starter
Registered User
Joined: Jun 2017
Posts: 175
Likes: 34
From: Reno/Tahoe Area
i actually quit and moved back to austin a few months ago. i was working for an equipment service contractor that was hired by pena. i was working on the battery production side. i'm glad i got out of there. the company i was with was total trash. i loved reno though.
i miss fire roads and mountains.
Dec 18, 2018 | 07:47 PM
#46
Thread Starter
Registered User
Joined: Jun 2017
Posts: 175
Likes: 34
From: Reno/Tahoe Area
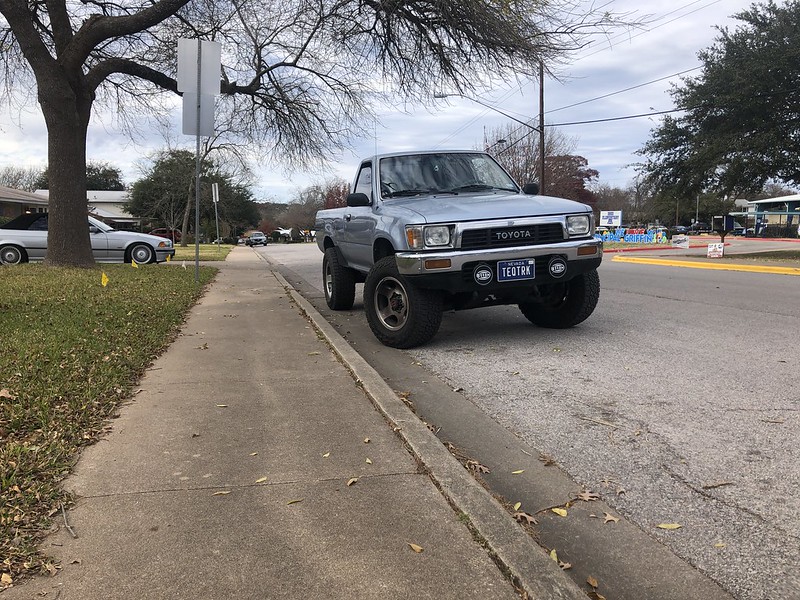
finally got these guys installed. still not wired up, but i wanted to drive around for a bit with them mounted up to see if it blocked too much air from the radiator.
it's fine.
i also don't think this mounting is gonna be permanent because i don't like how far out they stick in front of the bumper. i originally wanted to have them "recessed" into the bumper further on a custom mounting plate bolted to the front crossmember. i guess i'll still be doing that.
Jan 13, 2019 | 04:32 PM
#47
Thread Starter
Registered User
Joined: Jun 2017
Posts: 175
Likes: 34
From: Reno/Tahoe Area
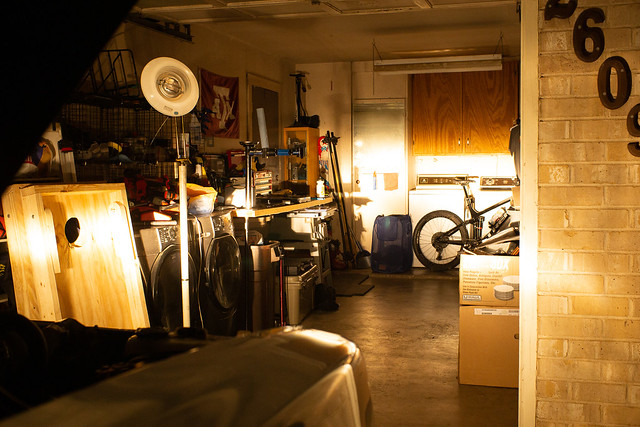
nothing too crazy going on recently. i have a clutch i still need to install but im waiting til i can build a transmission cradle for my jack that i still need to buy, and for one of my roommates to move out and take all his stuff out of the garage so i have a full spot to work in.
just order a wiring kit on amazon for my headlights the other day and it came in. h4 ceramic plugs, 14awg wire and relays to replace/supplement the old toyota wiring. now the old headlight plug acts as a remote to activate the relays. the headlights are substantially brighter. definitely makes me feel safer driving at night
pics to prove it. low and high beam before wiring upgrade, all taken with the same shutter speed and aperture setting, as well as a fixed exposure value and white balance across all images to negate any effects from that. nothing has bee retouched.
and after with all new wiring and relays installed:
Mar 27, 2019 | 06:36 PM
#48
Thread Starter
Registered User
Joined: Jun 2017
Posts: 175
Likes: 34
From: Reno/Tahoe Area
alright boys and girls. time to get some action going on this page again.
lots of plans ahead for Shirlee:
sr5 cluster swap is finally going in, along with supporting oil pressure sender, also full cab leds, including dash bulbs
new clutch, flywheel and supporting replacements, mods, and upgrades are going in
pads and rotors on the front
small upgrades in the engine bay, fan clutch, cleaning up some wiring and whatnot
ignition parts replacement
bucket seats may be going in
new head unit may be going in as well, budget dependent
connect differential and t-case breathers
clean out charcoal canister
clutch and whatnot are already here, along with gauge cluster and brake pads. all the parts are being ordered this week and weekend.
next step is to build a floor jack adapter for a transmission and transfer case
then i will start the repairs n earnest.
Oh boy
 May 30, 2019 | 08:37 PM
#51
Thread Starter
Registered User
Joined: Jun 2017
Posts: 175
Likes: 34
From: Reno/Tahoe Area
I'd been having "hard start" issues for the last few months. the infamous, *click* with nothing else happening. when it would finally start, it would skipp, sputter, and exhaust smoke that smelled like gas. i know it mustve been getting flooded from sitting these with the fuel pump on but no turnovers.
i'd ordered started solenoid contacts a while back, from 4crawler i think. but I was waiting to pull the transmission when i do the clutch here soonish to replace them. id remembered reading that the started was a bear to get to so i held off replacing them
then the other day i got stuck all the way across town. it was 95 and my girlfriend was with me. clearly, i needed to fix this. luckily after 10 minutes of trying, waiting, and trying, all while banging on the steering wheel, i got Shirlee started.
that afternoon i spend no more than 2 hours working on it.
i was able to remove the starter with hand tools, get the contacts swapped, clean all metal contact points, figure out the real issue, and get everything back together before dinner.
the contacts in the solenoid we fine. i replaced them anyway cause i had it open. but it turned out the nut holding the battery wire onto the solenoid was loose and the contact was corroded so badly that it was making very poor intermittent contact. i cleaned all surfaces and applied dielectric grease to keep it from happening again. so far so good.
here's to taking stuff apart and putting it back together again so it works better.
no pics cause i was in a hurry
Sep 10, 2019 | 05:50 PM
#52
Thread Starter
Registered User
Joined: Jun 2017
Posts: 175
Likes: 34
From: Reno/Tahoe Area
Turns out my starter positive lead was so corroded it wasnt starting the truck. replaced that after taking the starter apart and Shirlee spins like a top now and has been for some time
alsoooo...
i did an almost full ignition system tune up.
replaced the distributor cap and rotor, spark plugs, plug and coil wires, and distributor o rings. truck runs definitely better than it did before. butt dyno shows an increase of 5-8 horsepower.
alsoooo...
i did an almost full ignition system tune up.
replaced the distributor cap and rotor, spark plugs, plug and coil wires, and distributor o rings. truck runs definitely better than it did before. butt dyno shows an increase of 5-8 horsepower.
Sep 12, 2019 | 05:41 PM
#53
Thread Starter
Registered User
Joined: Jun 2017
Posts: 175
Likes: 34
From: Reno/Tahoe Area
now onto the brakes.
a while back i'd noticed the brakes rubbing, then they started to squeal a bit later. i already have pads and rotors that i bought earlier in the year, planning for this eventuality. id planned to do the brakes when i do the clutch here once I get my garage cleaned out and some time back from work.
well, it came sooner than expected.
i'd checked my pads a couple months ago and they didnt seem to be wearing down that quickly, but then i started hearing metal grinding and decided to park the truck.
 ] by generalee2010, on Flickr

so its time to do rotors, pads, and a bleed. might as well paint the rotor hats, hubs, and calipers while i'm at it too. turns out i have to pull the hubs to take the rotors off. so now it's all the aforementioned tasks plus a hub rebuild with new bearings and rebuild the hub lockers. also on the list. your classic 3 birds 1 stone scenario. called up marlin crawler and got a set of bearings in a hub rebuild kit shipped to me and started in on it.
what they looked like before

taking everything apart

had to use the wheel to hold the hub and knock the bolts loose holding the rotors to the hub
]
cleaning everything up and getting it painted to reinstall


I still have to rebuild everything. getting the hubs apart was harder than expected. the seal was really in there. i used a 19mm box wrench leveraged over a screwdriver with the hub set back in the wheel. then i was also replacing the bearing outer races and had to remove those. now that they're out, everything is cleaned up, painted, and ready for reassembly tomorrow.
also, im color matching my locking hub dials. they will match the truck blue. the hubs are black, and the calipers are "new ford grey", the color of part of the flag in the bed, brake drums, rotor hats, and shifter knobs.
a while back i'd noticed the brakes rubbing, then they started to squeal a bit later. i already have pads and rotors that i bought earlier in the year, planning for this eventuality. id planned to do the brakes when i do the clutch here once I get my garage cleaned out and some time back from work.
well, it came sooner than expected.
i'd checked my pads a couple months ago and they didnt seem to be wearing down that quickly, but then i started hearing metal grinding and decided to park the truck.
] by generalee2010, on Flickrso its time to do rotors, pads, and a bleed. might as well paint the rotor hats, hubs, and calipers while i'm at it too. turns out i have to pull the hubs to take the rotors off. so now it's all the aforementioned tasks plus a hub rebuild with new bearings and rebuild the hub lockers. also on the list. your classic 3 birds 1 stone scenario. called up marlin crawler and got a set of bearings in a hub rebuild kit shipped to me and started in on it.
what they looked like before
taking everything apart
had to use the wheel to hold the hub and knock the bolts loose holding the rotors to the hub
]
cleaning everything up and getting it painted to reinstall
I still have to rebuild everything. getting the hubs apart was harder than expected. the seal was really in there. i used a 19mm box wrench leveraged over a screwdriver with the hub set back in the wheel. then i was also replacing the bearing outer races and had to remove those. now that they're out, everything is cleaned up, painted, and ready for reassembly tomorrow.
also, im color matching my locking hub dials. they will match the truck blue. the hubs are black, and the calipers are "new ford grey", the color of part of the flag in the bed, brake drums, rotor hats, and shifter knobs.
Last edited by Genera_lee; Sep 15, 2019 at 08:39 PM. Reason: pics
Sep 16, 2019 | 08:10 PM
#54
Thread Starter
Registered User
Joined: Jun 2017
Posts: 175
Likes: 34
From: Reno/Tahoe Area
Progress, but as always, less than I'd wanted.
Got the lockers rebuilt. They look sicccccckkkkkkkkkk!!
Pressed one race into the right hub with the hammer and an old bearing, then realized it was 10 pm and I was hammering away on a piece of steel on a concrete floor. Oopsies.

Then I mocked it all up and put the rotor backing covers/vents back on. its gonna look great with some clean, waxed wheels. I love the color of this truck more and more as it ages. Maybe one day i'll have it resprayed to bring it back to its former glory.

Got the lockers rebuilt. They look sicccccckkkkkkkkkk!!
Pressed one race into the right hub with the hammer and an old bearing, then realized it was 10 pm
and I was hammering away on a piece of steel on a concrete floor. Oopsies.Then I mocked it all up and put the rotor backing covers/vents back on. its gonna look great with some clean, waxed wheels. I love the color of this truck more and more as it ages. Maybe one day i'll have it resprayed to bring it back to its former glory.
Sep 21, 2019 | 07:17 AM
#55
Thread Starter
Registered User
Joined: Jun 2017
Posts: 175
Likes: 34
From: Reno/Tahoe Area
Weekend update:
Got bearing races pressed into the hubs during the week. It was an excuse to buy a new tool. It this case, a BFH. 4 lb mini blacksmith sledge made quick work of this job.

edit: Unhappily, It looks like i'll have to replace the calipers. I could rebuild them, but a new set of calipers is cliose enough to the price of a rebuild kit that i just decided to get new ones. Then i can rebuild the other ones and sell em or keep me as a backup. Parts on order already.
Got bearing races pressed into the hubs during the week. It was an excuse to buy a new tool. It this case, a BFH. 4 lb mini blacksmith sledge made quick work of this job.
edit: Unhappily, It looks like i'll have to replace the calipers. I could rebuild them, but a new set of calipers is cliose enough to the price of a rebuild kit that i just decided to get new ones. Then i can rebuild the other ones and sell em or keep me as a backup. Parts on order already.
Last edited by Genera_lee; Sep 24, 2019 at 07:23 AM.
Oct 1, 2019 | 07:47 AM
#56
Thread Starter
Registered User
Joined: Jun 2017
Posts: 175
Likes: 34
From: Reno/Tahoe Area
Finished up the brakes this last weekend.

Painted the new calipers. Actually did it right this time.
Then i went to install the pads, and i couldn't get the inside pads to seat far enough to take the pins. The pads id ordered (like 8 months ago) were all outside pads. So i chopped the offending tabs off right quick with a death wheel and carried on with the install. Flushed with new fluid, then bled the brakes and we were good to go!

It's always so rewarding to tackle a big in-depth project like this and have it turn out really well! This one went from "pads and rotors? Ezpz!" to much more complicated rather quickly as i began to pull things apart. Then the inside pistons in the calipers were seized, and I just elected to get new ones rather than doing a rebuild. It was worth it for the peace of mind. I know i couldve done it, but they were about the same price for a rebuild kit vs a new caliper.
Now that shirlee stops again, its time for an adventure. Into the woods I go.
Painted the new calipers. Actually did it right this time.

Then i went to install the pads, and i couldn't get the inside pads to seat far enough to take the pins. The pads id ordered (like 8 months ago) were all outside pads. So i chopped the offending tabs off right quick with a death wheel and carried on with the install. Flushed with new fluid, then bled the brakes and we were good to go!
It's always so rewarding to tackle a big in-depth project like this and have it turn out really well! This one went from "pads and rotors? Ezpz!" to much more complicated rather quickly as i began to pull things apart. Then the inside pistons in the calipers were seized, and I just elected to get new ones rather than doing a rebuild. It was worth it for the peace of mind. I know i couldve done it, but they were about the same price for a rebuild kit vs a new caliper.
Now that shirlee stops again, its time for an adventure. Into the woods I go.
Jan 24, 2020 | 04:52 PM
#57
Thread Starter
Registered User
Joined: Jun 2017
Posts: 175
Likes: 34
From: Reno/Tahoe Area
Turns out i didnt set the preload right on my hubs (a la not owning a torque wrench) and they have since come loose.
now i get to repack the bearings and redo the hub rebuilds again. yay. i'll be good at it after this though.
now i get to repack the bearings and redo the hub rebuilds again. yay. i'll be good at it after this though.
Jan 24, 2020 | 05:23 PM
#58
Thread Starter
Registered User
Joined: Jun 2017
Posts: 175
Likes: 34
From: Reno/Tahoe Area
recently added a bed-top set up for more gear holding options.
after a recent camping trip, I quickly ran out of room in the bed with all the stuff we needed for the weekend plus 2 people and 2 dogs.
this is as elegant a solution and I've found. I had to do it in stages, and I've had most of the parts for a while, but I finally figured out how to get everything together how I wanted it.
this was stage 1, with just one bike rack:

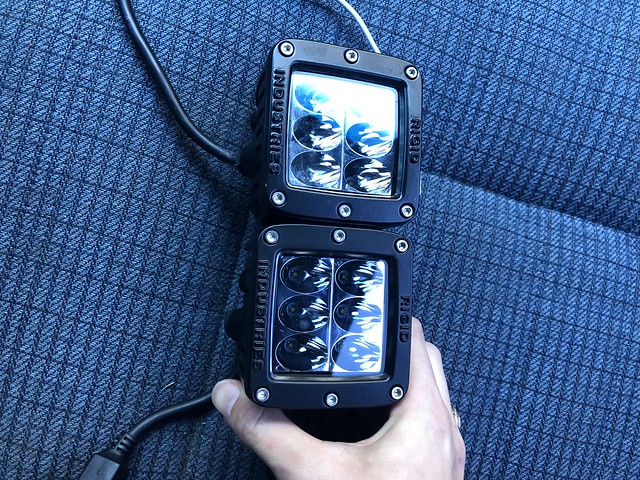
then stage 2 came when i found out my buddy was selling a basket and a set of Rigid pods for dirt cheap. so i picked those up.
no pics like that.
stage 3 was very quickly after that when my other god friend gave me another bike rack to match for Christmas. what a pal.

these are the lights I got. I'll have to build a wiring harness and figure out where I want them mounted. I'm thinking facing backward in the basket
and finally, I did some cleaning in the truck was just planning to do a quick clean up. that was promptly thrown out when i decided to try my new drill brushes and carpet shampoo to see how many of the coffee stains i could remove from around the shifters.
wow, what a difference!
the carpet looks almost new now!

I still have to fix my hubs, that will get re-done this weekend. this is what I get for not closely reading the FSM
edit: hubs rebuilt. all is well again. had to replace the drivers side outer bearing race cause im an idiot. $8 is pretty cheap for that lesson. i'll take it
after a recent camping trip, I quickly ran out of room in the bed with all the stuff we needed for the weekend plus 2 people and 2 dogs.
this is as elegant a solution and I've found. I had to do it in stages, and I've had most of the parts for a while, but I finally figured out how to get everything together how I wanted it.
this was stage 1, with just one bike rack:
then stage 2 came when i found out my buddy was selling a basket and a set of Rigid pods for dirt cheap. so i picked those up.
no pics like that.
stage 3 was very quickly after that when my other god friend gave me another bike rack to match for Christmas. what a pal.
these are the lights I got. I'll have to build a wiring harness and figure out where I want them mounted. I'm thinking facing backward in the basket
and finally, I did some cleaning in the truck was just planning to do a quick clean up. that was promptly thrown out when i decided to try my new drill brushes and carpet shampoo to see how many of the coffee stains i could remove from around the shifters.
wow, what a difference!
the carpet looks almost new now!
I still have to fix my hubs, that will get re-done this weekend. this is what I get for not closely reading the FSM
edit: hubs rebuilt. all is well again. had to replace the drivers side outer bearing race cause im an idiot. $8 is pretty cheap for that lesson. i'll take it
Last edited by Genera_lee; Jan 27, 2020 at 10:56 AM.


