Dropzone's 1994 4runner Build AKA: Project Recycle:

 03-24-2016, 03:49 PM
#142
I looked around at how various people had covered up the area of the tailgate where the stock license plate holder and back up lights were.
I would have loved to have picked up a factory tailgate that was built for the swing out and would have had the correct factory fascia piece but in keeping with the keep it cheap theme of this built decided to experiment with stuff i had on hand.
using the stock license frame as a template

dug around and found some diamond plate in the garage

figured i would use it to cover up the hole left when the plate mount was removed, though it was hidden with the spare tire on:


Using my knee to bend the diamond plate got the contour pretty close to the curvature of the tailgate. Not perfect but it will do
03-24-2016, 05:11 PM
#144
Registered User
iTrader: (1)

Join Date: Jan 2014
Location: North Carolina
Posts: 241
Likes: 0
Received 0 Likes
on
0 Posts
Good timing, as it just got covered up, the picture is down a few images.
I looked around at how various people had covered up the area of the tailgate where the stock license plate holder and back up lights were.
I would have loved to have picked up a factory tailgate that was built for the swing out and would have had the correct factory fascia piece but in keeping with the keep it cheap theme of this built decided to experiment with stuff i had on hand.
using the stock license frame as a template

dug around and found some diamond plate in the garage

figured i would use it to cover up the hole left when the plate mount was removed, though it was hidden with the spare tire on:


Using my knee to bend the diamond plate got the contour pretty close to the curvature of the tailgate. Not perfect but it will do
I looked around at how various people had covered up the area of the tailgate where the stock license plate holder and back up lights were.
I would have loved to have picked up a factory tailgate that was built for the swing out and would have had the correct factory fascia piece but in keeping with the keep it cheap theme of this built decided to experiment with stuff i had on hand.
using the stock license frame as a template
dug around and found some diamond plate in the garage
figured i would use it to cover up the hole left when the plate mount was removed, though it was hidden with the spare tire on:
Using my knee to bend the diamond plate got the contour pretty close to the curvature of the tailgate. Not perfect but it will do


 03-26-2016, 08:23 AM
#151
Registered User
Join Date: Jan 2011
Location: exo-reality -wave if you see me; Front Range, CO
Posts: 652
Received 93 Likes
on
73 Posts
Added some additional LED's in the cargo area. A single LED in the stock cargo lamp was pretty lame
So, what exactly did you do? I always thought the lights weren't lousy, it was just my "old and dim of eye" age!!
So, what exactly did you do? I always thought the lights weren't lousy, it was just my "old and dim of eye" age!!
03-26-2016, 11:23 AM
#152
I added some LED's that I was going to use as rock lights.
I had bought a set similar to these for the Trekker and decided they would get more use in the back. Not sure if i am going to add rock lights to the 4Runner
http://www.ebay.com/itm/381505124332?_trksid=p2057872.m2749.l2649&ssPageName=STRK%3AMEBIDX%3AIT
03-31-2016, 07:46 PM
#153
Decided to see if the recycling parts from the Trekker so pulled the stock tinfoil bumper. 6 bolts and 3 minutes it was on the ground..
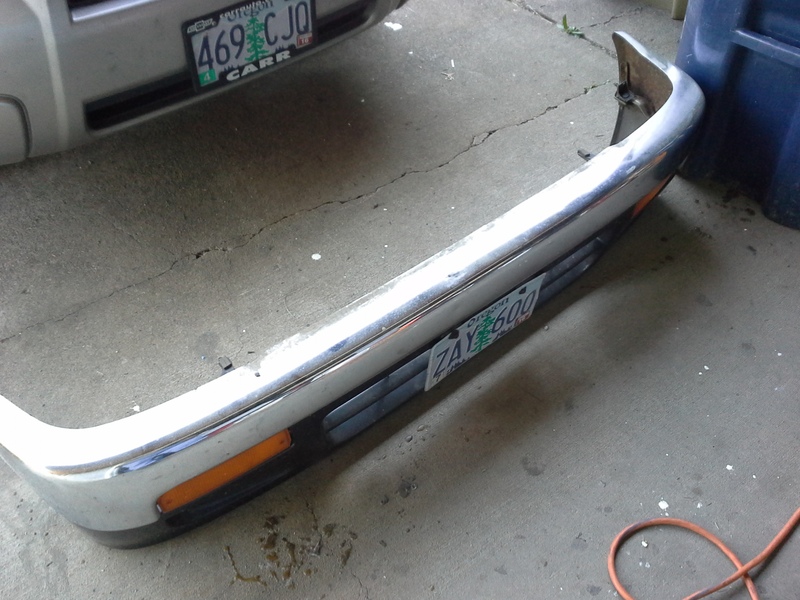
Absolutely no protection whatsoever
Pulled the Trekker Bumper out of storage for a test fit
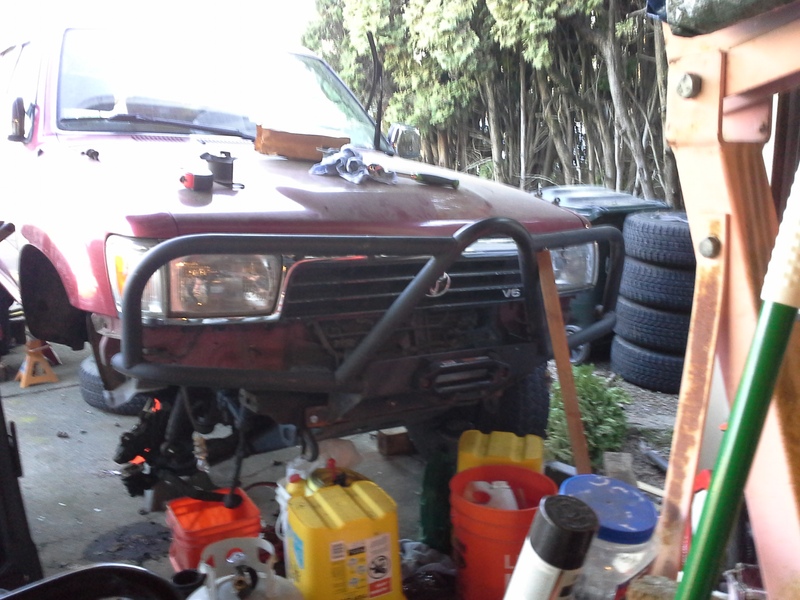

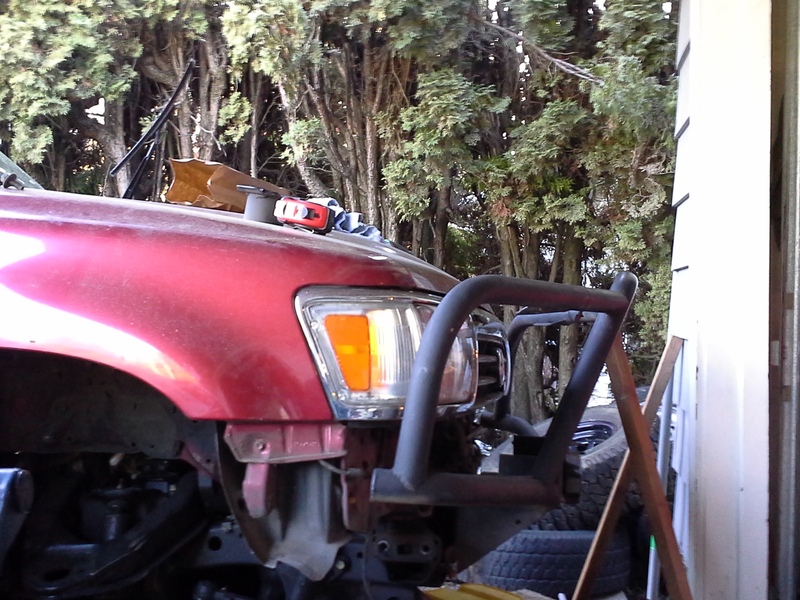
Not sure if I like it or not.
I need to make a 1" thick spacer for the lower mount it actually bolts up in 4 spots. I would need to fab a mount for each of the stock side mounts.
What do you guys think? Recycle it or get something new?

Absolutely no protection whatsoever
Pulled the Trekker Bumper out of storage for a test fit


Not sure if I like it or not.
I need to make a 1" thick spacer for the lower mount it actually bolts up in 4 spots. I would need to fab a mount for each of the stock side mounts.
What do you guys think? Recycle it or get something new?
03-31-2016, 08:05 PM
#154
Registered User
Join Date: May 2009
Location: Sierra Foothills
Posts: 216
Likes: 0
Received 0 Likes
on
0 Posts
It would be better if it were up an in more, but I don't know if that's possible. As it stands now I would probably not run it myself, since it seems pretty obvious it wasn't made for that car.
04-01-2016, 06:36 AM
#155
Contributing Member
What sort of tweaking besides a puck are you thinking of?
04-01-2016, 11:24 AM
#156
So I was thinking of a 1" steel spacer that would push it out far enough that the bottom core support would not need any reworking. Redeth005 made a comment on instagram that made me remember I had a big chunk of plate.
So I dug out my winter truck bed weight, a chunk of 1 1/8" plate, I need a piece 26" long. It will be a PITA to cut(going to talk to friend who runs a metal shop with big toys to see if he could cut it) but I am thinking this could be cut and threaded to act as a solid spacer and a secure enough mount to raise the bumper so it looks better.
Trying to this whole project with using crap around, hoping to keep the entire build under $2500, one reason it is so slow.
If raising the bumper doesn't pan out I can still use the winch mount and come up with a different bumper plan. Ideally I would love to have an ARB bumper fall into my hands
04-01-2016, 11:43 AM
#157
Registered User
iTrader: (1)
Join Date: Jan 2014
Location: North Carolina
Posts: 241
Likes: 0
Received 0 Likes
on
0 Posts
Ideally I would love to have an ARB bumper fall into my hands
04-01-2016, 06:32 PM
#158
So found my winter truck bed weight I have been using for almost 30 years.
Measured it, long enough, 1/8" thicker than I wanted but oh well

Was hoping to use a friend's plasma table but no response to text msgs so decided to take the long route

2 hours or so and 3 cut off wheels later I had a 27x4.25x 1.125" hunk of steel

So my half baked plan is to use this as a spacer to push the winch plate put so I wouldn't have to trim the lower core support and move the AC condensor and anot electric fan. It will also allow me to move the bumper up a couple of inches.
If it doesn't pan out I am out a few hours and some miscellaneous supplies.
04-02-2016, 11:43 AM
#159
Registered User
Join Date: Jan 2011
Location: exo-reality -wave if you see me; Front Range, CO
Posts: 652
Received 93 Likes
on
73 Posts
Cool! Using spare pieces of battleship armour you have! At a least that will help keep the front end hop down.
Reminded me of some bbq place I used to hit down in like Odessa or Seguin or somewhere. Across the street was (closed?) old fab shop, with humongous slabs of various widths plate (1"+, 5'x 10' ish) laying in this lot. Wasn't like anyone was ever going to sneak off with it.
Reminded me of some bbq place I used to hit down in like Odessa or Seguin or somewhere. Across the street was (closed?) old fab shop, with humongous slabs of various widths plate (1"+, 5'x 10' ish) laying in this lot. Wasn't like anyone was ever going to sneak off with it.


