When you click on links to various merchants on this site and make a purchase, this can result in this site earning a commission. Affiliate programs and affiliations include, but are not limited to, the eBay Partner Network.
awesome to hear you fixed the t case brake! i know a lot of guys complain about the noises they make.
thanks, it's a good feeling, it was really bugging me that i couldn't get it sorted. i took it for another drive, and was thoroughly pleased. i feel like there is some slight dragging noise (which i would expect, no big deal), but as soon as i get to about 20 mph, the tires and other noises drown it out completely. any added vibration from the rotor being on the t-case output seems to be negligible as well. it's possible that the guys complaining about noise had the older caliper version, as in my searches on issues, not too much info came up on people using the newer version with the wilwood caliper. either way, i'm stoked. the nuts on the driveshaft bolts hitting the bracket could be remedied in production by making the bracket just a little shorter on the back side.
i think the nut was hitting and the bracket was pushing back, and was potentially causing my rear output to leak more than usual while sitting. it was random if it would do it, which makes sense, as it would depend on if it was parked with the nut pressed against the bracket, or if it was parked at a place rotationally where there was no nut pressed against the bracket.
on to finishing up my front bumper and beyond....
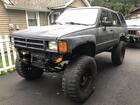
i finally finished my front bumper and got it installed. 6x 9/16" fine thread bolts for mounting. 2"x4" rectangular tube, cut, bent and welded. 3/8" and 1/4" tabs and gussets.
i have been driving it the last few days which has proved the heat isn't working. one more thing to fix...delaying the dreaded body/floor work...
Good lookin bumper. I hope it never gets used for what it's designed to for. If that makes any sense.
Any idea what's wrong with the heat? No fan operation, no hot water going into the core? Clogged up core? They get clogged up badly with dust, dirt, leaves etc. Quite often all it needs is a good blast of compressed air backwards through it. Makes a heck of a cloud of dust etc in the cab when you do it, but if you have a shop vac behind to catch the stuff, you're in good shape
Of course, if there's no hot water in the return line, that tells you where the trouble might be right off.
Good lookin bumper. I hope it never gets used for what it's designed to for. If that makes any sense.
Any idea what's wrong with the heat? No fan operation, no hot water going into the core? Clogged up core? They get clogged up badly with dust, dirt, leaves etc. Quite often all it needs is a good blast of compressed air backwards through it. Makes a heck of a cloud of dust etc in the cab when you do it, but if you have a shop vac behind to catch the stuff, you're in good shape
Of course, if there's no hot water in the return line, that tells you where the trouble might be right off.
Good luck! Keep us up to date on how it goes
Pat☺
thanks on the bumper
in terms of the heat, i am not sure. the motor seems to take forever to warm up, and seems to run a little on the cool side. i know in my ignorant youth i put a 180 degree thermostat in and sealed the housing with a ton of rtv, and i currently have a slight weep there. it seems like maybe the thermostat is stuck open, but i'm not sure. i removed the rear heater long ago when the duals went in and the console came out, so that is out of the picture. i just ordered all new Dayco hoses (radiator, bypass, and heater), Aisin water pump, 195 degree Aisin thermostat, and Dorman thermostat housing. I had replaced the radiator itself years ago, and since it is not leaking and it has never come close to overheating, i am calling that good. the radiator has no bubbles in it, no oil, etc. and the engine runs fine, so i am not worried about the head. hopefully, that will fix any issues there, then i just have to verify that the heater controls are all working properly. also, as you suggested, cleaning out the core is probably a good idea, not sure i have ever done it. i absolutely did not think of checking how hot both hoses going to and from the heater are once the engine warms up, thank you for the suggestion, i will post up what i find.
i ordered some sealed LED headlights with a DTRL and an adapter harness. (happy holidays to me)
i also ordered a set of corner markers/turn signal combos from an overseas version of a truck of the same vintage. there is a clear lens that takes the same bulb/socket as the corner markers, and it has an amber lens takes the same bulb/socket as the turn signal that mounts in the stock bumper (which is no longer on my truck). the cheapo temporary replacements i have on the front now will disappear. this will also allow my stock flasher to function as intended/designed. (happy holidays to me again)
i will post up how these all work out for me, with pics of course.
so i drove the fam to the store in the 4runner, far/long enough for it to warm up completely (it was maybe 40 degrees out), then we went to pick up food. they waited in the truck while i went in. when i came out, the truck was sort of warm inside, my wife even commenting that she was surprised how warm it got. i popped the hood and grabbed both the heater hose going to the heater and coming from the heater, and they were both pretty toasty. this makes me think the coolant passage running through the heater core must be clear enough. maybe i need to blow out the heater itself. it still seems like it is running cooler than it should be.
i have gathered a BUNCH of parts:
Aisin Timing Cover
Aisin Water Pump
Melling Oil Pump (turns out this is made in Japan)
OSK Timing Kit (made in Japan)
Aisin Thermostat
Thermostat housing (just in case)
Dayco Radiator hoses (x3)
Silicone hose (for smaller coolant hoses)
LED 5"x7" Hi/Lo Beams with DTRL
Headlight Harness (dual relay)
LN/RN corner/marker combo lenses
Amber LED 3/4" thru mount (x4)
new 18 mm Stover nuts (x12)
paint
black rtv
oil
oil filter
anti freeze
so far, i removed:
alternator
ps pump
radiator
hoses
accessory brackets
harmonic balancer and pulley
fan
fan shroud
head lights
head light buckets with adjusters
grille
intake air tube
thermostat
thermostat housing
water pump
oil
anti freeze
this all started because i wanted to do the water pump/hoses, and i noticed that the timing cover was cracked in addition to the hole for one of the coolant tubes being cracked. the almuinum cover was all corroded, expanded, and cracked. there must have been a leak, confirmed by the small spot that would form in the driveway. the bolt holding the timing cover on that was through the now cracked piece, snapped while trying to remove it. shocked i was not. i chiseled the rest of the aluminum out of the way, welded a nut on the end of the bolt, and was able to get it out.
the crank bolt holding on the harmonic balancer was also a HUGE pain.
the list of what did NOT work, in order of appearance:
electric impact
air impact
bumping the starter with a breaker bar on the frame
an 8 foot cheater bar (which resulted in breaking the half drive nub off one of my 3/4" to 1/2" adapters)
what DID work was welding my socket to the crank bolt (for the heat, not necessarily to make them one piece) and bumping the starter with a breaker bar on the frame while it was still hot. i was able to grind the socket back off, clean up the bolt, and it still threads in super smooth, for the win
i wire wheeled all the accessory brackets in prep for paint. all the rest of the timing cover bolts were cracked loose to make sure there were no more issues for next garage day for doing the timing chain itself.
i plan on following 4crawler's bible status article. for better or worse, i don't plan on removing the head but i do plan on removing the oil pan.
i got the new timing kit installed, along with the new cover, water pump, and oil pump. the valve cover is just sitting on the engine, i'd like to clean up/paint it. the oil pan's new paint is drying, and i will hopefully get to install it today. my accessory brackets are primed, and will get painted today if i can. i used gasket sealant on the paper gaskets for the timing cover and water pump. a little rtv on the top to help it re-seal to the head gasket, which i seem to have managed to not destroy.
making progress. i got the valve cover on, sprayed some clear on the new timing cover, got everything painted that wasn't, replaced the 3x M10 timing cover bolts to match the 4th that broke, put the distributor back in, etc.
i got the accessory brackets on, the alternator and power steering pump mounted, and the coolant hose bolted up.
next up would be the harmonic balancer and heater/bypass/coolant hoses and the radiator.
i also mounted and wired my new 5000 watt forced air garage heater! super excited. i added a separate wall mount thermostat, replacing the built in one that came on it. along with my old window ac unit in the wall, my little garage shop is climate controlled!
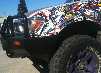
i made some more progress. i opened up the bulb mounting holes in my new corner lights for the 3/4" bulkhead mount led blinkers/markers i got. i soldered on some nice dorman connectors to match up to those i added to the factory harness. i also added a dual relay headlight power harness, the kind the leaves the stock headlight circuit just operating the relays. all i need to add is the daytime running light wires, once i figure out how i want to wite them. my grille painting was a disaster, and needs to be sanded down...again



 Dec 12, 2021 | 12:44 PM







 i was able to grind the socket back off, clean up the bolt, and it still threads in super smooth, for the win