
bluAM2's '93 DLX Ext Cab Build Thread
 Feb 13, 2012 | 04:15 PM
#1
Thread Starter
Registered User
Joined: Nov 2009
Posts: 166
Likes: 0
From: NW Earth
bluAM2's '93 DLX Ext Cab Build Thread
I guess this will be more for myself than it will for anyone else, but I decided to start a build thread for mine finally. It'll be $low going$ I'm sure, but at least this way I'll have a quick spot to see everything from start to finish. Any questions or suggestions are very welcome. Thanks!
- Jake
- Jake
Feb 13, 2012 | 04:57 PM
#2
Thread Starter
Registered User
Joined: Nov 2009
Posts: 166
Likes: 0
From: NW Earth
Oct '09 - Dec '11
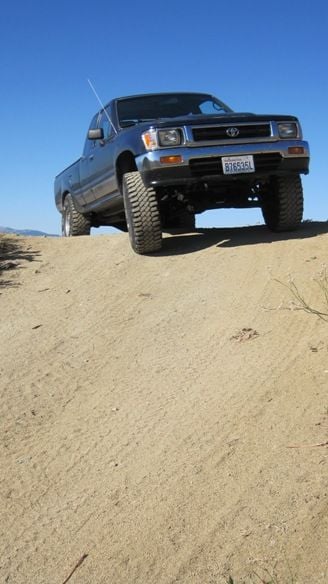
I bought my '93 the day before Halloween in 2009 in Lake Oswego, OR and drove it back to Oak Harbor, WA that same day. The next morning I woke up and decided to take a mini road trip with my new baby so I picked up a new pair of wipers (rain in the Pac NW?? No way!!). Right after installing them, I went to leave and when I started the engine ... WHITE SMOKE!! Yep ... head gasket ... #6 cylinder.
I was a little too disheartened at the time to think about taking pictures for this site and I just wanted to get it done so I could drive her again. Besides ... what 3VZE owner out there doesn't know what a 3.0L swap looks like? To make a long, depressing story short, I picked up a long block from CHS Machine out of Portland. The jury is still out on how I feel about that decision, but so far it's been behaving. Needless to say, this provided me the opportunity for plenty "while I'm in here" type fixes/upgrades as you'll see below:
- LCE Headers
- Spec Stage 2+ clutch
- K&N Intake & DryCharger
- EGR removal & blank off plate
- Bosch Plugs & Wires (changed to Denso shortly after)
- BWD Knock Sensor & pigtail (again ... stick with OEM. This one comes back to haunt me)
- Failsafe thermostat
- Timing Belt/Hydraulic Tensioner/Gasket set
- Re-man distributor & cap/rotor
- Oil pressure switch
- BVSV Valve (broken during reassembly)
- VAFM Sensor
- "Custom" homemade exhaust (whatever wasn't rusted out from the stock pipes, welded to an old '86 jag muffler)
- Replaced the oil cooler, which I found out later doesn't come on most of these engines.
This all got it running, but I had a Code 52 issue that I chased for quite some time. After I finally got it running, it was time to do what I had planned for so long to do to it.
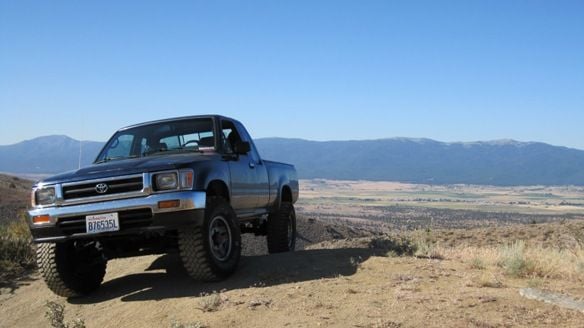
I actually made a trip to Fallon, NV with my Code 52 issue AND a short in my O2 Sensor circuit which randomly blew my EFI fuse and killed the truck. I think the final total of fuses I went through was like around 30 or something. Stupid?? Very. Here's a few pictures of that trip:

Sometime after this I blew the main fuel line and brake line (about 4-5 months apart) that come up right by the passenger side firewall because of my headers. I was so excited to get the thing running after the headgasket fix that I took it for a spin knowing that they were rubbing. I just never got back to it for re-routing. Yet another reason I love a standard transmission. If the brakes fail ... you can still stop. I wont lie, I drove it for about 2 weeks with no brakes. It's my only ride dammit! I hope someday when I have kids they wont do HALF the stupid stuff that I've done haha.
I was a little too disheartened at the time to think about taking pictures for this site and I just wanted to get it done so I could drive her again. Besides ... what 3VZE owner out there doesn't know what a 3.0L swap looks like? To make a long, depressing story short, I picked up a long block from CHS Machine out of Portland. The jury is still out on how I feel about that decision, but so far it's been behaving. Needless to say, this provided me the opportunity for plenty "while I'm in here" type fixes/upgrades as you'll see below:
- LCE Headers
- Spec Stage 2+ clutch
- K&N Intake & DryCharger
- EGR removal & blank off plate
- Bosch Plugs & Wires (changed to Denso shortly after)
- BWD Knock Sensor & pigtail (again ... stick with OEM. This one comes back to haunt me)
- Failsafe thermostat
- Timing Belt/Hydraulic Tensioner/Gasket set
- Re-man distributor & cap/rotor
- Oil pressure switch
- BVSV Valve (broken during reassembly)
- VAFM Sensor
- "Custom" homemade exhaust (whatever wasn't rusted out from the stock pipes, welded to an old '86 jag muffler)
- Replaced the oil cooler, which I found out later doesn't come on most of these engines.
This all got it running, but I had a Code 52 issue that I chased for quite some time. After I finally got it running, it was time to do what I had planned for so long to do to it.
I actually made a trip to Fallon, NV with my Code 52 issue AND a short in my O2 Sensor circuit which randomly blew my EFI fuse and killed the truck. I think the final total of fuses I went through was like around 30 or something. Stupid?? Very. Here's a few pictures of that trip:
Sometime after this I blew the main fuel line and brake line (about 4-5 months apart) that come up right by the passenger side firewall because of my headers. I was so excited to get the thing running after the headgasket fix that I took it for a spin knowing that they were rubbing. I just never got back to it for re-routing. Yet another reason I love a standard transmission. If the brakes fail ... you can still stop. I wont lie, I drove it for about 2 weeks with no brakes. It's my only ride dammit! I hope someday when I have kids they wont do HALF the stupid stuff that I've done haha.
Last edited by bluAM2; Feb 23, 2012 at 06:34 PM.
Feb 13, 2012 | 05:15 PM
#3
Thread Starter
Registered User
Joined: Nov 2009
Posts: 166
Likes: 0
From: NW Earth
Jan-Feb 2012
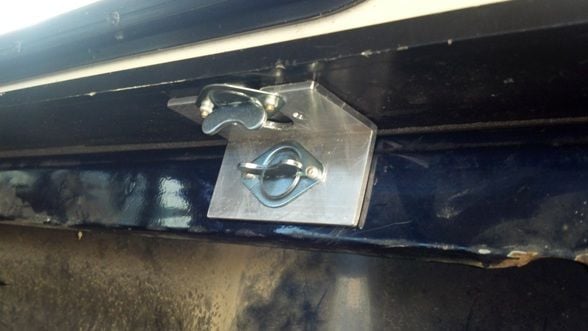
Picked up an almost perfect fit camper shell from craigslist and spent a little bit designing and building a custom mounting system.

I plan on getting a roof rack too, but that comes later.
Also had to replace my hi-beam switch as it hadn't worked right since I bought the truck.
Changed all my driveline fluids shortly after with all Luca$Oil stuff.
Picked up a Bluetooth/MP3 capable Kenwood Stereo. I plan on wiring in my cell phone car dock power cord directly to my cigarette lighter so there's no dangling cords. That way I can dock my phone and it's linked to my stereo and you don't have any cord clutter. Eventually I'll run lines from the Kenwood to my camper shell quick disconnect harness (thread to be started soon) so I can have a cheap set of speakers back there for Drive-In movies with the pretty lady .
.
Also got rid of the stock grill look by getting a sheet of powder coated steel mesh and mounted it to the stock chrome frame.

Here's the thread for that one.
Not sure what's next ... $$$ ... but I want to mount some Hella Black Magics behind my new grill, install some fog lights, and add some auxillary back up lights. Or install my 2000 Watt inverter and wire my bed for power tool usage. I want to recolor my interior as well and get ahold of a set of stock bucket seats and center console. That middle bench seat was designed for the Keebler Elves I think.
I plan on getting a roof rack too, but that comes later.
Also had to replace my hi-beam switch as it hadn't worked right since I bought the truck.
Changed all my driveline fluids shortly after with all Luca$Oil stuff.
Picked up a Bluetooth/MP3 capable Kenwood Stereo. I plan on wiring in my cell phone car dock power cord directly to my cigarette lighter so there's no dangling cords. That way I can dock my phone and it's linked to my stereo and you don't have any cord clutter. Eventually I'll run lines from the Kenwood to my camper shell quick disconnect harness (thread to be started soon) so I can have a cheap set of speakers back there for Drive-In movies with the pretty lady
.Also got rid of the stock grill look by getting a sheet of powder coated steel mesh and mounted it to the stock chrome frame.
Here's the thread for that one.
Not sure what's next ... $$$ ... but I want to mount some Hella Black Magics behind my new grill, install some fog lights, and add some auxillary back up lights. Or install my 2000 Watt inverter and wire my bed for power tool usage. I want to recolor my interior as well and get ahold of a set of stock bucket seats and center console. That middle bench seat was designed for the Keebler Elves I think.
Last edited by bluAM2; Feb 14, 2012 at 09:08 PM.
Feb 13, 2012 | 06:46 PM
#4
Thread Starter
Registered User
Joined: Nov 2009
Posts: 166
Likes: 0
From: NW Earth
Recoloring the interior it is: https://www.yotatech.com/forums/f116...loring-249758/. I found some vehicle specific black carpeting on ebay that will come much later, but I'm going for a black interior. I don't want everything to be COMPLETELY black cause I'll feel like I'm driving a chalk board or something, so I may add a few off color (grey?) highlights in places that make sense. We'll see what I can come up with I guess.
Last edited by bluAM2; Feb 22, 2012 at 04:58 PM.
Feb 23, 2012 | 06:27 PM
#5
Thread Starter
Registered User
Joined: Nov 2009
Posts: 166
Likes: 0
From: NW Earth
Boring night at work (again) so I opened up my Chilton's (don't act like the rest of you don't have yours at work!) to chapter 4 and realized ... THESE ARE THE CLEANEST PAGES IN THIS BOOK!! I've never gone thru my emissions system in the 2 years that I've owned it, and judging by the quality of some of the 'work' I've found, I'm guessing the PO hadn't done anything while he had it. I've had the "Something's still missing" feeling when driving for a while and I feel like this could be a good candidate. I see lots of vacuum hoses, PCV valves, and RTV in the future. Anyone know what this AS Reed Valve does?

 Mar 9, 2013 | 10:24 AM
#7
Thread Starter
Registered User
Joined: Nov 2009
Posts: 166
Likes: 0
From: NW Earth
So apparently this is to become more of a "theoretical ideas" page instead of a "build" page because I haven't spent any $$ on him since the last post besides gas & oil. It's free to dream right? I HAVE been doing a little design work for a backseat toolbox though and am fairly close to completion there. After that it's back to the $$ issue again.
This summer involves wheels & tires for sure as well as my new Trailgear wheel bearings that have been sitting for months. I still have to get a real exhaust or at least mount this one properly and swap in a new gasket between my passenger-side headers & y-pipe. Other possibilities are the toolbox project I mentioned above (which will involve a little modification of the jump seats & belts - build thread to come), still wanting to complete my wiring project, and hopefully (finally) hooking up my inverter and actually using it. My trim and auxiliary outlets are all completed for the last one, but there's no sense installing it without anything to hook it to.
Some new ideas that have been bouncing around in my head are as follows:
- Can-Back canvas campershell & cargo rack
- Rear tube bumper
- Paint (Midnight Green, Pepsi Blue ... maybe Copper?)
- Custom long travel IFS (as stock looking as can be)
At least I know what I'll be doing if I ever win the lottery
Last edited by bluAM2; Dec 14, 2014 at 03:57 PM.
Trending Topics
Apr 29, 2013 | 07:08 PM
#8
Thread Starter
Registered User
Joined: Nov 2009
Posts: 166
Likes: 0
From: NW Earth
Update:
This summer no longer involves wheels and tires ... found a crack in the headers, which is added to a laundry list full of "it's time to fix its". Sad to say my boy's in the garage for a while. I picked up a slightly more reliable set of wheels in the mean time, which I plan on keeping as stock as it already is. Yes it's new, shiny, and fast ... but it's not my yota
This summer no longer involves wheels and tires
... found a crack in the headers, which is added to a laundry list full of "it's time to fix its". Sad to say my boy's in the garage for a while. I picked up a slightly more reliable set of wheels in the mean time, which I plan on keeping as stock as it already is. Yes it's new, shiny, and fast ... but it's not my yota
Last edited by bluAM2; Dec 14, 2014 at 04:07 PM.
May 20, 2013 | 05:37 PM
#10
Thread Starter
Registered User
Joined: Nov 2009
Posts: 166
Likes: 0
From: NW Earth
Thanks! Everything I have on the grille is in here:
https://www.yotatech.com/51868904-post37.html
https://www.yotatech.com/51868904-post37.html


 Dec 8, 2014 | 11:27 AM
#17
Thread Starter
Registered User
Joined: Nov 2009
Posts: 166
Likes: 0
From: NW Earth
So I just finished doing rotors, pads, wheel bearings, and my idler arm this past Friday - just in time to go pick out our Christmas Tree. Before I brought it back down off jackstands I thought I'd fire it up.
Let me back up a little and say that I've had a "grinding/scraping" noise coming from underneath my timing belt cover for a little while now (a little while being a few months, but not very many miles as I've been using the Subie for my DD). I've just been too lazy (scared) to check out what it was. So when I fired it up before I set the truck down on the ground, I was expecting to hear some grinding. I’ve been searching the threads here for similar noises and I was optimistic that it was just an idler pully … except, when I started it, it was about twice as loud as I remember.
I was able to pry the rear timing belt cover out a little using a flathead wedged in between it and the passenger side head and when I did that, the noise stopped – obviously something rubbing (something being the cam gear). That’s when I noticed my power steering reservoir was resting up against the timing cover. That’s an issue to be resolved later, but I just leaned it away from the engine for now and removed the belt hoping that would take some pressure off of the cover and solve my problem. Started it back up … even worse and no amount of prying on the cover made the grinding quit. Time to peek inside.
>>>START READING HERE TO AVOID MY LONG-WINDEDNESS!<<<
I was able to get all the bolts out of the upper timing cover and pry it out enough to look inside. Gross. Long story short the guide on the back of the cam gear came loose, fell off of the gear and was wedged in behind the gear and the cover … hence the griding/scraping noise. It still rotated with the cam though (off center) and acted like a knife for the timing belt. The result is lots of metal and rubber shavings all over the timing system and the new item on the top of my to-do list. New cam gear from the dealer (13051-65010, $150), gates timing kit (both idlers & belt: TCK240A, $85) in the mail, and a Beck/Arnley timing cover gaskets kit (gaskets: 11328-65011, 11329-65020, 11319-65020, 11346-65010, 11347-65010, 11349-65020, 11357-65010, 11358-65010, 11359-65010, 11312-65010 ... $50) from RockAuto on the way. Tonight I dig in.
I’ll post a video of the noise and other goodies later. There are enough threads on timing belts so I don’t plan on doing any write ups for that, but it’s always nice to have noises to compare to your own.
Somewhere along the way I must have REEEEEEEEALLY upset the Toyota gods :/
Last edited by bluAM2; Dec 8, 2014 at 11:49 AM.
Dec 9, 2014 | 08:03 AM
#18
Thread Starter
Registered User
Joined: Nov 2009
Posts: 166
Likes: 0
From: NW Earth

Radiator & fan, belts, upper timing cover, fan bracket, hyd tensioner, and lower idler pulley are all out. Tonight I get to dig out my high-tech crank pulley removal tool and take the rest off and then get to cleaning. It looks like I fertilized the inside of my timing covers with an aluminum/rubber mulch. Yum.
On a brighter note: I noticed that my driver's side cam gear was clocked wrong by about 1 tooth!! When I put cyl 1 at TDC, the passenger cam was dead on it's mark, but the driver's was not. If so, and I get it clocked correctly, that should provide some noticable performance change
. That might explain why I've been running so rich, too. That I DO have pictures of, it's just a matter of posting them.
Last edited by bluAM2; Dec 9, 2014 at 08:15 AM.
Dec 14, 2014 | 03:41 PM
#19
Thread Starter
Registered User
Joined: Nov 2009
Posts: 166
Likes: 0
From: NW Earth
Well, everything's back together and he's runnin' great! It idle's much smoother now and when climbing steep hills where I'd normally have to downshift twice (since installing the new motor at 243k) I only have to drop one gear instead. I'd say it feels like it has a lot more power, except that'd be a lie. It's still the 3.slow, but it does accelerate much smoother and (seemingly) quicker now! I think that's some pretty great evidence that my driver's side cam sprocket was off by a tooth this whole time ... newb.
On the timing belt install, I followed the FSM mostly, except for the following:
1. I didn't install the No. 1 Timing Cover - or any of the covers (besides the rear timing cover obviously) - until after the belt was fully installed around all gears & pulleys. I couldn't guarantee that the belt was still where it should be on the crank gear while I was getting everything else lined up. Once the belt was all on and tight (minus the hyd tensioner) I checked all my marks about eleventy billion times and then covered everything up.
2. I installed the No. 1 Idler Pulley last. I found it way easier to get the timing belt clocked correctly first. Then I got the first couple threads of the idler pulley started and, while tightening, gently pried on the pulley arm to clear the stop on the cylinder head.
3. I didn't uninstall the Power Steering pump at all. I didn't really see the point in this, other than removing the adjustment bracket in order to remove the fan bracket.
I left my power steering belt off though, because it's a tad too long. It's brand newish (less than 1,000 mi), but my p/s reservoir rests against the timing cover when the belt is tight. If I want to leave room between the reservoir and the cover, then I have to loosen the belt to the point of squealing. I ran to the parts store about three separate times trying to get a slightly shorter belt, but nothing was long enough to make it around the pulleys. I needed to use the truck so I just finished the install with no belt. With 32"x11.5" MTs it's a little ridiculous to maneuver at slow speeds, but other than that it's do-able. I'll just have to remember to poop before parallel parking (never thought I'd use that smiley)
It idle's much smoother now and when climbing steep hills where I'd normally have to downshift twice (since installing the new motor at 243k) I only have to drop one gear instead. I'd say it feels like it has a lot more power, except that'd be a lie. It's still the 3.slow, but it does accelerate much smoother and (seemingly) quicker now! I think that's some pretty great evidence that my driver's side cam sprocket was off by a tooth this whole time ... newb.On the timing belt install, I followed the FSM mostly, except for the following:
1. I didn't install the No. 1 Timing Cover - or any of the covers (besides the rear timing cover obviously) - until after the belt was fully installed around all gears & pulleys. I couldn't guarantee that the belt was still where it should be on the crank gear while I was getting everything else lined up. Once the belt was all on and tight (minus the hyd tensioner) I checked all my marks about eleventy billion times and then covered everything up.
2. I installed the No. 1 Idler Pulley last. I found it way easier to get the timing belt clocked correctly first. Then I got the first couple threads of the idler pulley started and, while tightening, gently pried on the pulley arm to clear the stop on the cylinder head.
3. I didn't uninstall the Power Steering pump at all. I didn't really see the point in this, other than removing the adjustment bracket in order to remove the fan bracket.
I left my power steering belt off though, because it's a tad too long. It's brand newish (less than 1,000 mi), but my p/s reservoir rests against the timing cover when the belt is tight. If I want to leave room between the reservoir and the cover, then I have to loosen the belt to the point of squealing. I ran to the parts store about three separate times trying to get a slightly shorter belt, but nothing was long enough to make it around the pulleys. I needed to use the truck so I just finished the install with no belt. With 32"x11.5" MTs it's a little ridiculous to maneuver at slow speeds, but other than that it's do-able. I'll just have to remember to poop before parallel parking
(never thought I'd use that smiley)
Last edited by bluAM2; Dec 14, 2014 at 05:41 PM.


