
85Toyman's 1994 4Runner Build up Thread
 Jul 23, 2014 | 09:10 PM
#261
The engine install looks factory..
Jul 29, 2014 | 03:21 PM
#262
Thread Starter
Registered User
iTrader: (2)
Joined: Oct 2009
Posts: 1,044
Likes: 6
From: Centeral Willamette Valley Oregon
Ok,
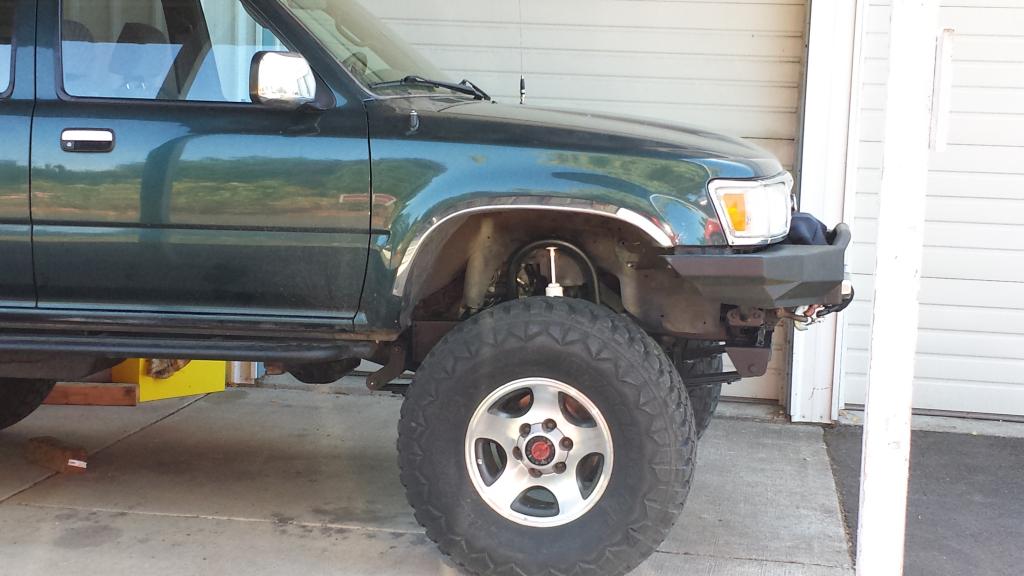
Here is a bit of an update on the SAS. I have welded up the engine mounts, the brake lines are installed and the front hanger is tack welded and bolt in place. All the shackles and ubolts are torqued and it is sitting on its own. I will weld the front hanger up complete tomorrow as long as nothing else comes up.
Things to finish.
1. Finish weld the front hanger in place.
2. Bleed brake lines and clean rotors before use.
3. Finish painting the front hanger and surrounding area's.
4. Fill the diff with oil.
5. Flex the front out and figure out which shocks will work, either 10" or 12"
6. Weld the front shock hoops in place with new shocks.
7. Install relay bar for the cross over steering. it is in the paint booth.
8. Wire up the front HP elocker
9. Install bump stops
10. Install steering stabilizer
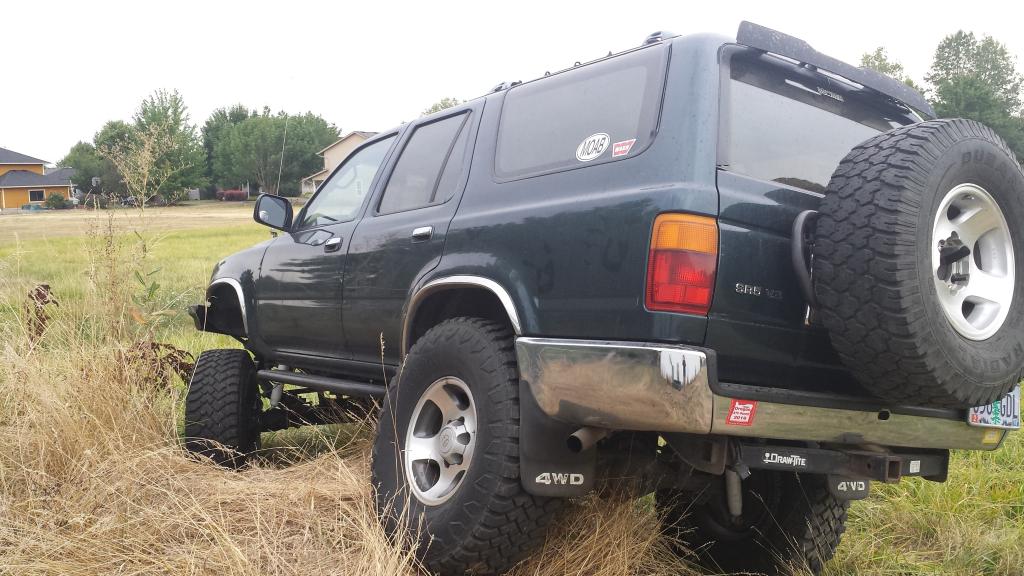
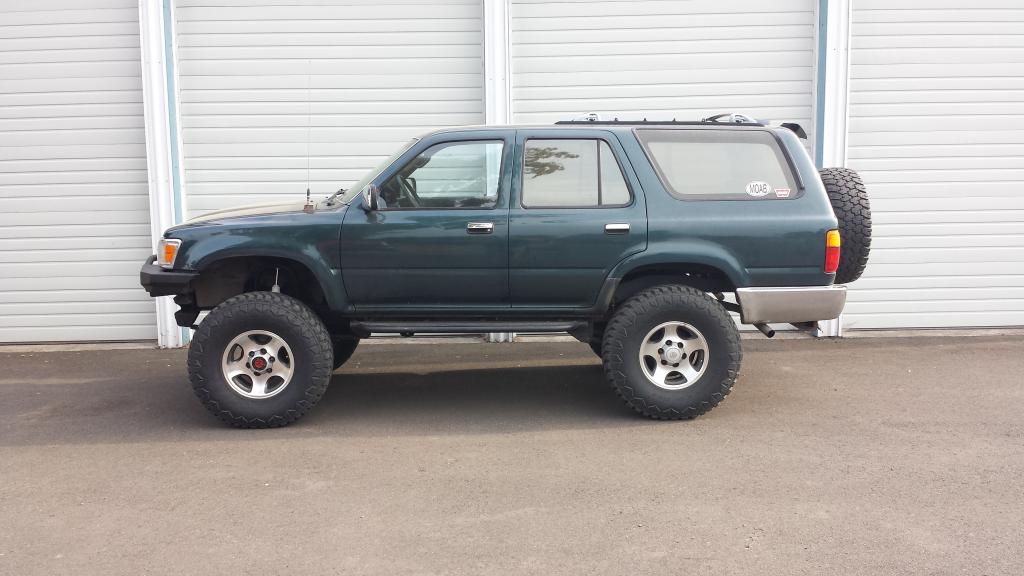
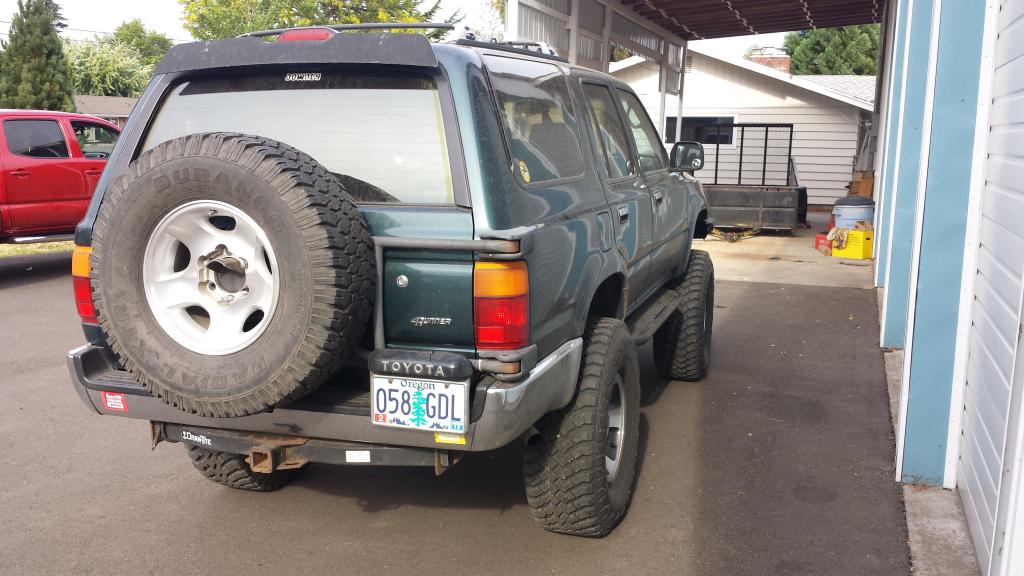
Here are some pictures of the product so far. I am sitting butt low again about 1". I will run the springs thru some run time and hope they settle a bit. If not level then I might add a small spacer to the rear or try a slightly longer rear spring.
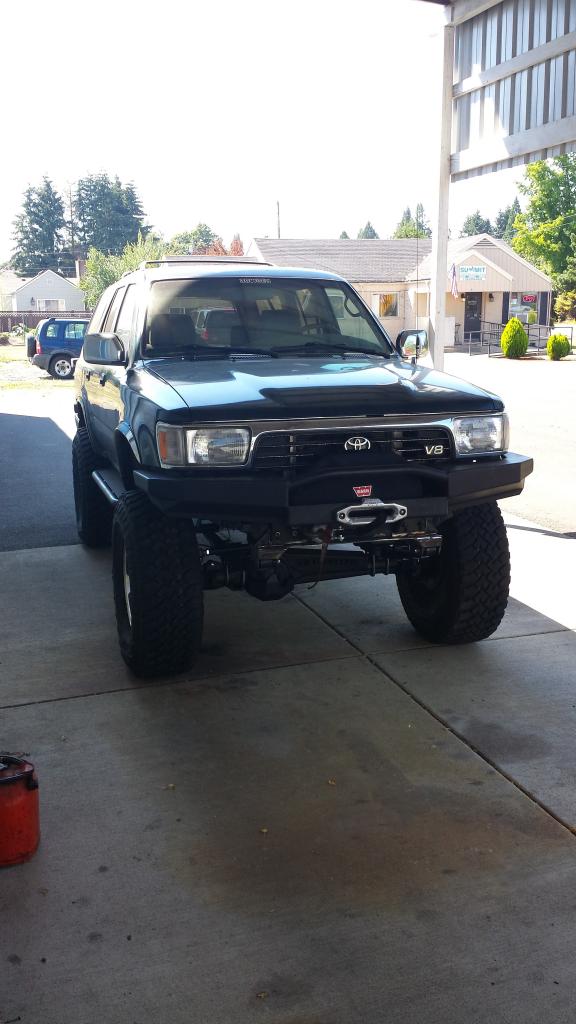
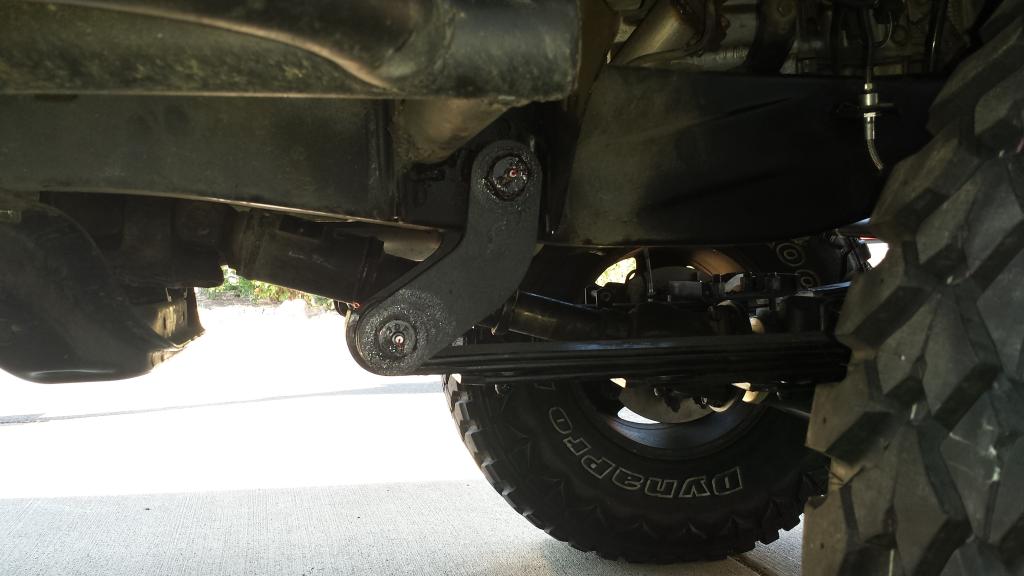
I had issues with the front hanger in the flush mount location. I moved it forward 1" and this is how the shackles sit now. Much better.
Here is the tape mark showing the stock IFS hub center location. This current spring setup pushes the hub center forward about 3/4" for better fire wall clearance but not looking silly with the tire 3 to 4" forward like some other setups I have seen. I wanted the best performance but close to stock look. Again this is not a dedicated wheeler but rather an all around off road toy
Here is a bit of an update on the SAS. I have welded up the engine mounts, the brake lines are installed and the front hanger is tack welded and bolt in place. All the shackles and ubolts are torqued and it is sitting on its own. I will weld the front hanger up complete tomorrow as long as nothing else comes up.
Things to finish.
1. Finish weld the front hanger in place.
2. Bleed brake lines and clean rotors before use.
3. Finish painting the front hanger and surrounding area's.
4. Fill the diff with oil.
5. Flex the front out and figure out which shocks will work, either 10" or 12"
6. Weld the front shock hoops in place with new shocks.
7. Install relay bar for the cross over steering. it is in the paint booth.
8. Wire up the front HP elocker
9. Install bump stops
10. Install steering stabilizer
Here are some pictures of the product so far. I am sitting butt low again about 1". I will run the springs thru some run time and hope they settle a bit. If not level then I might add a small spacer to the rear or try a slightly longer rear spring.


I had issues with the front hanger in the flush mount location. I moved it forward 1" and this is how the shackles sit now. Much better.

Here is the tape mark showing the stock IFS hub center location. This current spring setup pushes the hub center forward about 3/4" for better fire wall clearance but not looking silly with the tire 3 to 4" forward like some other setups I have seen. I wanted the best performance but close to stock look. Again this is not a dedicated wheeler but rather an all around off road toy

Last edited by 85toyman; Jul 29, 2014 at 03:27 PM.
Jul 29, 2014 | 03:31 PM
#263
Thread Starter
Registered User
iTrader: (2)
Joined: Oct 2009
Posts: 1,044
Likes: 6
From: Centeral Willamette Valley Oregon
Want to get this finished up so I can start working on the roof rack I want to build, and also get that auxiliary fuel tank installed..... Its a labor of love
 Aug 7, 2014 | 07:32 PM
#266
Thread Starter
Registered User
iTrader: (2)
Joined: Oct 2009
Posts: 1,044
Likes: 6
From: Centeral Willamette Valley Oregon
got bored tonight. Found this and was likin what I see. Thinking might have to think about a possible build for this newly sas'd 4runner......
http://www.expeditionportal.com/foru...x-build-thread

http://www.expeditionportal.com/foru...x-build-thread
Last edited by 85toyman; Aug 7, 2014 at 07:34 PM.
Aug 9, 2014 | 08:16 PM
#271
Thread Starter
Registered User
iTrader: (2)
Joined: Oct 2009
Posts: 1,044
Likes: 6
From: Centeral Willamette Valley Oregon
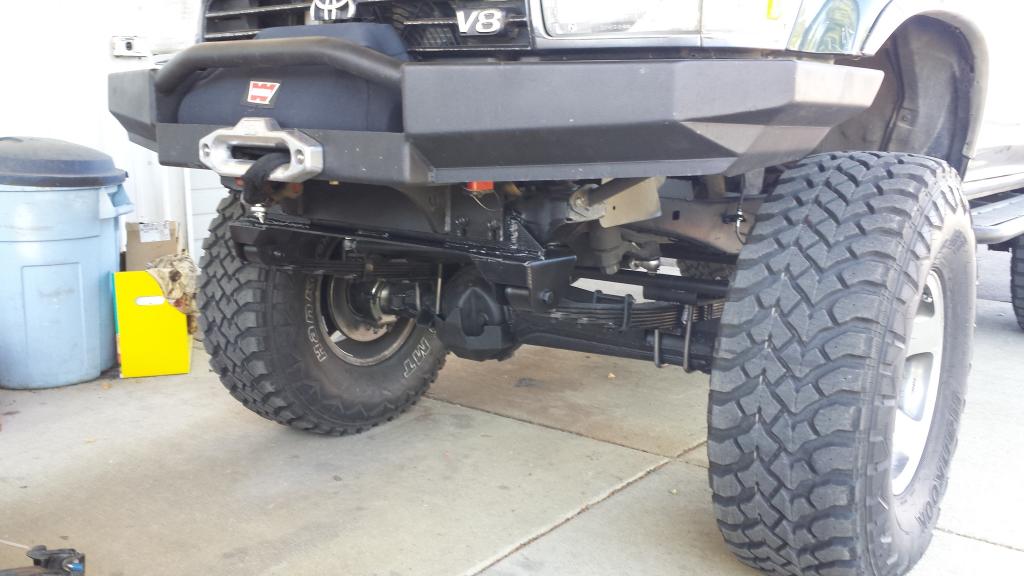
Swap is all finished up. I am thinking about getting a long spline front shaft as this one is a little short. I only have drive way shots yet. It will be a few weeks until I am able to get it out into the dirt.


 Aug 11, 2014 | 04:59 PM
#272
Thread Starter
Registered User
iTrader: (2)
Joined: Oct 2009
Posts: 1,044
Likes: 6
From: Centeral Willamette Valley Oregon
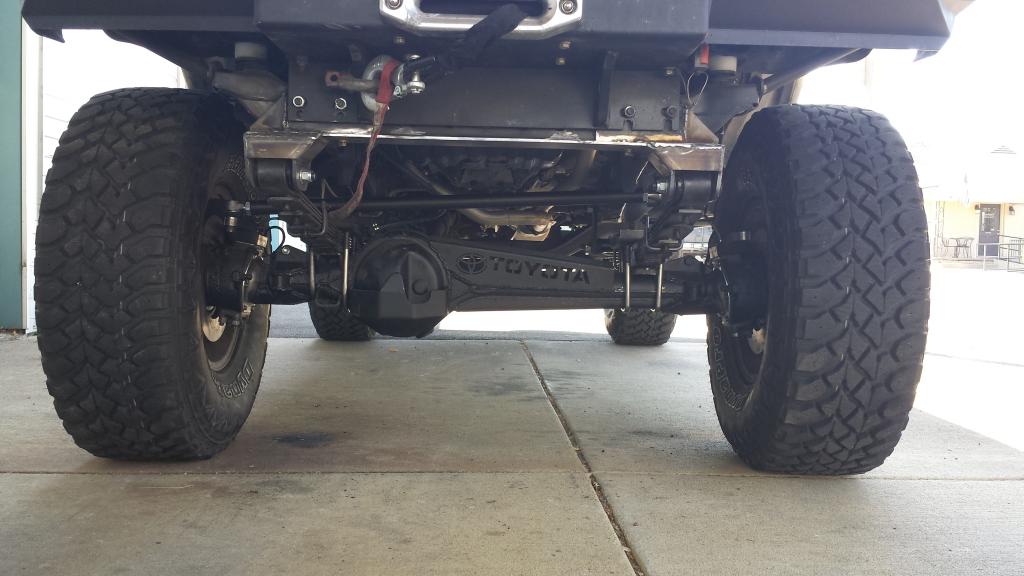
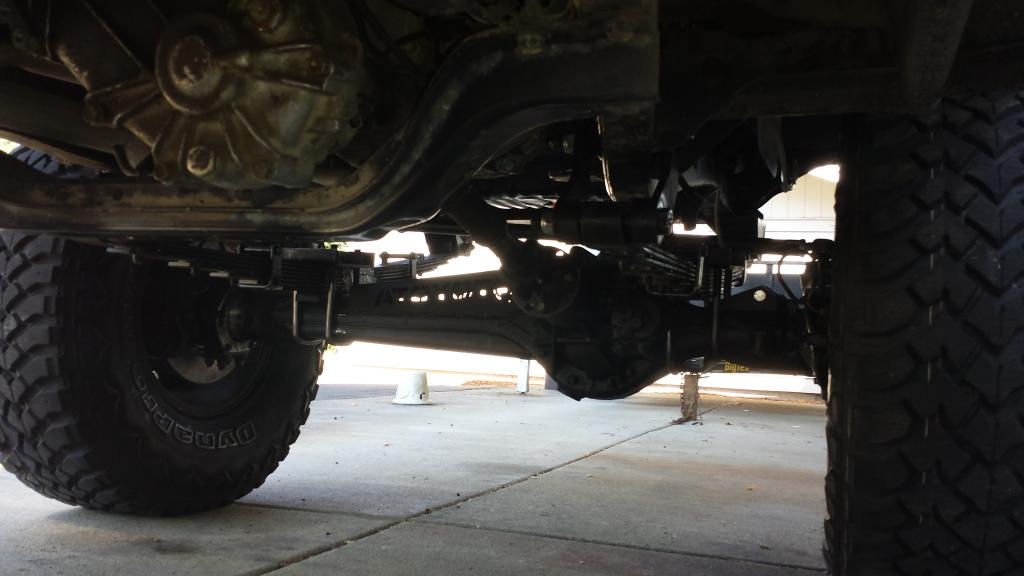
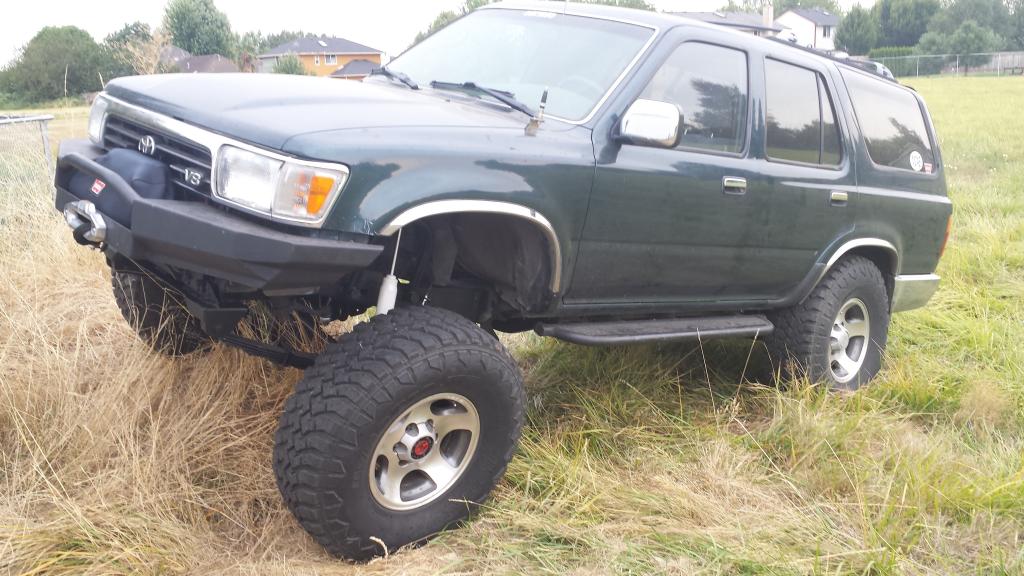
Well, I pulled the tractor out and built a nice mound of dirt to flex the rig out on.
It flex's out really nice, only issue is the rear tires make contact with the mud flaps pretty hard, so those are coming off along with the rear bumper. I guess I am going to fab up a nice rear bumper here soon. The front tires on full lock and under compression rub the pinch weld pretty good too, so I need to decide if I am gonna smooth out the pinch weld or move the axle forward another 3/4".....
Sorry no pics yet, busy checking things out and moving equipment and such under a time crunch so I didn't have time today.... Will get pics soon....

 Aug 11, 2014 | 06:17 PM
#274
Thread Starter
Registered User
iTrader: (2)
Joined: Oct 2009
Posts: 1,044
Likes: 6
From: Centeral Willamette Valley Oregon
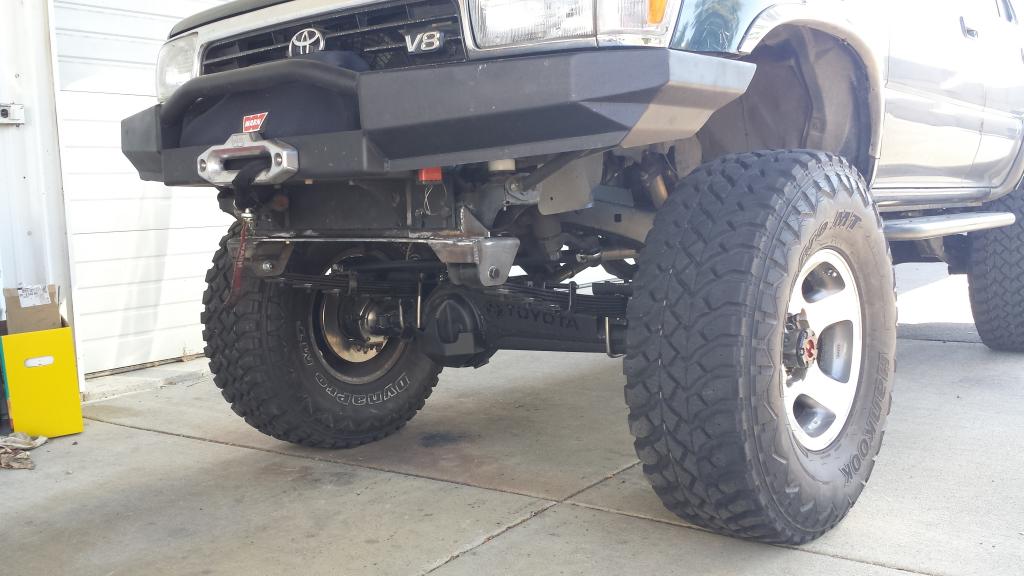
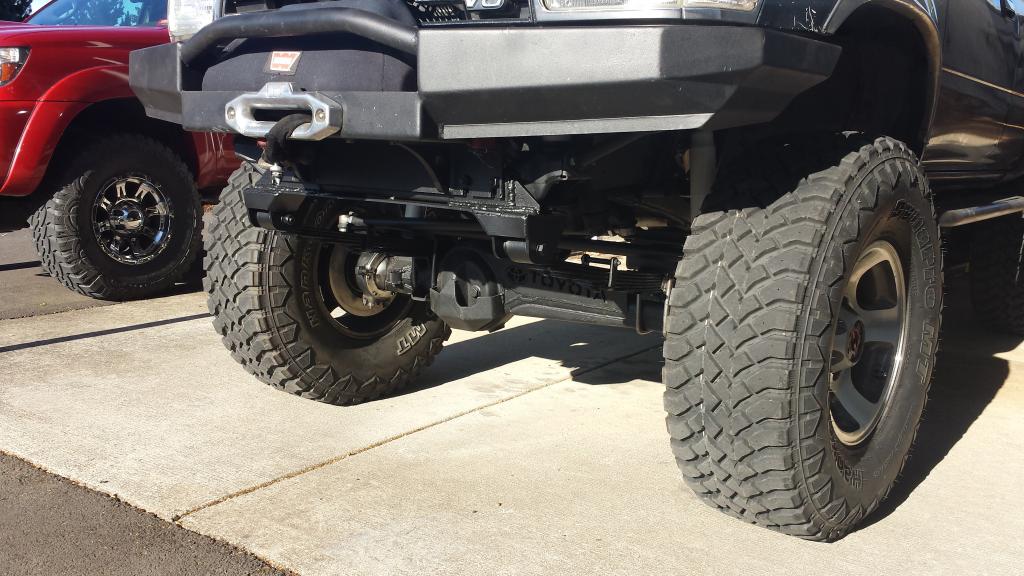
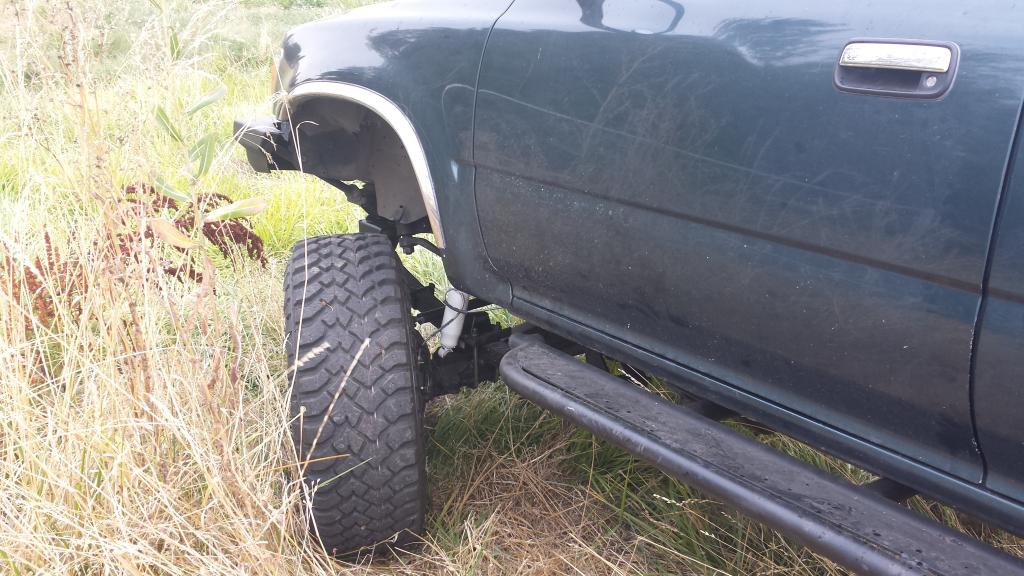
No they don't. It is very close at like 1/4" between the shackle and the frame. I think for next time, I would move the shackle mount back 1/2" instead of pushing it forward all the way when I burn my holes thru the frame if that makes sense. I would prefer a little bit more room between them. The last option since mine are set is to notch the body mount slightly to give them some more room. If they ever hit that is what I would do on this rig....
Aug 12, 2014 | 12:52 PM
#275
Thread Starter
Registered User
iTrader: (2)
Joined: Oct 2009
Posts: 1,044
Likes: 6
From: Centeral Willamette Valley Oregon
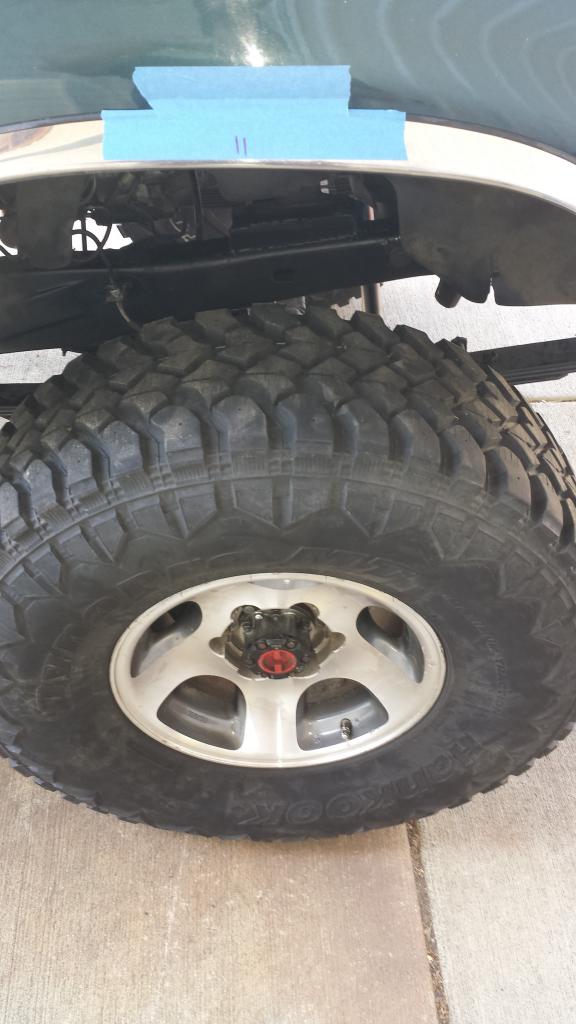
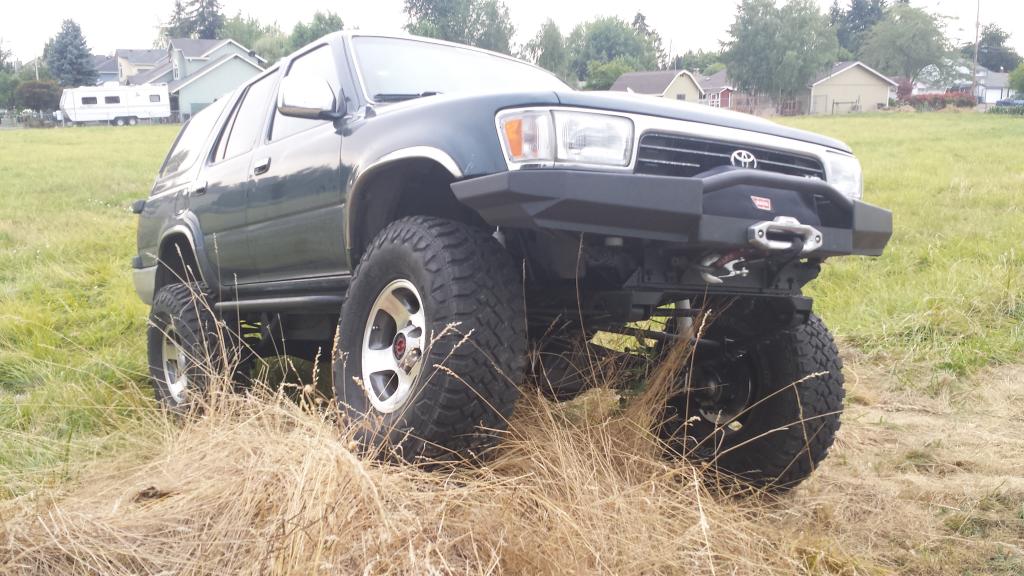
Goofing off and trying it out for the first time really. Both tires tuck up nicely. I think I still have to fiddle with it and I should get more down travel out of it...


 Aug 12, 2014 | 09:53 PM
#278
Registered User
Joined: Aug 2011
Posts: 1,507
Likes: 2
From: Fraser Valley, British Columbia
What's the deal with the shackles? I've not seen that before.
Is that a mini axle? So an upgrade to the FJ60 rotors on a mini axle if I'm right.
I've got an FJ62 axle waiting to go in. Just have to get some money projects done first.
Is that a mini axle? So an upgrade to the FJ60 rotors on a mini axle if I'm right.
I've got an FJ62 axle waiting to go in. Just have to get some money projects done first.
Aug 13, 2014 | 09:11 AM
#279
Thread Starter
Registered User
iTrader: (2)
Joined: Oct 2009
Posts: 1,044
Likes: 6
From: Centeral Willamette Valley Oregon
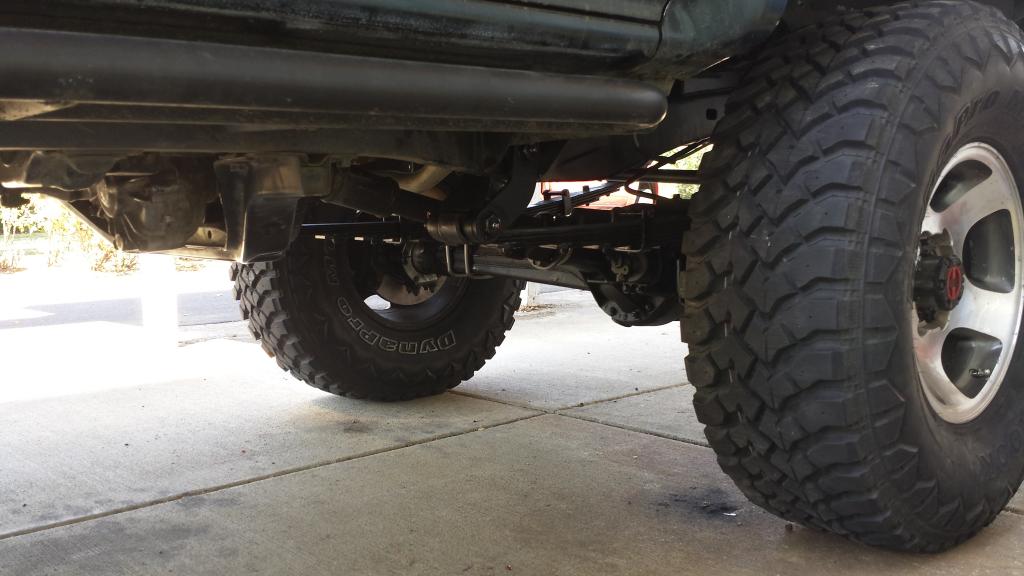
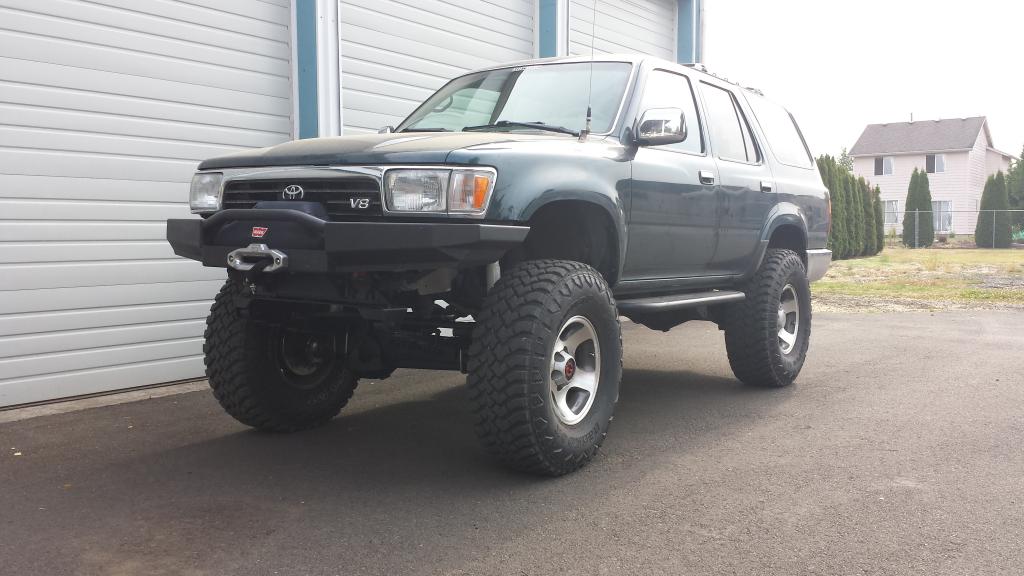
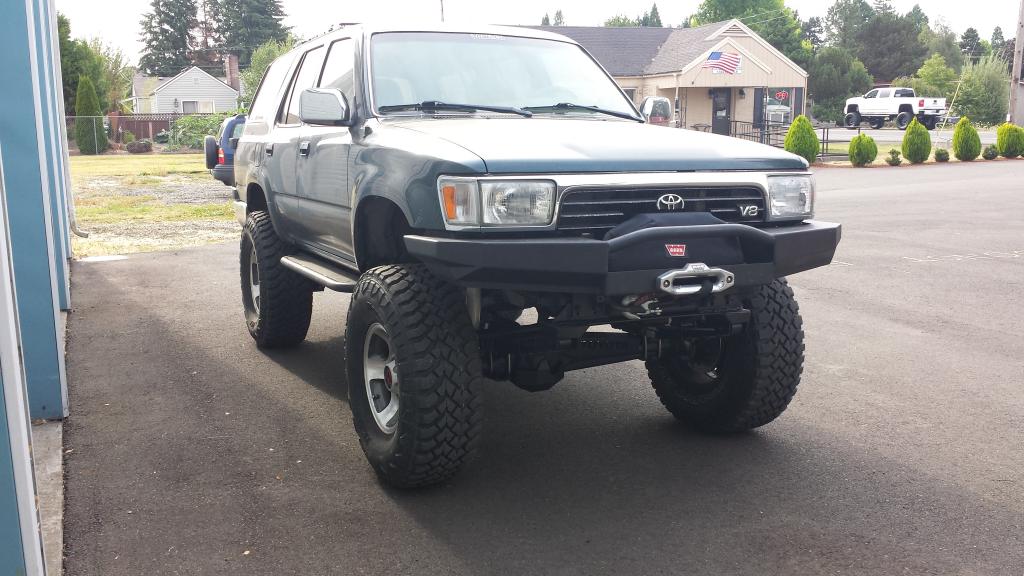
Yes it is a mini axle. I used IFS hubs and fj60 rotors with a wide axle kit. This pushes the axle out to 58" so I match the rear but I don't have wheel spacers to deal with. Its a very nice look.
Well get that axle under the wagon!!!!!!
 Aug 13, 2014 | 09:15 AM
#280
Thread Starter
Registered User
iTrader: (2)
Joined: Oct 2009
Posts: 1,044
Likes: 6
From: Centeral Willamette Valley Oregon
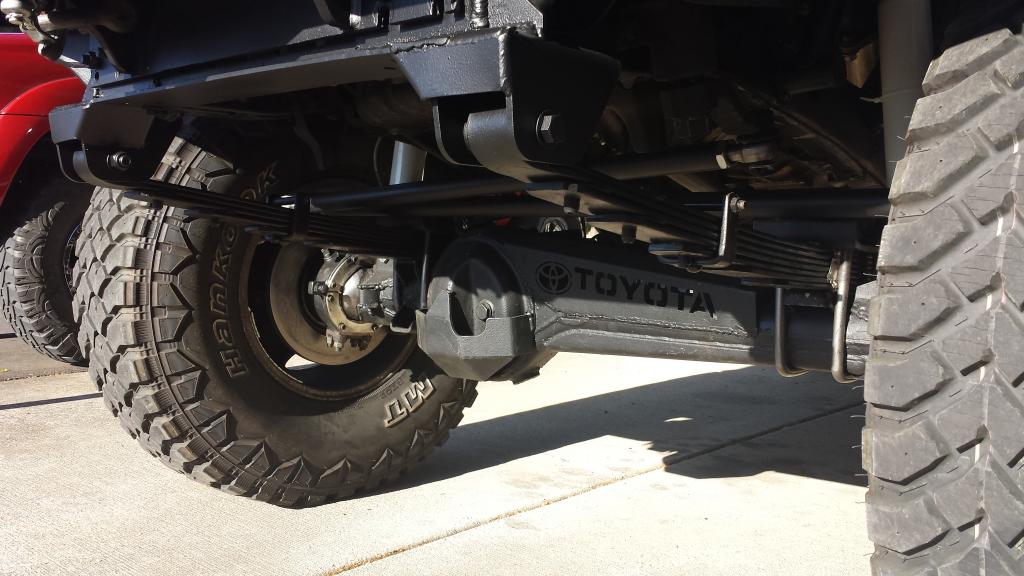
I cut the pinch weld area. Thinking about tubing it out, we will see.... I also took the chrome trim around the wheel arches off as well and the rear mud flaps as the tires were hitting during full stuff.
Whats everybody think? Should I put the trim back on or leave it off?


Whats everybody think? Should I put the trim back on or leave it off?


