
7m's swapped & sas' d 87 extended cab
 Jul 8, 2010 | 12:19 AM
#203

Thread Starter
Registered User
Joined: Jan 2009
Posts: 320
Likes: 0
well some of my part's shipment has arrived and im still waiting on a few thing's but atleast i've got a jump on some of the hard stuff 

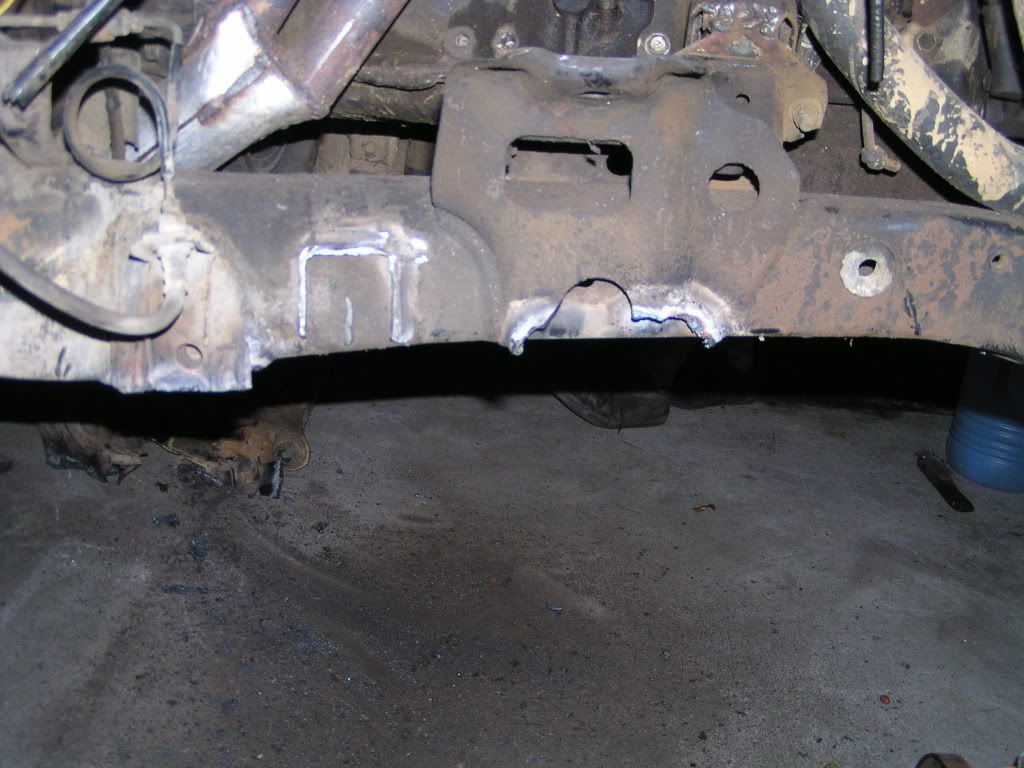
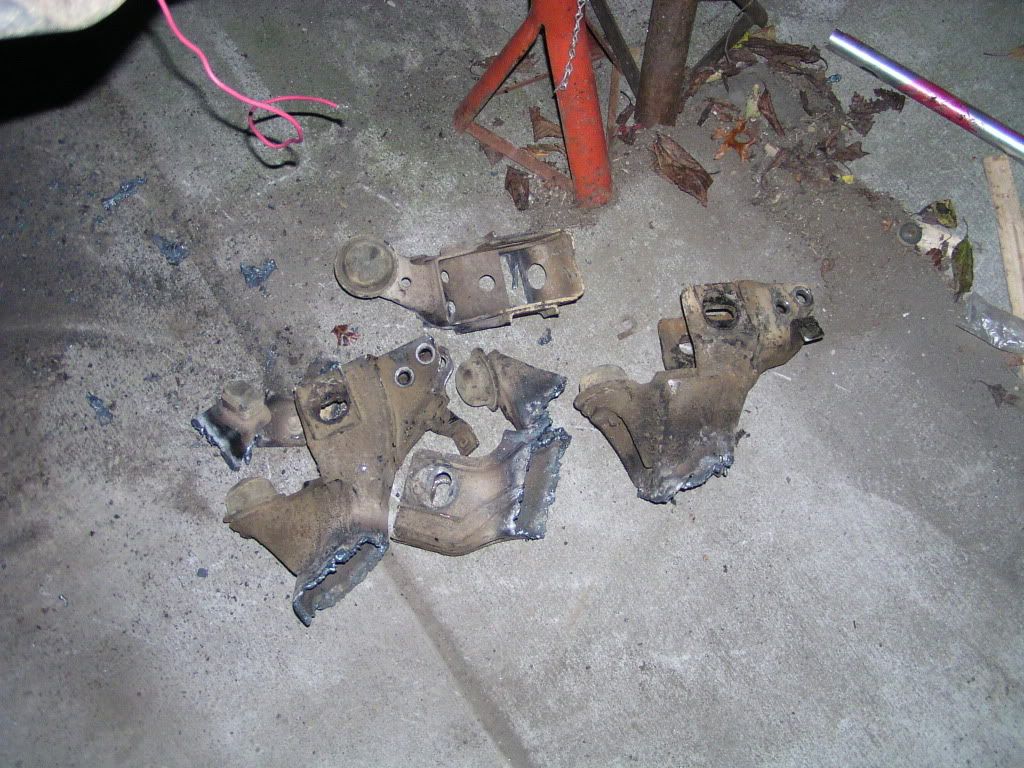
here i've cleaned up the front axle , sand blasted & now cutting off items im replacing or do not need.

i've decided where i wanted every thing and well forgot to take pictures of every thing welded up LOL
here i've cleaned up the front axle , sand blasted & now cutting off items im replacing or do not need.
i've decided where i wanted every thing and well forgot to take pictures of every thing welded up LOL
Last edited by vital22re; Dec 18, 2010 at 06:50 PM. Reason: inappropriate picture


 Jul 20, 2010 | 12:01 PM
#206
Thread Starter
Registered User
Joined: Jan 2009
Posts: 320
Likes: 0
WOOT it passed emissions yestday with flying colors.
funny though the operator just wanted the registration so she could look up the vehical.. so i just kept quite and didn't bother telling them that i had swaped the motor or any thing.. just curious to see if it would make a difference.
So my 6 cylinder , 3L engine passed just fine as a 2.4 4 cyl
HC(ppm) CO% CO+Co2 (%)
cruise limit 160 1.2 6
cruise emissions 139 .65 14.85
cruise result pass pass n/a
idle limit 220 1.2 6
idle emissions 89 0.28 14.68
idle result pass pass n/a
the co+co2% is listed but not used as part of testing
Last edited by 7m4x4dude; Jul 20, 2010 at 12:02 PM.
Jul 25, 2010 | 04:29 PM
#209
Thread Starter
Registered User
Joined: Jan 2009
Posts: 320
Likes: 0
well , Ive been dealing with brake non sense for the last few days.. i cant seem to get a master cylinder to work correctly !
So far i have replaced two four foot sections that went from the rear brake sensing load valve. towards the front of the truck. seems they rusted through ... (sadly im starting to think i might not have replaced enough of the line.. )
i have than replaced the master with a remand one from napa from a 96 runner, oops master cylinder resivor is different.. returned for just a stock 87 truck 15/16 bore.. this one had a problem with the rear brake piston returning to the cir-clip. but before i was satisfied with believing that; i replaced the rear wheel cylinders since i found both sides to be leaking past the cup's but not the outer dust seals. ie i hadn't blown them off yet LOL..
so i return the master cause the rear brake piston is still not returning to the cir clip right ,im guessing the bore wasn't honed right or one of the holes had sharp edges and was snagging the cup seals.
so now to return this sucker i had to drive to Portland deal with the dumbest part's dude I've seen any where lol but the lady working there was super helpful and got me a new 15/16 master w/ resivor for just a few dollars more..
so bench bleeding this sucker when i got home; this time getting lot's of bubbles out of the rear bore , and i getting some out the front bore as well.. then fluid starts spilling out of the top but not the side port... so i push the stroke in once get lots of fluid out the front, so i install the plug on the front, and proceed to push to piston in to get rear fluid to move out non shots out.. and piston seems to only move 1/8 inch.. so checking the info packet they say that's right, and i install it and the peddle is nice and firm... but no brakes... so i jump the peddle.. and now it feels more like a clutch... so i re bleed my brakes getting rear movement and some air.. but front brakes seem weak or not there and didn't get any air out...
keep working the brakes and i decided it feels like the piston cups are not sealing in this brand new master. so i suck the fluid out and take it back off to return it.
and looking into the resivor i find a chunk of green aluminum that was part of the piston for the front brakes i believe.
i have no idea why it got stuck, just that it's getting stupid and i'm glad at least they have a fire year warranty though i feel like just getting my money back at this point!
Oct 2, 2010 | 09:09 PM
#210
Thread Starter
Registered User
Joined: Jan 2009
Posts: 320
Likes: 0
well i've definitly been busy


still have some grinding and cleaning up but pretty much every thing is cut off and on my next morning i can work on this i'll be mounting the front hangers and cutting the hole's for the rear spring hangers, this way i can hang the axle tube and assemble every thing on the truck..
still have some grinding and cleaning up but pretty much every thing is cut off and on my next morning i can work on this i'll be mounting the front hangers and cutting the hole's for the rear spring hangers, this way i can hang the axle tube and assemble every thing on the truck..
Oct 21, 2010 | 11:18 AM
#211
Thread Starter
Registered User
Joined: Jan 2009
Posts: 320
Likes: 0
so im at a point where thing's dont look good..
i have the 87 rear's up front and with them in correct orrintation the hi-steer bar's cross and hit each other as the driver side uptravles.
and on the other hand if you spin the springs around and mount them backwards it fixes the hi-steer issue but raises another question.. is it going to flex right? seems like they will uptravle fine. but i notice my 35's should hit the fire wall in the fender well but it doesn't look like it'll move up that much.. as of now i do have my u-bolts contact the frame...


now these photo's are of the springs installed how i thought they should be in the first place but it set the hi-steer bar's crossing.

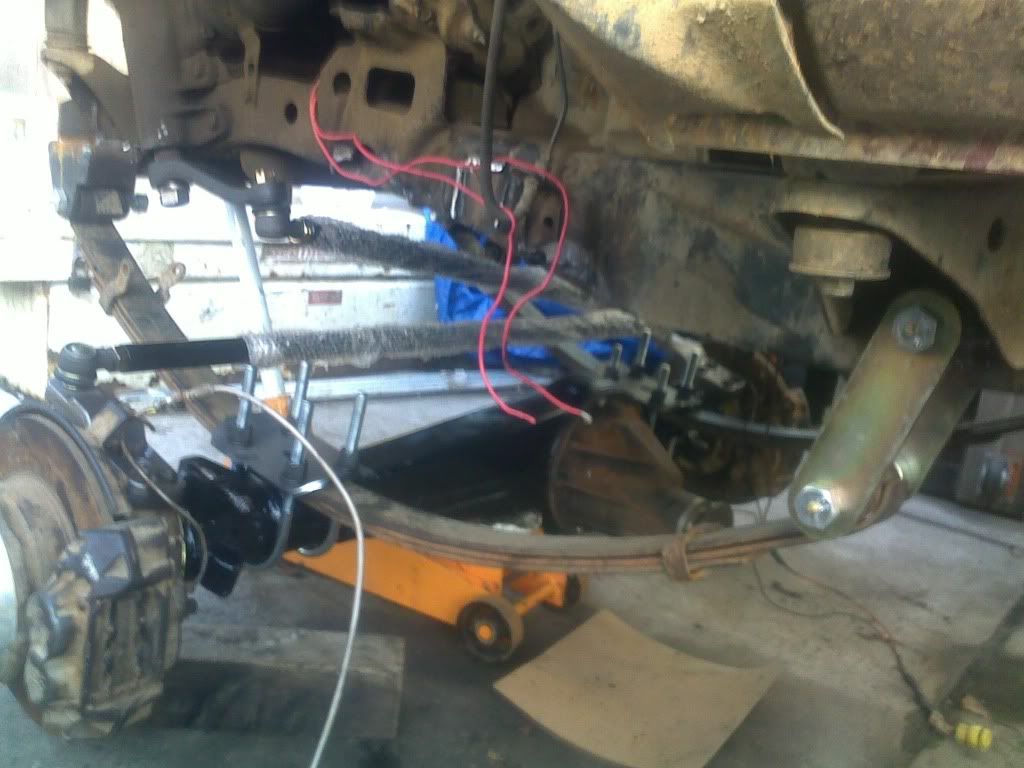
i have the 87 rear's up front and with them in correct orrintation the hi-steer bar's cross and hit each other as the driver side uptravles.
and on the other hand if you spin the springs around and mount them backwards it fixes the hi-steer issue but raises another question.. is it going to flex right? seems like they will uptravle fine. but i notice my 35's should hit the fire wall in the fender well but it doesn't look like it'll move up that much.. as of now i do have my u-bolts contact the frame...
now these photo's are of the springs installed how i thought they should be in the first place but it set the hi-steer bar's crossing.
Last edited by 7m4x4dude; Oct 21, 2010 at 11:24 AM.
Oct 21, 2010 | 09:45 PM
#212

Registered User
Joined: Oct 2010
Posts: 1
Likes: 0
Just found Yota tech. This site is awesome. Great build. I currently have a 94 pickup with a 7M in it for 6 years now with 70,000 miles since it was installed. I love the power I have now. Pulled a 7000 pound excavator with it 2 months ago, got some weird looks from the one tons. Looking at swapping to a 1jz and putting 7m back into a supra.Keep up the good work!!!!
Dec 18, 2010 | 02:34 PM
#213
Thread Starter
Registered User
Joined: Jan 2009
Posts: 320
Likes: 0
it's been a little while since i've posted, but i had a little issue with my front Ruf set up.
since im using an 87 main pack, it moves the front axle about 2-3 inches further forward than the eariler rear springs i belive or the front springs trail gear and marlin offer. and i belive these new and 84/85 springs are roughly 2-3 inches further forward then the 84/85 Stock front springs.. Soooo
with the 87 spring pack you are essentially pushing the front axle 4-6 inches further forward than the stock Front 85 spring would set the axle in if used.
Cause of my spring choice it made my hi steer come in contact with each other in the suspension travel.
to fix this i moved the box forward about 2 inches. there was a existing hole in the frame and i utilized it had to do some grinding of the body mount weld to get a flat enough spot to drill the lower forward hole, and i cut the factory top mount off and moved it forward aswell, i had to space it about 1/8-1/4 inch above the frame to get an angle i wanted.
So now hi steer doesn't come in contact and the steering box is off.
i will be installing Hydro assist, so drilling and tapping the box will happen in tonight or this weekend.
still need;
- drive shaft modded and lengthened.
-exhaust re-routed to above crossmember on passenger side instead of under the trans out to the stock exhaust routing.
-Install front diff into axle since lock-rit is now installed.
-purchase a shim or two from toyota to finish the set up of the knuckles.
-return 14 inch shocks for 12inch shocks. even though im only seeing 6.5-7 inchs of travle....
there's more to add to the list before driving but it's a hole lot closer than it has been !
Dec 19, 2010 | 01:42 AM
#215
Thread Starter
Registered User
Joined: Jan 2009
Posts: 320
Likes: 0
\thanks man the supra motor is a fun beast, this is my first N/A project but with the low gearing it's still a beast , it act's more like a 3xx/400 hp beast in low lol..
well im going to go tear down the steering box.
In the morning you will see a write up of how to install hydro steer into a ifs toyota box.
Last edited by waskillywabbit; Dec 21, 2010 at 04:17 AM. Reason: Last warning - knock it off
Dec 20, 2010 | 09:09 PM
#216
Contributing Member
Joined: Jun 2007
Posts: 2,336
Likes: 2
From: Harrisburg, PA
It's official: I am definitely going to go ahead with this swap... is there any minor mods I can do to a 7M-GE (n/a) other than exhaust? I'd like to see 20-40 hp above the stock ~200. Maybe I'm dreaming without doing some serious work, but one can only hope  . I think a 240HP Pickup would be a great blast to drive, considering the bloated newer Tacomas, which are pretty snappy and weigh a little more than our trucks, are putting out 236 at the crank...
by the way, I wish mine were getting a sfa.... You're gonna have so much fun in that truck. Do you have a breakdown of what you have in the motor swap itself so I know what to budget?
. I think a 240HP Pickup would be a great blast to drive, considering the bloated newer Tacomas, which are pretty snappy and weigh a little more than our trucks, are putting out 236 at the crank...by the way, I wish mine were getting a sfa.... You're gonna have so much fun in that truck
. Do you have a breakdown of what you have in the motor swap itself so I know what to budget?
Dec 21, 2010 | 12:17 PM
#217
Registered User
Joined: Aug 2007
Posts: 1,133
Likes: 7
From: PDX
It's official: I am definitely going to go ahead with this swap... is there any minor mods I can do to a 7M-GE (n/a) other than exhaust? I'd like to see 20-40 hp above the stock ~200. Maybe I'm dreaming without doing some serious work, but one can only hope . I think a 240HP Pickup would be a great blast to drive, considering the bloated newer Tacomas, which are pretty snappy and weigh a little more than our trucks, are putting out 236 at the crank...
. I think a 240HP Pickup would be a great blast to drive, considering the bloated newer Tacomas, which are pretty snappy and weigh a little more than our trucks, are putting out 236 at the crank...here's some notes on my install
my cylinder head rebuild (post #11)
Dec 22, 2010 | 12:07 AM
#218
Thread Starter
Registered User
Joined: Jan 2009
Posts: 320
Likes: 0
if i were to do this swap again, i would suggest using the 2jzge or vvti modle later introduced in the newer n/a lexus modles i think. but they provid that extra 20-30 hp & torque and really dont weight to much different get a little better gas millage, are more emission compliant with more vehicles being that most are obd2 donner's any way .. 1996+ newer for newb's.
i do belive a set of engine mounts would need to be made or purchased for this swap. where the M series you can find All stock toyota part's to swap in the motor. and actually all of them are either on the donnor car or the swapped rigg..
all in all tho, do what fit's your budget. and for this truck i got the 7mge free from a guy i met at the local drag strip, i just never imagined there was nothing wrong with the motor other than a broken egr !
Last edited by 7m4x4dude; Dec 22, 2010 at 12:09 AM.
Dec 22, 2010 | 12:34 AM
#219
Thread Starter
Registered User
Joined: Jan 2009
Posts: 320
Likes: 0
You could always pull the head and do a minor port and polish, it wouldn't be a bad idea to pull the head and install ARP head studs so you can increase head bolt torque before sliding it into the truck anyway.
here's some notes on my install
my cylinder head rebuild (post #11)
here's some notes on my install
my cylinder head rebuild (post #11)
i think a more free flowing exhaust would boast the most power up for grabs, aswell as a high flow air filter and intake .
Also the stock toyota head bolt's are re-useable. And have a tensile strength of 115,000psi if i remember correctly. infact their the same material and machined process the 2jz bolts use the difference lie's in the 7m head bolt torque is 56ft lbs and the 2jz is 78ftlbs iirc.
If the 7m show's no signs of over heating or loose of coolant, milky oil,sweet steamy exhaust and isn't missing either.. than a retorque of the factory or replaced head gasket is A MUST! the factory torque spec was meant for an asbestos style head gasket and they changed to a multi fiber compact metal embossed peice they needed a higher toque.
most n'a dont deal with as much head gasket drama as the turbo guy's do. but don't kid your self, it can happen.
if you want to eliminate the head gasket issues. than a metal head gasket is the only choice. just dont beat around the bush and do thing's right the first time.
for my self to say the job was done right i will bring the block and the head to the machine shop to be deck'd and surfaced to 25 Ra. than have the head bolt's chased.
for those who dont know.. that requires dropping the crank , rod's and pistons, oil pump & oil pan off the motor.
YOU WANT TO LEAVE THE READ TIMMING COVER ON THE MOTOR WHEN YOU HAVE THEM DECK THE BLOCK SURFACE.
other wise your timming cover will protrud The same amount they surfaced off your block., and hold your new metal head gasket up, causeing compression problems on cyl 1 and also leak all the pressure feed oil from the head, possibly destroying cam's or the head if ran long enough with no pressure to the cam bearings.
Long story short, you can see why going mhg can become expensive. but done right they work beautifully 20psi+
i didn't prep my block the first time i went mhg and i blew compression into the coolant system. mostly only while boosting. but i still feel it would have gaven an n/a car problems. it was caused by low spot's on the block deck that allowed compression to start burning the head gasket and eventually took enough out to put air pocket's into the coolant system. causing boil overs.
for n/a's i suggest either a retorque or a hg replacement but still torque to 75-85ft lbs. stock head bolts are fine to use. tho replace any that looks like they might have had the allen socket damaged durring removal. OR arp's are about 90-120 depending where you shop. Stud's are better and hold torque better but bolt's allow you to do head repairs or hg replacement's in tighter spot's. though they made the stud's with an allen key into the top's so they can be pulled out aswell as tightend snugly,not redicoulsy tight just snug! lol.
Mar 21, 2011 | 05:46 PM
#220

Registered User
Joined: Mar 2011
Posts: 2
Likes: 0
I have a question ii have a 1990 pickup with a 22re and it has lost compression. Can this be becose i have an exhaust leak? And do i have a vacume modulator? How do tell what trani i have?
Thank you
FLIP
Thank you
FLIP
Last edited by FlipSideArt; Mar 21, 2011 at 05:47 PM.


