
Yodaforce 1985 build up
 Sep 18, 2012 | 09:21 PM
#1
Thread Starter
Registered User
Joined: Jan 2008
Posts: 407
Likes: 0
From: West NC
Yodaforce 1985 build up
So It has been a while (a few years) since I sold my 87 (regretfully) but everything happens for a reason, and I think this is it.


I have been eye ballin' this truck for a few months just sitting in a guys yard, and as soon as he put a price on it, I had to just go get it.
It's going to need alot just to get it road worthy. Brakes are shot, steering is worn out, shocks, seals, leaks, gears, etc.... it has not even been tagged since 2009. The real deal sealer for me was the fact that the guys cousin had just put on the 35" KM2's the beginning of this year and never had it off the property (or tagged). He had intentions of doing something with it but lost interest.
I'm still in the repair/design phase and I'm not sure of the goal yet. I will try to keep up with the progress and post as I go (with pics of course). I'm a builder/fabricator so it will likely involve a plasma and mig. Lol.
Feb 16, 2013 | 11:51 AM
#5
Thread Starter
Registered User
Joined: Jan 2008
Posts: 407
Likes: 0
From: West NC
Been a while. After repairing most everything on the truck to get it driveable, and driving it around a bit, I have finally started working on getting it to look a little better.
Scrapped the exhaust that was on it

Replaced it with my old '01 exhaust system. Dumped it in the middle, with plans to integrate the end with the tube work out back

Took off the BL. Made a real differenc in drivability.

Got started on the front end. Starting with the winch, I plan to build off this platform and integrate all of the tubing (cage).

Scrapped the exhaust that was on it
Replaced it with my old '01 exhaust system. Dumped it in the middle, with plans to integrate the end with the tube work out back
Took off the BL. Made a real differenc in drivability.
Got started on the front end. Starting with the winch, I plan to build off this platform and integrate all of the tubing (cage).

 Feb 16, 2013 | 11:55 AM
#7
Thread Starter
Registered User
Joined: Jan 2008
Posts: 407
Likes: 0
From: West NC
Alot of body work involved (trying to keep costs as close to zero as possible)

To keep things simple, instead of welding and alot of metal work to repair the rusty seams, I simply blasted off the rust, fiberglassed the insides, and filled the outsides smooth. Should keep for the next few years.

To keep things simple, instead of welding and alot of metal work to repair the rusty seams, I simply blasted off the rust, fiberglassed the insides, and filled the outsides smooth. Should keep for the next few years.
Trending Topics
Feb 16, 2013 | 11:57 AM
#8
Thread Starter
Registered User
Joined: Jan 2008
Posts: 407
Likes: 0
From: West NC
Tailgate was trash. Had so much previous damage, that it was sketchy just trying to get into the back of the truck without feeling like it was going to just break off.
I figured for now, I would rather NOT put weight on it. Trying something different.


I figured for now, I would rather NOT put weight on it. Trying something different.


 Feb 16, 2013 | 04:04 PM
#10
Thread Starter
Registered User
Joined: Jan 2008
Posts: 407
Likes: 0
From: West NC
I was just out there installing a rubber stopper just below the tail lamp to keep it from rubbing paint. I have to admit, I'm pretty happy about it. Before, only one side would latch, you had to slam it (no matter how you adjusted it), it rattled like heck, I depended on the camper top door to keep it closed half the time, and when you had to open it, you had to reach inside, yank on the rod, and still took two hands to pull down. Golleeee!
Now, you can open it with one finger, it closes secure without effort, and it no longer rattles (35's are hard to balance. Lol.)
Now, you can open it with one finger, it closes secure without effort, and it no longer rattles (35's are hard to balance. Lol.)
Mar 16, 2013 | 01:23 PM
#11
Thread Starter
Registered User
Joined: Jan 2008
Posts: 407
Likes: 0
From: West NC
Door panels and jambs done.
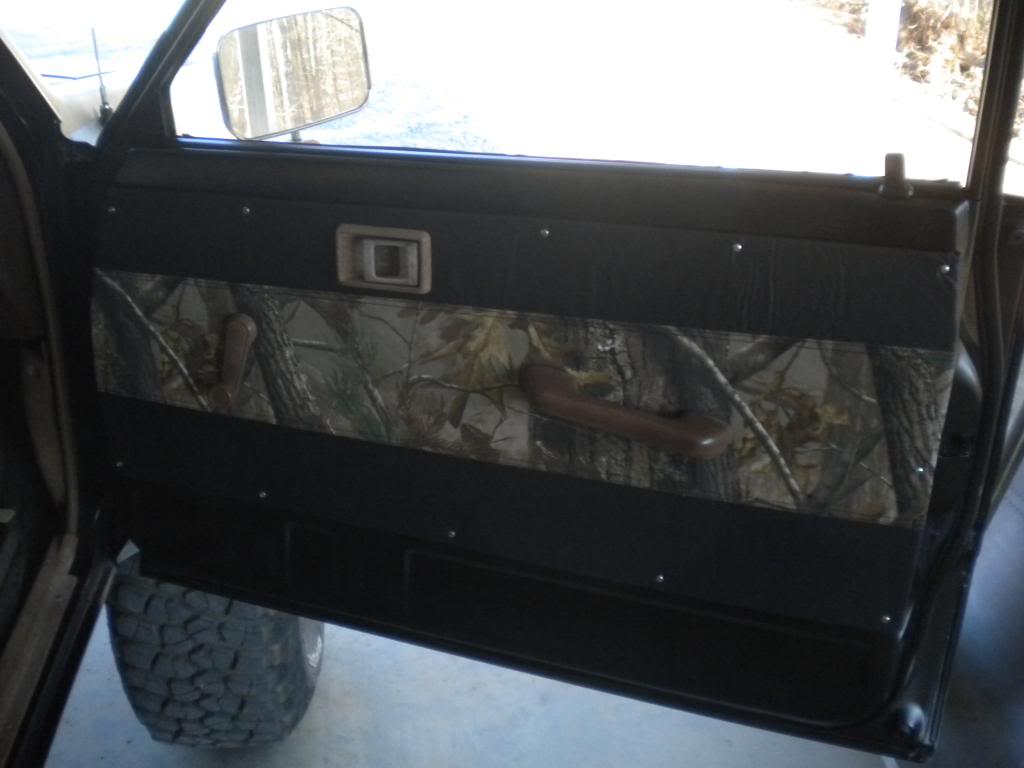
Weather was forcast warm so last night I got to work prepared for paint

Weather was perfect. Sprayed the satin black base.

Went onto the satin OD green with the touch up gun.

Weather was forcast warm so last night I got to work prepared for paint
Weather was perfect. Sprayed the satin black base.
Went onto the satin OD green with the touch up gun.

 Mar 17, 2013 | 11:22 AM
#14
Thread Starter
Registered User
Joined: Jan 2008
Posts: 407
Likes: 0
From: West NC
I do wish I could find a utility shell (side doors as well), but this freeby will do fine for the time being. Not like I made it's value go down by camo'ing it. Lol. I still have more to do for the paint, but my ideas keep trampling each other.
Maybe a giant faded silhouette of an AR down the side in brown. Lol.
Maybe a giant faded silhouette of an AR down the side in brown. Lol.
Mar 17, 2013 | 06:51 PM
#16
Thread Starter
Registered User
Joined: Jan 2008
Posts: 407
Likes: 0
From: West NC
Steel sawblades. Chrome was falling apart so I scuffed them with 220 for adhesion, put a light coat of etch primer, then some black epoxy. Got lucky and I was able to swap out the rusty lugs with a set of stock lugs I came across for free. Atleast now they are all 3/4. Lol. Sucks to have to have three diff sockets to take off four wheels.
Mar 17, 2013 | 07:20 PM
#17
Thread Starter
Registered User
Joined: Jan 2008
Posts: 407
Likes: 0
From: West NC
Seems to work well. Looks like the old bigfoot footage. Lol

Playing around in front of the shop some. The good news is that the tires did not rub.


Hope to find a good deal on some suspension parts soon. I have PS setup waiting for a crossover kit, and some new springs, as well as shocks and hoops. Then I will probably hack into the sheetmetal as I start bending tubes.
Playing around in front of the shop some. The good news is that the tires did not rub.
Hope to find a good deal on some suspension parts soon. I have PS setup waiting for a crossover kit, and some new springs, as well as shocks and hoops. Then I will probably hack into the sheetmetal as I start bending tubes.


