
Volcom's 1984 4Runner Build-Up Thread

 Nov 17, 2009 | 10:51 AM
#122
Thread Starter
Registered User
Joined: Aug 2004
Posts: 1,209
Likes: 0
From: Pueblo, CO


I added the small yellow LED for the turn signal rather than using a trailer taillight converter. I found out the small yellow turn signal doesn't show up at all during the day and I really need to use the big red LED's as the turn signals after all. I have the converter but didn't have the time to to wire it in before the trips this summer.
The metal inserts actually fit pretty good until the passenger side one took some damage. But that's why they are on there. Rather than breaking, they get bent up. I can just push them back into shape. They don't fit perfectly like a real taillight but it gets expensive at $15-$20-$30 a pop replacing broken taillights.
Last edited by Volcom; Nov 17, 2009 at 01:54 PM.
Nov 17, 2009 | 10:52 AM
#123
Thread Starter
Registered User
Joined: Aug 2004
Posts: 1,209
Likes: 0
From: Pueblo, CO
I needed a cheap project to work on since I don't have any money to start any big projects. I've been gathering stuff for rock lights for years (like 6  ) and I figured this would be a great time to put it all together.
I also wanted a fuse block to be able to add electrical components like a CB & additional 12v power sources.
I decided to go with 2 6-port fuse blocks. I also bought an ABS plastic project box from Radio Shack to hold all the fuse blocks and relays for the lights.
For lights, I have a pair of 6" KC lights that I plan on putting on the front bumper. I also have 2 sets of small 55w lights from Wal-mart that are designed to go on the front of a small car. They fit perfect in the places I wanted them. I want one set on the front bumper pointed down in front of the front tires and another set between the F&R tires along the frame. I also have a rectangle set of lights to point behind the rear tires.
The 6" KC's will be on their own relay and switch. The 4 small rock lights in front and middle of the 4Runner will be on their own relay and switch. And the rear 2 lights get their own relay and switch.
Onto the pictures!

I plan on putting the project box with all the stuff in it on the left hand side. It will mount on the passenger side fender and on top of the shock hoop. I will have to relocate one thing.

Top view of the box with the fuse block mounted on the sides, relays in the middle and all the wires running out of the side. Each fuse block has 8ga wire feeding it. The left relay is a 40a that feeds the front KC lights. The middle is a 40a that will run the 4 small rock lights and the right relay will run the back lights. The power & ground wires for the relays are 12ga and the wire for the switch will be 18ga.


Pics of the side mounted fuse blocks. Plently of room to expand if needed.

Close up of the relays and wires

Front 6" KC lights that I got for free 6 years ago from a friend. They should work out fine on the front bumper. When I get some time, I will paint them black rather than the worn out chrome.

I've got 2 sets of these small lights for the front and middle rock lights.

Rear lights

Overall shot of my tailgate work bench with all the wire, connectors, and other crap The battery jump box has been nice, I've been able to test my wiring before I put it in the truck. I tested all 3 relays and they all work as planned.
I'm done with the project box, I now need to get it installed under the hood. mount the 8 lights and get some power wires ran to each of them. I hope to get it done this week before my wheeling trip next weekend.
) and I figured this would be a great time to put it all together.I also wanted a fuse block to be able to add electrical components like a CB & additional 12v power sources.
I decided to go with 2 6-port fuse blocks. I also bought an ABS plastic project box from Radio Shack to hold all the fuse blocks and relays for the lights.
For lights, I have a pair of 6" KC lights that I plan on putting on the front bumper. I also have 2 sets of small 55w lights from Wal-mart that are designed to go on the front of a small car. They fit perfect in the places I wanted them. I want one set on the front bumper pointed down in front of the front tires and another set between the F&R tires along the frame. I also have a rectangle set of lights to point behind the rear tires.
The 6" KC's will be on their own relay and switch. The 4 small rock lights in front and middle of the 4Runner will be on their own relay and switch. And the rear 2 lights get their own relay and switch.
Onto the pictures!
I plan on putting the project box with all the stuff in it on the left hand side. It will mount on the passenger side fender and on top of the shock hoop. I will have to relocate one thing.
Top view of the box with the fuse block mounted on the sides, relays in the middle and all the wires running out of the side. Each fuse block has 8ga wire feeding it. The left relay is a 40a that feeds the front KC lights. The middle is a 40a that will run the 4 small rock lights and the right relay will run the back lights. The power & ground wires for the relays are 12ga and the wire for the switch will be 18ga.
Pics of the side mounted fuse blocks. Plently of room to expand if needed.
Close up of the relays and wires
Front 6" KC lights that I got for free 6 years ago from a friend. They should work out fine on the front bumper. When I get some time, I will paint them black rather than the worn out chrome.
I've got 2 sets of these small lights for the front and middle rock lights.
Rear lights
Overall shot of my tailgate work bench with all the wire, connectors, and other crap
The battery jump box has been nice, I've been able to test my wiring before I put it in the truck. I tested all 3 relays and they all work as planned.I'm done with the project box, I now need to get it installed under the hood. mount the 8 lights and get some power wires ran to each of them. I hope to get it done this week before my wheeling trip next weekend.
Nov 18, 2009 | 08:39 AM
#125
Aaron, it may be time for the 1wire GM alternator upgrade. Those rock lights are going to be a huge amperage draw. I remember my old EB had a stock 60amp alt similar to the stock Toyota one and with rock lights and headlights on it would kill the battery at idle. I upgraded to a 130amp and never had an issue again.
Nov 18, 2009 | 12:00 PM
#126
Thread Starter
Registered User
Joined: Aug 2004
Posts: 1,209
Likes: 0
From: Pueblo, CO
Aaron, it may be time for the 1wire GM alternator upgrade. Those rock lights are going to be a huge amperage draw. I remember my old EB had a stock 60amp alt similar to the stock Toyota one and with rock lights and headlights on it would kill the battery at idle. I upgraded to a 130amp and never had an issue again.
I'm going to have to pick and choose which lights I'll have on. Probably just the headlights & front KC's on the easy part of the trail, headlights and KC's off and just the front set of rock lights in the rocks, and the rear lights if I have to back up. I wish I could have afforded some LED rocklights but it wasn't in the budget. I've been buying all of the lights, wire, relays, and connectors over the years little by little.
I've seen some threads about the GM to 22RE bracket, it doesn't seem like it would be too bad to make one. My dad just bought a new plasma cutter so maybe it would be a good project
Nov 18, 2009 | 02:37 PM
#127
Yup, I was planning on something like the GM alternator. Rumor had it that Trail Gear was going to come out with an GM alternator bracket that would fit the 22RE. That would be pimp!
I'm going to have to pick and choose which lights I'll have on. Probably just the headlights & front KC's on the easy part of the trail, headlights and KC's off and just the front set of rock lights in the rocks, and the rear lights if I have to back up. I wish I could have afforded some LED rocklights but it wasn't in the budget. I've been buying all of the lights, wire, relays, and connectors over the years little by little.
I've seen some threads about the GM to 22RE bracket, it doesn't seem like it would be too bad to make one. My dad just bought a new plasma cutter so maybe it would be a good project
https://www.yotatech.com/forums/f37/...-mount-139305/
Nov 18, 2009 | 02:46 PM
#128
Contributing Member
Joined: Apr 2004
Posts: 5,464
Likes: 6
From: Arvada, Colorado
Looks awesome Aaron!
x2 on Scotty's post. My rock lights were very similar to yours in amperage draw and there were a few times when it would almost kill the truck at idle. Those little toy alts don't like lots of accessories.
x2 on Scotty's post. My rock lights were very similar to yours in amperage draw and there were a few times when it would almost kill the truck at idle. Those little toy alts don't like lots of accessories.
Nov 18, 2009 | 03:20 PM
#129
Thread Starter
Registered User
Joined: Aug 2004
Posts: 1,209
Likes: 0
From: Pueblo, CO
You mean like this?
https://www.yotatech.com/forums/f37/...-mount-139305/
https://www.yotatech.com/forums/f37/...-mount-139305/
 Nov 18, 2009 | 10:58 PM
#130
Thread Starter
Registered User
Joined: Aug 2004
Posts: 1,209
Likes: 0
From: Pueblo, CO
Worked on the Rock Light project with my dad tonight. We also got to use his new plasma cutter for the first time as well! It cuts good, I just need some work keeping my hands steady :mrgreen:

Front lights are now mounted. Just cut some 1/8" plate for some tabs on the bumper.

Small rock light pointed down in front of the passenger side tire. We also cut and welded some small tabs on the bumper.

Pic of the tab without a light.

We also made a mount for the small lights off of the middle slider support to keep the light mounted high between the frame & the body.
Front lights are now mounted. Just cut some 1/8" plate for some tabs on the bumper.
Small rock light pointed down in front of the passenger side tire. We also cut and welded some small tabs on the bumper.
Pic of the tab without a light.
We also made a mount for the small lights off of the middle slider support to keep the light mounted high between the frame & the body.
Nov 19, 2009 | 08:07 AM
#132
Thread Starter
Registered User
Joined: Aug 2004
Posts: 1,209
Likes: 0
From: Pueblo, CO

Do you have the Smittybilt XRC8? If so, do you like it?
Nov 19, 2009 | 12:31 PM
#133

Registered User
Joined: Oct 2009
Posts: 3
Likes: 0
Worked on the Rock Light project with my dad tonight. We also got to use his new plasma cutter for the first time as well! It cuts good, I just need some work keeping my hands steady :mrgreen:
Front lights are now mounted. Just cut some 1/8" plate for some tabs on the bumper.
Small rock light pointed down in front of the passenger side tire. We also cut and welded some small tabs on the bumper.
Pic of the tab without a light.
We also made a mount for the small lights off of the middle slider support to keep the light mounted high between the frame & the body.
Mar 21, 2010 | 09:24 AM
#134
Thread Starter
Registered User
Joined: Aug 2004
Posts: 1,209
Likes: 0
From: Pueblo, CO
I'll start by giving CUbuff4Runner a big thanks in helping me at his dad's sheetmetal shop. There's no way I could have done the tailgate conversion by myself in my garage.
The bonus for swapping tailgate is getting rid of the heavy 4Runner tailgate. You loose all the glass, elec. motor, and all the other stuff in the window to make it go up & down. You also gain 4" of clearance at the bottom of the gate. It makes connecting a bumper to the frame much easier. The negative, you loose the back window. I've only run the hard top 5 months out of the year and don't get much during that time. If it was a daily driver, I probably wouldn't suggest the conversion.
I took some heavy damage to the driver's side rear quarterpanel a couple of years ago running BV Carnage on 33's with no rear bumper. Wasn't the smartest idea I've had Here's the result of that trip.

Instead of fixing the damage, I just cut out the damage and left it for a couple of years.

The conversion was a good way to get rid of that low hanging quarterpanel and to make it eaiser to connect a bumper to the frame. Here's the pics.

Last picture with the stock tailgate in place. You can see my orange test spots to see what color orange I want to paint it somebody. The passenger side rear quarterpanel has taken some damage over the years as well.

Here's the damaged area that I've covered with cardboard & duct tape to keep the CO fumes from getting inside while running it with the hard top. Nice & ghetto.

Here's the pickup tailgate test fitted. Notice how much trimming has be done on the bottom quarterpanels.

Jeff welding up the 1" by 1" sqaure tubing frame that we used to relocate the hinges. The hidges sit between the 2 supports on each side.

Hinge supports tacked into place on the rear 2" by 3" crossmember I've put in between the rear framerails.

Hinge supports welded in. This shows that rear crossmember better.

Pickup tailgate hung and quarterpanels trimmed.

We welded a bottom piece of sheetmetal to the quarterpanel.

Driver's side was worse since we had to weld in a filler piece of sheetmetal between where I had trimmed and the bottom cap.

Passenger side welded. Just need some seam sealer on the inside and it's done.

Amazing how well the pickup tailgate fits in there.

Just need some paint and a rear bumper.

Driver's side was hard to work on. The Toyota sheetmetal is sooooooo thin. It's hard to weld without blowing holes in it left and right. This side will need some grinding and some bondo to make it look OK (it's not a show car so I'm not worried about it )

Another picture of th driver's side. The exhaust pipe used to touch the bottom of the quarterpanel. It's now 4" low.

The finsihed product.

Also picked up a 85 front axle housing, wheel hubs, steering knuckles, spindles, and hub bodies as spares from the pull-n-save.

I just reused the stock latches from the pickup. Seemed easier than fab'ing up another solution.

Height difference between the pickup latch vs. the 4Runner latch. I'll just leave the 4Runner latch as another tie down point for the rear.

We used sheetmetal over the 1"x1" frame and just tacked it to the tub in multiple spots. It's plenty strong to stand on.

Close up of the pickup hinge location, sheetmetal, and the orginal hinge location for the 4Runner tailgate.

Just alittle gap that I'll close up. Once I seam seal and heculine the rear, it will look somewhat stock.

Here's the space I gained in the cargo area. It's not much but I'll take as much of it for camping gear as I can get. I've always loved the way 4Runner's looked bob'ed but I use all the cargo room when I go camping so it wasn't feasible for me to bob the rear behind the seats.

Couldn't see the rear frame rails before the trim. Now it's a straight shot. It will make building a rear bumper easier & stronger.

Just sits in the garage 98% of the time.
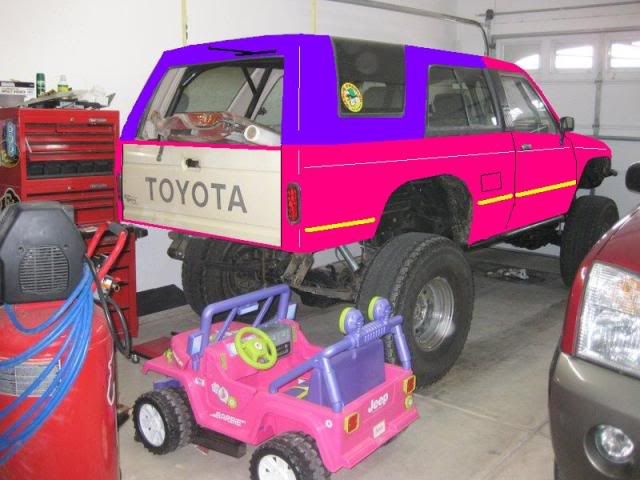
Here's how DIRTCO said I should paint my 4Runner
The bonus for swapping tailgate is getting rid of the heavy 4Runner tailgate. You loose all the glass, elec. motor, and all the other stuff in the window to make it go up & down. You also gain 4" of clearance at the bottom of the gate. It makes connecting a bumper to the frame much easier. The negative, you loose the back window. I've only run the hard top 5 months out of the year and don't get much during that time. If it was a daily driver, I probably wouldn't suggest the conversion.
I took some heavy damage to the driver's side rear quarterpanel a couple of years ago running BV Carnage on 33's with no rear bumper. Wasn't the smartest idea I've had
Here's the result of that trip.Instead of fixing the damage, I just cut out the damage and left it for a couple of years.
The conversion was a good way to get rid of that low hanging quarterpanel and to make it eaiser to connect a bumper to the frame. Here's the pics.
Last picture with the stock tailgate in place. You can see my orange test spots to see what color orange I want to paint it somebody. The passenger side rear quarterpanel has taken some damage over the years as well.
Here's the damaged area that I've covered with cardboard & duct tape to keep the CO fumes from getting inside while running it with the hard top. Nice & ghetto.
Here's the pickup tailgate test fitted. Notice how much trimming has be done on the bottom quarterpanels.
Jeff welding up the 1" by 1" sqaure tubing frame that we used to relocate the hinges. The hidges sit between the 2 supports on each side.
Hinge supports tacked into place on the rear 2" by 3" crossmember I've put in between the rear framerails.
Hinge supports welded in. This shows that rear crossmember better.
Pickup tailgate hung and quarterpanels trimmed.
We welded a bottom piece of sheetmetal to the quarterpanel.
Driver's side was worse since we had to weld in a filler piece of sheetmetal between where I had trimmed and the bottom cap.
Passenger side welded. Just need some seam sealer on the inside and it's done.
Amazing how well the pickup tailgate fits in there.
Just need some paint and a rear bumper.
Driver's side was hard to work on. The Toyota sheetmetal is sooooooo thin. It's hard to weld without blowing holes in it left and right. This side will need some grinding and some bondo to make it look OK (it's not a show car so I'm not worried about it
)Another picture of th driver's side. The exhaust pipe used to touch the bottom of the quarterpanel. It's now 4" low.
The finsihed product.
Also picked up a 85 front axle housing, wheel hubs, steering knuckles, spindles, and hub bodies as spares from the pull-n-save.
I just reused the stock latches from the pickup. Seemed easier than fab'ing up another solution.
Height difference between the pickup latch vs. the 4Runner latch. I'll just leave the 4Runner latch as another tie down point for the rear.
We used sheetmetal over the 1"x1" frame and just tacked it to the tub in multiple spots. It's plenty strong to stand on.
Close up of the pickup hinge location, sheetmetal, and the orginal hinge location for the 4Runner tailgate.
Just alittle gap that I'll close up. Once I seam seal and heculine the rear, it will look somewhat stock.
Here's the space I gained in the cargo area. It's not much but I'll take as much of it for camping gear as I can get. I've always loved the way 4Runner's looked bob'ed but I use all the cargo room when I go camping so it wasn't feasible for me to bob the rear behind the seats.
Couldn't see the rear frame rails before the trim. Now it's a straight shot. It will make building a rear bumper easier & stronger.
Just sits in the garage 98% of the time.
Here's how DIRTCO said I should paint my 4Runner
Mar 21, 2010 | 06:57 PM
#137
Thread Starter
Registered User
Joined: Aug 2004
Posts: 1,209
Likes: 0
From: Pueblo, CO
The bottom 2 studs on the housing have been replaced with bolts. I unbolt those 2 and the gear oil slowly comes out of the housing. I also loosen the other nuts and slightly crack the diff so that more oil comes out.
Mar 24, 2010 | 09:09 AM
#138
Registered User
Joined: Mar 2009
Posts: 34
Likes: 0
Awesome build. Thanks for sharing!
Saw your post on one of Scotty's builds: https://www.yotatech.com/forums/f152...l#post51398465
What's the reason for getting rid of the angled rear shocks?
I just finished my SAS and still need to do the rear shocks. The bushings in the Bilsteins were too small too fit onto the stock mounts at the top and I didn't want to ream them out or put in stock bushings. Figured I might as well put in a bar and angle them inwards.
Thanks
Mar 24, 2010 | 10:14 AM
#139
Registered User
Joined: Oct 2003
Posts: 1,133
Likes: 0
From: Thornton, Colorado
Awesome build. Thanks for sharing!
Saw your post on one of Scotty's builds: https://www.yotatech.com/forums/f152...l#post51398465
What's the reason for getting rid of the angled rear shocks?
I just finished my SAS and still need to do the rear shocks. The bushings in the Bilsteins were too small too fit onto the stock mounts at the top and I didn't want to ream them out or put in stock bushings. Figured I might as well put in a bar and angle them inwards.
Thanks
Saw your post on one of Scotty's builds: https://www.yotatech.com/forums/f152...l#post51398465
What's the reason for getting rid of the angled rear shocks?
I just finished my SAS and still need to do the rear shocks. The bushings in the Bilsteins were too small too fit onto the stock mounts at the top and I didn't want to ream them out or put in stock bushings. Figured I might as well put in a bar and angle them inwards.
Thanks
The more you angle them the less effective they are. If they are strait up and down every inch of travel at the location of the shock is an inch of travel on the shock. As they get angled in what was an inch now can become 1/2" of shock travel.
Mar 24, 2010 | 10:37 AM
#140
Thread Starter
Registered User
Joined: Aug 2004
Posts: 1,209
Likes: 0
From: Pueblo, CO
Awesome build. Thanks for sharing!
Saw your post on one of Scotty's builds: https://www.yotatech.com/forums/f152...l#post51398465
What's the reason for getting rid of the angled rear shocks?
I just finished my SAS and still need to do the rear shocks. The bushings in the Bilsteins were too small too fit onto the stock mounts at the top and I didn't want to ream them out or put in stock bushings. Figured I might as well put in a bar and angle them inwards.
Thanks
Saw your post on one of Scotty's builds: https://www.yotatech.com/forums/f152...l#post51398465
What's the reason for getting rid of the angled rear shocks?
I just finished my SAS and still need to do the rear shocks. The bushings in the Bilsteins were too small too fit onto the stock mounts at the top and I didn't want to ream them out or put in stock bushings. Figured I might as well put in a bar and angle them inwards.
Thanks


