
My 1985 4Runner
 May 12, 2015 | 10:36 PM
#1

Thread Starter
Registered User
Joined: Oct 2013
Posts: 57
Likes: 0
My 1985 4Runner
So, I just bought THE 1985 4Runner!
I plan to update this thread as I make my (slow) build up/restoration, but for now lets focus on what I got.
The good:
FSA
EFI
4Runner
Tailgate rear window motor works! (well, with the key it does, not from inside the cab).
The maybe:
146,452 miles. Not really this low but I'm thinking maybe not too much higher.
The tenth/mile goes 'round and 'round but never pushes any of the other numbers around. So the odometer stayed the same the whole trip home except the tenth/mile which went round and round about 125 times. The guy swears up and down it was working before he sold it to me. I think I remember the mileage going from 146,451 to 146,452 and then freezing, but I can't remember for sure. Don't really know where to start on this though - the speedometer reads about 10mph too fast about all the time (maybe?) and like 15mph at idle. I'm thinking these are related.
The Bad:
On the drive home blew a REAL nasty exhaust leak about 40 miles in.
I already miss my SR5 gauges!
No Radio Broken Antenna
RUST
Misc. interior
Last edited by Quinn's87RE; May 15, 2015 at 09:29 PM.
May 13, 2015 | 08:40 PM
#4
Thread Starter
Registered User
Joined: Oct 2013
Posts: 57
Likes: 0
Day 2
Some good news. Upon further inspection (than on the side of I-5 in the rain at night) the exhaust leak was coming from the EGR heater hose (?). It had spit clear open. $1.69 later I cut some new hose to length and out from under the overbearing exhaust she sounds smooth and tight.
Nothing on the odo. yet.
Got some steel wool and began hacking away at some of the rust. Also found out that the Toyota color code for Creme is 557, and is available to order online.
May 14, 2015 | 01:18 AM
#5
I just painted my 85 Creme. It can be mixed up at paint stores. Your paint code is located on the firewall just above the valve cover. It is the first 3 digits on the metal tag. I think 557 is right but dont recall right off.
May 14, 2015 | 07:01 PM
#6
Thread Starter
Registered User
Joined: Oct 2013
Posts: 57
Likes: 0
^^^^^^Cool about the color code being a standard. Nice to know I'm not at the whims of the internet when purchasing.
Day 3
Really looking forward to having a full day of with her. Still finding a little time after work to get into it though.
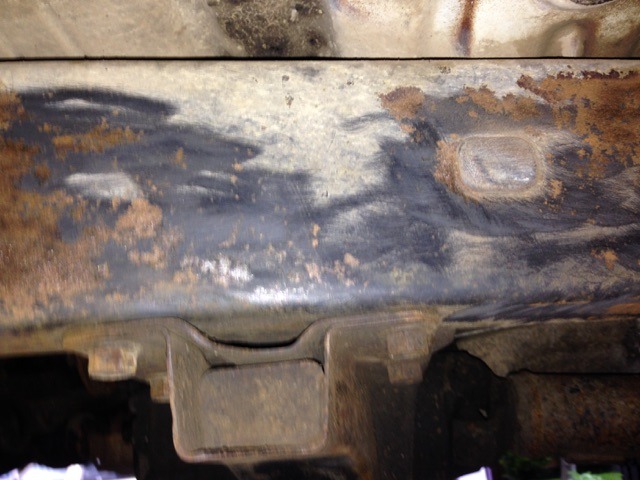
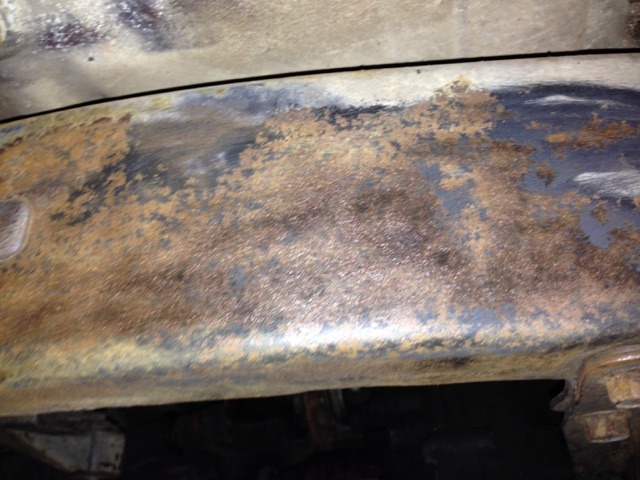
Rust is really built up. On the frame it appears all surface rust. Went around with a sheet of sand paper and tested out how bad it gets. Still smooth metal underneath! But practically every piece of bare metal is rust coated and I see lots of sanding in my future. I'll keep picking away at it until my day off and then i'm going to hook up some sand paper to my power drill and hopefully speed things up. Should I paint the areas of the frame I can get to after they are sanded down?
Front and rear springs are so rusty but that doesn't matter so much cause they'll be replaced. Perfect time to skip sanding out the shackles and what not and just replace them with the springs. I'll do a little work on the axles/diff but it'll be a lot easier when they are out from under the truck so i wont worry about that too much now. Seems like all the info I need for the 63' spring swap is here: http://www.pirate4x4.com/forum/toyot...-swap-faq.html
Day 3
Really looking forward to having a full day of with her. Still finding a little time after work to get into it though.
Rust is really built up. On the frame it appears all surface rust. Went around with a sheet of sand paper and tested out how bad it gets. Still smooth metal underneath! But practically every piece of bare metal is rust coated and I see lots of sanding in my future. I'll keep picking away at it until my day off and then i'm going to hook up some sand paper to my power drill and hopefully speed things up. Should I paint the areas of the frame I can get to after they are sanded down?
Front and rear springs are so rusty but that doesn't matter so much cause they'll be replaced. Perfect time to skip sanding out the shackles and what not and just replace them with the springs. I'll do a little work on the axles/diff but it'll be a lot easier when they are out from under the truck so i wont worry about that too much now. Seems like all the info I need for the 63' spring swap is here: http://www.pirate4x4.com/forum/toyot...-swap-faq.html
May 14, 2015 | 07:05 PM
#7
Thread Starter
Registered User
Joined: Oct 2013
Posts: 57
Likes: 0
Day 3 cont.
Around the rear wells is quite a bit of cancer. It's pretty uniformly confined to about 1.5 inches within the edge so I think I will trim out the fenders rather than deal with repair. There are some spots I think i'm going to bondo - around the gas cap, on the tailgate, the hood...
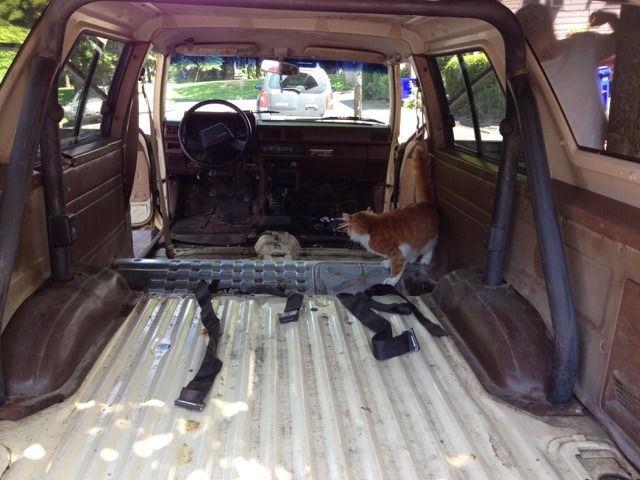
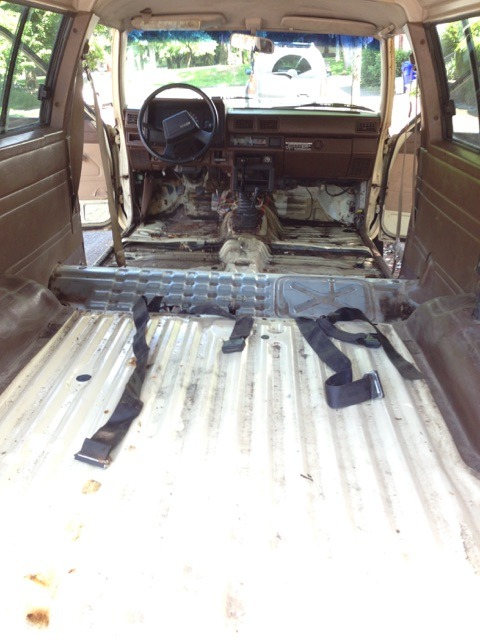
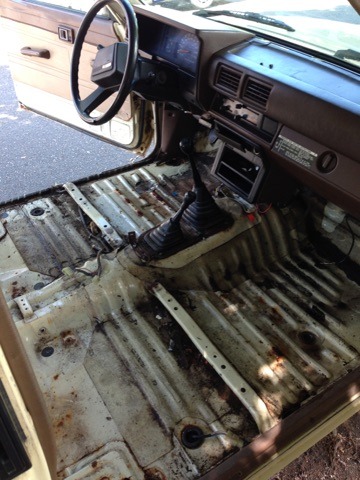
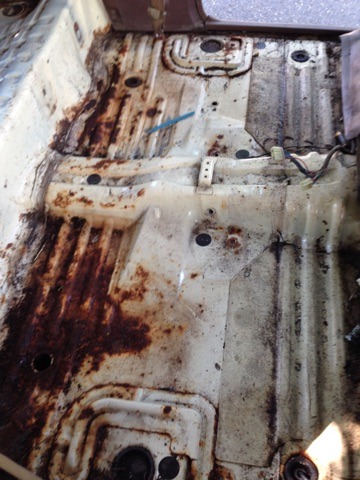
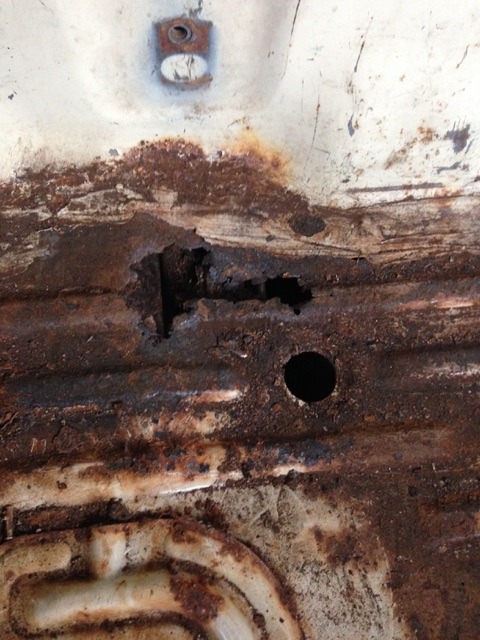
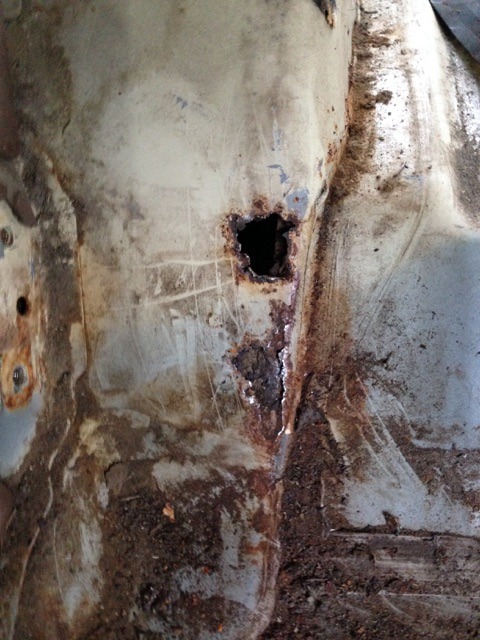
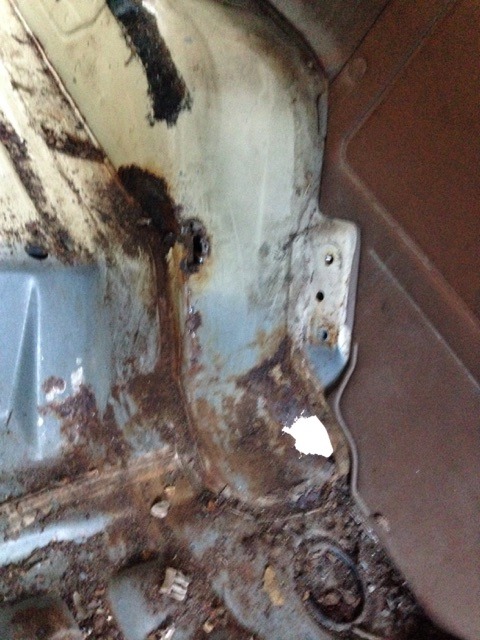
Also rust in the floor pans. Mostly on the driver side. The foam under the vinyl is wet underneath and I have it sort of half peeled back to air dry it out. Eventually I'd like to get rid of it all and replace it but it seems that new carpets cast about $250 and right now that money is going to elsewhere on the truck. However, I figure it is a good idea to tear it all up, gently, let it dry, clean the floor pan underneath, sand down any rust, weld support if needed, and then, at least in the meantime between new carpet, put the old stuff back in. Seems like kind of a pain to have to take all the seats and center console, etc. out but it is pretty damp and stale in this old girl. No rust in the "pickup bed" part though!
Around the rear wells is quite a bit of cancer. It's pretty uniformly confined to about 1.5 inches within the edge so I think I will trim out the fenders rather than deal with repair. There are some spots I think i'm going to bondo - around the gas cap, on the tailgate, the hood...
Also rust in the floor pans. Mostly on the driver side. The foam under the vinyl is wet underneath and I have it sort of half peeled back to air dry it out. Eventually I'd like to get rid of it all and replace it but it seems that new carpets cast about $250 and right now that money is going to elsewhere on the truck. However, I figure it is a good idea to tear it all up, gently, let it dry, clean the floor pan underneath, sand down any rust, weld support if needed, and then, at least in the meantime between new carpet, put the old stuff back in. Seems like kind of a pain to have to take all the seats and center console, etc. out but it is pretty damp and stale in this old girl. No rust in the "pickup bed" part though!
Trending Topics
May 14, 2015 | 07:11 PM
#8
Thread Starter
Registered User
Joined: Oct 2013
Posts: 57
Likes: 0
The front Left blinker isn't completing the circuit. The back left goes double-time. The Right front blinker works fine, and it traces back to the same wire as the Left, so I figure my issue has to be somewhere within that 1.5 foot of electrical after the split. The connector snap plug thing behind the blinker bulb looks worn but inside there is metal showing so i'm not sure if this is the issue. Also, the blinkers/flashers only work when the engine is running, not in any of the battery power modes or with the car off. Weird right?
I checked the air intake for gunk and found an "Air Tornado" (http://www.tornadoair.com/). LOL. Threw that crap out.
The switch for the rear window inside the cab works - but only to put the window back up. I think If i get underneath that switch and gently rub the solenoid with some steel wool it'll come alive!
Since I blew through that EGR heater hose the first 40 miles after driving home I'm going to pro-actively start replacing hoses. Also belts. I'll have some piece of mind to drive her around once I flush out the tranny, diffs, coolant, and give her some fresh oil.
My girls here with a pizza, so I'm done for the day.
Last edited by Terrys87; May 15, 2015 at 04:58 AM.
 May 15, 2015 | 05:05 AM
#10
I use a wire brush on a drill to get the rust off of the frame. I would paint it when done. Some use POR-15 when done. I have not tried it but lots of good reviews.
On the carpet, I would take it to the car wash and give it a good cleaning. Lots of nasty gunk will come out and it will freshen up the look and work until you can get new carpet. I get my carpet from stockinteriors.com For the trunk area, you can get some scrap from a local carpet shop. That will save you about $100. I have tried other replacement carpets and you still have to cut it to fit. It will have it molded to your floor board but I have yet to see one that you can just drop in.
You are probably leaking around the windshield. That metal trim is a rust magnet. Your blinker is most likely in the socket assembly. Behind the bulb is really corroded.
May 15, 2015 | 08:10 PM
#11
Thread Starter
Registered User
Joined: Oct 2013
Posts: 57
Likes: 0
Day 4
She hasn't been registered since 2008. The story is that she grew up in Colorado but had been since living with her original owner in the north Washington coastal area. Since she was last registered she was said to have been used solely to tow an aluminum boat around the POs lake filled acreage.
Picked up some wire brush attachments. Looking more in depth to my options.
Yes, definitely some rust underneath that trim. I didn't remember to look in to the blinker today. Tomorrow I'll test her blinker socket assembly by pulling one off my Pickup and see what happens.
Not much time today. Picked up a bunch of fluids. 80W-90 for the differentials. 75w-90 for the transmission and transfer case. An air filter.
I drained and filled the front differential. Upon wrenching the drain hole loose the fluid was far below capacity and only slightly reminiscent of gear oil in its color or viscosity. However, metal shavings appeared to be minimal. I spent too much trying to yank the bolts loose on the rear diff. It wasn't going to happen, even with the penetrating oil coating it. I'm investing in a breaker bar. Switched out air filters.
She's now insured. She's getting registered Monday! Can't wait to get her out on the road all legal.
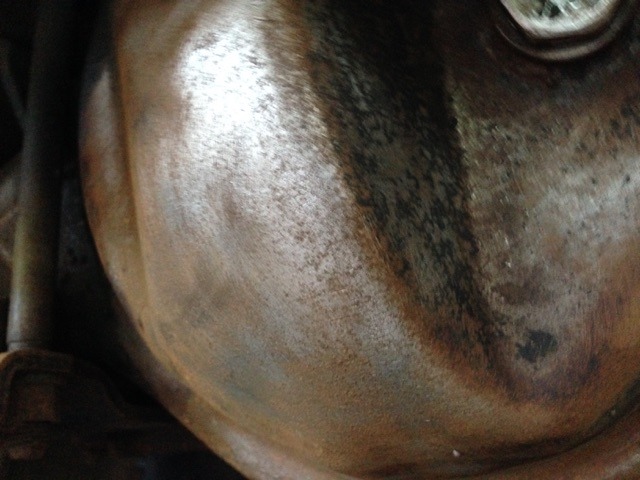
Got a leak coming out of the front axle/hub area that started to show today. Everything is just so filthy. On Sunday I have access to a power washer and I'm going to just blast the hell out of her. I'm looking forward to getting some of this bulk gunk off.
She hasn't been registered since 2008. The story is that she grew up in Colorado but had been since living with her original owner in the north Washington coastal area. Since she was last registered she was said to have been used solely to tow an aluminum boat around the POs lake filled acreage.
Not much time today. Picked up a bunch of fluids. 80W-90 for the differentials. 75w-90 for the transmission and transfer case. An air filter.
I drained and filled the front differential. Upon wrenching the drain hole loose the fluid was far below capacity and only slightly reminiscent of gear oil in its color or viscosity. However, metal shavings appeared to be minimal. I spent too much trying to yank the bolts loose on the rear diff. It wasn't going to happen, even with the penetrating oil coating it. I'm investing in a breaker bar. Switched out air filters.
She's now insured. She's getting registered Monday! Can't wait to get her out on the road all legal.
Got a leak coming out of the front axle/hub area that started to show today. Everything is just so filthy. On Sunday I have access to a power washer and I'm going to just blast the hell out of her. I'm looking forward to getting some of this bulk gunk off.
Last edited by Quinn's87RE; May 15, 2015 at 08:43 PM.
May 15, 2015 | 11:15 PM
#12
Might as well order a front end rebuild kit. your wipers are shot and more than likely the inner seal is toast allowing differential fluid to mix with your birfield grease
May 16, 2015 | 11:10 PM
#13
Thread Starter
Registered User
Joined: Oct 2013
Posts: 57
Likes: 0
Day 5
Sounds reasonable. And so the reading begins...
After work today got the rear diff. bolts of a breaker bar and drained and filled, Drained and filled the tranny as well (Haynes manual said capacity is 4,1 quarts). I had planned on removing the transmission cover plate and going through the cab to refill it, but (of course) those screws had rusted shut. Ended up having to spend $16 on a fluids pump - it rules! way easier, and cleaner, than going through the cab, I just wish I would have bought it before I did the diffs! Also oil change.
There's a coolant leak where the lower radiator hose connects on the radiator side. I happen to already have a replacement hose but it was getting late and when I went to loosen the clamp the screw had rust shut. Hungry and tired I said **** it and put a bucket under it to see how much has drained by morning.
Driving it to work tomorrow (with out of state plates and WAY expired tags). I'll just keep some coolant in the rig and fill if necessary - it's like a pre-flush for the coolant right?
Last edited by Quinn's87RE; May 17, 2015 at 05:05 PM.
May 17, 2015 | 05:02 PM
#15
Thread Starter
Registered User
Joined: Oct 2013
Posts: 57
Likes: 0
So I've begun my research on rebuilding the axles with new seals. Lots of really good write-ups out there. My work space is pitiful (the side of semi-heavy traffic street in front of my apartment complex) so I want this to go as smoothly as possible, especially since I'll have a maximum two days to complete it once I start. I figure the best way to make that happen is to soak up as much information as possible before I start because I've never done something like this before (well, I've taken apart a rear axle to replace diff. gasket, but there is a lot less to a rear axle). This (http://www.4crawler.com/4x4/CheapTri...eRebuild.shtml) write up mentions another write up by Morgan Fletcher, but the link is dead. Anybody have a good link for this? There are a few other write ups I've come across that I'll read a few more times. A couple youtube videos with some pertinent information.
People seem to say that it is pretty straight forward for the most part (but MESSY). Follow the FSM, keep track of what order you took the parts off in, and make sure you set the pre-load on the bearings correct or else you'll be doing it again soon. I'll probably go with this (http://www.lowrangeoffroad.com/toyot...-ultimate.html) kit.
You think a motivated first timer has a good shot at doing it over a weekend alone on the side of the road?
Last edited by Quinn's87RE; May 17, 2015 at 05:13 PM.
May 17, 2015 | 08:45 PM
#18
Thread Starter
Registered User
Joined: Oct 2013
Posts: 57
Likes: 0
DAY 6
Got her power washed after work today. Got a lot of the gunk off from underneath and a lot of the flaky rust speckles too. Cleaned out the window seals too so they are sliding a little more smoothly! Had a little time when I got home so I tested out the drill with the metal brush tips. They worked pretty good, I might want something a little stiffer but I think they might do a good enough job to get her prepped before a POR15 treatment - which will happen next week after payday (I figure i'll most likely end up spending close to $100 on a full line of rust killer and prevention products).
Tomorrow is my first full day with her and I think I'll spend most it sanding. Tuesday I'm going to gut the interior and then sand on the inside floor boards too (Tuesday night I have a welding workshop and want to have it mostly prepped so I can talk with the instructor about the best way to go about welding the floorboards, I can also talk to her about plasma trimming the fenders free from the rust around the edges).
Also somewhere between Monday and Tuesday I am going to get the title transferred to my name, as well as register it and get tags - come on baby and please pass DEQ the first time! Hopefully while I'm driving her around I can swing by a U-Pull and snag a blinker assembly, maybe some other misc. too.
Yes, I believe this is the issue too. Tuesday when I am gutting the vinyl flooring I am going to take a peak under the center console and clean the electrical up. I just figure that since the seats will be removed I'll have better access to underneath the center console. Good to know it worked for you! Gives me yet more hope that the ultra-cool rear electric window will be fully functioning soon!
Got her power washed after work today. Got a lot of the gunk off from underneath and a lot of the flaky rust speckles too. Cleaned out the window seals too so they are sliding a little more smoothly! Had a little time when I got home so I tested out the drill with the metal brush tips. They worked pretty good, I might want something a little stiffer but I think they might do a good enough job to get her prepped before a POR15 treatment - which will happen next week after payday (I figure i'll most likely end up spending close to $100 on a full line of rust killer and prevention products).
Tomorrow is my first full day with her and I think I'll spend most it sanding. Tuesday I'm going to gut the interior and then sand on the inside floor boards too (Tuesday night I have a welding workshop and want to have it mostly prepped so I can talk with the instructor about the best way to go about welding the floorboards, I can also talk to her about plasma trimming the fenders free from the rust around the edges).
Also somewhere between Monday and Tuesday I am going to get the title transferred to my name, as well as register it and get tags - come on baby and please pass DEQ the first time! Hopefully while I'm driving her around I can swing by a U-Pull and snag a blinker assembly, maybe some other misc. too.
Last edited by Quinn's87RE; May 17, 2015 at 08:48 PM.
May 17, 2015 | 09:31 PM
#19
Thread Starter
Registered User
Joined: Oct 2013
Posts: 57
Likes: 0
So I've begun my research on rebuilding the axles with new seals. Lots of really good write-ups out there. My work space is pitiful (the side of semi-heavy traffic street in front of my apartment complex) so I want this to go as smoothly as possible, especially since I'll have a maximum two days to complete it once I start. I figure the best way to make that happen is to soak up as much information as possible before I start because I've never done something like this before (well, I've taken apart a rear axle to replace diff. gasket, but there is a lot less to a rear axle). This (http://www.4crawler.com/4x4/CheapTri...eRebuild.shtml) write up mentions another write up by Morgan Fletcher, but the link is dead. Anybody have a good link for this? There are a few other write ups I've come across that I'll read a few more times. A couple youtube videos with some pertinent information.
People seem to say that it is pretty straight forward for the most part (but MESSY). Follow the FSM, keep track of what order you took the parts off in, and make sure you set the pre-load on the bearings correct or else you'll be doing it again soon. I'll probably go with this (http://www.lowrangeoffroad.com/toyot...-ultimate.html) kit.
You think a motivated first timer has a good shot at doing it over a weekend alone on the side of the road?
 THANK YOU
 So new plan is to use the camo method to access my inner axle seal, swap it out, and knock this darn gear oil off from dripping out! (and save money on a smaller rebuild kit! And as i'm sure you all know - more money saved means the sooner I can't put money towards the FUN stuff!!)

Last edited by Quinn's87RE; May 17, 2015 at 10:33 PM.
May 18, 2015 | 10:01 PM
#20
Thread Starter
Registered User
Joined: Oct 2013
Posts: 57
Likes: 0
DAY 7
Lots of sanding today - LOTS more sanding to go. But she shows promise. Underneath all of the rust coating and oxidized flakes she proves there truly is steel in her bones. The wire brushes seem to be working okay but I might try something stiffer before I coat her with a POR15 process. The hard to reach places in the frame are starting to bother me.
Got the whole interior gutted too. Underneath the rank vinyl I found plenty of mold and a few more holes in the floor boards than I expected. Also, I borrowed a shop vac tonight so I can suck up all the gunk, rust flakes, and whatever else was growing under that foul vinyl. The whole in the floorboards must have just allowed salty coastal air and water to permeate into their own environment for years upon years. Who knows? Maybe I have extinguished a microorganism which had only ever survived or come to creation between that floor and that vinyl.
Tomorrow is also my welding workshop where hopefully the instructor can offer some sound insight into patching up them there holes. After I weld it I'm going to clean it up enough to repaint the whole floorboards.
Lots of sanding today - LOTS more sanding to go. But she shows promise. Underneath all of the rust coating and oxidized flakes she proves there truly is steel in her bones. The wire brushes seem to be working okay but I might try something stiffer before I coat her with a POR15 process. The hard to reach places in the frame are starting to bother me.


Got the whole interior gutted too. Underneath the rank vinyl I found plenty of mold and a few more holes in the floor boards than I expected. Also, I borrowed a shop vac tonight so I can suck up all the gunk, rust flakes, and whatever else was growing under that foul vinyl. The whole in the floorboards must have just allowed salty coastal air and water to permeate into their own environment for years upon years. Who knows? Maybe I have extinguished a microorganism which had only ever survived or come to creation between that floor and that vinyl.


Tomorrow is also my welding workshop where hopefully the instructor can offer some sound insight into patching up them there holes. After I weld it I'm going to clean it up enough to repaint the whole floorboards.


Last edited by Quinn's87RE; May 18, 2015 at 11:05 PM.


