
CamTom12's 1985 4Runner Thread
 Jan 25, 2014 | 06:10 PM
#1

Thread Starter
Registered User


Joined: May 2008
Posts: 523
Likes: 1
CamTom12's 1985 4Runner Thread
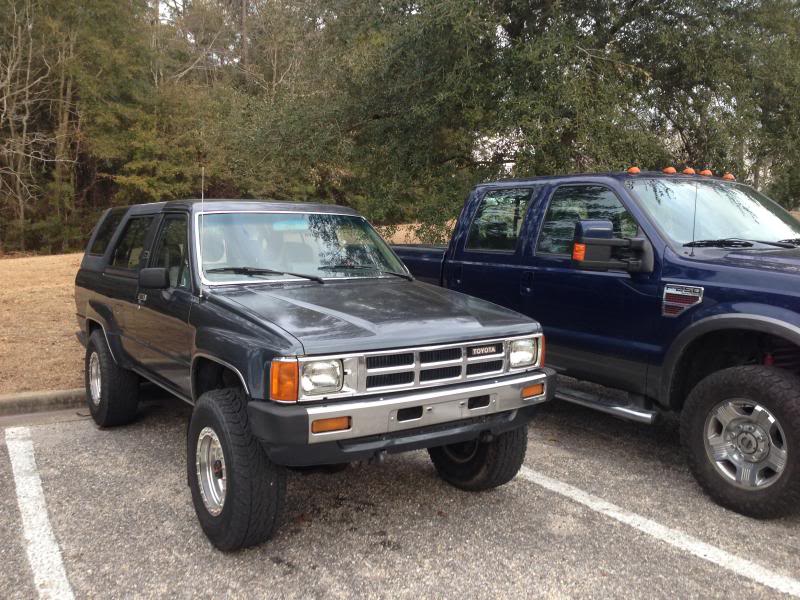
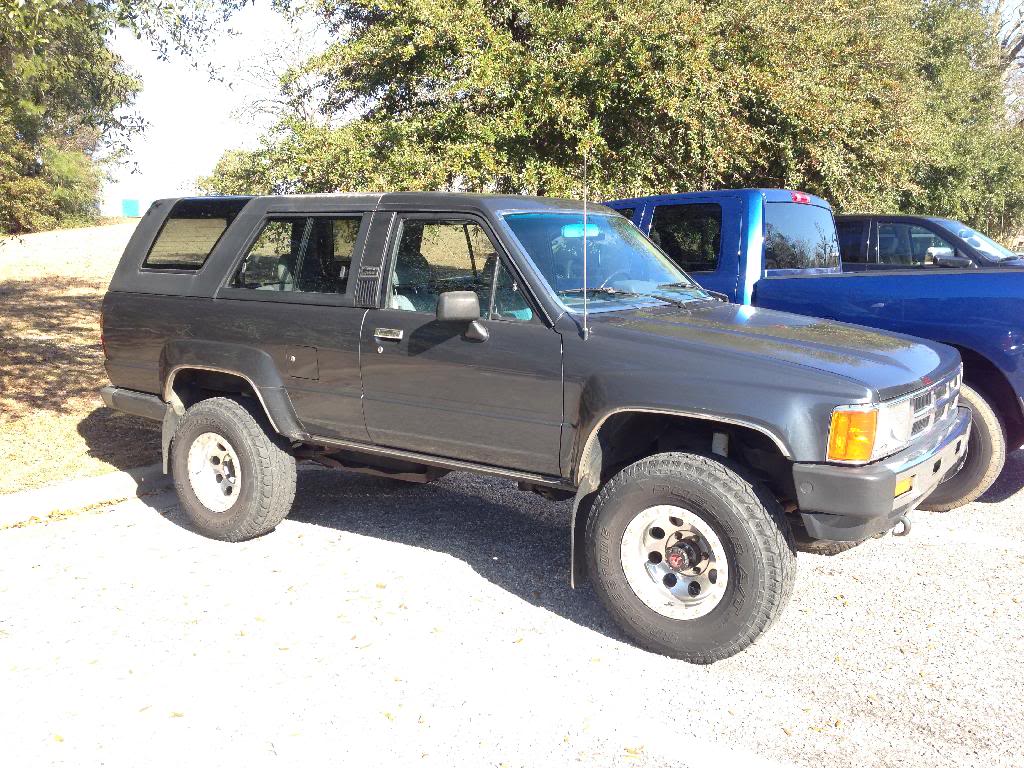
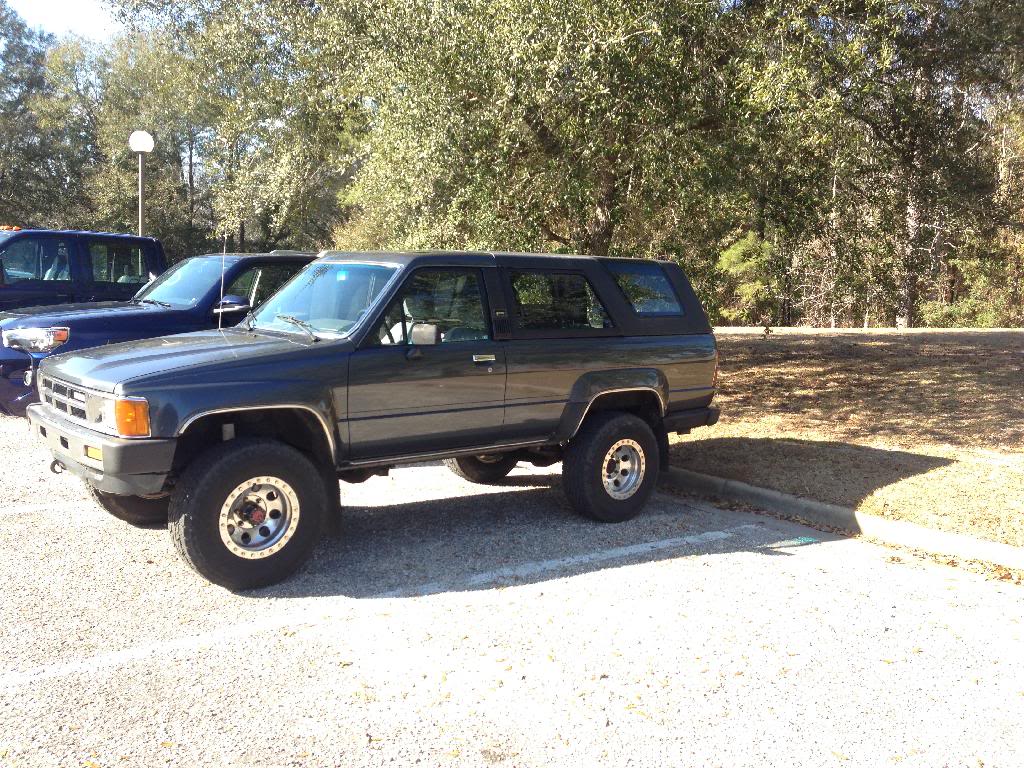
Hey! I got a new-to-me '85 4Runner yesterday, bought it from dragr1. It is in EXCELLENT shape!
So, most of the stuff I'll be doing will be minor restoration stuff. On my old 4Runner I really wanted to put a MS EFI set-up together, so I might do that down the road here. Also maybe an OME and some other little things.
I'll put some pictures up tomorrow, but today I ordered the grey paint from this thread: https://www.yotatech.com/forums/f116...on-how-167686/
Also got the oil changed and put about 50 miles on her!
Jan 25, 2014 | 07:19 PM
#2
CamTom12 I had to paint the rear panels in my Runner, same color, same fade.
I used a Valspar vinyl paint from Lowes. Turned out very well.
Fresh paint makes a huge difference.
an old tip from a detail shop is to use vinyl paint on the carpet to freshen it up too.
I used a Valspar vinyl paint from Lowes. Turned out very well.
Fresh paint makes a huge difference.
an old tip from a detail shop is to use vinyl paint on the carpet to freshen it up too.
Jan 26, 2014 | 01:54 PM
#3
Thread Starter
Registered User
Joined: May 2008
Posts: 523
Likes: 1
Erik, I looked through your thread the other day - nice truck!
I'm not 100% sure what I want to do with the carpet. Before I start messing with that I need to repair/replace the driver's seat though. It's been recovered or replaced with an off-match fabric at some point in the past, the frame is bent crooked, and the foam isn't doing it's job anymore anyway.
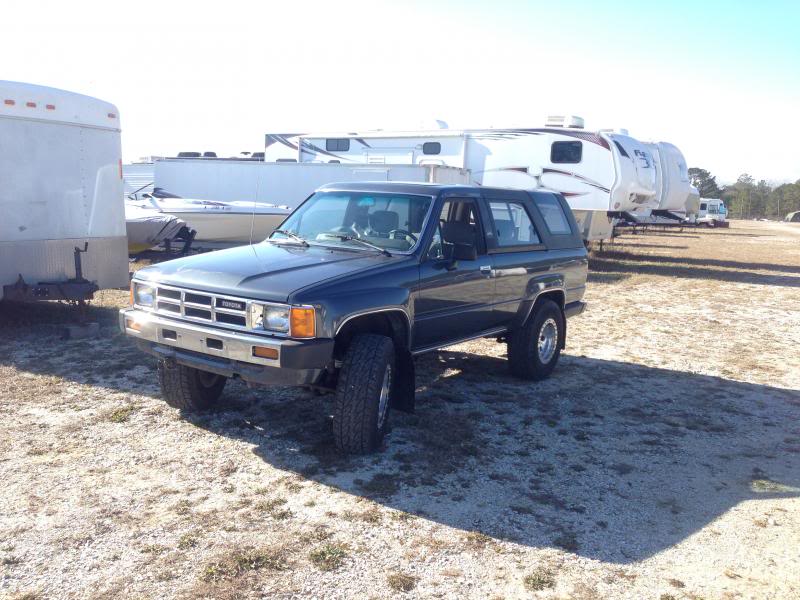
Here's a couple of pics! I didn't get any in detail, I'll make sure I do befores and afters for anything I repair.
I'm not 100% sure what I want to do with the carpet. Before I start messing with that I need to repair/replace the driver's seat though. It's been recovered or replaced with an off-match fabric at some point in the past, the frame is bent crooked, and the foam isn't doing it's job anymore anyway.
Here's a couple of pics! I didn't get any in detail, I'll make sure I do befores and afters for anything I repair.
Last edited by CamTom12; Nov 8, 2014 at 01:09 PM.
Jan 28, 2014 | 12:23 PM
#4
Thread Starter
Registered User
Joined: May 2008
Posts: 523
Likes: 1
Well, I also found a set of TJ front springs so I'll be doing a ZUK mod soon.
After talking with ZUK and taking some measurements, I want about 3" of lift in the back end to achieve a level/slight nose high look. The T100 at the bottom of ZUK's page (http://gearinstalls.com/coilphilbert.htm) got about 3" after cutting the TJ springs down to about 6 and a half wraps. I'm going to cut mine to 6.5 also and measure after the install. It'll be easy to pull them and cut a little more if it sits too high, I think. I should be able to get to it next week!
After talking with ZUK and taking some measurements, I want about 3" of lift in the back end to achieve a level/slight nose high look. The T100 at the bottom of ZUK's page (http://gearinstalls.com/coilphilbert.htm) got about 3" after cutting the TJ springs down to about 6 and a half wraps. I'm going to cut mine to 6.5 also and measure after the install. It'll be easy to pull them and cut a little more if it sits too high, I think. I should be able to get to it next week!

 Jan 28, 2014 | 04:47 PM
#6
Thread Starter
Registered User
Joined: May 2008
Posts: 523
Likes: 1
Thanks! Yeah, I lucked out - it's super clean!
We've been having a wintry mix just about all day. Next week I'll try to get some good pics of the truck. I'll for sure have good pics of any progress I make!
We've been having a wintry mix just about all day. Next week I'll try to get some good pics of the truck. I'll for sure have good pics of any progress I make!

Trending Topics
Feb 12, 2014 | 06:51 PM
#8
Thread Starter
Registered User
Joined: May 2008
Posts: 523
Likes: 1
Thanks!
I haven't updated this in a minute, been dealing with this pesky issue: https://www.yotatech.com/forums/f115...owhere-277459/
Anywho, the other day I snagged a set of TJ front springs and the 4Runner was mysteriously running normally so I rode down to the craft shop to put them in.
Not too hard of a job, I cut the springs down to 6.5 coils from the small end and ended up still having to use a spring compressor as well as unbolting the shocks and using a bottlejack to push the axle down.
Here's a couple shots of the springs on the bumpstops and a couple of after shots.
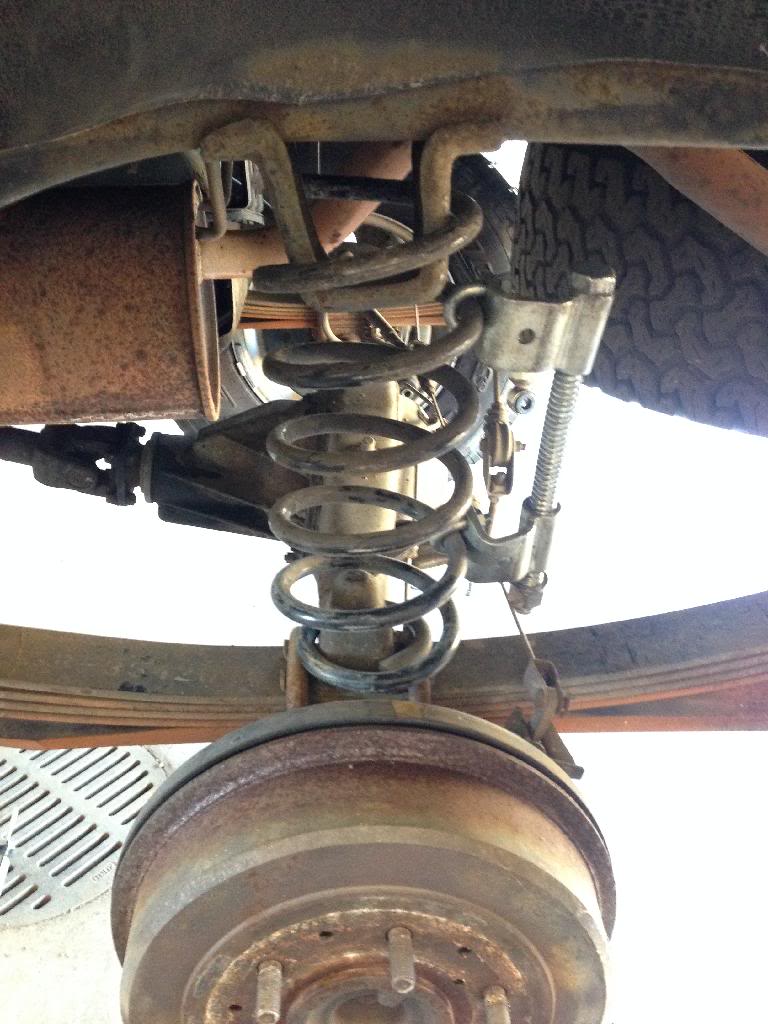
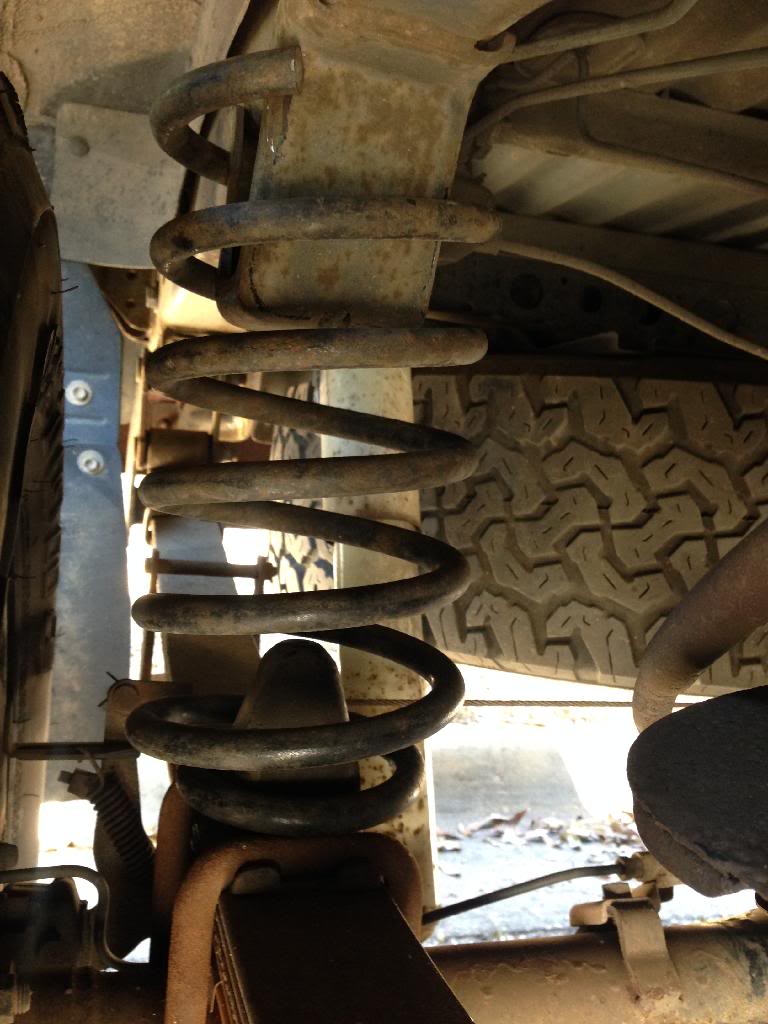
Waiting on a new coolant temp sensor in the mail, so I'm not sure how it rides yet until I get the issue in my other thread fixed. But I think it looks way better!!
I haven't updated this in a minute, been dealing with this pesky issue: https://www.yotatech.com/forums/f115...owhere-277459/
Anywho, the other day I snagged a set of TJ front springs and the 4Runner was mysteriously running normally so I rode down to the craft shop to put them in.
Not too hard of a job, I cut the springs down to 6.5 coils from the small end and ended up still having to use a spring compressor as well as unbolting the shocks and using a bottlejack to push the axle down.
Here's a couple shots of the springs on the bumpstops and a couple of after shots.
Waiting on a new coolant temp sensor in the mail, so I'm not sure how it rides yet until I get the issue in my other thread fixed. But I think it looks way better!!
Feb 13, 2014 | 05:16 AM
#9
Very nice, CamTom, I recently received a coolant temp sensor from RockAuto, my runner has not been idling up on a cold start. From what I've read that should fix my issue. Looking forward to your progress.
Our area currently under a state of emergency, around 10" of snow in some places. Sheww!
Our area currently under a state of emergency, around 10" of snow in some places. Sheww!
Feb 13, 2014 | 12:25 PM
#10
Thread Starter
Registered User
Joined: May 2008
Posts: 523
Likes: 1
Erik,
From all the researching and testing I've been doing to troubleshoot this problem, if you're not idling up I'd look toward your Aux Air Valve. The thing on page 227 here :http://www.functionalfab.com/resourc...%204runner.pdf
From all the researching and testing I've been doing to troubleshoot this problem, if you're not idling up I'd look toward your Aux Air Valve. The thing on page 227 here :http://www.functionalfab.com/resourc...%204runner.pdf
Feb 19, 2014 | 03:46 AM
#12
Nice looking little runner. The Zuk Mod does great and makes the ride so much better. It takes more time cleaning the panels then it does painting them. It has to be interior paint. I haven't used the brand in the link you provided but it is all the same. I clean my panels with a 50/50 solution of simple green and give them a good rinse. Interior paint works great when done right and gives a new look to the panels.
As far as your carpet, you would be surprised at just what pulling it out and taking it to a carwash can do for it. You will be shocked at all of the gunk in it as well. If you need to replace the carpet, I get mine from stockinteriors.com There are other places as well and for replacement carpet they do a good job of pressing all of the molds into place but there is a lot of trimming. Slow and steady on the trimming and it is easily done. Looking forward to your build.
As far as your carpet, you would be surprised at just what pulling it out and taking it to a carwash can do for it. You will be shocked at all of the gunk in it as well. If you need to replace the carpet, I get mine from stockinteriors.com There are other places as well and for replacement carpet they do a good job of pressing all of the molds into place but there is a lot of trimming. Slow and steady on the trimming and it is easily done. Looking forward to your build.
Feb 19, 2014 | 02:54 PM
#13
Thread Starter
Registered User
Joined: May 2008
Posts: 523
Likes: 1
Good news everyone! The CLT finally came in and I got it installed earlier. She's idling and running very well now.
EDIT: I almost forgot... I had to top off my brake reservoir today. The light was on for a few days but since I was working through those other issues I wasn't really driving it and am not sure when it started. I wonder if it had anything to do with the new position of the LSPV after the ZUK mod or if I have a leak... I'm keeping an eye on it for sure.
EDIT: I almost forgot... I had to top off my brake reservoir today. The light was on for a few days but since I was working through those other issues I wasn't really driving it and am not sure when it started. I wonder if it had anything to do with the new position of the LSPV after the ZUK mod or if I have a leak... I'm keeping an eye on it for sure.
Last edited by CamTom12; Feb 19, 2014 at 03:01 PM.
Feb 20, 2014 | 06:37 AM
#15
Good news everyone! The CLT finally came in and I got it installed earlier. She's idling and running very well now.
EDIT: I almost forgot... I had to top off my brake reservoir today. The light was on for a few days but since I was working through those other issues I wasn't really driving it and am not sure when it started. I wonder if it had anything to do with the new position of the LSPV after the ZUK mod or if I have a leak... I'm keeping an eye on it for sure.
EDIT: I almost forgot... I had to top off my brake reservoir today. The light was on for a few days but since I was working through those other issues I wasn't really driving it and am not sure when it started. I wonder if it had anything to do with the new position of the LSPV after the ZUK mod or if I have a leak... I'm keeping an eye on it for sure.
I would agree with Terry and also look for a leak.
Mar 2, 2014 | 04:59 PM
#16
Thread Starter
Registered User
Joined: May 2008
Posts: 523
Likes: 1
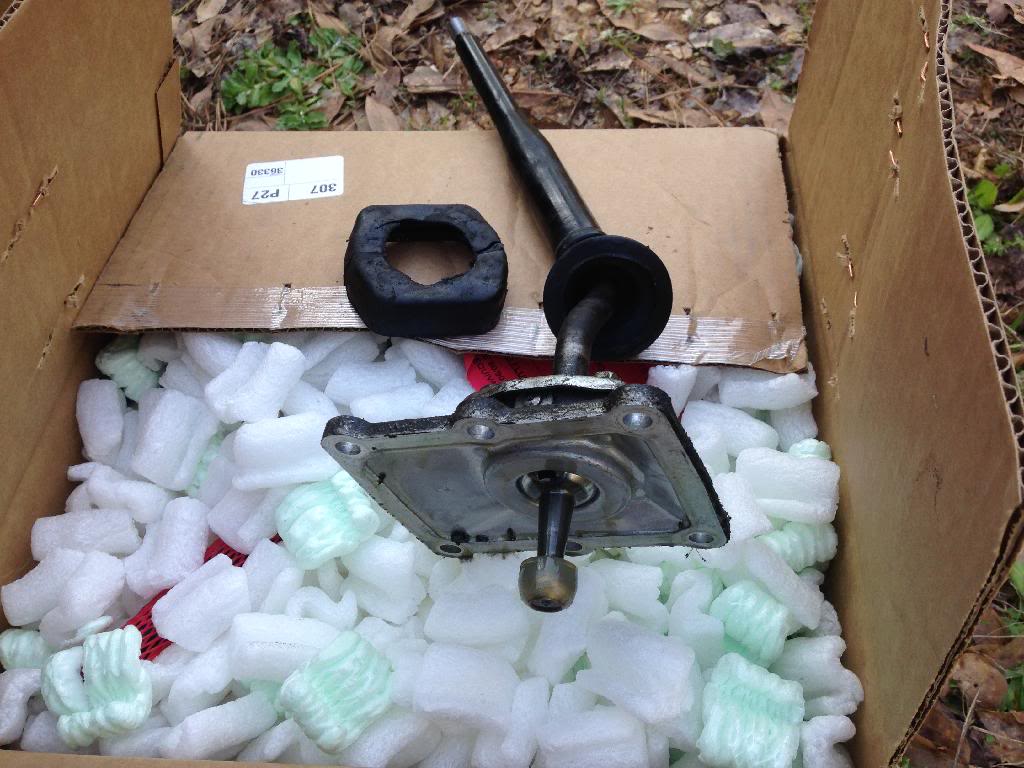
Installed my marlin short shifter today!
Here's a rough write-up:
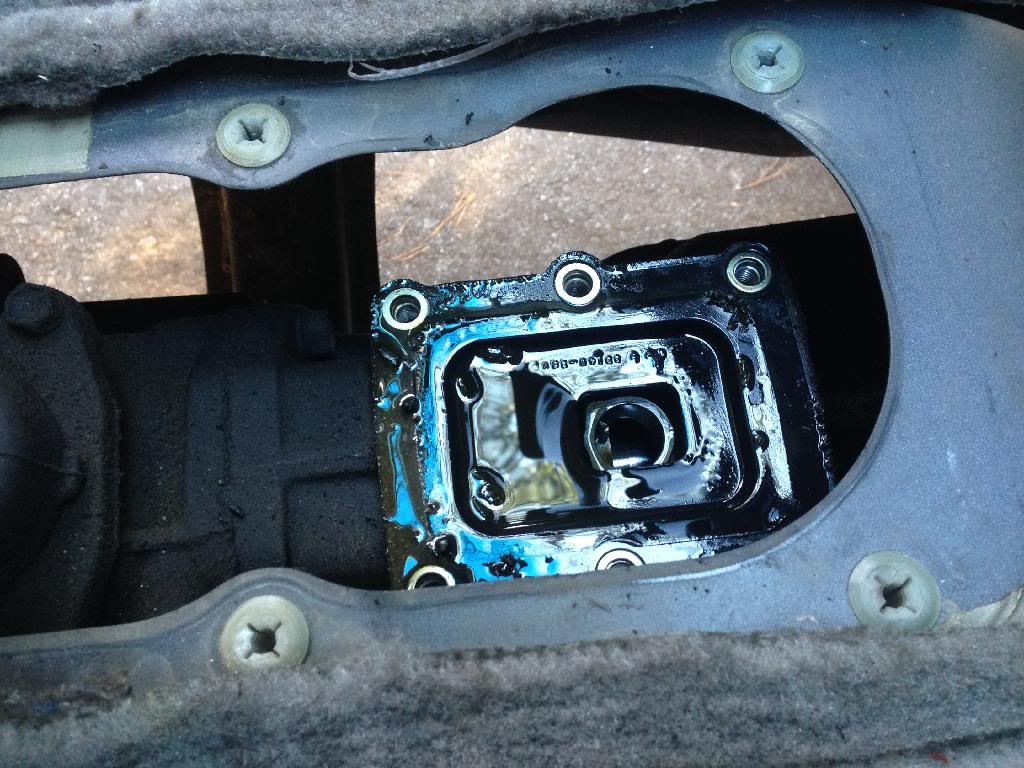
Step one, remove the front console around the shifters. 4 screws and unscrewing the shift knobs, no biggie. Next, remove the rubber boots from over the shifters. 6 screws. Easy. Next there's 6 bolts around the shifter base. Here's mine after removal.
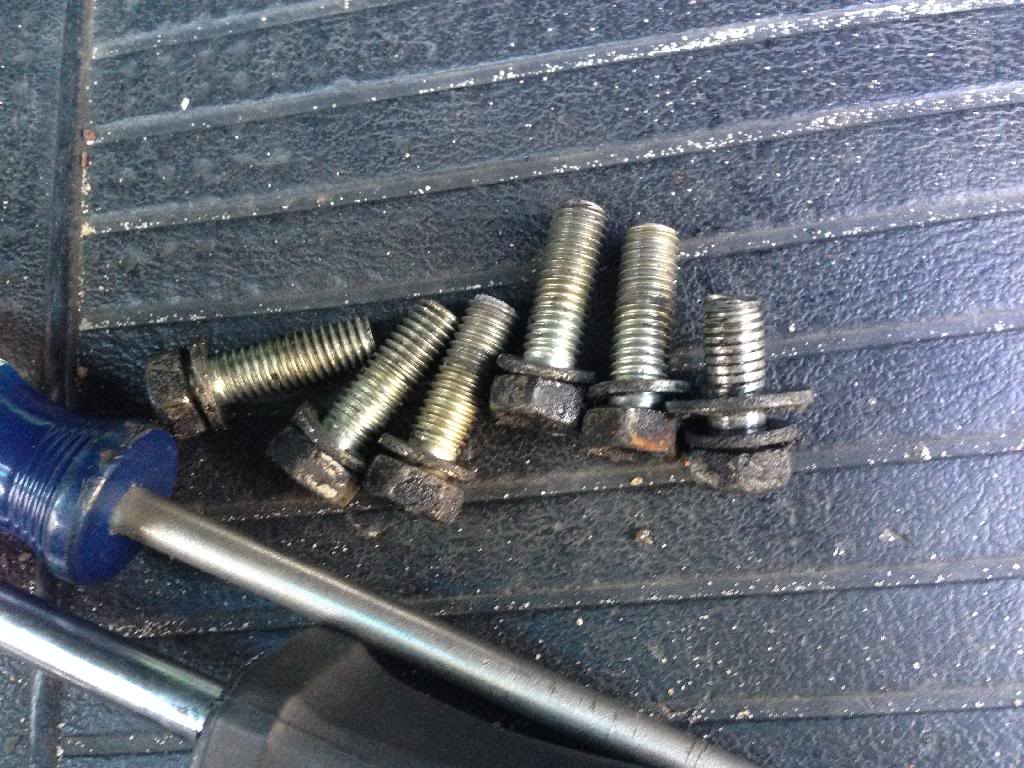
One of these is not like the others... Oddly enough, the hole was fine, just this bolt was ripped apart and had jacked up threads.
So then the base comes off (I left my shifter attached.
And there's a gasket between the shifter base and the trans. I cleaned mine up with a shop towel and set it aside for reinstallation.
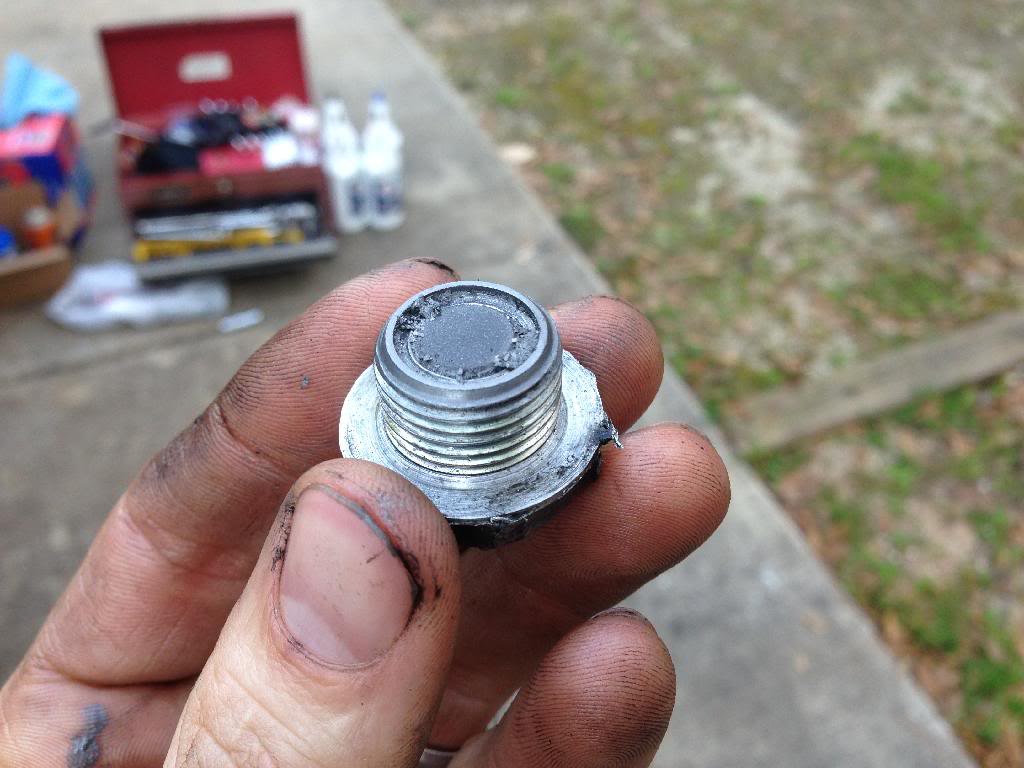
Then I drained my trans fluid. It had the consistency of dirty dishwater. Here's a picture of the drain plug before and after cleaning.

I couldn't get the fill plug out to check the level, so I matched the amount of oil I removed plus a little extra through the shifter hole. I used 85-140 and Lucas stabilizer.
Then the new shifter base and shifter mounted up nicely!
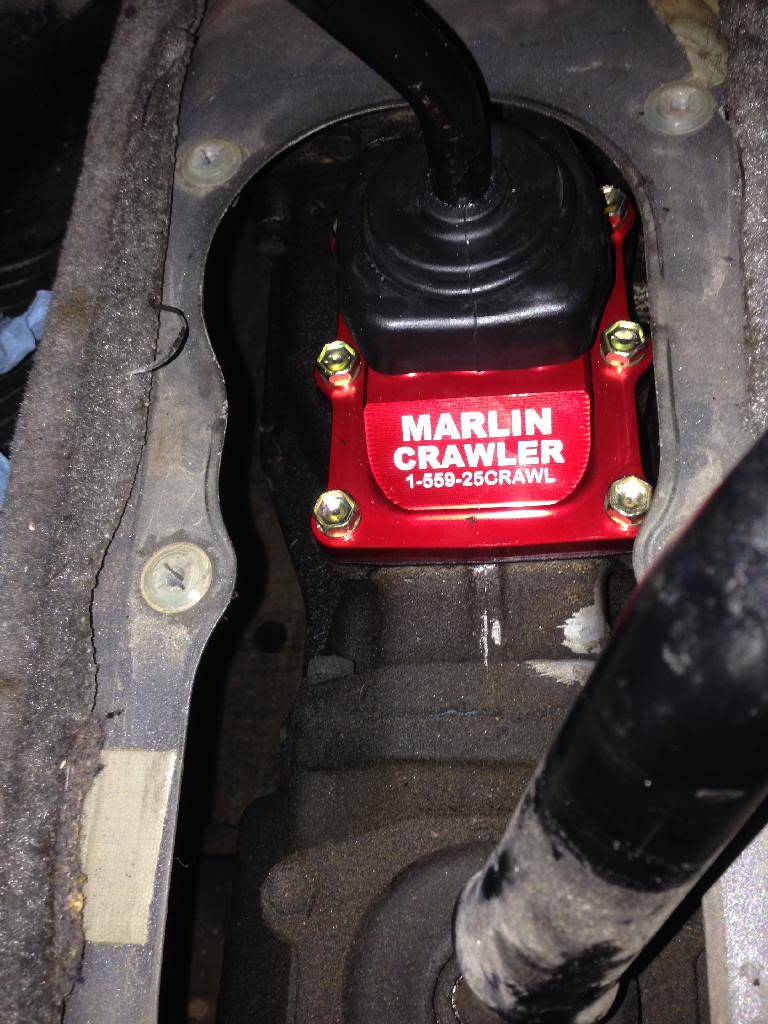
It's too bad I had to cover it up, it looks sharp!
Drove around a little. The throw is definitely shortened. My trans must have weak centering springs because (it did this with the old shifter as well) every once and again it gets stuck on the gate between 1-3 from 2nd gear. Not an issue. I used some Lucas grease on the poly bushings when I put it together so as I continue to shift I'll bet it finds a groove. I'm really happy about the new firm shift feel!
Here's a rough write-up:
Step one, remove the front console around the shifters. 4 screws and unscrewing the shift knobs, no biggie. Next, remove the rubber boots from over the shifters. 6 screws. Easy. Next there's 6 bolts around the shifter base. Here's mine after removal.
One of these is not like the others... Oddly enough, the hole was fine, just this bolt was ripped apart and had jacked up threads.
So then the base comes off (I left my shifter attached.
And there's a gasket between the shifter base and the trans. I cleaned mine up with a shop towel and set it aside for reinstallation.
Then I drained my trans fluid. It had the consistency of dirty dishwater. Here's a picture of the drain plug before and after cleaning.
I couldn't get the fill plug out to check the level, so I matched the amount of oil I removed plus a little extra through the shifter hole. I used 85-140 and Lucas stabilizer.
Then the new shifter base and shifter mounted up nicely!
It's too bad I had to cover it up, it looks sharp!
Drove around a little. The throw is definitely shortened. My trans must have weak centering springs because (it did this with the old shifter as well) every once and again it gets stuck on the gate between 1-3 from 2nd gear. Not an issue. I used some Lucas grease on the poly bushings when I put it together so as I continue to shift I'll bet it finds a groove. I'm really happy about the new firm shift feel!
Mar 3, 2014 | 01:23 PM
#18
Thread Starter
Registered User
Joined: May 2008
Posts: 523
Likes: 1
It cuts a good couple of inches off the throw. Best part is it firms up the feel quite a bit.
ALSO WARNING! Do not use Lucas additive and 85/140! It was like shifting in molasses. I grabbed some pennzoil synchromesh because it specifically said it was designed for yellow metals (like brass, etc.) and it feels way better. My centering springs might be weak, but the sludge I had in there was way too thick for them to fight through. Seems much better now, but I haven't driven it since the fluid swap. Just sat in the seat shifting gears and making engine noises :-D
ALSO WARNING! Do not use Lucas additive and 85/140! It was like shifting in molasses. I grabbed some pennzoil synchromesh because it specifically said it was designed for yellow metals (like brass, etc.) and it feels way better. My centering springs might be weak, but the sludge I had in there was way too thick for them to fight through. Seems much better now, but I haven't driven it since the fluid swap. Just sat in the seat shifting gears and making engine noises :-D


