
neockder's Ol Blue Build Thread
 Aug 31, 2011 | 10:40 PM
#1

Thread Starter
Registered User
Joined: Feb 2010
Posts: 124
Likes: 0
From: High Desert, OR
neockder's Ol Blue Build Thread
Well, I went one year without my 4Runner and couldn't take it! Cherry '89, wish I still had it but It's ok, deep down I wanted a sharknose anyway!

Now, its time for 'Ol Blue. I got her about a month ago, and am slowly making progress. I'll bring you up to speed.
Here's the beast, in all its Glory. This is a day or two after having it towed home. It sat on a farm here in CO for the last 5+ years apparently. Lots of war scars, but the Cancer is actually very minimal. Some in the rear bedseams that can probably be blasted away, and both floorboards need some replacement going on. Blue doesn't run, but will soon.. I think it's fuel related.


Interior is destroyed.. it will be hard not working on this first, running or not. Turns out I don't have any good full picture shots..


But First.. lets take a look at this motor. Doesn't turn over, but PO said he had it running a few weeks ago. 20R w 4spd. Pretty basic, no PS, but does have A/C woohoo! (Hurricane windows should do the trick alone though.)
Wish I would have gotten a picture before, but this is after at least an hour cleaning in there.

Started with the fuel filter and some fresh gas,. didn't do the trick. With a little starter fluid it wanted to go, but wouldn't keep. Fuel made it through the filter and to the pump, but wasn't getting to the carb. Time for a new fuel pump. By far easiest and cheapest fuel pump out there!
Might as well do that valve cover while waiting for the pump to arrive..

What?! Wait.. when removing the old fuel pump.. it looked as though the infeed was hooked up to the pump's vent line, and vice versa. I realized this when looking at the directions for the new pump. Did they honestly have the pump hooked up backwards somehow?! Crazy..
Intense cleaning for the valve cover and buttoned back up, with new pump in place. Once piece at a time this cleaning will go.. Life on the farm has proved dusty.. Inside and out!

Hook up the jumper cables..
Liberal Starter fluid blast..
She runs!!! About 10 mins of running, lots of smoke in the beginning, LOTS of carb adjusting.. and I think Blue could bear at least a short drive. Er.. at least the motor is ready for it!
Now, its time for 'Ol Blue. I got her about a month ago, and am slowly making progress. I'll bring you up to speed.
Here's the beast, in all its Glory. This is a day or two after having it towed home. It sat on a farm here in CO for the last 5+ years apparently. Lots of war scars, but the Cancer is actually very minimal. Some in the rear bedseams that can probably be blasted away, and both floorboards need some replacement going on. Blue doesn't run, but will soon.. I think it's fuel related.
Interior is destroyed.. it will be hard not working on this first, running or not. Turns out I don't have any good full picture shots..
But First.. lets take a look at this motor. Doesn't turn over, but PO said he had it running a few weeks ago. 20R w 4spd. Pretty basic, no PS, but does have A/C woohoo! (Hurricane windows should do the trick alone though.)
Wish I would have gotten a picture before, but this is after at least an hour cleaning in there.
Started with the fuel filter and some fresh gas,. didn't do the trick. With a little starter fluid it wanted to go, but wouldn't keep. Fuel made it through the filter and to the pump, but wasn't getting to the carb. Time for a new fuel pump. By far easiest and cheapest fuel pump out there!
Might as well do that valve cover while waiting for the pump to arrive..
What?! Wait.. when removing the old fuel pump.. it looked as though the infeed was hooked up to the pump's vent line, and vice versa. I realized this when looking at the directions for the new pump. Did they honestly have the pump hooked up backwards somehow?! Crazy..
Intense cleaning for the valve cover and buttoned back up, with new pump in place. Once piece at a time this cleaning will go.. Life on the farm has proved dusty.. Inside and out!
Hook up the jumper cables..
Liberal Starter fluid blast..
She runs!!! About 10 mins of running, lots of smoke in the beginning, LOTS of carb adjusting.. and I think Blue could bear at least a short drive. Er.. at least the motor is ready for it!
Aug 31, 2011 | 11:01 PM
#2
Thread Starter
Registered User
Joined: Feb 2010
Posts: 124
Likes: 0
From: High Desert, OR
Update: Picked up some goodies.
Local yard had 3, but only one '80. Turns out this '80 has a 20R with power steering! I shouldn't get too excited yet, haven't driven it yet..
Anyways, I got the whole setup:
-reservoir, mini rad, all the lines, pump + brackets, and gear box + arm.
Here's what it looks like (+ the old gear box)

I started with removing the old gearbox, and figured working my way up would make sense. I've never seen a joint like the pitman arm's, clever - but not ideal.
New gear and reservoir in; where is the reservoir supposed to bolt? It would fit perfectly over the regulator next to where I have it bolted, but it contacts the coil = / Any ideas?


Hmm, apparently at this point Toyota was still figuring out how to spell its name in English! Edit: Their CEO right now is named Akio Toyoda? nice.

Local yard had 3, but only one '80. Turns out this '80 has a 20R with power steering! I shouldn't get too excited yet, haven't driven it yet..
Anyways, I got the whole setup:
-reservoir, mini rad, all the lines, pump + brackets, and gear box + arm.
Here's what it looks like (+ the old gear box)
I started with removing the old gearbox, and figured working my way up would make sense. I've never seen a joint like the pitman arm's, clever - but not ideal.
New gear and reservoir in; where is the reservoir supposed to bolt? It would fit perfectly over the regulator next to where I have it bolted, but it contacts the coil = / Any ideas?
Hmm, apparently at this point Toyota was still figuring out how to spell its name in English! Edit: Their CEO right now is named Akio Toyoda? nice.
Last edited by neockder; Oct 19, 2011 at 09:12 PM.
Aug 31, 2011 | 11:14 PM
#3
Thread Starter
Registered User
Joined: Feb 2010
Posts: 124
Likes: 0
From: High Desert, OR
There's a bracket that wraps around that coolant line, quite possibly the most time consuming part is getting that in.

Got all 3 pulleys in, brackets fastened down, and lines all snug. You'll want to remove the skid plate and distributor to do this, but that's literally all I had to remove..
I put in a new alt belt while I was down there, A/C and P/S belts to come still.


You won't need all these, but this is what I used. It's funny, because all german cars use odd millimeter bolts, ex: 13mm and 15mm. So far the Yotas are all 12mm and 14mm! Giving those sockets some room to stretch

Got all 3 pulleys in, brackets fastened down, and lines all snug. You'll want to remove the skid plate and distributor to do this, but that's literally all I had to remove..
I put in a new alt belt while I was down there, A/C and P/S belts to come still.
You won't need all these, but this is what I used. It's funny, because all german cars use odd millimeter bolts, ex: 13mm and 15mm. So far the Yotas are all 12mm and 14mm! Giving those sockets some room to stretch
Last edited by neockder; Aug 31, 2011 at 11:17 PM.
Sep 1, 2011 | 10:46 AM
#4

Registered User
Joined: Jan 2011
Posts: 193
Likes: 0
From: Center Point, La
looking good. The power steering will make a world of a difference.....When i did the P.S. conversion on my '80 i mounted the reservoir in between the coil and the washer fluid reservoir (that's where it supposed to go) so you got it in the right place. And when i installed the bracket, i just took the fan shroud and fan clutch out to reach all the bolts. This made it much easier to put on the bottom P.S. pully on the crank. I did not have to remove the distributor or skid plate..
Sep 10, 2011 | 09:03 PM
#5
Thread Starter
Registered User
Joined: Feb 2010
Posts: 124
Likes: 0
From: High Desert, OR
looking good. The power steering will make a world of a difference.....When i did the P.S. conversion on my '80 i mounted the reservoir in between the coil and the washer fluid reservoir (that's where it supposed to go) so you got it in the right place. And when i installed the bracket, i just took the fan shroud and fan clutch out to reach all the bolts. This made it much easier to put on the bottom P.S. pully on the crank. I did not have to remove the distributor or skid plate..
Minor updates.. not quite ready to unveil the interior, as its still underway. I am having issues with the power steering pressure line connection at the gear box. I've removed the brass coupler, cleaned it entirely, as well as the surface it mates to in the box, and the surface of the p/s line. No matter what, I can't get it to stop leaking from in between the line and the nut fastening it down. All the surfaces seem to mate fine. Both ends of the p/s line are the same, so I swapped the line and tried the other end in the box, and the leaking end in the pump. The pump side Still doesn't leak, but the box side is. Anyone had this problem before and fixed it?
When hooked up, it seems as though everything's working as it should - aside from p/s fluid spraying out! It looks like it's hitting the belt, so it convieniently gets EVERYwhere.
 Sep 11, 2011 | 02:11 PM
#7
Thread Starter
Registered User
Joined: Feb 2010
Posts: 124
Likes: 0
From: High Desert, OR
Pulled everything apart.. Cleaned it all up, put it all back together again. Turned the wheel back and forth while running..
Pump is leaking BAD. I think that it was leaking onto the pressure line, and traveling down to the fitting, making it look like the fitting was leaking.
Going to get a new pump and see if that fixes it!
Pump is leaking BAD. I think that it was leaking onto the pressure line, and traveling down to the fitting, making it look like the fitting was leaking.
Going to get a new pump and see if that fixes it!
Trending Topics
 Sep 11, 2011 | 09:59 PM
#9
Thread Starter
Registered User
Joined: Feb 2010
Posts: 124
Likes: 0
From: High Desert, OR
So.. on to the interior, which needs a ton of work. As I'll need the truck drive-able in a few weeks for emissions, this will have to happen in stages. First part.. fix up/clean up/paint what I can for now. Bedliner under and behind seats, eventually the front floors will be covered as well. And then carpet. No rust in this rear section so it was nearly ready for the bedliner.

http://i574.photobucket.com/albums/s...p/IMG_0304.jpg
I went with the cheapest spray on, and it shows. I'll probably respray the rear section when I do the front.
Dash time. Two coats of black, and two coats of satin clear. Looks good! It will need some touching up in a few spots (after I swap to the sr5 cluster i just got).

Not much to these things

Before:
And After (with coverlay dashcap; I also put in a cigarette lighter, and some cuts of burber for the floors until they're replaced):

I still need to paint the defrost area up by the winshield, but I plan on taking it out to do that. Anyone have a good reference for winshield gaskets? This is what I'm finding..
http://i574.photobucket.com/albums/s...p/IMG_0304.jpg
I went with the cheapest spray on, and it shows. I'll probably respray the rear section when I do the front.
Dash time. Two coats of black, and two coats of satin clear. Looks good! It will need some touching up in a few spots (after I swap to the sr5 cluster i just got).
Not much to these things
Before:
And After (with coverlay dashcap; I also put in a cigarette lighter, and some cuts of burber for the floors until they're replaced):
I still need to paint the defrost area up by the winshield, but I plan on taking it out to do that. Anyone have a good reference for winshield gaskets? This is what I'm finding..
Last edited by neockder; Sep 11, 2011 at 10:01 PM.
Sep 11, 2011 | 10:35 PM
#10
Thread Starter
Registered User
Joined: Feb 2010
Posts: 124
Likes: 0
From: High Desert, OR
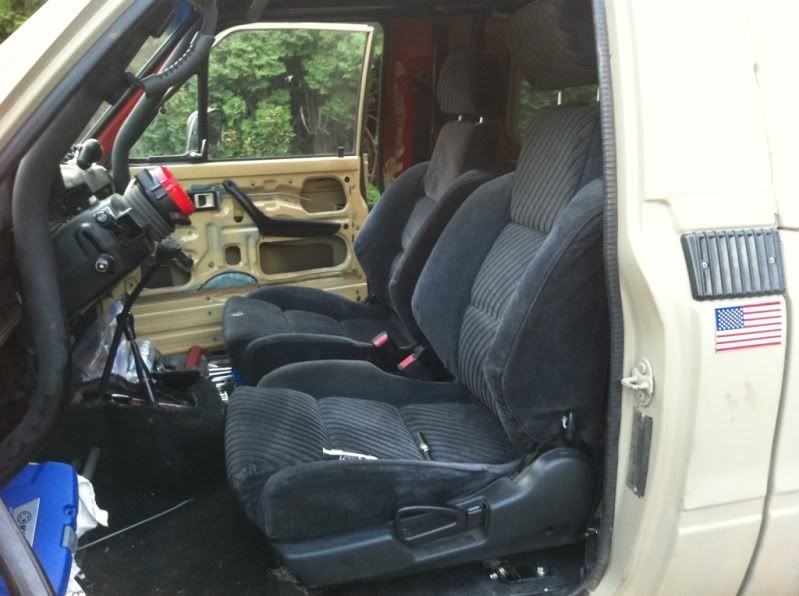
Seats. Well, I had some e36 3 series tan pleather seats that were awesome, but the lowest setting was just a bit too tall for me. Second swing, I went to the local Honda yard to see what they had. Found a Cherry set of black '91 Prelude seats. Ghetto fantasically agressive and the driver's bolsters adjust in and out. Pretty sweet. They do provide tons of space compared to whatever else you could fit in this truck; sits low, and has a fairly thin back. Flip forward is nice as well. One downside, they don't have power functions - I like putting the front lip of the seat all the way up, and the ass down.
I used some.. i think 1.5" angle iron (old bed frame!) and beat it so the angle matched the seat rails, so I could use the stock bolt holes.

With more material I could use this BMW seat hole I drilled Probably just body fill it.

Surprisingly the Prelude seat bracket fit right onto the seat rail in front on both sides.


Mine came with a bench, so holes had to be drilled for the inside bolts. I mounted the seats pretty far out so I can later fit a nice center console in (tuffy perhaps). The driver's seat is about 3/4" off of center from the steering wheel, and I'm ocd enough that I thought it would bug me. Turns out I don't even notice it when driving.


I used some.. i think 1.5" angle iron (old bed frame!) and beat it so the angle matched the seat rails, so I could use the stock bolt holes.
With more material I could use this BMW seat hole I drilled
Probably just body fill it.Surprisingly the Prelude seat bracket fit right onto the seat rail in front on both sides.
Mine came with a bench, so holes had to be drilled for the inside bolts. I mounted the seats pretty far out so I can later fit a nice center console in (tuffy perhaps). The driver's seat is about 3/4" off of center from the steering wheel, and I'm ocd enough that I thought it would bug me. Turns out I don't even notice it when driving.
Oct 19, 2011 | 09:53 PM
#12
Thread Starter
Registered User
Joined: Feb 2010
Posts: 124
Likes: 0
From: High Desert, OR
looking good. The power steering will make a world of a difference.....When i did the P.S. conversion on my '80 i mounted the reservoir in between the coil and the washer fluid reservoir (that's where it supposed to go) so you got it in the right place. And when i installed the bracket, i just took the fan shroud and fan clutch out to reach all the bolts. This made it much easier to put on the bottom P.S. pully on the crank. I did not have to remove the distributor or skid plate..
2 Trips, $40 later - another project! Maybe I can make something less hideous out of this..


On to the next project:
New windshield! I ended up getting an $80 discount for taking the glass out myself. I needed to do some work up there anyways..
The mounting screws for the defrost ducts had separated from the ducts themselves.. so I ran a bead of silicone. Then, screened the vents. Do SR5s have vent covers at all, or was mine just missing something? Seems like their should be something there..
Here it is:


Filling the cracks and sanding out the original dash, almost essential for these dash caps it seems.

New windshield pics soon.. and no more cell phone pics!
Next step: Used 31x11.50 Interco TSLs
 Oct 20, 2011 | 12:05 AM
#13
Second swing, I went to the local Honda yard to see what they had. Found a Cherry set of black '91 Prelude seats. Ghetto fantasically agressive and the driver's bolsters adjust in and out. Pretty sweet. They do provide tons of space compared to whatever else you could fit in this truck; sits low, and has a fairly thin back. Flip forward is nice as well. One downside, they don't have power functions - I like putting the front lip of the seat all the way up, and the ass down.

edit: I would consider adding a fender washer under your spacer so that it doesn't push through the floor:
for your dash pad, you might consider fiberglass, I picked up a junkyard dash pad and am planning on trying something like Corax did in this thread
Last edited by dropzone; Oct 20, 2011 at 12:08 AM.
Feb 20, 2012 | 09:07 PM
#16
Thread Starter
Registered User
Joined: Feb 2010
Posts: 124
Likes: 0
From: High Desert, OR
Sorry I've been lagging on this.. lots has happened since last post.
Haha! Yep those be them. I totally agree about the fender washer. This was just to get it roadworthy. Friend of mine will be replacing some small sections of floor near the body mounts, at which time I'll beef up the mounts and probably tack the nuts to the underside and undercoat.
There was an '82 that I pulled some interior parts from at a local yard. I know the yard owners and this was a local pickup that rolled on its top coming down the canyon. This guy put a lot into his and one could tell it at one time was a sweet pickup. Anyways, his dash pad was stitched leather, still in pretty good shape but I need to go back and take another look. I'm not sure if it was aftermarket or a special dash, but I've never seen anything but stock on these - blue, tan and the occasional black.
Yep! I thought about putting them on the BMW for a minute..

Sorry this is the only pic I have, via phone. I'll take more soon.

Yep, love these seats. They're the best alternative for buckets for several reasons, the biggest being space. I plan on remedying that at some point though. If you had low back buckets, that's the only way you're going to get more room than these. The back of the prelude seats comes to a pretty thin point before meeting the headrest, allowing for the most room in the cab.
On to new things.. coming up shortly!
thought those seats looked familar
edit: I would consider adding a fender washer under your spacer so that it doesn't push through the floor:
for your dash pad, you might consider fiberglass, I picked up a junkyard dash pad and am planning on trying something like Corax did in this thread
edit: I would consider adding a fender washer under your spacer so that it doesn't push through the floor:
for your dash pad, you might consider fiberglass, I picked up a junkyard dash pad and am planning on trying something like Corax did in this thread
There was an '82 that I pulled some interior parts from at a local yard. I know the yard owners and this was a local pickup that rolled on its top coming down the canyon. This guy put a lot into his and one could tell it at one time was a sweet pickup. Anyways, his dash pad was stitched leather, still in pretty good shape but I need to go back and take another look. I'm not sure if it was aftermarket or a special dash, but I've never seen anything but stock on these - blue, tan and the occasional black.
Yep! I thought about putting them on the BMW for a minute..
Sorry this is the only pic I have, via phone. I'll take more soon.
On to new things.. coming up shortly!
Last edited by neockder; Feb 20, 2012 at 09:08 PM.
Feb 21, 2012 | 12:24 AM
#17
Thread Starter
Registered User
Joined: Feb 2010
Posts: 124
Likes: 0
From: High Desert, OR
This truck was running, but running like crap. And I couldn't get the carb to respond to any adjustments, or come close to passing emissions, and my temp plates were about to expire!
- I had the valves and timing adjusted,
- performed an awesome Seafoam treatment >> This is an awesome writeup <<
- Burned through some tanks of gas (remember this truck has been sitting since who knows when [on a farm])
The pickup is running great now, just a slight valve tick (which almost seems normal but hey, I'm used to old bmws) but with the stock carb it's still running ridiculously rich.
On to the carb.. the PO 'rebuilt' the carb, which probably made it even worse. Local shop found a pinhole in a diaphragm but that still didn't do the trick. Took the HCs from 2000 to 600; I can't remember but to pass emmisions it was like 150. The carb also wouldn't respond to the idle adjustment, so it was time for a change.
Got this sucker for $180. Essentially new, but the CL ad said 32/36, but it's actually a 38. Stood for some barganing ground, but I still haven't calculated my mpgs. It ran at .37 HCs after install!

I'd like to keep all the pics high res in this album, so I've attached a link to the album >>> Pics HERE <<<<
This shows a BONE STOCK setup; vaccum, smog, and everything else. I'll post pics soon of the new setup with Weber installed, and what tricks I did to make it look like all of the emissions systems were installed and operational (CO law). This will be a great resource for those of you that want the weber, but also need to pass a visual inspection!
- I had the valves and timing adjusted,
- performed an awesome Seafoam treatment >> This is an awesome writeup <<
- Burned through some tanks of gas (remember this truck has been sitting since who knows when [on a farm])
The pickup is running great now, just a slight valve tick (which almost seems normal but hey, I'm used to old bmws) but with the stock carb it's still running ridiculously rich.
On to the carb.. the PO 'rebuilt' the carb, which probably made it even worse. Local shop found a pinhole in a diaphragm but that still didn't do the trick. Took the HCs from 2000 to 600; I can't remember but to pass emmisions it was like 150. The carb also wouldn't respond to the idle adjustment, so it was time for a change.
Got this sucker for $180. Essentially new, but the CL ad said 32/36, but it's actually a 38. Stood for some barganing ground, but I still haven't calculated my mpgs. It ran at .37 HCs after install!
I'd like to keep all the pics high res in this album, so I've attached a link to the album >>> Pics HERE <<<<
This shows a BONE STOCK setup; vaccum, smog, and everything else. I'll post pics soon of the new setup with Weber installed, and what tricks I did to make it look like all of the emissions systems were installed and operational (CO law). This will be a great resource for those of you that want the weber, but also need to pass a visual inspection!
Last edited by neockder; Feb 21, 2012 at 12:33 AM.
Apr 24, 2012 | 12:31 AM
#18
Thread Starter
Registered User
Joined: Feb 2010
Posts: 124
Likes: 0
From: High Desert, OR
So.. I’m going to jump around a little bit, and fill in the second half of each project as they are completed! So many unfinished projects, but I need to get ol Blue back on the road – so for now..
A new front axle! My stock axle has drum brakes up front =/ A spring broke or a wheel cylinder is bad, as the brake is holding up after stopping and takes more effort to get going again. Pretty sure it’s coming from the front, but I’ll do the rear at the same time.
So, as I need new brakes, I’m thinking,. Why not upgrade to disc? The axle is in dire need of a knuckle rebuild as well,. Hmm, might as well pull it and paint it. Oh man it could use some new springs, bushings, and rod ends too! Oh crap, entire overhaul it is HA.
I found an axle on craigslist, he said everthing turned freely when it was pulled, but frozen when I picked it up. Figured the calipers were holding it up and sure enough it spins. I had my fingers crossed it had stock gearing, turns out it has 5.71s?!
I originally bought it for just the outers, thinking that I’d upgrade to discs and be done with it. Then I started to research.. And looking at those tiny stock discs, and probably defunct calipers, I figured I’d shoot the moon. I picked ’83 LC rotors, ’94 V6 4R calipers and pads.
I went as far as toying with IFS hubs, but I think I’ve come to the consensus (with myself apparently) that it’s not worth it. As far as I can tell, the wheel studs don’t even go through the rotor? Hmm.. I can definitely picture 2 bolts shearing off at some point.. If I upgrade to a 58” rear, then I’ll just run some spacers.
Scary Pic of IFS hub install from another thread.

So many wrongs I don’t want to pick it apart.. [edit]: my '80 hubs are similar, but use SIX bolts to hold the rotor on..
That FROR sealed kit is interesting though, but you lose connection with what these axles were. If I want to work on sealed bearings then I’d buy an old BMW! Also it's expensive.
So like everything else,. It’s a work in progress! Wish I had a pick of the ugly axle from the beginning.. I tore it all the way down without taking any pics.. I’ll outline the buildup, and differences between Drum and Disc outers when I tear down the Drum axle.


The third member was extremely difficult to remove from the housing. Kept getting stuck on two places inaccessible, I ended up hanging the third and beating the housing to pop it off. It didn't take much with that method, but took forever trying everything else!

Knuckles, wheel hubs, spindles, etc. All cleaned up, painted, and ready to rock. Those knuckles took like an hour a piece! I'm pretty sure dirt was starting to petrify. Do I spy some '94 4R Calipers?

To be continued..
A new front axle! My stock axle has drum brakes up front =/ A spring broke or a wheel cylinder is bad, as the brake is holding up after stopping and takes more effort to get going again. Pretty sure it’s coming from the front, but I’ll do the rear at the same time.
So, as I need new brakes, I’m thinking,. Why not upgrade to disc? The axle is in dire need of a knuckle rebuild as well,. Hmm, might as well pull it and paint it. Oh man it could use some new springs, bushings, and rod ends too! Oh crap, entire overhaul it is HA.
I found an axle on craigslist, he said everthing turned freely when it was pulled, but frozen when I picked it up. Figured the calipers were holding it up and sure enough it spins. I had my fingers crossed it had stock gearing, turns out it has 5.71s?!
I originally bought it for just the outers, thinking that I’d upgrade to discs and be done with it. Then I started to research.. And looking at those tiny stock discs, and probably defunct calipers, I figured I’d shoot the moon. I picked ’83 LC rotors, ’94 V6 4R calipers and pads.
I went as far as toying with IFS hubs, but I think I’ve come to the consensus (with myself apparently) that it’s not worth it. As far as I can tell, the wheel studs don’t even go through the rotor? Hmm.. I can definitely picture 2 bolts shearing off at some point.. If I upgrade to a 58” rear, then I’ll just run some spacers.
Scary Pic of IFS hub install from another thread.
So many wrongs I don’t want to pick it apart.. [edit]: my '80 hubs are similar, but use SIX bolts to hold the rotor on..
That FROR sealed kit is interesting though, but you lose connection with what these axles were. If I want to work on sealed bearings then I’d buy an old BMW! Also it's expensive.
So like everything else,. It’s a work in progress! Wish I had a pick of the ugly axle from the beginning.. I tore it all the way down without taking any pics.. I’ll outline the buildup, and differences between Drum and Disc outers when I tear down the Drum axle.
The third member was extremely difficult to remove from the housing. Kept getting stuck on two places inaccessible, I ended up hanging the third and beating the housing to pop it off. It didn't take much with that method, but took forever trying everything else!
Knuckles, wheel hubs, spindles, etc. All cleaned up, painted, and ready to rock. Those knuckles took like an hour a piece! I'm pretty sure dirt was starting to petrify. Do I spy some '94 4R Calipers?
To be continued..
Last edited by neockder; Jun 4, 2012 at 10:41 PM.
Apr 26, 2012 | 04:11 PM
#20
Registered User
Joined: Dec 2011
Posts: 415
Likes: 1
From: 775 Reno Nevada
I love seeing old yotas brought back to life ! I also like seeing people actually do work and get dirty, bust out the grinders and welders and get down themselves. You have definatly turned it around. Interior looks great !
Last edited by 775Toy; Apr 26, 2012 at 04:12 PM.


