KawaZX636's 1983 Toyota Pickup Restoration

 06-10-2015, 10:56 AM
#1262
The tires look small on that Jeep but they were definitely at least 33's. He actually snapped the axle housing coming around a turn when he hit a big hole in the mud and SNAP...there she goes!
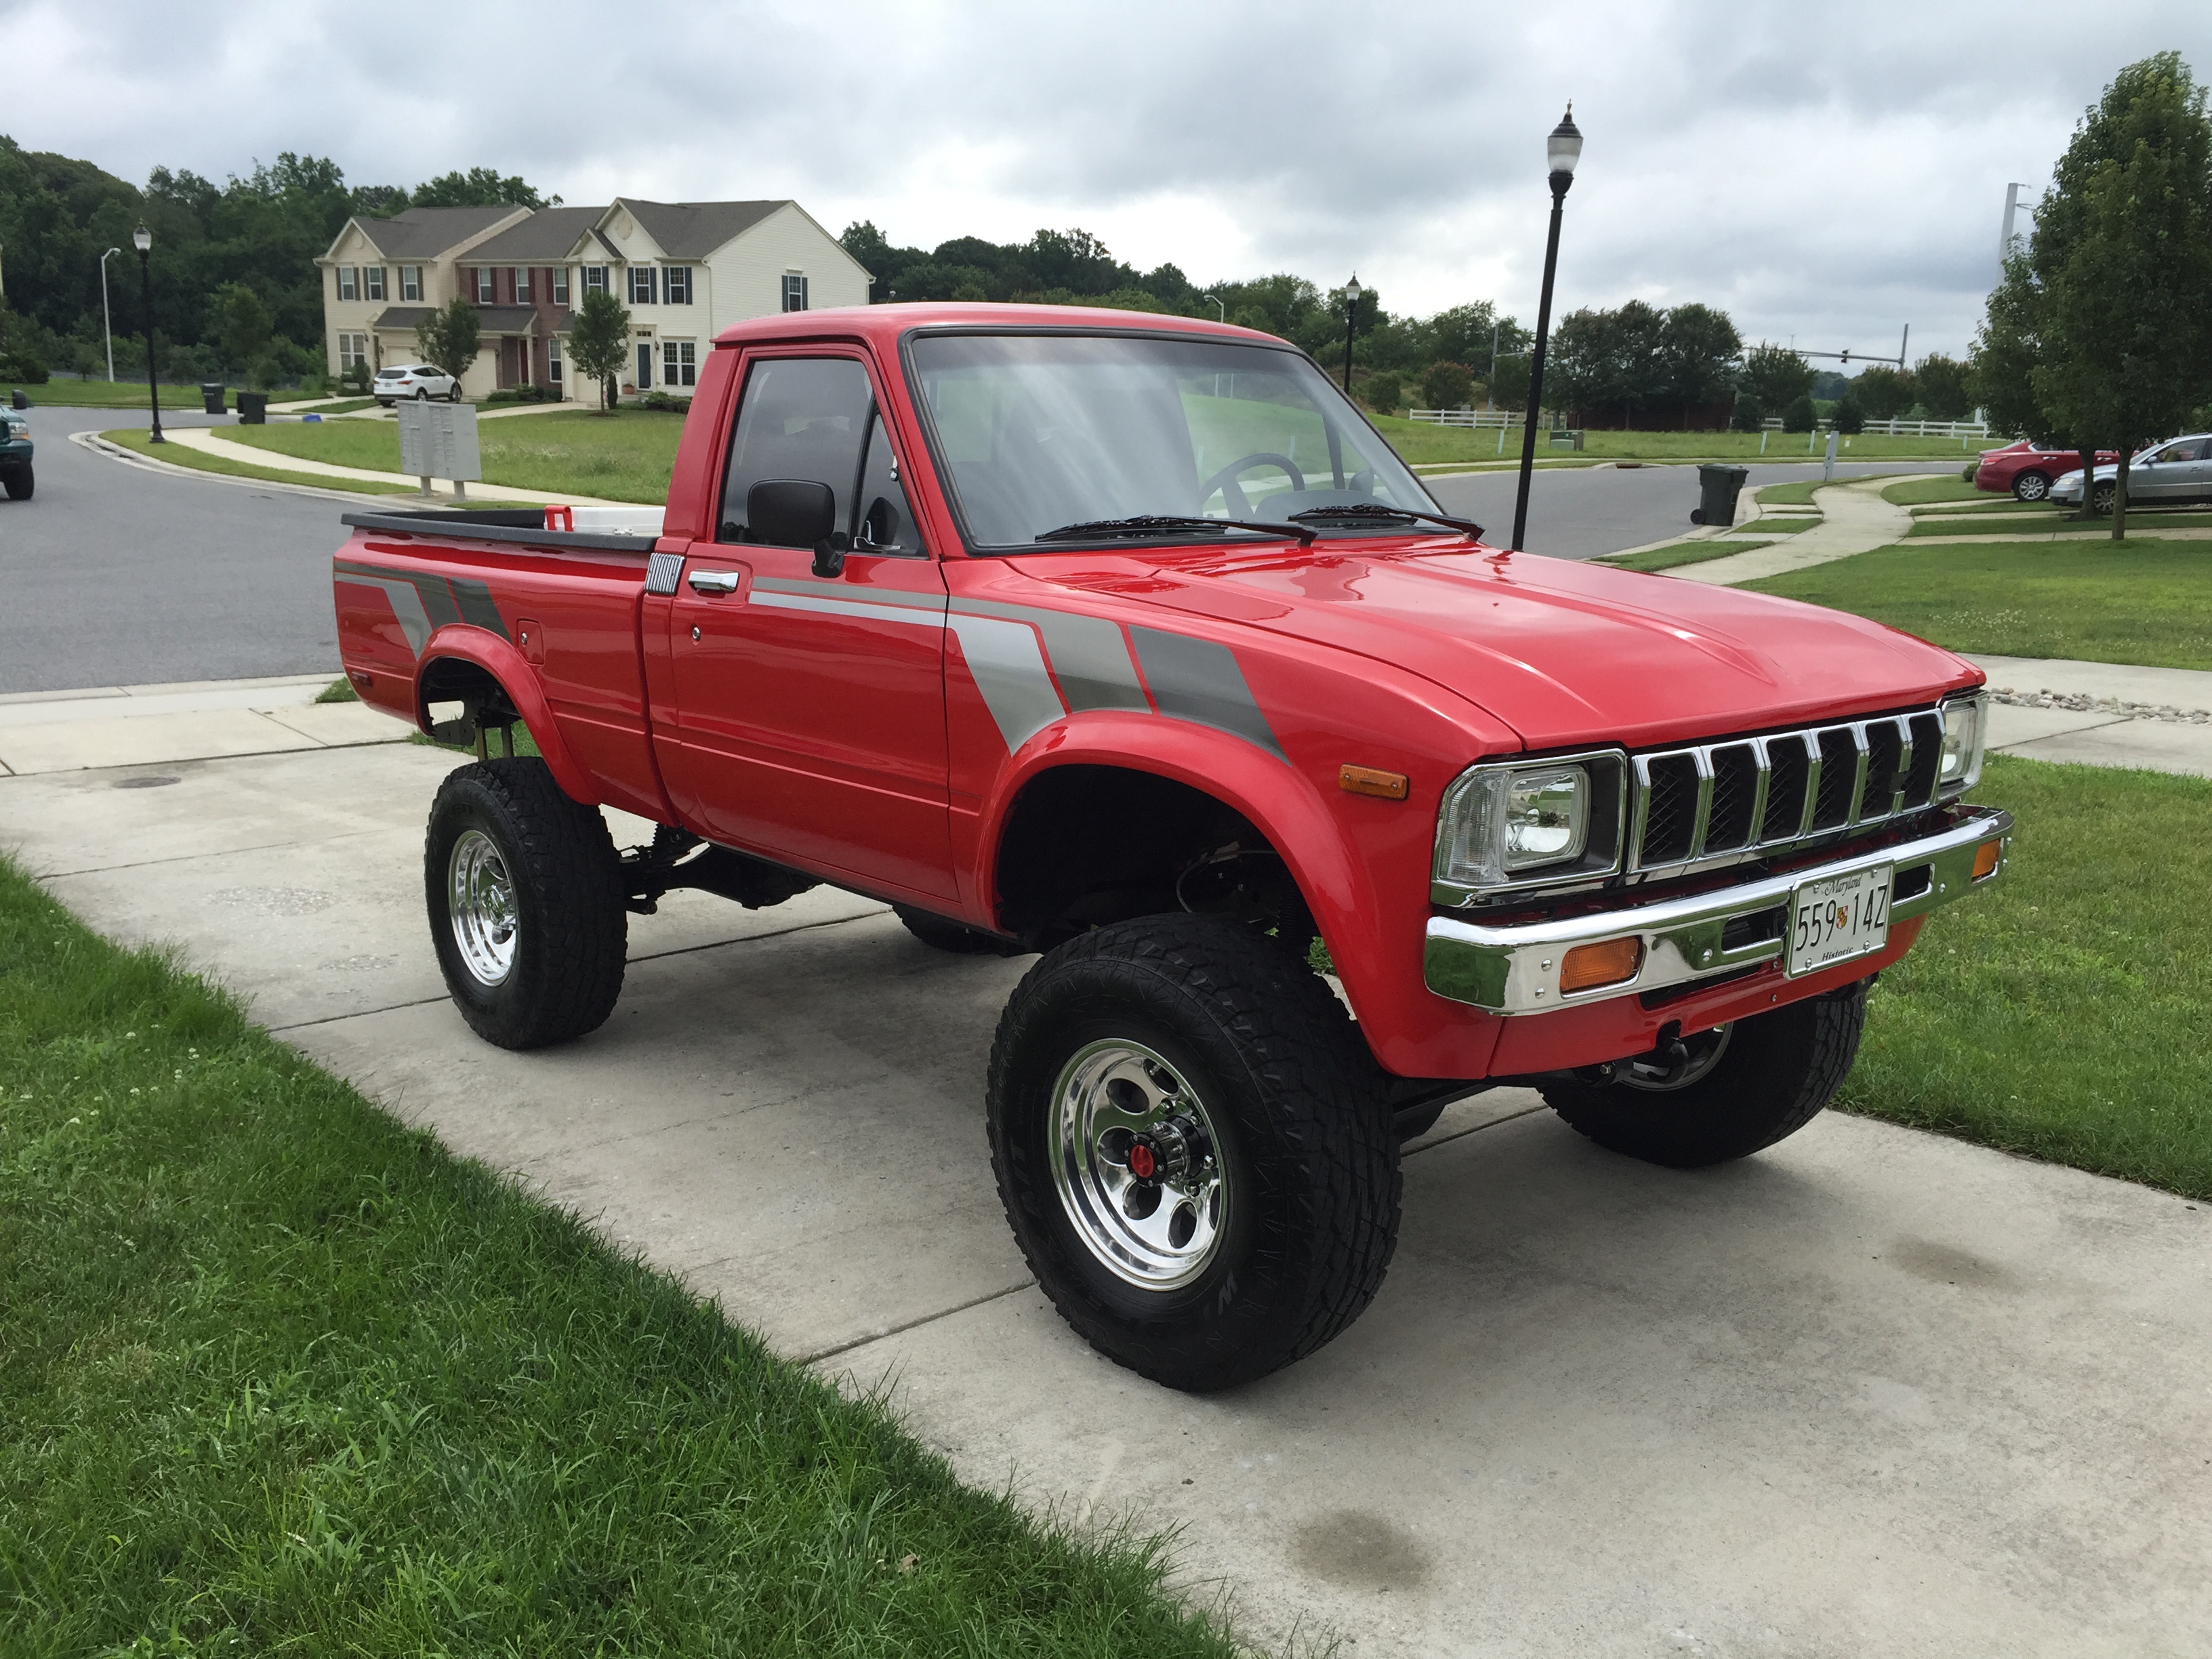
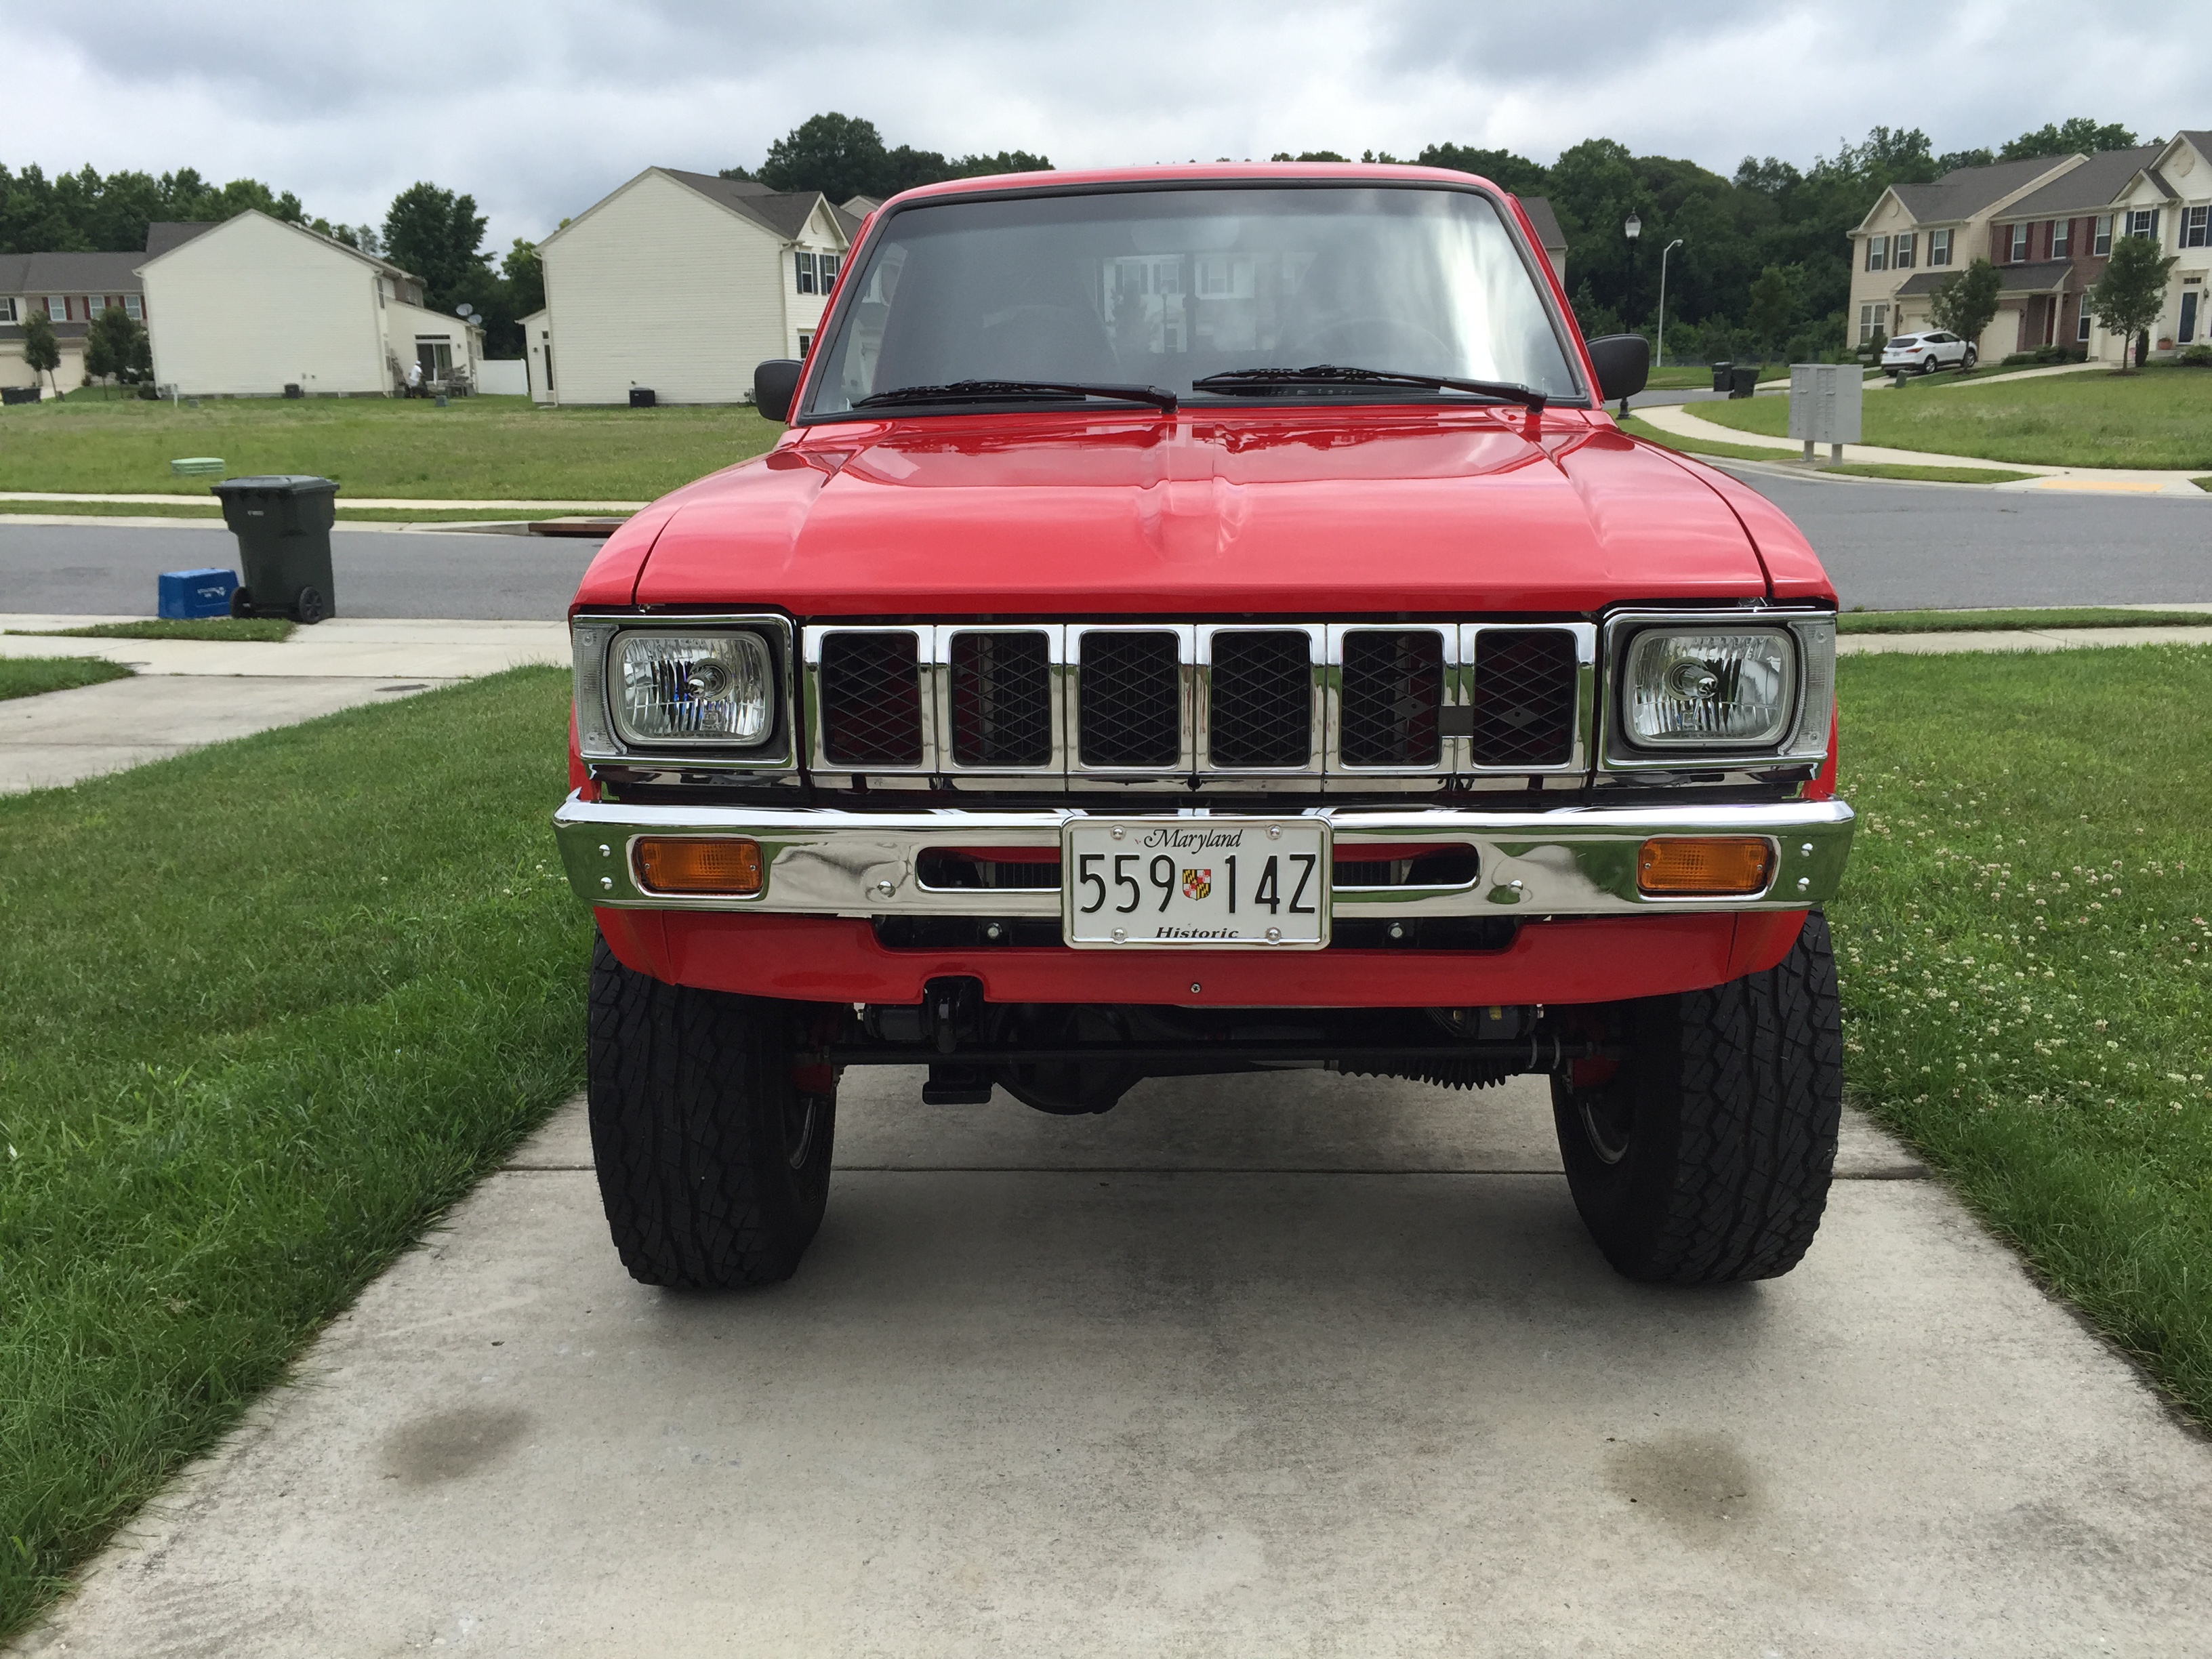
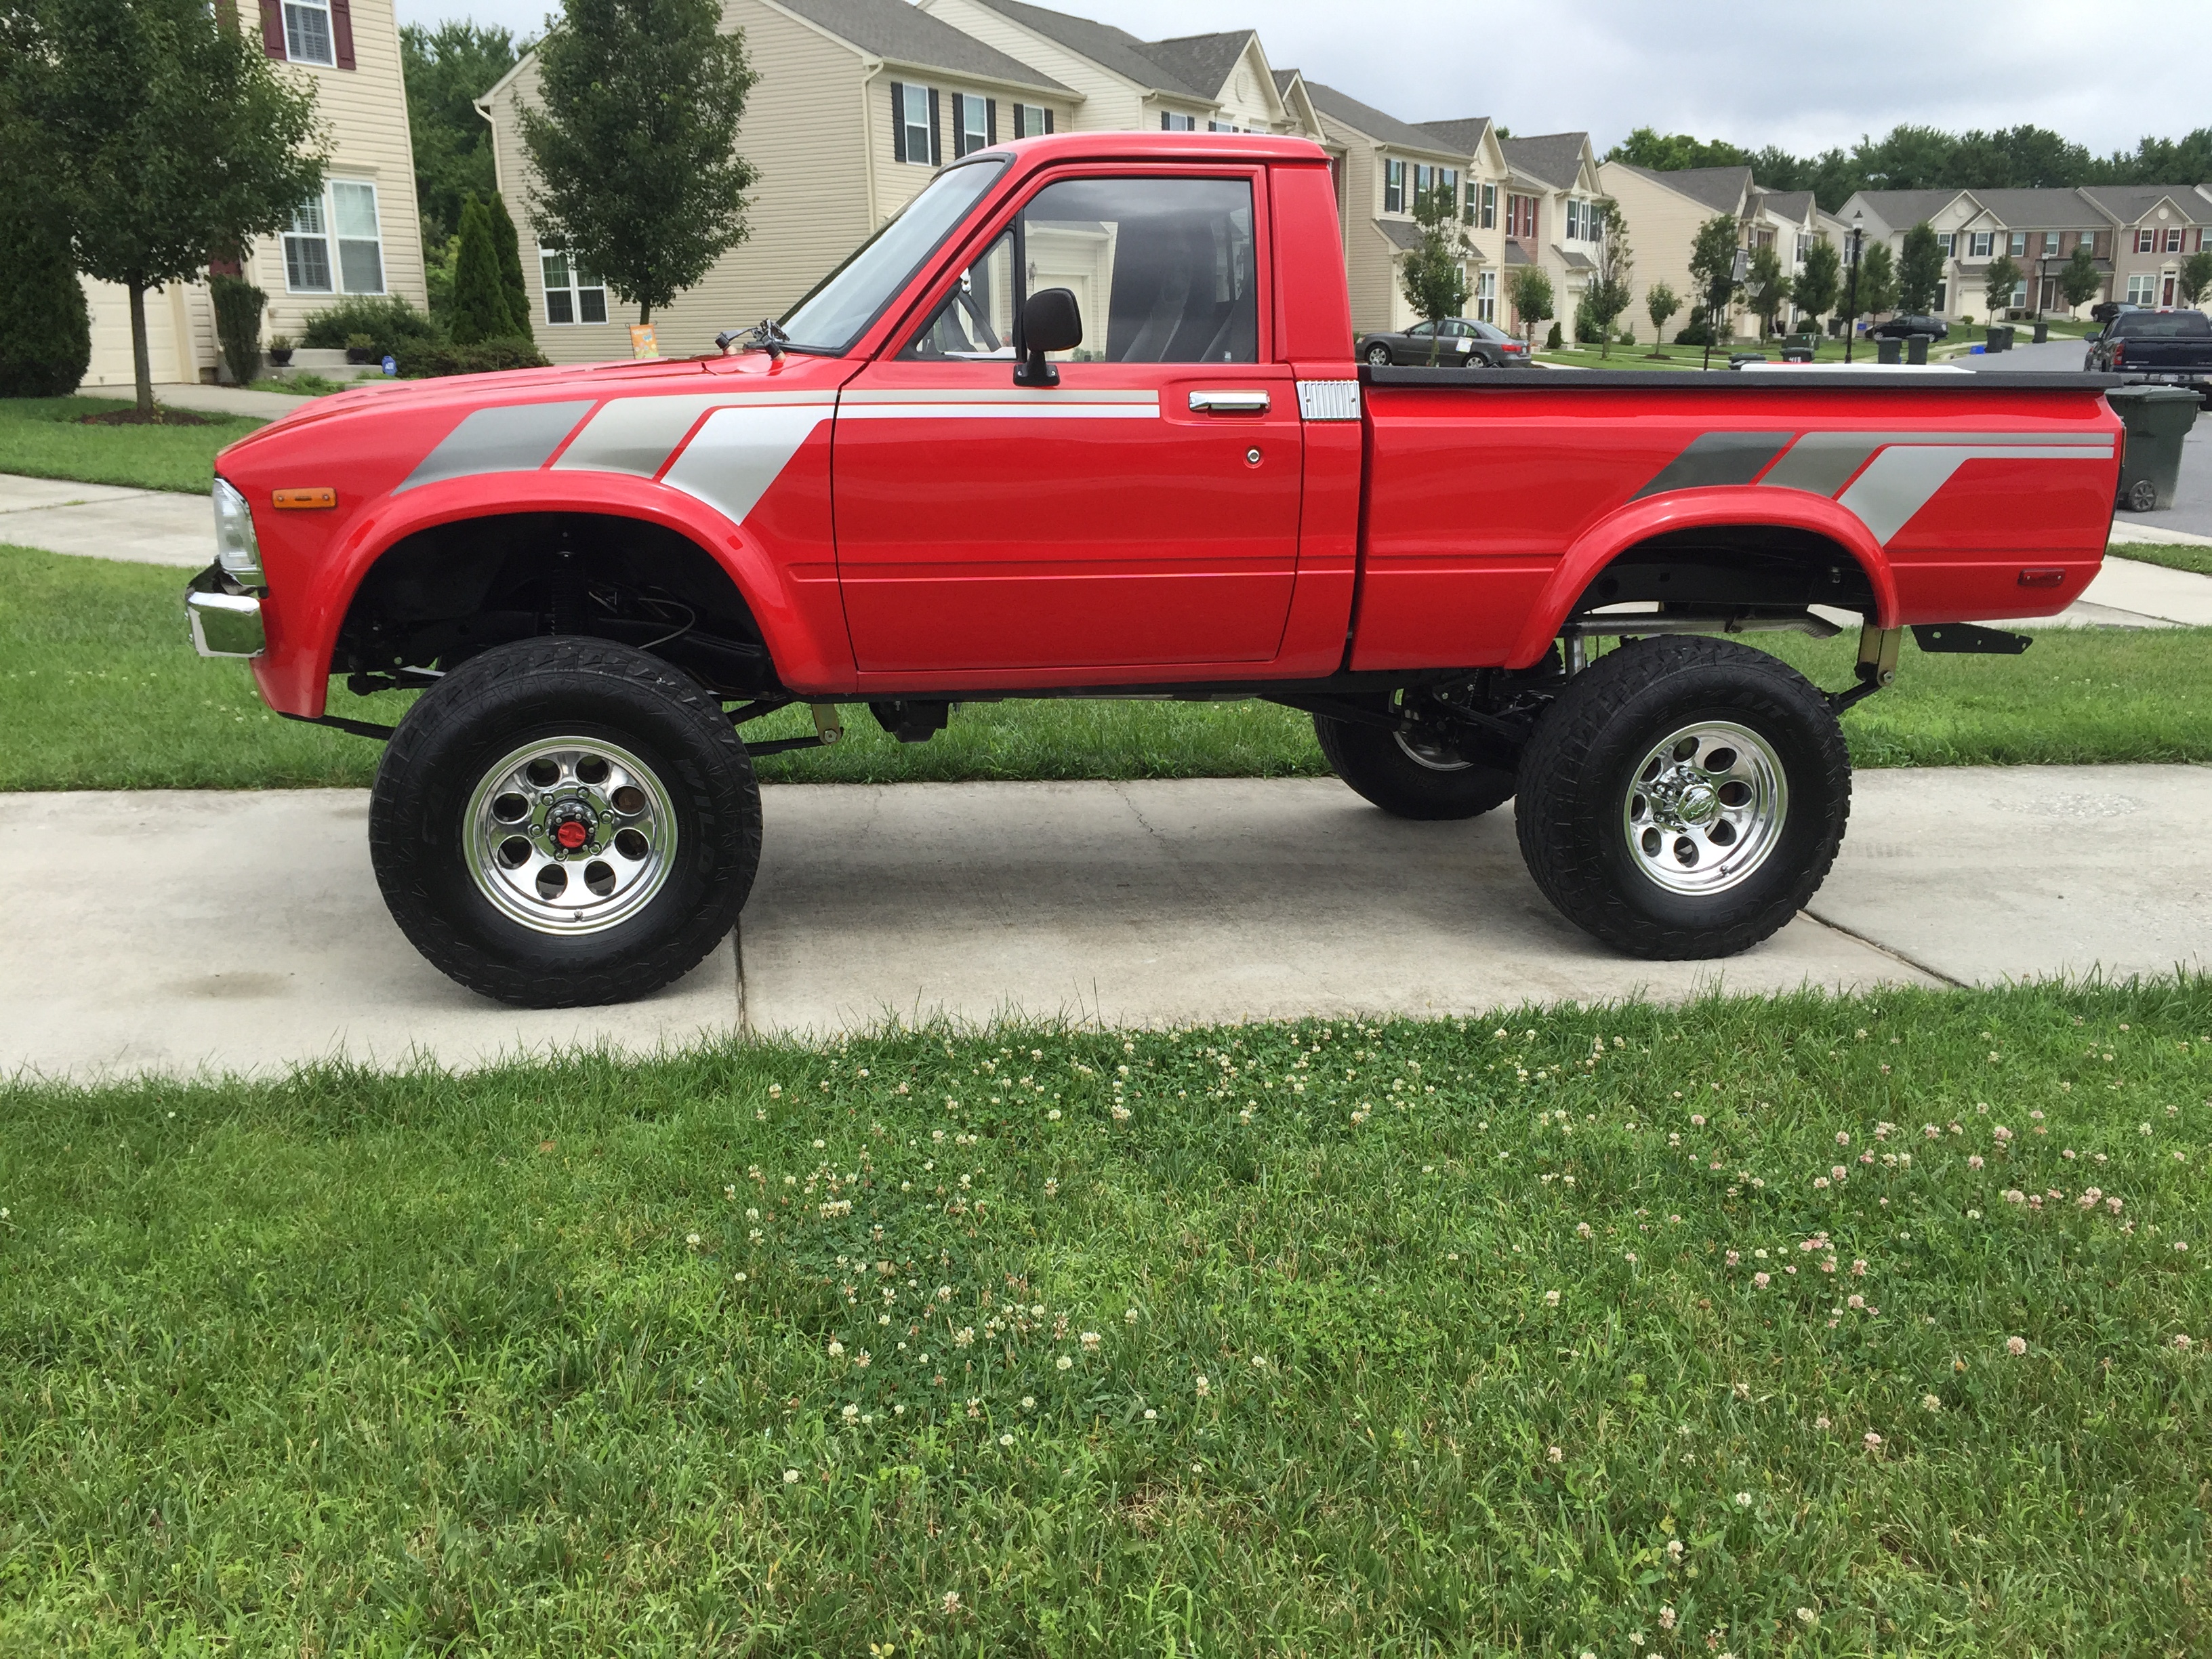
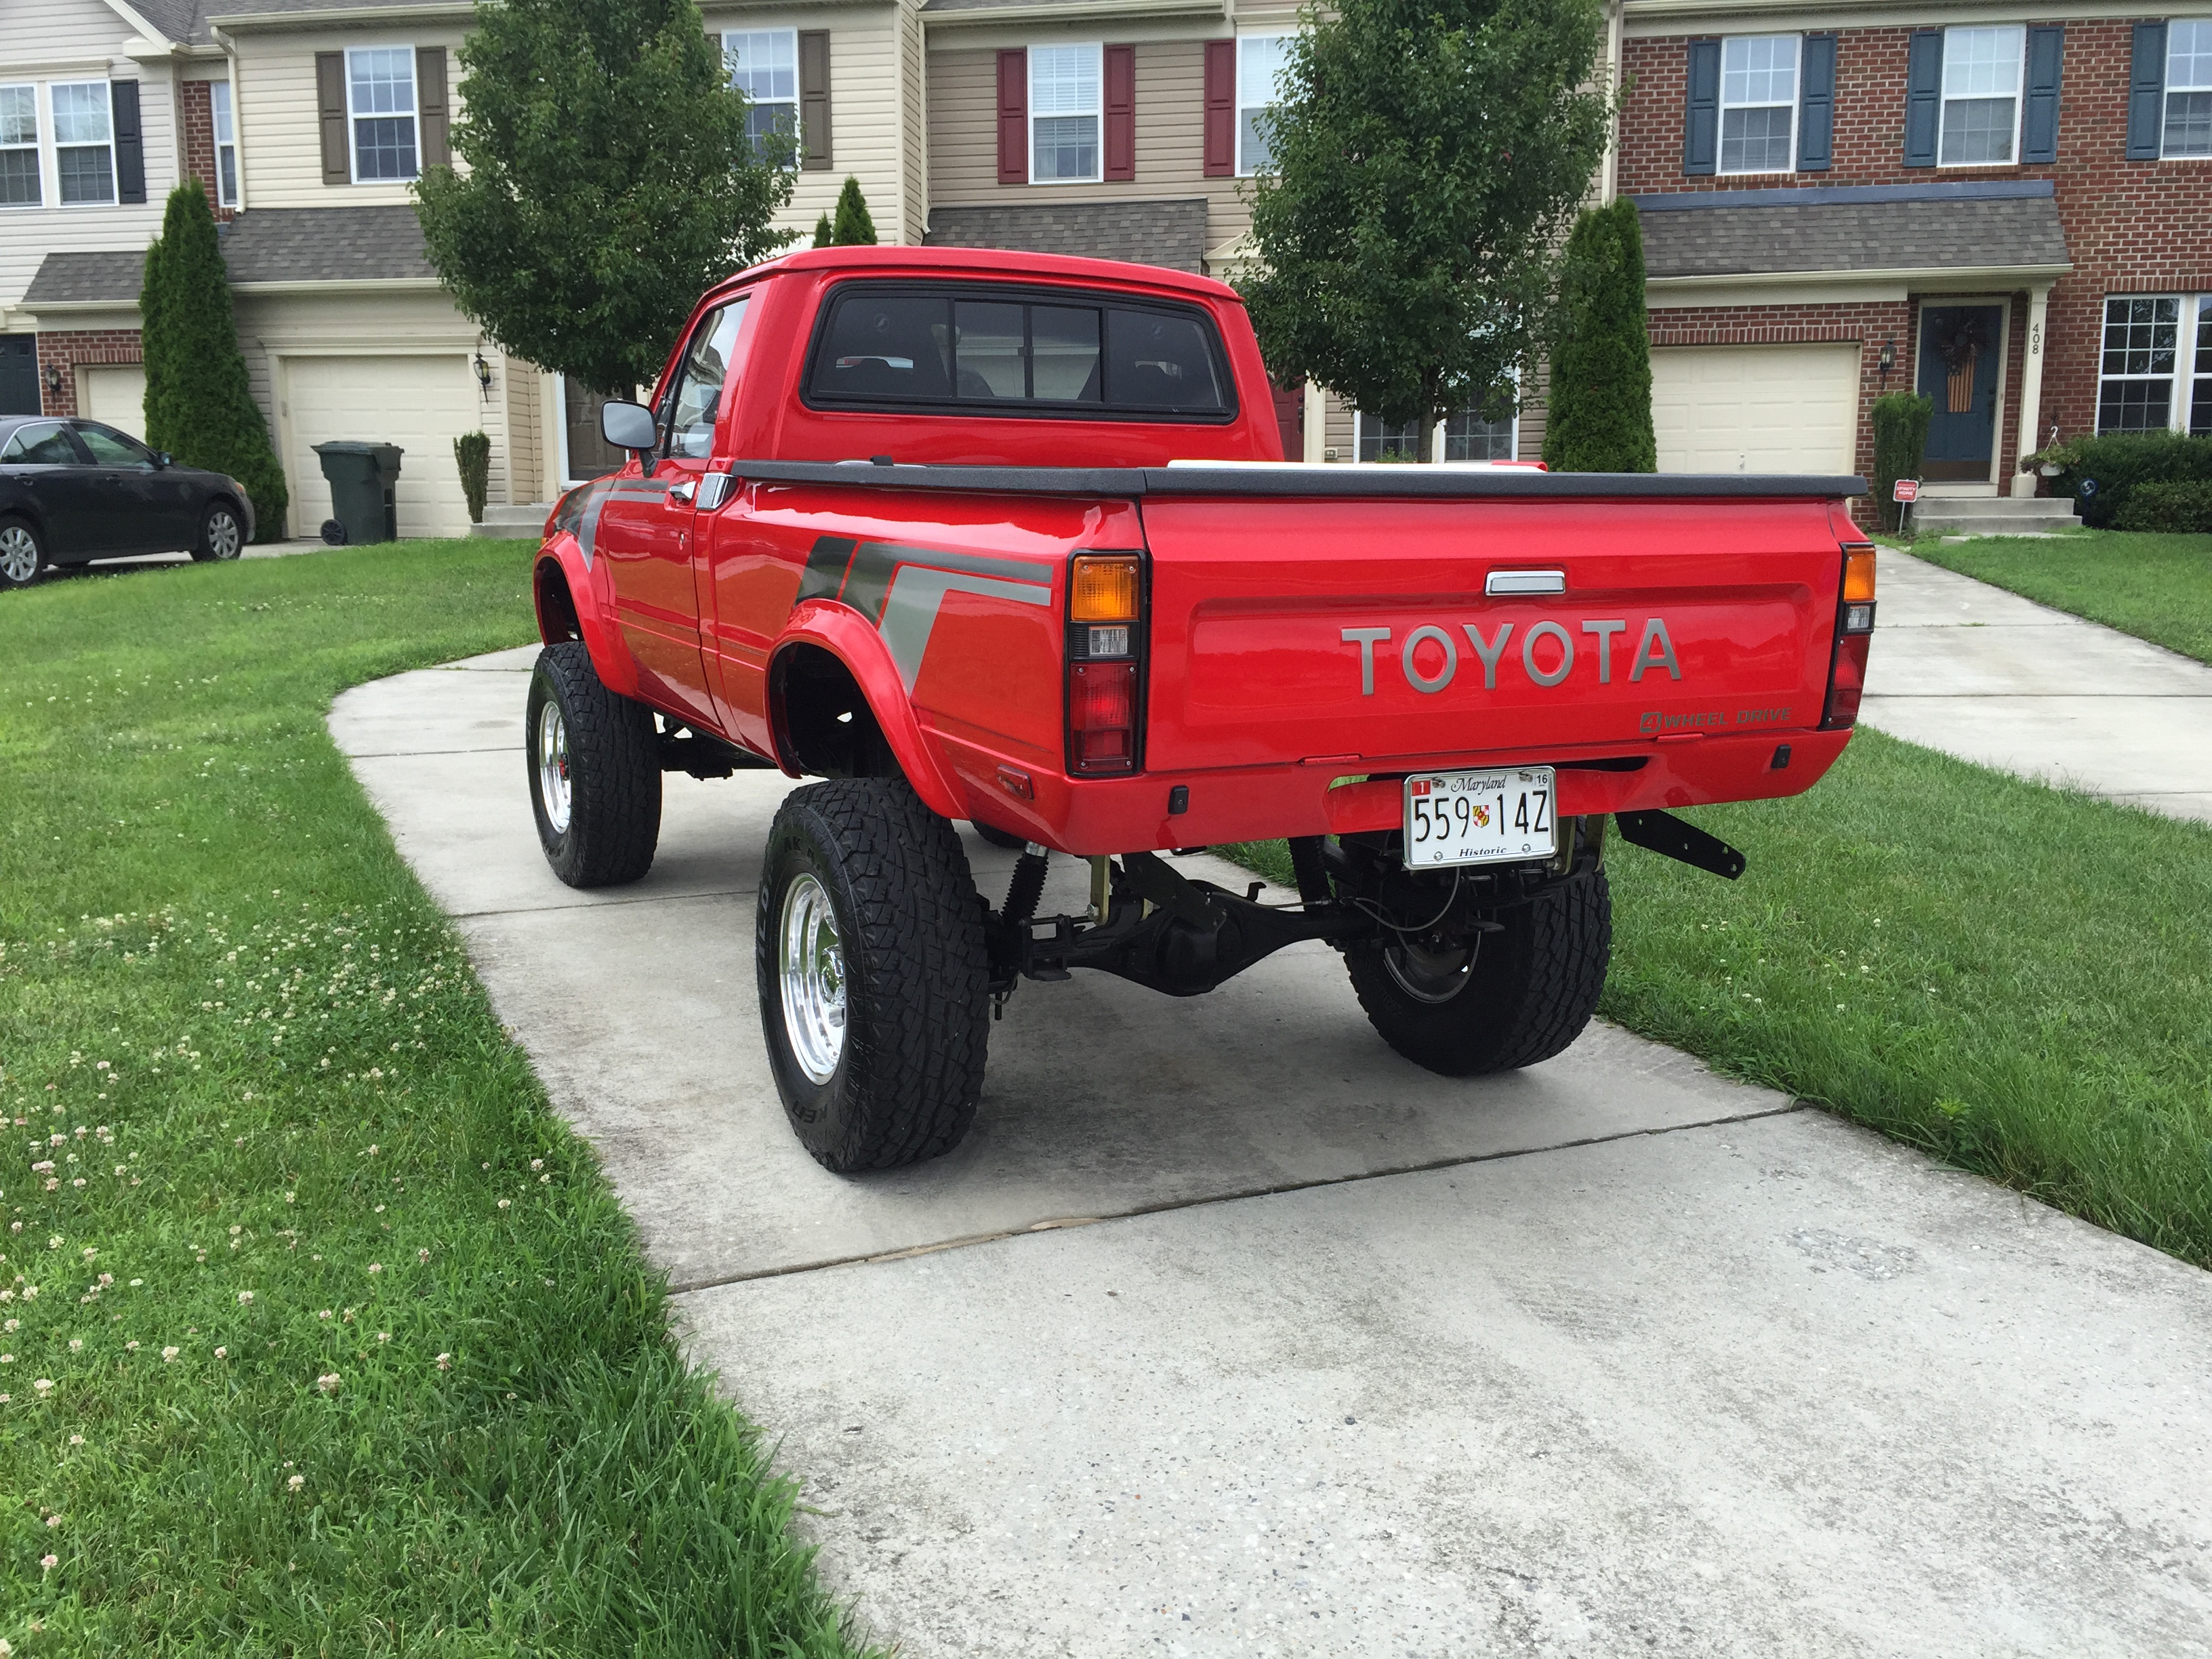
All the same on the truck front. I finally got to drive it this past Sunday when the rain finally let up. The t-case brake was a little tight on the rotor so I had to pull the caliper back off and add a washer to space the caliper back off of the rotor a hair. After that, all was well! Holds the truck still on fairly considerable inclines and resists movement pretty well when I try to release the clutch with the brake engaged. It by no means will stop you on a dime when driving, but it is certainly doing the job that I need it to do which is a parking brake! I'm pretty satisfied so far.
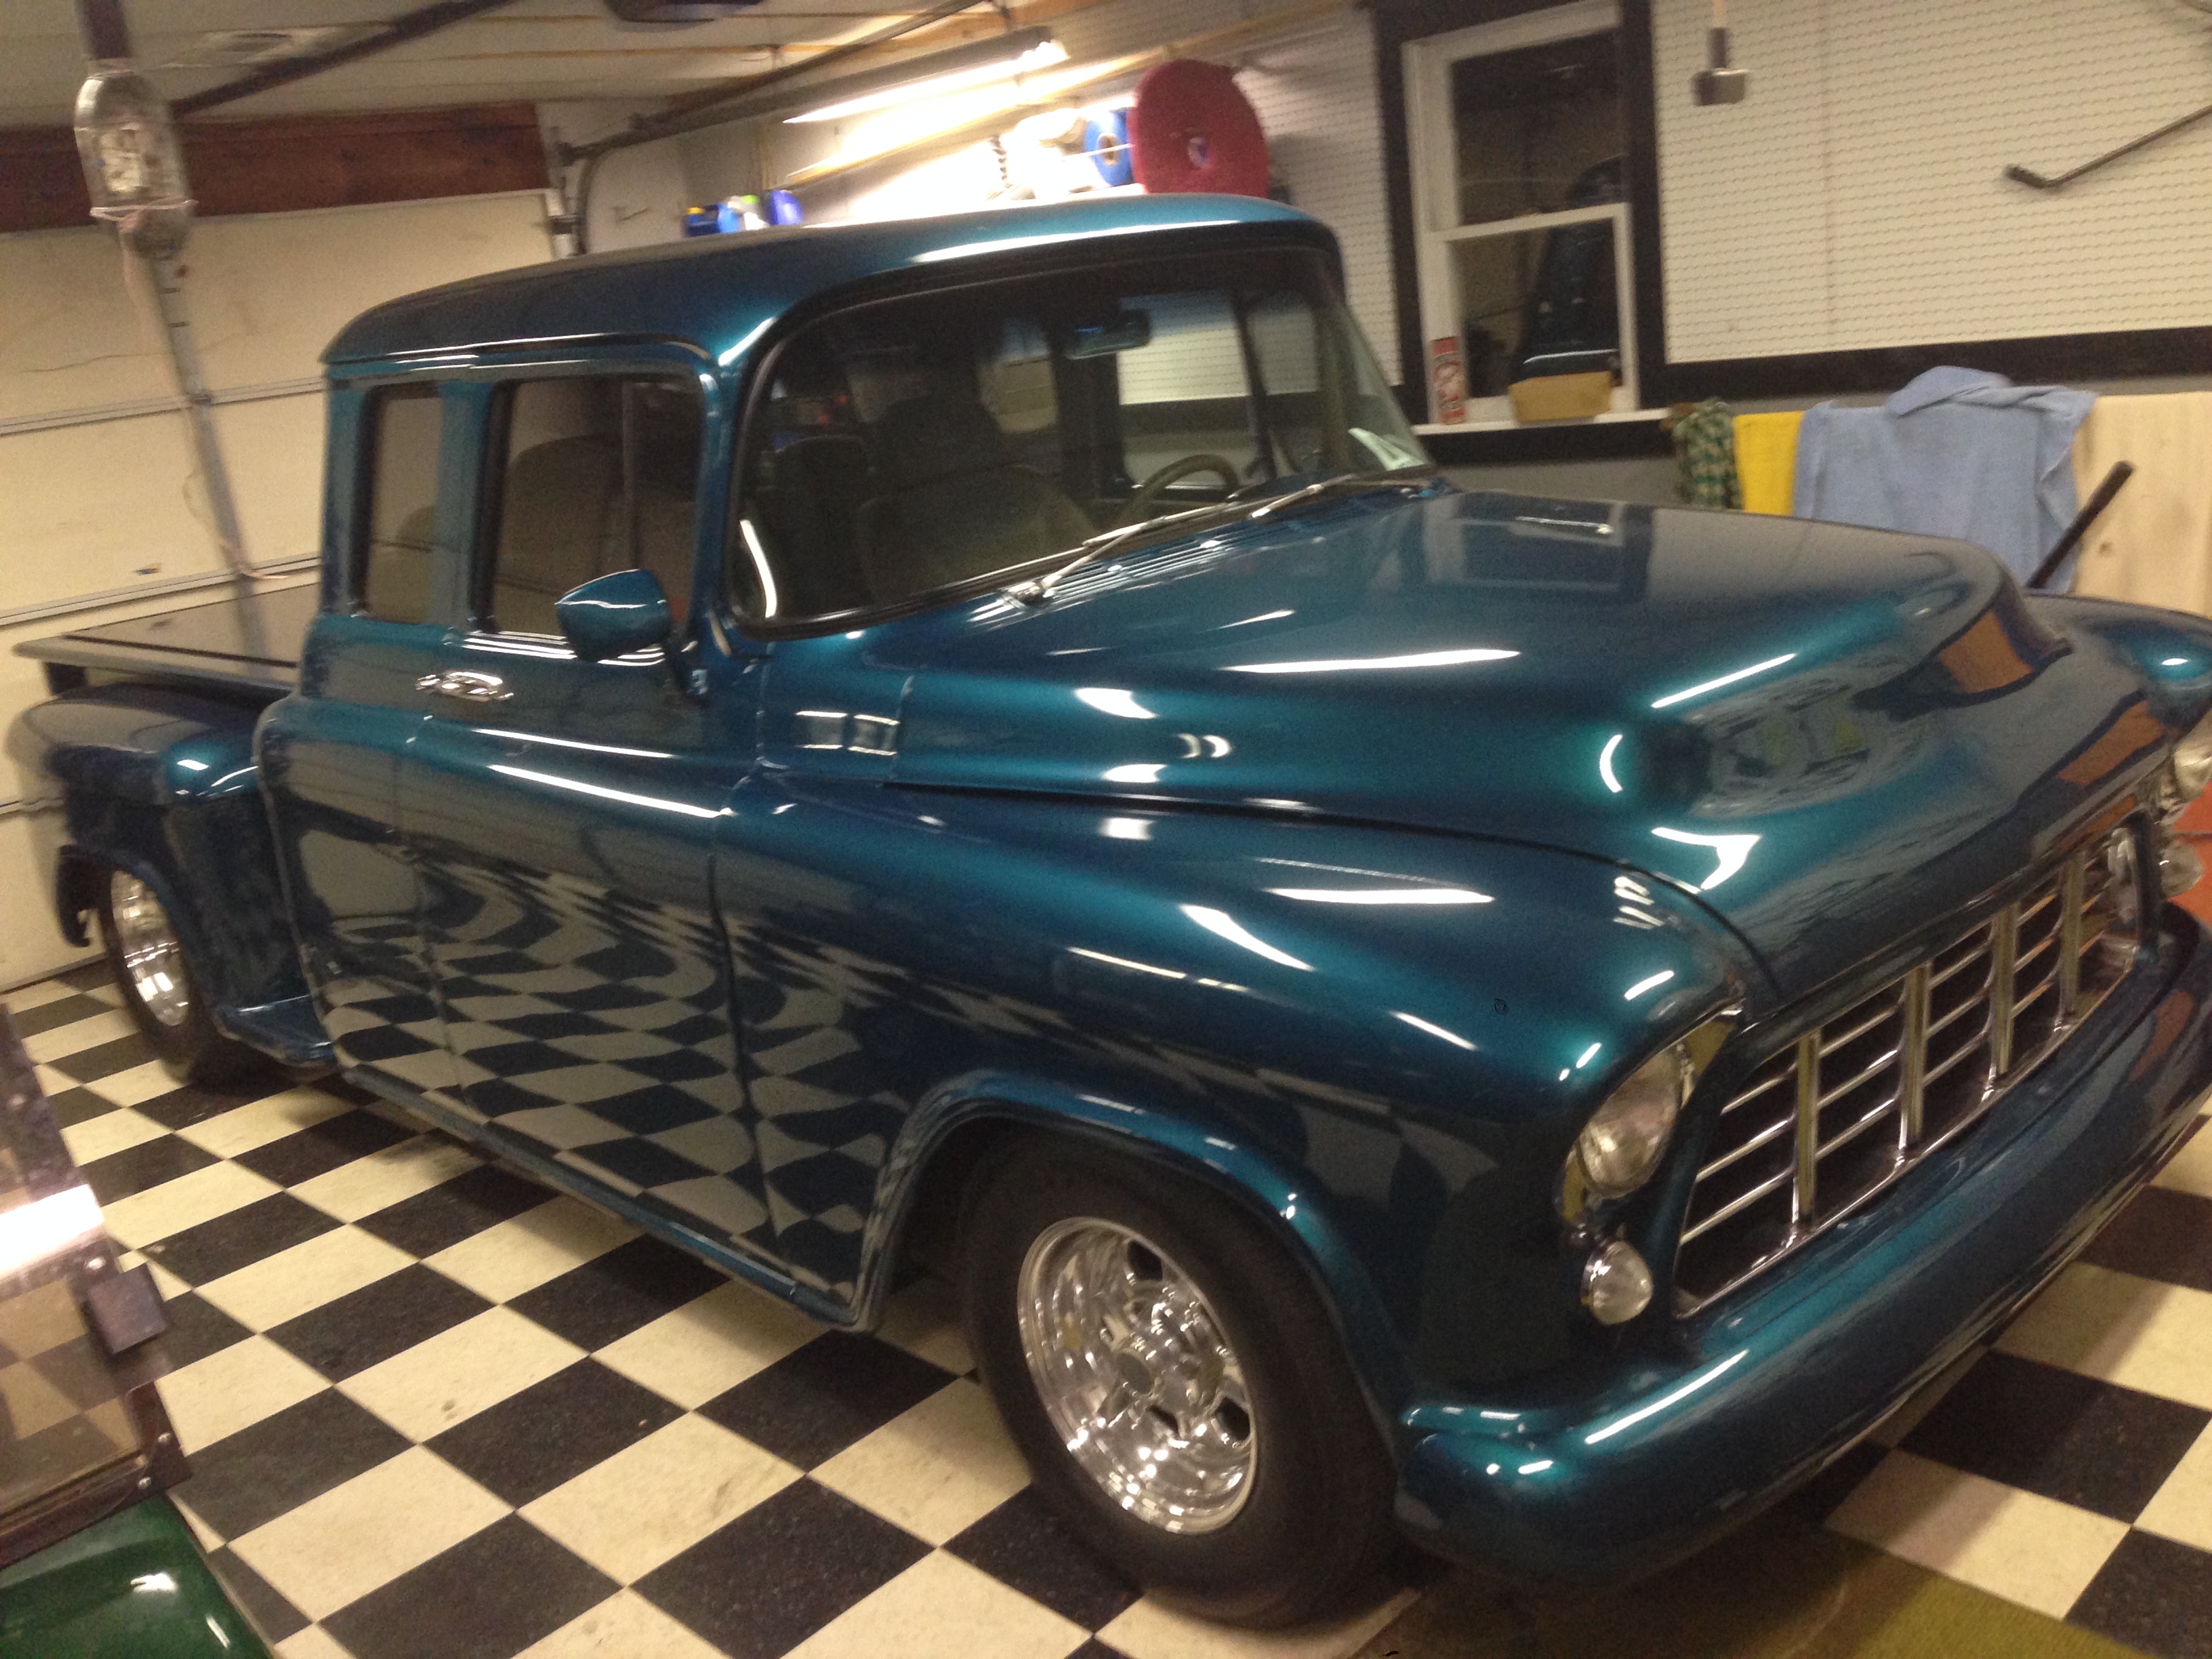
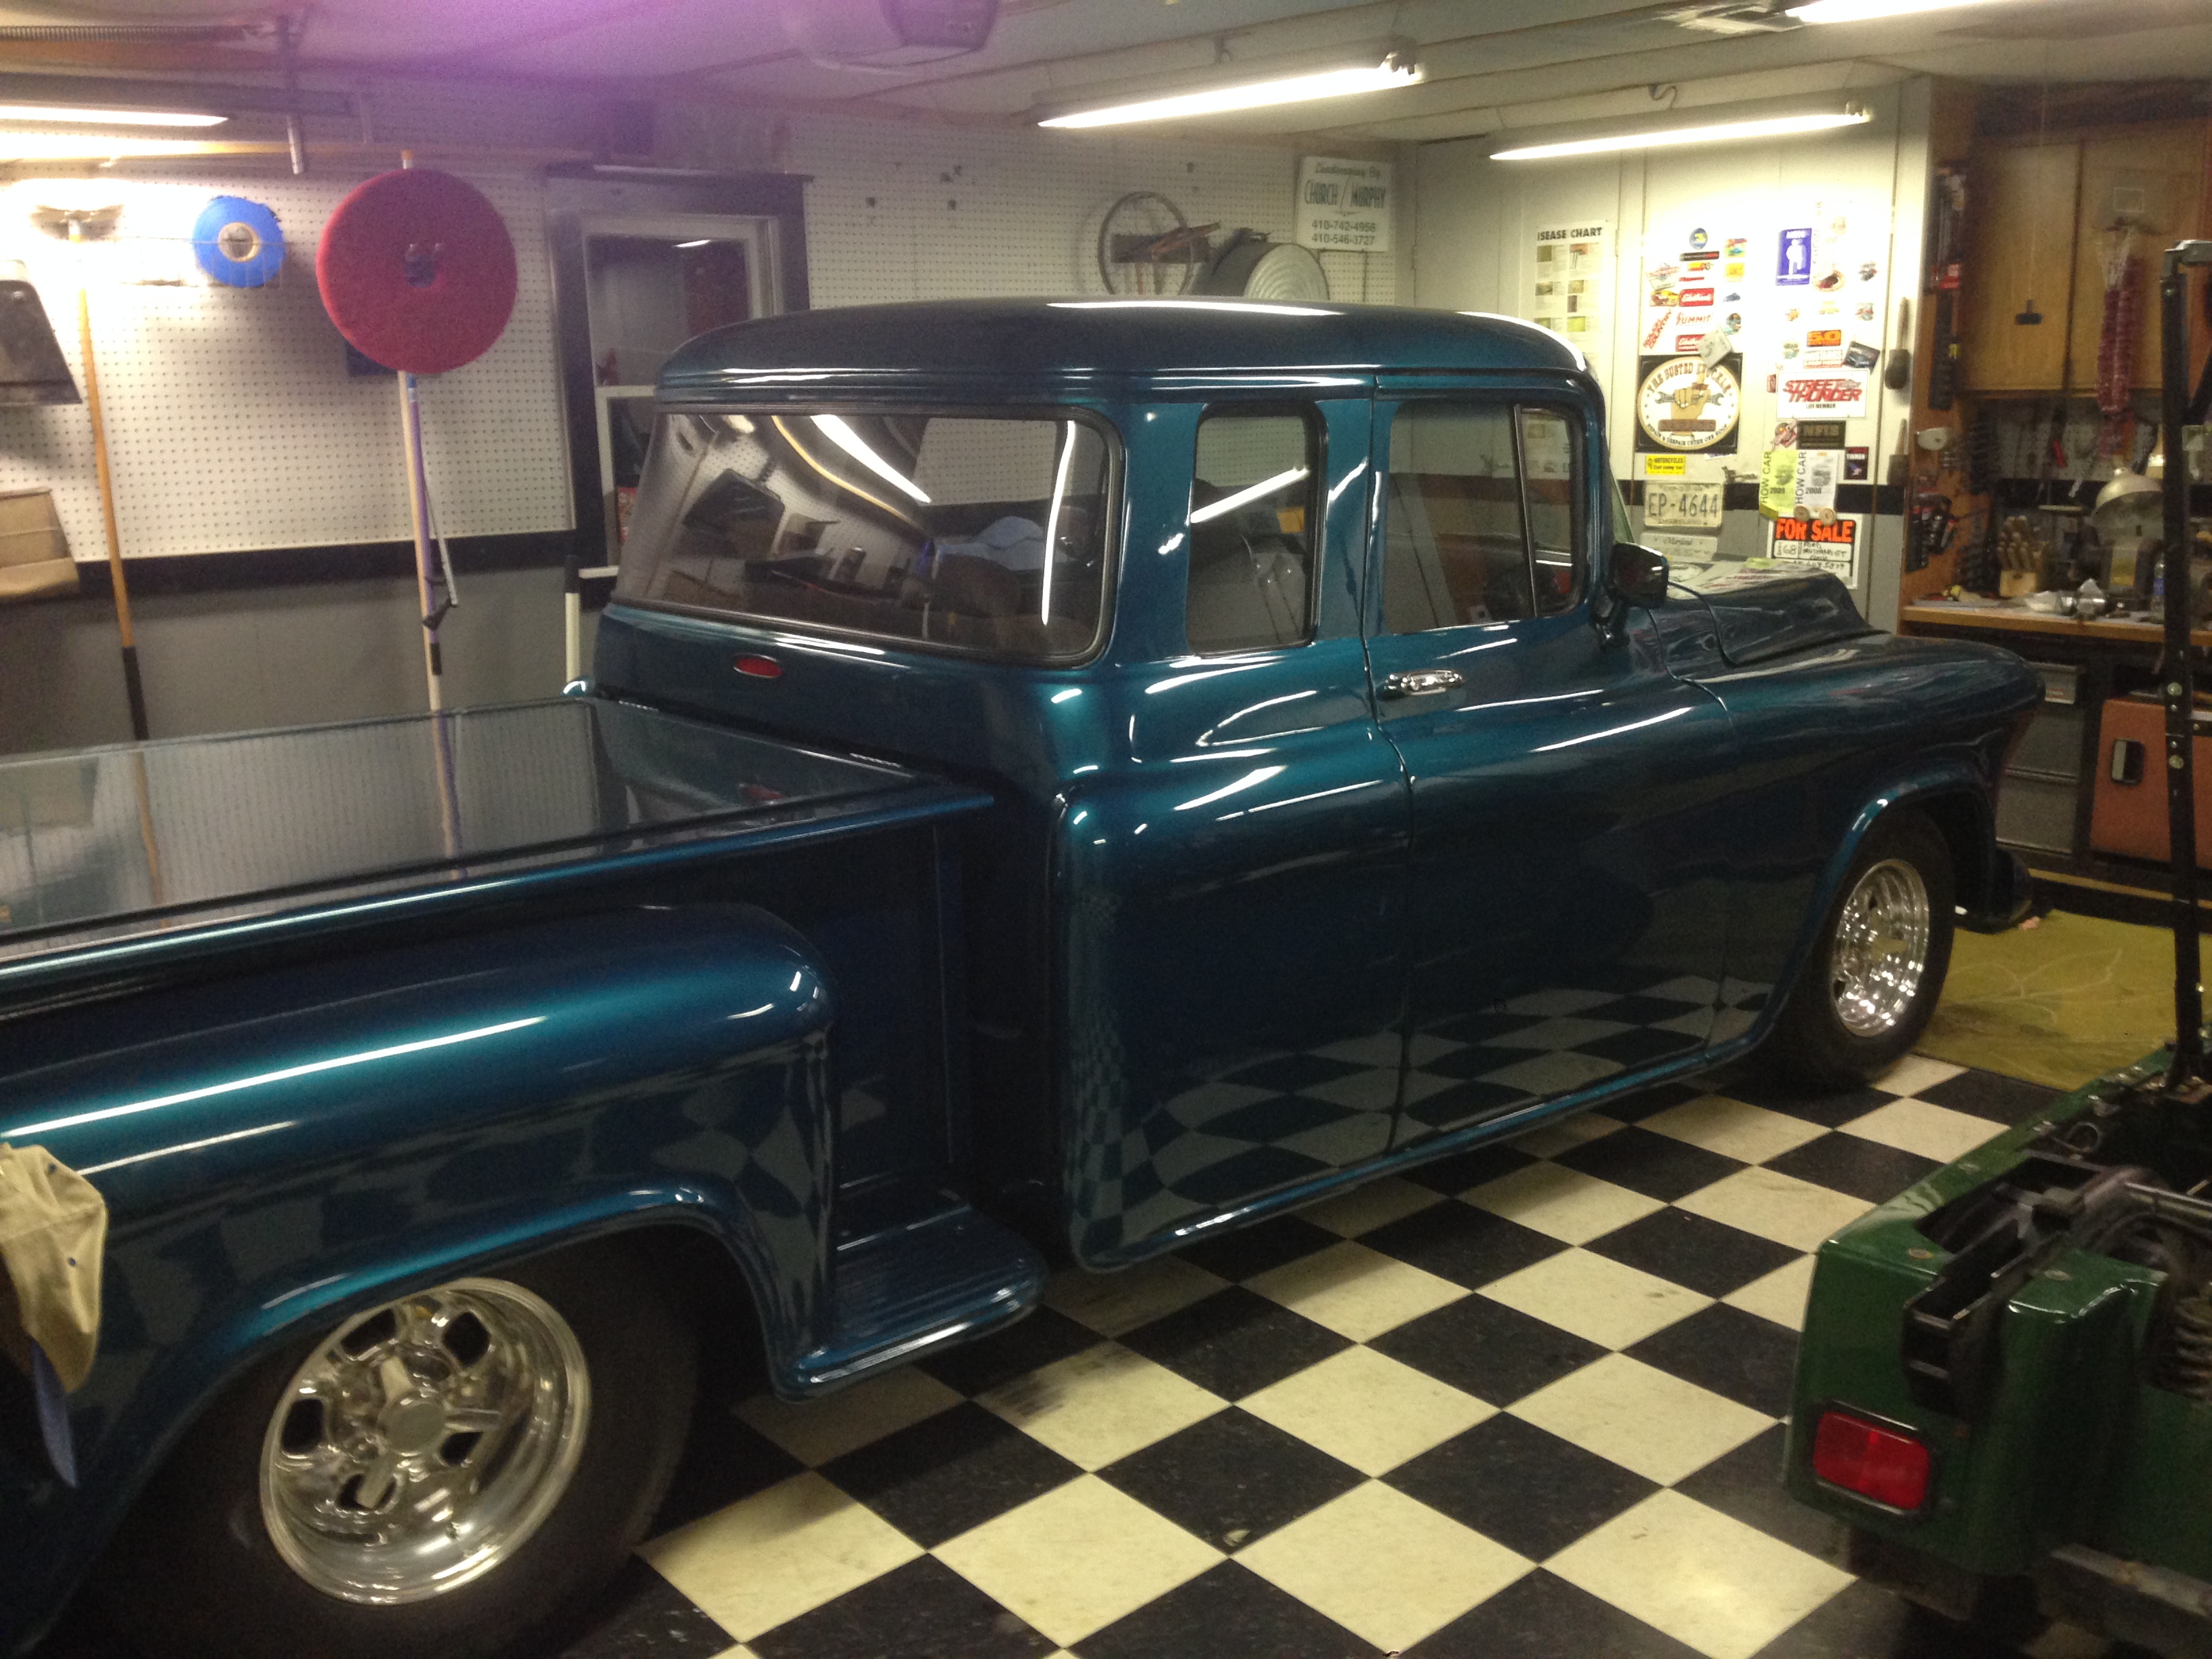
We have a pretty big car show about a hour up the road in Harrington, DE on the last weekend in June. I plan on taking my truck up there, but right now I am working on getting my Pop's truck ready for the show. He has a 1955 Chevy Pickup that has a custom fabricated extended cab. I've showed you guys before, but here it is again:
All I have left to do is so dress up. No "after" pics yet, but I'm working on making this look pretty:

Lots of chrome and aluminum to polish and since my Pops is lazy and doesn't like cleaning his engine, I'm going to clear powder everything that shines under the hood. It won't be a sparkly as properly polished metal, but it won't look like crap when he decides to not clean it as often as he should.
All the same on the truck front. I finally got to drive it this past Sunday when the rain finally let up. The t-case brake was a little tight on the rotor so I had to pull the caliper back off and add a washer to space the caliper back off of the rotor a hair. After that, all was well! Holds the truck still on fairly considerable inclines and resists movement pretty well when I try to release the clutch with the brake engaged. It by no means will stop you on a dime when driving, but it is certainly doing the job that I need it to do which is a parking brake! I'm pretty satisfied so far.
We have a pretty big car show about a hour up the road in Harrington, DE on the last weekend in June. I plan on taking my truck up there, but right now I am working on getting my Pop's truck ready for the show. He has a 1955 Chevy Pickup that has a custom fabricated extended cab. I've showed you guys before, but here it is again:


All I have left to do is so dress up. No "after" pics yet, but I'm working on making this look pretty:

Lots of chrome and aluminum to polish and since my Pops is lazy and doesn't like cleaning his engine, I'm going to clear powder everything that shines under the hood. It won't be a sparkly as properly polished metal, but it won't look like crap when he decides to not clean it as often as he should.
Last edited by kawazx636; 07-29-2015 at 10:16 AM.
06-11-2015, 10:32 AM
#1263
I finally got around to taking an inventory of and photographing my leftover parts from my build. Pretty much everything is listed in my add in the classifieds section. If you need parts, I may have them so check it out:
https://www.yotatech.com/forums/f109.../#post52276428
https://www.yotatech.com/forums/f109.../#post52276428
06-18-2015, 09:02 PM
#1264
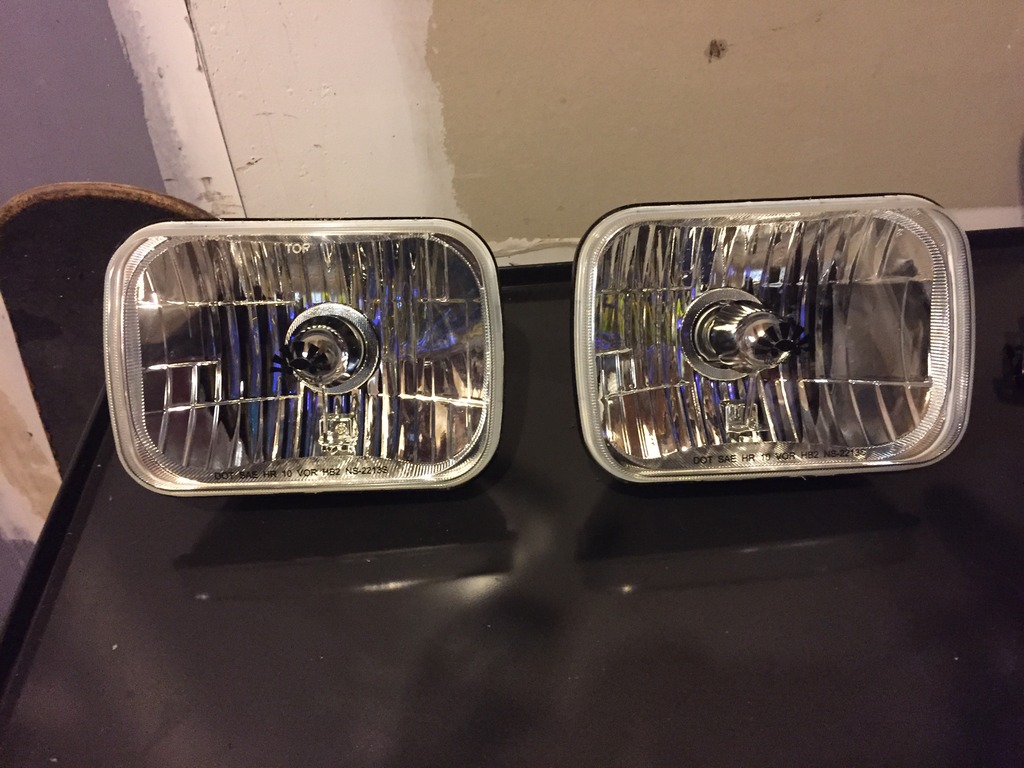
About a week ago I scored a nice set of Round Eye H4 headlight conversion lenses for a really good price from a member here on YT. They were sitting on my front door step when I got home tonight. They were apparently used for about a year, but I certainly can't tell! They also came with yellow Piaa Plasma bulbs which I absolutely love driving behind but I don't like the look for my particular truck so I'm going to have to run out and get some new bulbs before I install them or I might put the Piaa bulbs in my Tundra and swap the Silverstar Ultras over to my pickup. Here are the Round Eyes in all their squared glory:
Hopefully I'll get to installing those tomorrow night. I've been tied up with my Pops' 55 Chevy for the past couple weeks so time has been short. I have the long block put back together, but not like I wanted to do it... A little more finishing work to do and I'll have it all slapped back together just in time for the Car show next week. Talk about a stressful deadline!! And to top it all off, the new intake manifold and carb may not be here in time so I might end up putting the old nasty ones back on! Hopefully that is not the case

Hopefully I'll get to installing those tomorrow night. I've been tied up with my Pops' 55 Chevy for the past couple weeks so time has been short. I have the long block put back together, but not like I wanted to do it... A little more finishing work to do and I'll have it all slapped back together just in time for the Car show next week. Talk about a stressful deadline!! And to top it all off, the new intake manifold and carb may not be here in time so I might end up putting the old nasty ones back on! Hopefully that is not the case
Last edited by kawazx636; 07-29-2015 at 10:19 AM.
06-19-2015, 09:28 AM
#1265
Registered User

Join Date: Oct 2007
Location: raleigh,nc
Posts: 302
Likes: 0
Received 0 Likes
on
0 Posts
thanks for sharing the pics of the Chevy extended cab, I can't imagine the work and dedication for something like that.
I feel you on the E brake install. It really doesn't take a rocket surgeon to write decent instructions. It's a darn word document. Just open it, make changes, save and print.
I had to add shims as well for my 86, apparently they weren't designed for any particular year truck.
I feel you on the E brake install. It really doesn't take a rocket surgeon to write decent instructions. It's a darn word document. Just open it, make changes, save and print.
I had to add shims as well for my 86, apparently they weren't designed for any particular year truck.
06-25-2015, 11:15 PM
#1266
Pretty stressful week around my way. My Pops and I have a car show up in Harrington, DE this weekend and we've been working on getting everything back together on his '55 Pickup. We had a couple smags along the way - missing gaskets, wrong parts and some powdercoating failures. Then to top it off my Pops get sick on Tuesday so I'm left by myself to assemble everything and get it up and running again by Thursday morning since he wanted to leave thursday afternoon for the show. Me being a night owl, the lack of sleep wasn't a big deal, but not having help was. So I wrapped that up at about 3:30am last night and rushed home from work to get my truck ready for the show. I had a bunch of swirl marks in my paint from rushing through the buffing and polishing so I compounded the whole truck and then slapped some wax on it. I also installed the Round Eye H4 - very nice upgrade! No pics of them yet, but I'll get some soon.
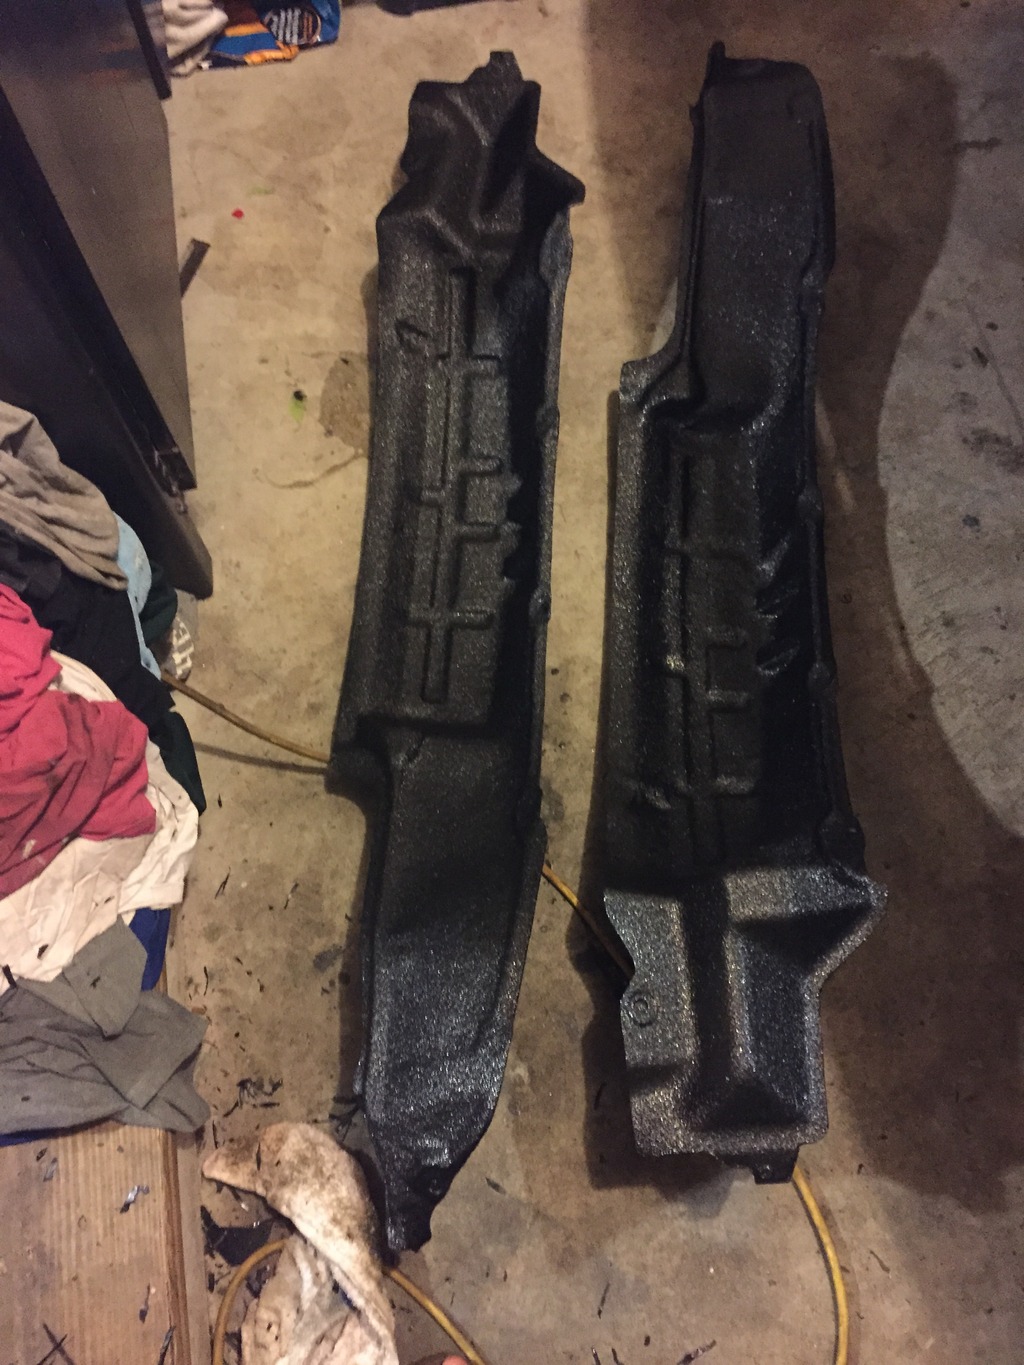
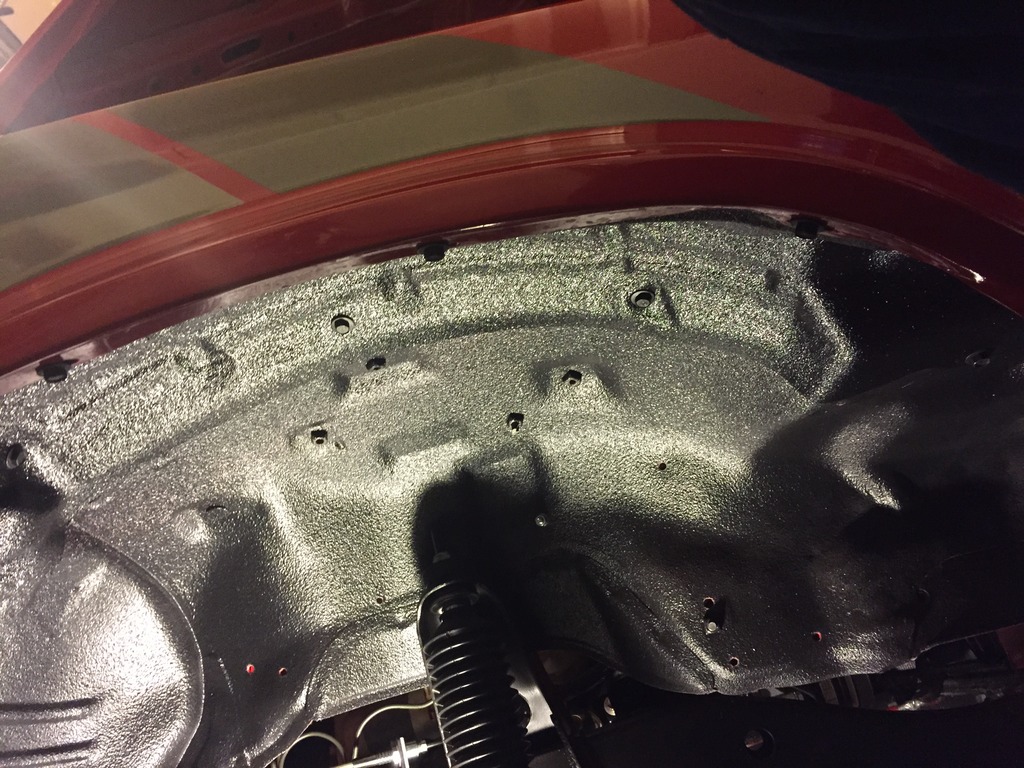
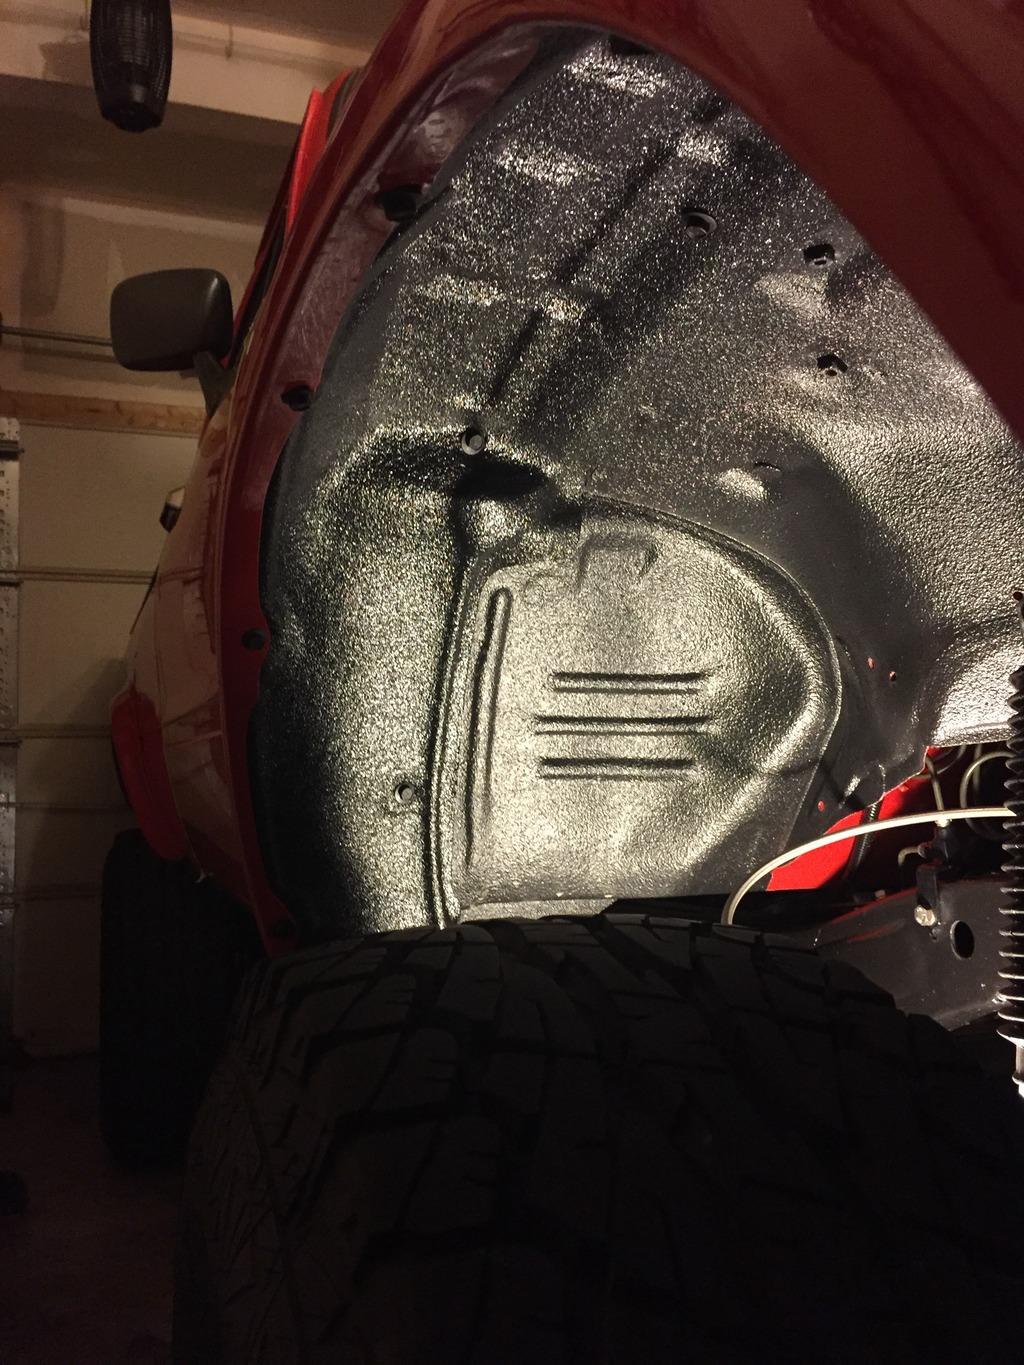
I have been getting the run around from several people who supposedly have a set of fenderliners, but they either want me to pay a ridiculous amount for them or they say them have them but flake out and never return my messages. Soooo.... I took it upon myself to fix the ones I have. Since a bunch of tabs were cracked and they pretty much looked like crap I decided to have them sprayed with bedliner. I put duct tape on the back side of the tabs that were cracked to stabilize them and act like a form for the bedliner to form to. Then I took them down to friend's shop who just started doing spray in bedliners. It's the same as Line-X but if you recall, Line-X has forever lost my business. The idea worked like a charm! Only had the spray the wheel side and they came out looking better than just plastic.
Results:
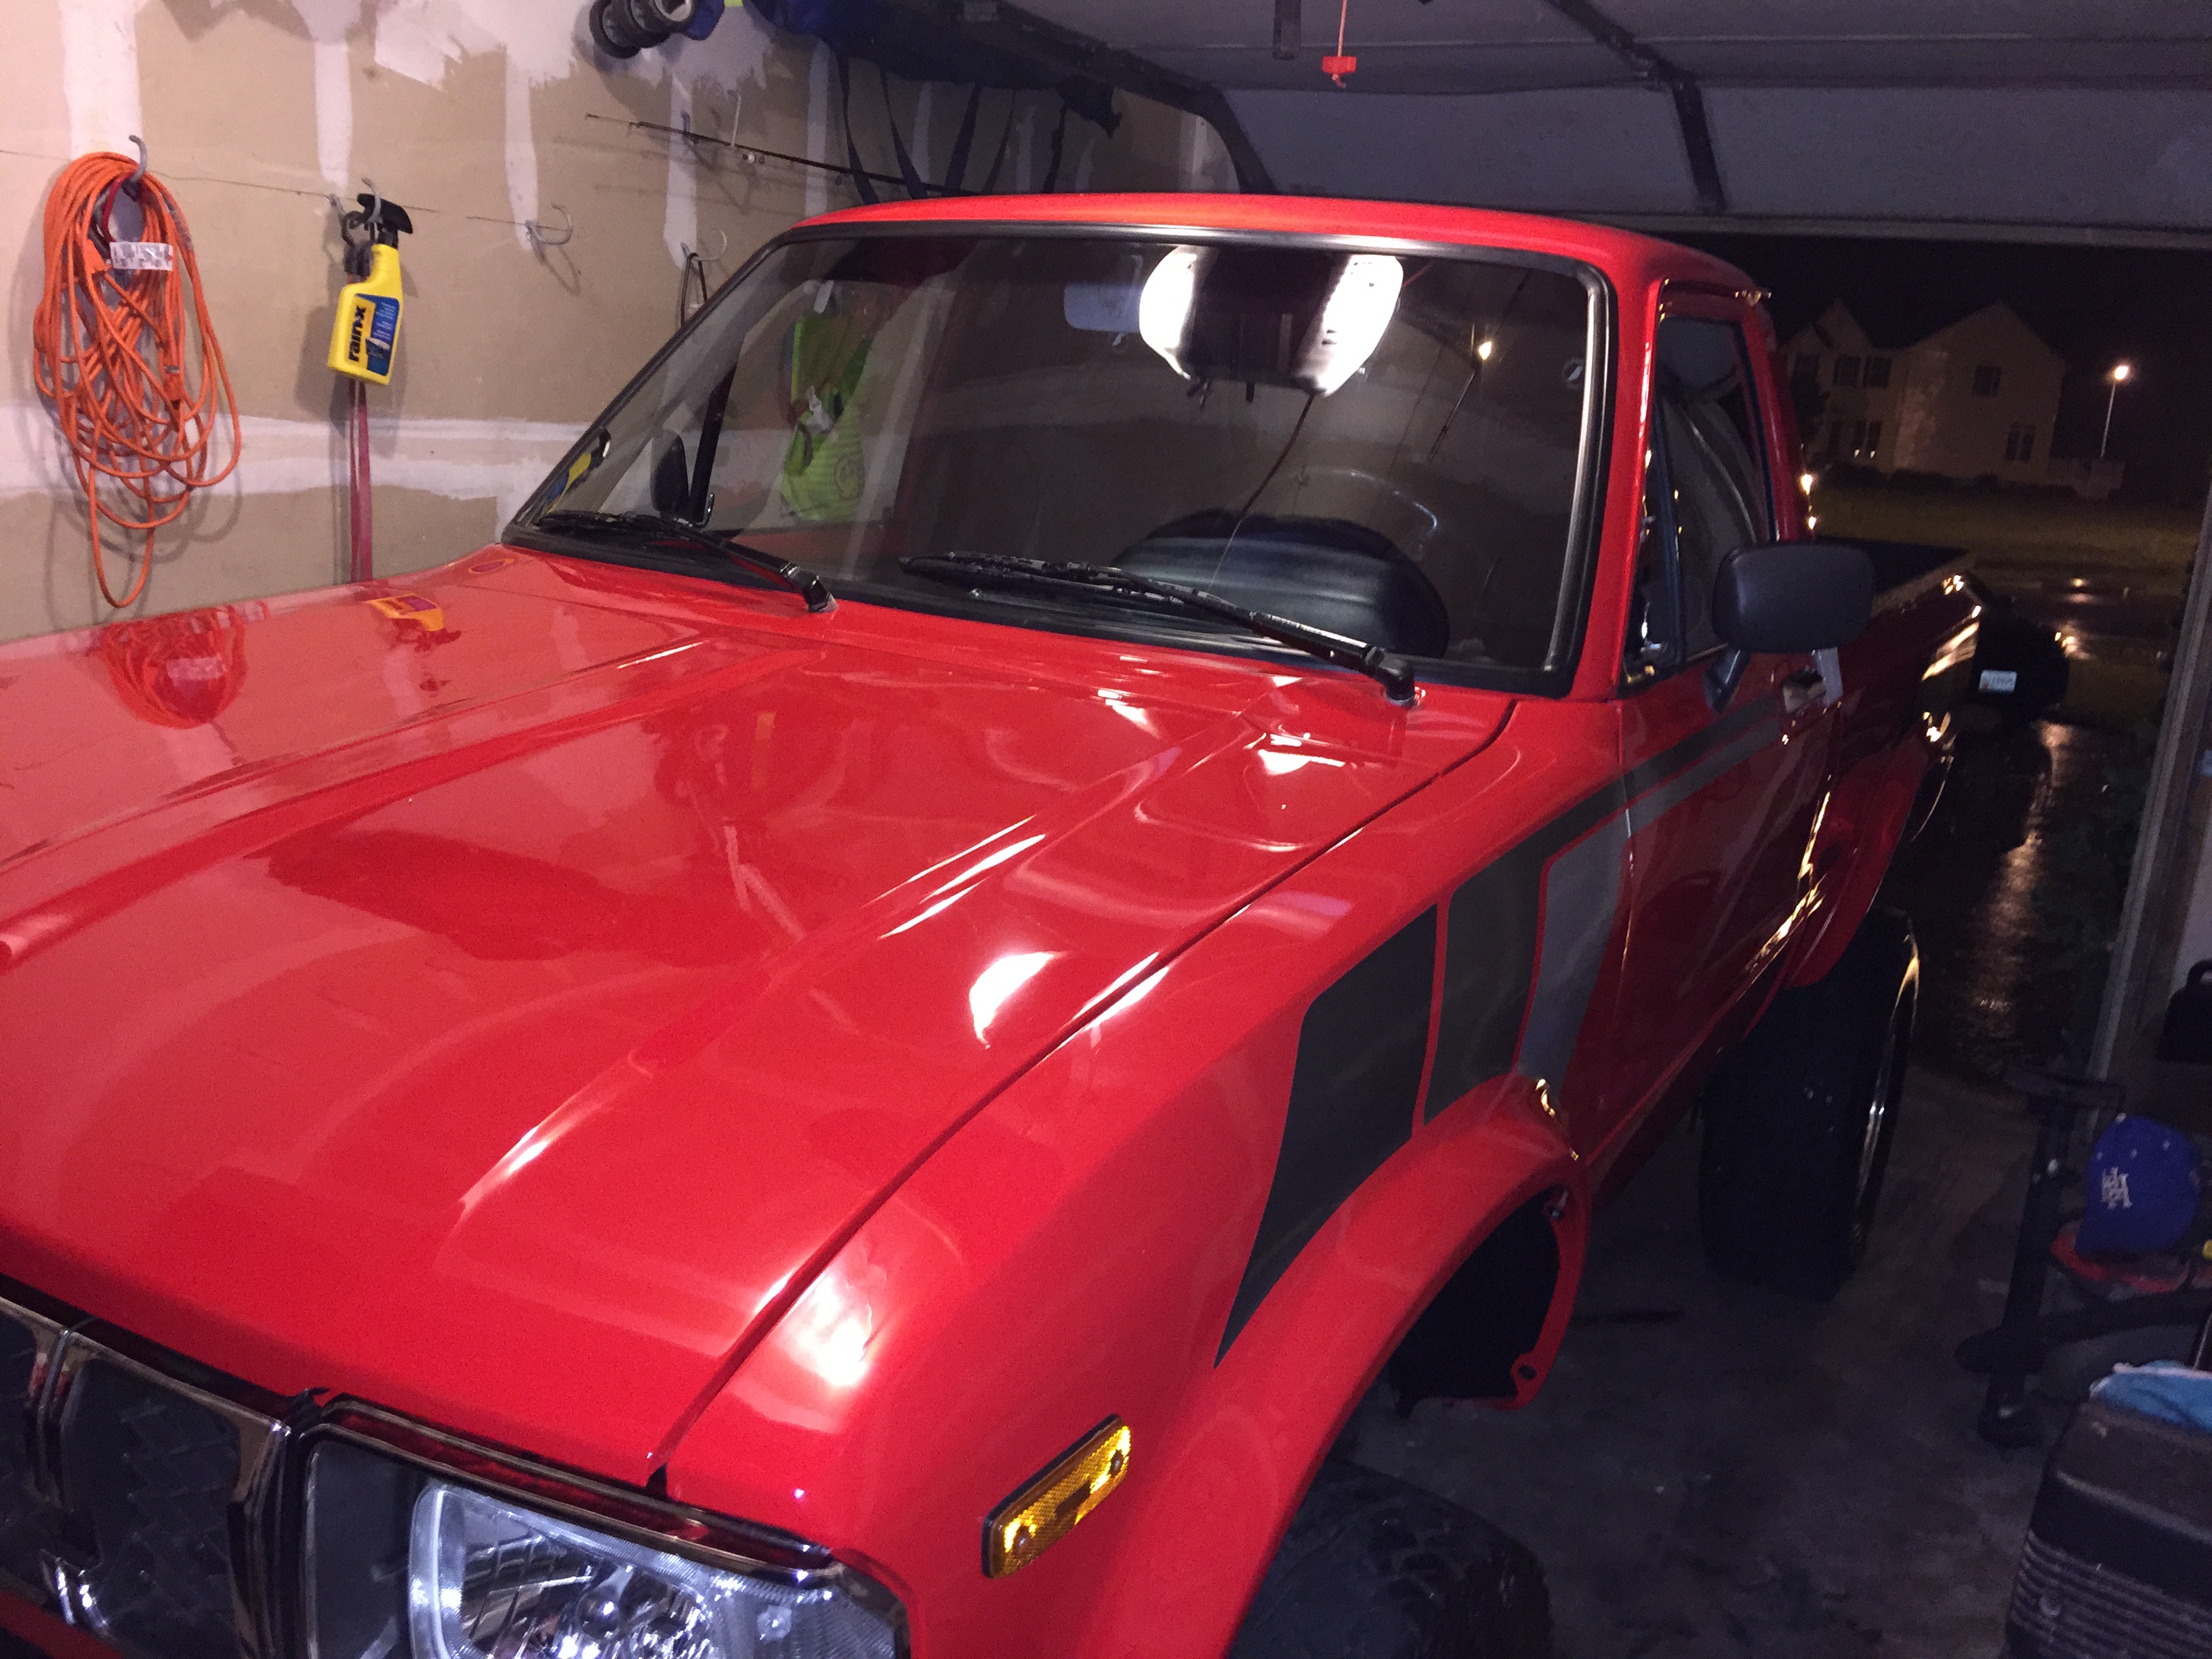
After a few hours of cleaning, polishing and waxing I am not ready to hit the road for the show!!
Only one problem... It's supposed to rain on and off all weekend, but this particular show is WAAYYYYY to fun to miss so it looks like the truck might see some rain (Corey, you can't make fun of me anymore!). Supposedly there is an import truck class so perhaps I have a chance to bring home some hardware - especially since all vehicles registered vehicles must be 30+ years old. Not many 30+ import trucks out there, but We'll see how the weekend goes.
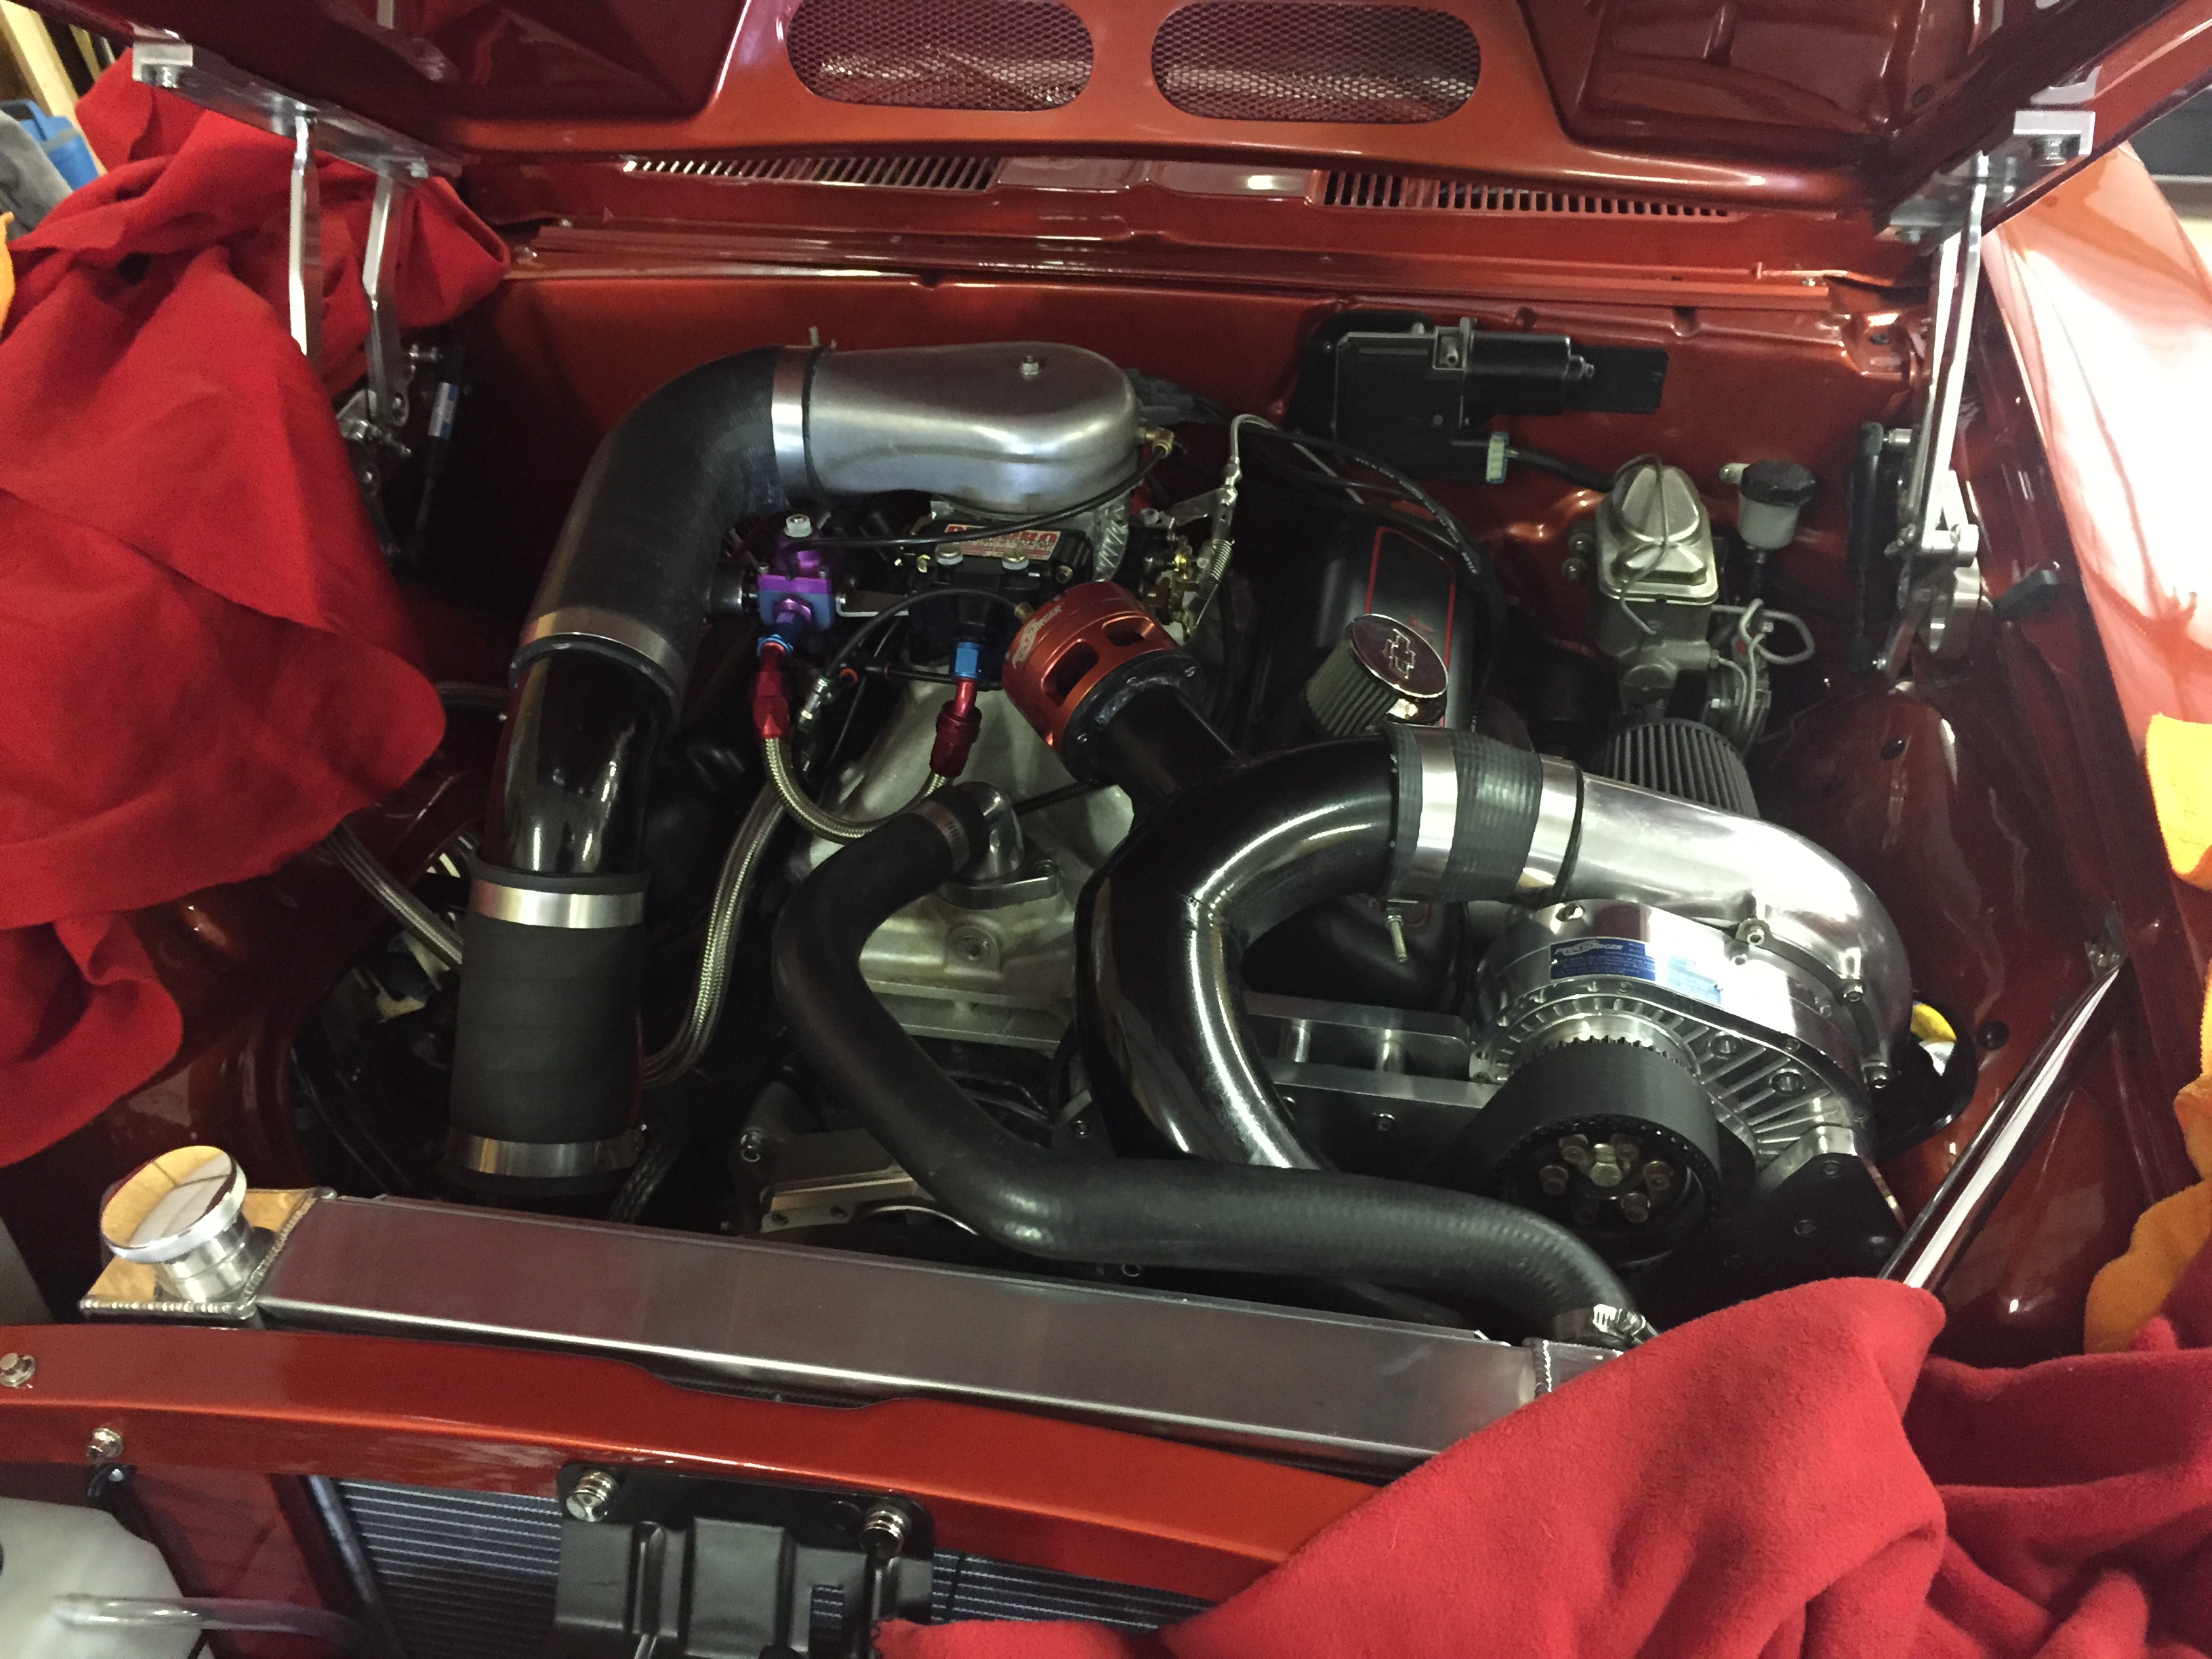
I figured that I might also leave you guys with some car porn. My Dad's friend just got done with this 69 Camaro Z28. It's packin' a little something under the hood... A ridiculously built 302 sporting a ProCharger supercharger that is dyno'ed at over 1,300 HP! Annnd.... It's carbeurated!!!! Runs an 8.4 1/4 mile on SMALL tires! I'm absolutely terrified to ride in it... Here you go, enjoy!

The sound in these videos don't even do it justice


I have been getting the run around from several people who supposedly have a set of fenderliners, but they either want me to pay a ridiculous amount for them or they say them have them but flake out and never return my messages. Soooo.... I took it upon myself to fix the ones I have. Since a bunch of tabs were cracked and they pretty much looked like crap I decided to have them sprayed with bedliner. I put duct tape on the back side of the tabs that were cracked to stabilize them and act like a form for the bedliner to form to. Then I took them down to friend's shop who just started doing spray in bedliners. It's the same as Line-X but if you recall, Line-X has forever lost my business. The idea worked like a charm! Only had the spray the wheel side and they came out looking better than just plastic.
Results:


After a few hours of cleaning, polishing and waxing I am not ready to hit the road for the show!!

Only one problem... It's supposed to rain on and off all weekend, but this particular show is WAAYYYYY to fun to miss so it looks like the truck might see some rain (Corey, you can't make fun of me anymore!). Supposedly there is an import truck class so perhaps I have a chance to bring home some hardware - especially since all vehicles registered vehicles must be 30+ years old. Not many 30+ import trucks out there, but We'll see how the weekend goes.
I figured that I might also leave you guys with some car porn. My Dad's friend just got done with this 69 Camaro Z28. It's packin' a little something under the hood... A ridiculously built 302 sporting a ProCharger supercharger that is dyno'ed at over 1,300 HP! Annnd.... It's carbeurated!!!! Runs an 8.4 1/4 mile on SMALL tires! I'm absolutely terrified to ride in it... Here you go, enjoy!


The sound in these videos don't even do it justice
Last edited by kawazx636; 07-29-2015 at 10:22 AM.
06-26-2015, 12:47 PM
#1267
Got the truck loaded up and ready to roll this morning - finished cleaning it up too
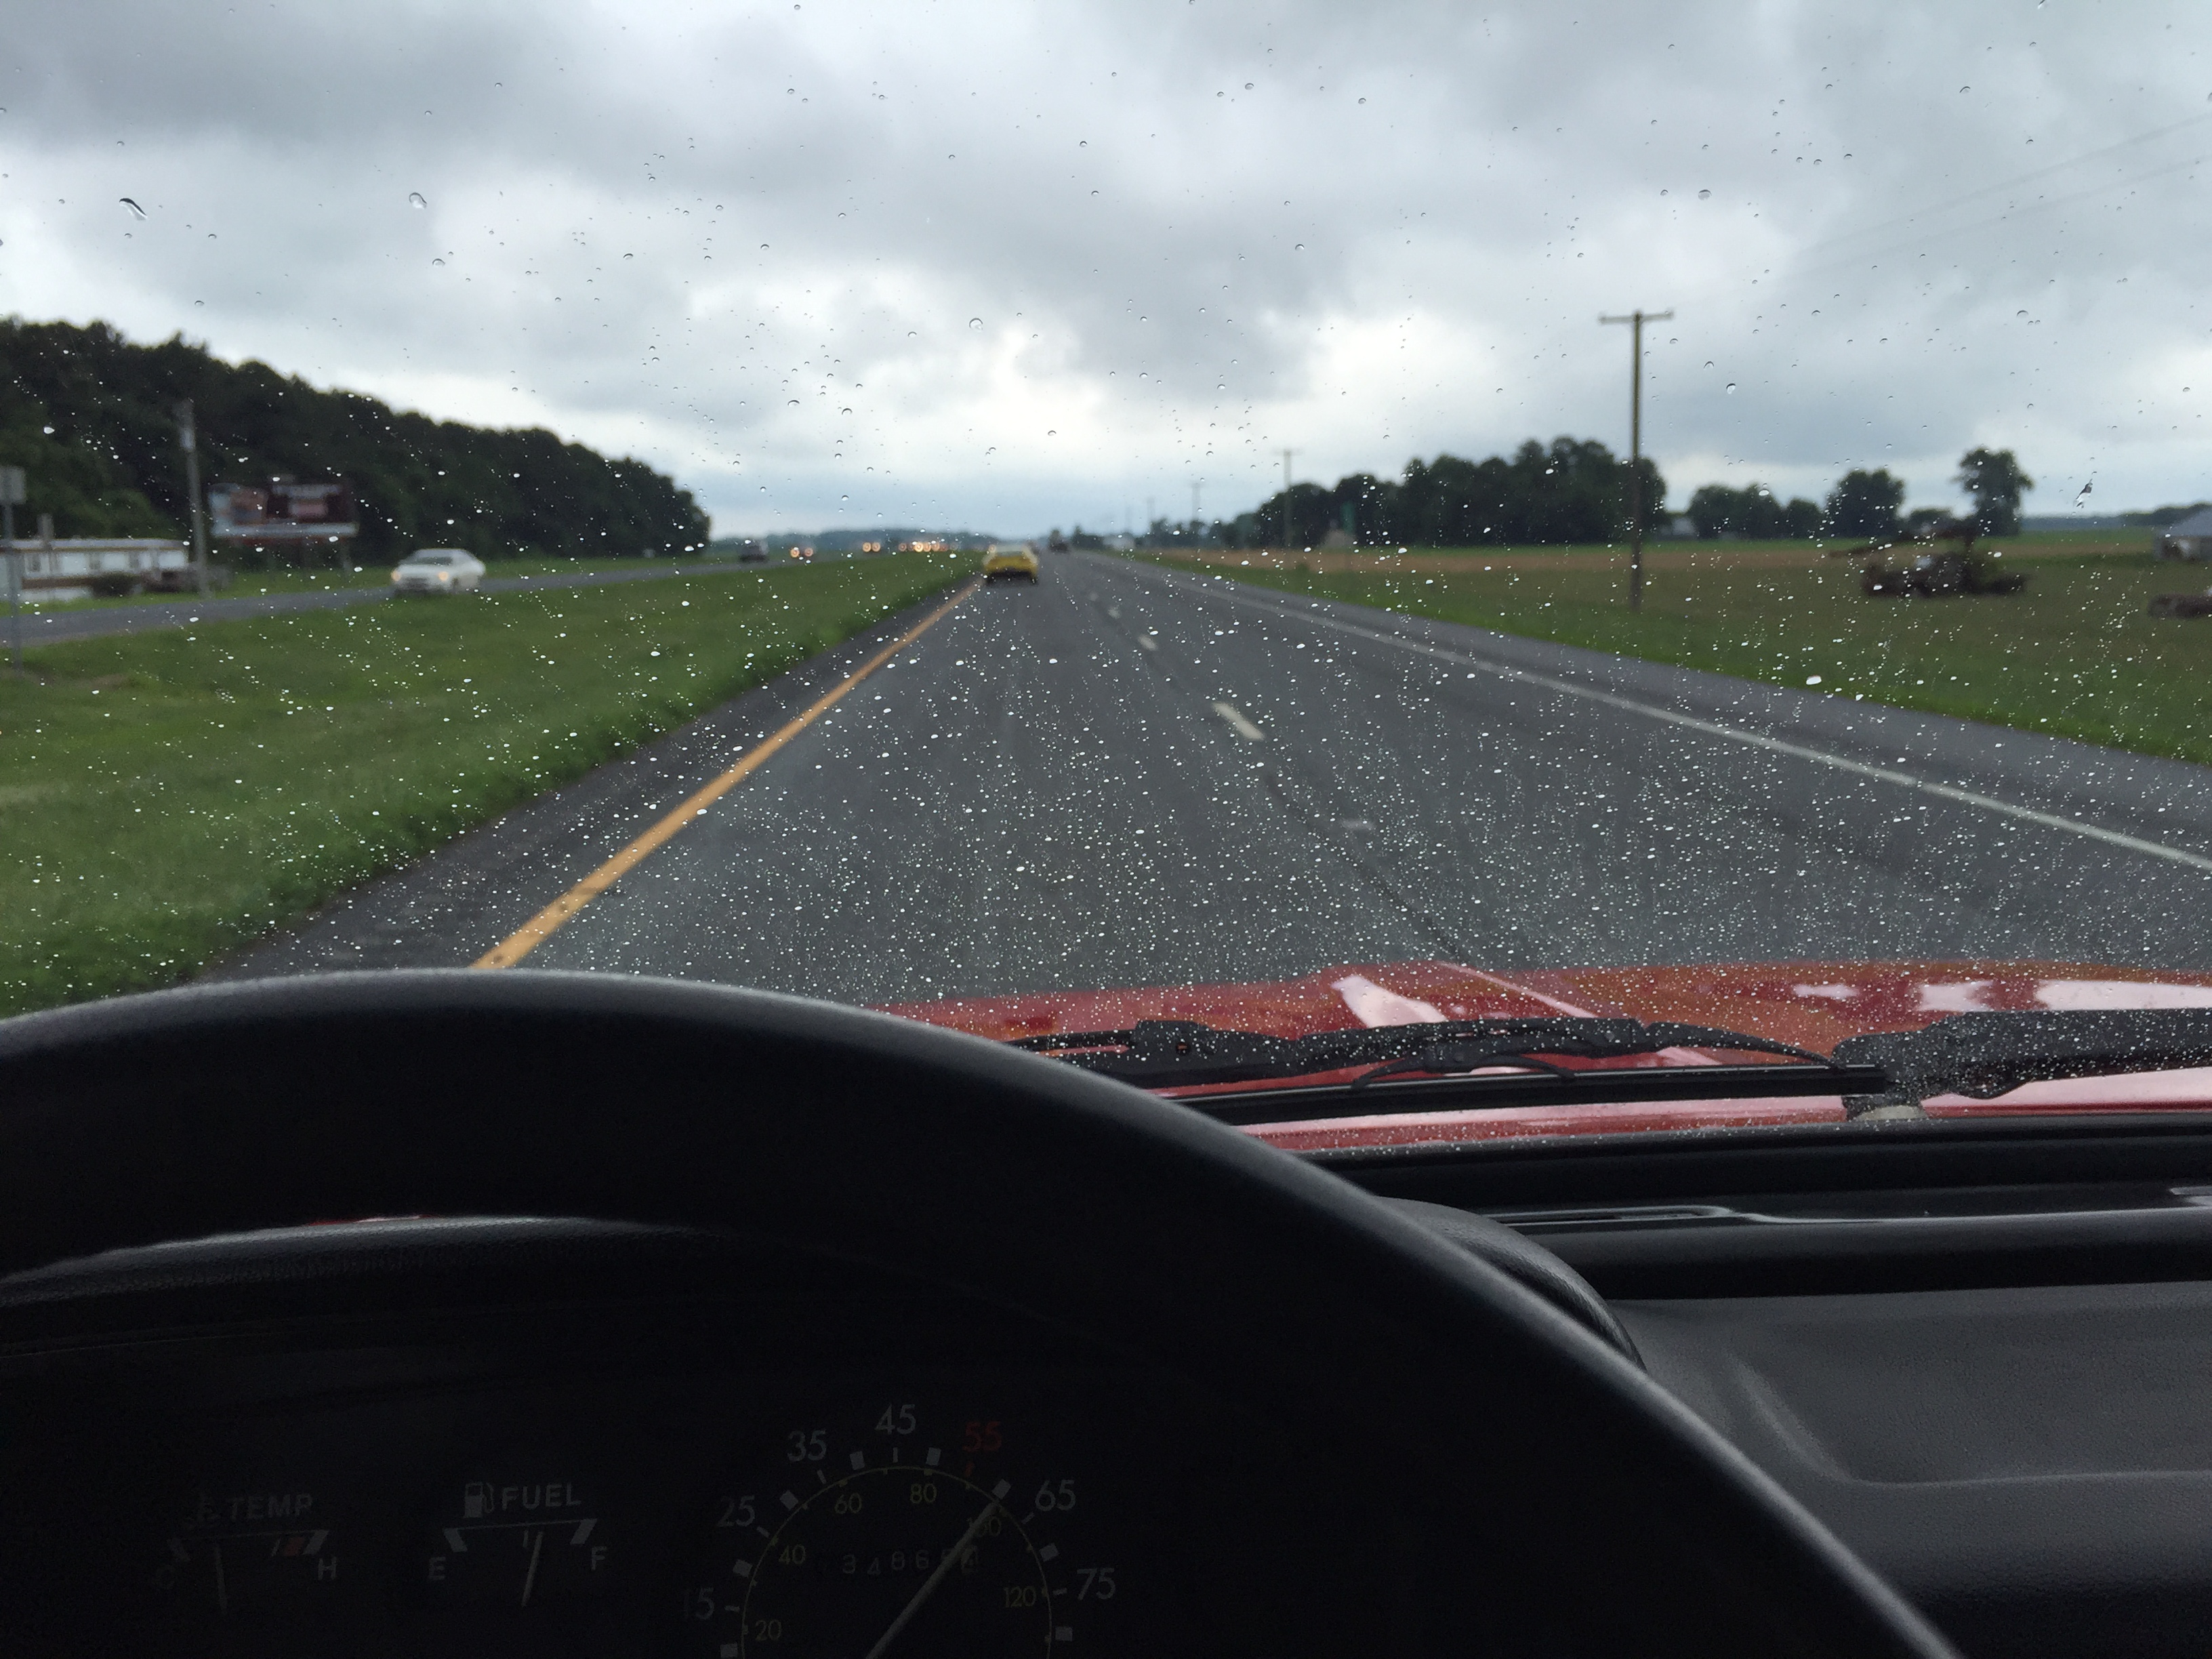
Corey, this one is for you... Tried dodging rain drops on my way but wasn't too successful
And some shots from the show:
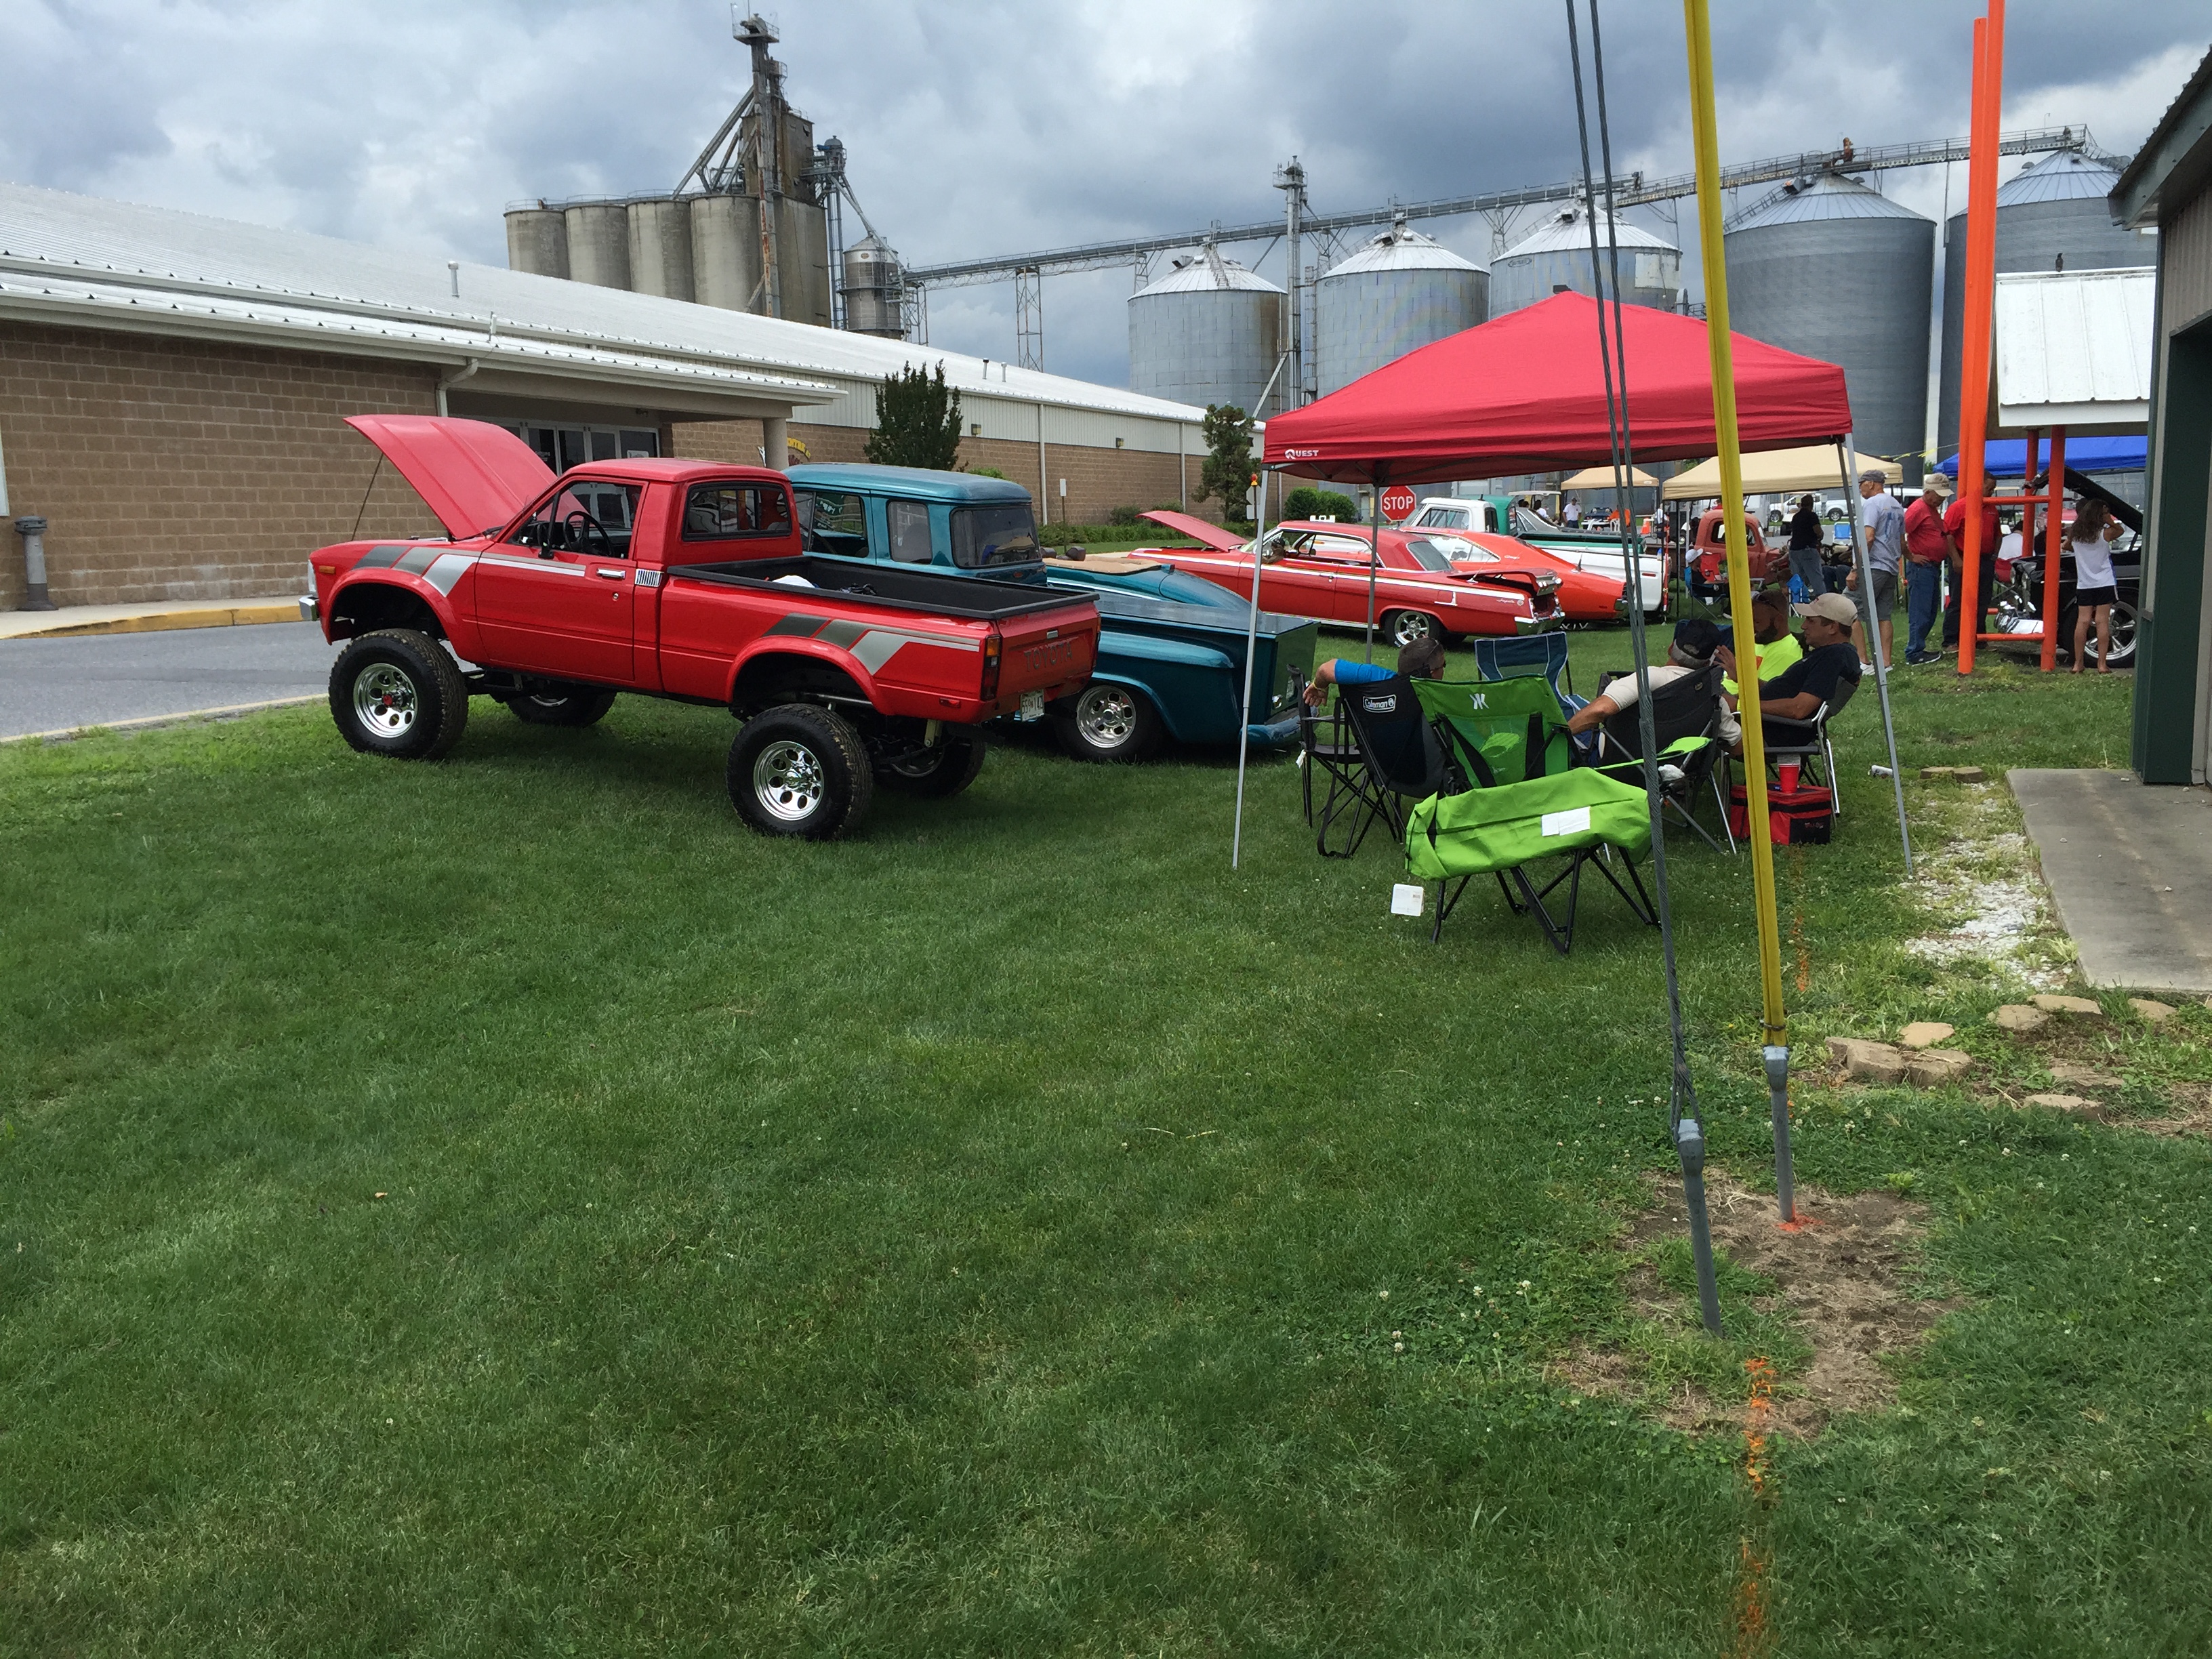
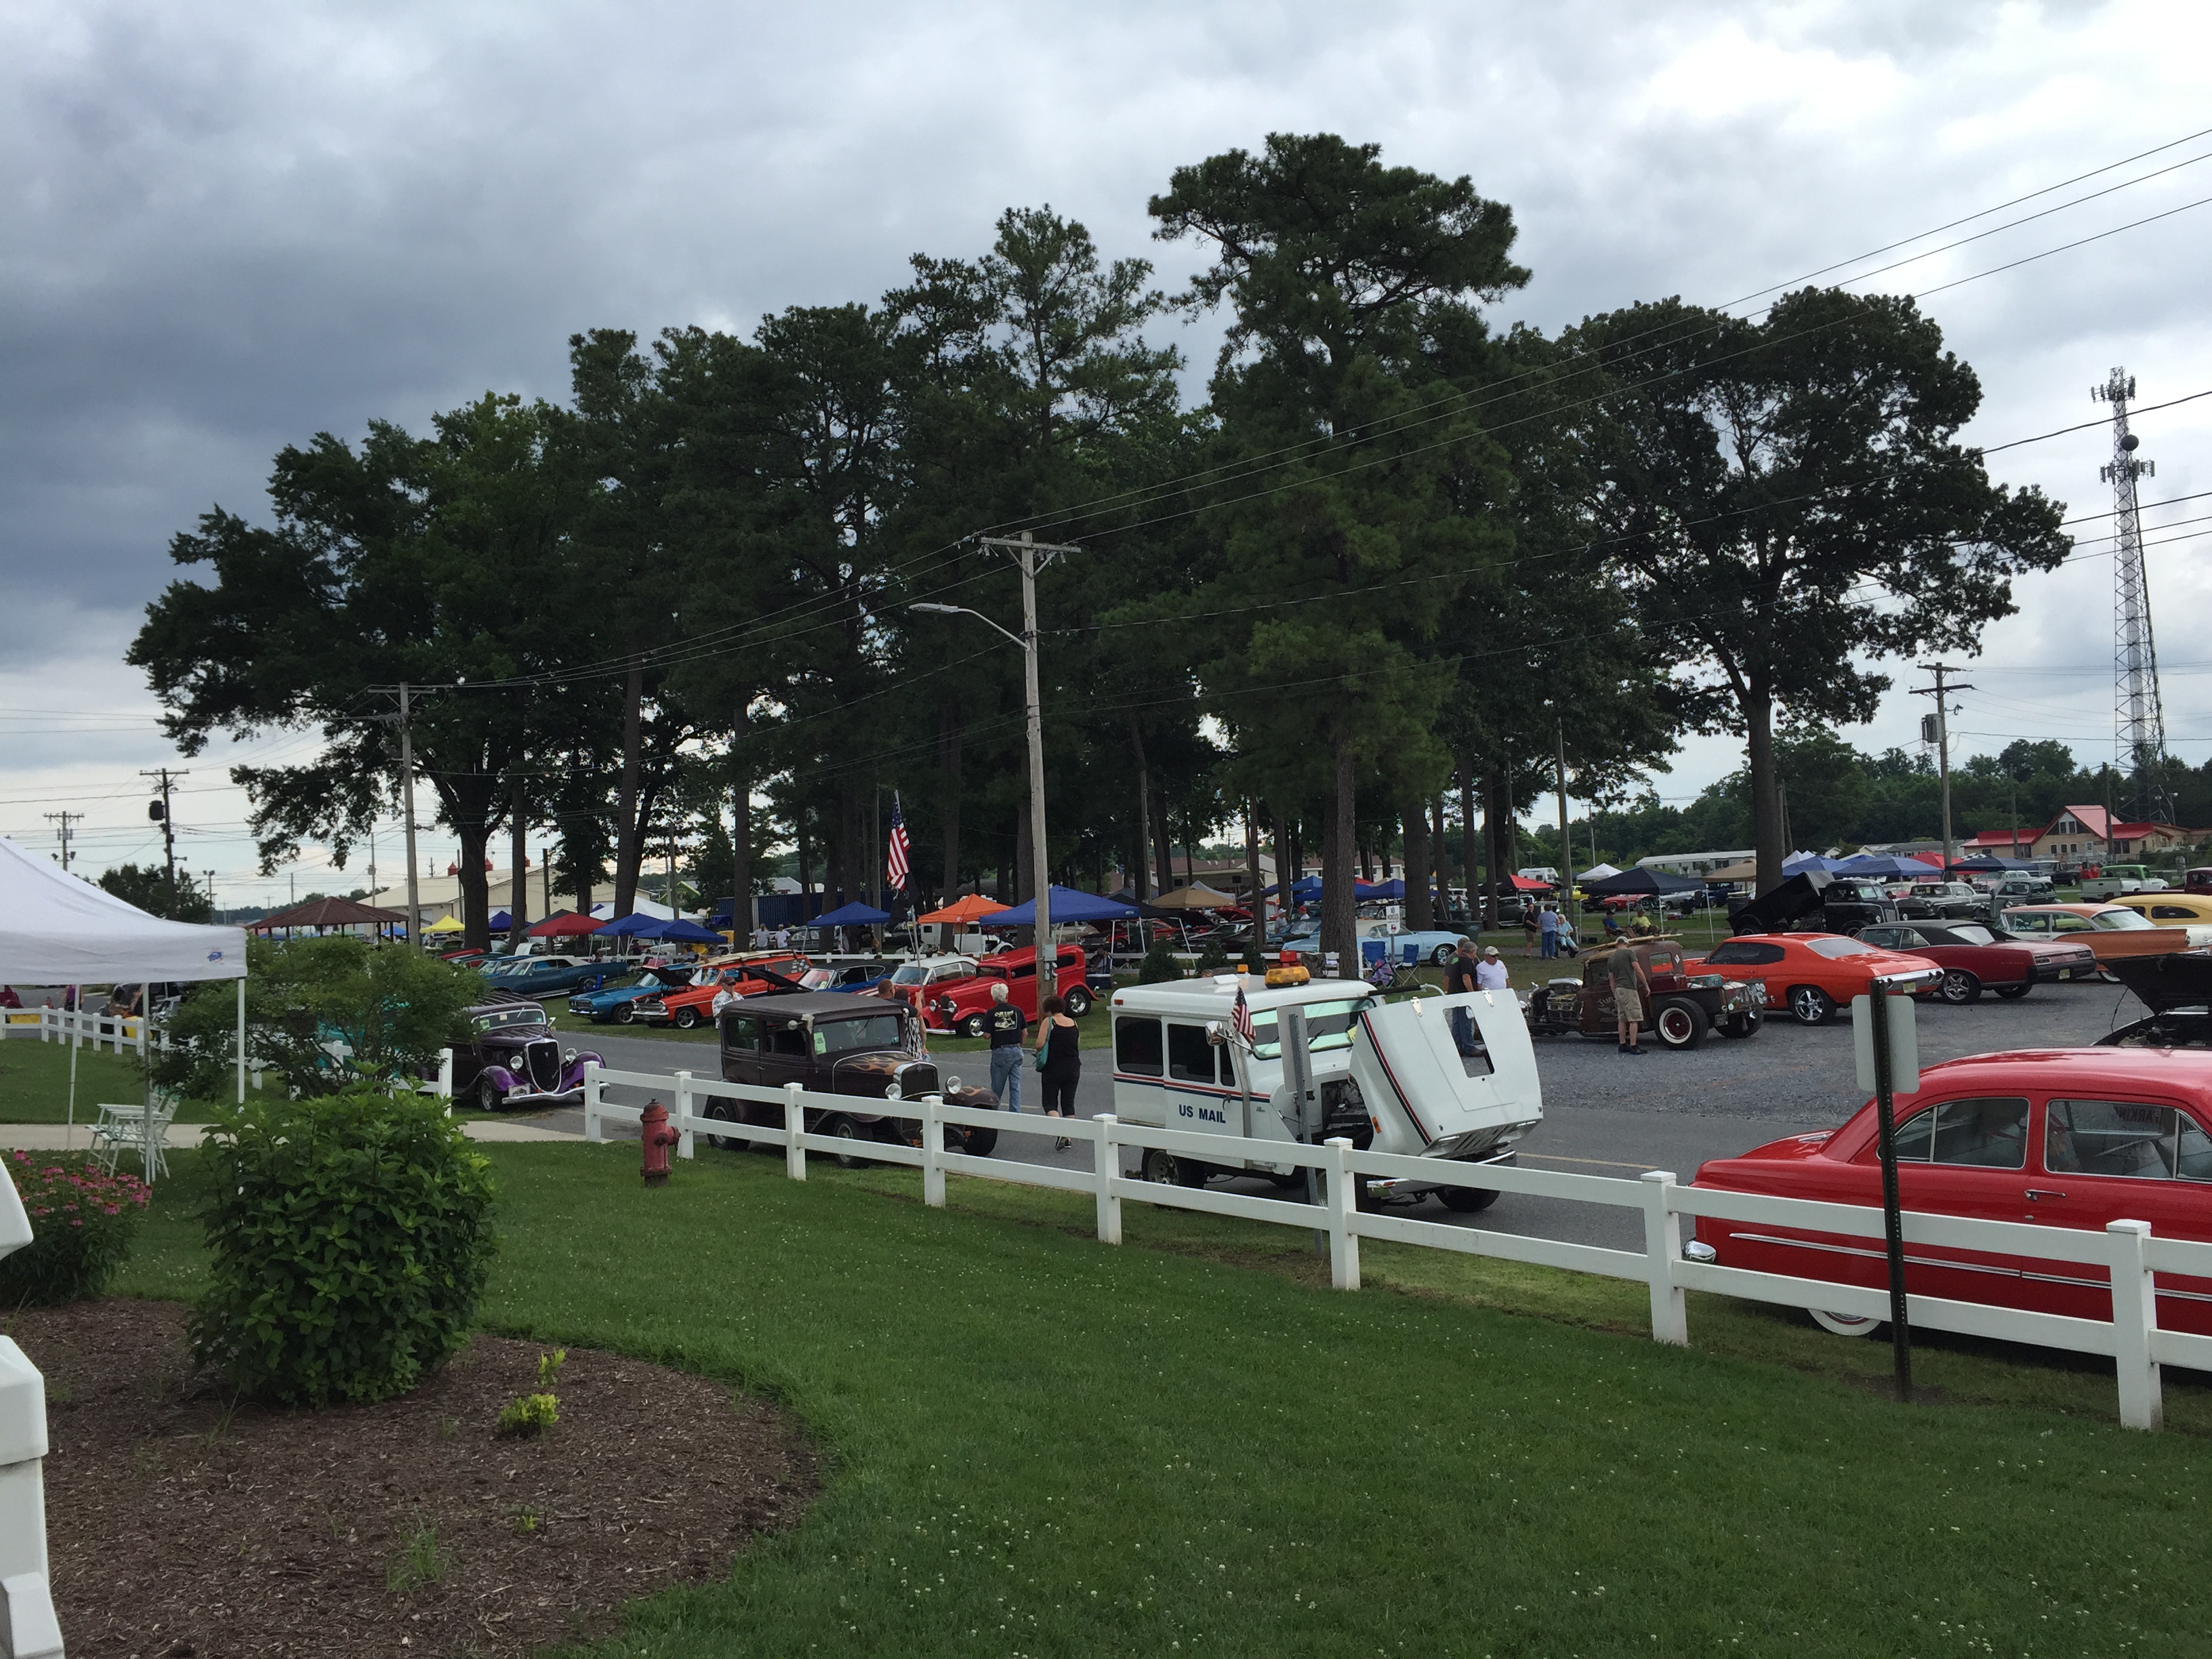
And that's only about a quarter of the cars that will be there! I was the 560th registered so we should see about 2000 cars here this weekend. More to come!


Corey, this one is for you... Tried dodging rain drops on my way but wasn't too successful

And some shots from the show:


And that's only about a quarter of the cars that will be there! I was the 560th registered so we should see about 2000 cars here this weekend. More to come!
Last edited by kawazx636; 07-20-2015 at 08:39 AM.
06-26-2015, 05:42 PM
#1268
cool ... , I have been caught in the rain as well .. it happens , and I only mentioned it , cause , you we're "hackin' " on me  .. we're even now
I'm here for a local show this weekend .. Peach City Beach Cruise .. it attracts cars from everywhere , a world class event .. 800 cars and sun sun sun
have fun buddy
.
.. we're even now I'm here for a local show this weekend .. Peach City Beach Cruise .. it attracts cars from everywhere , a world class event .. 800 cars and sun sun sun
have fun buddy
.
06-27-2015, 10:19 PM
#1270
Registered User
iTrader: (1)
Join Date: Jul 2012
Location: Calistoga, CA
Posts: 639
Likes: 0
Received 0 Likes
on
0 Posts
Nice save on the fender liners, those things are unobtanium.
I was thinking my options over on repairing mine, and sandwiching the cracked parts with 1/8" strips of ABS plastic and epoxy were my thoughts.
Also, have you considered using oversized washers behind the mounting screws to increase their footprint? That was another thought I'd had: bigger foundation, less energy concentrated onto a smaller area.
06-30-2015, 01:43 PM
#1271
The show was fun! Perhaps too much fun since I broke my phone so no more pictures of that event... Tons of very nice cars unfortunately the rain kept the turnout down to about 1,000 registered cars. My Pop's friend with the Z28 Camaro above won best Pro-Street and his other friend won best Sedan Delivery/Wagon with his '55 Chevy Wagon (GORGEOUS CAR!!). A couple other guys we were with placed in the top 30. It's kind of neat that I was hanging out with the owners of basically the top 1% of the cars in the show. Definitely a good time though with lots of booze, food, laughter and burnouts! Sunday was definitely a recovery day for me!
My truck drove great in the rain - unfortunate that I had to drive it in the rain, but at least now I'm not so apprehensive about it. Seals and weather stripping didn't leak at all, but the truck is a damn sauna in the rain with the windows up and no A/C!! I may look into some A/C options soon... The wax I used was incredible! I wicked off the water and dirt really well so when I got home I just had to wipe it down with a microfiber towel and it was shining like it was when I left! I forgot the name of the stuff, but I'll let you guys know what it is when I get home.
My truck drove great in the rain - unfortunate that I had to drive it in the rain, but at least now I'm not so apprehensive about it. Seals and weather stripping didn't leak at all, but the truck is a damn sauna in the rain with the windows up and no A/C!! I may look into some A/C options soon... The wax I used was incredible! I wicked off the water and dirt really well so when I got home I just had to wipe it down with a microfiber towel and it was shining like it was when I left! I forgot the name of the stuff, but I'll let you guys know what it is when I get home.
06-30-2015, 09:29 PM
#1272
Tonight I decided to go ahead and pull the valve cover off to check the valve clearance and do some light dress up that I have been meaning to do. The valvetrain looks just as good as the last time I saw it before she was fired up! She is running really healthy and clean - the oil in there now is about 450 miles old and it still has a nice clean golden color.
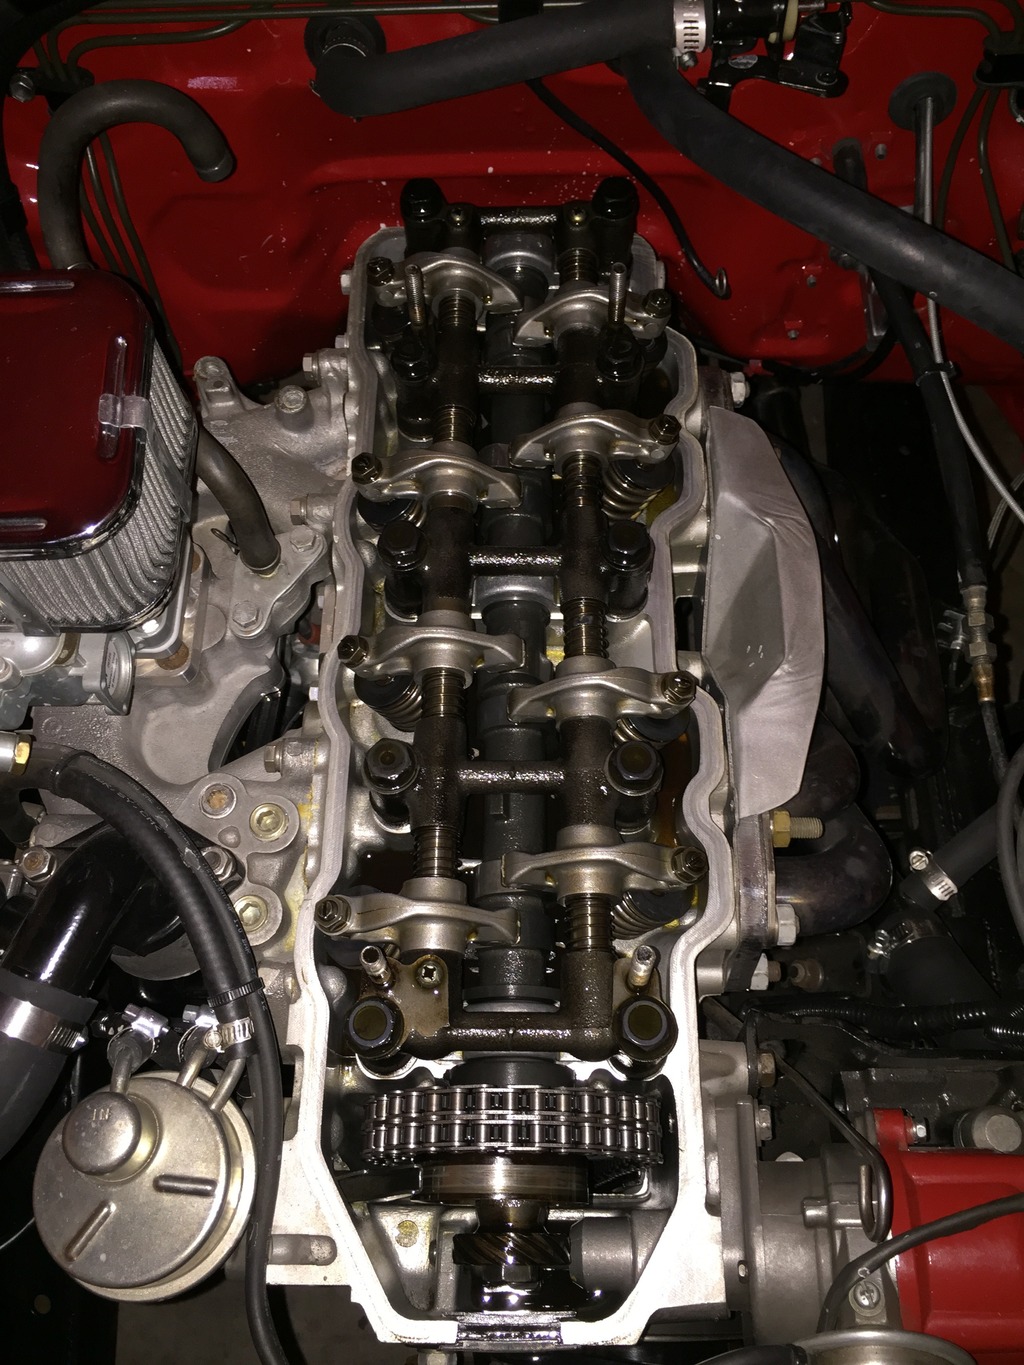
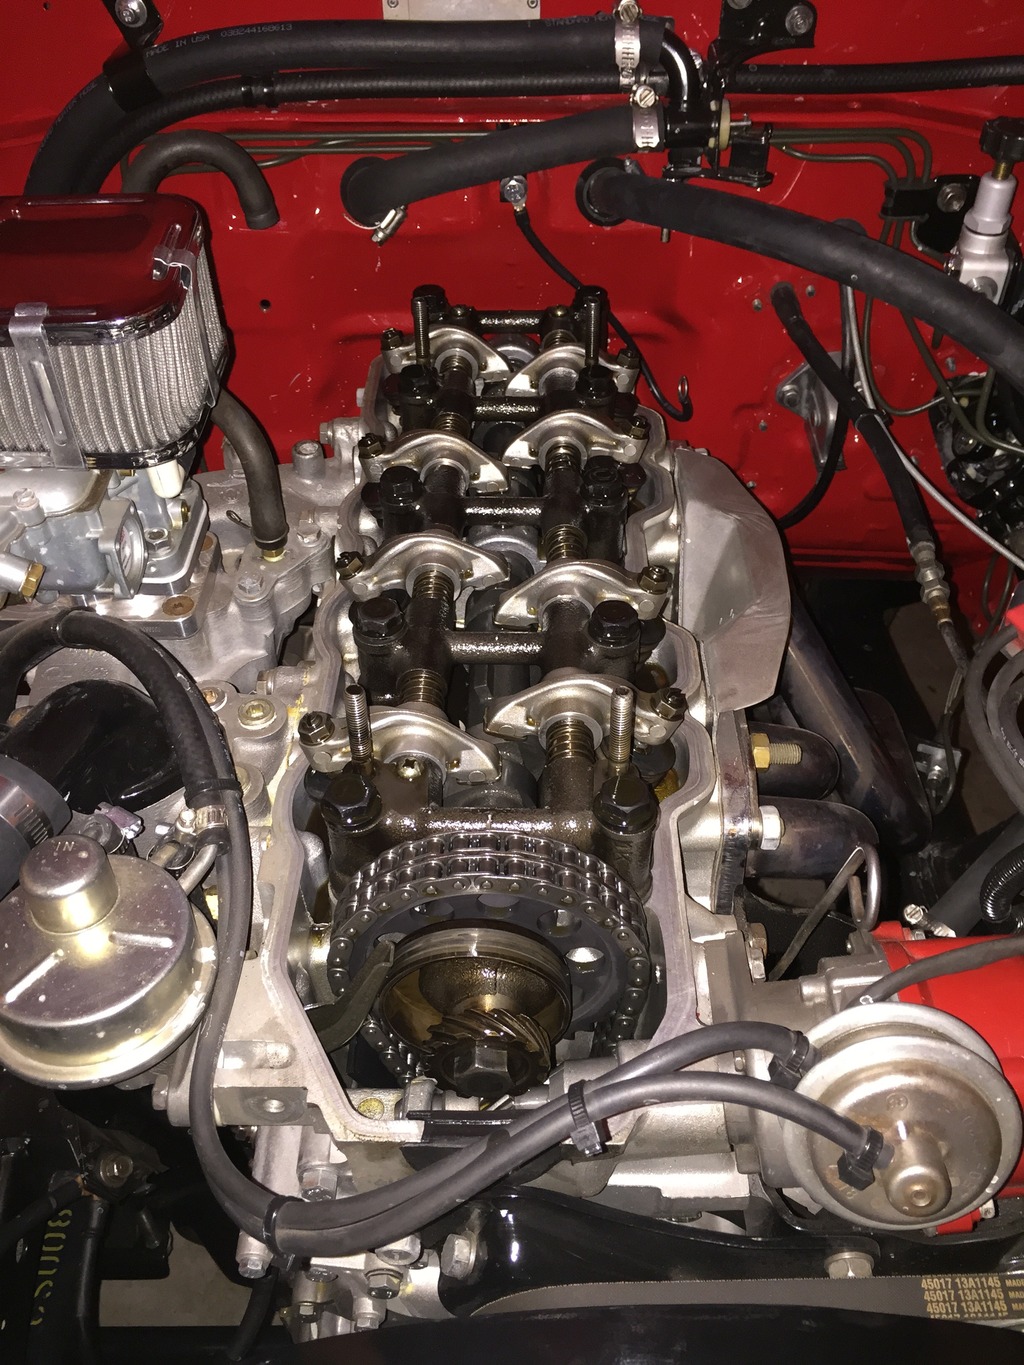
The valve clearance was a little loose which is what I had expected with the new camshaft. I was also starting to get a little extra valve chatter over the last couple hundred miles so it was about time for the first check-up. The Camshaft break in looks good so I just tighted the valve clearance and it should be good for a while. While I have the valve cover off, I'm going to strip it down and powdercoat it, along with some other small parts that I didn't already powdercoat.


The valve clearance was a little loose which is what I had expected with the new camshaft. I was also starting to get a little extra valve chatter over the last couple hundred miles so it was about time for the first check-up. The Camshaft break in looks good so I just tighted the valve clearance and it should be good for a while. While I have the valve cover off, I'm going to strip it down and powdercoat it, along with some other small parts that I didn't already powdercoat.
07-02-2015, 07:25 AM
#1274
I snagged some chrome and clear powder to do some parts on my Pop's truck (had to practice on something first, right?? LOL) and they turned out pretty good! But I'm going with red power on my valve cover again and black on the small stuff. Between my aluminum radiator, billet battery tray, billet wire loom, chrome air cleaner (which will eventually be replaced with a billet air cleaner) and soon to acquire billet oil cap, I have decided to balance it out with a little black on the small stuff. I don't like everything to be super shiney - that's also more to clean!! LOL
07-02-2015, 10:11 PM
#1275
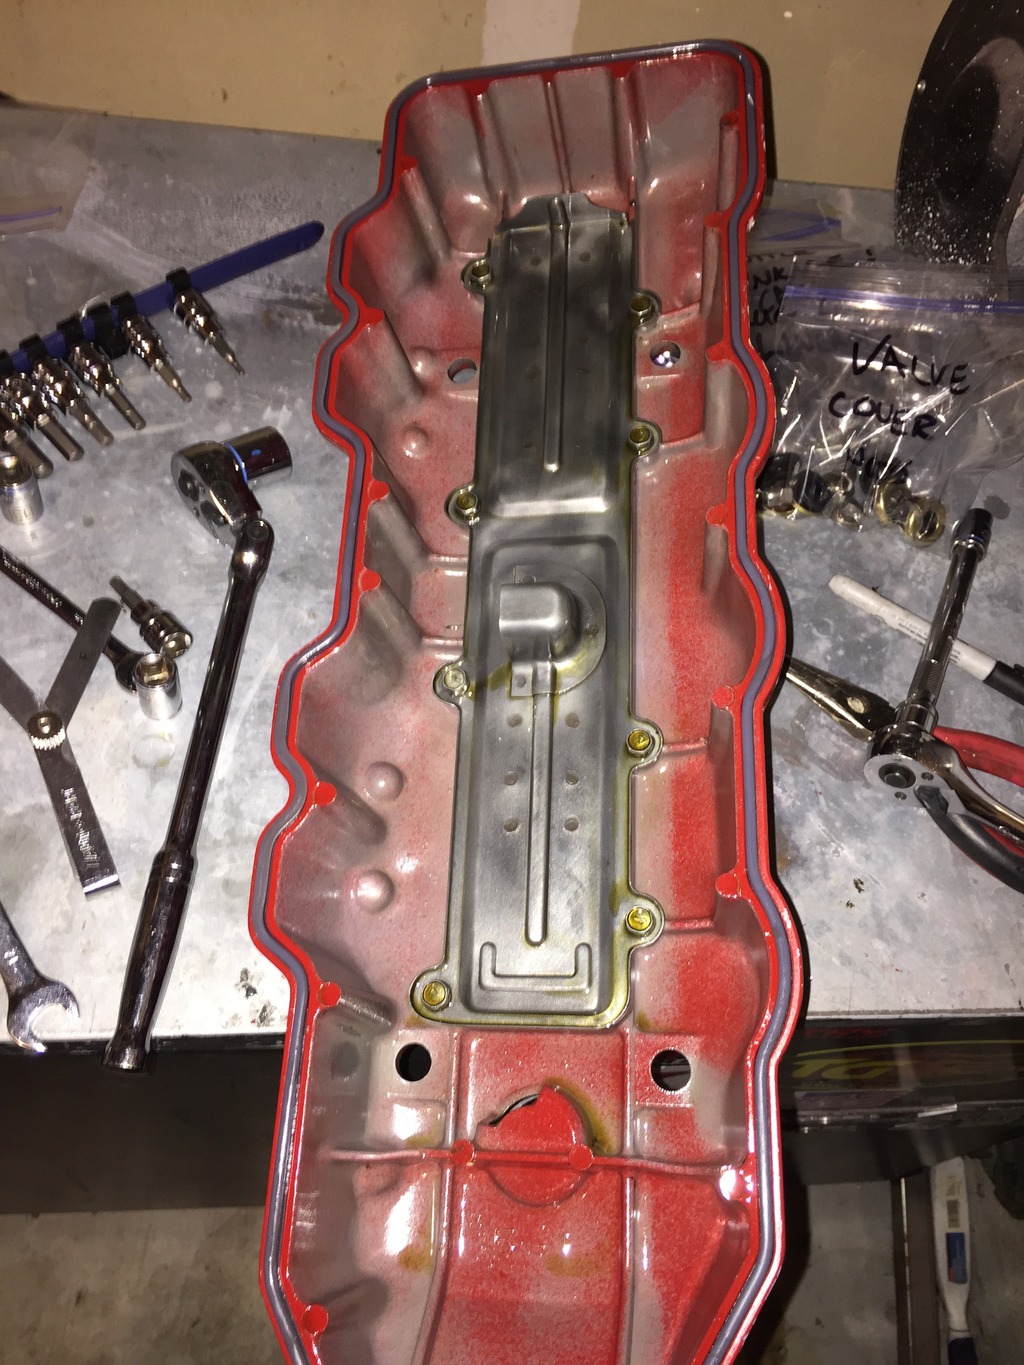
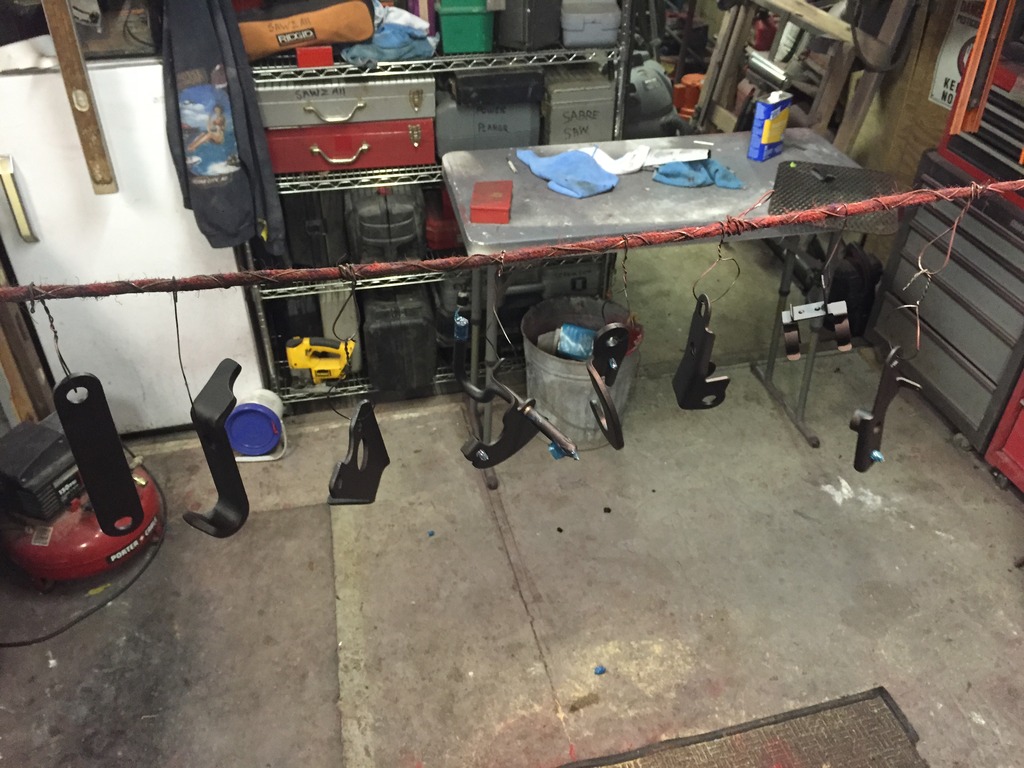
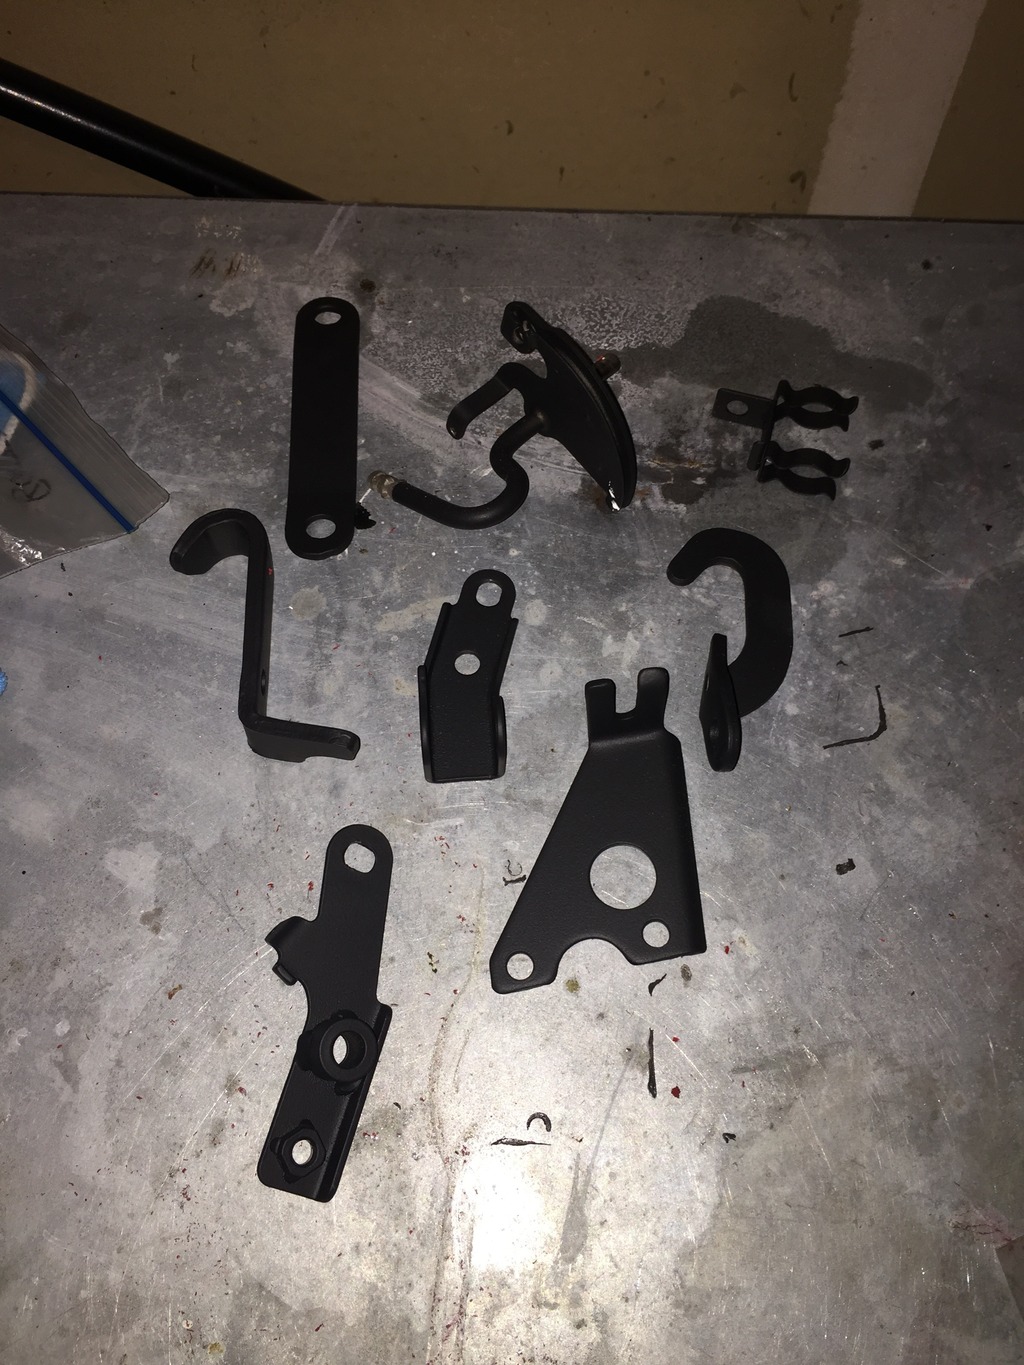
Had a little powdercoating session tonight - hopefully the last one for a long time! I shot a bunch of miscellaneous stuff under the hood that I had been putting off (throttle linkage, engine hoist hooks, distributor plug bracket, etc...) and re-coated my valve cover. I got this down to an efficient production with my rope braided with wire strung across the shop for my ground to connect to my parts:
I meant to use gloss black powder but I grabbed the wrong bottle and they ended up being satin black. I actually think it will all look better in satin black so maybe it was a good mistake.
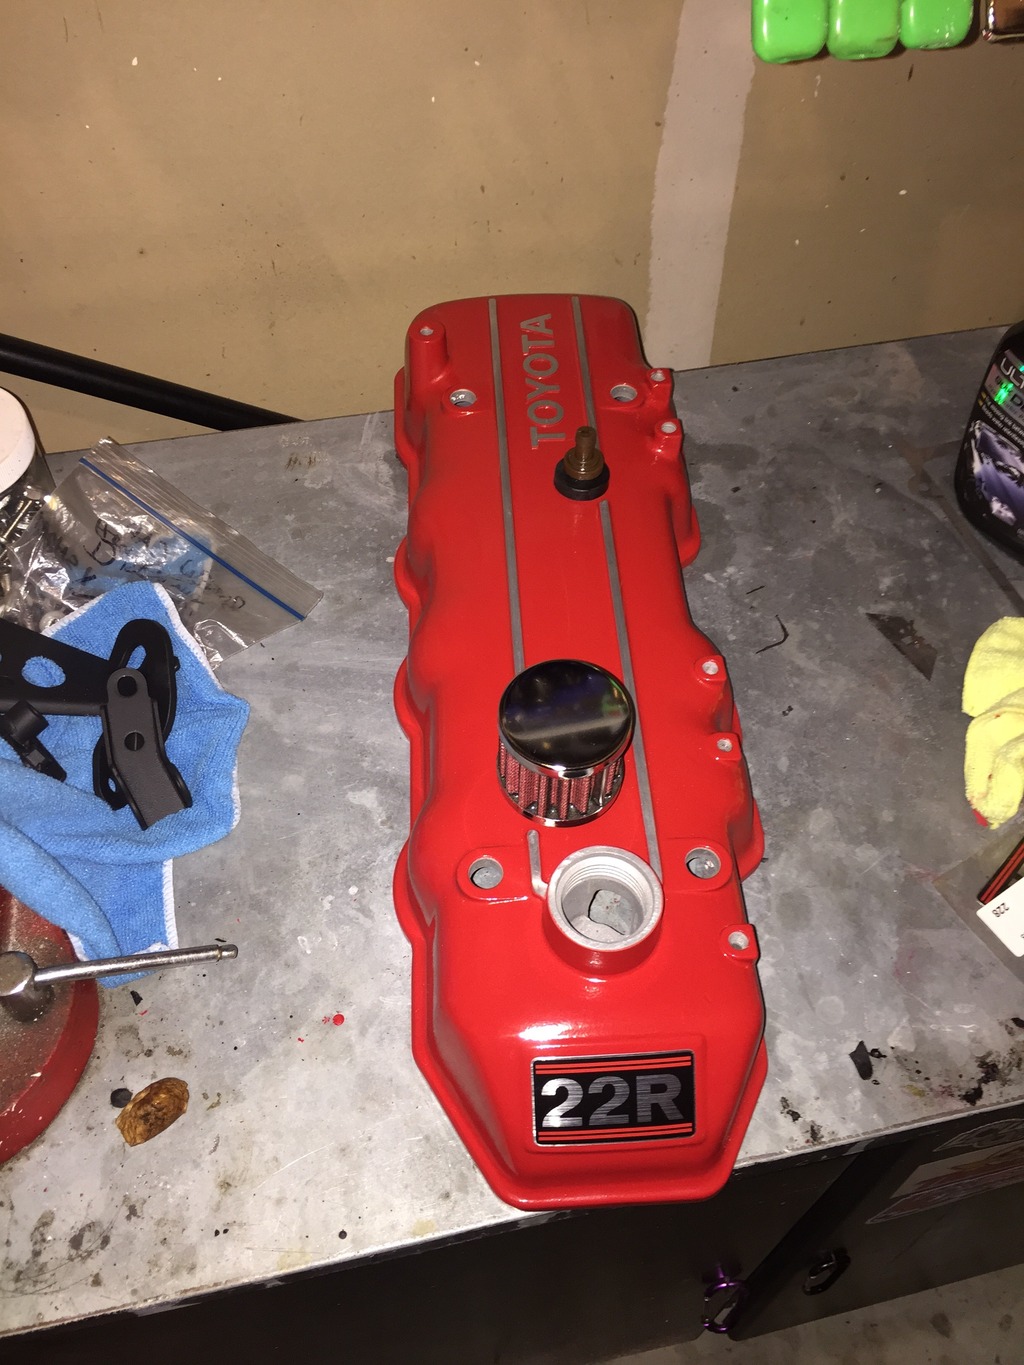
After I powdercoated the valve cover I took it over to my friend's house to mill off the raised lettering - that was much easier than using a file and sandpaper like I did last time. I also began to polish the raised areas but decided I was been a little too ambitious so I'm going with the brushed look.
Started putting it all back together tonight but I want to get new bushings for the throttle cam pivot shaft so I'll grab those tomorrow and get her running again before the weekend.

I meant to use gloss black powder but I grabbed the wrong bottle and they ended up being satin black. I actually think it will all look better in satin black so maybe it was a good mistake.

After I powdercoated the valve cover I took it over to my friend's house to mill off the raised lettering - that was much easier than using a file and sandpaper like I did last time. I also began to polish the raised areas but decided I was been a little too ambitious so I'm going with the brushed look.

Started putting it all back together tonight but I want to get new bushings for the throttle cam pivot shaft so I'll grab those tomorrow and get her running again before the weekend.
Last edited by kawazx636; 07-02-2015 at 10:13 PM.
 07-06-2015, 09:25 AM
#1277
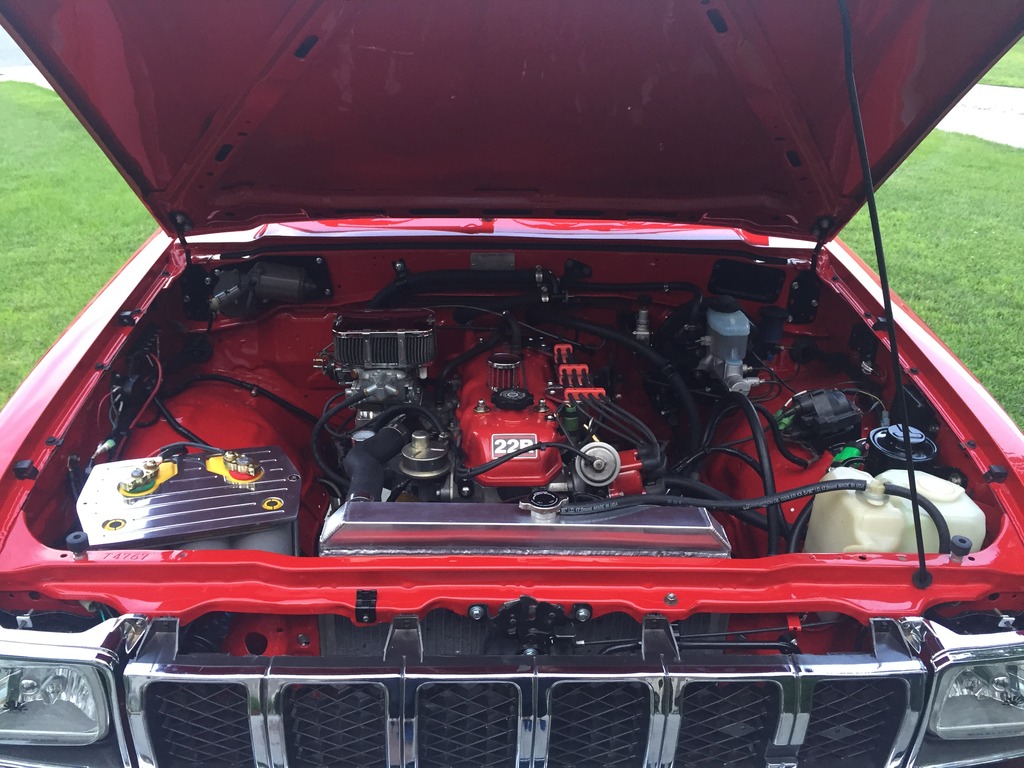
I got everything back together this weekend. I like how you can hardly tell which parts I just powdercoated satin black! That's what I was going for - kind of trying to make things "disappear" under the hood:
I'm not sure if a previous owner in all of their infinite wisdom decided to drill out one of the holes in the throttle bracket where the throttle cam pivots on, but the hole closest to the carb was far too large to for the plastic bushing to properly do it's job. So I took it over to my Pop's friend's shop and made a bushing on his lathe to fit into the hole so that it eliminates the obscene amount of slop in the travel of the throttle and it also gives the return spring something thicker to ride on thus giving me a stronger return rate on the spring. I'm not too sure how I missed this before now, but it has been quite a while since I built the engine. The problem I have now is that since I tightened up the slop on that linkage I now have a slight binding issue on my carb linkage - when coming down to idle it occasionally binds at about 1,100 RPM instead of returning back down to about 800 where I have the idle set. There are slight alignment variations in the actual mounting of the throttle linkage so I should be able to make the adjustment to keep it from binding - it'll be an adjust, test, adjust again, test, adjust again, etc process until I get it right. I want to get a new throttle cable before I get on with figuring all that out.
I also made an adjustment to my gas pedal. Before, I wasn't getting enough travel in my modified 2000 Tacoma pedal to fully engage the secondaries on my carb so I had to do a little bending of the pedal to get more travel while maintaining a desirable pedal position relative to the floor and brake pedal. Now I have full range of the throttle and boy does it make a difference!!! Combine that with the valve clearance adjustments I made and she is running much better and a lot more quiet! I have nearly eliminated all valve chatter (compression checked and leaked down to make sure the valves weren't staying open when fully closed) and now pretty much all you can hear under the hood is the obnoxious mechanical fuel pump which I am thinking about removing and going with an electric pump. I'll get a video to show you guys how quiet she runs now once I get the linkage binding worked out. For now, here she is pulling 31x10.5 tires at 70mph (about 78mph corrected for tire size) with no problems (even slightly uphill)!
 07-13-2015, 01:05 PM
#1278
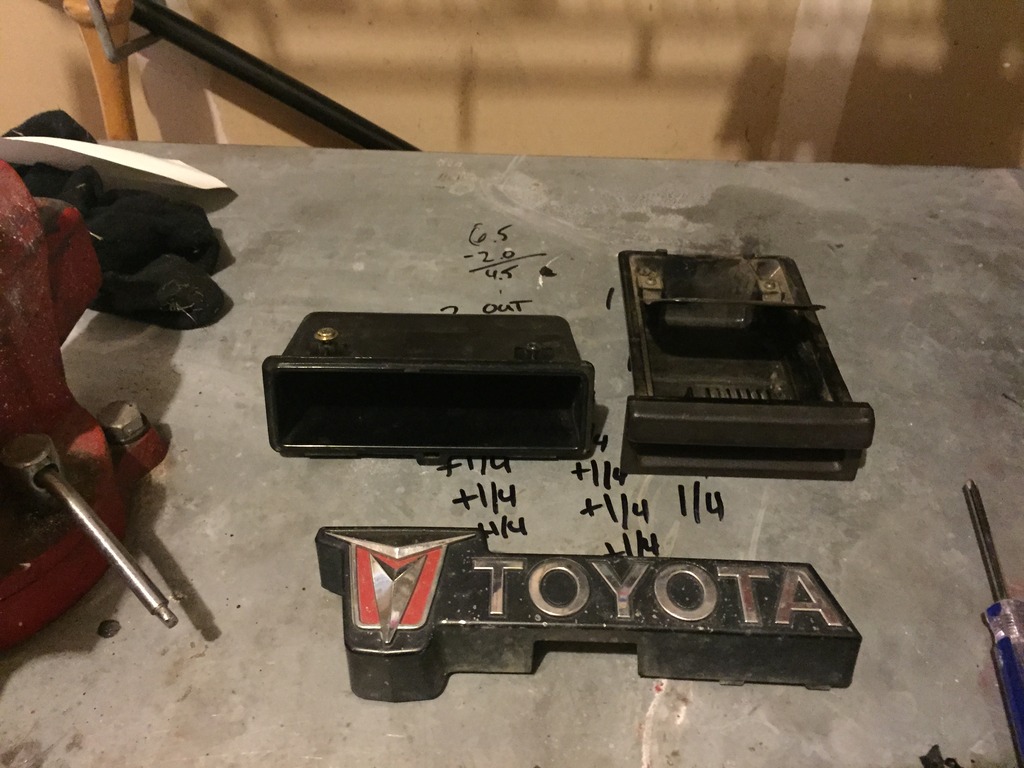
I got some of the final pieces in the mail today that I need to get my truck a little closer to being "Complete." Ashtray, dash pocket and grille emblem - all in pretty good shape! Thanks lledwod!!! They need a little cleaning and TLC, but they will suit my truck just fine!
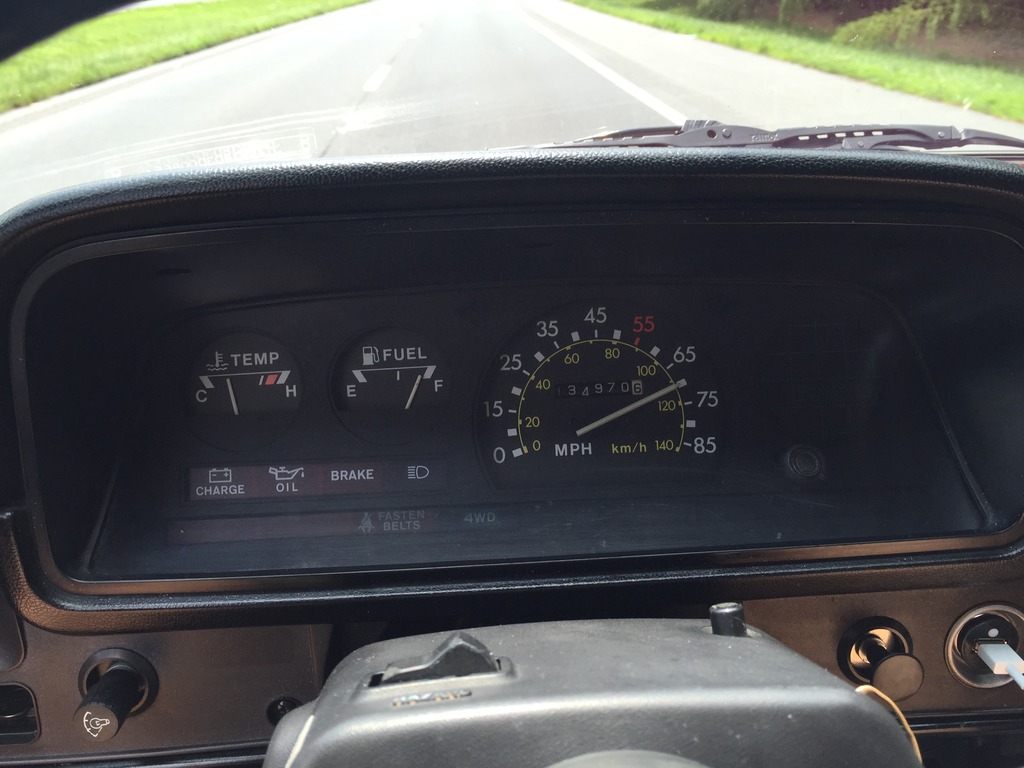
I've been slowly getting my carb dialed in. I've gone with the best lean idle adjustment per Weber's advice, but I've also considered a lot of information provided by LCE for better performance throughout the RPM range. I made a couple of adjustment and went for a test drive. It's running much better now! I way on the highway running it up and down the RPM range and I think I may have found my ideal advance and air/fuel mixture. I might try a couple more tweaks, but I'm pretty satisfied so far. Here's a picture of the truck at 76mph (about 83.6 mph corrected for the 31x10.5 tires) and it was still pulling in 5th gear! I could have easily buried the speedometer if I wasn't concerned about getting pulled over (tons of police regularly do radar in the area):

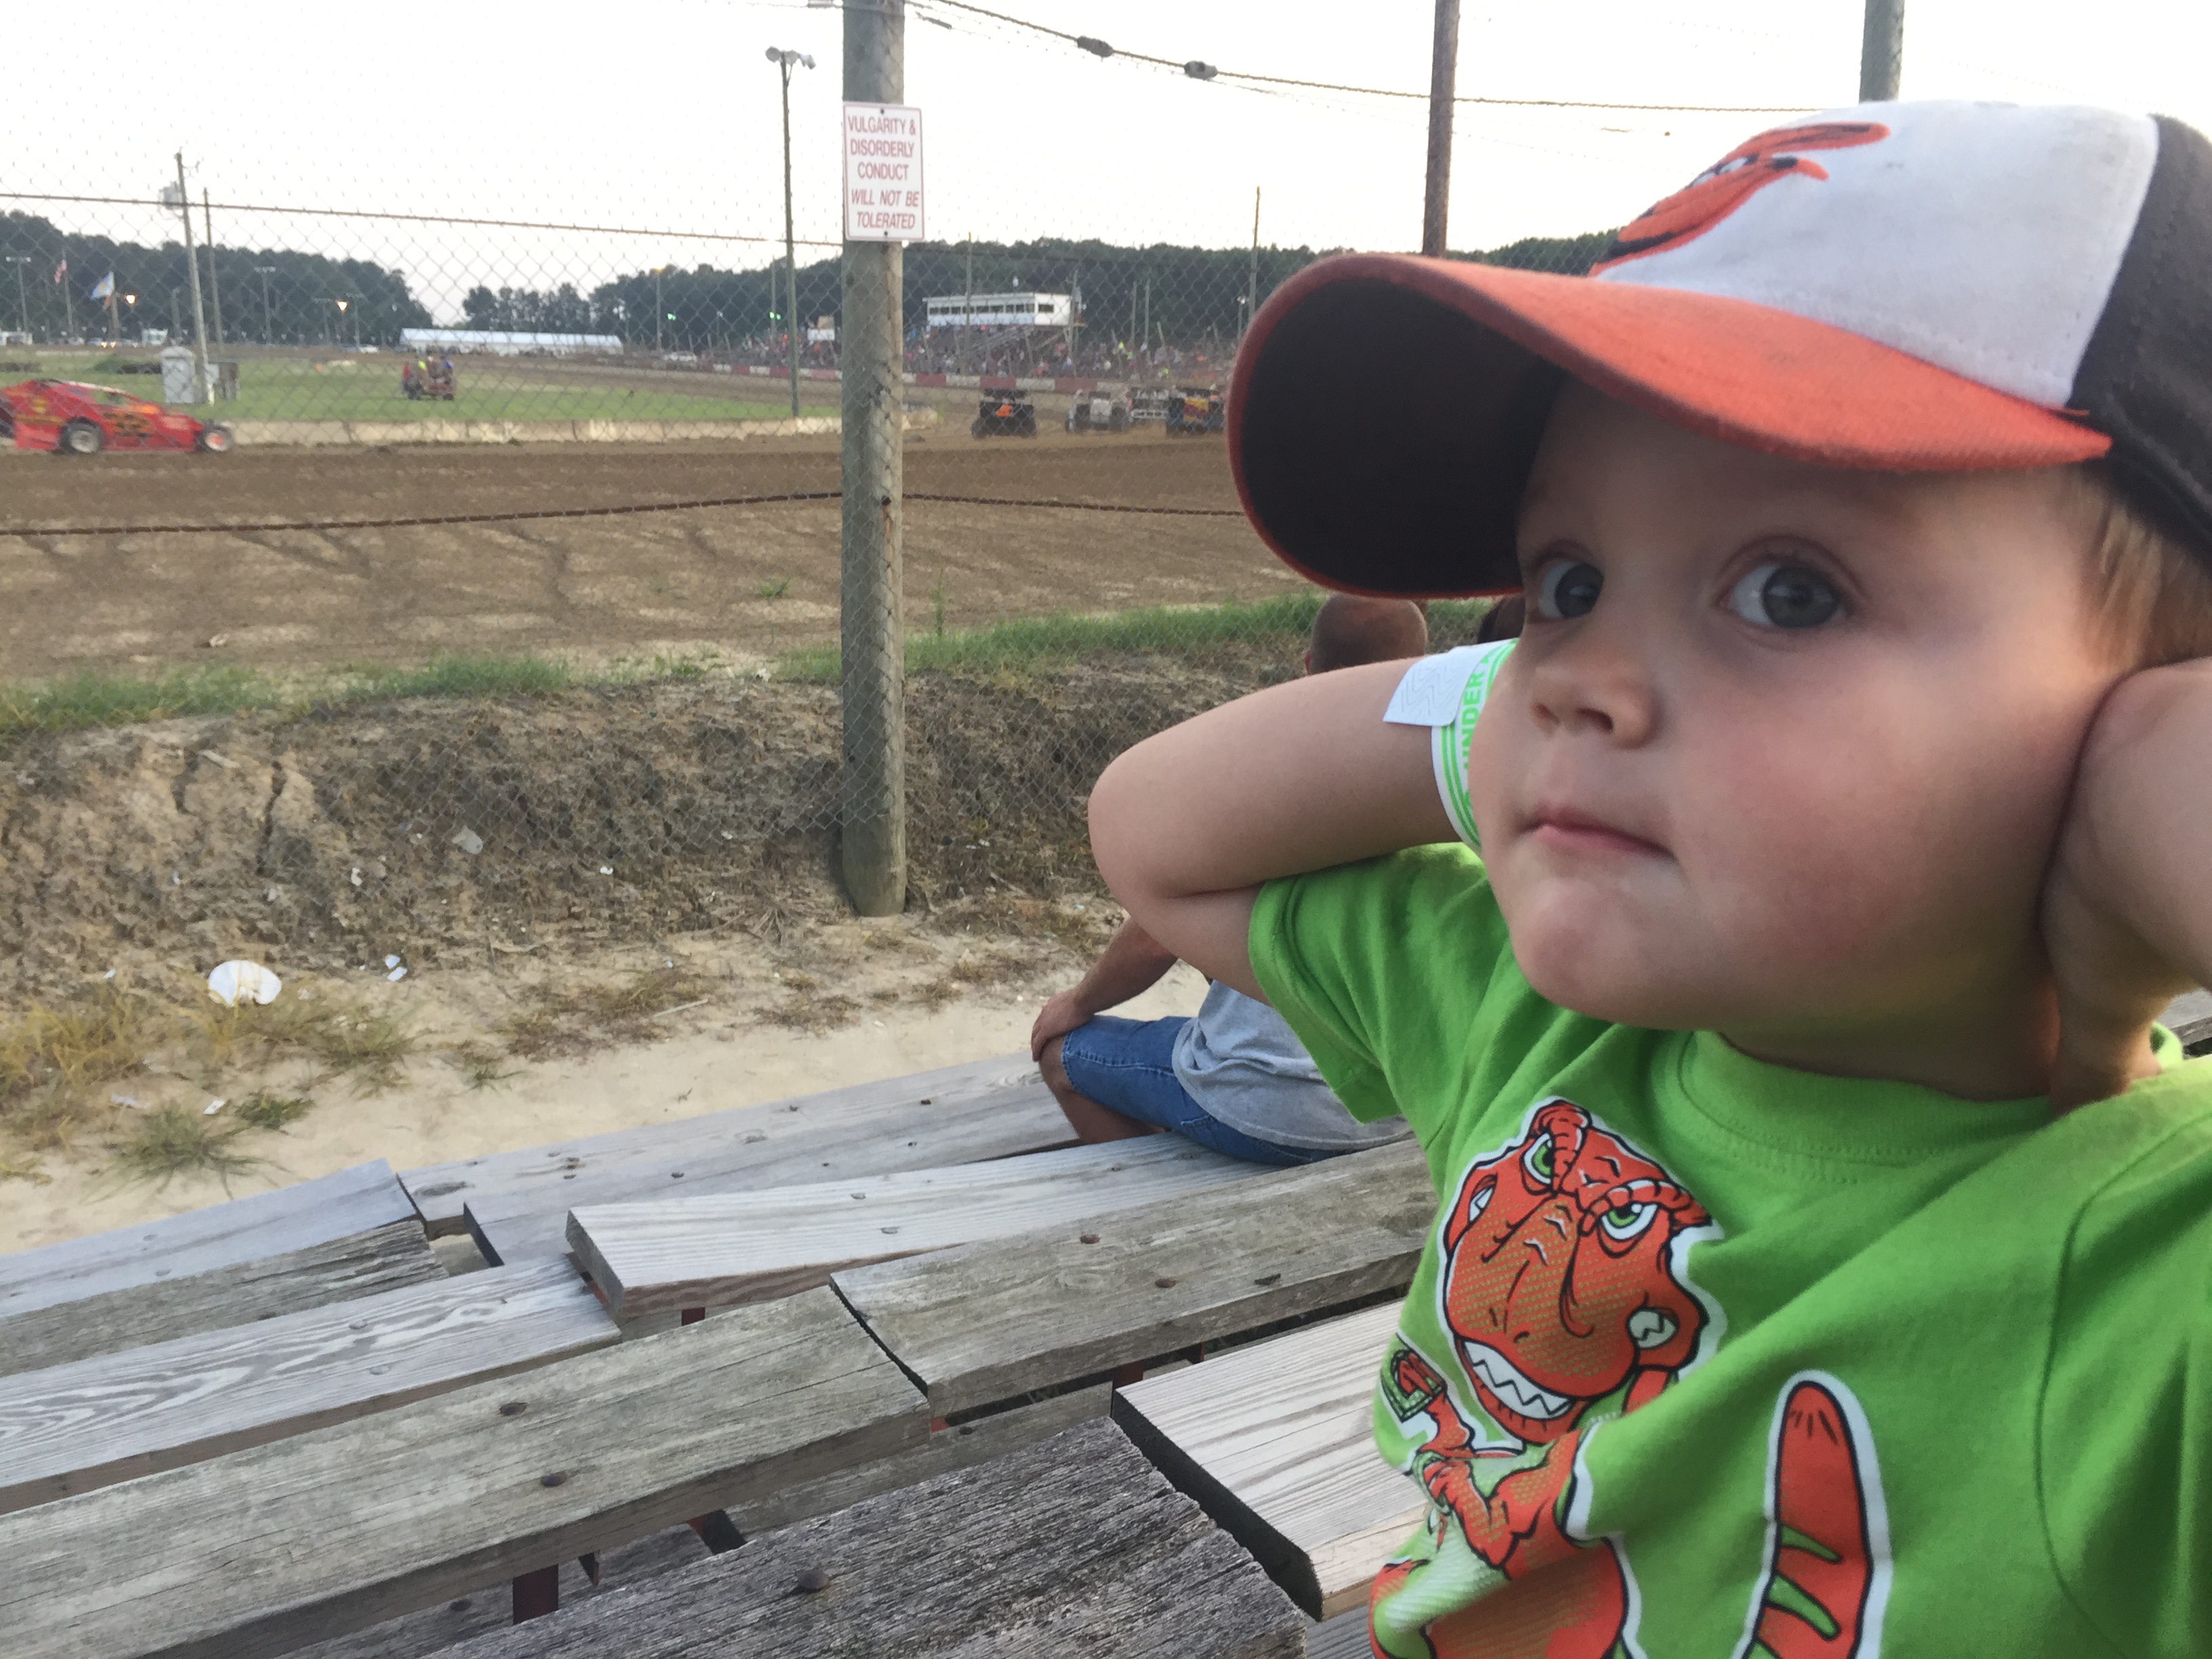
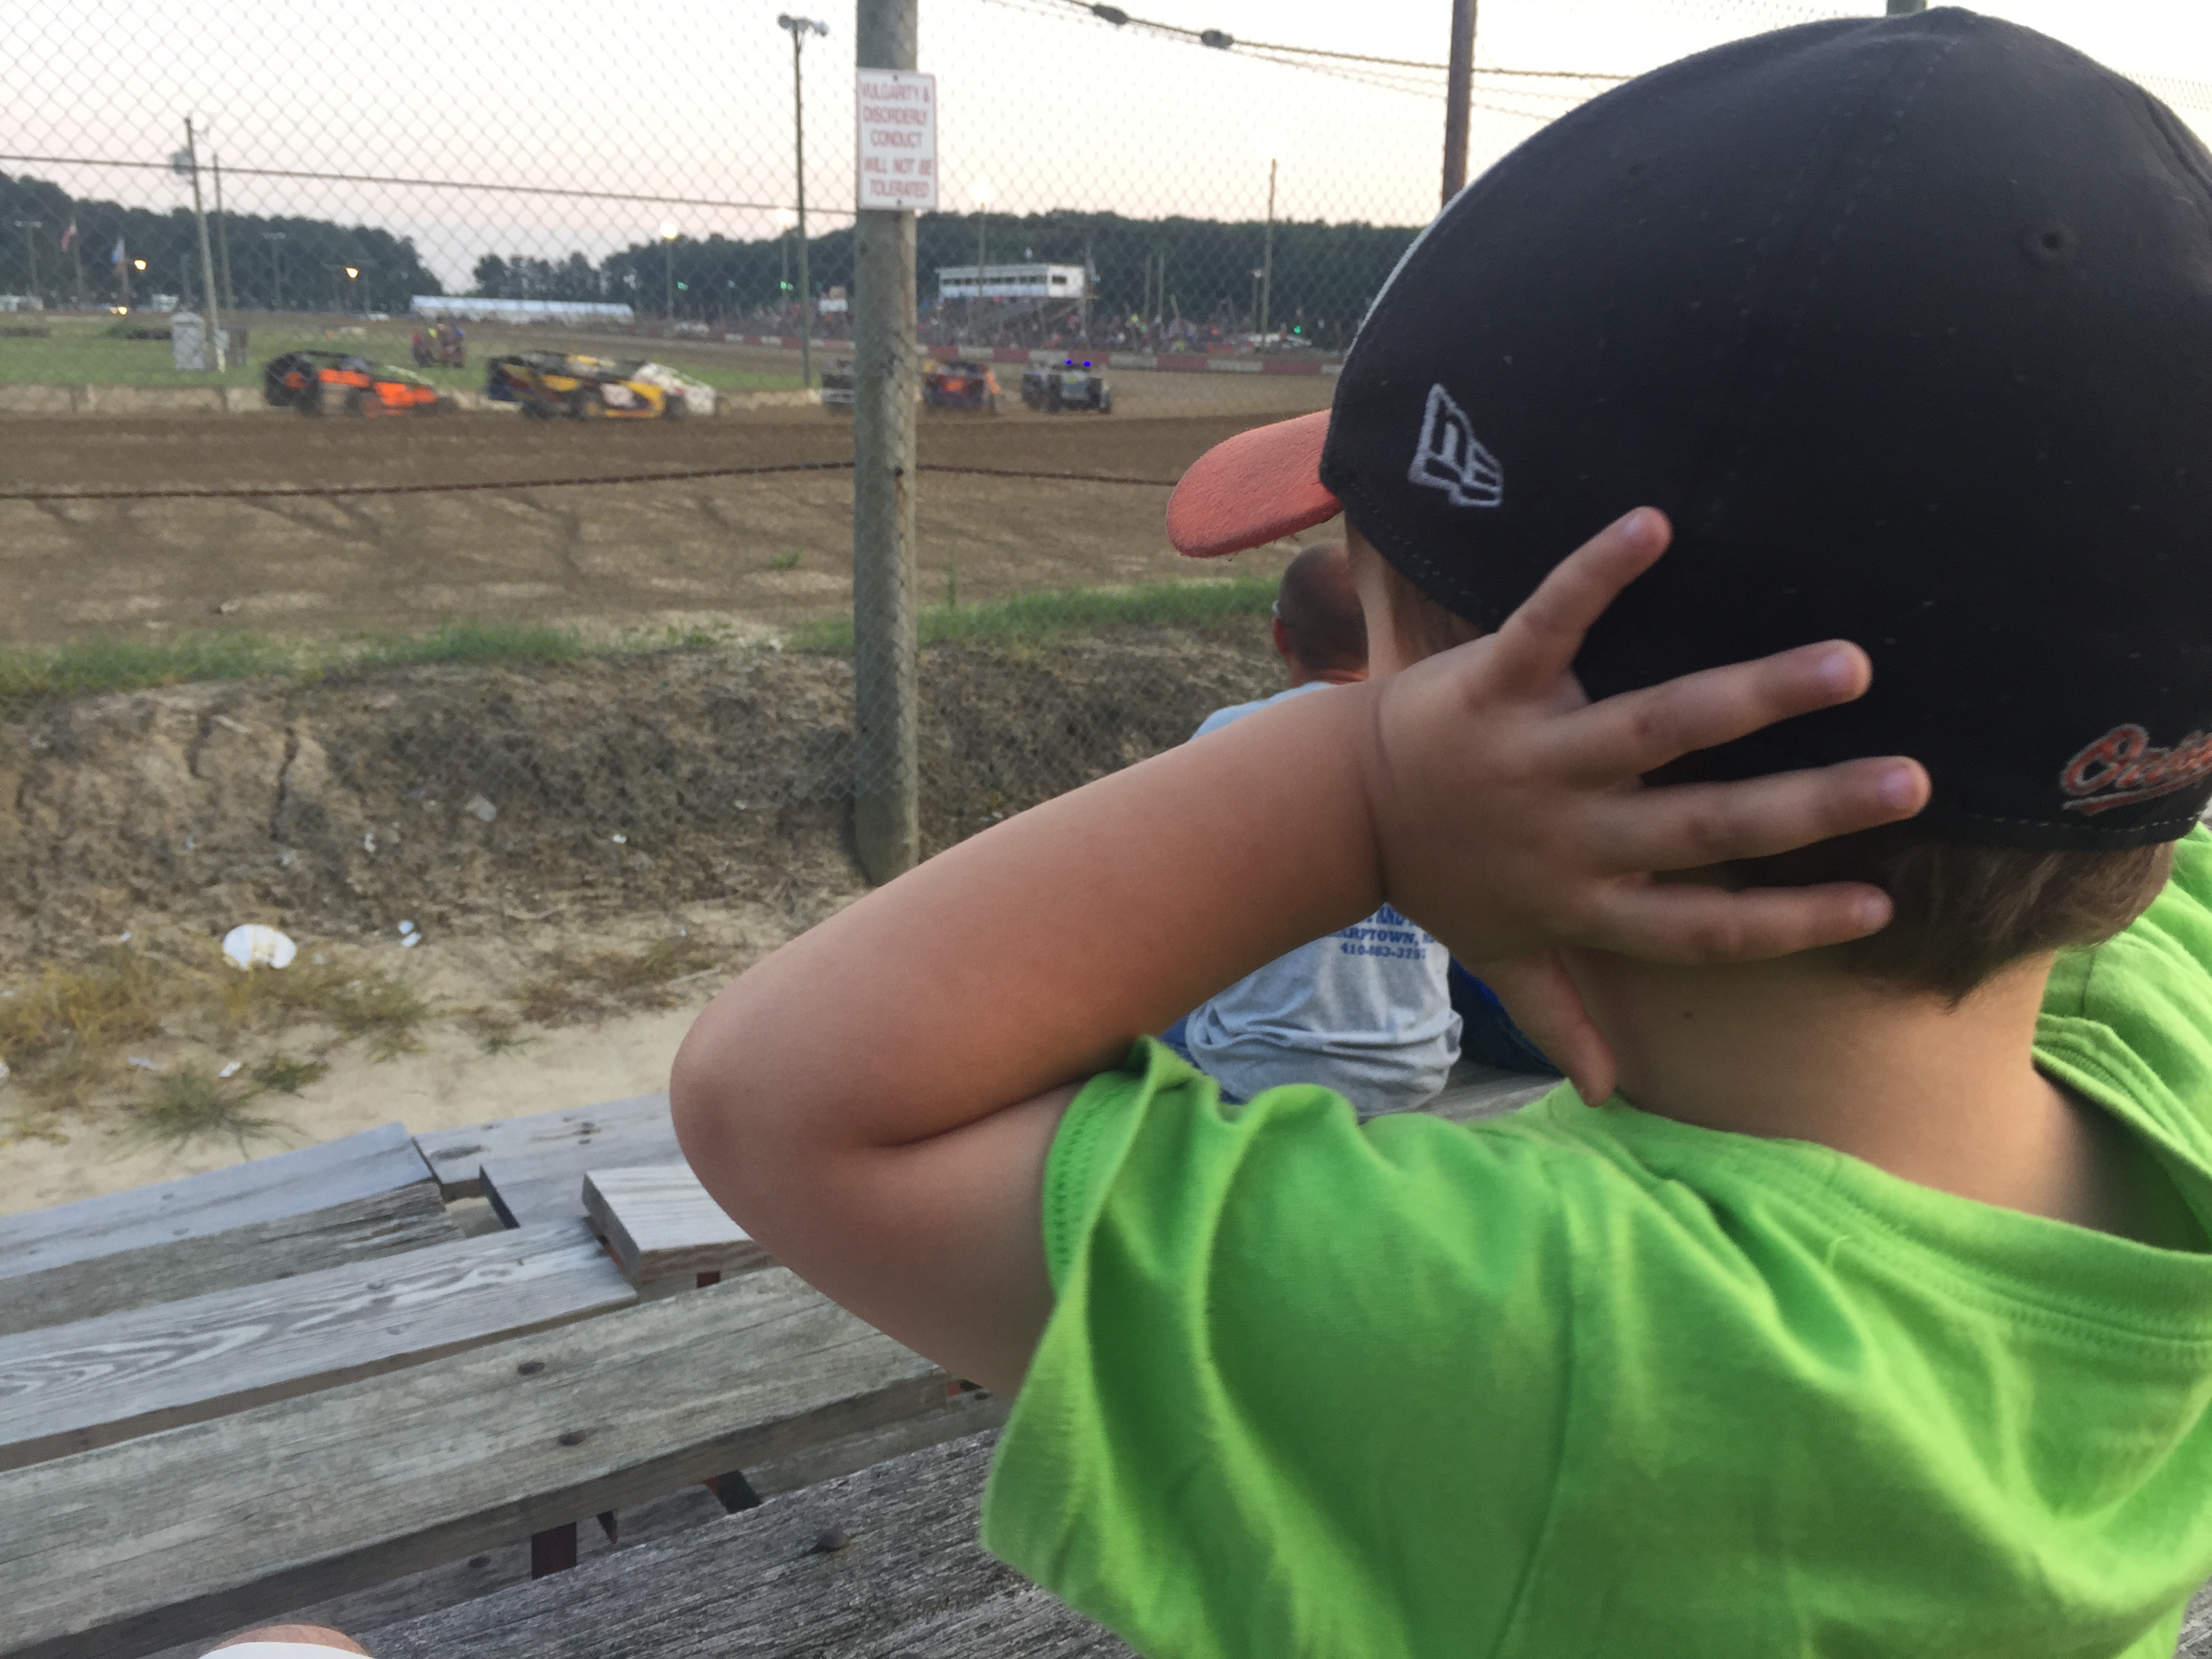
This past Saturday I decided to take my oldest son out to the dirt track races. We have some pretty good local drivers and the competition is pretty tight - I grew up with a few of the drivers so it's pretty cool seeing them race. My son had a lot of fun even though I forgot his earmuffs and he had to spend most of the night holding his ears with the loud engines. LOL

Right after this picture was taken Camden said "Dad, don't forget my earmuffs next time!"
Patiently waiting in line to ride go-carts:
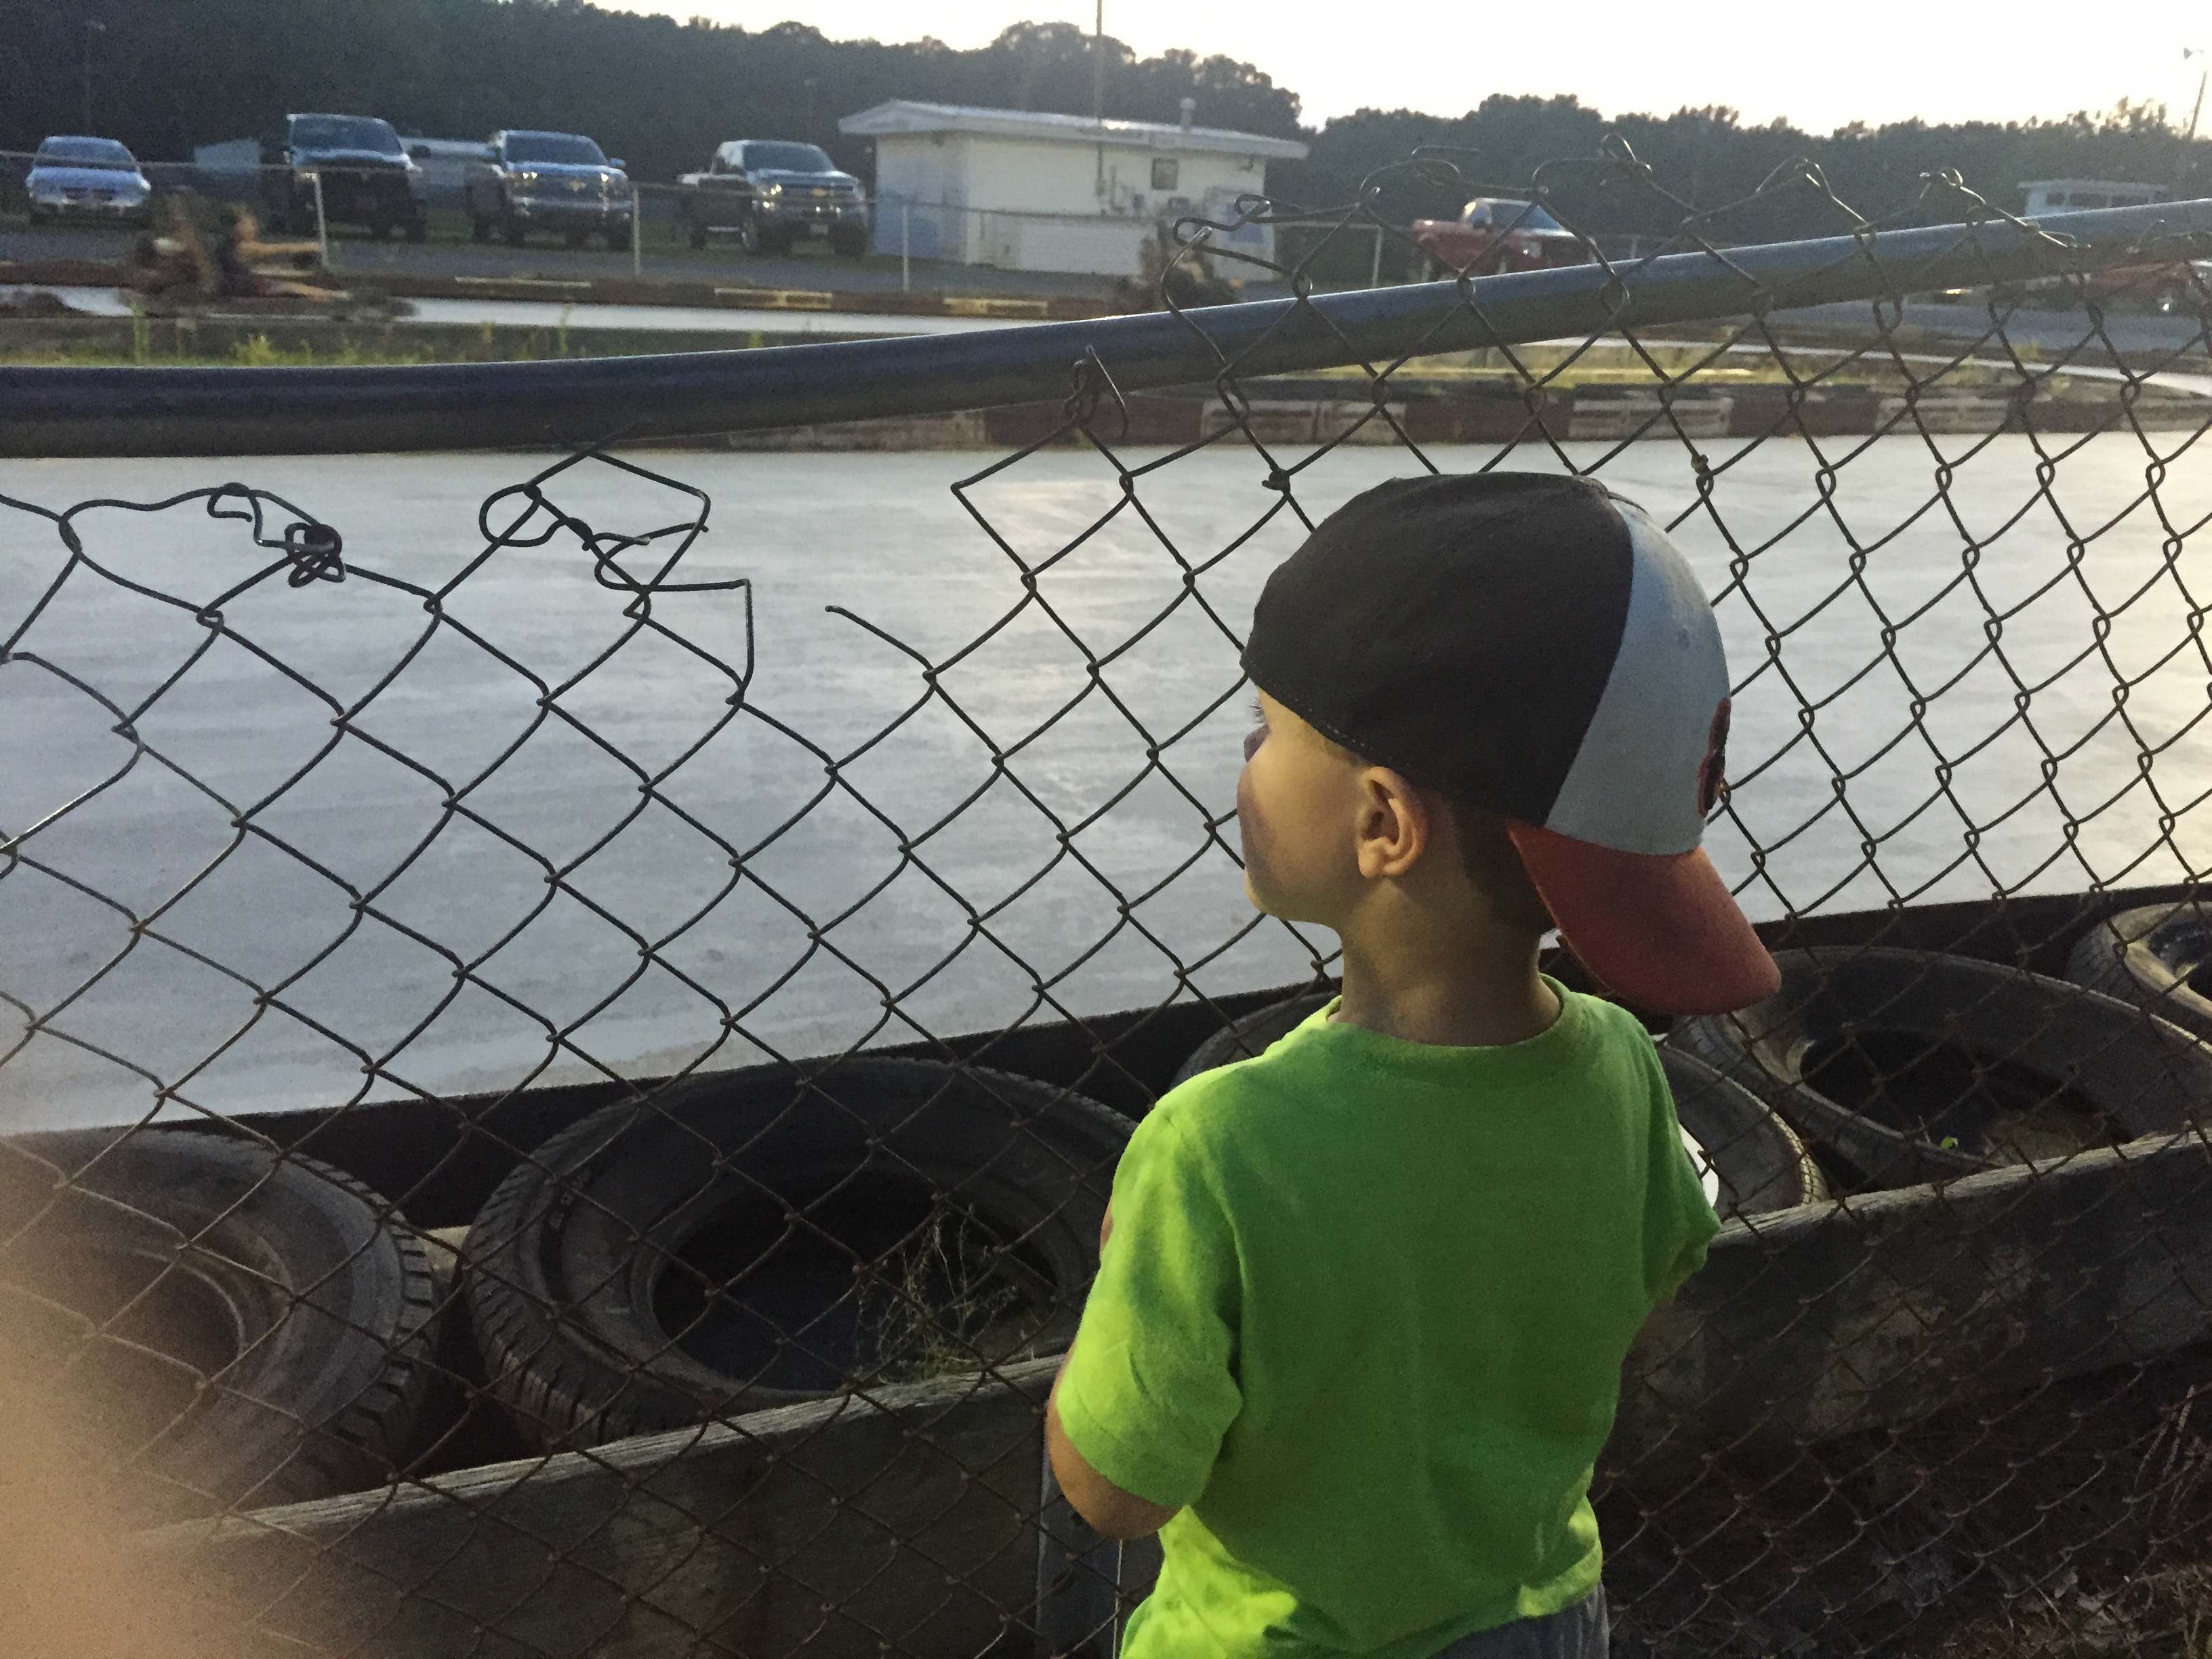
Tons of fun! He can't wait to go back!

I've been slowly getting my carb dialed in. I've gone with the best lean idle adjustment per Weber's advice, but I've also considered a lot of information provided by LCE for better performance throughout the RPM range. I made a couple of adjustment and went for a test drive. It's running much better now! I way on the highway running it up and down the RPM range and I think I may have found my ideal advance and air/fuel mixture. I might try a couple more tweaks, but I'm pretty satisfied so far. Here's a picture of the truck at 76mph (about 83.6 mph corrected for the 31x10.5 tires) and it was still pulling in 5th gear! I could have easily buried the speedometer if I wasn't concerned about getting pulled over (tons of police regularly do radar in the area):

This past Saturday I decided to take my oldest son out to the dirt track races. We have some pretty good local drivers and the competition is pretty tight - I grew up with a few of the drivers so it's pretty cool seeing them race. My son had a lot of fun even though I forgot his earmuffs and he had to spend most of the night holding his ears with the loud engines. LOL
Right after this picture was taken Camden said "Dad, don't forget my earmuffs next time!"


Patiently waiting in line to ride go-carts:

Tons of fun! He can't wait to go back!
07-14-2015, 09:09 PM
#1279
I got the grille emblem cleaned up and painted tonight. I'm very satisfied with the results - It turned out GREAT!

And the crown jewel mounted on the grille:
The exterior is pretty much done for now. All I really want to do to the exterior now is find a good fitting rear bumper (I heard old Dakota bumpers fit well) and mount some fog/driving lights. I love driving behind bright lights at night so I basically want them for the added illumination while driving at night. I'll probably go with some 4" KC HiLites mounted upside down from the bottom of the bumper.
In other news, I scored a new tool chest tonight! I have an obscene amount of tools and I ran out of tool space long ago but don't exactly have the funds to blow on a bigger tool chest. So a buddy of mine bought a 52" chest a few months ago, but he has since moved and doesn't have the space for it so I traded him one of my 26" tool chest stacks for it. I already have the new 52" bottom chest full as well as my 26" stacked chest and I still don't have all of my tools stored! So I think I'm going look for a deal on a another 26" middle and top chest to stack side by side on top of my new 52" with the 26" middle and top chest that I already have. Maybe, just MAYBE, then I will have all of my tools stored... I think I have a tool problem...

And the crown jewel mounted on the grille:

The exterior is pretty much done for now. All I really want to do to the exterior now is find a good fitting rear bumper (I heard old Dakota bumpers fit well) and mount some fog/driving lights. I love driving behind bright lights at night so I basically want them for the added illumination while driving at night. I'll probably go with some 4" KC HiLites mounted upside down from the bottom of the bumper.
In other news, I scored a new tool chest tonight! I have an obscene amount of tools and I ran out of tool space long ago but don't exactly have the funds to blow on a bigger tool chest. So a buddy of mine bought a 52" chest a few months ago, but he has since moved and doesn't have the space for it so I traded him one of my 26" tool chest stacks for it. I already have the new 52" bottom chest full as well as my 26" stacked chest and I still don't have all of my tools stored! So I think I'm going look for a deal on a another 26" middle and top chest to stack side by side on top of my new 52" with the 26" middle and top chest that I already have. Maybe, just MAYBE, then I will have all of my tools stored... I think I have a tool problem...
07-17-2015, 08:26 AM
#1280
Well after getting sick of dealing with my stiff brake pedal I finally decided to do something about it... It almost seemed like I didn't have enough travel in the brake pedal so Last night I took my master cylinder off to investigate. Just to be sure there weren't any problems with the master cylinder, I disassembled it and clean it up (not that it was really dirty to begin with...). I wanted to make sure that there wasn't any debris in there that could potentially limit fluid flow. Everything looked good in the MC so I'll get some brake grease and re-assemble it this afternoon:
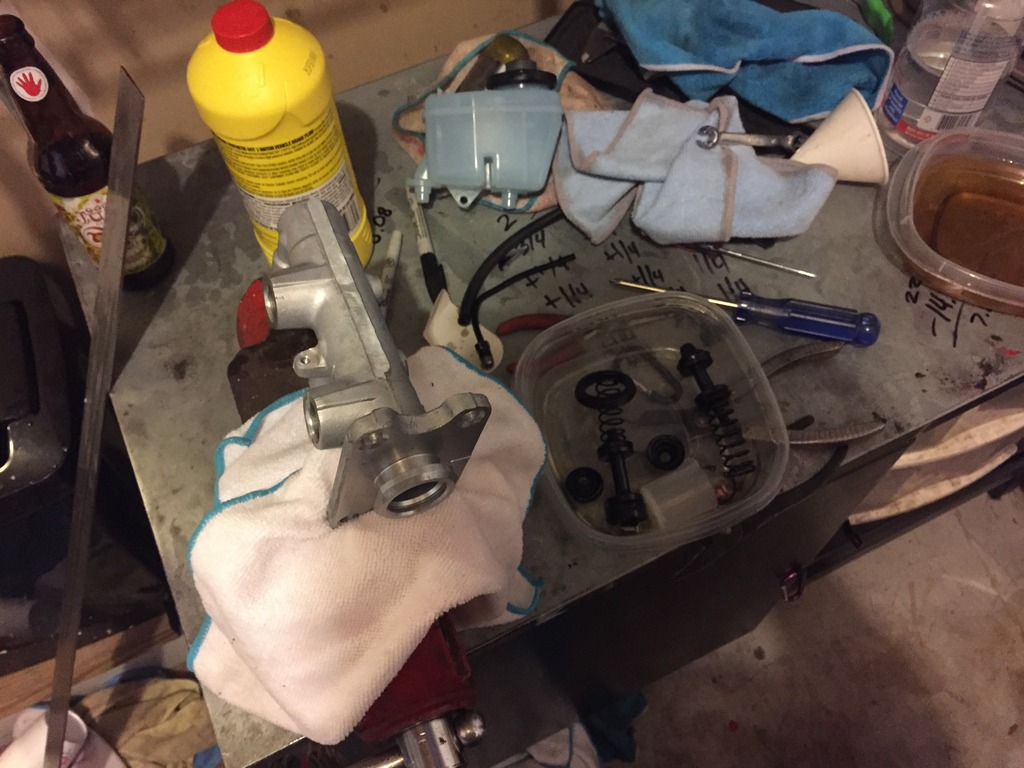

Then I moved on to the brake booster... I checked to make sure that the booster was receiving and holding an adequate amount of vacuum. That checked out fine. I checked the travel of the push rods on both sides. That checked out. Then I checked the push rod clearance with the MC piston. I don't have the special service tool to check the clearance the easy way, but I was able to use my calipers and a little bit of math to figure out how much adjustment I needed. DING DING DING!!! Come to find out the push rod was about nearly 3/8" too short - pretty considerable when you consider that the travel of the piston is around 1.25". This somewhat perplexes me because it shouldn't cause a stiff pedal but it would certainly limit the progressive pressure of the MC under hard braking and would hinder the ability to "pump up" the brakes. Nonetheless, I made the adjustment and I'm hoping that is it because, other than a possible frozen caliper piston, I have know idea what could be causing the symptoms. The calipers are new remans and if I did have a frozen caliper my truck would likely pull to one side and I would have uneven wear on my rotor - neither of which is present.
My son and I are going camping this weekend and he really wants to take the Pickup so hopefully I can get everything back together and working properly before we have to leave!
Last edited by kawazx636; 07-20-2015 at 09:02 AM.


