KawaZX636's 1983 Toyota Pickup Restoration
 04-28-2015, 06:50 PM
#1221
My son and I took a nice Sunday drive this past weekend. I let him (a 3 year old that has no idea where he is going) decide which way to go at each intersection we hit. We ended up about 90 miles north of our home via back roads and then headed down the coast to the beach which is about 30 miles east of of our home. He we are when we hit the beach:
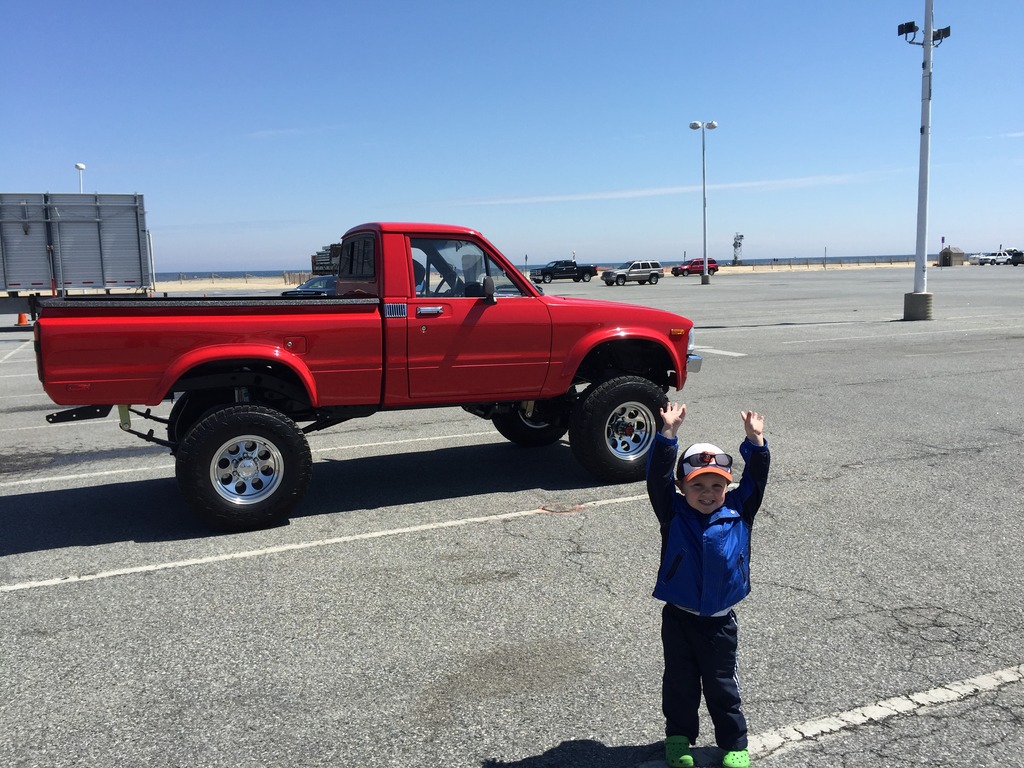
We ended up putting about 260 miles on the clock and got 21.6mpg on the trip. Everything ran great still, but I'm due to check and relash the valves.
Soooo, when we got home, my wife went into labor. Our second healthy son was born Monday morning weighing in at a hefty 8lbs 4oz. Everybody is tired but doing well!


This is what life is all about!
 04-28-2015, 09:46 PM
#1222

Just awesome
04-29-2015, 05:19 PM
#1225
Registered User
Join Date: Jun 2011
Location: Brew city,Wisconsin
Posts: 57
Likes: 0
Received 0 Likes
on
0 Posts
Congratulations Dave, beautiful boys you have. I live in a house full of girls. Good luck sleeping anytime soon. Cherish the moments,time flys by.Truck look awesome,glad you didn't have any problems. I'll let you know what i come up with this weekend.
04-30-2015, 12:01 PM
#1226
Thanks guys! Mom (Ashley) and the baby (Beckett) are doing really well. My other son (Camden) has had a little culture shock leaving his only-child status, but he is starting to adjust and warm up to the little guy.
I suppose the truck is officially on hold for a little while. Looks like I got everything done that I "needed" to get done just in the nick of time! There are a few small things that I can probably do when time permits me to do so. I'm hoping to pull the valve cover this weekend to re-lash my valves and perform my 500 mile tune-up. This time around I am going to go a little tighter on my valve clearance. I did that on the 22R that I rebuilt for my friend a few years ago and it helped significantly with the noise and it is still running strong despite the fact that he is HORRIBLE at performing routine maintenance and oil changes - Last time I checked, he was at around 9,000 miles and over one year from his last oil change and he beats the living crap out of his truck and it still runs VERY strong! I credit the engine builder for creating such a hearty engine! Toot TooT!! (me tooting my own horn...LOL) When I adjust valves I typically tune them "tight" meaning I clearance the valves so that a feeler gauge that is one size smaller than what the specs recommend can easily pass through, but the proper spec'ed feeler gauge can still squeeze in nice and tight. I used to do this on all of my motorcycle engine builds and rebuilds as well. This time around I am going to adjust my valve clearance to a "tight" 0.007" on the intake and a "tight" 0.011" on the exhaust to help reduce the valve chatter a little. So basically I'll pass some 0.006" and 0.010" feeler gauges loosely through the clearance so that a 0.007" and 0.011" feeler gauges pass through a little tight. HOPEFULLY, while I have it off I will be able to get the valve cover in the blast cabinet to strip the paint so that I can powder coat it and a couple other parts under the hood that I originally rattle canned or left unpainted (ie: throttle brackets, engine hoist hooks, etc). Shouldn't take much time, but time is something I don't exactly have at this moment...
A few other things I need to get done:
-Door panels: I'm doing temporary door panels with MDF covered in vinyl. I have the materials and I already have the rivnuts installed in the doors to mount the panels, but it is just a matter of cutting the MDF to fit the doors, wrapping them in vinyl, installing the speakers and mounting them.
-Rocker panel internal coating: I never coated the inside of my rocker panels with any rust inhibitor so I bought some internal frame coating to shoot in them from the access holes in the rear of the cab. It is just a matter of breaking out the shutz gun, taping up the holes and shooting the stuff in there. I also would like to find some good plugs to fit in those holes to prevent water from finding its way in there. This is literally the only thing that is keeping me from driving my truck in the rain and water - those rockers were a PITA to repair and I don't want them to rot out again!
-Door sill scuff plates: I have the original plastic scuff plate molding, but they don't exactly fit perfectly since I had to replace my floorpan. I would like to get some nice stainless steel bent to fit the contour of the door sills. When I sprayed the bedliner in the interior I shot the door sills really well so I don't have to worry about chipping paint, but I would like to have something nice and clean looking to go on the sills.
-Drivetrain seals: I did not rebuild my tranny, transfer case and thirds since it was not required. I just resealed the thirds at the axle housings after checking to make sure that the ring and pinion were ok. However, I have VERY slow leaks on all the seals. I knew this a while back, but for some reason I never got around to replacing the seals during the build. I have all the seals sitting pretty on the shelf so it is just a matter of fighting the stake nuts and replacing them. I also put some generic gear oil in everything just to keep it lubed up during the build so all that will come out and be replaced with some synthetic gear lube.
Coming up soon, Now that I know what is surplus, I will be posting some parts for sale in the classifieds. It is a bunch of random parts, but somebody might need them. Here's a short list off the top of my head if anybody is looking for these:
-Original bucket seats (complete with sliders)
-Brake master cylinder
-Clutch master cylinder
-Rear drum brakes (complete, minus hat)
-Two sets of headlight doors (new, but not originals)
-Door handles
-Steering stabilizer w/ bracket (Sky Off Road Design)
-Factory radiator (with cap, no leaks)
-Dual row timing chain kit (new)
-82-83 4WD front bumper brackets
-79-81 Passenger front bumper turn signal (new)
-Lower gauge pod (without gauges)
-Fuel sending unit (original but works)
-Original steering tie rod
-Second gen pickup IFS front drive shaft
-Torque rod
-Voltage regulator (5 pin)
-Weber fuel cutoff solenoid (new)
-Emissions computer
-Water pump
-Oil pump
-Timing cover
-22R head (1983, disassembled but have the cam, springs, valves, keepers, caps and guides. Can be rebuilt or used as a core)
-Misc emissions parts
Everything above is used unless otherwise noted. I would NEVER sell parts that are broken or worthless. All of these parts were either replaced because I am obsessed with shiny new stuff, I ordered order one too many of the same part or I ordered bought a part and changed my mind. I have more stuff, but I need to go through it all and take some pictures. I'll start a thread in the classifieds eventually, but if anybody is interested in any of the above just drop me a PM.
I'm still in desperate need of fender liners! If I don't find something soon I may try to have mine repaired with a bedliner idea that I came up with. I also need an uncut ash tray and dash pocket. If anybody has these, PLEASE let me know!
That's it for now!
 05-06-2015, 11:02 PM
#1230
Started making my door panels tonight. As with most everything I do, I took a methodical approach and drew out a template in CAD based on some pretty damn good measurements. Printed it out 1:1 on the wide format plotter at work and voila! A template is created!
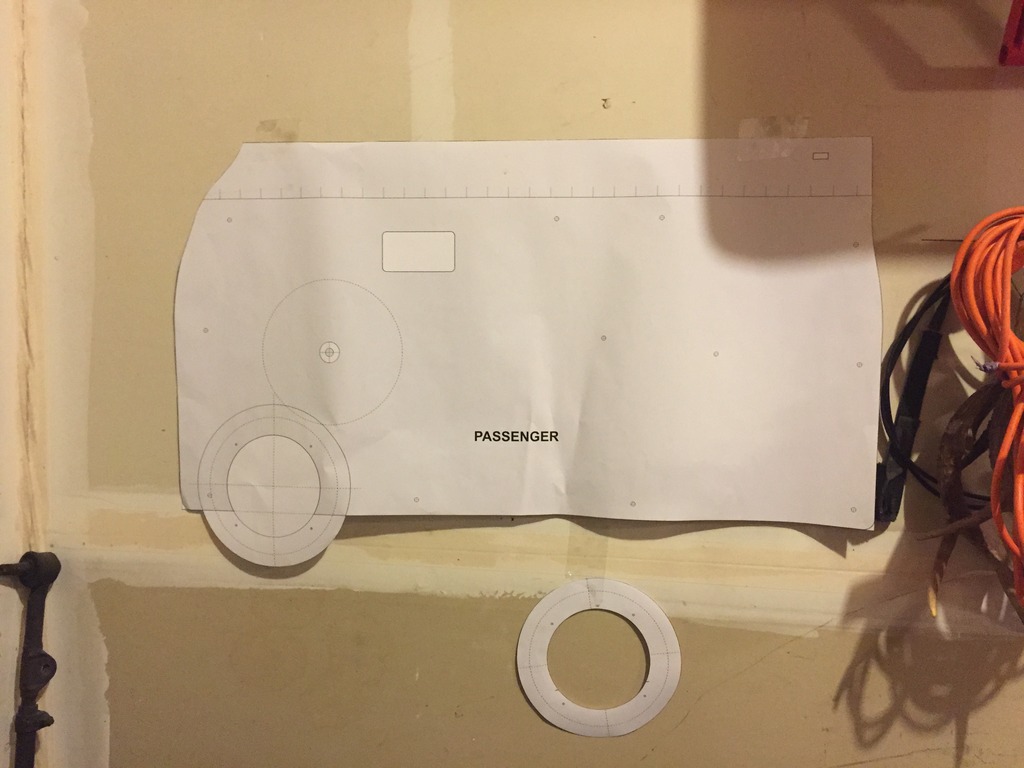
The template matches up perfectly with the factory holes so if anybody is interested in using it, I have a PDF file that I can send you.
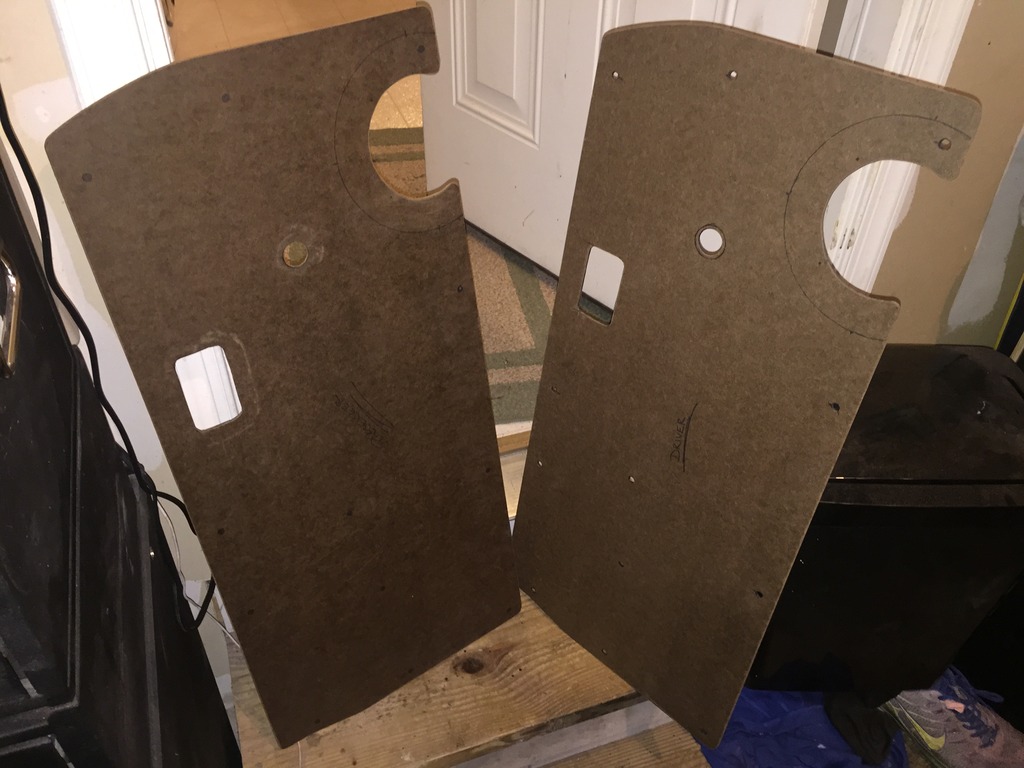
I took some 1/8" MDF with my templates drawn out on it to my table top scroll saw and cut out the main panels and speaker rings. The main panels are basically ready to wrap, just need to drill the holes on the passenger panel.
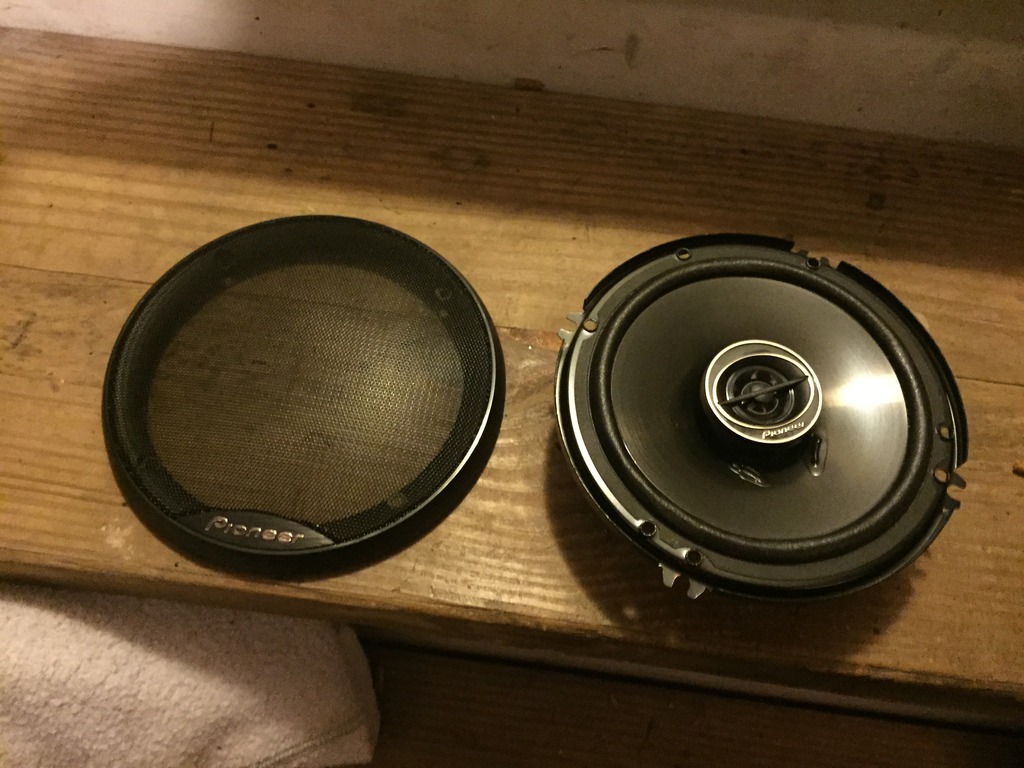
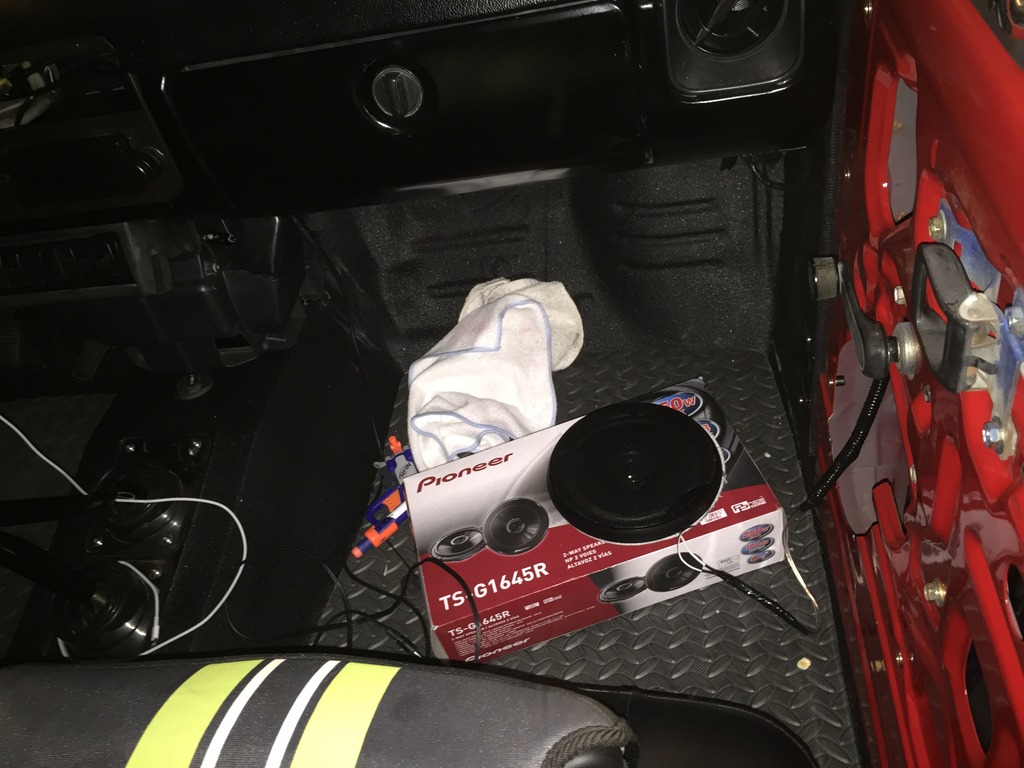
I'm going to be using some Pioneer 6.5" dual speakers that I had laying around for my audio pleasure. They were supposed to go in the cabin of the boat but I never got around to installing them.
Since at some point the previous owner decided to hack the crap out of my door panels to install speakers (some people should be allowed to use any kind of saw at all!) I had to address that issue. Remember way back when I was prepping my doors for paint and I had to clean up my speaker holes in the doors? Well in doing such, I had to cut the hole just barely too big to properly mount 6.5" speakers. So now I have to make and use some speaker rings. The mounting of the speakers to the panels and the panels to the door is a little tricky, but I'll post on that later when I get to it (don't feel like explaining). I'm using T-nuts on the back of the rings to mount the speakers. Since I wanted the speakers to sit out a little more, I glued together two pieces of 1/8" MDF.
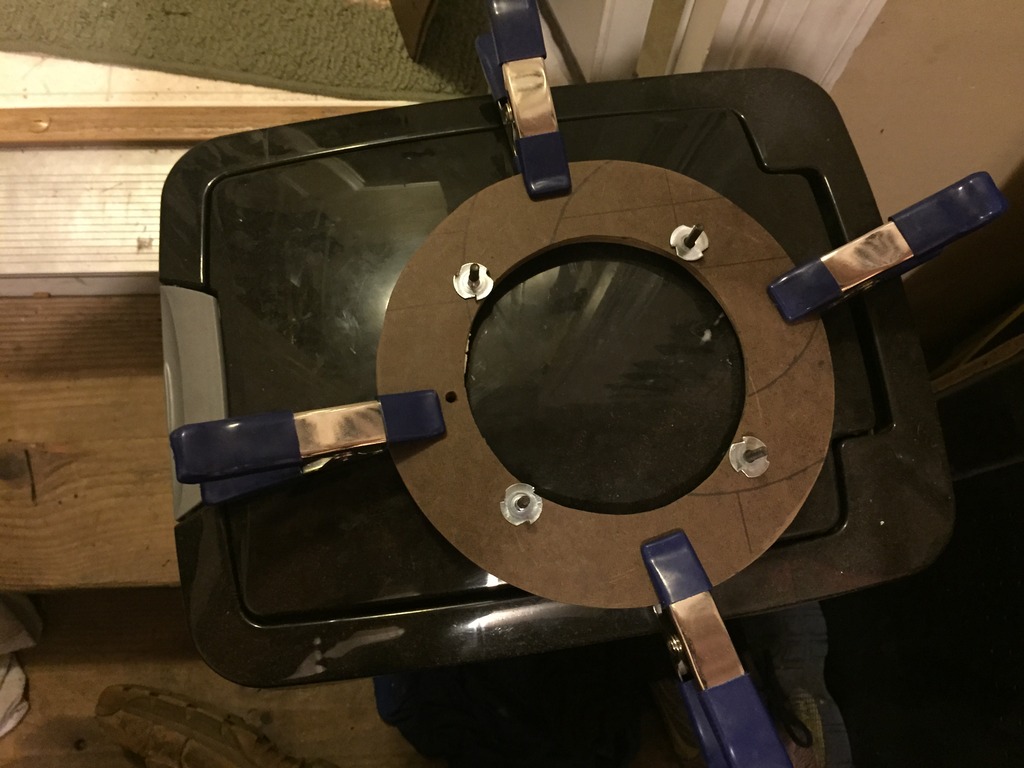
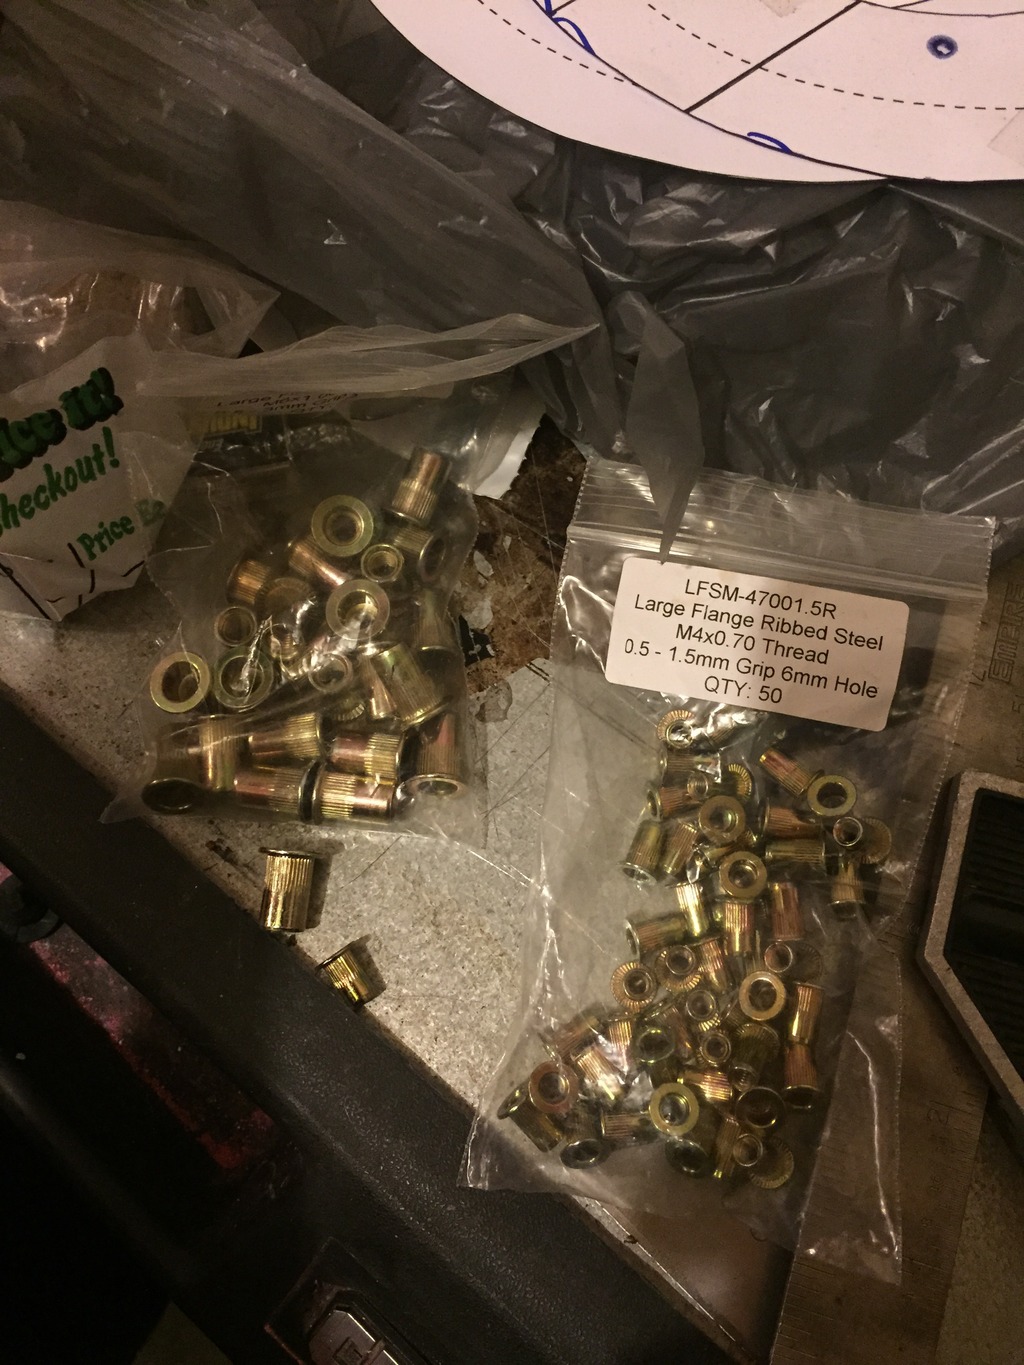
I am using rivnuts and stainless flat head allen bolts with finishing washers to mount the doors so I had to install some Rivnuts in the factory mounting holes. I love rivnuts!!

Once everything is cut out and ready I'll cover it with black vinyl
Between MDF, Vinyl, hardware and rivnuts, I only have roughly $30 into my door panels. These panels aren't intended to be the permanent panels, but I need something to essentially hold me speakers in place until I have the time and spare cash to make something better - I'm thinking fiberglass eventually. My Pops also had some left over DynaMat from when we did the floor and doors of his Camaro so I'll use that on the back side of the door skins kill some sound.
My mother-in-law gets in tow tomorrow night therefore I will be retreating to my happy place (the garage) until she leaves so there is a good chance that I will be getting the door panels down by the weekend.

The template matches up perfectly with the factory holes so if anybody is interested in using it, I have a PDF file that I can send you.
I took some 1/8" MDF with my templates drawn out on it to my table top scroll saw and cut out the main panels and speaker rings. The main panels are basically ready to wrap, just need to drill the holes on the passenger panel.

I'm going to be using some Pioneer 6.5" dual speakers that I had laying around for my audio pleasure. They were supposed to go in the cabin of the boat but I never got around to installing them.

Since at some point the previous owner decided to hack the crap out of my door panels to install speakers (some people should be allowed to use any kind of saw at all!) I had to address that issue. Remember way back when I was prepping my doors for paint and I had to clean up my speaker holes in the doors? Well in doing such, I had to cut the hole just barely too big to properly mount 6.5" speakers. So now I have to make and use some speaker rings. The mounting of the speakers to the panels and the panels to the door is a little tricky, but I'll post on that later when I get to it (don't feel like explaining). I'm using T-nuts on the back of the rings to mount the speakers. Since I wanted the speakers to sit out a little more, I glued together two pieces of 1/8" MDF.

I am using rivnuts and stainless flat head allen bolts with finishing washers to mount the doors so I had to install some Rivnuts in the factory mounting holes. I love rivnuts!!


Once everything is cut out and ready I'll cover it with black vinyl

Between MDF, Vinyl, hardware and rivnuts, I only have roughly $30 into my door panels. These panels aren't intended to be the permanent panels, but I need something to essentially hold me speakers in place until I have the time and spare cash to make something better - I'm thinking fiberglass eventually. My Pops also had some left over DynaMat from when we did the floor and doors of his Camaro so I'll use that on the back side of the door skins kill some sound.
My mother-in-law gets in tow tomorrow night therefore I will be retreating to my happy place (the garage) until she leaves so there is a good chance that I will be getting the door panels down by the weekend.
Last edited by kawazx636; 05-06-2015 at 11:06 PM.
05-07-2015, 11:18 PM
#1232
Got the door panels DynaMatted tonight:

And did the final mock up and adjustment on the MDF for the door panels:

Tomorrow night I should be able to get everything wrapped in vinyl and mounted to the doors. Should go pretty easy - I can't wait to finally have some good tunes instead of a single speaker sitting in the original box on the passenger floor...
 05-08-2015, 09:10 PM
#1234
Nice! Haha your single speaker is some quality redneck tech
05-08-2015, 10:54 PM
#1235
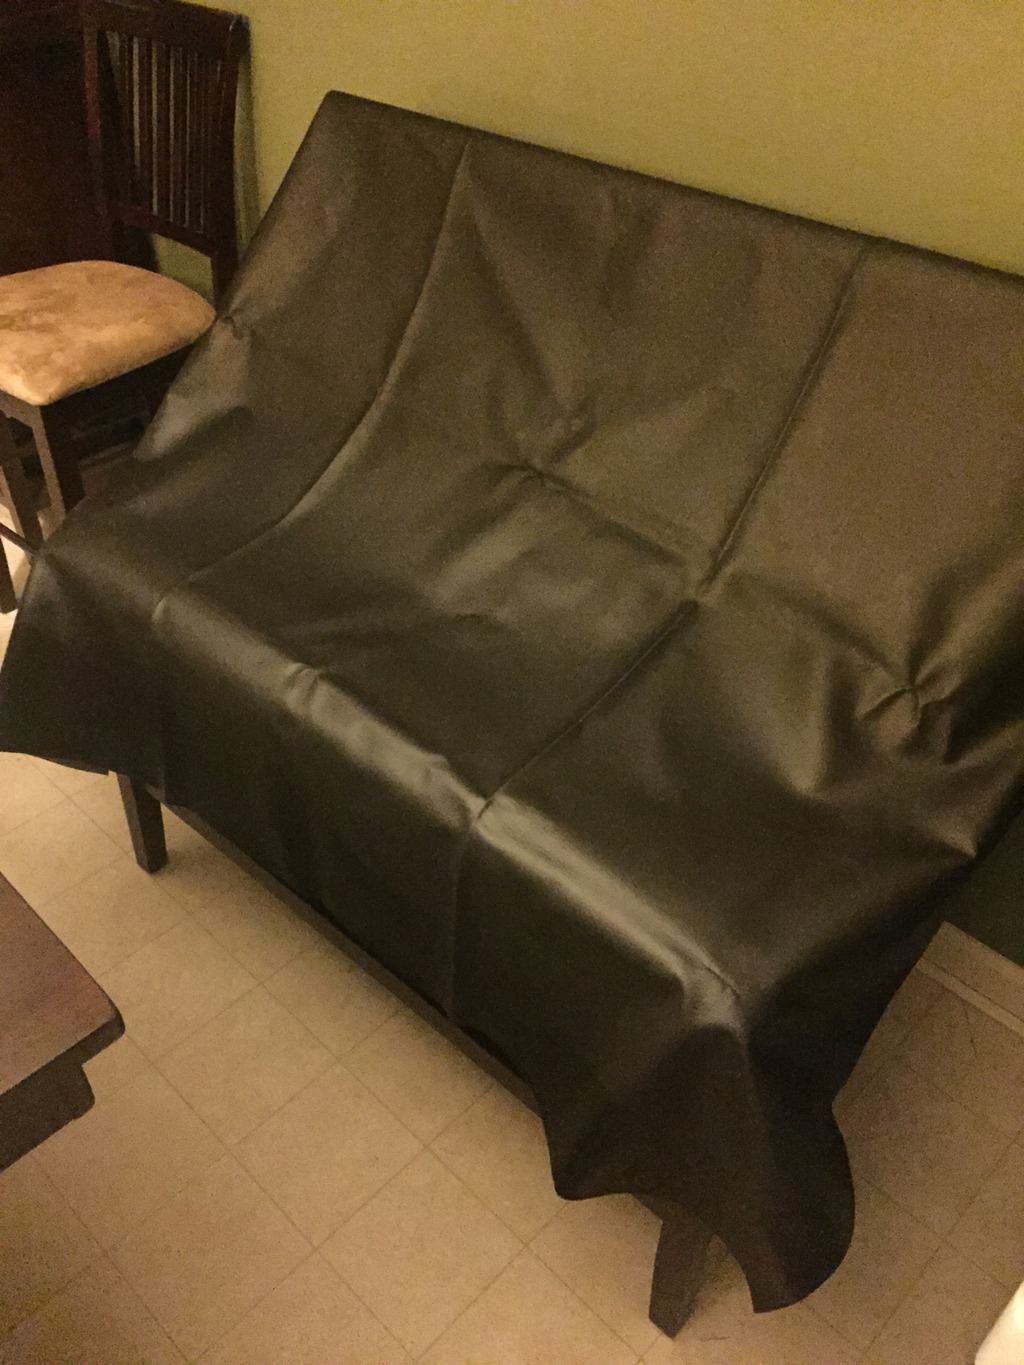
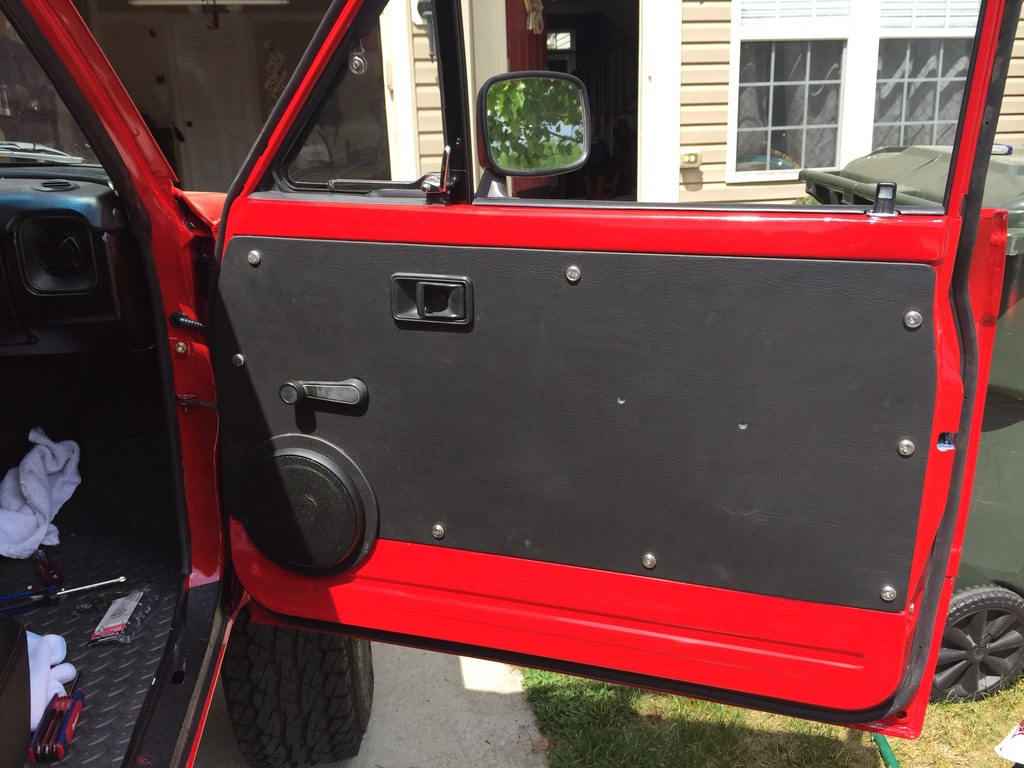
Got the door panels done tonight. I think they turned out pretty good! Given the amount of contact cement that I used, the vinyl will have to got throught a nuclear holocaust before it delaminates.
Here are the pieces that I had to make from where the PO FUBAR'ed the speaker hole:

And the parts put together for the passenger panel:

And the final product for both sides:

It was getting later tonight (3am) so I'm going to mount them to the door panels tomorrow morning before heading to the beach. Should be a 10-15 minute task.
All I have left to do is wrap factory the door handles in vinyl. Not sure how I'm going to do it, but I may recruit the assistance of my Ma to stitch them up for me.. She's the sewing whiz (she's even teaching my wife to sew) so she can likely work it up for me.
05-10-2015, 10:33 AM
#1238
Ta-da!!!
Got both sides installed today while the wife was in the shower. All I have left to do is wrap and install the door handles. I'm pretty satisfied with the final look though.
Now I'm off to take my wife and boys out on the boat for mother's day.

Got both sides installed today while the wife was in the shower. All I have left to do is wrap and install the door handles. I'm pretty satisfied with the final look though.
Now I'm off to take my wife and boys out on the boat for mother's day.
05-12-2015, 09:50 AM
#1240
Thanks!
As I am wrapping up the bulk of this build, and before I forget to do such, I would like to personally thank several of the members here that greatly helped me out along the way by either selling/gifting me parts or providing much needed information and advice.
And where would we all be without YotaTech?! Special thanks to the current staff Corey, Fink, Josh, Robb, Ron and Terry as well as the past staff and founders of YotaTech for establishing and maintaining the integrity of YotaTech. After becoming a Moderator myself, I know how much work it take to keeps the wheels turning on this forum - folks, we (Staff) have a whole section of this forum dedicated to staff where we discuss issues and work on ways to better improve the user experience here. Average users also don't realize that behind the scenes Christina and Nolan at Internet Brands work extremely diligently at keeping YotaTech up and running functionally and FREE!! Most of you have never heard from them nor will you ever, but staff members work with them on the daily basis to help improve this forum based on YOUR feedback and experiences. We are truly blessed to have such a valuable resource dedicated to Toyotas.
I hope that all of you can learn as much from me as I have from all of you. Folks, nothing is impossible! Sure, I have a fairly solid background in a bunch of different fields as they relate to fixing or restoring vehicles, but I am by NO MEANS an expert in any field - I sit at a desk from 8am to 5pm Monday through Friday but turn into a weekend and late night warrior when it comes to working on my projects. All it takes to do something like this is a basic skill set, ambition and RESEARCH RESEARCH RESEARCH! READ FOLKS - the knowledge of others will get you a long way. If you haven't already, go back and read through this build thread - you will discover that 99% of the work on this truck was performed solely by myself. That 1% I didn't do myself was the machine work on my engine (because I simply don't have the equipment) and the installation of my windshield (because it was free and cheaper!). Make mistakes - Mistakes teach you valuable lessons! If I teach anybody anything with this build, I want it to be that YOU CAN DO ANYTHING!
I greatly appreciate all the well wishes and support given from everybody throughout this process. I know I likely missed some specific people that I should have thanked, but please do not think that your good deed or help went unappreciated. My truck is by no means "done" at this point (what truck project is ever really "done" anyway?), but I am at a point where I am satisfied with my results and will continue to work on it as I get the time, money and parts.
Again, thank you all!
- DropZone (Robb)
- Suncomb (Don)
- 83Toyota88 (Stephen)
- jrheingans (Jacob)
- 4Crawler (Roger)
- njtrekker (Al)
- TrekkerPaul (Paul)
- ToyBoy Twink
- ToyoToler
- LCE Performance
- Low Range Off Road
- Sky Off Road Design
- Marlin Crawler
- Trail Gear
- Griffith Motorsports
- Engnbldr
- Old Man Emu
- AccuBuilt (my local machine shop)
And where would we all be without YotaTech?! Special thanks to the current staff Corey, Fink, Josh, Robb, Ron and Terry as well as the past staff and founders of YotaTech for establishing and maintaining the integrity of YotaTech. After becoming a Moderator myself, I know how much work it take to keeps the wheels turning on this forum - folks, we (Staff) have a whole section of this forum dedicated to staff where we discuss issues and work on ways to better improve the user experience here. Average users also don't realize that behind the scenes Christina and Nolan at Internet Brands work extremely diligently at keeping YotaTech up and running functionally and FREE!! Most of you have never heard from them nor will you ever, but staff members work with them on the daily basis to help improve this forum based on YOUR feedback and experiences. We are truly blessed to have such a valuable resource dedicated to Toyotas.
I hope that all of you can learn as much from me as I have from all of you. Folks, nothing is impossible! Sure, I have a fairly solid background in a bunch of different fields as they relate to fixing or restoring vehicles, but I am by NO MEANS an expert in any field - I sit at a desk from 8am to 5pm Monday through Friday but turn into a weekend and late night warrior when it comes to working on my projects. All it takes to do something like this is a basic skill set, ambition and RESEARCH RESEARCH RESEARCH! READ FOLKS - the knowledge of others will get you a long way. If you haven't already, go back and read through this build thread - you will discover that 99% of the work on this truck was performed solely by myself. That 1% I didn't do myself was the machine work on my engine (because I simply don't have the equipment) and the installation of my windshield (because it was free and cheaper!). Make mistakes - Mistakes teach you valuable lessons! If I teach anybody anything with this build, I want it to be that YOU CAN DO ANYTHING!
I greatly appreciate all the well wishes and support given from everybody throughout this process. I know I likely missed some specific people that I should have thanked, but please do not think that your good deed or help went unappreciated. My truck is by no means "done" at this point (what truck project is ever really "done" anyway?), but I am at a point where I am satisfied with my results and will continue to work on it as I get the time, money and parts.
Again, thank you all!


