
Clemons 1982 SR5 Build
 Apr 23, 2015 | 08:26 PM
#1

Thread Starter
Registered User
Joined: Apr 2015
Posts: 17
Likes: 0
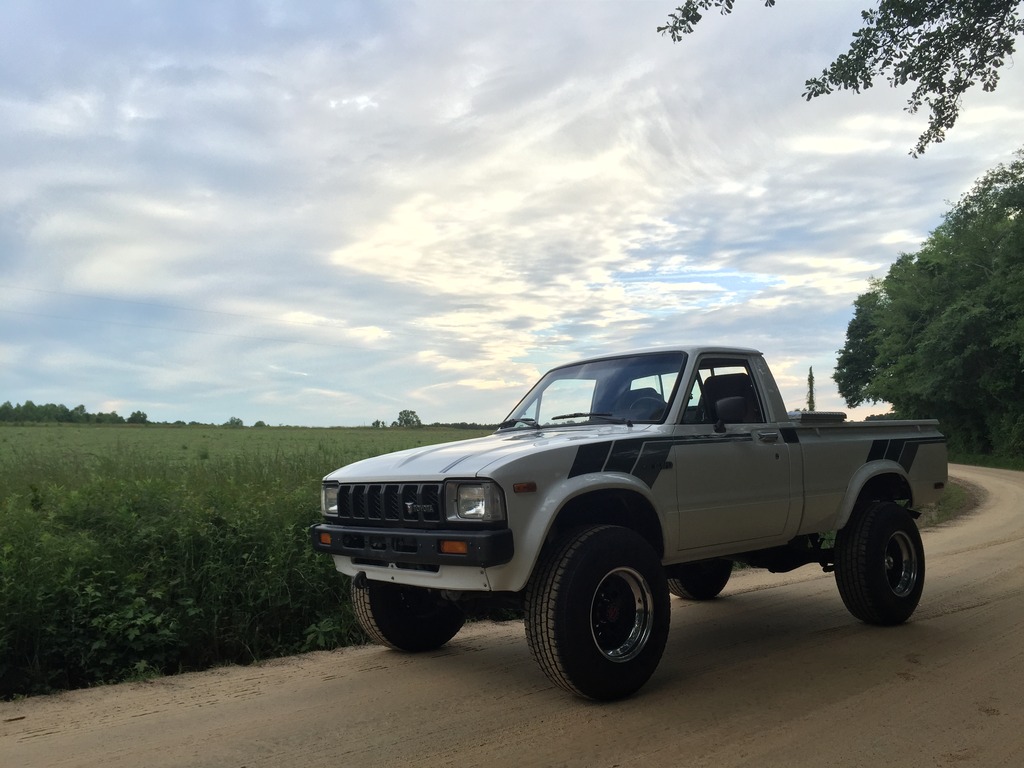
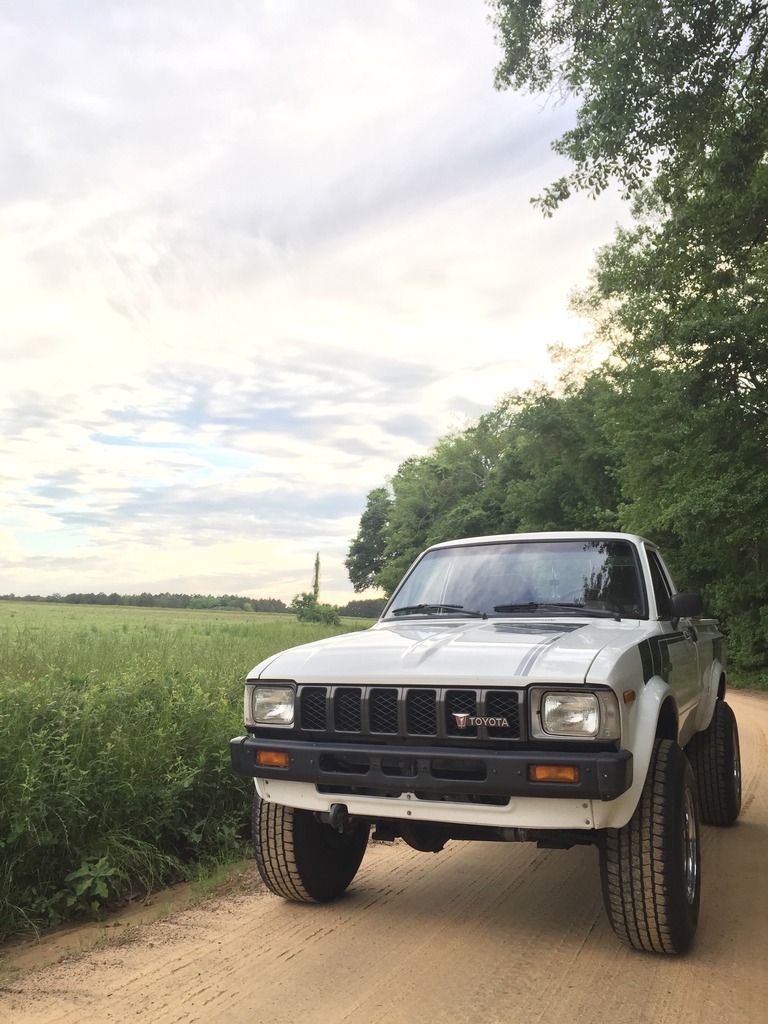
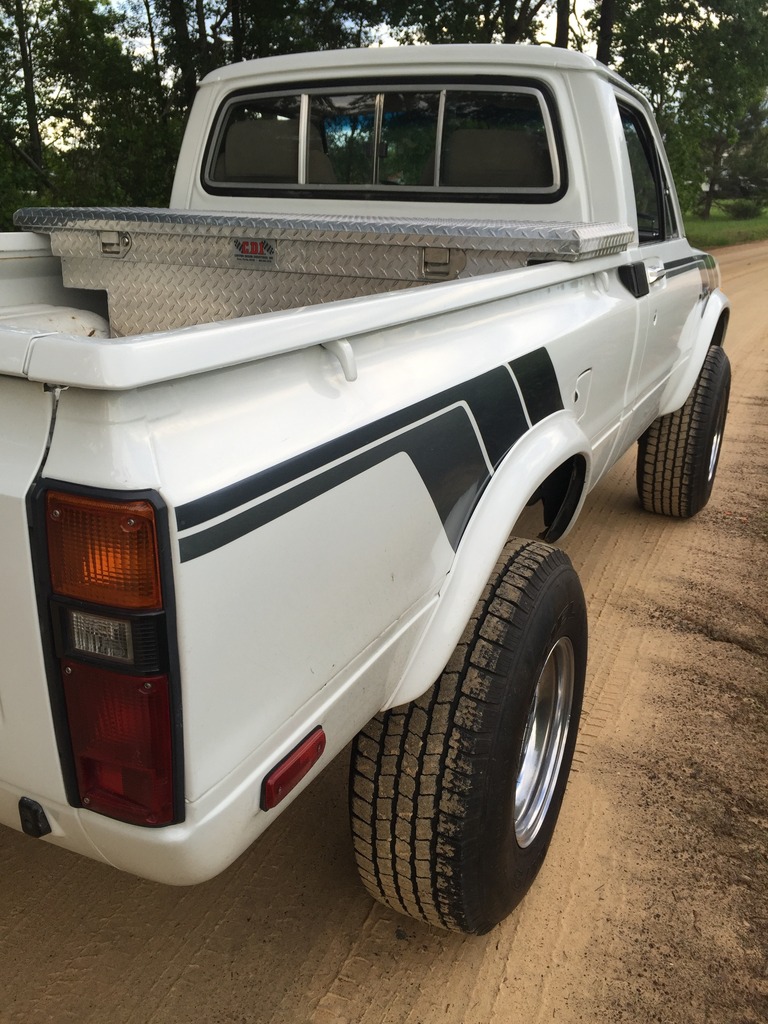
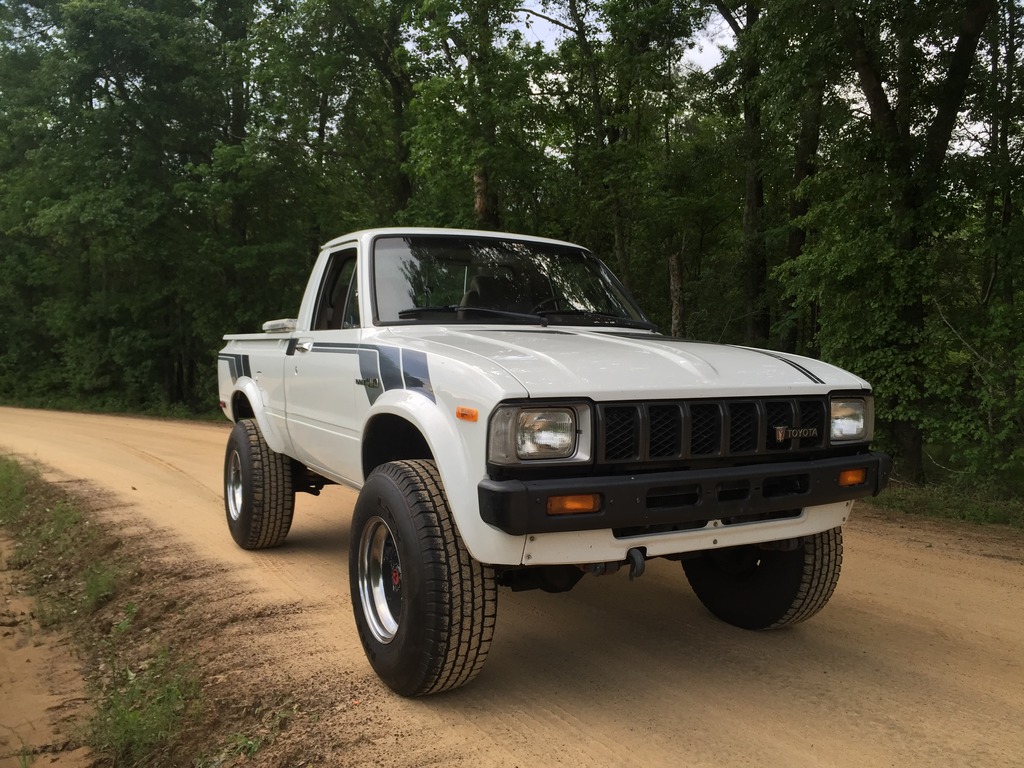
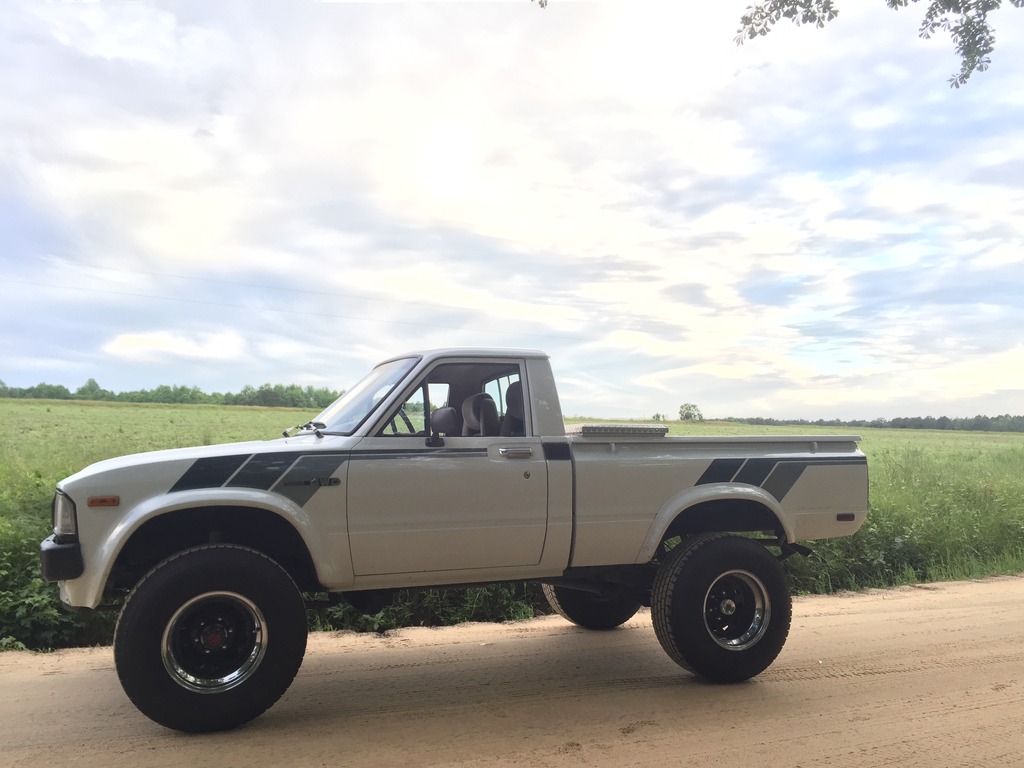
1982 Hilux SR5 Mild Build
Hello everyone, I just picked up my truck a weeks or so ago from the second owner in north Georgia. It is a 1982 SR5 short box with 220k original miles, non factory ac or power steering. 7 years ago the previous owner flew to California with his son and drove it back to Georgia where he daily drove it for several years. It has had a good solid driver quality respray with OEM graphics painted on under the clear coat. It seems to be all factory beside the seats (appear to be period correct celica supra seats), rear add a leaf, wheels/tires and tool box. I drove it 4 hours home without a hickup which was an awesome experience. I am very excited to start working on this truck, I really want to keep this build mild since it is so nice and unmolested. Any help will be appreciated as i am new to the toyota scene! Plans are...
Full Smog delete
Fix parking brake cable
Add A/C (south ga must have)
Raptor liner in bed (possibly floor and behind seats instead of replacing carpet
Weber carb
Header with new exhaust (turn down after rear axle)
OME springs with all new bushings front and rear
Brake upgrade (brake feel is not great)
Lockers F&R of some sort with regear
15x8 Steel Wheels and 33x12.50s that do not take away from the trucks appearance
20" light bar behind front bumper with smoked cover to keep it stealthy
Interior refresh (currently brown yellowish) want to go black, blue or grey. door cards are shot and lower carpet is missing
2nd gen Bench seat? (will take suggestions i really like bench seats in pickups)


Last edited by clemons; Apr 23, 2015 at 08:41 PM.
Apr 24, 2015 | 06:28 AM
#2
Wow!!! Looks like your build is complete. I havent seen one looked that good in a long time. I can see you wanting to add ac in the south. Great looking truck you found Welcome to Yotatech. There are some 79-93 guys that will be able to help with your questions that will jump in here shortly.
Apr 24, 2015 | 11:27 AM
#3

Wow I thought that pic was going too be one of those build threads where you start with a picture of the finished product and then recount what you did.
I'm not sure I would do anything but drive it till things started failing.
I'm not sure I would do anything but drive it till things started failing.
Apr 24, 2015 | 12:03 PM
#5
Nice clean truck! Looks like you have a rather rare, unmolested version! Did you by any chance get it off eBay? Looks like one that was listed a couple weeks ago.
For your Desmog, Weber, Exhaust, OME, Raptor Liner and Brake Upgrades, check out my build thread - I did them all. Particularly with the Raptor Liner, the stuff is pretty good, but you will spend at least $150 to do the inside of the cab, but most Line-X type places would do it for around $250 so it really isn't much more, but the quality is WAY better. I have to tell you this though, Raptor will re-flow and non fully cured 2K paint as well as any single part seal sealers and coatings. When it re-flows this stuff underneath it you lose all adhesion and it WILL bubble and peal (ask me how I know - check out my build thread....). If I had to do the inside of my cab again, I would definitely go with a commercial bedliner company like Line-X.
Good luck and keep us posted on how it goes!
Apr 24, 2015 | 01:12 PM
#6
Thread Starter
Registered User
Joined: Apr 2015
Posts: 17
Likes: 0
Wow!!! Looks like your build is complete. I havent seen one looked that good in a long time. I can see you wanting to add ac in the south. Great looking truck you found Welcome to Yotatech. There are some 79-93 guys that will be able to help with your questions that will jump in here shortly.
Apr 24, 2015 | 01:22 PM
#7
Thread Starter
Registered User
Joined: Apr 2015
Posts: 17
Likes: 0
Nice clean truck! Looks like you have a rather rare, unmolested version! Did you by any chance get it off eBay? Looks like one that was listed a couple weeks ago.
For your Desmog, Weber, Exhaust, OME, Raptor Liner and Brake Upgrades, check out my build thread - I did them all. Particularly with the Raptor Liner, the stuff is pretty good, but you will spend at least $150 to do the inside of the cab, but most Line-X type places would do it for around $250 so it really isn't much more, but the quality is WAY better. I have to tell you this though, Raptor will re-flow and non fully cured 2K paint as well as any single part seal sealers and coatings. When it re-flows this stuff underneath it you lose all adhesion and it WILL bubble and peal (ask me how I know - check out my build thread....). If I had to do the inside of my cab again, I would definitely go with a commercial bedliner company like Line-X.
Good luck and keep us posted on how it goes!
For your Desmog, Weber, Exhaust, OME, Raptor Liner and Brake Upgrades, check out my build thread - I did them all. Particularly with the Raptor Liner, the stuff is pretty good, but you will spend at least $150 to do the inside of the cab, but most Line-X type places would do it for around $250 so it really isn't much more, but the quality is WAY better. I have to tell you this though, Raptor will re-flow and non fully cured 2K paint as well as any single part seal sealers and coatings. When it re-flows this stuff underneath it you lose all adhesion and it WILL bubble and peal (ask me how I know - check out my build thread....). If I had to do the inside of my cab again, I would definitely go with a commercial bedliner company like Line-X.
Good luck and keep us posted on how it goes!
 I am changing all the fluids this weekend, full tune up and valve adjustment. thanks for the feedback on that raptor liner i need to drive it to my local line x place for a quote. I have another project i am trying to tackle at the same time as this (2001.5 Audi S4 Avant) so if i can cut cost (without reducing quality) I would like to. I went to a junk yard a few hours ago and didn't have any luck pulling ac or interior parts i may just post a wtb ad and see what happens.
Trending Topics
Apr 24, 2015 | 11:03 PM
#8
Glad to see you wandered over here from Pirate.
Like those guys said and you will hear it here- please keep it clean.
I would love to have your truck..
here is a link to some parts sources that might have some of the stuff you need
https://www.yotatech.com/forums/f120...rs-etc-221645/
Like those guys said and you will hear it here- please keep it clean.
I would love to have your truck..
here is a link to some parts sources that might have some of the stuff you need
https://www.yotatech.com/forums/f120...rs-etc-221645/
Apr 25, 2015 | 05:34 AM
#9
Thread Starter
Registered User
Joined: Apr 2015
Posts: 17
Likes: 0
Glad to see you wandered over here from Pirate.
Like those guys said and you will hear it here- please keep it clean.
I would love to have your truck..
here is a link to some parts sources that might have some of the stuff you need
https://www.yotatech.com/forums/f120...rs-etc-221645/
Like those guys said and you will hear it here- please keep it clean.
I would love to have your truck..
here is a link to some parts sources that might have some of the stuff you need
https://www.yotatech.com/forums/f120...rs-etc-221645/
Apr 25, 2015 | 06:58 AM
#10
Thread Starter
Registered User
Joined: Apr 2015
Posts: 17
Likes: 0
We have awful weather today so it looks like I'll have to wait until tomorrow to do my valve adjustment and fluid change.
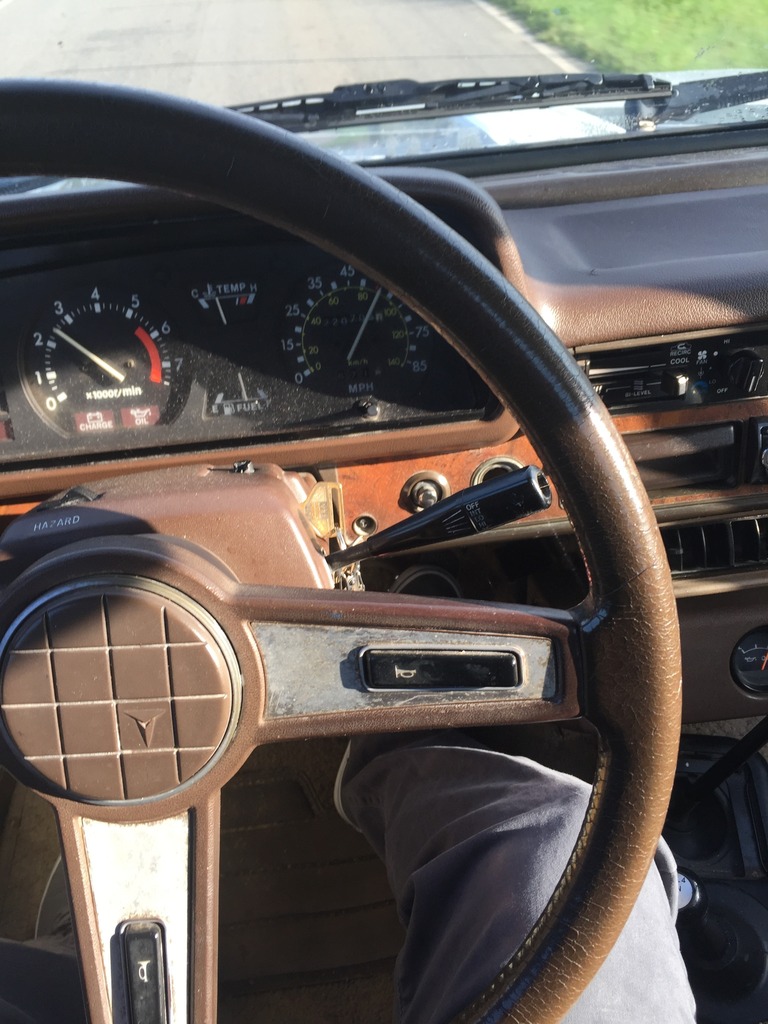
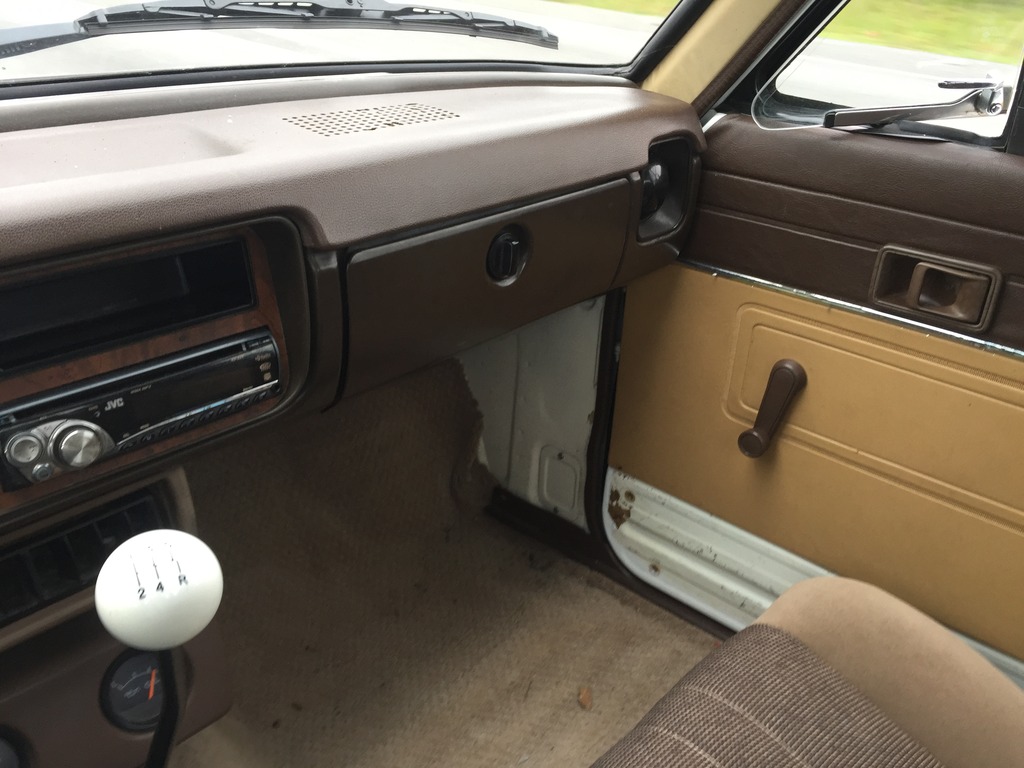
I was poking around yesterday and noticed a couple odd things. My hvac controls have a markings like it had ac? I've seen some pictures of non ac trucks hvac controls and they do not have that. Also there is a piece of a bracket or tab on the block where the ac bracket goes. There is absolutely no condenser or lines. Here are the pics
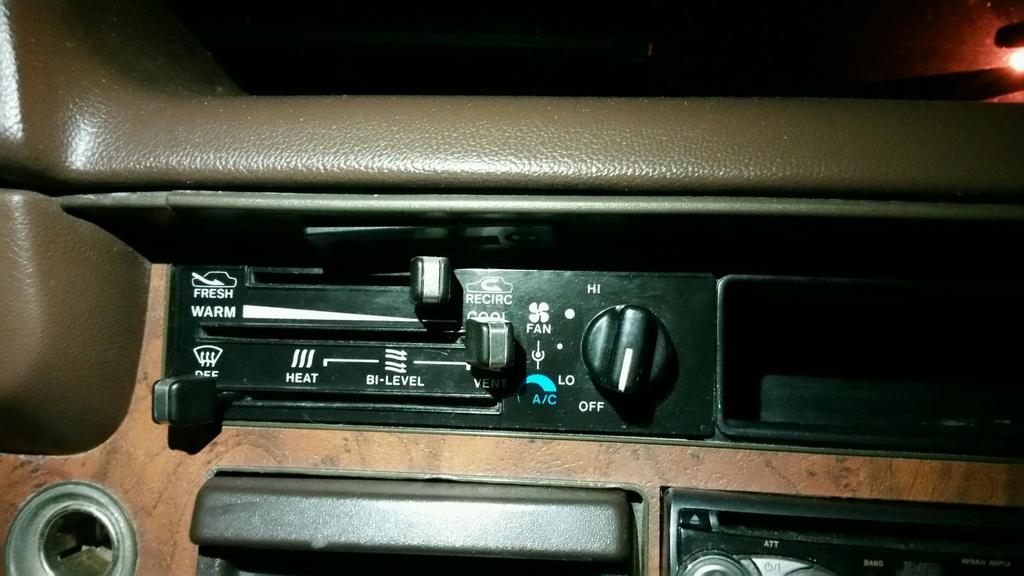
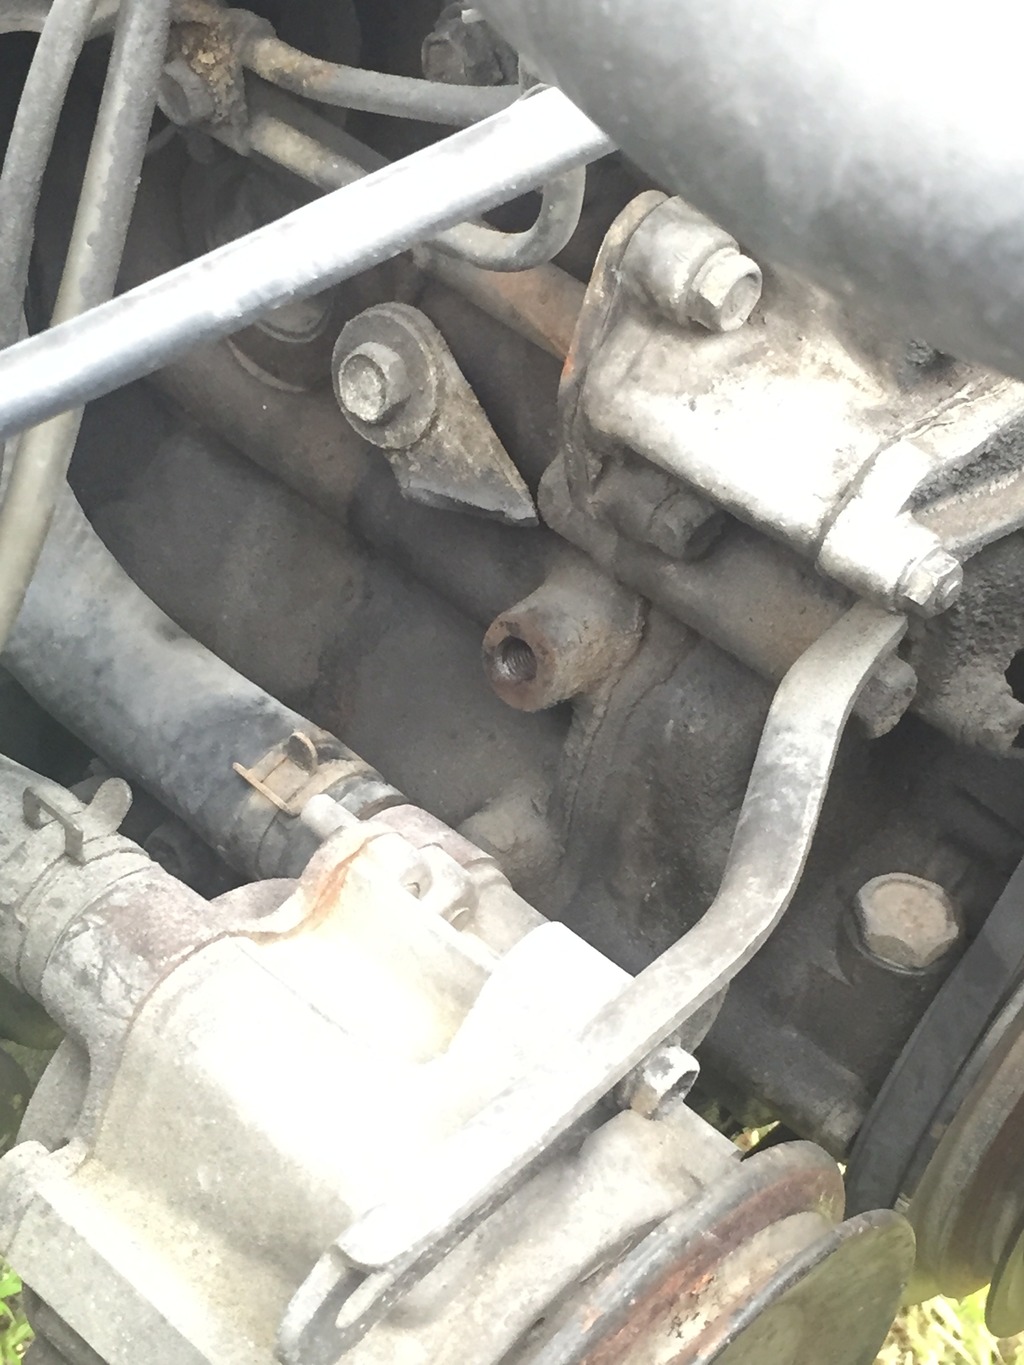
I was poking around yesterday and noticed a couple odd things. My hvac controls have a markings like it had ac? I've seen some pictures of non ac trucks hvac controls and they do not have that. Also there is a piece of a bracket or tab on the block where the ac bracket goes. There is absolutely no condenser or lines. Here are the pics

 Apr 25, 2015 | 07:32 PM
#11
Thread Starter
Registered User
Joined: Apr 2015
Posts: 17
Likes: 0
Today I did manage to change my trans fluid with some mt90. I could tell that the fluid was old the shifter felt a little notchy (no grinds) I had good luck using mt90 in the e30 that I sold last year. I had the same issue with my 97 tdi that had been sitting for a while before I bought it but I used penzoil synchromesh in that application. I've found out with almost ever single car I've owned trans fluid seems to be the most neglected when it comes to maintenance.
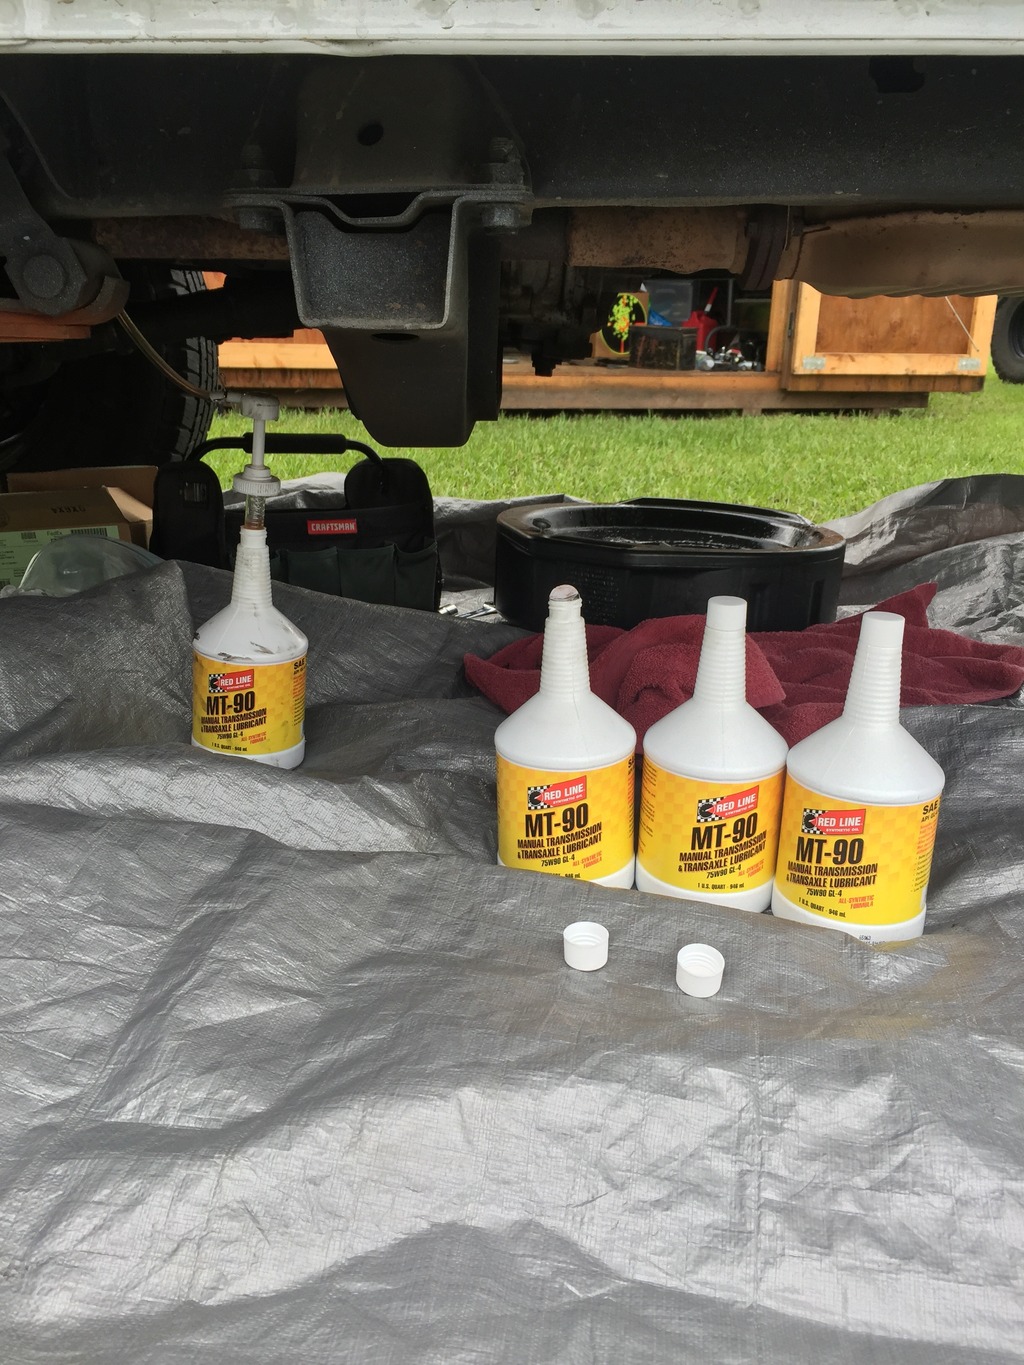
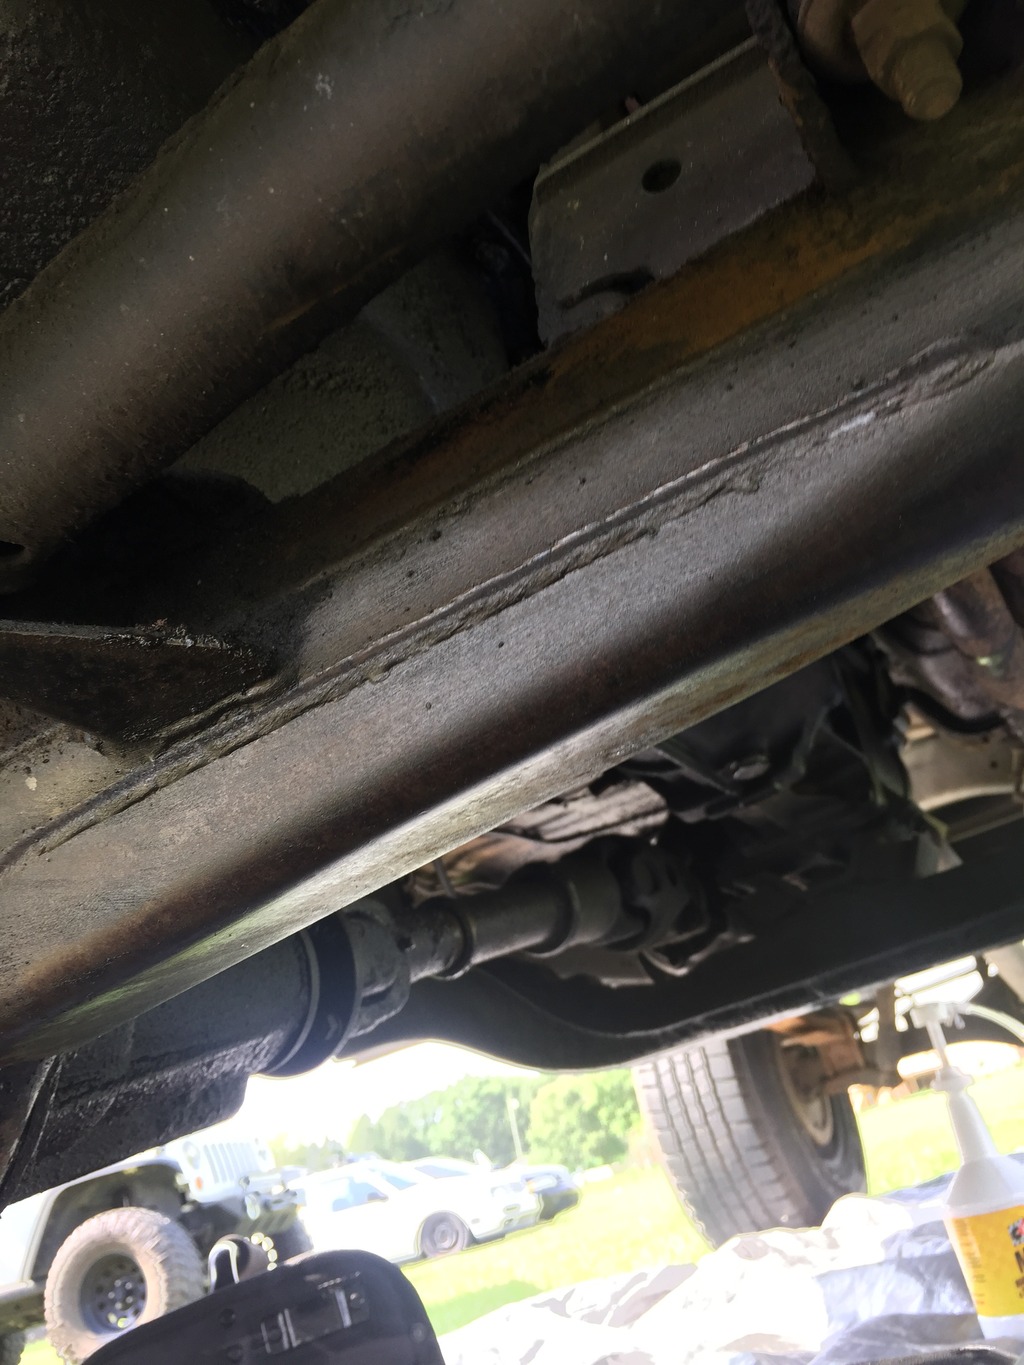
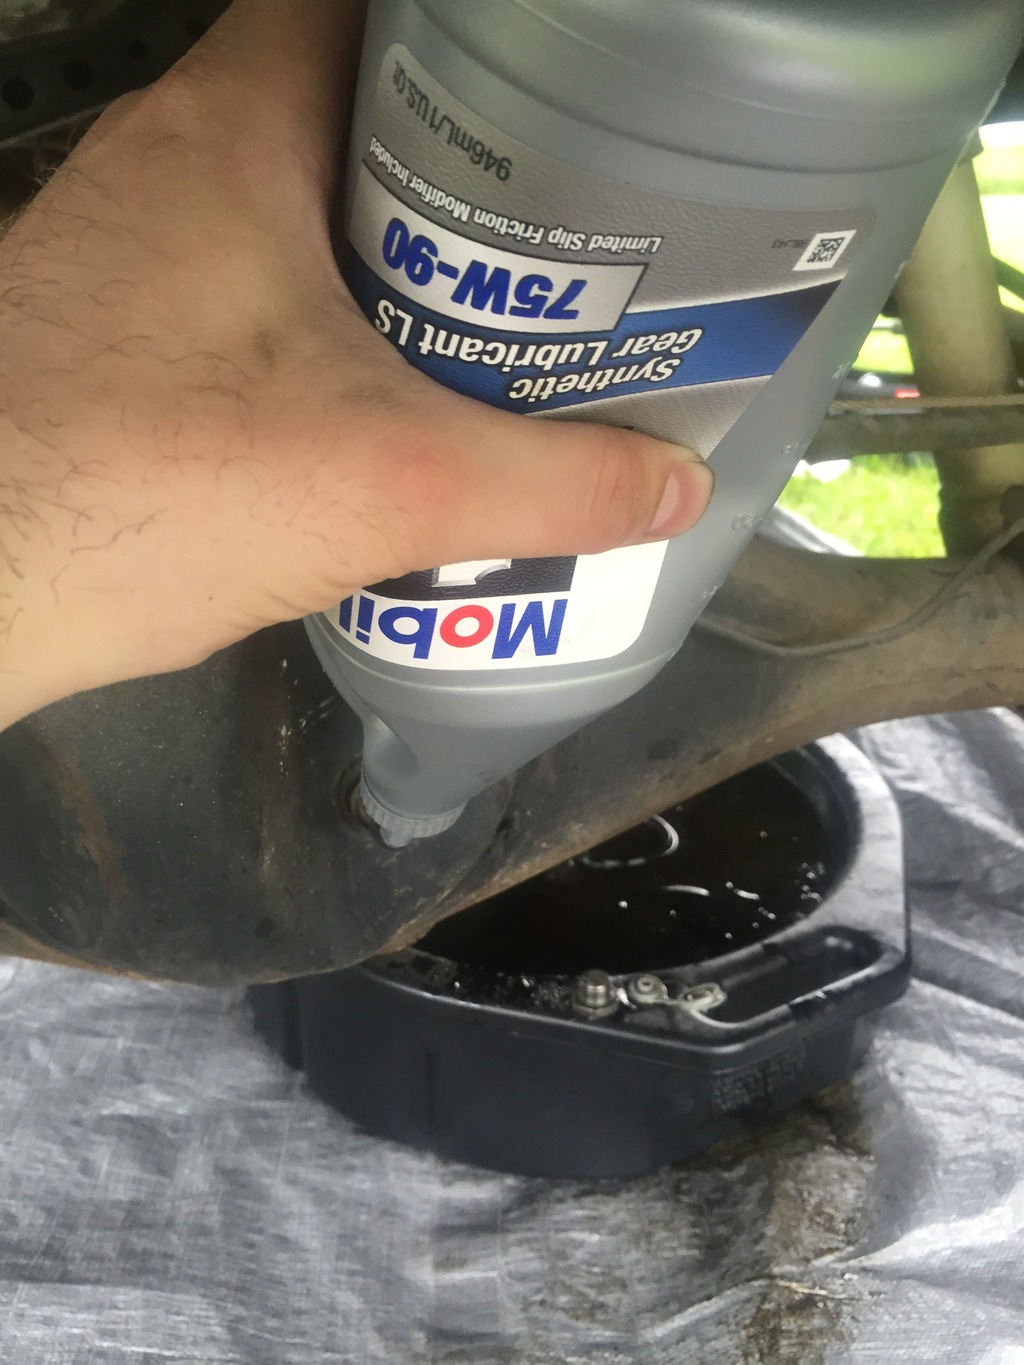
I also changed the front and read differential fluid with some synthetic Mobil 1 75w/90. The oil pan has been leaking for quite a while so I ordered up a new gasket. I cleaned some of the grime off of the front axle I doubt this truck has seen much trail abuse since there are no scuffs or scratches on the bottom of the front axle housing
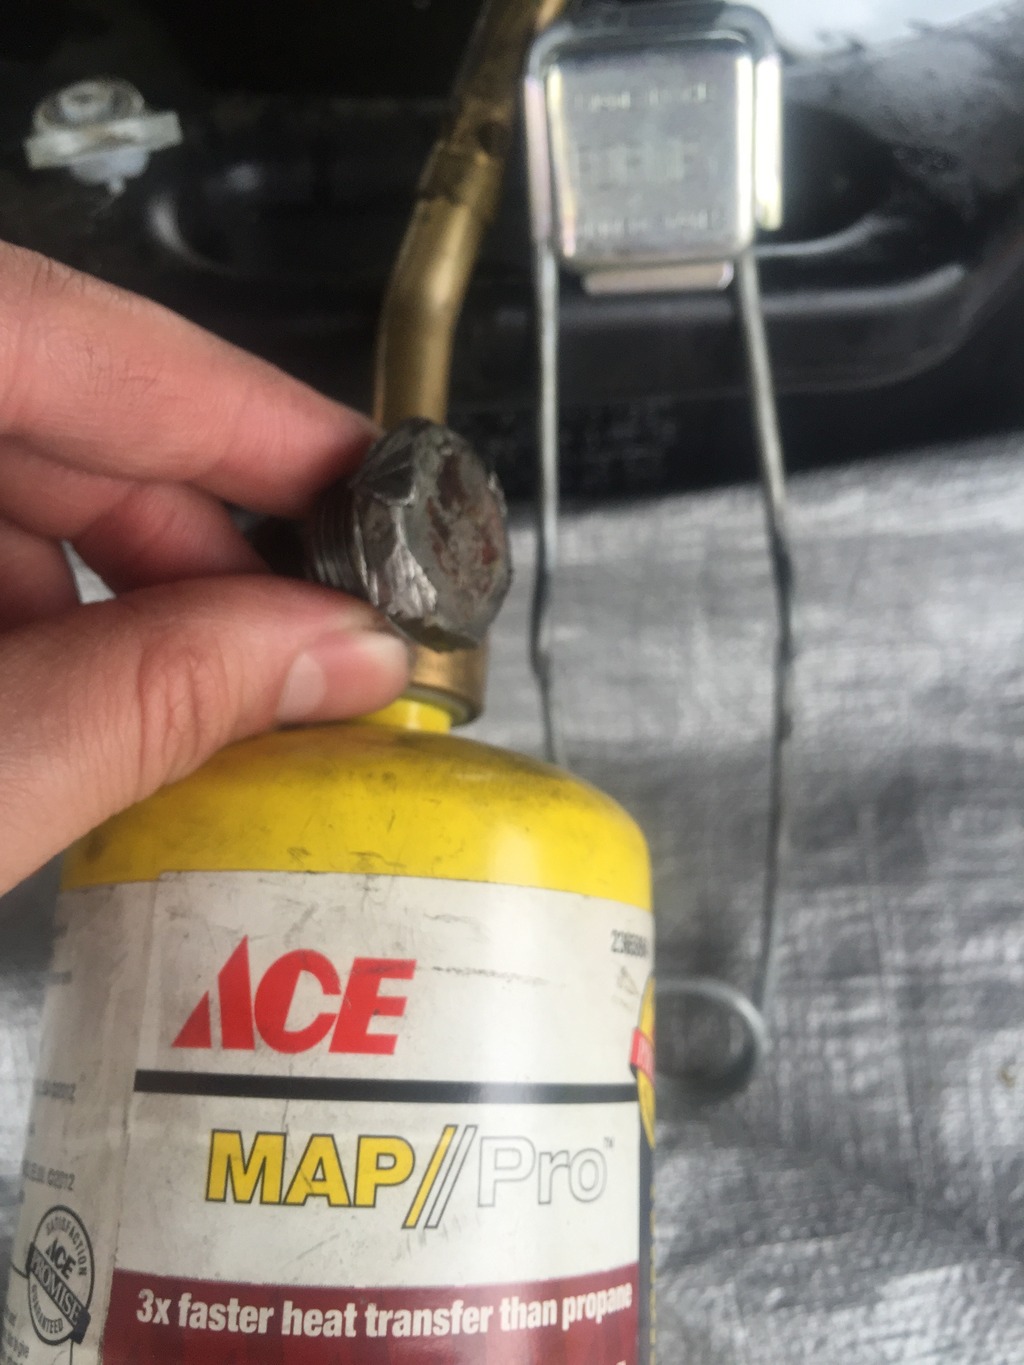
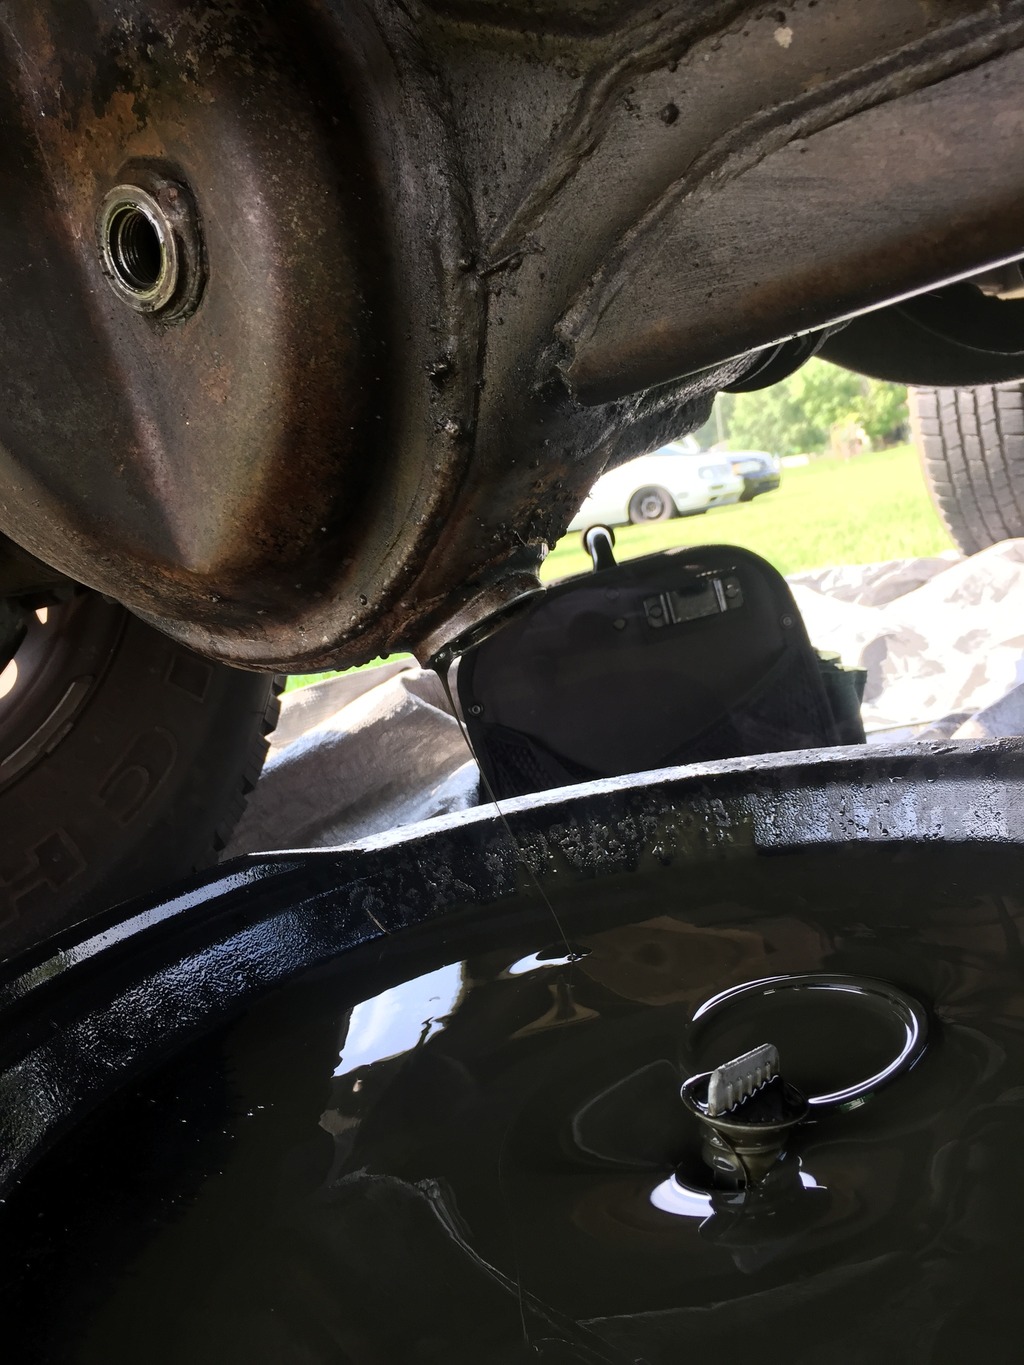
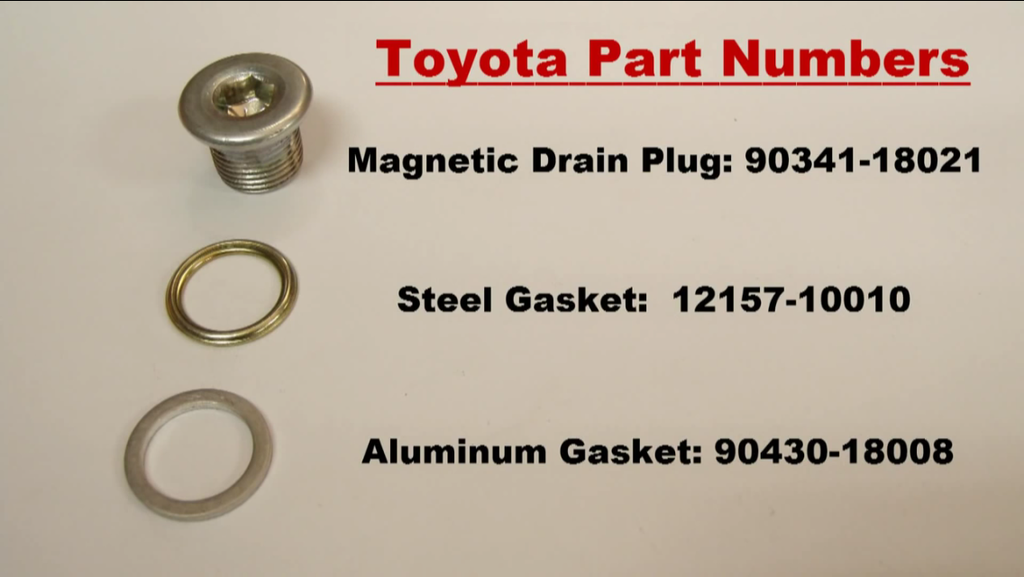
The differential drain plugs were in pretty good shape however the fill plugs were in terrible shape and over tightened to boot. I had to break out the map gas to get the rear plug out. I found some awesome info online today with part numbers to replace with much better plug. I am gonna order new ones for both differentials with steel gaskets and two more for the transfer case with aluminum gaskets. The front diff fluid puked out a nice olive drab green colored fluid either the grease is leaking in or water got in the front housing somehow. I'll change it again in a month or so and see what happens.
Here are the new drain plug and gasket part numbers.

I also changed the front and read differential fluid with some synthetic Mobil 1 75w/90. The oil pan has been leaking for quite a while so I ordered up a new gasket. I cleaned some of the grime off of the front axle I doubt this truck has seen much trail abuse since there are no scuffs or scratches on the bottom of the front axle housing


The differential drain plugs were in pretty good shape however the fill plugs were in terrible shape and over tightened to boot. I had to break out the map gas to get the rear plug out. I found some awesome info online today with part numbers to replace with much better plug. I am gonna order new ones for both differentials with steel gaskets and two more for the transfer case with aluminum gaskets. The front diff fluid puked out a nice olive drab green colored fluid either the grease is leaking in or water got in the front housing somehow. I'll change it again in a month or so and see what happens.


Here are the new drain plug and gasket part numbers.

Last edited by clemons; Apr 25, 2015 at 07:43 PM.
Apr 26, 2015 | 03:17 AM
#13
Registered User
Joined: Jul 2012
Posts: 205
Likes: 5
From: Estill Springs TN / Atl GA
Yeah. Trans fluid has never been done because who would want to deal with pumping oil down that hole. Good lord it's awful. I put AMSOIL in mine. It seemed like a good decision. My trans is still shifting better than when I got the truck. Sound choice keeping up with that.
Thanks for posting that drain plug part number! I'm about to go repost that in my thread so that I remember it when I need it in a few days.
Thanks for posting that drain plug part number! I'm about to go repost that in my thread so that I remember it when I need it in a few days.
Apr 26, 2015 | 02:41 PM
#14
Thread Starter
Registered User
Joined: Apr 2015
Posts: 17
Likes: 0
from the video i watched it works for the transfer case also just have to use the aluminum gaskets due to the casing of the transfer case being made from aluminum. your trekker is awesome bud. I've never seen one in person!
Apr 26, 2015 | 02:45 PM
#15
Thread Starter
Registered User
Joined: Apr 2015
Posts: 17
Likes: 0
Yeah. Trans fluid has never been done because who would want to deal with pumping oil down that hole. Good lord it's awful. I put AMSOIL in mine. It seemed like a good decision. My trans is still shifting better than when I got the truck. Sound choice keeping up with that.
Thanks for posting that drain plug part number! I'm about to go repost that in my thread so that I remember it when I need it in a few days.
Thanks for posting that drain plug part number! I'm about to go repost that in my thread so that I remember it when I need it in a few days.
Apr 28, 2015 | 11:07 PM
#16

Registered User
Joined: Mar 2013
Posts: 1,060
Likes: 48
Awesome truck indeed!!! I changed my trans fluid to mt-90 as well and used that "awesome" hand fill pump. Jk leaked like crazy, but I expected that it was $5.
As for adding A/C I hear that dealerships added A/C to 22r/re trucks and 4runners. Not sure about the 1st gens though. Here is a link from yotatech where a guy added A/C to his 85 pickup for like $400. Seems totally reasonable. Said he got his parts from a toyota recycler in Rancho Cordova CA. Give them a call, they might be able to send you all the parts you need!
https://www.yotatech.com/forums/f198...-miles-287309/
Apr 29, 2015 | 05:33 AM
#18
Apr 29, 2015 | 06:04 AM
#19
Registered User
Joined: Mar 2013
Posts: 1,060
Likes: 48
Apr 29, 2015 | 08:18 PM
#20
Thread Starter
Registered User
Joined: Apr 2015
Posts: 17
Likes: 0
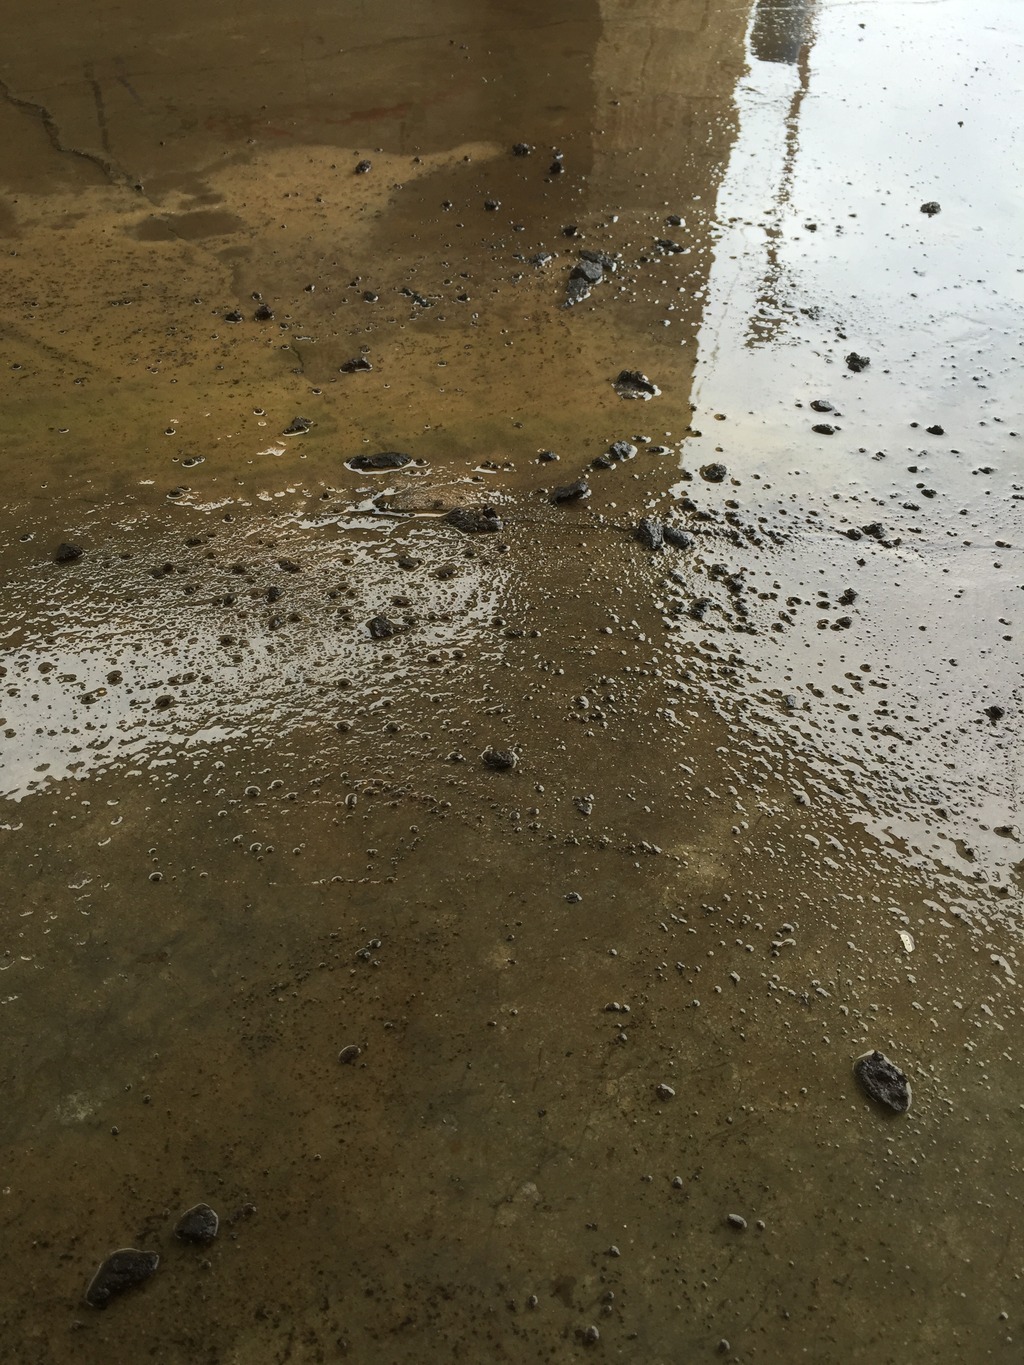
My oil pan gasket came in and i was off work yesterday so i got too it. there was a lot of oil on the oil pan, front sway bar, front differential, driveshaft, transmission crossmember.... you get the point. i broke out the dawn and spray bottle and went to town.
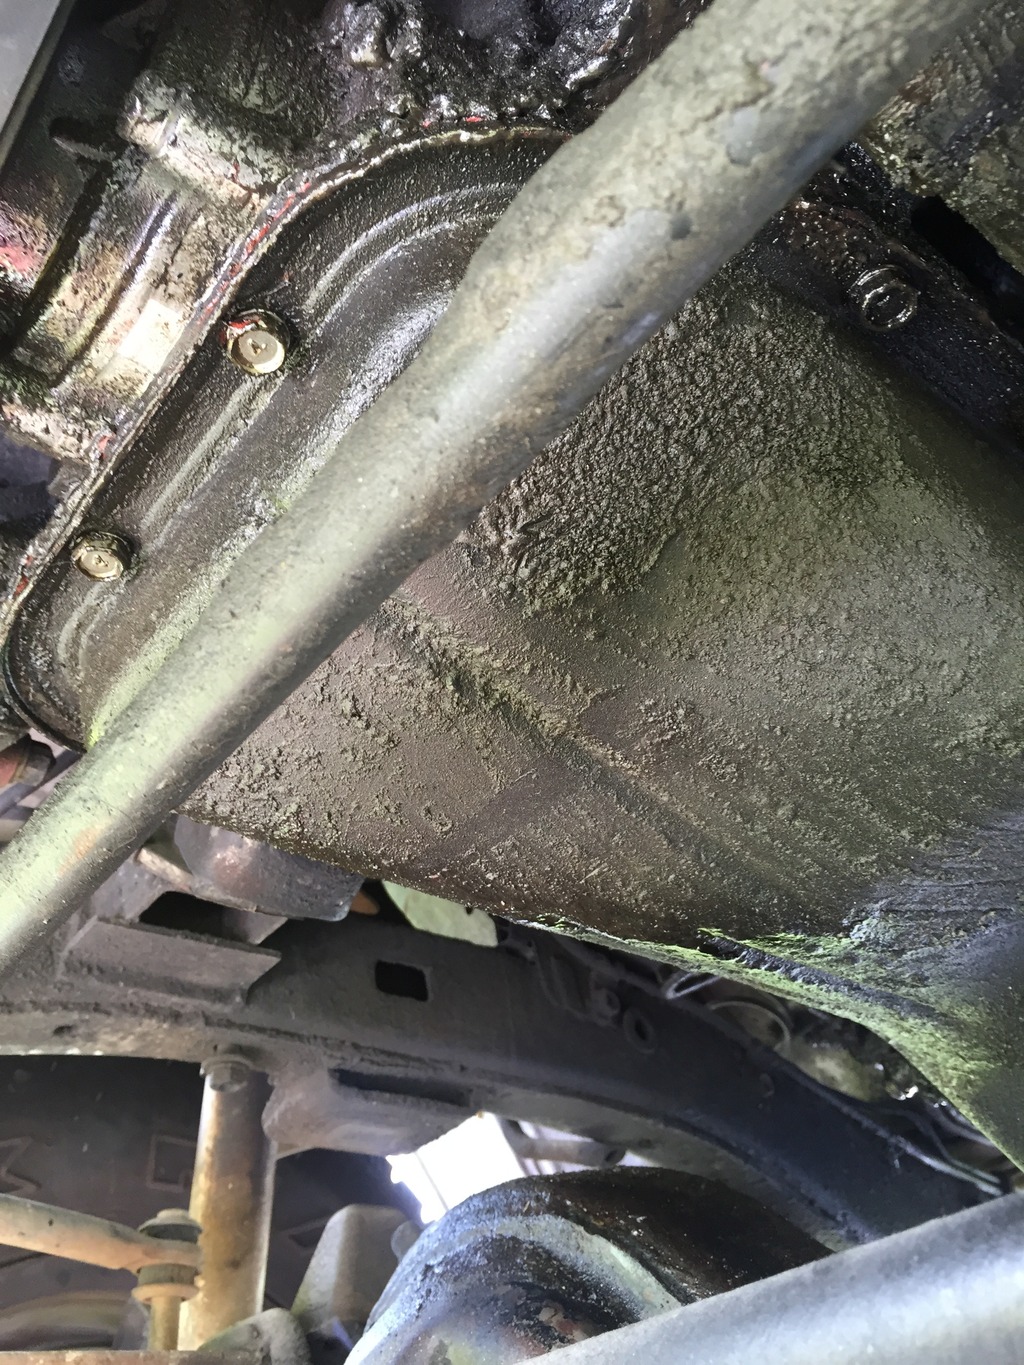
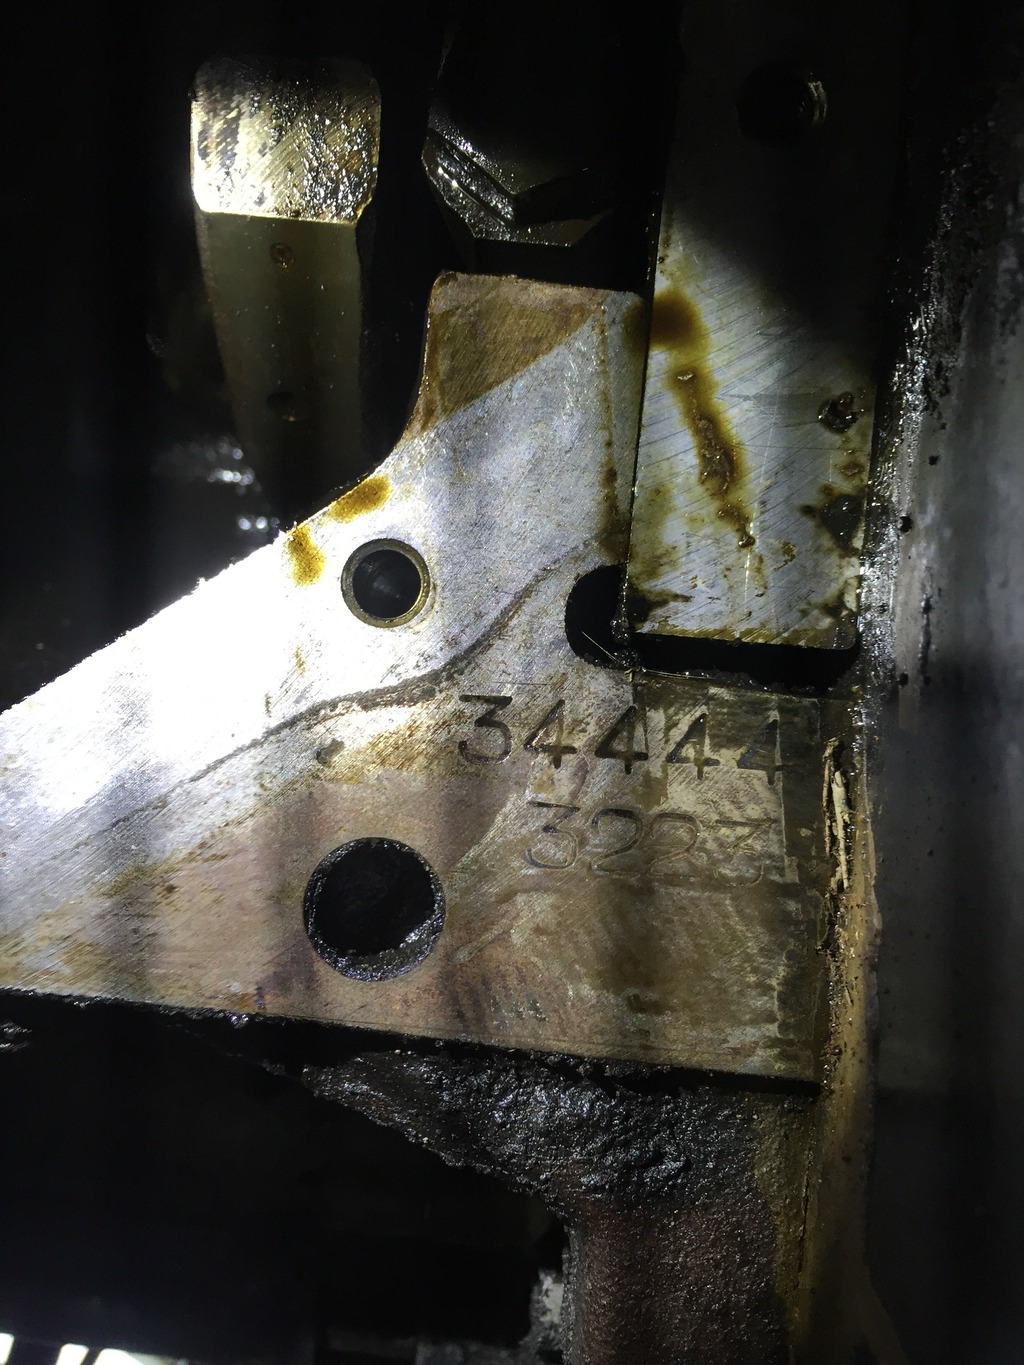
i tried to do some research but could not find any info on these casting numbers next to the oil pan but at least grease isn't covering them anymore.
all buttoned up with no leaks, the previous owner (there was only two before me) must have used some red sealant to patch where the oil pan was leaking in the front. the cork gasket was really on there. i had to use a putty knife and my trusty 2lb hammer to get it going i didn't want to pry on the oil pan. i may or may not have used the map gas again
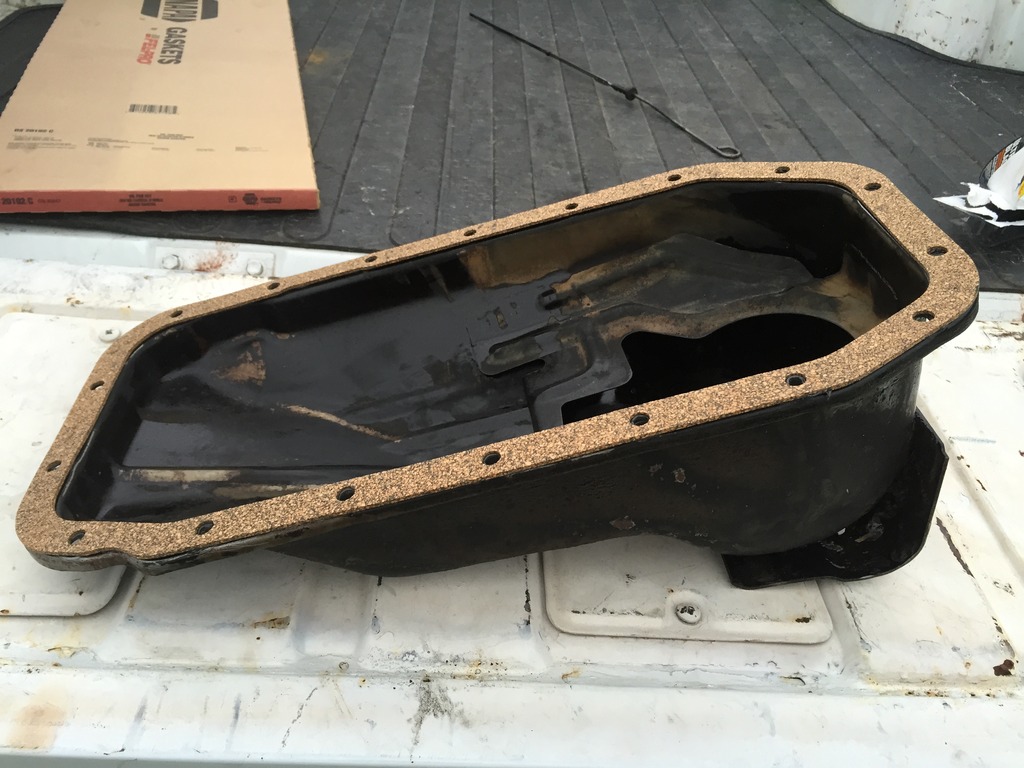
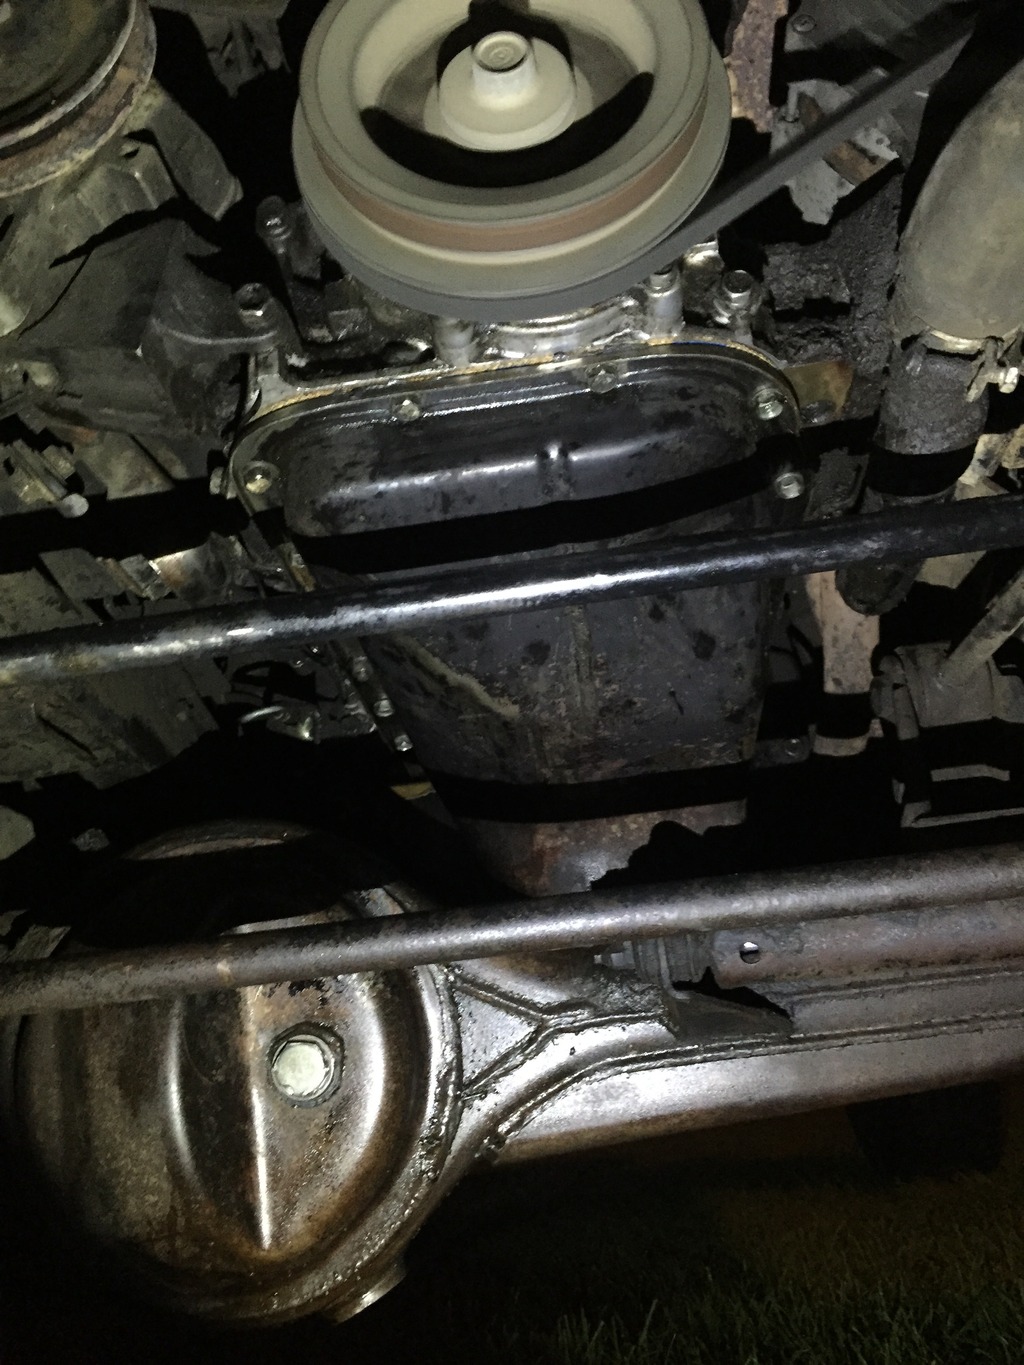
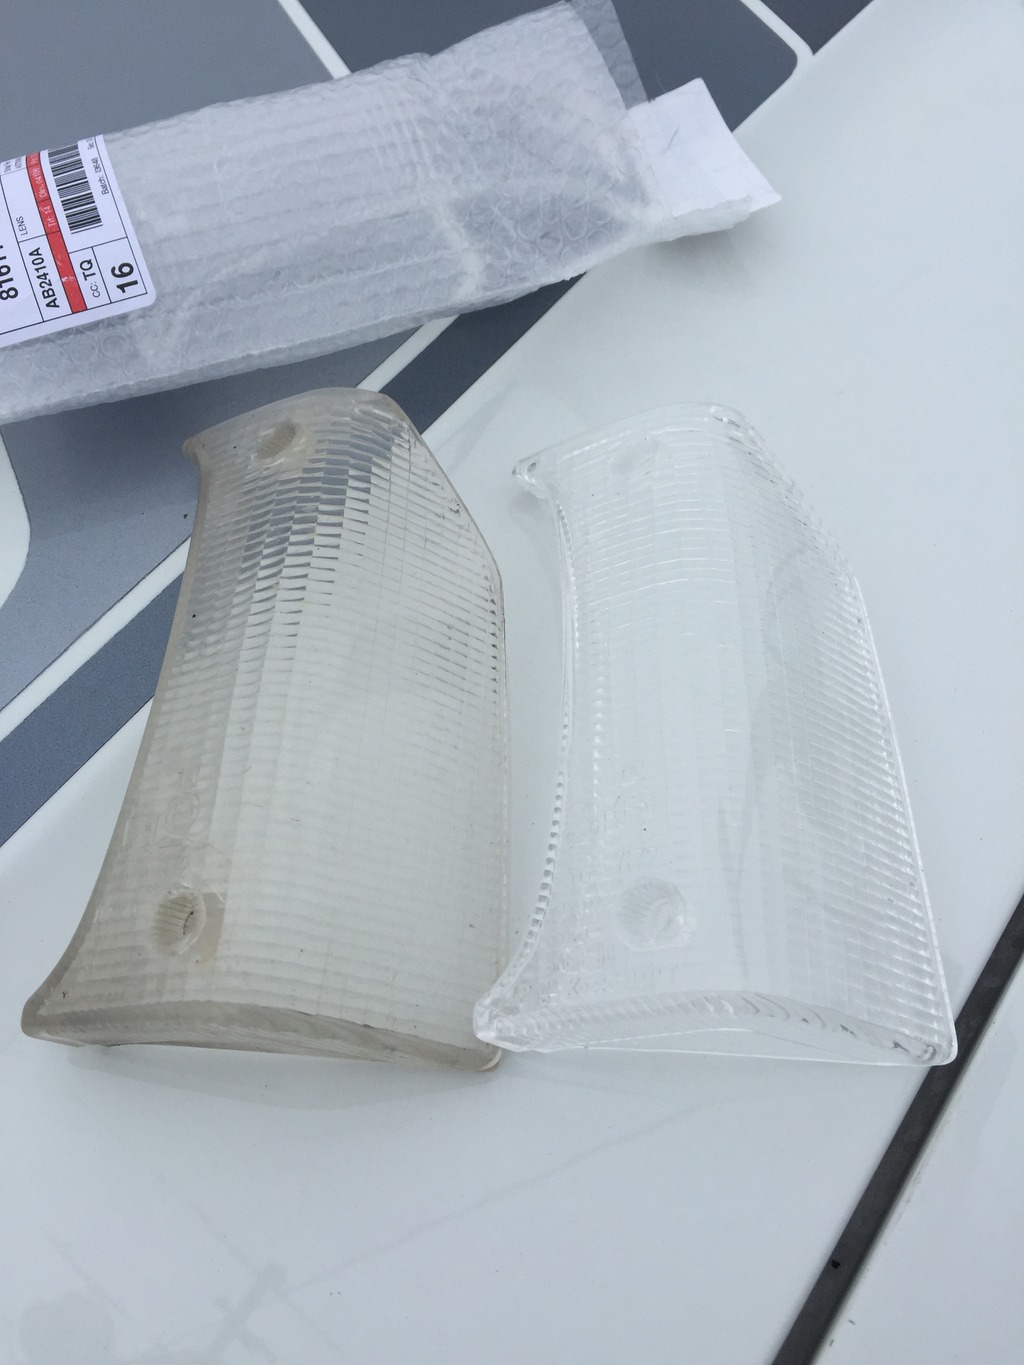
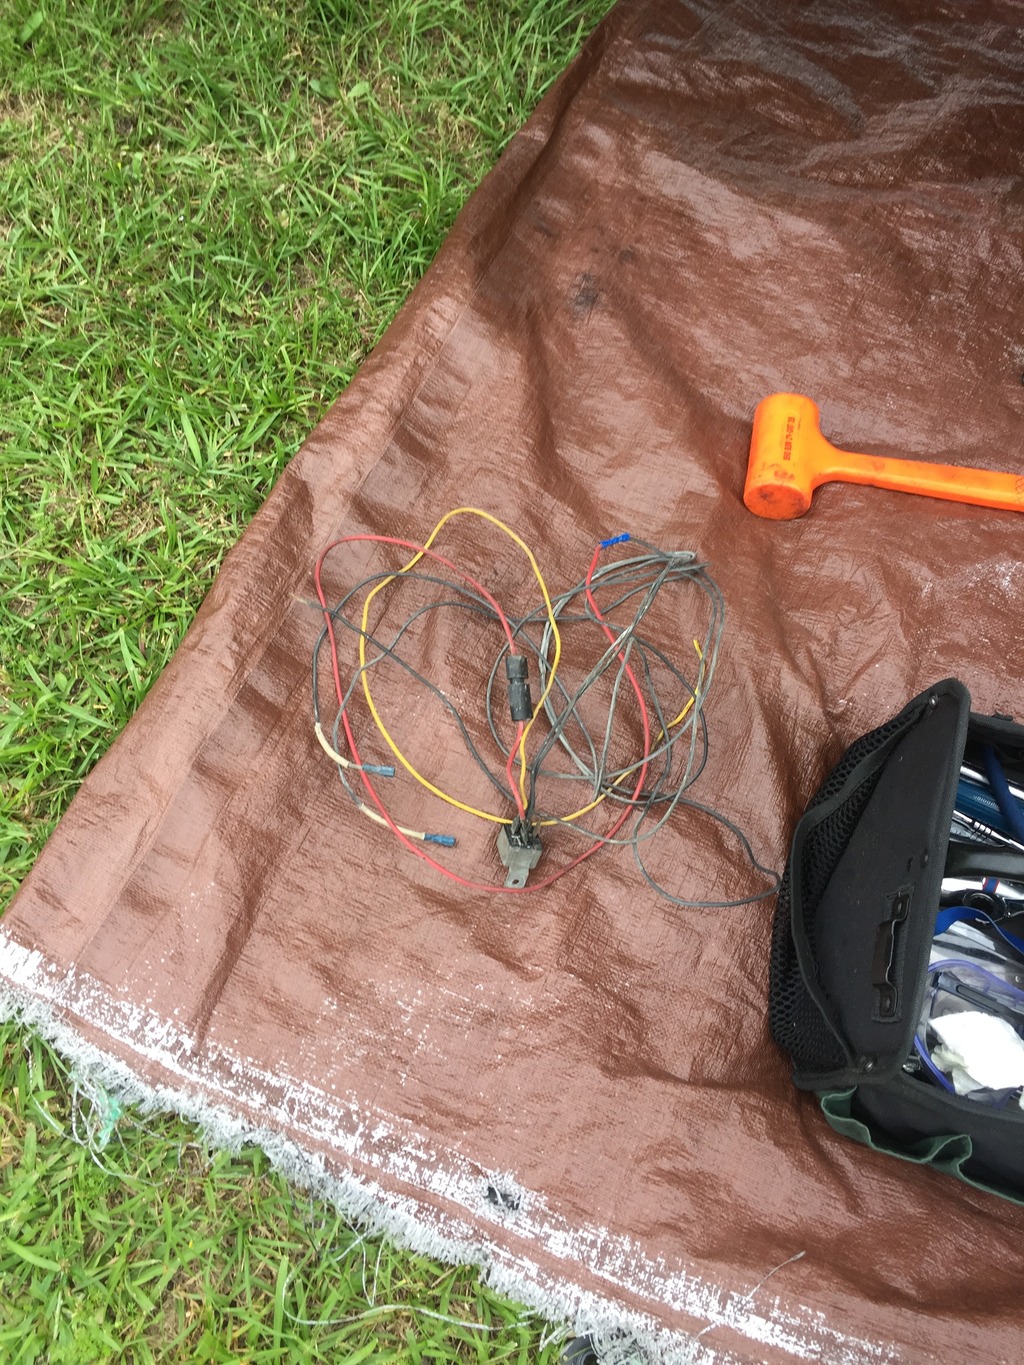
my new factory corner light covers came in so i had to put those on also. i pulled some old wiring out that someone had some off road lights mounted along with changing the fuel filter. tomorrow i am going to change the spark plugs, plug wires, distributor cap, rotor button and adjust the valves. it was a good day, i would have liked to take some time to paint the oil pan but it was getting late and i wanted to make sure it wasn't leaking again.


i tried to do some research but could not find any info on these casting numbers next to the oil pan but at least grease isn't covering them anymore.

all buttoned up with no leaks, the previous owner (there was only two before me) must have used some red sealant to patch where the oil pan was leaking in the front. the cork gasket was really on there. i had to use a putty knife and my trusty 2lb hammer to get it going i didn't want to pry on the oil pan. i may or may not have used the map gas again


my new factory corner light covers came in so i had to put those on also. i pulled some old wiring out that someone had some off road lights mounted along with changing the fuel filter. tomorrow i am going to change the spark plugs, plug wires, distributor cap, rotor button and adjust the valves. it was a good day, i would have liked to take some time to paint the oil pan but it was getting late and i wanted to make sure it wasn't leaking again.


Last edited by clemons; Apr 29, 2015 at 08:29 PM.


