
Finishing 3.4 Swap Codes to go: P0135 P0340 P0505
 Mar 12, 2012 | 09:46 PM
#1
Thread Starter
Registered User
Joined: Feb 2012
Posts: 61
Likes: 0
From: Auburn, WA
Finishing 3.4 Swap Codes to go: P0135 P0340 P0505
Hello. I'm excited to make my first post here! I've been a long time lurker, but since finishing this swap in late 2010, it's time to get involved and finish this beast right. I swapped the motor and drove it up from SoCal (Joshua Tree) to the Seattle area after getting off active duty. We sold our 2 civics in Jan '12 and started DDing this one. The unadjusted (for 529 & 35" MT) mpg is about 11. I was getting 21 pulling a loaded trailer on 31" xTerrains with 410 when I drove up here in Feb '11.
Full OBD2. MT. 97 MT ECM. 2003 Motor from AT 4x2 Tacoma. 3.4 Evap box.
Actron OBDII PocketScan Results:
4 Codes
P0135
P0340
P0505
P0135pd
Mil On
Monitors
3 Inc
Catlyst
Evap
02 Snsr
4 Ready
Misfire
Fuel
Comp
02 Htr
Part of the loom fell on the downpipe and melted causing everything to short out before I even had an exhaust put on, ya it was loud! I soldered and heat shrank all the wires, and carefully fixed the shielded ones. I tested them from sensor to computer and they all seem to be fine. I haven't tried anything new in a few months since we wern't driving it much, but what I have tried: New 02's and rewired them. Crank and Cam wires tested and working, Crank and Cam sensors replaced, tested, and functioning properly. I have a 2nd ECM also, switched them and problems stayed. I put the harness together myself with the 3.0, a AT and MT 3.4 harness and weeks studying forums and EWD's from TIS. I have done everything to this truck myself since getting it stock with a blown motor. With our tax return on the way I have the "extra" funds to put into it soon. I will be replacing the 2.5" exhaust with a cat that matches the motor and ecm in a week or two. It's got an original style on there now, but I'm thinking that's just the tip of the iceberg. I don't want to take it into the dealership for $100 an hour. I'll be on 2 wheels for the summer so this rig can be down for days if necessary. I'm confident and comfortable taking on any mechanical or electrical projects. Thank you masters, in advance!
Last edited by Ranscat3; Mar 14, 2012 at 11:59 AM.
Mar 13, 2012 | 06:26 AM
#2
I cannot help you much with your codes, but sounds like you've accomplished a lot on that rig getting it swapped and geared, etc ! Wish you had posted sooner to share with us all. Anyway, welcome and let's see more pics and details of your rig please.
Mar 13, 2012 | 07:26 AM
#3
Thread Starter
Registered User
Joined: Feb 2012
Posts: 61
Likes: 0
From: Auburn, WA
I figure I'd better get the better bulk of my info up here in the swap section so I can help add to the knowledge base I used to much.
Bonediddly's 3.4 Yota Swap
Started on Friday, July 9, 2010
Alright, let’s see how this works! Deadline for the swap is September 7th, the day I start terminal leave! 60 Days to go.

Picked up in Auburn, WA 1NOV07 and dropped off in Joshua Tree, CA 6NOV07 for $650.
•The truck sat untouched for a while.
•I rebuilt the starter and one ambitious morning: hooked up an extra battery, gave it a few snorts of starting fluid and got it to crank. If I gave it some gas it would run, but there was a terrible clanging sliding knocking sound coming from the motor, and it wouldn't idle. So at that time my plan was to rebuild the 3.0. After some research, I learned how terrible of a motor it was, and that replacing it with a 3.4 would give me a more reliable and powerful engine for only a few hundred more than it would cost me to rebuild the motor after parts and taking it to a machine shop.
•The date on a picture says I started to disconnect things in the bay March of 2009, but I doubt that's accurate.

Then, shortly after 9PM on March 28th 2010, I did a little victory dance.
•I worked at unhooking everything for a couple days between checkpoints, role players, ranges college and whatever else, but after deciding on doing the swap, keeping track of where everything went became much less important. The worst part was getting the tranny apart from the motor!

Leak oil? No. Oh you mean this engine? Well ya, everything leaked on this truck.
More good stuff to come, but I gotta get to bed!
The Little Beast Has Arrived
I've been searching for a 5VZ-FE motor to replace the 3VZ-E with for a while. The motor itself is spendy, and I want to keep this project as low budget as possible. One day on eBay, I found a guy, Jack, selling a 3.4 with auto tranny in Lake Elisnore for 1800.00. So, since you can't win the lotto of you don't play, I eMailed him, told him I was local, and asked if he would be willing to sell me the motor only for a grand. He replied back and said I could have the motor and tranny for $1000.00, since he "owed it to the military." I got all excited and called Anna. She said we could do it as long as I made it work financially, I assured her I'd make it work!! Since I didn't have all the money at the time, I paid him a $100 deposit, he canceled the auction, and I set a date to pick it up after payday. Selling the tranny later on will bring down the cost of the motor.

On July 1st, at approximately 11:40PM, Richard and I arrived at my place with the motor. Did you hear the angels singing? I did.

Took some time to drool the next morning.

Took the 3.0 4x4 manual tranny, that will be reused, out for cleaning on the 5th.

Removed the baffle, pan and pickup tube from the 3.0 and opened up the 3.4 to check fitment. Super Green.

Newer motors don't have the mid dipstick union hole drilled and plugged. The nub to the right of the oil filter.

Piloted out to 3/8". Recommend a U bit because although the union was snug when I finally tapped it in there, it could have been tighter.

Walah!

Plug from the 3.0 block I'ma use to fill the old dipstick hole. Just needs to be tapped first. That's it for the 8th, class was rescheduled for Friday at 6.
Clearly It's time to get serious about the swap. Time's a wastin, and there's much work to be done. So I developed a list. I was disappointed that the motor didn't have a harness, air intake, alternator, and that the power steering pump pulley was bent and the fan idler bracket broken from the Tacoma it came out of being wrapped around a tree by Jack's friend's son. Jack didn't know the year of the motor, but from looking at plugs (1998+), what's drilled or not (2000+), and the exhaust manifold (2003+), it's not that old, and we know it only has 48,000 miles. I'll get an exact year when I do the timing belt and can see the vin plate behind the timing cover.
5VZ-FE motor and auto trans ($1000, 1JUL, eBay)
3.0 Dipstick Tube (I bent mine) (9JUL, Junkyard, $7)
3.4 (2000 4Runner) Wiring Harness (13JUL, eBay, $110 shipped)
3.4 P/S Pump (15JUL, eBay, $36.99 shipped)
Tap for old Dipstick Hole, M16 x 1.50 (15JUL, eBay, $18.25 shipped)
3.4 Clutch kit and Flywheel. (learned I can reuse all 3.0 parts, $160 saved!)
Igniter (22JUL, eBay, $19.99 shipped)
MAF (23JUL, eBay, $21.99 shipped)
Crossover Fab. (23-25JUL, Hobby Shop, $43)
3.0 Flywheel Resurface (24JUL, Hobby Shop, $15)
Heat Wrap for Crossover (26JUL, Autozone, $54.63)
M10x1.25 Tap and Die (26JUL, Barr Lumber, $6.16)
9/16 Drill Bit (26JUL, Barr Lumber, $11.03)
2" Body Lift (27JUL, 4Crawler.com $152.66)
3.4 Air Intake Box and Tube (30JUL, eBay, $50.49 shipped)
Fan Idler Bracket (3AUG, Parts Train, $30.25 shipped
4 Wire O2 Sensor (3AUG, Parts Train, $37.74 shipped
02 Sensor Adapter (3AUG, Parts Train, $13.20 shipped
Clutch Slave Cylinder (3AUG, Parts Train, $19.16 shipped
Clutch Alignment Tool (3AUG, Parts Train, $12.59 shipped
Battery (2AUG, Autozone, $79.99)
Vacuum Hoses (2AUG, Autozone, $3.76)
10K OHM 1/4 Watt Resistor for Tach Mod (7AUG, eBay, $3.14 shipped)
EWDs (11AUG, TIS, $15.00)
Total cost so far, not including $650 for the truck itself: $1762.02
Parts outstanding
3.4 Evap Canister
Radio Antenna
Rock ford 15" Sub, because I wanna!
Battery Bracket
AC Setup
Alt & P/S Belts
3.4 ECM
On Friday, July 9th, I went to Apple Valley, Hesperia and Victorville to source the parts. At the pick and pull in Victorville I found a COMPLETE (as in motor with all the stuff in my list) 2003 Tacoma 3.4 for $950 right when I walked into the yard, pulled and waiting to be bought. What a kick in the junk. Brush it off, move on! After going to five yards and three cities, I only found the dipstick tube, some nuts and bolts I broke taking everything apart, and a sunburn on my neck. I felt so defeated.

On the 12th I took the motor off the stand to remove the 3.4 flex plate and replace it with...

the 3.0 flywheel! $MONEY$
Just waiting on parts to come so I can get serious with the wiring. I've not decided how the crossover is going to happen yet, but that's what I'm waiting on to bolt the motor in the truck. Then it's just a matter of hooking everything up. I should probably make a decision on that soon, huh? Buy one for $175, or pay the rest of the $201 Chevy registration and take it to the hobby shop to have a crossover made for me super cheap? Hmm...
"Try not,do or do not, there is no try."
July 18th: I took out the cluster in anticipation of doing the tac mod, removed the old 3.0 brain and got the wiring harness completely out of the truck. It's got remnant wires from old stereos and a rat's nest of an alarm system going all over the place. Tidy wiring is one of my pet-peeves so I'll be all over cleaning that up!
July 21st: Power steering pump arrived, and that's it
Tackling the Crossover
After patiently waiting, the power steering pump arrived on the 21st. The next day, the wiring harness arrived! I also purchased the MAF and Igniter on eBay now knowing what sensors I do and don't need. Still have to get a couple more, but I have to really get into Evolta's thread about the COR, reusing the 3.0 canister and those other little things I don't quite understand yet.

If Agent J were here he would say, "The left, old busted, the right, new hotness."
I called "toyonlyswaps" about their crossover for $175 on Wednesday. They were ready to help, but when I told them I had the new style crossover to turn in as a core they said it would do them no good and that I would need new manifolds as well as the crossover and that the core could not be accepted, and that it would be $500 for the crossover. YEAH RIGHT! So I paid the rest of the Chevy registration on Thursday ($201 then on top of the $100 I'd already paid), and finished TAP class!

Look at that ghetto strap/come-along job.
I was glad the old truck made it there and back, its first time out since I've had it. Plan is now to take it to the hobby shop and have them help me make a crossover.

3.4 flanges, 3.4 bend, and the rest is ole 3.0
They were reluctant to let me get started, didn't think what I wanted to do would was going to work. After repeatedly explaining to them piecing it together was the only other way since they said their pipe bending machine wouldn't make the tight 90's, they let me get started cutting up the old pipe. I started at 3PM. The plan was to cut up the 3.4 and 3.0 exhaust, reuse the flanges, bends, and flex joint. After 2.5 hours, 6 blades, and lots of water, I had it measured, angled and laid out like so. I went and got the guy to provide the couple lengths I'd need to put it all together so they could weld it up (we're not allowed to, not even if I'd brought my own welder! lame! Waiting on them took up the most time).

Just weld it, trust me, weld it.
So it's about 6PM when this jerk, who said my plan wouldn't work in the beginning because he owned his own custom exhaust shop for a millennium and knew everything, whips out some 2" pipe from you know where, "fixes" the pipe bending machine by beating on it with a hammer, and fabricates me a crossover in about 40 minutes. I'll never get those three hours of my life back.

Saturday morning, test fit one! The motor is in, and I heard the Heck-female-dog cry to me that she didn't want to come out. I told her it wouldn't be long before it was permanent. Clearly some additional modification is needed. That shield covering whatever that is might have to go. The 16 x 1.5 tap arrived today, so I can finish the oil pan situation as soon as time permits, I've got homework to do tomorrow so it will have to wait.
http://sphotos.xx.fbcdn.net/hphotos-..._7081663_n.jpg
Need body lift, and that's why. So sexy!

Free donor 3" pipe with both flanges from some old truck.

Heating up with the rosebud and reshaping with a ball-peen hammer to get the dual 2" to slide in.

Oh ya, it fits, outside the motor...

Test fit two after getting the flange attached. No go... took the motor out, sawed off the flange, spun it 2 fingers and tacked it back on. Put it back in, and somehow went too far. Took the motor back out, ground off the flange, spun it from noon to 1:30, retacked and put the motor back in.

So, in this situation the 4th time is the charm. There's about a foot of 3" I left on the other end. It was bent just right, like I'd hoped it would be, to make the jog around the frame. That's what it'll be like when I'm driving the 16 miles into the hobby shop to put the rest of the exhaust together.

I'm going back on Sunday after church to pick up the 3.0 flywheel they resurfaced and to have them fill and tig all the gaps. It'll ultimately be reduced (or stretched actually) to 2.5" all the way back, 1 federal (boo CA boo!) cat, no resonator, no muffler, and calmly dump out with a run of the mill shiny tip like stock on the drivers side.
After grinding some tabs on the 25th, they welded the whole thing up in about an hour. $23 for parts, $20 for welding, so I got a $43.00 crossover. Sounds much better than $500 from toyonlyswaps!


I called wondering where my ECM is, since I haven't been billed for it and 10 days later it still hasn't arrived. Ya, the jerkwads didn't have it and never told me. I found one from a 1999 on Carpart out of St. Paul, MN that they say they're sending to me. I picked up some heat wrap for the crossover and the tap and die for chasing the exhaust nuts and bolts.
Tuesday I drilled out the old oil plug hole and tapped it, then put in my plug. I about cried when the block cracked. It got cross threaded and snapped, so I left the plug in there and JB welded it. Then put on the 3.0 oil pickup, baffle, and pan with Permatex ultra.


All I accomplished Wednesday was putting on the power steering pump. I dug a water line for Richie with the rest of the day. Now I'm veggin' and nursing my sore muscles. He's paying me $80 for the job, so that translates to the battery I need for the truck.
I didn't do much Thursday, but it felt productive. Before work I swapped over the oil pressure senders, which was cake. Then put the 3.0 alternator on the 3.4. I could of put some washers on the block side of the 3.4 bracket, but the bracket only flexed a bit to accommodate so I don't think it's necessary. The igniter was in the mailbox, as well as the slip for the MAF. So when I went to pick it up after work I was stoked to see that the lift kit from 4Crawler.com had also arrived, the website said they were backed up 5-7 weeks! Also, I got the notice from PayPal that I'd finally been billed for the computer, so it's on the way! Before going back to work, after a nap and school, I put the new harness on the 3.4 and it fits like a glove.


Git-R-Done!
The goal for this weekend is to get the EWD's, put the motor back in the truck, and hook up the tranny. Then it's just the matter of hooking everything back up, swapping out connectors, and splicing wires.
Friday morning at about 3AM after the check point I ordered the air intake off of eBay, and that evening I ordered the slave cylinder, fan idler bracket, 2nd 4wire O2 sensor, and clutch alignment tool from Parts Train.
So Saturday I ground off the part of the A/C bracket that interfered with the thicker motor mounts. I put the clutch on, but not tight because the tool is on the way. Then went to bolt on the crossover. I let part of it get cross threaded, even after chasing everything. Trying to back off the nut I snapped the stud, that I was holding in place with vice grips, which mushroomed the back threads. So I cut off the rest of the stud to back it out because of the smooth part for the flange, and then it cross threaded. Then the back side of the stud rounded off trying to get it out. Done for the day. Sunday morning I welded on some girth to aid my struggles, and that's when I for the flash. ARGH! still hurts... Torching wasn't helpful, nor was the welding, so I drilled it out and smashed the stud in on itself, and it came out. Tapped, and put the crossover on with the aid of some more 3.0 hardware!

I almost forgot I needed to make a bracket for the relocated dipstick tube. So I picked up this piece of heat shielding, don't remember where it goes and can't seem to find it, so I smashed it flat, cut it, bent it, drilled it, and welded it to the tube.
 \
\
I'll clean it up later.

Just before going in!
Motor is bolted in. Hope to get the battery and belts at Autozone Monday while delivering some Chinese food for the extra cash. Family is getting here on Tuesday for a week so progress will probably slow a little more.
It's the 7th, and I haven't worked on the truck since the fam has been visiting. They're leaving tomorrow, but I still haven't got the darn computer! On the 2nd I picked up the battery and a couple lengths of vacuum hose. Yesterday I got a bunch of parts from Parts Train, the O2 mount, the clutch alignment tool (so the tranny can go back on now, not gonna be fun), the slave cylinder and the fan idler bracket. Today the O2 sensor was waiting at the post office. The intake is scheduled to arrive on the 10th, and I'm going to call the place that's supposed to be sending me the ECM, they billed me on the 30th, if it's not here Monday.
So it's the eve of Friday the 13th! I ordered the resistor for the tach mod on the 8th off eBay. On the 10th I called Action Auto Parts out of St. Paul, MN to find out where my computer was. They omitted part of my address, I guess they know my own address better than I do, and it had been sitting in Palm Springs for 4 days. Anyway, I came home to a package and it was the intake. I opened it up and a mounting leg was busted off and one of the two hinges that holds the filter in placed was broke in half because the seller put literally no packing in the box. No wonder it broke, the idiot... So I eMailed them demanding action and was eventually refunded 50%. That's good, I'll repair it. On the 11th, I started by finishing the clutch and moved to putting the transmission back in at about 330PM The computer arrived a little after four. Finally! The last piece! I open it at the truck ready to plug in, hook up the battery and starter and turn it over... and it's for an automatic tranny. F#%@!!!! After five and a half hours of wrestling and two separate attempts, I got the tranny bolted in. For today, I called the wrecking yard, they say that's not possible (well obviously it is I say) but to send it back for a refund minus my shipping costs. I think I'll have better luck and actually make back all my money if I put it on eBay. I downloaded EWDs from TIS for the 90 4Runner (donor), 99 4Runner (ECM), 00 4Runner (harness) and 03 Tacoma (motor, I think, close to it...). Anna agreed to drive to I-5 Auto and Truck Parts in Chehalis, WA, about 1 1/2 hours from where she's staying, where they have one, but won't ship, so she'll pick it up and send it to me. I'll be confirming it's the correct part thoroughly tomorrow morning. Besides that I just cleaned up the bay by taking out old unneeded components such as the cruise control and distributor parts. I fitted the airbox and started thinking about how I want to do the wiring for the power.
Some Little Details
Since being back in Washi, I’ve done a few more things. I fabbed up a winch bracket and mounted a gorgeous M8724-50. I’d love to locate a ARB bumper to modify to accommodate it. I scored a 4” Trailmaster lift from Craigslist, and added Pro Comp 4” lift springs, which also fixed my bad sagging booty. It was complete except for the tracking bar which I ordered from 4WheelParts in Tacoma. About that same time I got some 35’s on 17’s from another Marine for $700. They’re a little flashy, but I don’t mind. One or more of my rims were bent and the xTerrains were worn and chewed from the few runs they had in Johnson Valley before I left, and one feathered badly, so it was needed.
Lesson learned about not using heat wrap. Again, DO NOT USE HEAT WRAP. My driver’s side pipe rotted away from the flange about a month ago. The guy in Cali refused to modify it from the stock specs, but for the price I didn’t argue. But really? It was a swap, that I brought to him in the back of a pickup? Who cares how the exhaust goes! So Stan’s headers in Kent gave me a true “Y” pipe for $600. They quoted me $300, but after a stud broke off labor doubled it. Oh well. It’s beautiful. The truck has never sounded to good! I’ve got some heat shielding to put on the fuel lines on the passenger side. I don’t think it would have cleared at all without the 2” body lift. I had to sweet talk them into trying to make it fit in the first place. It’s 2” (I think that’s right) going to a 3” collector to soon be joined by a new exhaust with full 3”, to replace the 2.5”, accommodate a Supercharger that I’m in the market for.
I ordered the 2” shifter extensions form 4Crawler back in the day. But it wasn’t until a few weeks ago that I got them working properly. I tried cutting and mig welding them in at first with my little 110 welder. Bad idea. I had the shifter break off at the base in downtown Seattle trying to get to work. So I drove home that night with vice grips on the little nub. I rewelded with the 220 arc and that fella held fast for a while. However, I didn’t get them straight, so reverse was on the right side of the 4x4 selector. So I finally got the torch and welder back out and straightened them out. After hours of heat cool check heat cool check, I not only melted my nice Marlin ball seats, which I highly recommend and will be replacing, but finally had the lever lined up right after comparing to a video I took of me shifting through the gears in a junkyard rig. Sometimes it would get in 4x4 if I wasn’t paying attention. I got stuck in a hole after that’d happened and drove with it unknowingly, which heated up my diff and melted my ADD lines. When I needed the 4x4 with my first encounter with Washington clay, it was gone. I didn’t find the melted lines until after I’d winched myself out backwards under the truck to a tree and got home. I’m still a fan of the ADD.
Bonediddly's 3.4 Yota Swap
Started on Friday, July 9, 2010
Alright, let’s see how this works! Deadline for the swap is September 7th, the day I start terminal leave! 60 Days to go.
Picked up in Auburn, WA 1NOV07 and dropped off in Joshua Tree, CA 6NOV07 for $650.
•The truck sat untouched for a while.
•I rebuilt the starter and one ambitious morning: hooked up an extra battery, gave it a few snorts of starting fluid and got it to crank. If I gave it some gas it would run, but there was a terrible clanging sliding knocking sound coming from the motor, and it wouldn't idle. So at that time my plan was to rebuild the 3.0. After some research, I learned how terrible of a motor it was, and that replacing it with a 3.4 would give me a more reliable and powerful engine for only a few hundred more than it would cost me to rebuild the motor after parts and taking it to a machine shop.
•The date on a picture says I started to disconnect things in the bay March of 2009, but I doubt that's accurate.
Then, shortly after 9PM on March 28th 2010, I did a little victory dance.
•I worked at unhooking everything for a couple days between checkpoints, role players, ranges college and whatever else, but after deciding on doing the swap, keeping track of where everything went became much less important. The worst part was getting the tranny apart from the motor!
Leak oil? No. Oh you mean this engine? Well ya, everything leaked on this truck.
More good stuff to come, but I gotta get to bed!
The Little Beast Has Arrived
I've been searching for a 5VZ-FE motor to replace the 3VZ-E with for a while. The motor itself is spendy, and I want to keep this project as low budget as possible. One day on eBay, I found a guy, Jack, selling a 3.4 with auto tranny in Lake Elisnore for 1800.00. So, since you can't win the lotto of you don't play, I eMailed him, told him I was local, and asked if he would be willing to sell me the motor only for a grand. He replied back and said I could have the motor and tranny for $1000.00, since he "owed it to the military." I got all excited and called Anna. She said we could do it as long as I made it work financially, I assured her I'd make it work!! Since I didn't have all the money at the time, I paid him a $100 deposit, he canceled the auction, and I set a date to pick it up after payday. Selling the tranny later on will bring down the cost of the motor.
On July 1st, at approximately 11:40PM, Richard and I arrived at my place with the motor. Did you hear the angels singing? I did.
Took some time to drool the next morning.
Took the 3.0 4x4 manual tranny, that will be reused, out for cleaning on the 5th.
Removed the baffle, pan and pickup tube from the 3.0 and opened up the 3.4 to check fitment. Super Green.
Newer motors don't have the mid dipstick union hole drilled and plugged. The nub to the right of the oil filter.
Piloted out to 3/8". Recommend a U bit because although the union was snug when I finally tapped it in there, it could have been tighter.
Walah!
Plug from the 3.0 block I'ma use to fill the old dipstick hole. Just needs to be tapped first. That's it for the 8th, class was rescheduled for Friday at 6.
Clearly It's time to get serious about the swap. Time's a wastin, and there's much work to be done. So I developed a list. I was disappointed that the motor didn't have a harness, air intake, alternator, and that the power steering pump pulley was bent and the fan idler bracket broken from the Tacoma it came out of being wrapped around a tree by Jack's friend's son. Jack didn't know the year of the motor, but from looking at plugs (1998+), what's drilled or not (2000+), and the exhaust manifold (2003+), it's not that old, and we know it only has 48,000 miles. I'll get an exact year when I do the timing belt and can see the vin plate behind the timing cover.
5VZ-FE motor and auto trans ($1000, 1JUL, eBay)
3.0 Dipstick Tube (I bent mine) (9JUL, Junkyard, $7)
3.4 (2000 4Runner) Wiring Harness (13JUL, eBay, $110 shipped)
3.4 P/S Pump (15JUL, eBay, $36.99 shipped)
Tap for old Dipstick Hole, M16 x 1.50 (15JUL, eBay, $18.25 shipped)
3.4 Clutch kit and Flywheel. (learned I can reuse all 3.0 parts, $160 saved!)
Igniter (22JUL, eBay, $19.99 shipped)
MAF (23JUL, eBay, $21.99 shipped)
Crossover Fab. (23-25JUL, Hobby Shop, $43)
3.0 Flywheel Resurface (24JUL, Hobby Shop, $15)
Heat Wrap for Crossover (26JUL, Autozone, $54.63)
M10x1.25 Tap and Die (26JUL, Barr Lumber, $6.16)
9/16 Drill Bit (26JUL, Barr Lumber, $11.03)
2" Body Lift (27JUL, 4Crawler.com $152.66)
3.4 Air Intake Box and Tube (30JUL, eBay, $50.49 shipped)
Fan Idler Bracket (3AUG, Parts Train, $30.25 shipped
4 Wire O2 Sensor (3AUG, Parts Train, $37.74 shipped
02 Sensor Adapter (3AUG, Parts Train, $13.20 shipped
Clutch Slave Cylinder (3AUG, Parts Train, $19.16 shipped
Clutch Alignment Tool (3AUG, Parts Train, $12.59 shipped
Battery (2AUG, Autozone, $79.99)
Vacuum Hoses (2AUG, Autozone, $3.76)
10K OHM 1/4 Watt Resistor for Tach Mod (7AUG, eBay, $3.14 shipped)
EWDs (11AUG, TIS, $15.00)
Total cost so far, not including $650 for the truck itself: $1762.02
Parts outstanding
3.4 Evap Canister
Radio Antenna
Rock ford 15" Sub, because I wanna!
Battery Bracket
AC Setup
Alt & P/S Belts
3.4 ECM
On Friday, July 9th, I went to Apple Valley, Hesperia and Victorville to source the parts. At the pick and pull in Victorville I found a COMPLETE (as in motor with all the stuff in my list) 2003 Tacoma 3.4 for $950 right when I walked into the yard, pulled and waiting to be bought. What a kick in the junk. Brush it off, move on! After going to five yards and three cities, I only found the dipstick tube, some nuts and bolts I broke taking everything apart, and a sunburn on my neck. I felt so defeated.
On the 12th I took the motor off the stand to remove the 3.4 flex plate and replace it with...
the 3.0 flywheel! $MONEY$
Just waiting on parts to come so I can get serious with the wiring. I've not decided how the crossover is going to happen yet, but that's what I'm waiting on to bolt the motor in the truck. Then it's just a matter of hooking everything up. I should probably make a decision on that soon, huh? Buy one for $175, or pay the rest of the $201 Chevy registration and take it to the hobby shop to have a crossover made for me super cheap? Hmm...
"Try not,do or do not, there is no try."
July 18th: I took out the cluster in anticipation of doing the tac mod, removed the old 3.0 brain and got the wiring harness completely out of the truck. It's got remnant wires from old stereos and a rat's nest of an alarm system going all over the place. Tidy wiring is one of my pet-peeves so I'll be all over cleaning that up!
July 21st: Power steering pump arrived, and that's it
Tackling the Crossover
After patiently waiting, the power steering pump arrived on the 21st. The next day, the wiring harness arrived! I also purchased the MAF and Igniter on eBay now knowing what sensors I do and don't need. Still have to get a couple more, but I have to really get into Evolta's thread about the COR, reusing the 3.0 canister and those other little things I don't quite understand yet.
If Agent J were here he would say, "The left, old busted, the right, new hotness."
I called "toyonlyswaps" about their crossover for $175 on Wednesday. They were ready to help, but when I told them I had the new style crossover to turn in as a core they said it would do them no good and that I would need new manifolds as well as the crossover and that the core could not be accepted, and that it would be $500 for the crossover. YEAH RIGHT! So I paid the rest of the Chevy registration on Thursday ($201 then on top of the $100 I'd already paid), and finished TAP class!
Look at that ghetto strap/come-along job.
I was glad the old truck made it there and back, its first time out since I've had it. Plan is now to take it to the hobby shop and have them help me make a crossover.
3.4 flanges, 3.4 bend, and the rest is ole 3.0
They were reluctant to let me get started, didn't think what I wanted to do would was going to work. After repeatedly explaining to them piecing it together was the only other way since they said their pipe bending machine wouldn't make the tight 90's, they let me get started cutting up the old pipe. I started at 3PM. The plan was to cut up the 3.4 and 3.0 exhaust, reuse the flanges, bends, and flex joint. After 2.5 hours, 6 blades, and lots of water, I had it measured, angled and laid out like so. I went and got the guy to provide the couple lengths I'd need to put it all together so they could weld it up (we're not allowed to, not even if I'd brought my own welder! lame! Waiting on them took up the most time).
Just weld it, trust me, weld it.
So it's about 6PM when this jerk, who said my plan wouldn't work in the beginning because he owned his own custom exhaust shop for a millennium and knew everything, whips out some 2" pipe from you know where, "fixes" the pipe bending machine by beating on it with a hammer, and fabricates me a crossover in about 40 minutes. I'll never get those three hours of my life back.
Saturday morning, test fit one! The motor is in, and I heard the Heck-female-dog cry to me that she didn't want to come out. I told her it wouldn't be long before it was permanent. Clearly some additional modification is needed. That shield covering whatever that is might have to go. The 16 x 1.5 tap arrived today, so I can finish the oil pan situation as soon as time permits, I've got homework to do tomorrow so it will have to wait.
http://sphotos.xx.fbcdn.net/hphotos-..._7081663_n.jpg
Need body lift, and that's why. So sexy!
Free donor 3" pipe with both flanges from some old truck.
Heating up with the rosebud and reshaping with a ball-peen hammer to get the dual 2" to slide in.
Oh ya, it fits, outside the motor...
Test fit two after getting the flange attached. No go... took the motor out, sawed off the flange, spun it 2 fingers and tacked it back on. Put it back in, and somehow went too far. Took the motor back out, ground off the flange, spun it from noon to 1:30, retacked and put the motor back in.
So, in this situation the 4th time is the charm. There's about a foot of 3" I left on the other end. It was bent just right, like I'd hoped it would be, to make the jog around the frame. That's what it'll be like when I'm driving the 16 miles into the hobby shop to put the rest of the exhaust together.
I'm going back on Sunday after church to pick up the 3.0 flywheel they resurfaced and to have them fill and tig all the gaps. It'll ultimately be reduced (or stretched actually) to 2.5" all the way back, 1 federal (boo CA boo!) cat, no resonator, no muffler, and calmly dump out with a run of the mill shiny tip like stock on the drivers side.
After grinding some tabs on the 25th, they welded the whole thing up in about an hour. $23 for parts, $20 for welding, so I got a $43.00 crossover. Sounds much better than $500 from toyonlyswaps!
I called wondering where my ECM is, since I haven't been billed for it and 10 days later it still hasn't arrived. Ya, the jerkwads didn't have it and never told me. I found one from a 1999 on Carpart out of St. Paul, MN that they say they're sending to me. I picked up some heat wrap for the crossover and the tap and die for chasing the exhaust nuts and bolts.
Tuesday I drilled out the old oil plug hole and tapped it, then put in my plug. I about cried when the block cracked. It got cross threaded and snapped, so I left the plug in there and JB welded it. Then put on the 3.0 oil pickup, baffle, and pan with Permatex ultra.
All I accomplished Wednesday was putting on the power steering pump. I dug a water line for Richie with the rest of the day. Now I'm veggin' and nursing my sore muscles. He's paying me $80 for the job, so that translates to the battery I need for the truck.
I didn't do much Thursday, but it felt productive. Before work I swapped over the oil pressure senders, which was cake. Then put the 3.0 alternator on the 3.4. I could of put some washers on the block side of the 3.4 bracket, but the bracket only flexed a bit to accommodate so I don't think it's necessary. The igniter was in the mailbox, as well as the slip for the MAF. So when I went to pick it up after work I was stoked to see that the lift kit from 4Crawler.com had also arrived, the website said they were backed up 5-7 weeks! Also, I got the notice from PayPal that I'd finally been billed for the computer, so it's on the way! Before going back to work, after a nap and school, I put the new harness on the 3.4 and it fits like a glove.
Git-R-Done!
The goal for this weekend is to get the EWD's, put the motor back in the truck, and hook up the tranny. Then it's just the matter of hooking everything back up, swapping out connectors, and splicing wires.
Friday morning at about 3AM after the check point I ordered the air intake off of eBay, and that evening I ordered the slave cylinder, fan idler bracket, 2nd 4wire O2 sensor, and clutch alignment tool from Parts Train.
So Saturday I ground off the part of the A/C bracket that interfered with the thicker motor mounts. I put the clutch on, but not tight because the tool is on the way. Then went to bolt on the crossover. I let part of it get cross threaded, even after chasing everything. Trying to back off the nut I snapped the stud, that I was holding in place with vice grips, which mushroomed the back threads. So I cut off the rest of the stud to back it out because of the smooth part for the flange, and then it cross threaded. Then the back side of the stud rounded off trying to get it out. Done for the day. Sunday morning I welded on some girth to aid my struggles, and that's when I for the flash. ARGH! still hurts... Torching wasn't helpful, nor was the welding, so I drilled it out and smashed the stud in on itself, and it came out. Tapped, and put the crossover on with the aid of some more 3.0 hardware!
I almost forgot I needed to make a bracket for the relocated dipstick tube. So I picked up this piece of heat shielding, don't remember where it goes and can't seem to find it, so I smashed it flat, cut it, bent it, drilled it, and welded it to the tube.
\I'll clean it up later.
Just before going in!
Motor is bolted in. Hope to get the battery and belts at Autozone Monday while delivering some Chinese food for the extra cash. Family is getting here on Tuesday for a week so progress will probably slow a little more.
It's the 7th, and I haven't worked on the truck since the fam has been visiting. They're leaving tomorrow, but I still haven't got the darn computer! On the 2nd I picked up the battery and a couple lengths of vacuum hose. Yesterday I got a bunch of parts from Parts Train, the O2 mount, the clutch alignment tool (so the tranny can go back on now, not gonna be fun), the slave cylinder and the fan idler bracket. Today the O2 sensor was waiting at the post office. The intake is scheduled to arrive on the 10th, and I'm going to call the place that's supposed to be sending me the ECM, they billed me on the 30th, if it's not here Monday.
So it's the eve of Friday the 13th! I ordered the resistor for the tach mod on the 8th off eBay. On the 10th I called Action Auto Parts out of St. Paul, MN to find out where my computer was. They omitted part of my address, I guess they know my own address better than I do, and it had been sitting in Palm Springs for 4 days. Anyway, I came home to a package and it was the intake. I opened it up and a mounting leg was busted off and one of the two hinges that holds the filter in placed was broke in half because the seller put literally no packing in the box. No wonder it broke, the idiot... So I eMailed them demanding action and was eventually refunded 50%. That's good, I'll repair it. On the 11th, I started by finishing the clutch and moved to putting the transmission back in at about 330PM The computer arrived a little after four. Finally! The last piece! I open it at the truck ready to plug in, hook up the battery and starter and turn it over... and it's for an automatic tranny. F#%@!!!! After five and a half hours of wrestling and two separate attempts, I got the tranny bolted in. For today, I called the wrecking yard, they say that's not possible (well obviously it is I say) but to send it back for a refund minus my shipping costs. I think I'll have better luck and actually make back all my money if I put it on eBay. I downloaded EWDs from TIS for the 90 4Runner (donor), 99 4Runner (ECM), 00 4Runner (harness) and 03 Tacoma (motor, I think, close to it...). Anna agreed to drive to I-5 Auto and Truck Parts in Chehalis, WA, about 1 1/2 hours from where she's staying, where they have one, but won't ship, so she'll pick it up and send it to me. I'll be confirming it's the correct part thoroughly tomorrow morning. Besides that I just cleaned up the bay by taking out old unneeded components such as the cruise control and distributor parts. I fitted the airbox and started thinking about how I want to do the wiring for the power.
Some Little Details
Since being back in Washi, I’ve done a few more things. I fabbed up a winch bracket and mounted a gorgeous M8724-50. I’d love to locate a ARB bumper to modify to accommodate it. I scored a 4” Trailmaster lift from Craigslist, and added Pro Comp 4” lift springs, which also fixed my bad sagging booty. It was complete except for the tracking bar which I ordered from 4WheelParts in Tacoma. About that same time I got some 35’s on 17’s from another Marine for $700. They’re a little flashy, but I don’t mind. One or more of my rims were bent and the xTerrains were worn and chewed from the few runs they had in Johnson Valley before I left, and one feathered badly, so it was needed.
Lesson learned about not using heat wrap. Again, DO NOT USE HEAT WRAP. My driver’s side pipe rotted away from the flange about a month ago. The guy in Cali refused to modify it from the stock specs, but for the price I didn’t argue. But really? It was a swap, that I brought to him in the back of a pickup? Who cares how the exhaust goes! So Stan’s headers in Kent gave me a true “Y” pipe for $600. They quoted me $300, but after a stud broke off labor doubled it. Oh well. It’s beautiful. The truck has never sounded to good! I’ve got some heat shielding to put on the fuel lines on the passenger side. I don’t think it would have cleared at all without the 2” body lift. I had to sweet talk them into trying to make it fit in the first place. It’s 2” (I think that’s right) going to a 3” collector to soon be joined by a new exhaust with full 3”, to replace the 2.5”, accommodate a Supercharger that I’m in the market for.
I ordered the 2” shifter extensions form 4Crawler back in the day. But it wasn’t until a few weeks ago that I got them working properly. I tried cutting and mig welding them in at first with my little 110 welder. Bad idea. I had the shifter break off at the base in downtown Seattle trying to get to work. So I drove home that night with vice grips on the little nub. I rewelded with the 220 arc and that fella held fast for a while. However, I didn’t get them straight, so reverse was on the right side of the 4x4 selector. So I finally got the torch and welder back out and straightened them out. After hours of heat cool check heat cool check, I not only melted my nice Marlin ball seats, which I highly recommend and will be replacing, but finally had the lever lined up right after comparing to a video I took of me shifting through the gears in a junkyard rig. Sometimes it would get in 4x4 if I wasn’t paying attention. I got stuck in a hole after that’d happened and drove with it unknowingly, which heated up my diff and melted my ADD lines. When I needed the 4x4 with my first encounter with Washington clay, it was gone. I didn’t find the melted lines until after I’d winched myself out backwards under the truck to a tree and got home. I’m still a fan of the ADD.
Last edited by Ranscat3; Mar 14, 2012 at 08:27 AM. Reason: Photo
Mar 13, 2012 | 11:43 AM
#5
Thread Starter
Registered User
Joined: Feb 2012
Posts: 61
Likes: 0
From: Auburn, WA
Also, I removed and cleaned the IACV a while back. It still and always has idled between 1100 and 1200 ish, and bounces about 200rpm when sitting warm at a stoplight. I replaced the spark plugs with dealer plugs, cleaned the MAF and got NGK wires for it. I'm feeling confident the high idle is related to the 02 sensor issue which I think is related to the wrong cat. I'm lost at this point. I've thrown so much at it already I don't know where new to start looking or go back to.

Here's a teaser from 12/2010 above the Joshua Tree dry lake bed after a monsoon.

01/28/2012 above Wilkeson, WA
Here's a teaser from 12/2010 above the Joshua Tree dry lake bed after a monsoon.
01/28/2012 above Wilkeson, WA
Last edited by Ranscat3; Mar 14, 2012 at 08:58 AM.
Mar 13, 2012 | 02:07 PM
#6
PO135 O2 Sensor Heater Circuit Malfunction (Bank Sensor 1)
PO340 Camshaft Position Sensor Sensor A- Bank 1 Circuit Malfunction
PO505 Idle Control System Malfunction
Hope this helps in some way?
PO340 Camshaft Position Sensor Sensor A- Bank 1 Circuit Malfunction
PO505 Idle Control System Malfunction
Hope this helps in some way?
Mar 13, 2012 | 07:51 PM
#7
Thread Starter
Registered User
Joined: Feb 2012
Posts: 61
Likes: 0
From: Auburn, WA
Alright, so I did a couple basic tests tonight with the little bit of free time I had. I figure at least here I can start over troubleshooting, document my efforts and narrow it down. I tested the sensor and ECM power with directions from the FSM linked in here. I passed the DI-190 test for power. When testing the ohms of the sensors as outlined on SF-54, I got 5.5 ohms from Bank 1 and 9.1 ohms from Bank 2. This was after driving around back from the street, but everything was still pretty cool. I went back out about 30mins later and they tested 5.2 and 8.9. According to the FSM my range is 11-16. Both sensors fail then. So, some more input would be great before I go dropping a small fortune on new sensors tomorrow. I think I'll start with just the Bank 1 from Toyota and see if that gets me anywhere.
Trending Topics
Mar 13, 2012 | 09:25 PM
#9
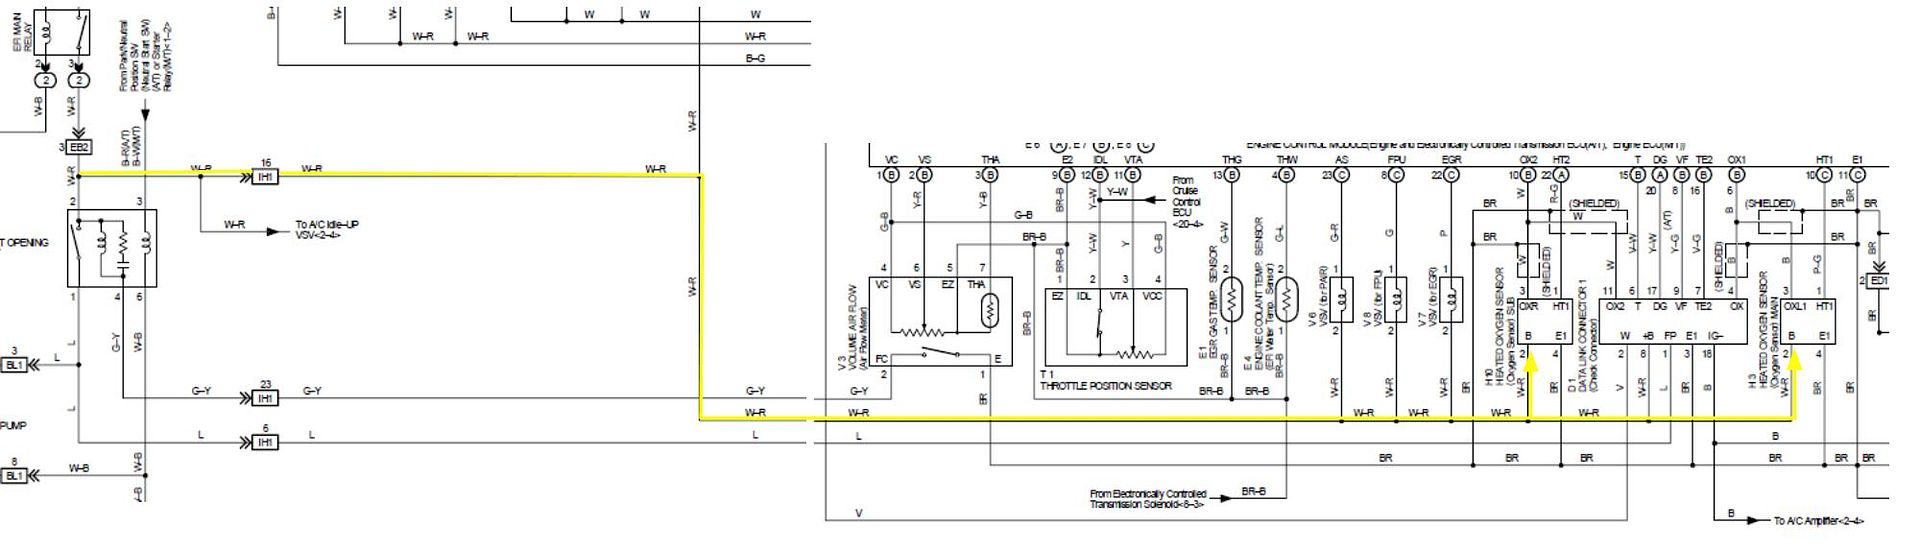
Looks like II3 pin 16 should go to IH1 pin 16 (or maybe C1 16 on your older year 4runner). This comes from a leg of the COR, to B+ on the o2 sensors AND to your idle air control valve. You are throwing codes for both. I'll bet you are missing that B+.
Last edited by vasinvictor; Mar 14, 2012 at 06:21 AM.
 Mar 14, 2012 | 06:09 AM
#11
Thread Starter
Registered User
Joined: Feb 2012
Posts: 61
Likes: 0
From: Auburn, WA
I will get out the giant diagram I made during the swap and check it against the EWD and my harness as soon as I get home. I never fully switched the C1 and C2 plugs over to the II3 and II1, so all 4 of them are in there. I've been waiting to fix the these CELs before finally securing all of the wiring and cleaning it up.
The resistance was 0.2ohms on the meter. I'll make the wiring check before spending the money on the 02 sensor. I replaced it once already when I really got into the issues (failing to fix them!) last time, and nothing changed.
Thanks for pointing out that possible error, that's the kind of help I need! It's easy to get lost in the diagrams, even when trying to track down specific circuits and problems. I'd make a terrible chess player. I know it's a shot in the dark starting out, but if we shoot enough we'll get em eventually!
Mar 14, 2012 | 11:40 AM
#13
Thread Starter
Registered User
Joined: Feb 2012
Posts: 61
Likes: 0
From: Auburn, WA
Here's a EWD I prepared for my testing tonight to make things easier. It's from here. Just something I could pull up at work. It's pretty much the same. My ECM is a 97.

Pink is in the bay, blue is in the cab, yellow is for vac stuff, and the orange is grounds. It was when I was highlighting them that I came to the fuel pump (circled) and remembered that right after I'd had the loom fall onto the exhaust is when I had the fuel pump go out. It sporadically died on me while driving. So I took it out and tested it and it worked fine. What a job. Put it back in. It did it again. Figuring it was just old and dying, being the original and after sitting for a couple years, one of which was in the desert, we just replaced it and it hasn't done it since. I don't remember if I'd wired in the COR yet or not, or if I just had stuff twisted together and was still connecting an extended wire to get the pump to turn on. I'll be checking that circuit's grounds extra carefully tonight along with everything else highlighted (all things B+ related).
Suggestions?
Last edited by Ranscat3; Mar 14, 2012 at 11:42 AM.
Mar 14, 2012 | 09:06 PM
#14
Thread Starter
Registered User
Joined: Feb 2012
Posts: 61
Likes: 0
From: Auburn, WA
I started fiddling around with my meter and checking over my diagrams. I did have the +B wire correctly in the cab in the connectors, but didn't get around to tracking it back to the engine bay tonight. I wanted to start off with the grounds after some suggestions I got at work today, and the EFI ground hit between 30-50 ohms. I was confused but kept checking it against other grounds and finally accepted I'd started at the right ground. I spent the rest of the night tearing the harness and truck apart to examine the wire. I found, by the passenger headlight, where it had been cut at least half way through. I was still getting 2+ ohms from the drivers side of the wire (I cut it the rest of the way to solder) I disconnected the 4 grounds I had attached to the drivers side fender and tested them one by one. The old and unused fog light relay was reading 1.0 ohms. I left that ground disconnected, hooked up the other 3, fixed the break, and the EFI ground now read correctly at the relay. I still don't know where the really high ohms came from that I started with, was that the partially cut part?
So I drove my usual test loop, and got the same list of jargon from the OBDII reader EXCEPT the P0135 and P0135pd. So I hit it hard on some on and off ramps and a steep grade on the highway for about 20 miles over half an hour. Cleared the codes twice, shut off and restarted the truck 2 separate times. Couldn't get the o2 codes to come back.
I also think the dome and head lights were brighter at idle. That same lead spliced into the lights at the drivers fender. I pushed it nearly to redline in 2nd and 3rd getting on the highway near the end of my trip; it accelerated smoothly and there was power I didn't know that ole truck had. Is it all in my head or is my sensor finally working right after all this time over a half cut ground?
Still 2 codes to go...
Mar 15, 2012 | 10:10 AM
#15
Thread Starter
Registered User
Joined: Feb 2012
Posts: 61
Likes: 0
From: Auburn, WA
Tonight I'll work on the P0505. The P0340 was the one I spent the most time on previously and was unsuccessful with, so maybe it'll fix itself when I get the other systems working properly and get out of open loop finally. Unlikely, because its circuit is isolated from the other 2 codes. I was hoping the 135 and 505 were related. TPS and CPS have both been previously replaced and it didn't change anything. My truck as burned through 5 AutoZone (3.0 starter on 3.0 flywheel) starters since I swapped it.
Anyway, I'm going to use the FSM info found here and here to test the TB and then follow this write-up to clean the IAC. I'll be replacing both gaskets. Here's a fun little PDF with some basics to chase down.
Talked to a coworker, the high ohms were caused by the current trying to cram through those few remaining strands of wire. So, lots of ohms means partially cut/bad wire, 1 means open, and .2-.4ish means g2g.
Mar 15, 2012 | 10:33 AM
#16
Man something's really wrong with your wiring I think. Any way you can post up what you did- you diagram, or a list? There is so much info in every post of yours it's hard to comprehend.
Mar 15, 2012 | 11:04 AM
#17
Thread Starter
Registered User
Joined: Feb 2012
Posts: 61
Likes: 0
From: Auburn, WA
I'll see about getting my diagram posted up. It's pretty crazy. I've got lists that go to it too. Mating a 97 MT ECM to a 00 AT harness into a 90 was no easy task. I'd rather have more info up here than not enough. 
I just learned I have a 3 day weekend, the wife's gonna be mad when I spend it all with the truck.
Going to folow the FSM as outlined here to work on the P0340 too. I found this helpful piece of information (step 5) while reading this thread.
I just learned I have a 3 day weekend, the wife's gonna be mad when I spend it all with the truck.
Going to folow the FSM as outlined here to work on the P0340 too. I found this helpful piece of information (step 5) while reading this thread.
Last edited by Ranscat3; Mar 15, 2012 at 11:52 AM.
Mar 19, 2012 | 08:20 AM
#19
Thread Starter
Registered User
Joined: Feb 2012
Posts: 61
Likes: 0
From: Auburn, WA
Well, I did say I would post up a picture of my wiring diagram. This is what I came home to.  Completely my fault for leaving it outside, but man that sucks! I think it’s going to be mostly salvageable, it’s drying out. I still have my lists; this was the actual diagram I drew up.

I went around resting all my wiring harness. Everything checked out good. CPS ohmed correctly when warm, I didn’t do it cold yet. But this is CPS #2 with no change. Wiring harness tested ok for shorts. I looked to the throttle body for the issues there and oh my oh my what do we have here?!

Plugged that back in, and started spraying down the IM with carb cleaner. I got a bit of blurbing from the front right. Changed out that gasket and cleaned out the TB and IAC so they’re like new. I went to change out the front O2 sensor and realized I have bungs and the super awesome Toyota sensors have the flange. I’m going to schedule to get my exhaust re-done today and have the correct flanged put in so I can run the correct O2 sensors.

I was testing the crank position sensor and noticed something copper.

Added a ground. I know it's not the right spot, but I didn't have enough wire.

I went to the junkyard because I have a hunch on this CPS issue I want to rule out. I left the junkyard with a complete core motor for $250 out of a 97 T-100 AT 4x4 with 225,756 miles. Complete harness, all sensors and accessories included. Basically for a parts motor and to rebuild someday to have an extra. I'll be adding the ground wire between the block and battery from the donor truck.


The vehicle that I got the currently installed motor from had front end damage. The fan clutch mounting bracket had been broke off at the shaft, I got one from eBay. One of the cam pulleys could have been bent, one of the teeth broken off of the crank pulley, or the timing jumped? I plan to switch over all of the pulleys when I do a timing belt on it in the next week or 2 as a last resort. I have not used an oscilloscope on it because I don’t have one. But by the time I pay Toyota to fix it, I might as well of bought the tools and done it myself so if I need to go get one or a live feed OBDII reader I will.
When I hit 3200 ish RPM, for a few seconds, it pops on. The CEL shuts off with the truck and doesn’t come back when I start the truck back up until I trip it again. I drove on the highway this morning for 20 minutes getting to work and it didn’t come on until I downshifted trying to get it to come on.
I did successfully get the front diff re-geared to 529 so now I can use my 4x4 again! I ended up grinding off the heads of the bolts holding the ADD side of the axle together and replacing them with ones from NAPA.
The current list of codes:
1 Code
P0340
Mil On
Monitors
2 Inc
Catlyst
Evap
5 Ready
Misfire
Fuel
Comp
O2 Snsr
O2 Htr
Completely my fault for leaving it outside, but man that sucks! I think it’s going to be mostly salvageable, it’s drying out. I still have my lists; this was the actual diagram I drew up.I went around resting all my wiring harness. Everything checked out good. CPS ohmed correctly when warm, I didn’t do it cold yet. But this is CPS #2 with no change. Wiring harness tested ok for shorts. I looked to the throttle body for the issues there and oh my oh my what do we have here?!
Plugged that back in, and started spraying down the IM with carb cleaner. I got a bit of blurbing from the front right. Changed out that gasket and cleaned out the TB and IAC so they’re like new. I went to change out the front O2 sensor and realized I have bungs and the super awesome Toyota sensors have the flange. I’m going to schedule to get my exhaust re-done today and have the correct flanged put in so I can run the correct O2 sensors.
I was testing the crank position sensor and noticed something copper.
Added a ground. I know it's not the right spot, but I didn't have enough wire.
I went to the junkyard because I have a hunch on this CPS issue I want to rule out. I left the junkyard with a complete core motor for $250 out of a 97 T-100 AT 4x4 with 225,756 miles. Complete harness, all sensors and accessories included. Basically for a parts motor and to rebuild someday to have an extra. I'll be adding the ground wire between the block and battery from the donor truck.
The vehicle that I got the currently installed motor from had front end damage. The fan clutch mounting bracket had been broke off at the shaft, I got one from eBay. One of the cam pulleys could have been bent, one of the teeth broken off of the crank pulley, or the timing jumped? I plan to switch over all of the pulleys when I do a timing belt on it in the next week or 2 as a last resort. I have not used an oscilloscope on it because I don’t have one. But by the time I pay Toyota to fix it, I might as well of bought the tools and done it myself so if I need to go get one or a live feed OBDII reader I will.
When I hit 3200 ish RPM, for a few seconds, it pops on. The CEL shuts off with the truck and doesn’t come back when I start the truck back up until I trip it again. I drove on the highway this morning for 20 minutes getting to work and it didn’t come on until I downshifted trying to get it to come on.
I did successfully get the front diff re-geared to 529 so now I can use my 4x4 again! I ended up grinding off the heads of the bolts holding the ADD side of the axle together and replacing them with ones from NAPA.
The current list of codes:
1 Code
P0340
Mil On
Monitors
2 Inc
Catlyst
Evap
5 Ready
Misfire
Fuel
Comp
O2 Snsr
O2 Htr
Last edited by Ranscat3; Mar 20, 2012 at 04:24 PM.
Mar 26, 2012 | 11:01 AM
#20
Thread Starter
Registered User
Joined: Feb 2012
Posts: 61
Likes: 0
From: Auburn, WA
Update time. I had a week off and slayed myself getting ready to move and working on the truck while watchin the kid while wife works. Sweet, I know. On Monday I added a couple lights to our utility trailer and fixed the previous owner�s poorly added harness that was too short and rubbing on sharp corners. I went to the junkyard on Tuesday and got some exhaust chunks to cut the exhaust flanges out of. I know they can be ordered aftermarket, but I also thought Toyota would have had them, and they didn�t separate from the whole exhaust sections, so I just saved these from the cruncher.


I dropped the truck off at 0800 on Wednesday at Stan�s Headers and they were still workin t get it done before close at 1700. $983 later I have a new sexy 2.5� mandrel bent Magnaflow exhaust with, for the first time, the correct cat. I had them also add a standard bung for the wideband sensor. It sounds great. I know it should be 2.25 for a stock 3.4, but a SC isn�t too far down the road so 2.5 it was.

My lil helper! Before Darren got started.


It was barely running getting the few miles to the shop. Acting really weird, not wanting to go over a few hundred RPM. It was acting like my Civic when the distributor was dying. I got it to the shop before they opened, parked it, and went to investigate. I touched the wiring in the fuse box and it died. Wouldn�t start up. Then about the 5th try it went, I shut it off and went inside. It started right up and drove on the rack. Then when I came back it started up and drove off the rack. Died again in the parking lot. Quick troubleshooting showed fuel but no spark. I didn�t have an extra EFI relay with me, but suspected the igniter. They helped me push it to the exit so they could close their gate and I waited for the tow truck. Thank God for roadside assistance! USAA 3 bucks a month. Get it home, pop in a new EFI relay, and it starts right up. Recheck with the old one, nothing. Put JY relay back in, alive. Problem solved. That�s about #5 EFI relay since it�s been going in the last 18 months. I usually have extras in my toolbox b/c I also pull it at night when I park it on the street.

I spent the next night separating the entire network of shielded, power and ground wires from the T-100 harness. I removed the speed sensor plug from the group, extended a couple wires, and changed a couple pins, but only messes with non-shielded lines. I zip tied in alongside the current harness, plugged everything in and repined it into the ECM, being sure to label everything really well with colored tape and a sharpie. I had a good feeling about it all because it all runs the Igniter, MAF, TPS, VSV, O2�s, CPS and CkPS. all the places I�m having troubles with? Ya� I had to add the 2 VSV sensors to the power circuit because T-100�s are wired to the dash. I separated the old hot bundle and assed 12+ to each sensor to trace the 2 lines that I needed to tie in. I could only find the VSV� the VPS was not getting power. So I fixed that. I�ll chase that wire when I re-do the whole harness to properly add the piggyback harness and remove the old stuff.


I know it's messy, but it makes sense to me! Very temporary.

It fired right up and we headed out to pick up a bunk bed for our kid with the trailer after a quick test drive. We noticed that it was starting much faster. Before it would crank for maybe 4 seconds before firing up. Now I can practically blip the starter and it�ll take off. No CEL at first. No P0340 that is, no matter how much I tried to trip it. We drove it around for a couple hours doing errands and stopping for dinner. No CEL. Well it wasn�t hooked up �NO LINK� from my reader, but after I got the wire in the right spot on the ECM, I did get it to throw 2 codes while messing with the A plug wires. A6, the B-R wire that goes to the IAC, is not making good contact, giving me the P0505 if I mess with it, so I�ll make that pin tighter today when I go mess with it. No other wires appeared to be loose, and that�s an issue I�ve knew about for a while, just never looked for before. Poor neglected back-up vehicle. It idles perfect right away now. It bogs when I wiggle that wire just right and that will throw the code. Hopefully that�ll solve that intermittent problem. I also got a P0172 last night. I cleaned the MAF when I did the IAC the other day, but the air filter is from it�s days in the desert and disgusting so I plan on getting a new one today and re-cleaning the MAF. Any new air filter suggestions over what I�d pick up at O�Reilly�s down the street?
I got my 3-pod a-pillar from TruckPillars.com on Saturday too. I�m going to put a vac and the wideband gauge in there, the ones I bought for my Civic from GlowShift. I think I want to put a temp gauge in the other pod for more accurate readings, any other suggestions? Fuel pressure will get added in the bay someday, and I�ll be happy with it there.
I dropped the truck off at 0800 on Wednesday at Stan�s Headers and they were still workin t get it done before close at 1700. $983 later I have a new sexy 2.5� mandrel bent Magnaflow exhaust with, for the first time, the correct cat. I had them also add a standard bung for the wideband sensor. It sounds great. I know it should be 2.25 for a stock 3.4, but a SC isn�t too far down the road so 2.5 it was.
My lil helper! Before Darren got started.
It was barely running getting the few miles to the shop. Acting really weird, not wanting to go over a few hundred RPM. It was acting like my Civic when the distributor was dying. I got it to the shop before they opened, parked it, and went to investigate. I touched the wiring in the fuse box and it died. Wouldn�t start up. Then about the 5th try it went, I shut it off and went inside. It started right up and drove on the rack. Then when I came back it started up and drove off the rack. Died again in the parking lot. Quick troubleshooting showed fuel but no spark. I didn�t have an extra EFI relay with me, but suspected the igniter. They helped me push it to the exit so they could close their gate and I waited for the tow truck. Thank God for roadside assistance! USAA 3 bucks a month. Get it home, pop in a new EFI relay, and it starts right up. Recheck with the old one, nothing. Put JY relay back in, alive. Problem solved. That�s about #5 EFI relay since it�s been going in the last 18 months. I usually have extras in my toolbox b/c I also pull it at night when I park it on the street.
I spent the next night separating the entire network of shielded, power and ground wires from the T-100 harness. I removed the speed sensor plug from the group, extended a couple wires, and changed a couple pins, but only messes with non-shielded lines. I zip tied in alongside the current harness, plugged everything in and repined it into the ECM, being sure to label everything really well with colored tape and a sharpie. I had a good feeling about it all because it all runs the Igniter, MAF, TPS, VSV, O2�s, CPS and CkPS. all the places I�m having troubles with? Ya� I had to add the 2 VSV sensors to the power circuit because T-100�s are wired to the dash. I separated the old hot bundle and assed 12+ to each sensor to trace the 2 lines that I needed to tie in. I could only find the VSV� the VPS was not getting power. So I fixed that. I�ll chase that wire when I re-do the whole harness to properly add the piggyback harness and remove the old stuff.
I know it's messy, but it makes sense to me! Very temporary.
It fired right up and we headed out to pick up a bunk bed for our kid with the trailer after a quick test drive. We noticed that it was starting much faster. Before it would crank for maybe 4 seconds before firing up. Now I can practically blip the starter and it�ll take off. No CEL at first. No P0340 that is, no matter how much I tried to trip it. We drove it around for a couple hours doing errands and stopping for dinner. No CEL. Well it wasn�t hooked up �NO LINK� from my reader, but after I got the wire in the right spot on the ECM, I did get it to throw 2 codes while messing with the A plug wires. A6, the B-R wire that goes to the IAC, is not making good contact, giving me the P0505 if I mess with it, so I�ll make that pin tighter today when I go mess with it. No other wires appeared to be loose, and that�s an issue I�ve knew about for a while, just never looked for before. Poor neglected back-up vehicle. It idles perfect right away now. It bogs when I wiggle that wire just right and that will throw the code. Hopefully that�ll solve that intermittent problem. I also got a P0172 last night. I cleaned the MAF when I did the IAC the other day, but the air filter is from it�s days in the desert and disgusting so I plan on getting a new one today and re-cleaning the MAF. Any new air filter suggestions over what I�d pick up at O�Reilly�s down the street?
I got my 3-pod a-pillar from TruckPillars.com on Saturday too. I�m going to put a vac and the wideband gauge in there, the ones I bought for my Civic from GlowShift. I think I want to put a temp gauge in the other pod for more accurate readings, any other suggestions? Fuel pressure will get added in the bay someday, and I�ll be happy with it there.


