
3.0 to 2jz Big single turbo SWAP 91 4runner
 Feb 17, 2013 | 07:48 PM
#1
Thread Starter
Registered User
Joined: Aug 2012
Posts: 61
Likes: 0
From: Youngstown, Ohio
3.0 to 2jz Big single turbo SWAP 91 4runner
3.0 to 2jz Big single turbo SWAP 91 4runner.
There are very few people out there that actually enjoy having that slow 3.0 v6 engine in there rig that can barely spin the tires, but i cant, and there are many different swaps out there to take care of it. The famous 3.4 swap, the 7m swap, 350 swap, and the 1 and 2jz swaps. In my opinion the 2jz swap may be more complicated than most other swaps needing custom bellhousing or longer input shaft, wiring headaches, plumbing and fitment issues, body lifts and SAS, and many other odds and ins but it has been done before and with amazing results. Sounds like a headache while the project is in progress but when its all said and done its well worth it.
So im going to try and take as many pics as i can along the way and show each step involved in swapping out your 3.0 to a 2jz. I just want to get a feel for the waters and see who is all interested in this swap.
lets get it started:
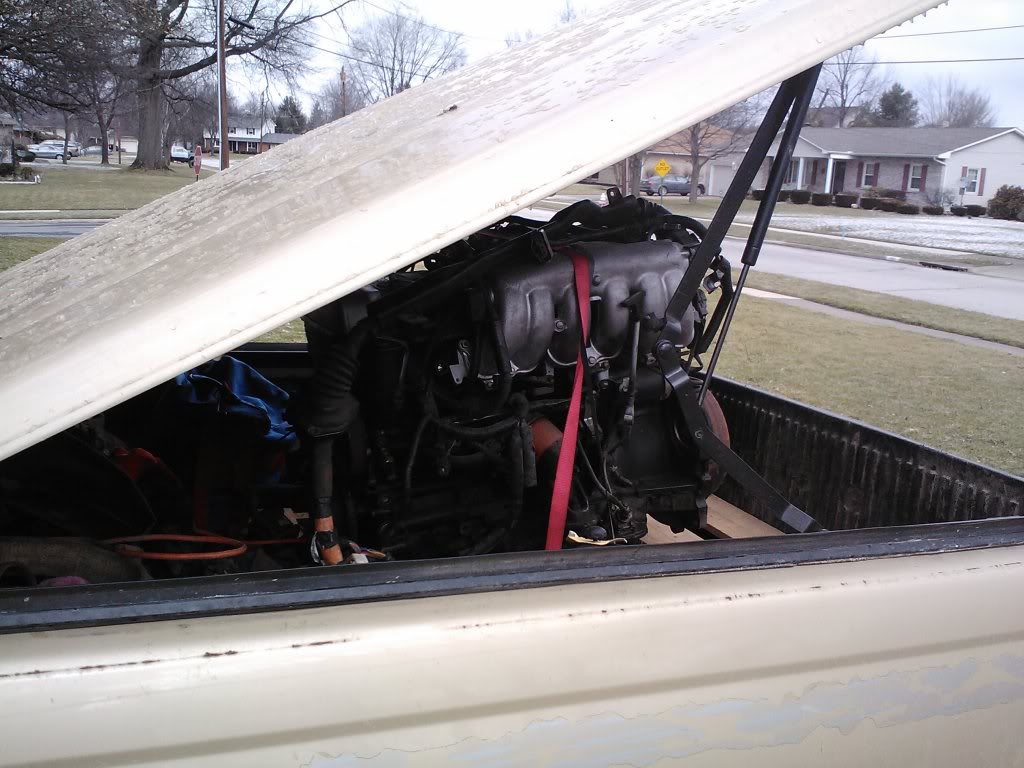
So i picked up the engine this last Saturday from a local shop in Youngstown fairly cheap came with full ecu, uncut harness, all accessories like the power steering, altenater, starter, flywheel, etc.
Make sure when u go get your engine it comes with an ecu and harness and hopefully all the accessories but most important is that harness and ecu since no one likes to go searching for extra parts when you dont need to.
So lets make a little part list and discuss your options on how to approach this swap or at least get you started:
(I WILL BE MAKING MOST OF MY OWN PARTS FOR THIS SWAP AND WILL MAKE EXTRAS IF ANYONE MAY NEED THEM AS FAR AS METAL FABBED PARTS NO ELECTRONIC OR SLICED HARNESSES)
1. Complete 2JZ Engine with ECU and Harness + accessories
2. Custom bellhousing to mate your transmission to your new engine (since im using the 5speed tranny from the 3.0 ill need an R150F to 2JZ Housing)
2*. (not using the custom bellhousing) You'll need to swap out your R150F input shaft for a longer shaft... but it gets confusing needing to use an AX-15 input shaft from a jeep with 3.83 1st gear. This will match the gearing of the R150. So the AX-15 shaft will work and is long enough... but now the spline on the end of the shaft has changed from a 20-odd tooth and your clutch doesnt match the spline. It can get very messy i advise custom cut bell.
3. 2jzge clutch and pressure plate (It has the same spline as your R150F Input shaft and lucky for you the pressure plate fits the flywheel cause its a 2jz assembly... it works perfect. I think 7mgte has the 21 spline clutch too but not sure if the pressure plate matches flywheel or not.
4. Engine mounts ( Ive heard the 5m engine mounts fit just about perfect with the 4cyl pickups but not for the v6. Im going to make my own. Ill be sure to take a few pictures and measurements for everyone that has the know how to make them.
5. Body Lift (Optional...) The engine sits at an angle and the front may or may not hit the hood so a small body lift could be used or a functional hood scoop. Mine is Solid Axle Swapped and recommended, I dont think ive ever seen one done without being SAS'd
6. Battery relocate kit (Make your own little bracket and wire it up over to the other side. you can run the wires any way you want it self explanatory)
7. Extra wires to extend your ECU. In my case ill be locating my ECU in the glove box rather than behind the front wheel well on the passenger side where it sits originally.
8. Upgraded fuel pump. I plan on going with a big single turbo setup so i will be running dual walbarro pumps wired so one runs constant and the other one kicks on at 4000 and stays on during boost and 4 additional seconds after shift to insure i dont starve the engine. Injectors can be upgraded also but if your going to stick with the stock set up id leave the stock ones in.
This will get us started for now but there will be many other parts involved in our swap some small such as clamps, hoses, wires, and lines along with major upgrades such as Radiator, Intercooler, Standalones or Piggy-Backs, and everything in between.

There are very few people out there that actually enjoy having that slow 3.0 v6 engine in there rig that can barely spin the tires, but i cant, and there are many different swaps out there to take care of it. The famous 3.4 swap, the 7m swap, 350 swap, and the 1 and 2jz swaps. In my opinion the 2jz swap may be more complicated than most other swaps needing custom bellhousing or longer input shaft, wiring headaches, plumbing and fitment issues, body lifts and SAS, and many other odds and ins but it has been done before and with amazing results. Sounds like a headache while the project is in progress but when its all said and done its well worth it.
So im going to try and take as many pics as i can along the way and show each step involved in swapping out your 3.0 to a 2jz. I just want to get a feel for the waters and see who is all interested in this swap.
lets get it started:
So i picked up the engine this last Saturday from a local shop in Youngstown fairly cheap came with full ecu, uncut harness, all accessories like the power steering, altenater, starter, flywheel, etc.
Make sure when u go get your engine it comes with an ecu and harness and hopefully all the accessories but most important is that harness and ecu since no one likes to go searching for extra parts when you dont need to.
So lets make a little part list and discuss your options on how to approach this swap or at least get you started:
(I WILL BE MAKING MOST OF MY OWN PARTS FOR THIS SWAP AND WILL MAKE EXTRAS IF ANYONE MAY NEED THEM AS FAR AS METAL FABBED PARTS NO ELECTRONIC OR SLICED HARNESSES)
1. Complete 2JZ Engine with ECU and Harness + accessories
2. Custom bellhousing to mate your transmission to your new engine (since im using the 5speed tranny from the 3.0 ill need an R150F to 2JZ Housing)
2*. (not using the custom bellhousing) You'll need to swap out your R150F input shaft for a longer shaft... but it gets confusing needing to use an AX-15 input shaft from a jeep with 3.83 1st gear. This will match the gearing of the R150. So the AX-15 shaft will work and is long enough... but now the spline on the end of the shaft has changed from a 20-odd tooth and your clutch doesnt match the spline. It can get very messy i advise custom cut bell.
3. 2jzge clutch and pressure plate (It has the same spline as your R150F Input shaft and lucky for you the pressure plate fits the flywheel cause its a 2jz assembly... it works perfect. I think 7mgte has the 21 spline clutch too but not sure if the pressure plate matches flywheel or not.
4. Engine mounts ( Ive heard the 5m engine mounts fit just about perfect with the 4cyl pickups but not for the v6. Im going to make my own. Ill be sure to take a few pictures and measurements for everyone that has the know how to make them.
5. Body Lift (Optional...) The engine sits at an angle and the front may or may not hit the hood so a small body lift could be used or a functional hood scoop. Mine is Solid Axle Swapped and recommended, I dont think ive ever seen one done without being SAS'd
6. Battery relocate kit (Make your own little bracket and wire it up over to the other side. you can run the wires any way you want it self explanatory)
7. Extra wires to extend your ECU. In my case ill be locating my ECU in the glove box rather than behind the front wheel well on the passenger side where it sits originally.
8. Upgraded fuel pump. I plan on going with a big single turbo setup so i will be running dual walbarro pumps wired so one runs constant and the other one kicks on at 4000 and stays on during boost and 4 additional seconds after shift to insure i dont starve the engine. Injectors can be upgraded also but if your going to stick with the stock set up id leave the stock ones in.
This will get us started for now but there will be many other parts involved in our swap some small such as clamps, hoses, wires, and lines along with major upgrades such as Radiator, Intercooler, Standalones or Piggy-Backs, and everything in between.


 Feb 17, 2013 | 09:45 PM
#3
Registered User
Joined: Jul 2009
Posts: 236
Likes: 0
From: All over Canada
You're gonna love it.
You can also do it without body lift, and with IFS.
What kind of electronics are you going with if you're going single? What turbo are you planning on using, and at about what boost?
You can also do it without body lift, and with IFS.
What kind of electronics are you going with if you're going single? What turbo are you planning on using, and at about what boost?
Feb 18, 2013 | 08:32 PM
#4
Thread Starter
Registered User
Joined: Aug 2012
Posts: 61
Likes: 0
From: Youngstown, Ohio
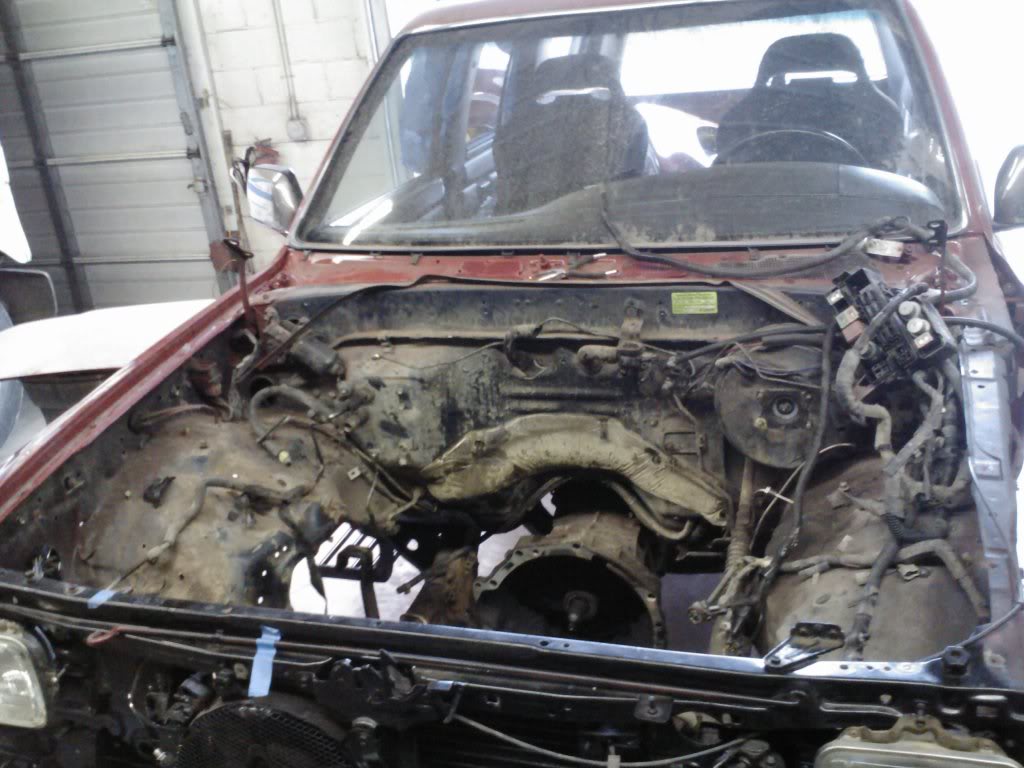
So far today i started pulling the engine out but only got as far as unplugging everything and unbolting the bellhousing and engine mounts. I want this thread to be newbie friendly so i tried to take as many pictures as i could of the engine in different stages so even the most inexperienced of mechanics could follow along as the build goes on as well as the others that are going to help with their own experiences to make it a build for everyone on one thread... Well hopefully ha
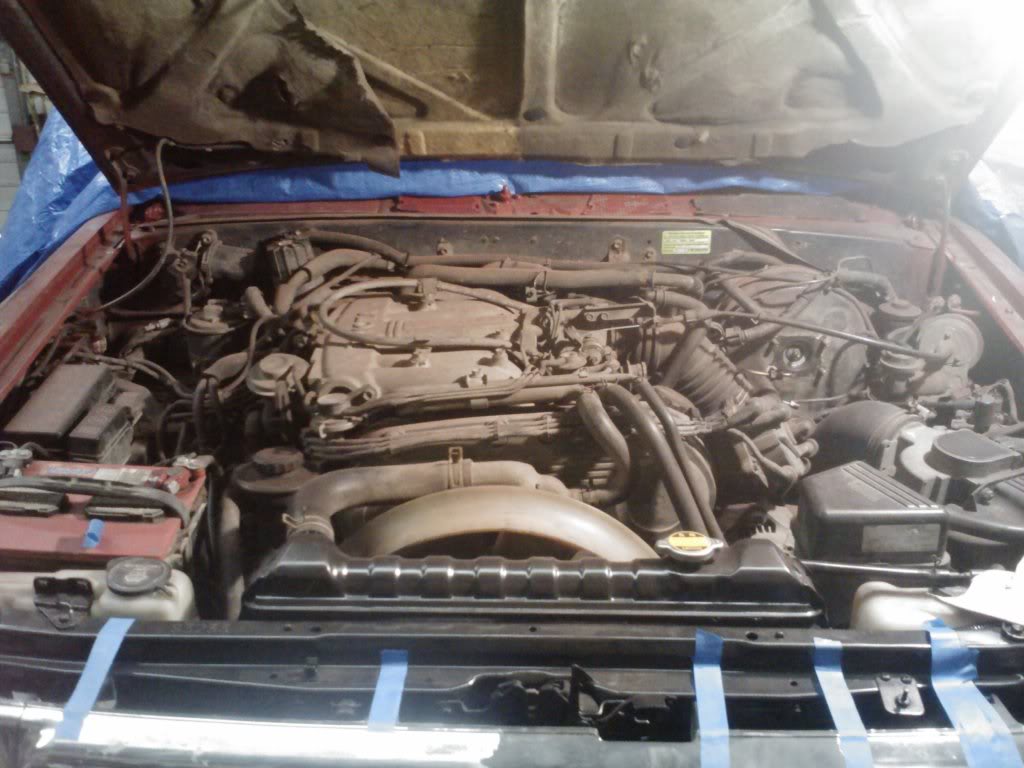
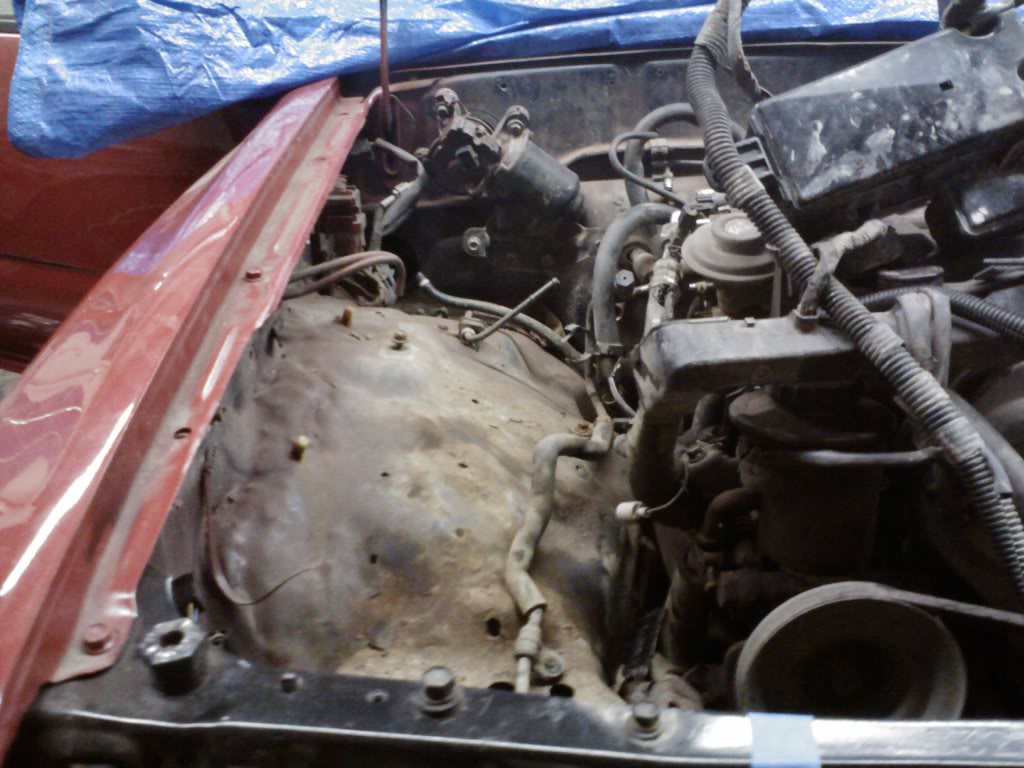
Soo Lets start off with our base picture of the engine which is the 3vze 3.0L V6 engine found in the Toyota 4runners and Pickups. This is what we will be pulling out in the next few days.
First things first lets get that battery out of the way. Take care of pos, neg, ground, and any other wires that may be connected to your battery.
After we disconnected the battery i liked to start with the easiest thing to take off and thats your intake and air filter housing along with all the piping and vacuum lines over on the passenger side. Just 3 clips holding on the air filter box and MAF sensor... Be sure to unplug your sensors and not rip them out you may need them down the road.
Once the air fliter box, filter, and MAF are removed there are 3 small bolts holding on the bottom of the air filter box shown in the picture above on the outside around the box. I believe they are 10mm at least mine are and just about every other bolt in there is 10mm ha. You can see the 2 hole locations in the picture below the other one is in the corner near the headlight.
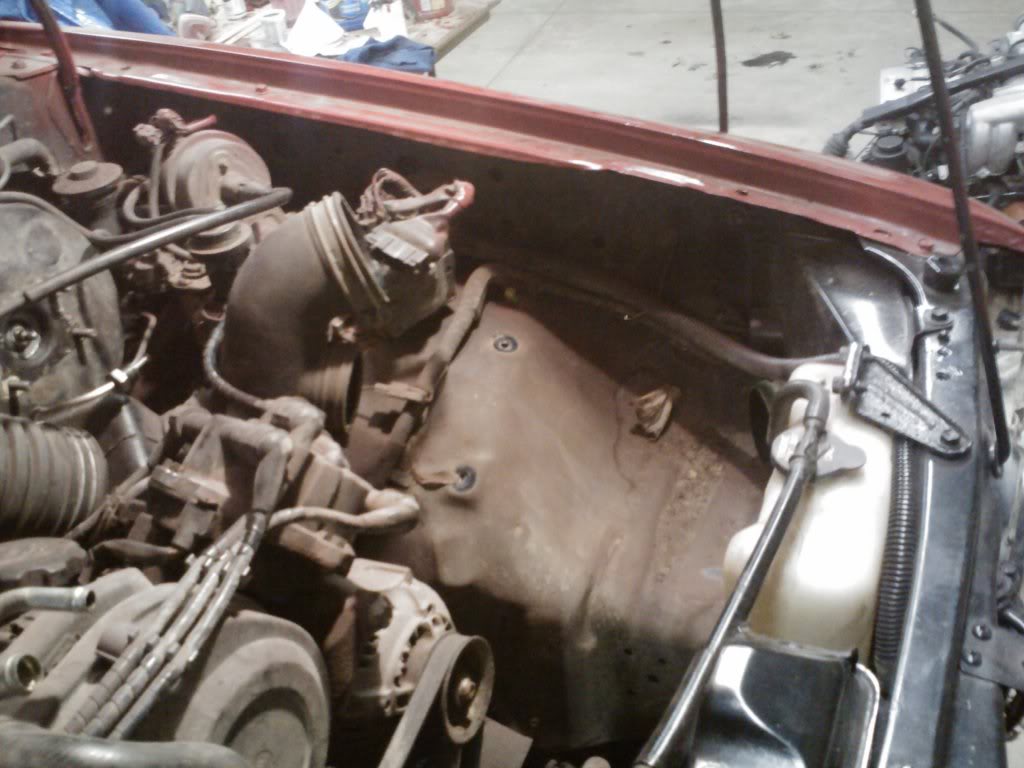
Now that the air box is completely removed we now have room for our new location for the battery, but its not going in just yet. go ahead and pull off all the intake piping from the intake manifold. There are 5 or 6 twist tighten clamps holding everything in place and a few clips holding some vacuum lines on just go ahead and take all that off and clear some room up in the engine bay for yourself to work. Next i took off the radiator overflow bottle, radiator (Drain it first please), and windshield wiper fluid resivour. 2 10mm bolts on top of overflow and one line, 2 10mm bolts on wiper bottle tank along with a plug and 2 water lines that need disconnected, and 4 12mm radiator bolts found on the back side of the radiator.
After removing all of those items i went back over to the driver side and pulled the remaining items off of the wheel well and began unplugging and disconnecting the wiring harness from the components. This is alot harder to document than i thought at this point its more or less unplug and unbolt what you see. I plan on shaving and painting my bay so im going to be pulling everything.

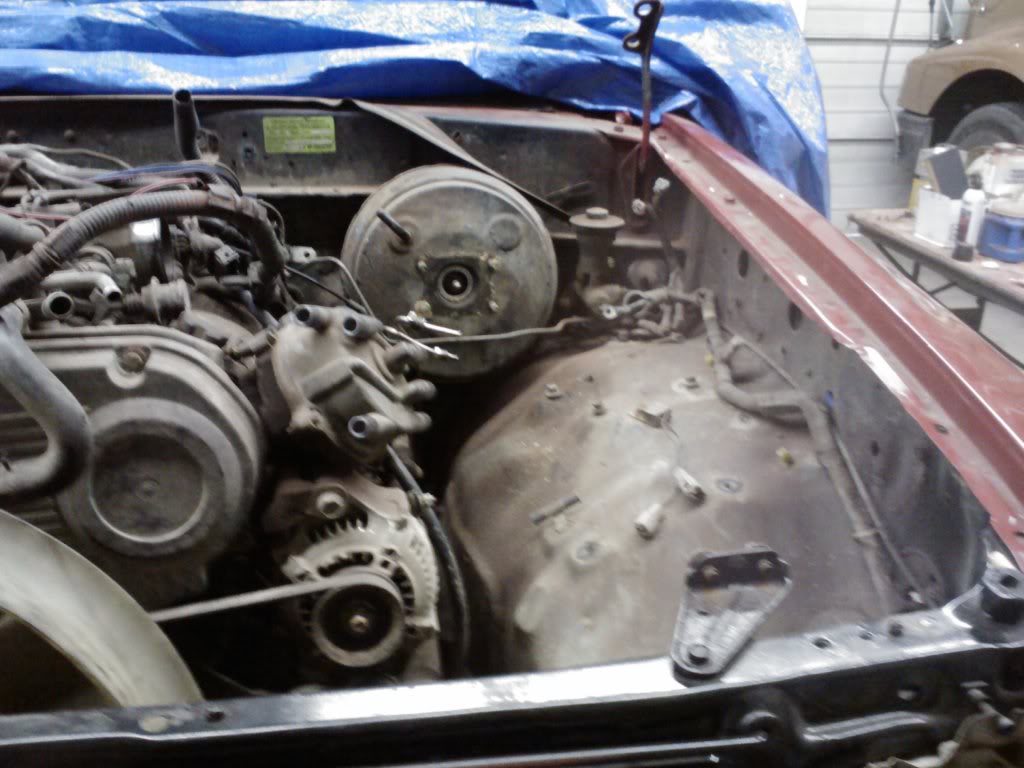
Nice and clean now and nothing to get in the way of the engine when it gets yanked out not to mention so much easier to paint my bay without all those ugly things in the way.
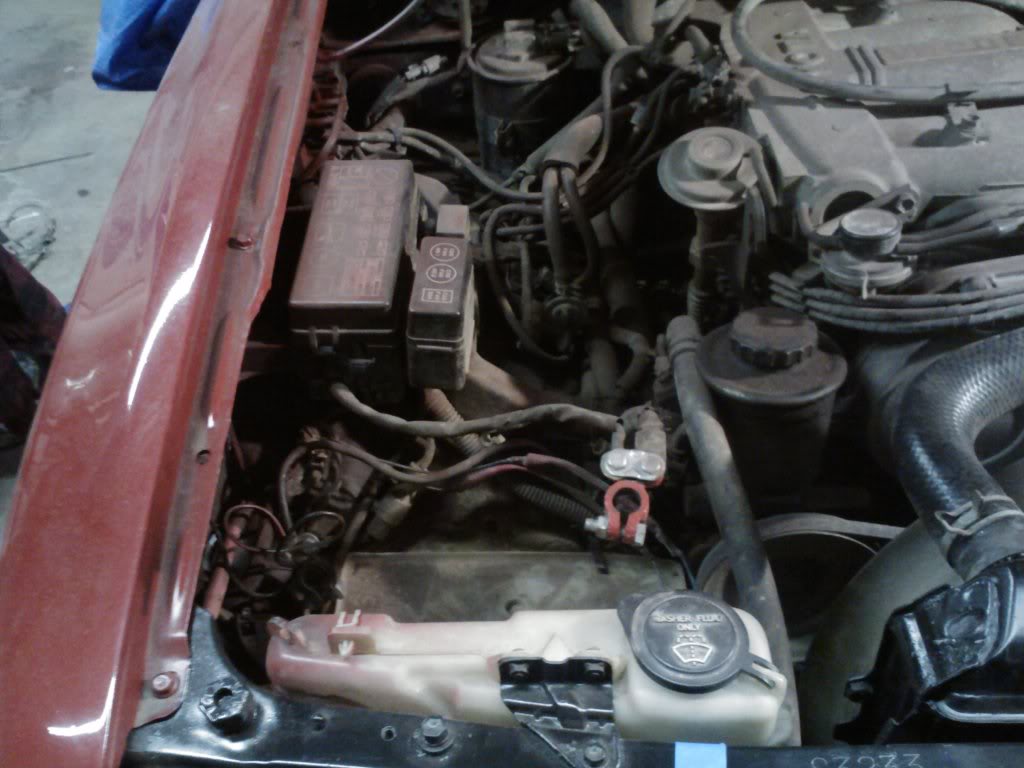
over to the other side is a little more messier. there are about 10 vacuum lines that run into your engine that need unclamped and pulled out. very self explanitory on how to remove them. You can also see the mess of ecu wires, heater, ac, power steering, abs, and a bunch of other things you will have to go through and unplug but stay calm and steady it isnt as bad as it seems... everything is held on by 10mm bolts and if your work front to back on pulling everything it clears up space and everything comes out very simple it just takes time is all be patient.
I had the genny can supervising haha
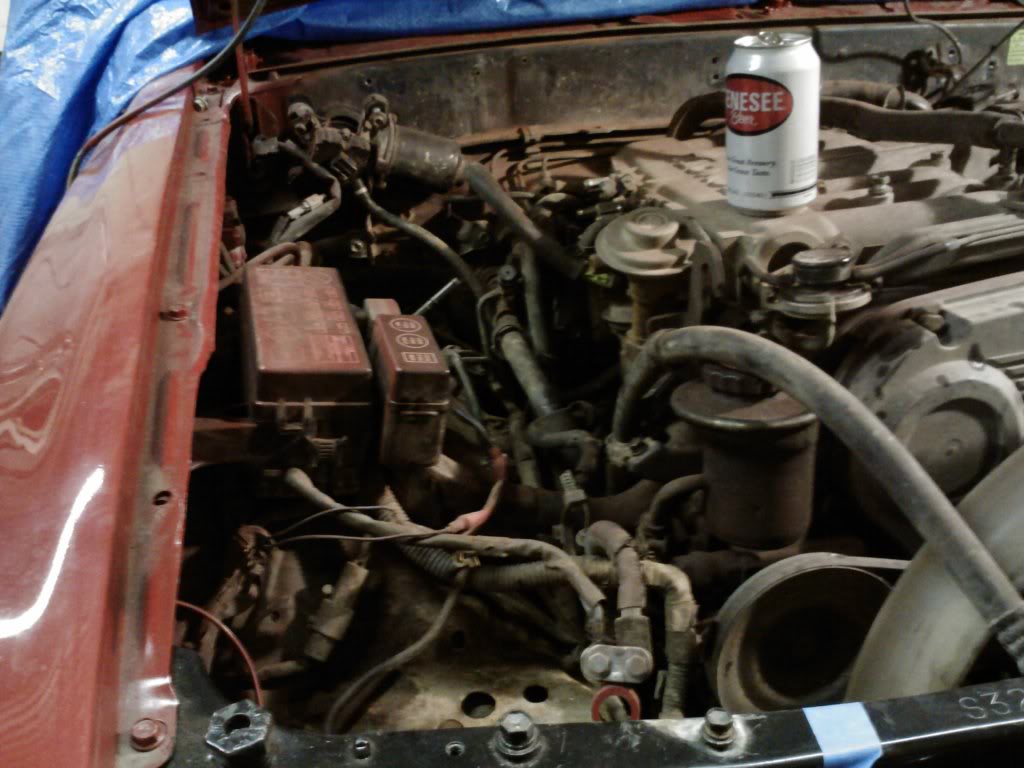
Once you sort through the mess of wires and get most everything unplugged head into your passenger side kick panel and unplug your ECU from the harness so you can pull the wires up through the firewall and keep the harness in one piece instead of pulling a hack job and destroying it. It comes out quite simple its only 3 plugs into the ECU and another plug onto a secondary harness that has 2 clips unplug them both and pull the wires up through.
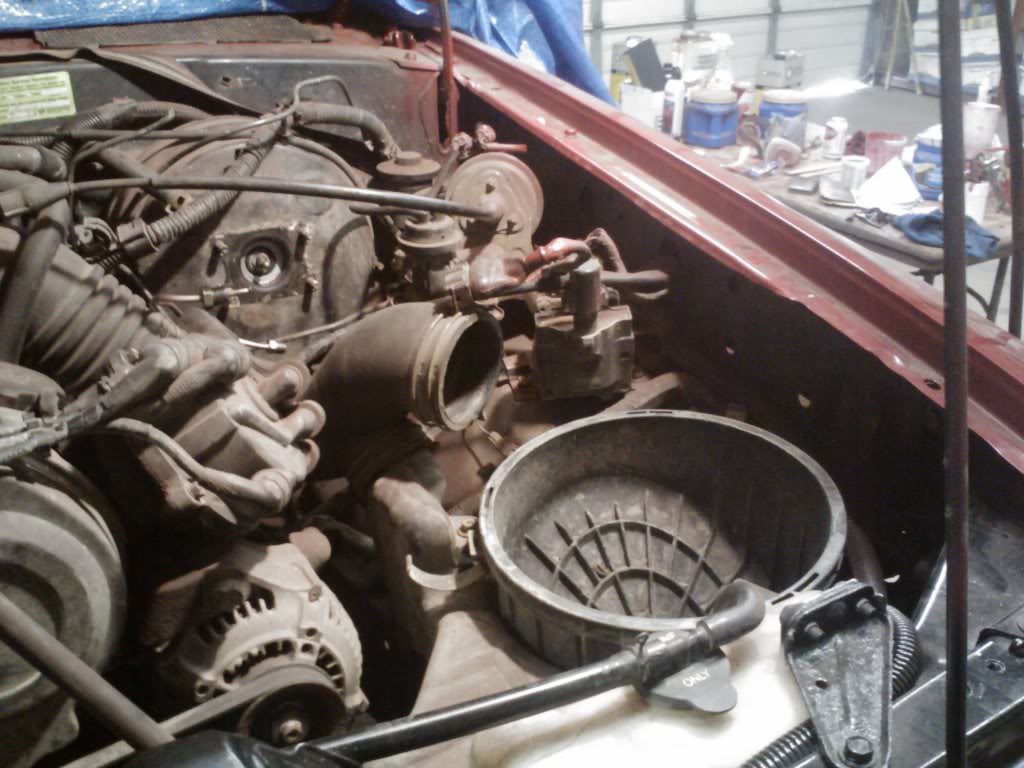
Next step i took out the huge banjo bolt on the side of the power steering and let it drain and unhooked all the power steering line from the engine to the pump and took off the ac lines. That should do it for everything in the engine bay just look it over make sure you didnt leave any gas lines connceted or have something tangled up in the engine still connected. you should than get a picture something like the one below.
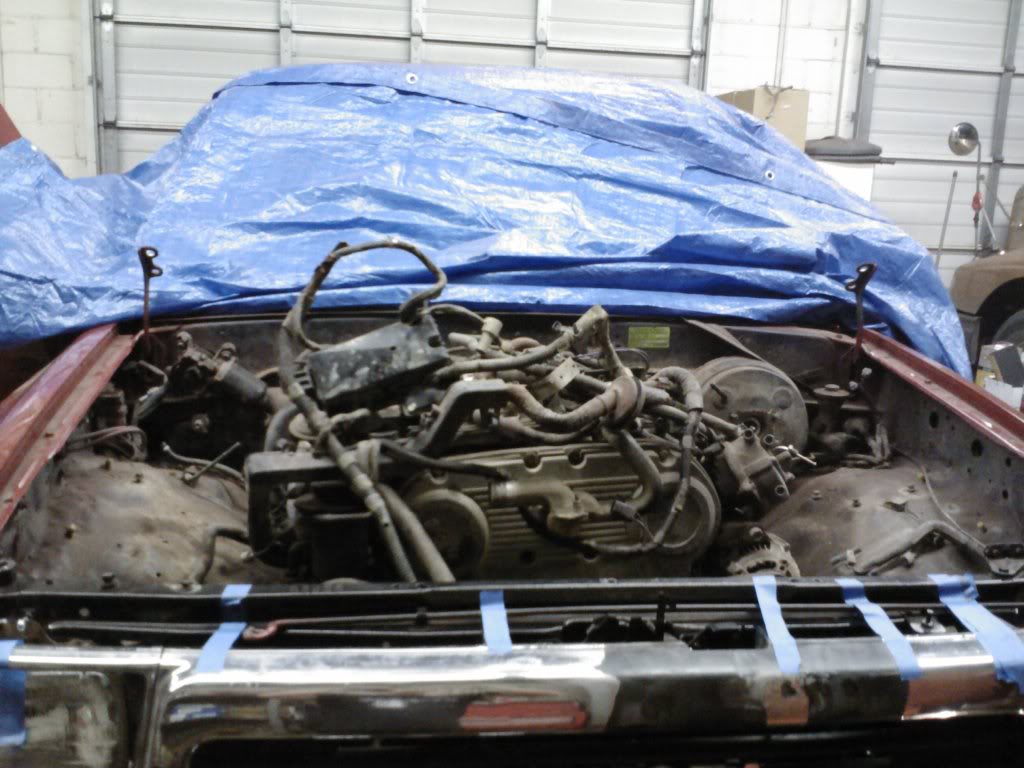
And finally unbolt your bellhousing from the engine and remove your engine mount bolts. Should be 12 bellhousing bolts, 8 smaller ones, and 4 larger ones not sure of the size i havent cracked them free yet since i wasnt pulling the engine and 4 bolts for the engine mounts.
Soo Lets start off with our base picture of the engine which is the 3vze 3.0L V6 engine found in the Toyota 4runners and Pickups. This is what we will be pulling out in the next few days.
First things first lets get that battery out of the way. Take care of pos, neg, ground, and any other wires that may be connected to your battery.
After we disconnected the battery i liked to start with the easiest thing to take off and thats your intake and air filter housing along with all the piping and vacuum lines over on the passenger side. Just 3 clips holding on the air filter box and MAF sensor... Be sure to unplug your sensors and not rip them out you may need them down the road.
Once the air fliter box, filter, and MAF are removed there are 3 small bolts holding on the bottom of the air filter box shown in the picture above on the outside around the box. I believe they are 10mm at least mine are and just about every other bolt in there is 10mm ha. You can see the 2 hole locations in the picture below the other one is in the corner near the headlight.
Now that the air box is completely removed we now have room for our new location for the battery, but its not going in just yet. go ahead and pull off all the intake piping from the intake manifold. There are 5 or 6 twist tighten clamps holding everything in place and a few clips holding some vacuum lines on just go ahead and take all that off and clear some room up in the engine bay for yourself to work. Next i took off the radiator overflow bottle, radiator (Drain it first please), and windshield wiper fluid resivour. 2 10mm bolts on top of overflow and one line, 2 10mm bolts on wiper bottle tank along with a plug and 2 water lines that need disconnected, and 4 12mm radiator bolts found on the back side of the radiator.
After removing all of those items i went back over to the driver side and pulled the remaining items off of the wheel well and began unplugging and disconnecting the wiring harness from the components. This is alot harder to document than i thought at this point its more or less unplug and unbolt what you see. I plan on shaving and painting my bay so im going to be pulling everything.
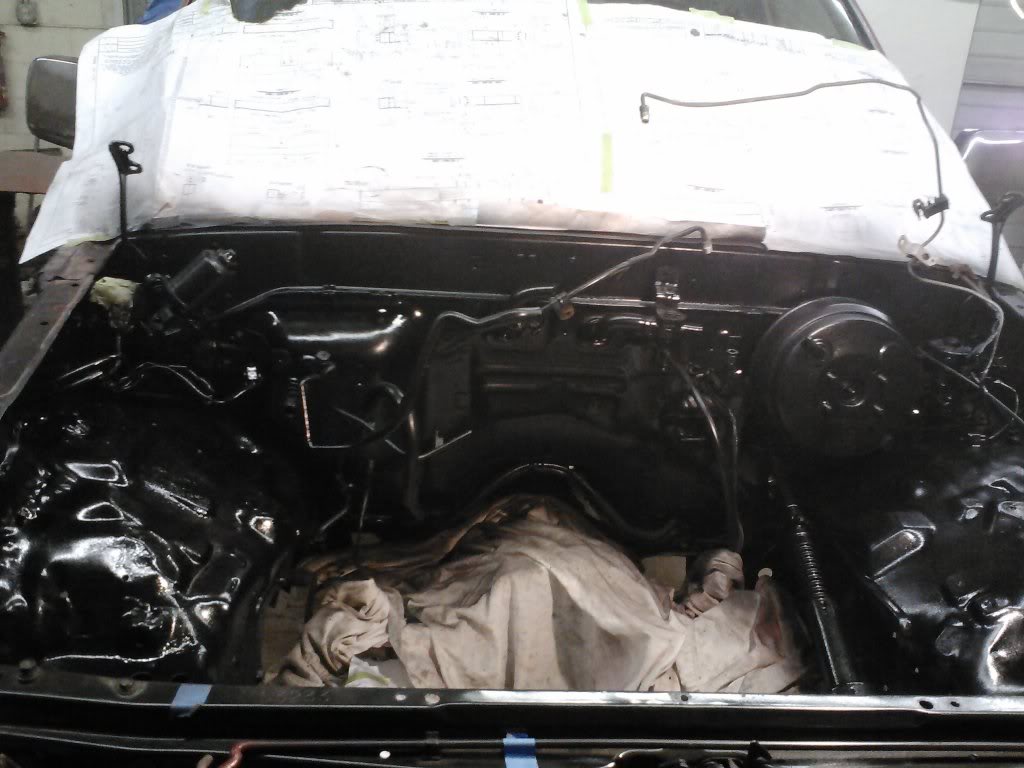
Nice and clean now and nothing to get in the way of the engine when it gets yanked out not to mention so much easier to paint my bay without all those ugly things in the way.
over to the other side is a little more messier. there are about 10 vacuum lines that run into your engine that need unclamped and pulled out. very self explanitory on how to remove them. You can also see the mess of ecu wires, heater, ac, power steering, abs, and a bunch of other things you will have to go through and unplug but stay calm and steady it isnt as bad as it seems... everything is held on by 10mm bolts and if your work front to back on pulling everything it clears up space and everything comes out very simple it just takes time is all be patient.
I had the genny can supervising haha
Once you sort through the mess of wires and get most everything unplugged head into your passenger side kick panel and unplug your ECU from the harness so you can pull the wires up through the firewall and keep the harness in one piece instead of pulling a hack job and destroying it. It comes out quite simple its only 3 plugs into the ECU and another plug onto a secondary harness that has 2 clips unplug them both and pull the wires up through.
Next step i took out the huge banjo bolt on the side of the power steering and let it drain and unhooked all the power steering line from the engine to the pump and took off the ac lines. That should do it for everything in the engine bay just look it over make sure you didnt leave any gas lines connceted or have something tangled up in the engine still connected. you should than get a picture something like the one below.
And finally unbolt your bellhousing from the engine and remove your engine mount bolts. Should be 12 bellhousing bolts, 8 smaller ones, and 4 larger ones not sure of the size i havent cracked them free yet since i wasnt pulling the engine and 4 bolts for the engine mounts.
Feb 18, 2013 | 08:45 PM
#5
Thread Starter
Registered User
Joined: Aug 2012
Posts: 61
Likes: 0
From: Youngstown, Ohio
For electronics i wanted to run a nice AEM Standalone, Greddy Electronic boost controller, 3 gauge piller pods for monitoring, Dual walbarros, and upgraded RC injectors at least 550s
Turbo choices at first were Garrett GT45R but seemed way too big, Garrett GT35R (My favorite so far), than a step down to a T04E .67 Trim, or a Holset.
Boost wise i wanted to run a nice street tune around 8psi and pick it up into the 15psi+ depending on what i was doing with it that day and run.
BUT... This setup all depends on what kind of funds i have left over it gets crazy pricey
Feb 18, 2013 | 09:16 PM
#6
Registered User
Joined: Jul 2009
Posts: 236
Likes: 0
From: All over Canada
Do the AEM EMS if you can, it makes wiring a breeze. I'm running the V2, way easier tuning software (had the original aem ems in the past) and if you do go with the AEM, run their boost controller, it's a really good unit, and adds some compatibility/tunability features to the standalone.
The stock injectors on most usdm spec 2jz's are 550, if you want to ever get up into that 15psi+ range (which would be the point of doing a big single), you'll have to step that up a bunch.
Look at precision turbos, they are super well priced, and have a great track record.
Looking forward to following along! good luck bud!
Feb 19, 2013 | 12:39 AM
#7
Thread Starter
Registered User
Joined: Aug 2012
Posts: 61
Likes: 0
From: Youngstown, Ohio
Do the AEM EMS if you can, it makes wiring a breeze. I'm running the V2, way easier tuning software (had the original aem ems in the past) and if you do go with the AEM, run their boost controller, it's a really good unit, and adds some compatibility/tunability features to the standalone.
The stock injectors on most usdm spec 2jz's are 550, if you want to ever get up into that 15psi+ range (which would be the point of doing a big single), you'll have to step that up a bunch.
Look at precision turbos, they are super well priced, and have a great track record.
Looking forward to following along! good luck bud!
The stock injectors on most usdm spec 2jz's are 550, if you want to ever get up into that 15psi+ range (which would be the point of doing a big single), you'll have to step that up a bunch.
Look at precision turbos, they are super well priced, and have a great track record.
Looking forward to following along! good luck bud!
Thanks for the input... ill need every ounce of help I can get with this project its not your everyday swap well at least not for me.
What size Precision Turbo do you suggest I use?
Trending Topics
Feb 19, 2013 | 12:52 AM
#8
Registered User
Joined: Jul 2009
Posts: 236
Likes: 0
From: All over Canada
pick a horsepower goal, then the turbo to suit. I'm running a 5862 because i had a set laying around, and realistically, that's about as much power as i want running through my drivetrain.
you have to keep a single realistic. honestly, if i hadn't gone single turbo on the supra i pulled my motor out of, i'd have kept the twins for quicker spool time.
now with a bigger single, and the need for more power at lower rpm, i'm having to build a quick spool valve to speed up the flow, and hopefully spool a little quicker.
Mar 2, 2013 | 10:04 AM
#9
Thread Starter
Registered User
Joined: Aug 2012
Posts: 61
Likes: 0
From: Youngstown, Ohio
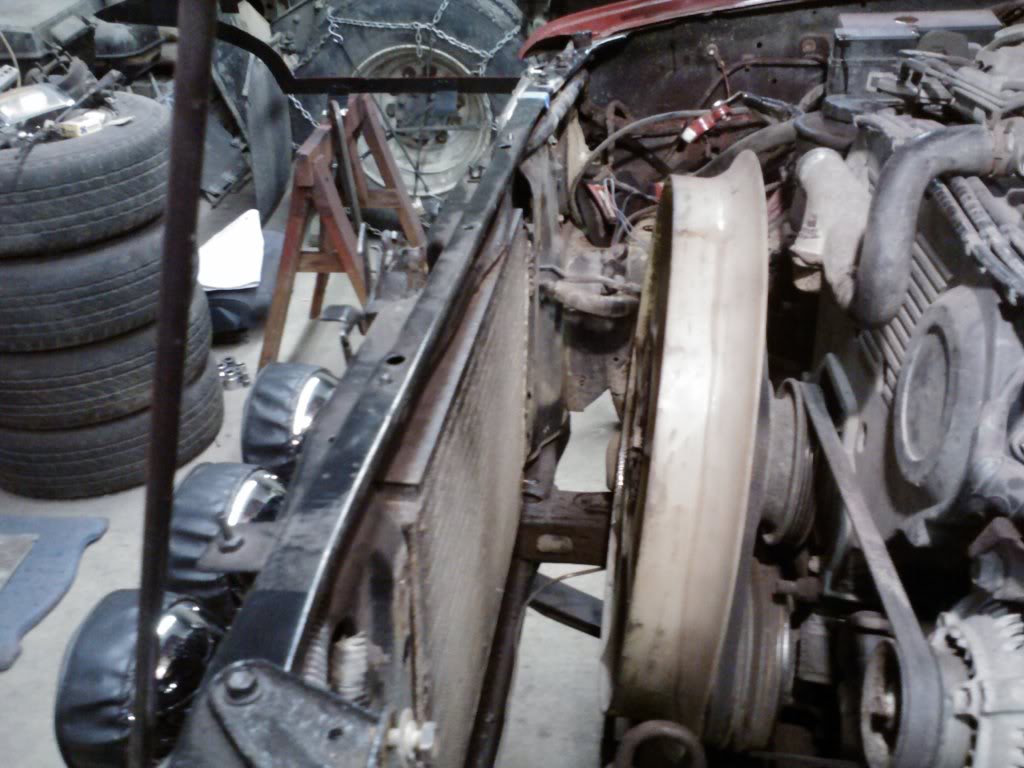
So i havent had alot of off time lately to get this swap going. Did manage to get the engine pulled out last saturday and got the engine bay all primered and painted. I went with rhino liner for the engine bay it turned out pretty nice.
Pulling the engine was a pain in the a$$ the picker wasnt high enough to get the engine out so it took us a few hours. But for those of you pulling the engine for the first time youll find you need to:
1. Unbolt the motor mounts
2. Unbolt the bellhousing from the engine. (12 bolts around total... dont forget the starter bolts there are 2.)
3. Make sure you disconnect all power steering, clutch lines, wires, ac, etc. all that and hook up your chains. Youll find 2 hooks on the engine top that you hook the chains to there is one in the rear and one up front caticorner from eachother. i usually rap my chains underneath and than hook to the top side engine hooks incase it breaks but dont recommend it if your going to use the engine im just scrapping mine.
4. Pull that engine out nice and slow. Youll find bellhousing pins you have to get the engine off of so pick the engine out a little and wiggle it off the pins. Once its loose pick it on out.
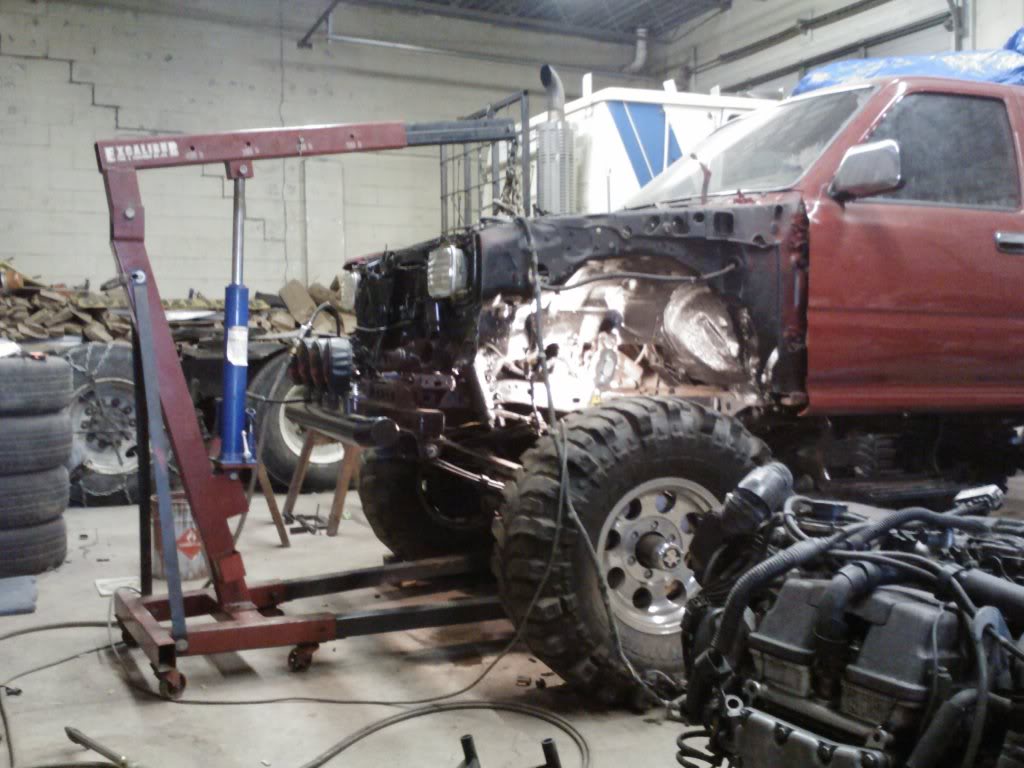
On its way out.
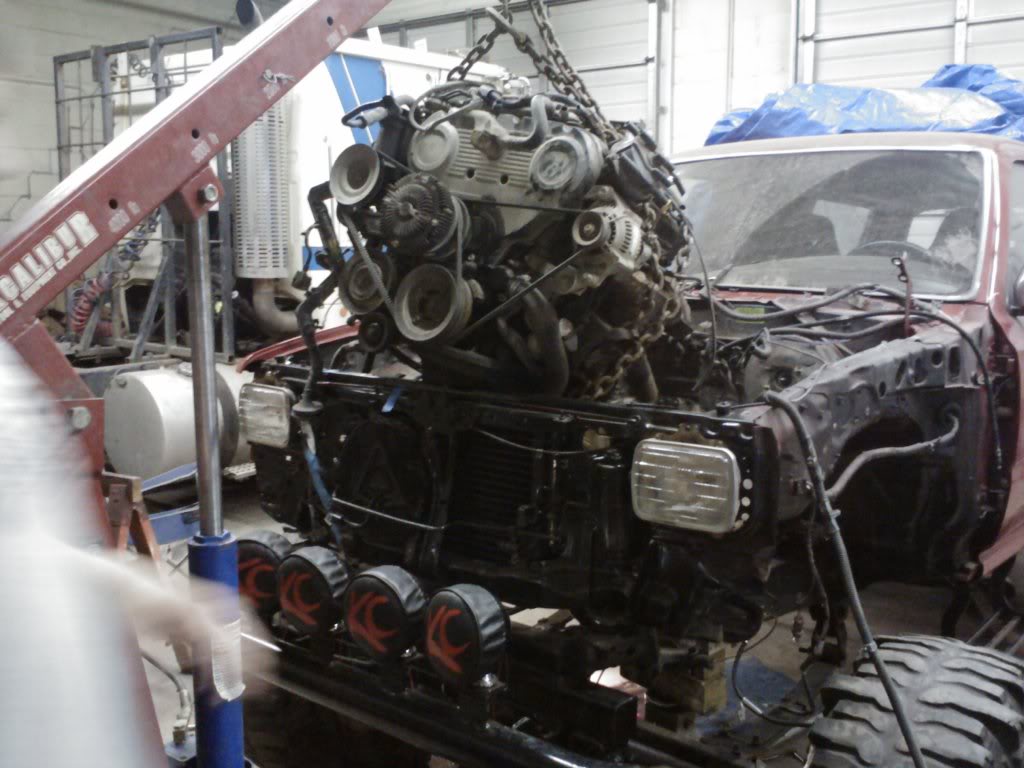
Pulling the engine was a pain in the a$$ the picker wasnt high enough to get the engine out so it took us a few hours. But for those of you pulling the engine for the first time youll find you need to:
1. Unbolt the motor mounts
2. Unbolt the bellhousing from the engine. (12 bolts around total... dont forget the starter bolts there are 2.)
3. Make sure you disconnect all power steering, clutch lines, wires, ac, etc. all that and hook up your chains. Youll find 2 hooks on the engine top that you hook the chains to there is one in the rear and one up front caticorner from eachother. i usually rap my chains underneath and than hook to the top side engine hooks incase it breaks but dont recommend it if your going to use the engine im just scrapping mine.
4. Pull that engine out nice and slow. Youll find bellhousing pins you have to get the engine off of so pick the engine out a little and wiggle it off the pins. Once its loose pick it on out.
On its way out.
 Mar 2, 2013 | 10:53 AM
#11
Thread Starter
Registered User
Joined: Aug 2012
Posts: 61
Likes: 0
From: Youngstown, Ohio
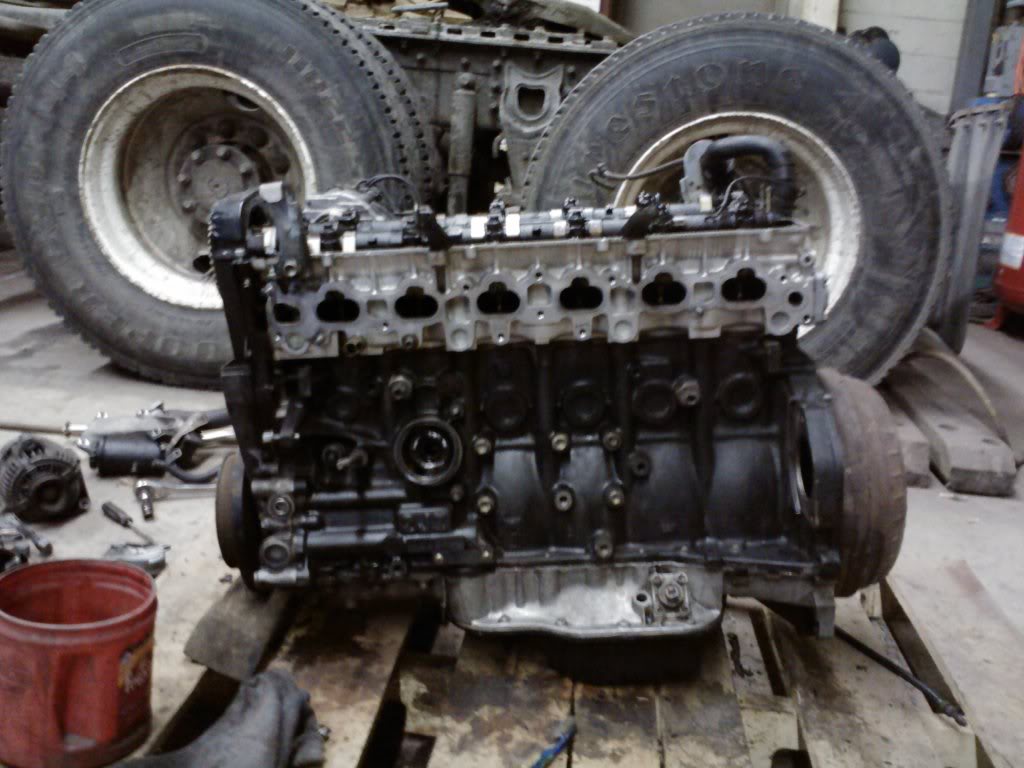
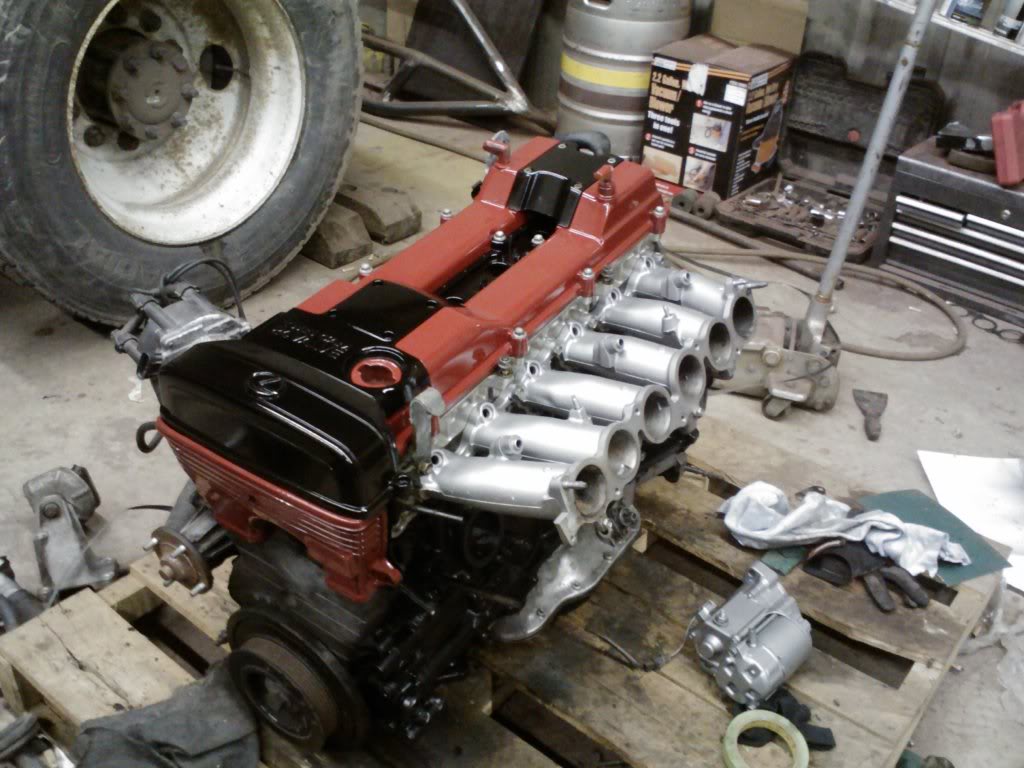
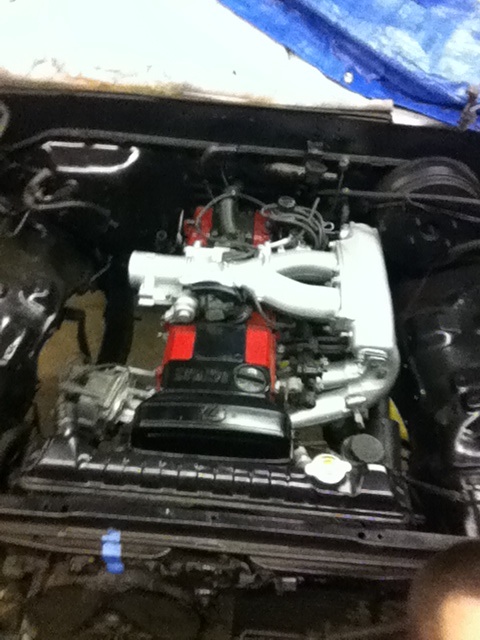
Once i pulled the 3vze i started taking the 2jz down to its block to clean it up and replace all the old parts. 4 hours with a ratchet and a tooth brush and this is where it stands... Still not completely done but i made some big moves on it this week. Hopefully i can have everything ordered in and on the engine by the end of next week.
Mar 5, 2013 | 03:29 PM
#12
Thread Starter
Registered User
Joined: Aug 2012
Posts: 61
Likes: 0
From: Youngstown, Ohio
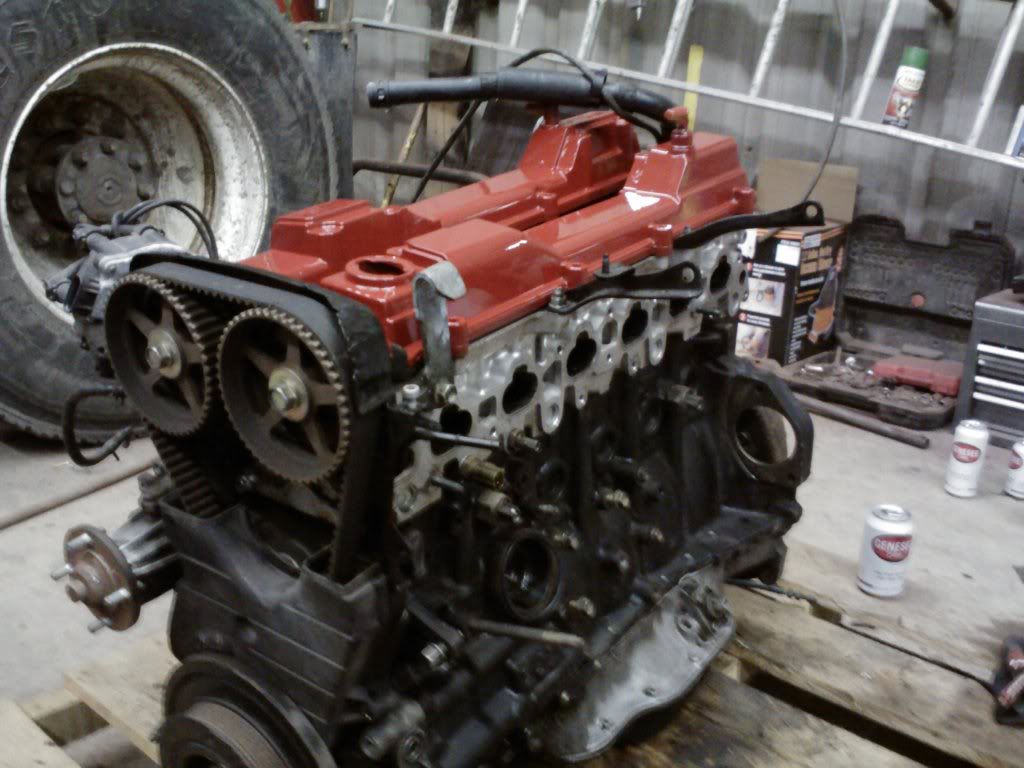
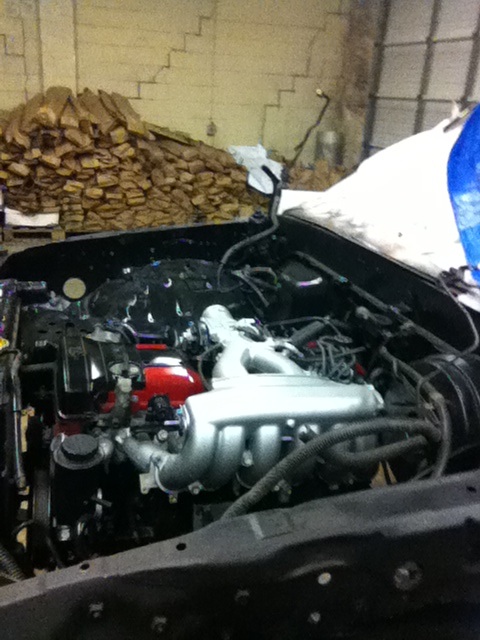
So i got the engine all cleaned up and mostly everything painted and im in the reassembly stage. Im going to drop the transmission tomorrow and lower the engine into the bay and make some engine mounts once its all back together.
Didnt realize the turbo kit i put together was going to push me about 2k over my budget so since its the GE not GTE ill be running N/A until i can piece together everything i need. Hopefully a few months from now.
Quick updated pic of engine:
Didnt realize the turbo kit i put together was going to push me about 2k over my budget so since its the GE not GTE ill be running N/A until i can piece together everything i need. Hopefully a few months from now.
Quick updated pic of engine:
Mar 5, 2013 | 03:38 PM
#13
Thread Starter
Registered User
Joined: Aug 2012
Posts: 61
Likes: 0
From: Youngstown, Ohio
Running into some problems... Intended on making my own bellhousing but cant seem to find the 2jz or 1jz 5speed bell cheap enough or any for that matter in my area. 
Any suggestions? If i ordered a custom made one where would i order it from and how much?
Any suggestions? If i ordered a custom made one where would i order it from and how much?

 I'm sure someone will chime in on the housing.
Mar 9, 2013 | 05:13 AM
I'm sure someone will chime in on the housing.
Mar 9, 2013 | 05:13 AM
#15
Registered User


Joined: May 2010
Posts: 415
Likes: 6
From: Anne Arundel,MD
Im currently working on doing a 1jz gte vvti into my runner. The biggest speed bump i have right now is a flywheel and clutch combo that will work. I talked to driftmotion and he gave me a setup that would cost a $1,000 and couldnt fully gurantee that it would work. So ive been looking and looking for a potential alternative. My trany setup is the R154 bellhousing mated to a R150 out of a 96Runner. When toyota went to the 5vz for whatever reason they made the bellhousing just shy of an inch longer. So once you bolt the 154 bellhousing on it works perfectly. I have pics in my thread.https://www.yotatech.com/forums/f161...runner-266328/
Mar 21, 2013 | 03:21 PM
#16
Thread Starter
Registered User
Joined: Aug 2012
Posts: 61
Likes: 0
From: Youngstown, Ohio
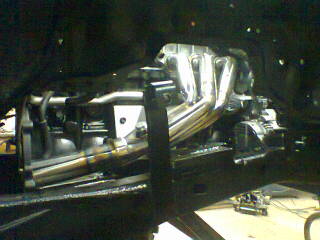
So havent been on in a while... got alot done over the last time being on here. Made my engine mounts, mounted the engine, got it 90% wired up, and in the process of adjusting the header to fit.
The bottom engine mounts with bushings. Used polyurethane leaf spring bushings with grade 8 3/8x4"bolts and nylon lock nuts with the engine mount bottom plate off the stock mounts and came up with this.
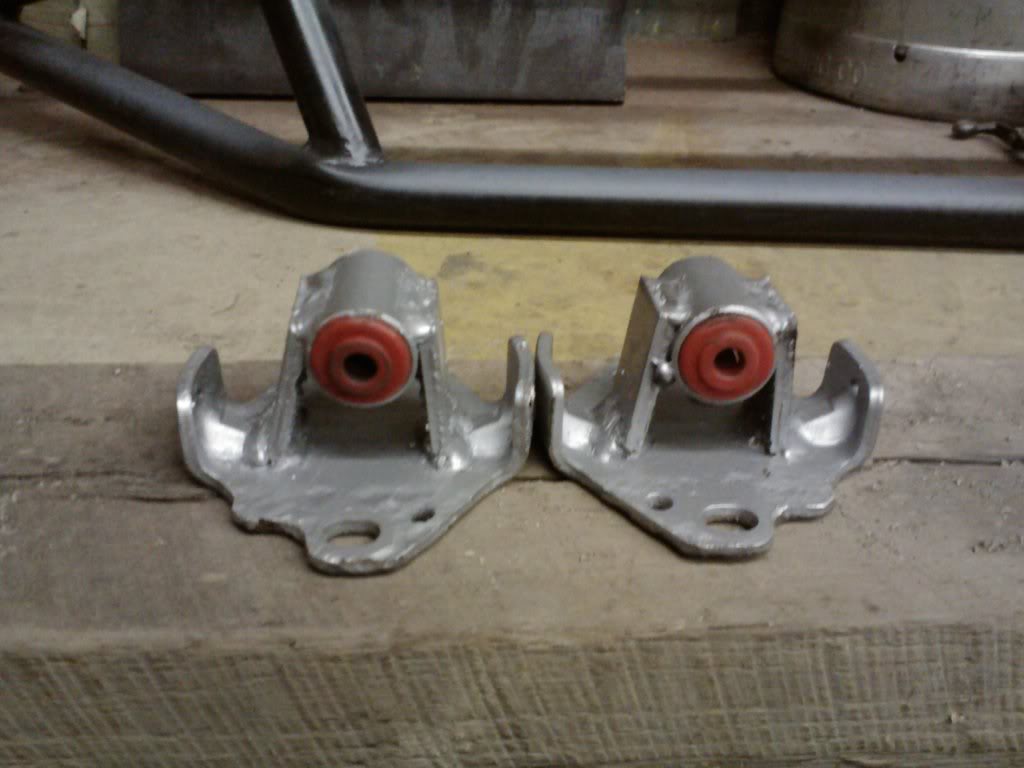
The bottom engine mounts with bushings. Used polyurethane leaf spring bushings with grade 8 3/8x4"bolts and nylon lock nuts with the engine mount bottom plate off the stock mounts and came up with this.
Mar 21, 2013 | 04:12 PM
#17
Thread Starter
Registered User
Joined: Aug 2012
Posts: 61
Likes: 0
From: Youngstown, Ohio
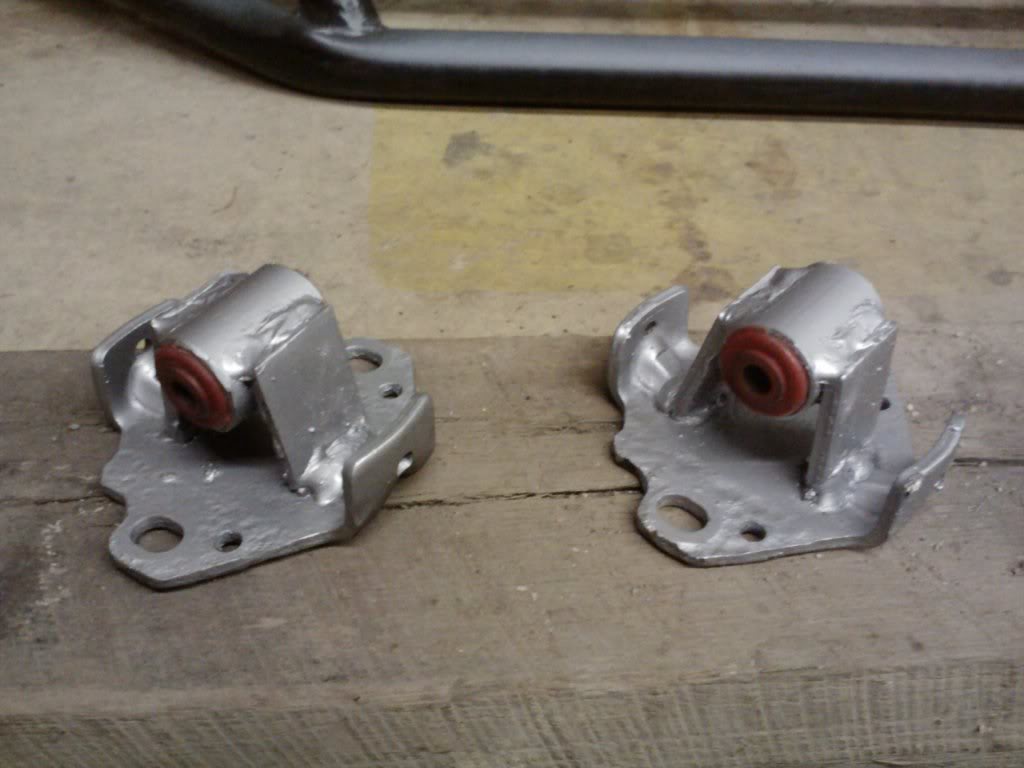
After i made the bottom engine mounts i made the mounts that come off the block. This wasnt as hard as i thought it was going to be but still was a challenge. I had a ton of pictures of everything but my phone took a ˟˟˟˟ on me about a week ago and lost alot of things.
The nice thing about the mounts are they use the stock 4runner engine mount location and it sits the engine in the right spot about 2" back from the radiator and right height to clear the hood.
Made an extra few sets of mounts and can make more. Comes with:
2 3/8"x4" grade 8 bolts with nylon locking nuts
4 polyurethane bushings
2 4runner frame mounts for 2jz
2 2jz engine block to frame mounts
Side view showing the engine mount on the passenger side
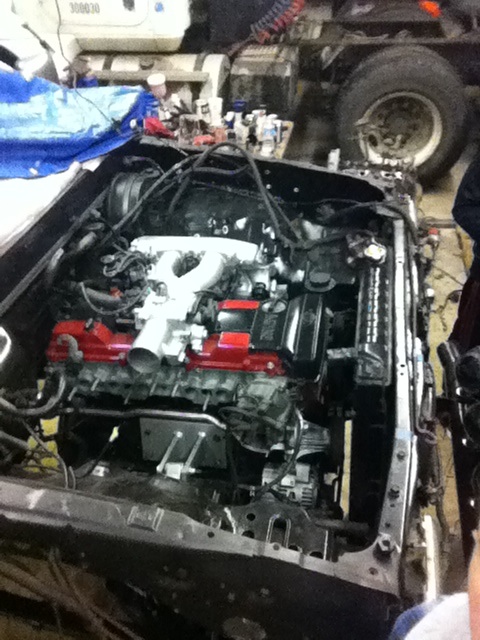
Front shot of the engine almost fully mounted.
Finally the engine all mounted and in the bay ready to be wired up
The nice thing about the mounts are they use the stock 4runner engine mount location and it sits the engine in the right spot about 2" back from the radiator and right height to clear the hood.
Made an extra few sets of mounts and can make more. Comes with:
2 3/8"x4" grade 8 bolts with nylon locking nuts
4 polyurethane bushings
2 4runner frame mounts for 2jz
2 2jz engine block to frame mounts
Side view showing the engine mount on the passenger side
Front shot of the engine almost fully mounted.
Finally the engine all mounted and in the bay ready to be wired up
Mar 21, 2013 | 04:50 PM
#18
Thread Starter
Registered User
Joined: Aug 2012
Posts: 61
Likes: 0
From: Youngstown, Ohio
So i went over budget by a few grand. Had intentions of building a big single set up but money got tight so i stayed N/A. Even going this route im still over budget of about 3500.
List of parts i ordered to give you a figure of what youll be buying and roughly spending. Remeber this is what i paid, this doesnt neccessarily mean you will be paying these prices its just a general figure:
$310 10lb light weight comp flywheel
$425 Stage 3 6 puck clutch, pressure plate, and bearings
$340 R154 Bellhousing
$385 Chrome exhaust headers
$350 AEM 4'' Brute Force Air Intake w/ upgraded MAF
$110 Radiator hoses, Heater hoses
$90 Dual 9" E-Fans 1500cfm
$65 Oil relocation kit
$45 ARP flywheel bolts, Pressure plate bolts
$65 Slave and Clutch master
This is what i ordered so far to get me going. Be sure to have extra money laying around cause parts add up quick. Be sure to account for $300 to $400 in misc items here and there.
So far roughly $2585 including misc item parts. So anywhere from $1500 to $3000 depending on used or on sale items. This figure isnt including the engine. (just to show what its going to cost you to swap in the engine so dont think your going to get away with anything under 3K out the door using new parts)
Headers before i cut the collector off and made them 2 seperate pieces to fit.
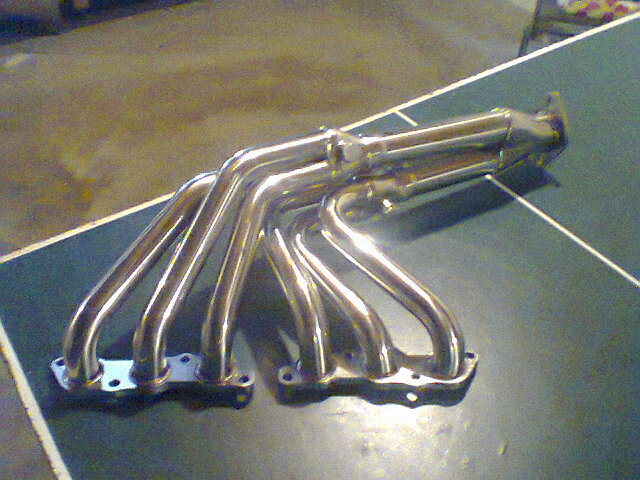
Header cut from 1 into 2. Had to heat, bend, twist, and cut to make fit. Ive never bought a header that fit the right way the first time EVERRRR.
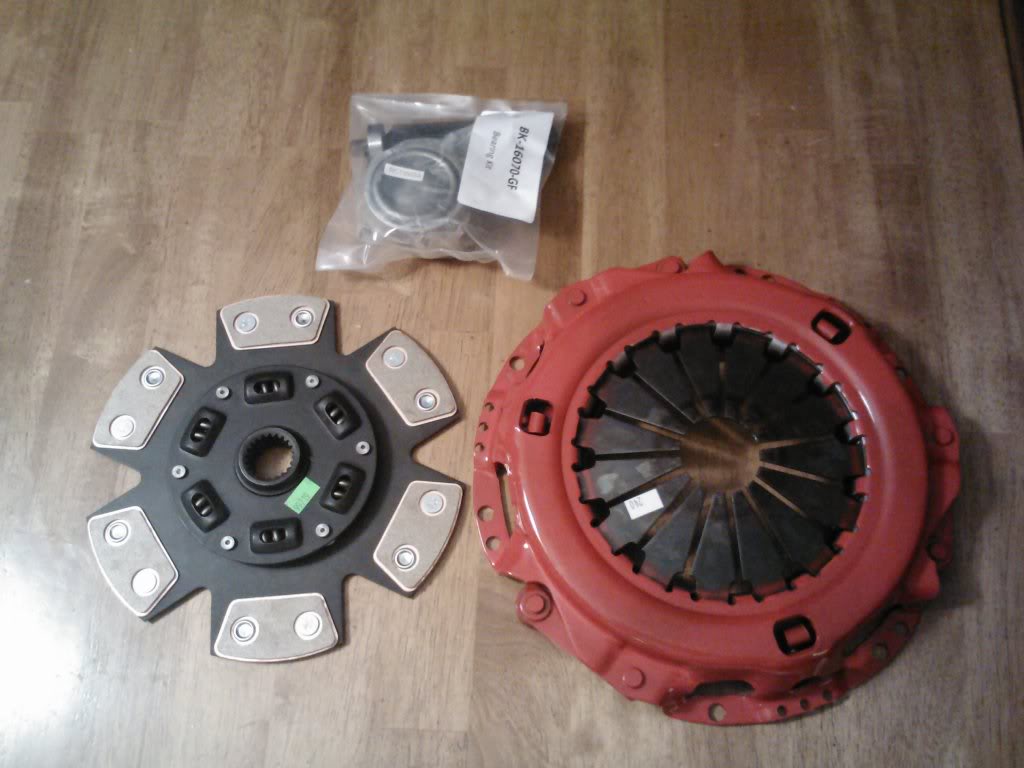
Clutch and pressure plate
List of parts i ordered to give you a figure of what youll be buying and roughly spending. Remeber this is what i paid, this doesnt neccessarily mean you will be paying these prices its just a general figure:
$310 10lb light weight comp flywheel
$425 Stage 3 6 puck clutch, pressure plate, and bearings
$340 R154 Bellhousing
$385 Chrome exhaust headers
$350 AEM 4'' Brute Force Air Intake w/ upgraded MAF
$110 Radiator hoses, Heater hoses
$90 Dual 9" E-Fans 1500cfm
$65 Oil relocation kit
$45 ARP flywheel bolts, Pressure plate bolts
$65 Slave and Clutch master
This is what i ordered so far to get me going. Be sure to have extra money laying around cause parts add up quick. Be sure to account for $300 to $400 in misc items here and there.
So far roughly $2585 including misc item parts. So anywhere from $1500 to $3000 depending on used or on sale items. This figure isnt including the engine. (just to show what its going to cost you to swap in the engine so dont think your going to get away with anything under 3K out the door using new parts)
Headers before i cut the collector off and made them 2 seperate pieces to fit.
Header cut from 1 into 2. Had to heat, bend, twist, and cut to make fit. Ive never bought a header that fit the right way the first time EVERRRR.
Clutch and pressure plate


Thread
Thread Starter
Forum
Replies
Last Post
infinityisfive
Other Makes Cars/Trucks
0
Jun 16, 2015 06:51 PM


