
Headlight Harness Wiring Upgrade (w/pics)
 May 26, 2011 | 10:18 AM
#1
Thread Starter
Contributing Member
Joined: Mar 2003
Posts: 11,334
Likes: 0
From: COTKU,Ontario,Canada
This is an article on the installation of a NOKYA H4 Headlight harness upgrade kit.
Backstory... I got a ticket from the local "Gendarmieres" the other day for having a (right) headlight out and discovered when I attempted to replace the light bulb that it was not the bulb but the stock harness that had failed.
I was'nt going to spend the time to try to find the break in the factory harness and I'd been planning to upgrade the harness at some point anyway so it seems my beast decided for herself that NOW was the time.
Because of the ticket I could'nt wait for delivery from the guy others have used for upgrade kits previously reported on here. I went with one I'd seen in an performance auto parts store at the Pacific Mall in Markham On. (Great place if you are into Asian food/markets lots of interesting special import stuff at good prices and the shopkeepers will sometimes haggle on price just like in Hong Kong)
The Kit was a NOKYA #NOK9201 for 2 lamp H4 type systems there are also kits for 9004/9007 lamps and 9003 lamps I think. here's a pic of the empty pkg fwiw...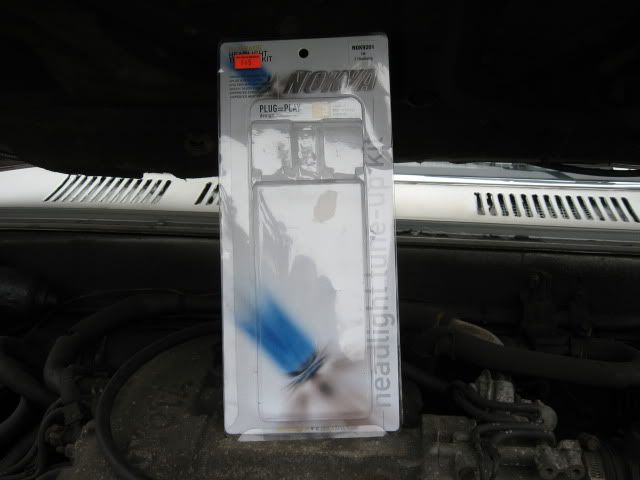
Out of the box impressions...(Sorry no pics available I forgot to take any before I started the installation)...The kit seems to be well made, wires are 14AWG, the connectors seem to be of good quality though the lamp sockets are more "open" then the factory ones.
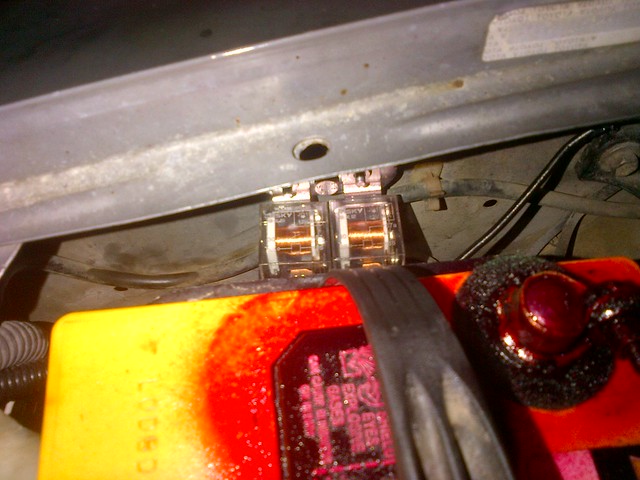
Relays are 30Amp capacity and should be able to handle the draw from the lights with no issues... one covers the low beam and the other the high beam.
Included hardware consists of a bracket, a few clear ty-wraps, and one nut/bolt...a little short in my book. I did'nt use any of it so it was not an issue.
I used 2 hex head self tapping screws to mount the relays and 1 for one of the light ground connections, the other I was able to attach to a bolt near the left light.
** NOTE before you drill any holes in the rad mount or fender walls check behind for wires or water/A/C pressure lines you don't want to hit anything by mistake.**
Main Harness connectors
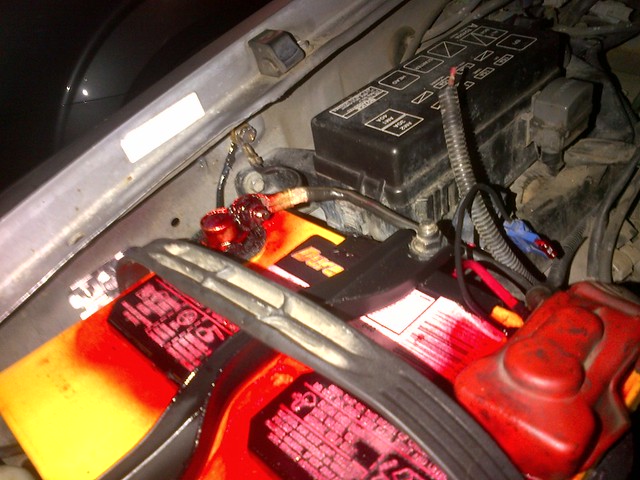
I decided to locate the relays on the inner fender wall beside the battery just for ease of mounting and wiring. It also keeps the install somewhat stealthy lol. This of course required removing the Batt.
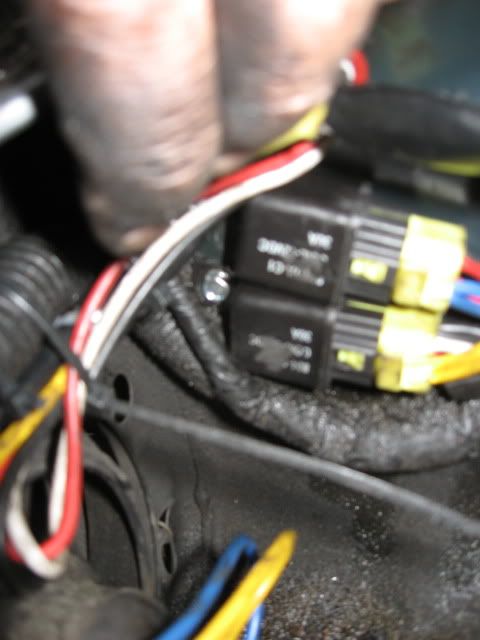
The Relays
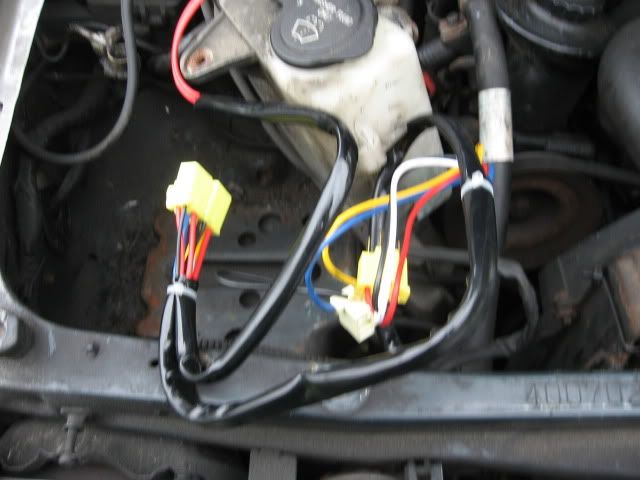
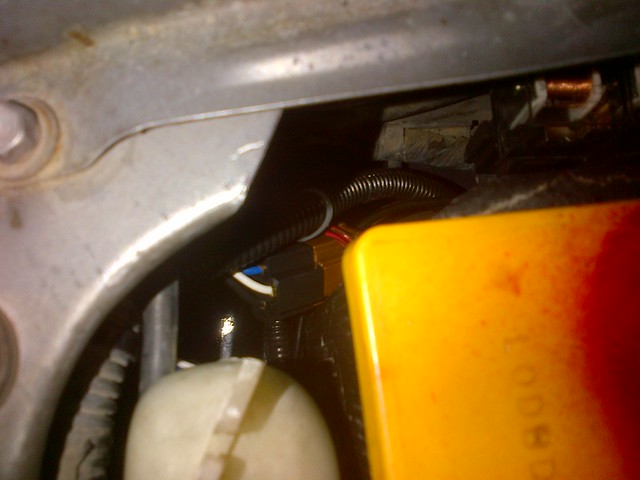
Trigger harness connected to factory light harness. You can clearly see the difference in wiring sizes.
The right front headlight and relays, trigger harness is shown connected to right front factory headlight harness in upper right of picture.
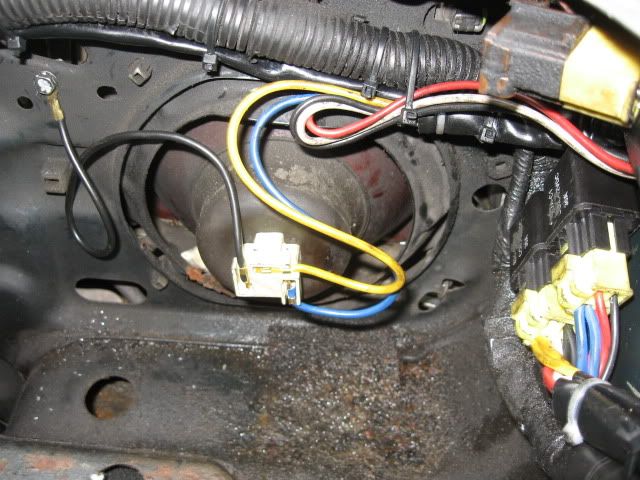
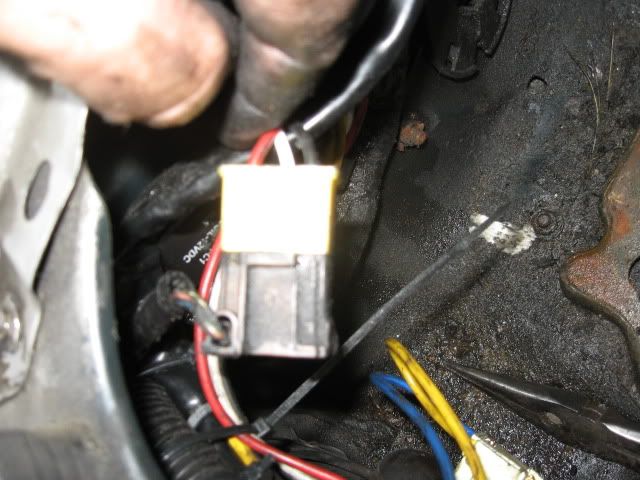
You can see what I meant about the light socket being more "open" than the stock type plug. Also the black ground wire attached to the rad mount to the left of the light bucket.
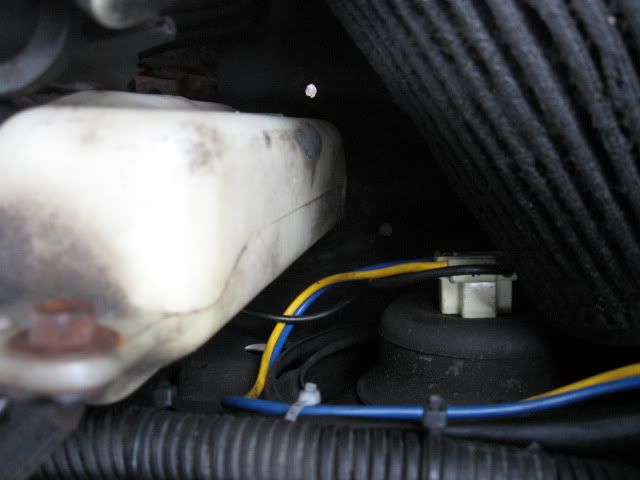
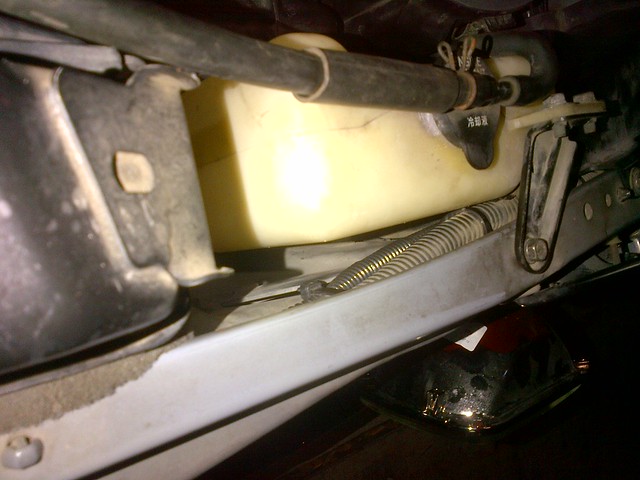
To run the harness across the rad mount I removed the washer reservoir and coolant reservoir and loosened of the top two rad mount nuts and ty-wrapped the harness to the underside of the factory harness that runs across the same place. Ty-wraps were placed about every 4" or so. Excessive perhaps but I wanted to be sure there was no contact between the harness and the rad. I used the black weather resistant type Ty-wraps. You can see the shiny new harness attached below the factory harness above the light bucket in the picture above and the ty-wraps in the picture below.
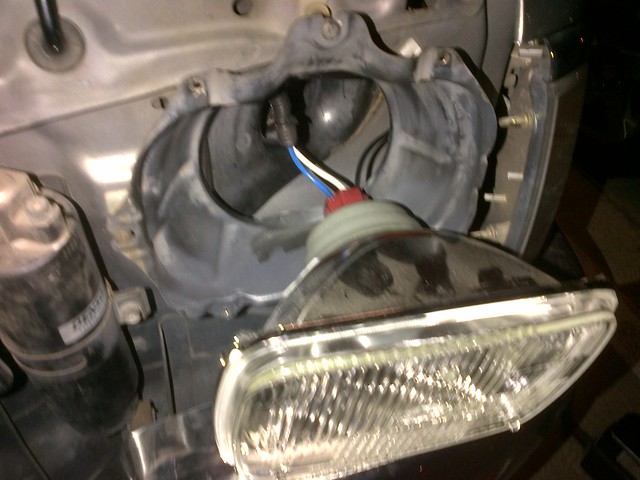
Left side light
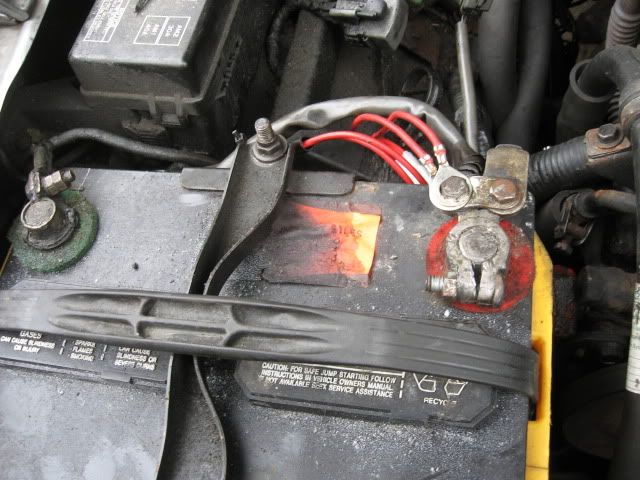
Installation and connections are very straight forward. The harnesses are designed to be completely plug-n-play. The only non-harness connections are the negative grounds (two black wires with ring connectors on the lamp plugs which you can attach to a nearby bolt on the frame or screw to the rad mount) and the positive battery connections (two red wires with large ring connectors which you attach to the battery pos. terminal).
Positive Terminal connections
Total time spent including clean-up was under 90 mins. Price of the kit was $45.00 all in and includes a 1yr mfg. warranty.
First use impressions... As you'd expect the DRLs no longer function as "Dimmed headlights" but are full power low beam all the time. The headlights seem brighter in both low and high beam and cut off is more defined, this may be due to the increased power available to the bulbs or it just may be my impression IDK. I don't have a light meter at the moment so I can't give you precise lumen numbers yet however I plan to borrow one from a photographer friend some time soon and may be able to get some before and after numbers then. The light also seems somewhat whiter as well.
The company has a website www.nokyausa.com but the wiring harnesses are not listed yet (even though the item has been available for a few yrs now). There are several different types of high powered halogen bulbs/LED bulbs and the like that are listed however.
See post #11 for contact information for the store where I purchased this kit. The store also now has a supply of the halogen bulbs listed on the nokya website.
Backstory... I got a ticket from the local "Gendarmieres" the other day for having a (right) headlight out and discovered when I attempted to replace the light bulb that it was not the bulb but the stock harness that had failed.
I was'nt going to spend the time to try to find the break in the factory harness and I'd been planning to upgrade the harness at some point anyway so it seems my beast decided for herself that NOW was the time.
Because of the ticket I could'nt wait for delivery from the guy others have used for upgrade kits previously reported on here. I went with one I'd seen in an performance auto parts store at the Pacific Mall in Markham On. (Great place if you are into Asian food/markets lots of interesting special import stuff at good prices and the shopkeepers will sometimes haggle on price just like in Hong Kong)
The Kit was a NOKYA #NOK9201 for 2 lamp H4 type systems there are also kits for 9004/9007 lamps and 9003 lamps I think. here's a pic of the empty pkg fwiw...
Out of the box impressions...(Sorry no pics available I forgot to take any before I started the installation)...The kit seems to be well made, wires are 14AWG, the connectors seem to be of good quality though the lamp sockets are more "open" then the factory ones.
Relays are 30Amp capacity and should be able to handle the draw from the lights with no issues... one covers the low beam and the other the high beam.
Included hardware consists of a bracket, a few clear ty-wraps, and one nut/bolt...a little short in my book. I did'nt use any of it so it was not an issue.
I used 2 hex head self tapping screws to mount the relays and 1 for one of the light ground connections, the other I was able to attach to a bolt near the left light.
** NOTE before you drill any holes in the rad mount or fender walls check behind for wires or water/A/C pressure lines you don't want to hit anything by mistake.**
Main Harness connectors
I decided to locate the relays on the inner fender wall beside the battery just for ease of mounting and wiring. It also keeps the install somewhat stealthy lol. This of course required removing the Batt.
The Relays
Trigger harness connected to factory light harness. You can clearly see the difference in wiring sizes.
The right front headlight and relays, trigger harness is shown connected to right front factory headlight harness in upper right of picture.
You can see what I meant about the light socket being more "open" than the stock type plug. Also the black ground wire attached to the rad mount to the left of the light bucket.
To run the harness across the rad mount I removed the washer reservoir and coolant reservoir and loosened of the top two rad mount nuts and ty-wrapped the harness to the underside of the factory harness that runs across the same place. Ty-wraps were placed about every 4" or so. Excessive perhaps but I wanted to be sure there was no contact between the harness and the rad. I used the black weather resistant type Ty-wraps. You can see the shiny new harness attached below the factory harness above the light bucket in the picture above and the ty-wraps in the picture below.
Left side light
Installation and connections are very straight forward. The harnesses are designed to be completely plug-n-play. The only non-harness connections are the negative grounds (two black wires with ring connectors on the lamp plugs which you can attach to a nearby bolt on the frame or screw to the rad mount) and the positive battery connections (two red wires with large ring connectors which you attach to the battery pos. terminal).
Positive Terminal connections
Total time spent including clean-up was under 90 mins. Price of the kit was $45.00 all in and includes a 1yr mfg. warranty.
First use impressions... As you'd expect the DRLs no longer function as "Dimmed headlights" but are full power low beam all the time. The headlights seem brighter in both low and high beam and cut off is more defined, this may be due to the increased power available to the bulbs or it just may be my impression IDK. I don't have a light meter at the moment so I can't give you precise lumen numbers yet however I plan to borrow one from a photographer friend some time soon and may be able to get some before and after numbers then. The light also seems somewhat whiter as well.
The company has a website www.nokyausa.com but the wiring harnesses are not listed yet (even though the item has been available for a few yrs now). There are several different types of high powered halogen bulbs/LED bulbs and the like that are listed however.
See post #11 for contact information for the store where I purchased this kit. The store also now has a supply of the halogen bulbs listed on the nokya website.
Last edited by aviator; Oct 26, 2011 at 09:20 PM.
 May 27, 2011 | 03:19 PM
#4
Registered User
Joined: Oct 2010
Posts: 152
Likes: 0
From: Winnipeg, MB
I'm working on a headlight relay harness for my truck as well, using parts and instructions from here:
http://www.danielsternlighting.com/t...ys/relays.html
Not sure when I'll get a chance to finish, but I'll post pics and impressions when I am.
http://www.danielsternlighting.com/t...ys/relays.html
Not sure when I'll get a chance to finish, but I'll post pics and impressions when I am.
Jun 9, 2011 | 08:41 PM
#5
Thread Starter
Contributing Member
Joined: Mar 2003
Posts: 11,334
Likes: 0
From: COTKU,Ontario,Canada
Well after 2 weeks of use including during a blackout last night I can say the lights are def. brighter than stock and are working with no issues yet. Have gotten an occasional flash from other drivers during DRL mode so other peeps are noticing the brightness too...
(yes my lights are properly aimed lol)... as I said DRLs are now full power not reduced as is normal... overall very happy with product... side note I've also noticed a slight reduction in load on elec. sys. based on gauge position so I'm thinking the whole system is running more efficiently now...
(yes my lights are properly aimed lol)... as I said DRLs are now full power not reduced as is normal... overall very happy with product... side note I've also noticed a slight reduction in load on elec. sys. based on gauge position so I'm thinking the whole system is running more efficiently now...
Trending Topics
Jun 25, 2011 | 10:27 AM
#10
Thread Starter
Contributing Member
Joined: Mar 2003
Posts: 11,334
Likes: 0
From: COTKU,Ontario,Canada
Thanks you Ron.... one month in and still very happy with the harness...
Rob I think the store I got mine from will also do web/mail order. If I get the chance this week I'll drop by and check and post their contact info if they do.
Rob I think the store I got mine from will also do web/mail order. If I get the chance this week I'll drop by and check and post their contact info if they do.
Oct 26, 2011 | 09:18 PM
#11
Thread Starter
Contributing Member
Joined: Mar 2003
Posts: 11,334
Likes: 0
From: COTKU,Ontario,Canada
UPDATE! source information
So the harness ahs been installed for 6 mos. through all kinds of summer/fall weather and no issues at all so far other than one old bulb burning out about 2 mos in but it was about 4 yrs old so it was expected.
If you want to get some of these for yourself here is the contact info for the store where I bought them. They are not set up for e-tailing but will take phone orders and respond to email info requests. The store itself has been there for at least 4 yrs that I recall so they are solid.
Auto Sports
Accessories & Performance
(905) 918-9556
Pacific Mall
Unit B57 4300 Steeles Ave. E.
Markham, Ontario
Canada
L3R 0Y5
Contact: Steven Wong
steven_autosports@hotmail.com
Store Hours are Mon - Sat 12pm - 8pm ET Sun. 12pm - 7pm ET
Hope this helps everyone
 Aug 10, 2013 | 02:25 AM
#15

Registered User
Joined: Mar 2013
Posts: 1,047
Likes: 1
From: Central TX
Thanks for the writeup aviator. Definitely helped with mine.
I decided to go with this kit as the wire was a little heavier gauge and came w/ ceramic plugs than the other premade kits I could find.
http://cgi.ebay.com/ws/eBayISAPI.dll?ViewItem&item=330813121438
Basically, I did it the same as you, working left to right:
1. Remove battery holder.
2. Remove windshield washer fluid holder.
3. Loosen passenger side radiator bolts.
4. Loosen drivers side radiator bolts.
5. Remove radiator top foam.
6. Remove coolant overflow holder (I went ahead and flushed this out as there was crud at the bottom of the container...)
7. Remove air deflector -- I went ahead and removed the whole thing as it made it easier to remove the deflector and I needed space for another project anyways (haven't detailed yet, but added an add'l square inch of air intake by drilling 1/4" holes below the front drivers side light...).
8. Run the light harness right below the stock harness and loosely zip tie.
9. Double check your end links (grounds and connections to lights for appropriate length) before tightening zip ties all the way.
10. Install grounds (I used existing ground locations and just sanded away some paint to ensure with good connection, and once installed coated w/ diaelectric grease).
11. Remove battery for working room. (While I had it out I took a wire brush to below the tray, hosed it off, waited for it to dry, and dropped a couple coats of spray paint beneath the battery too -- one of the few rust spots on my rig).
12. Install relays in factory screw terminal in inside engine bay wall next to battery (I just used a piece of flashing as it was the cheapest sheet metal at the hardware store). I want to say it was an 8x1.0 thread fitting but it is the same size as the air deflector screws (actually probably the air deflector install point for yota diesels...). I used a couple of washers between the bracket and frame to allow space for the windshield washer hose to pass behind -- female screw mount is already slightly raised from engine wall.
13. Connect the the new harness male control connector to factory passenger side light connection. Good time for electrical tape.
14. Zip tie drivers side factory light connection out of the way so it doesn't dangle.
15. Reinstall battery.
16. Install power cable to battery positive.
17. Reinstall everything else your removed.
18. Connect new harness connections to lights before install -- found on drivers side that it was easiest to install deflector with light not yet installed (the H4s extend a little further back than the old sealed beams did...).
19. Test that your lights work.
20. And done.
Here are some pics.
Harness run and zip tied between windshield washer fluid reservoir and radiator
Harness leaving radiator by coolant reservoir to air deflector
Drivers side ground to existing ground location (make sure the ground wire runs/fits through air deflector wire slot)
Passenger side ground location (the battery to frame ground location -- my next big electrical project is addressing the wiring at the battery and new battery terminals)
Relays installed
Old light connection to new relay harness
Old v New Harness

New harness, driver side, on new Hella H4 light conversion
I decided to go with this kit as the wire was a little heavier gauge and came w/ ceramic plugs than the other premade kits I could find.
http://cgi.ebay.com/ws/eBayISAPI.dll?ViewItem&item=330813121438
Basically, I did it the same as you, working left to right:
1. Remove battery holder.
2. Remove windshield washer fluid holder.
3. Loosen passenger side radiator bolts.
4. Loosen drivers side radiator bolts.
5. Remove radiator top foam.
6. Remove coolant overflow holder (I went ahead and flushed this out as there was crud at the bottom of the container...)
7. Remove air deflector -- I went ahead and removed the whole thing as it made it easier to remove the deflector and I needed space for another project anyways (haven't detailed yet, but added an add'l square inch of air intake by drilling 1/4" holes below the front drivers side light...).
8. Run the light harness right below the stock harness and loosely zip tie.
9. Double check your end links (grounds and connections to lights for appropriate length) before tightening zip ties all the way.
10. Install grounds (I used existing ground locations and just sanded away some paint to ensure with good connection, and once installed coated w/ diaelectric grease).
11. Remove battery for working room. (While I had it out I took a wire brush to below the tray, hosed it off, waited for it to dry, and dropped a couple coats of spray paint beneath the battery too -- one of the few rust spots on my rig).
12. Install relays in factory screw terminal in inside engine bay wall next to battery (I just used a piece of flashing as it was the cheapest sheet metal at the hardware store). I want to say it was an 8x1.0 thread fitting but it is the same size as the air deflector screws (actually probably the air deflector install point for yota diesels...). I used a couple of washers between the bracket and frame to allow space for the windshield washer hose to pass behind -- female screw mount is already slightly raised from engine wall.
13. Connect the the new harness male control connector to factory passenger side light connection. Good time for electrical tape.
14. Zip tie drivers side factory light connection out of the way so it doesn't dangle.
15. Reinstall battery.
16. Install power cable to battery positive.
17. Reinstall everything else your removed.
18. Connect new harness connections to lights before install -- found on drivers side that it was easiest to install deflector with light not yet installed (the H4s extend a little further back than the old sealed beams did...).
19. Test that your lights work.
20. And done.
Here are some pics.
Harness run and zip tied between windshield washer fluid reservoir and radiator
Harness leaving radiator by coolant reservoir to air deflector
Drivers side ground to existing ground location (make sure the ground wire runs/fits through air deflector wire slot)
Passenger side ground location (the battery to frame ground location -- my next big electrical project is addressing the wiring at the battery and new battery terminals)
Relays installed
Old light connection to new relay harness
Old v New Harness
New harness, driver side, on new Hella H4 light conversion
Last edited by RSR; Aug 10, 2013 at 07:34 PM.
Aug 15, 2013 | 03:44 PM
#16
Thread Starter
Contributing Member
Joined: Mar 2003
Posts: 11,334
Likes: 0
From: COTKU,Ontario,Canada
Glad I could inspire RSR that kit looks great and about the same $ i paid for mine with the plastic plugs... did you remember to put some dielectric grease on the plugs too?
Sep 27, 2013 | 10:15 AM
#18
Registered User
Joined: Mar 2013
Posts: 1,047
Likes: 1
From: Central TX
I was asked this in private message, so thought I'd share:
Yes, the link above is now $50, but this looks like the exact same item to me: http://www.ebay.com/itm/CERAMIC-H4-H...-/231025300216
Any different product numbers are probably for their internal tracking/ebay pricing/marketing strategies.
When I purchased the link above it was only $30, but I suppose they're seeing a lot of interest so raised their $...
I had a question for you. I was looking on Ebay for the exact harness you bought, and i followed the thumbnail you posted, but it took me to a 50 dollar harness. You said in your thread it was around 30 dollars, which there just so happens to be a 30 dollar one from a different vendor. My question is, which one did you buy, the 30 or 50 dollar one? The part numbers differ slightly (9003-1 for the 50 dollar one, 9003-3 for the 30.) Just wanted some clarification. Thanks man.
Any different product numbers are probably for their internal tracking/ebay pricing/marketing strategies.
When I purchased the link above it was only $30, but I suppose they're seeing a lot of interest so raised their $...


