

Cleaning out 22RE EFI?
 Jun 16, 2010 | 04:41 PM
#1
Thread Starter
Registered User
Joined: May 2010
Posts: 3,120
Likes: 1
From: piney hicks nj
Cleaning out 22RE EFI?
hello everyone i was considering removing the efi on my 22re 4x4, to clean it out, ive seen people do it before but i want to know a few things, is it hard , by hard i mean how invoved is it, does it rrquire like disassembling half the engine?...thats pretty much my only question lol
lol but i was also wondering if anyone has done it, what are the steps to removing it and cleaning it and how easy is it to f$&# up.
im just looking for something progressive to do and i know the injectors havnt been cleaned in 25 years and 250k miles. so far ive figured out unbolt it and remove vacuum hoses but idont know where to go from there.
Jun 17, 2010 | 06:22 AM
#2
Registered User
Joined: Oct 2006
Posts: 4,166
Likes: 11
From: GrangeVille, Idaho
The only thing that really needs to be cleaned out is the throttle body and the upper and lower intake, and having the injectors cleaned is also a good idea. It would also be a good idea to clean out the EGR valve while you have it a part. Run a can of sea foam through the engine also, it will clean out any carbon build up in the cylinders.
Jun 17, 2010 | 06:34 AM
#3
careful with the tps and don't get any solvents on it. It's best to remove it, clean the intake, then reinstall according to spec. Easy way to get it close when reinstalling it is to mark where it was in the first place.
Jun 17, 2010 | 06:55 AM
#4
Registered User
Joined: Dec 2009
Posts: 24
Likes: 0
From: Washington
I just performed this nightmare of a job, and it was worth while. Used up about 10 rags & 3.5 cans of Gumout Throttle Body & Intake cleaner.
1st pull the TB and clean it up, check the TPS, ect. 2nd pull all the hoses, label, and maybe use some bailing wire to hold them up/out of the way. At this point I could use my fingers to literally scoop the tar out of my upper plenum! (192k - 0 maintenance from PO). I needed to make some brushes that would reach all the odd angles PITA. Clean till you can see aluminum. Check for blockage in all vacuum ports, ect. Most people hot tank the plenums but I was stubborn. 3rd, I was able to carefully clean the lower plenum by jacking up the drivers side and spray/scrub/wipe/repeat. This kept all the tar running back toward me instead of toward the motor. My lower plenum was remarkably cleaner then the top. If it was worse, I would have removed it.
She runs better than ever!
Last edited by PlanB; Jun 17, 2010 at 09:56 AM.
Jun 17, 2010 | 09:05 AM
#5
Thread Starter
Registered User
Joined: May 2010
Posts: 3,120
Likes: 1
From: piney hicks nj
lol thanks all of you guys, i know my injectors are clogged and dirty, ive known people with spotless engines whove had clogged injectors and my engine only has like 2 inches of grime on it and its been ran with no air filter and a clogged fuel filter for like the last ten years.
i looked at it this morning, it looks fairly easy to remove, so i'll let you guys know how i make out, i heard it makes the engine run like brand new
i looked at it this morning, it looks fairly easy to remove, so i'll let you guys know how i make out, i heard it makes the engine run like brand new
Jun 17, 2010 | 01:36 PM
#6
Thread Starter
Registered User
Joined: May 2010
Posts: 3,120
Likes: 1
From: piney hicks nj
ok so i tried it today, i got off most of the vac hoses and like 4 bolts on the pass. side and the throttle cable. then i was stuck, i couldnt find any more bolts. after looking for about 30 mins i put it all back together and headed to work.
before i try it again i think it would be good to gather some info on the removal...anyone have any tips??...dont be shy
before i try it again i think it would be good to gather some info on the removal...anyone have any tips??...dont be shy
Jun 18, 2010 | 07:40 AM
#7
Registered User
Joined: Oct 2006
Posts: 4,166
Likes: 11
From: GrangeVille, Idaho
To remove the upper intake you need to unbolt the EGR from the back of the intake remove the throttle cable and vacuum lines, and then unbolt the upper intake from the lower intake, there is 4-6 bolts that hold the two together, and then it should come a part.
Trending Topics
Jun 18, 2010 | 11:29 AM
#9
Thread Starter
Registered User
Joined: May 2010
Posts: 3,120
Likes: 1
From: piney hicks nj
okay thank you guys, i have one final question before i remove it...
from what i understand there is a gasket on the upper/lower intake, can i re-use the gasket, or do i buy a new one?...
ill keep you guys posted on how i make out and thanks for all the input...or should i say intake....lol bad joke, lol really bad joke [crickets chirping off in the distance]
from what i understand there is a gasket on the upper/lower intake, can i re-use the gasket, or do i buy a new one?...
ill keep you guys posted on how i make out and thanks for all the input...or should i say intake....lol bad joke, lol really bad joke [crickets chirping off in the distance]

 Jun 18, 2010 | 12:26 PM
#12
Thread Starter
Registered User
Joined: May 2010
Posts: 3,120
Likes: 1
From: piney hicks nj
alright i feel as if i am prepared, my dads going out with my mom tonight so if i gotta make a tool run or something (wich i shouldnt have to because i dont think theres any special tool required i hope)i can use his truck.
@pismojoe thanks for the graphic, i have a feeling thats what i got hung op on last time...
@pismojoe thanks for the graphic, i have a feeling thats what i got hung op on last time...
Jun 19, 2010 | 07:22 PM
#13
Thread Starter
Registered User
Joined: May 2010
Posts: 3,120
Likes: 1
From: piney hicks nj
okay, so i had about a half hour before work today, so i did some reaching around at the efi block, 'dry runs' if you will. i figured out i have easy acess to about 4 bolts, but the rest are buried under wires and hoses and whatnot. i was wondering if there is an easier way to acces them ,like removing the skid plates and working from underneath, or if i just have to play it by feel.
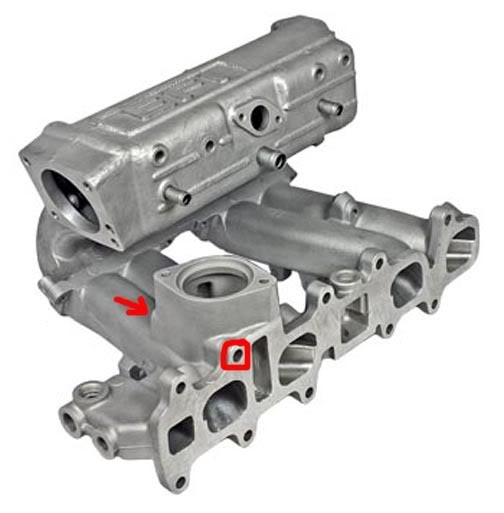
another thing i was wonderin' too, this is kinda hard to explain, there are 4 bolts on the intake pipe thingys, you can see them clearly, they are in an open area, its almost like the "efi block" , has pipe extensions on them, and there is a seam,. so i was wondering if i can remove the "efi block" just by unbolting the 4 bolts at the seam thingy, then remove the actual pipes that go to the injectors , to try and get some more room. let me know if you couldnt understand this and ill try to explain it better, but if you look at the pic above you might see what im talkin about
lol and sorry for my lack of vocab. i learned to rebuild engines when i was younger by taking them apart and seeing how they work , i never learned the names for the stuff so i just make up my own. im not stpid though i know the names to all the important stuff lol
Jun 19, 2010 | 07:25 PM
#14
Thread Starter
Registered User
Joined: May 2010
Posts: 3,120
Likes: 1
From: piney hicks nj
okay, about the "4 bolt seam on the pipe thingys" if you take the arrow pismojoe drew on his graphic and turn it backwards, it will point at "the seam thingy" i was talking about
Jun 19, 2010 | 08:02 PM
#15
Registered User
Joined: Jan 2010
Posts: 2,259
Likes: 84
From: Pismo Beach, California
I don't know what 'seam thingy' you're talking about lol
Try to explain it better, the EFI plenum has 2 parts, the top box and and the bottom manifold. Is it on the top part or the bottom?
Can you see it here?
Try to explain it better, the EFI plenum has 2 parts, the top box and and the bottom manifold. Is it on the top part or the bottom?
Can you see it here?
Jun 19, 2010 | 08:26 PM
#16
Thread Starter
Registered User
Joined: May 2010
Posts: 3,120
Likes: 1
From: piney hicks nj
yes! okay, im gonny try to use the actual words. in the photo you removed the top box from the bottom manifolds. that was my question.
long question short, can i remove the top box but leave the lower manifolds installed.
and the answer (wich i just figured out) is yes, the top box and lower manifolds are two different peices and can be seperated, they are not one peice.
lol i hope that cleared up any confusion in my last post with the 'seam thingy'
Last edited by 85gijunk4x4; Jun 19, 2010 at 08:28 PM. Reason: accidentally said pot instead of post
Jun 21, 2010 | 05:48 AM
#17

Registered User
Joined: Aug 2009
Posts: 35
Likes: 0
From: Howes Cave, NY
I'm finishing up a HG replacement so am in the middle of doing this right now. I think if you reread PlanB's post above, that will answer your question. I found it difficult to remove the lower intake with the head still on, but I don't think its impossible. I would brush it out and leave it on. You can probably shine a light down those passageways and see right into the intake ports on the head.
Jun 21, 2010 | 11:14 AM
#18
Registered User
Joined: Jan 2010
Posts: 2,259
Likes: 84
From: Pismo Beach, California
yes! okay, im gonny try to use the actual words. in the photo you removed the top box from the bottom manifolds. that was my question.
long question short, can i remove the top box but leave the lower manifolds installed.
and the answer (wich i just figured out) is yes, the top box and lower manifolds are two different peices and can be seperated, they are not one peice.
lol i hope that cleared up any confusion in my last post with the 'seam thingy'
long question short, can i remove the top box but leave the lower manifolds installed.
and the answer (wich i just figured out) is yes, the top box and lower manifolds are two different peices and can be seperated, they are not one peice.
lol i hope that cleared up any confusion in my last post with the 'seam thingy'
 Jun 21, 2010 | 05:41 PM
#19
Thread Starter
Registered User
Joined: May 2010
Posts: 3,120
Likes: 1
From: piney hicks nj
alright everyone, i feel as if im an expert on intake manifolds now lol !!
im probably going to remove the top box anyway because i dont exactly have the best patience with japanese engines and/or the ability to move my hands into positions not humanly possible lol. but im gonna take everything apart and blow out all the little vacuum hole thingys (lol) and just clean it out so it looks like brand new. if i have any questions ill post them up but you guys pretty much got into full detail and covered everything...this is why i havnt joined pirate4x4, the people dont seem as freindly, but thanks alot everyone!!!
im probably going to remove the top box anyway because i dont exactly have the best patience with japanese engines and/or the ability to move my hands into positions not humanly possible lol. but im gonna take everything apart and blow out all the little vacuum hole thingys (lol) and just clean it out so it looks like brand new. if i have any questions ill post them up but you guys pretty much got into full detail and covered everything...this is why i havnt joined pirate4x4, the people dont seem as freindly, but thanks alot everyone!!!
Jul 12, 2010 | 02:53 PM
#20
Registered User
iTrader: (2)
Joined: Dec 2009
Posts: 2,159
Likes: 7
From: Pleasanton, CA - SF Bay Area
[quote=85gijunk4x4;51480084]alright everyone, i feel as if im an expert on intake manifolds now lol !!
im probably going to remove the top box anyway because i dont exactly have the best patience with japanese engines and/or the ability to move my hands into positions not humanly possible lol. but im gonna take everything apart and blow out all the little vacuum hole thingys (lol) and just clean it out so it looks like brand new. if i have any questions ill post them up but you guys pretty much got into full detail and covered everything...this is why i havnt joined pirate4x4, the people dont seem as freindly, but thanks alot everyone!!![/quote]
How'd this turn our for you? Can you report back what worked/didn't and the end result? Something I want to tackle sooner than later myself.
Any photos you can share?
You're right about Pirate....smart guys there but not noob friendly, as I found out the hard way


