
Valve Clearance
 May 3, 2016 | 07:41 AM
#1

Thread Starter
Registered User
Joined: May 2015
Posts: 13
Likes: 0
Valve Clearance
Working on a 1991 Toyota pickup 3L V6, automatic. Vehicle has about 160k on it. Valve cover gaskets were leaking, so I decided to change them. While I was there, went ahead and checked the valve clearances. All were in spec but 2. One intake valve was on the low side of the tolerance (.007 -.011") and 1 exhaust valve was out of spec by .001" (S/B .009" -.013") at .008". My question is, do I need to change the shim on the exhaust valve since it is tight??? I've never heard or seen clearance getting smaller over time, so to me I would just leave it. What do you think??
May 3, 2016 | 07:47 AM
#2

Registered User


Joined: Aug 2013
Posts: 4,264
Likes: 683
From: Southern Arizona
The clearances do indeed get smaller, especially the exhaust valve clearances.
I'd open up all the exhaust clearances to near maximum.
The intake valve clearances do not close up nearly as fast.
I'd open up all the exhaust clearances to near maximum.
The intake valve clearances do not close up nearly as fast.
Last edited by millball; May 3, 2016 at 01:26 PM.
May 3, 2016 | 08:15 AM
#3

Registered User

Joined: Sep 2007
Posts: 8,384
Likes: 875
From: San Francisco East Bay
Like millball says; the USUAL course is for the valve clearance to get smaller as the valve/seat wears together.
(How would it get bigger? Wear on the cam? )
Personally, I wouldn't worry about .001", but it IS out of spec. Perhaps I'm influenced by what a pain it is to GET another shim, and then to install it.
(How would it get bigger? Wear on the cam? )
Personally, I wouldn't worry about .001", but it IS out of spec. Perhaps I'm influenced by what a pain it is to GET another shim, and then to install it.
May 3, 2016 | 08:33 AM
#4
Thread Starter
Registered User
Joined: May 2015
Posts: 13
Likes: 0
My next question is how do you remove the shim??? I have the required tools to do the job. But I really have no idea as to how to use the tools. One of the tools looks like a pair of pliers and the other, well, can't really describe it other than it is something to remove the shim with. Can't find any pics as to how to use the tool. Is there anywhere where I can see how to use the tools??
May 3, 2016 | 10:36 AM
#7
Thread Starter
Registered User
Joined: May 2015
Posts: 13
Likes: 0
This is some of what I have and it doesn't really explain it too well, and the pics are, well............ not good either!! LOL LOL
tuneup.pdf
tuneup.pdf
Trending Topics
 May 4, 2016 | 05:38 AM
#9
Registered User
Joined: Sep 2007
Posts: 8,384
Likes: 875
From: San Francisco East Bay
If you have the right tool, you're half-way there! (Pulling the shim with a make-do tool; that way lies madness.)
The shim sits in a bucket, which presses the shim up into the cam. First, rotate the bucket (the cam is rotated so it doesn't touch the shim) until you can see the notch in the edge. You need to push the shim and bucket down, with the "pliers."
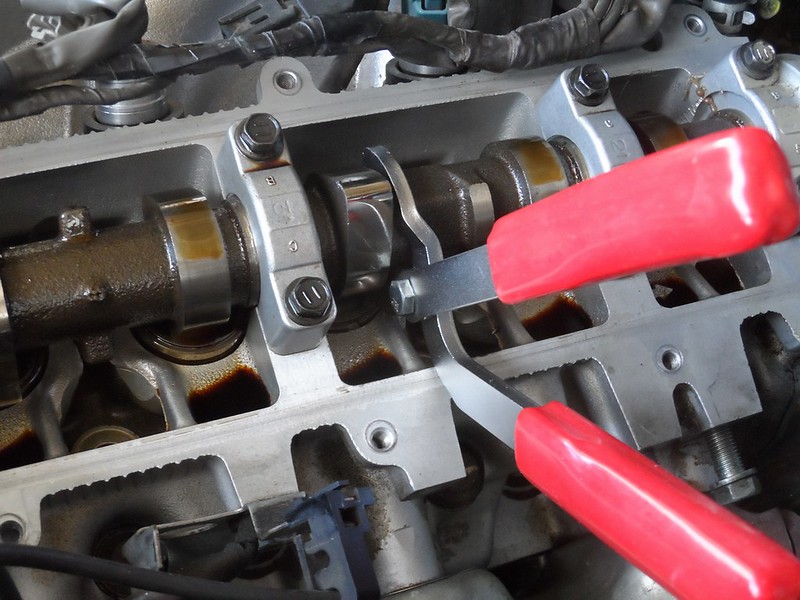
then hold JUST THE BUCKET down with the thin metal piece.
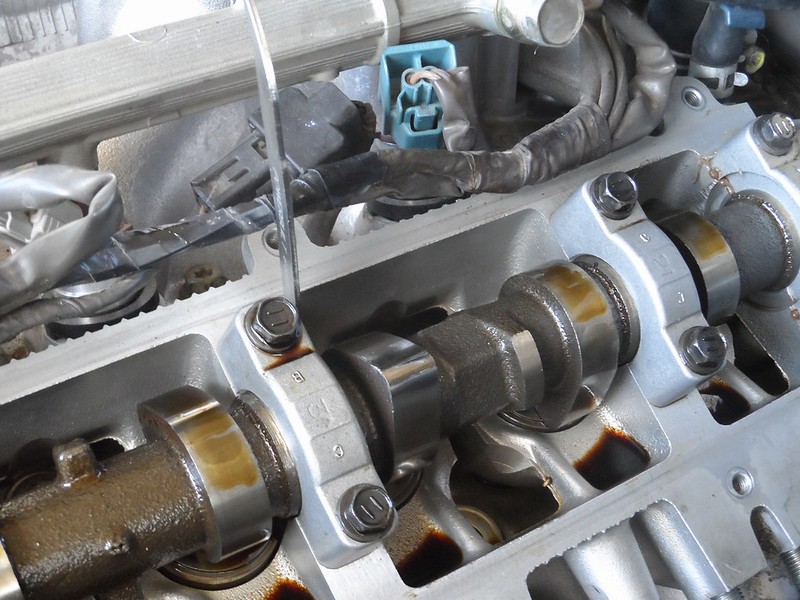
The metal is narrow so that it can sit on the top edge of the bucket without touching the shim. The shape of the end allows you to slip it around the back of the cam and fit it between the bucket and the cam. Pull out the pliers. Use a small screwdriver to "pop" the shim loose (there is a slot in the edge of the bucket). Remove the shim with a magnet-on-a-stick. Note that the metal piece goes on the hard-to-access side of the bucket, or it will be in the way of removing the shim.
Sound tricky? It is. It will take you 15 minutes to remove the first one. But once you do that, it will take you about 15 seconds for each of the rest.
By the way, on #6 you may not be able to get the pliers in there. Take out the bolt that hold the two halves together, and using one-half of the pliers will (sorta) work.
The shim sits in a bucket, which presses the shim up into the cam. First, rotate the bucket (the cam is rotated so it doesn't touch the shim) until you can see the notch in the edge. You need to push the shim and bucket down, with the "pliers."
then hold JUST THE BUCKET down with the thin metal piece.
The metal is narrow so that it can sit on the top edge of the bucket without touching the shim. The shape of the end allows you to slip it around the back of the cam and fit it between the bucket and the cam. Pull out the pliers. Use a small screwdriver to "pop" the shim loose (there is a slot in the edge of the bucket). Remove the shim with a magnet-on-a-stick. Note that the metal piece goes on the hard-to-access side of the bucket, or it will be in the way of removing the shim.
Sound tricky? It is. It will take you 15 minutes to remove the first one. But once you do that, it will take you about 15 seconds for each of the rest.
By the way, on #6 you may not be able to get the pliers in there. Take out the bolt that hold the two halves together, and using one-half of the pliers will (sorta) work.

Thread
Thread Starter
Forum
Replies
Last Post
chicago60647
Newbie Tech Section
6
May 9, 2016 11:59 PM
getabiggerhammer
General Vehicle Related Topics (Non Year Related)
5
Apr 30, 2016 09:05 AM
87YotaPU4X4
86-95 Trucks & 4Runners (Build-Up Section)
1
Apr 24, 2016 07:21 PM
buckz6319
General Electrical & Lighting Related Topics
12
Mar 26, 2016 07:39 AM


