
Stripped AT pan drain plug hole...options?
 Apr 5, 2016 | 09:17 PM
#1
Thread Starter
Contributing Member
Joined: Apr 2004
Posts: 7,122
Likes: 6
From: 5th Gen San Diegan, California
Stripped AT pan drain plug hole...options?
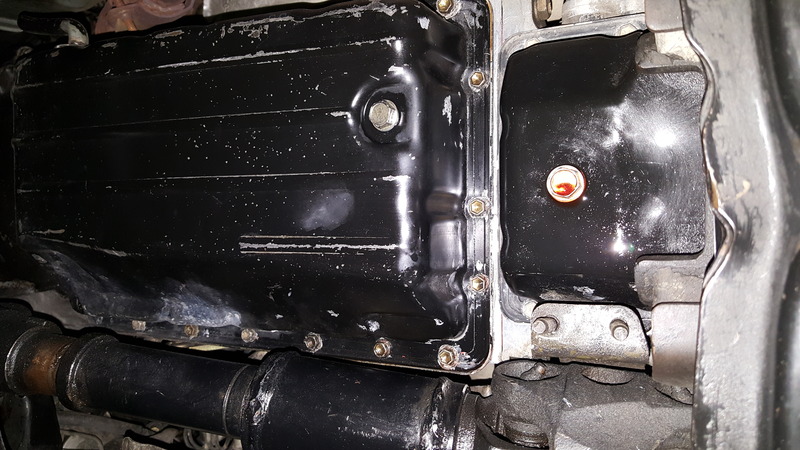
I've noticed a decent leak coming from my new to me 1991 4x4 3.0 4runner... Leak is coming from the rear drain pan plug (Why are there two!?).
As I went to check the torque on the plug, I instantly realized it was stripped. Assuming the PAN is stripped (still need to check later when I can afford draining the ATF), what are my options? Can I use a timesert or helicoil? Enough material to attach a thread repair insert?
Anyone have a part number for this pan?
(Left of the image is FORWARD. Looking at the plug to the right)
UPDATE:
Just going to edit post to let others know what to expect if you run into this problem. I know this might be simple to many, but maybe there will be another one like myself who's never owned a A340H and have to deal with fixing a pan that doesn't exist anymore and is hard to locate.
Removal of transfer case pan:
1) Remove 4x 12mm bolts attaching transmission mount to rear cross member.
2) Remove 8x 17mm bolts from cross member to frame, remove cross member.
3) Mark and disconnect front driveshaft from transfer case output. Zip tie DS to frame rail for access to passenger side trans mount bolts.
4) Remove 5x 14mm bolts from transmission mount to transmission. (Part that "cradles" transfer case pan) and remove.
5) Remove transfer case pan.
After I removed the pan, I collected about 3 quarts of fluid from the transfer case, as well as some spill over from the main transmission.
I proceeded try and get the bolt/plug out but it was just spinning with no catch. I ended up drilling from the inside out, hoping that the spinning would induce some sort of outward movement. Eventually after drilling through the plug, it decided to slide out with a center punch and mallet.
The threaded hole in the drain pan is roughly 0.25" thick. Not much thread engagement while using a M10x1.5 drain plug. It makes sense these will strip out. Rather than dealing with buying a helicoil or timesert kit, and trying to trim them to fit in such a shallow hole, I decided it would be best to re-thread using M12x1.0 fine tap. Fine tap allowed for much more thread engagement. I used a 13/32 (.406", ~10.5mm) drill to open the hole, which is slightly undersized drill tap per drill/tap specs, but allowed for a tighter fitment.
Re-assembled with "The Right Stuff" 1-minute grey RTV. So far so good, no leaks and still have a functioning drain plug. Now on to the front transmission pan which also has a stripped plug as well. Fun stuff.
As I went to check the torque on the plug, I instantly realized it was stripped. Assuming the PAN is stripped (still need to check later when I can afford draining the ATF), what are my options? Can I use a timesert or helicoil? Enough material to attach a thread repair insert?
Anyone have a part number for this pan?
(Left of the image is FORWARD. Looking at the plug to the right)

UPDATE:
Just going to edit post to let others know what to expect if you run into this problem. I know this might be simple to many, but maybe there will be another one like myself who's never owned a A340H and have to deal with fixing a pan that doesn't exist anymore and is hard to locate.
Removal of transfer case pan:
1) Remove 4x 12mm bolts attaching transmission mount to rear cross member.
2) Remove 8x 17mm bolts from cross member to frame, remove cross member.
3) Mark and disconnect front driveshaft from transfer case output. Zip tie DS to frame rail for access to passenger side trans mount bolts.
4) Remove 5x 14mm bolts from transmission mount to transmission. (Part that "cradles" transfer case pan) and remove.
5) Remove transfer case pan.
After I removed the pan, I collected about 3 quarts of fluid from the transfer case, as well as some spill over from the main transmission.
I proceeded try and get the bolt/plug out but it was just spinning with no catch. I ended up drilling from the inside out, hoping that the spinning would induce some sort of outward movement. Eventually after drilling through the plug, it decided to slide out with a center punch and mallet.
The threaded hole in the drain pan is roughly 0.25" thick. Not much thread engagement while using a M10x1.5 drain plug. It makes sense these will strip out. Rather than dealing with buying a helicoil or timesert kit, and trying to trim them to fit in such a shallow hole, I decided it would be best to re-thread using M12x1.0 fine tap. Fine tap allowed for much more thread engagement. I used a 13/32 (.406", ~10.5mm) drill to open the hole, which is slightly undersized drill tap per drill/tap specs, but allowed for a tighter fitment.
Re-assembled with "The Right Stuff" 1-minute grey RTV. So far so good, no leaks and still have a functioning drain plug. Now on to the front transmission pan which also has a stripped plug as well. Fun stuff.
Last edited by BajaRunner; Apr 14, 2016 at 10:37 AM.
Apr 5, 2016 | 11:51 PM
#2
Registered User
iTrader: (1)
Joined: Apr 2009
Posts: 13,381
Likes: 100
From: I live in New Tripoli Pa out in the woods
Wow it might be fun just getting the plug out!!
Get a new pan
get a used one
weld in a new female plug getting old oil soaked aluminum clean to weld is another project
The hard part is removing and installing the pan
Get a new pan
get a used one
weld in a new female plug getting old oil soaked aluminum clean to weld is another project
The hard part is removing and installing the pan
Apr 6, 2016 | 05:56 AM
#3
Thread Starter
Contributing Member
Joined: Apr 2004
Posts: 7,122
Likes: 6
From: 5th Gen San Diegan, California
OK I am having a difficult time figuring out what transmission I have. I have the FSM, trying to see what is entailed with dropping the pan. Why is there two drain pans?
Apr 6, 2016 | 07:33 AM
#4

Registered User

Joined: Sep 2007
Posts: 8,384
Likes: 875
From: San Francisco East Bay
You probably have the A340H -- look on the door pillar.
The smaller pan is for the transfer case. It looks to be 34106-35021, $70 http://jp-carparts.com/lexus/partlis...pe=33&fig=3609 to $100 http://parts.lakelandtoyota.com/p/TO...410635021.html
The smaller pan is for the transfer case. It looks to be 34106-35021, $70 http://jp-carparts.com/lexus/partlis...pe=33&fig=3609 to $100 http://parts.lakelandtoyota.com/p/TO...410635021.html
Apr 6, 2016 | 07:48 AM
#5
Thread Starter
Contributing Member
Joined: Apr 2004
Posts: 7,122
Likes: 6
From: 5th Gen San Diegan, California
Thanks! That is very helpful.
Ok so that is for the transfer case? Weird. All my Toyotas were filled with gear oil, not ATF, but wow the FSM says ATF as well. Interesting.
To me, looks not too bad on dropping this transfer case pan. This is a totally different/seperate system from the transmission right? Looks like I refill the transfer case system through a fill plug and not through the dipstick. Right?
Apr 6, 2016 | 07:56 AM
#6
Registered User
Joined: Sep 2007
Posts: 8,384
Likes: 875
From: San Francisco East Bay
IF you have the A340H, the transfer case is an automatic transmission, complete with planetary gears and a shifting solenoid. It's nothing like those with gear oil.
As to filling, do some searching here. I've believed that the two cases connected to each other and were filled from the same dipstick (separate drain plugs because of the separate pans), (http://web.archive.org/web/201210210...nce/2maint.pdf #26) but I recall a thread here where some disagreed.
As to filling, do some searching here. I've believed that the two cases connected to each other and were filled from the same dipstick (separate drain plugs because of the separate pans), (http://web.archive.org/web/201210210...nce/2maint.pdf #26) but I recall a thread here where some disagreed.
Apr 6, 2016 | 08:07 AM
#7
Thread Starter
Contributing Member
Joined: Apr 2004
Posts: 7,122
Likes: 6
From: 5th Gen San Diegan, California
Ha, yes, I'm reading that now. A little confusing...FSM I am reading says to fill "Transfer Chain Case" through filler hole....sounds to me like you fill them up independently, but they end up mixing in the end.
Buying a time-sert kit appears to be about the same price as buying a new pan. Hmm.
Buying a time-sert kit appears to be about the same price as buying a new pan. Hmm.
Trending Topics
Apr 6, 2016 | 03:12 PM
#10
Personally I'd either do the Time Sert or Helicoil for a proper fix.
You could also drill/tap to the next size up.
Lastly I supposed you could use one of those self-tapping oversized oil pan repair plugs, you can get these at auto parts store.
You could also drill/tap to the next size up.
Lastly I supposed you could use one of those self-tapping oversized oil pan repair plugs, you can get these at auto parts store.
Apr 7, 2016 | 09:44 AM
#12

Registered User


Joined: Jun 2011
Posts: 1,699
Likes: 75
i've done the drill/tap thing on assembled parts before, just cover both the drill and tap with wheel grease, and use a drill that turns slowly, the grease will capture all of the chunks.
Apr 7, 2016 | 12:44 PM
#14
Registered User
iTrader: (1)
Joined: Apr 2009
Posts: 13,381
Likes: 100
From: I live in New Tripoli Pa out in the woods
Can you weld ??
I would just weld an Aluminum female fitting in and be done
Or a piece of aluminum flat stock with the same size plug threads
I have done that a few times over the years
I would just weld an Aluminum female fitting in and be done
Or a piece of aluminum flat stock with the same size plug threads
I have done that a few times over the years
Apr 10, 2016 | 08:25 AM
#15
Thread Starter
Contributing Member
Joined: Apr 2004
Posts: 7,122
Likes: 6
From: 5th Gen San Diegan, California
Does anyone know if you can get this guy off without removing the center support? Looks like I am gonna drop the pan and have to drill out the plug. I can't find any pans locally. Then I will determine if I can use a timesert or have to get a nut welded.
I still dont see the need for this drain plug really. Part of me just wants to weld it up completely. Lastly -- this pan feels like steel,but I don't know. Does anyone know if it is steel or aluminum?
I still dont see the need for this drain plug really. Part of me just wants to weld it up completely. Lastly -- this pan feels like steel,but I don't know. Does anyone know if it is steel or aluminum?
Apr 11, 2016 | 08:02 AM
#16
Registered User
Joined: Jun 2011
Posts: 1,699
Likes: 75
i can't answer that, but one thing you could do is completely degrease the area around the nut, and then cover the whole thing up with a big wad of rtv.
it's just a slow drip, right?
kinda half-assed tho, sounds like it really does need to be pulled out.
it's just a slow drip, right?
kinda half-assed tho, sounds like it really does need to be pulled out.
Last edited by osv; Apr 11, 2016 at 08:04 AM.
Apr 11, 2016 | 08:58 AM
#17
^i've done that before, but you kinda need to get the plug out so all the oil behind hit can drain first and clean it off properly or you'll never get a good seal.
sounds like the bolt is loose and won't grab to let you extract it. Try putting something behind hit to pry while you spin with a wrench. Perhaps a screwdriver, pry bar, putty knife, pickle fork, etc will work for you?
sounds like the bolt is loose and won't grab to let you extract it. Try putting something behind hit to pry while you spin with a wrench. Perhaps a screwdriver, pry bar, putty knife, pickle fork, etc will work for you?
Apr 11, 2016 | 09:37 AM
#18
Registered User
Joined: Jun 2011
Posts: 1,699
Likes: 75
yeah, if it's dripping it'll never be fully clean.
what i would do here is stand a big screwdriver up vertically, one end on a floor jack and the other end on the head of the plug, jack up slightly to seal the plug against the drain, then blast the entire area off repeatedly with carb cleaner and a toothbrush.
upwards pressure should stop the drip, hopefully, and it'll be clean enough to apply a big wad of rtv... let the rtv cure awhile before releasing pressure on the floor jack.
if the trucks been driven and warmed up first, it'll probably speed up the curing time.
Last edited by osv; Apr 11, 2016 at 09:41 AM.
Apr 12, 2016 | 07:20 AM
#19
Thread Starter
Contributing Member
Joined: Apr 2004
Posts: 7,122
Likes: 6
From: 5th Gen San Diegan, California
OK well, I've tried my best and cannot get that plug out.
Time to remove the pan. Of course I can't find a pan locally. If anyone has any leads on some yards that might ship me one, PLEASE let me know.
For now I'm going to try and remove the pan and drill out the plug. Then I will see if I can get a timesert installed or maybe get someone to weld a nut on the inside. Not sure what it looks like in there.
My question now is: Do I need to drain the MAIN transmission fluid pan first? I know that the transfer case and transmission share same fluid. I basically just don't want to remove the small pan only to get a gallon plus of fluid pouring out from the transmission. I'd prefer NOT draining the main transmission cavity because the fluid is new, and ATF is expensive.
Thanks for any insight. And I like the idea of putting pressure on the drain plug and RTV'ing the crap out of it for a temp fix.

Thread
Thread Starter
Forum
Replies
Last Post
FS[SouthCent]: 1991 4Runner, Long Travel, 3.4L Swap
drew02a
Vehicles - Trailers (Complete)
5
Oct 4, 2016 03:35 PM
Snowking
86-95 Trucks & 4Runners
3
Jan 29, 2016 02:03 PM
Dustin Egle
86-95 Trucks & 4Runners
2
Jan 24, 2016 06:35 AM


