

 Feb 9, 2016, 10:13 AM
Last edit by: IB Advertising
See related guides and technical advice from our community experts:
Browse all: Interior Guides
- Toyota 4Runner 1984-1995 How to Swap Gauge Cluster
Step by step instructions for do-it-yourself repairs
Browse all: Interior Guides

SR5 Gauge Cluster Swap - How-to, with pics!
Apr 10, 2009 | 12:48 PM
#21
Thread Starter
Contributing Member
Joined: Feb 2008
Posts: 12,248
Likes: 33
From: Lake City, Fl
well I made a bit more pregress today 
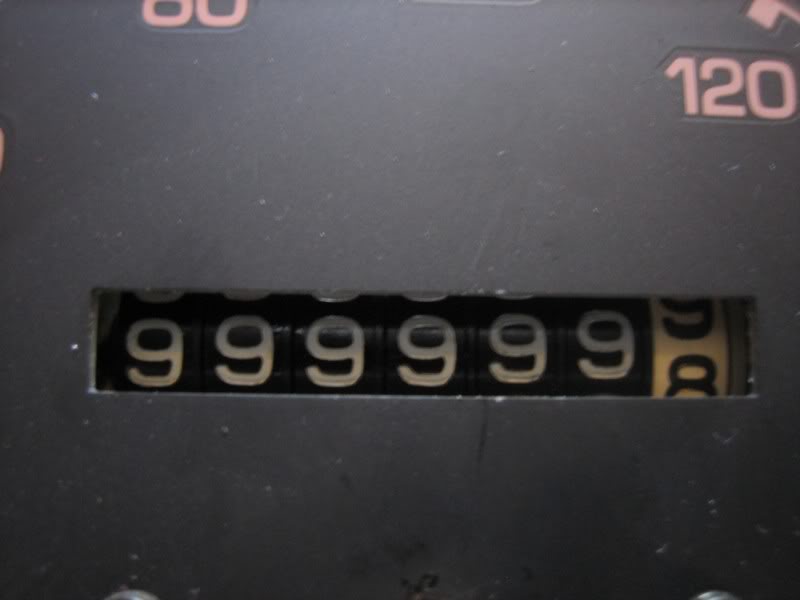
the main thing I wanted to do was to roll the odometer up so that it was current. so there was 295,074 on the original to match, plus the 100 even that I had put on the trip of the SR5 cluster, so the goal milage was 295,174. Well I took a drill to it and went to town... I rolled 20,000 more, and thought to myself "there's just got to be a better way..."... I was growing impatient, lol
well it turns out that if you grasp any one of the wheels on the odometer firmly, you can make them pop up or down how ever many numbers you need to! so 10 seconds later, I had the reading I needed!
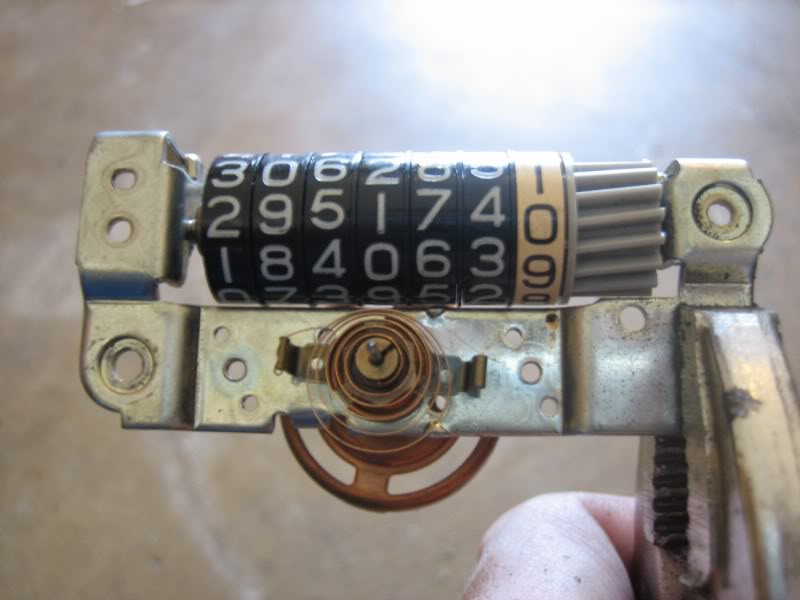
and then I played around with the old one, the one I messed up the coild return spring up on, lol
one day way back when:
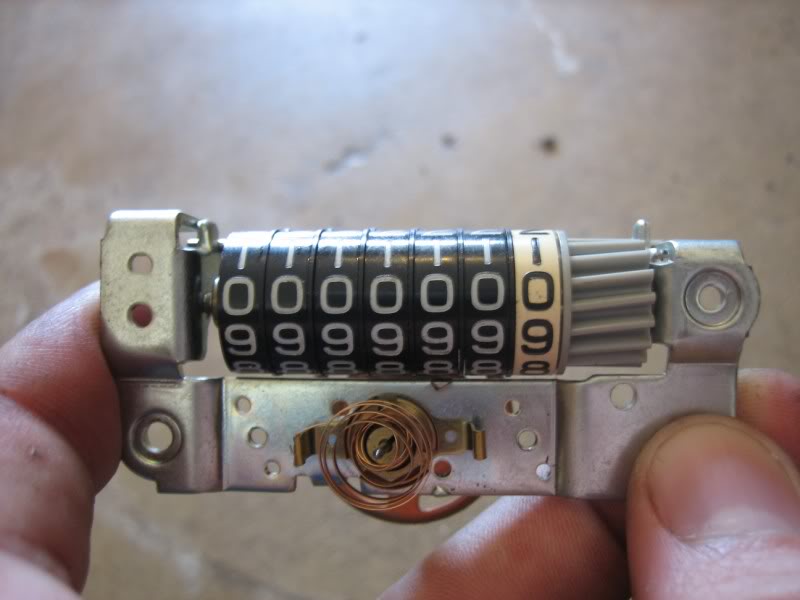
and then, someday in the future
lawl
anyhow, back to business
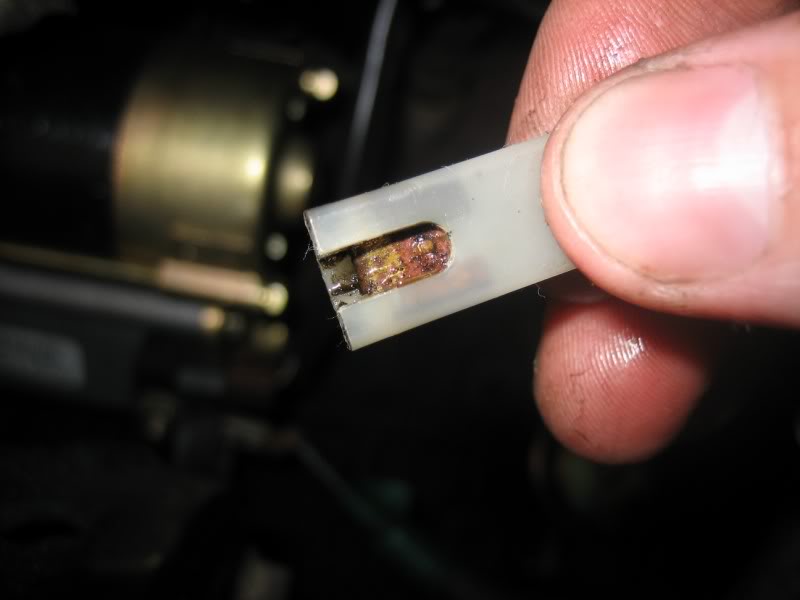
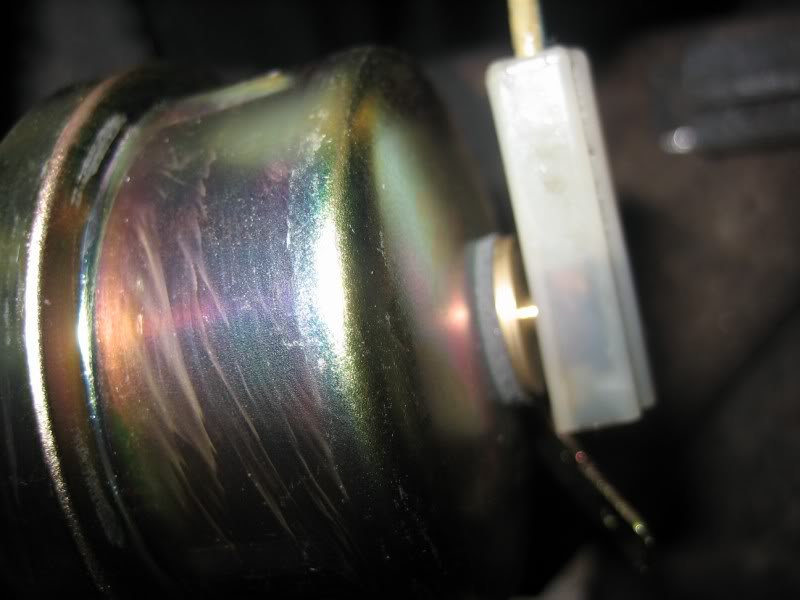
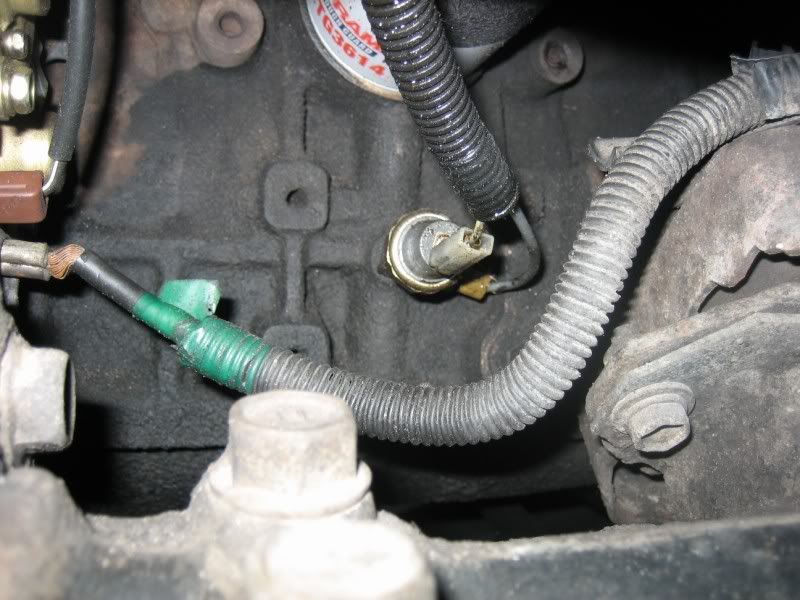
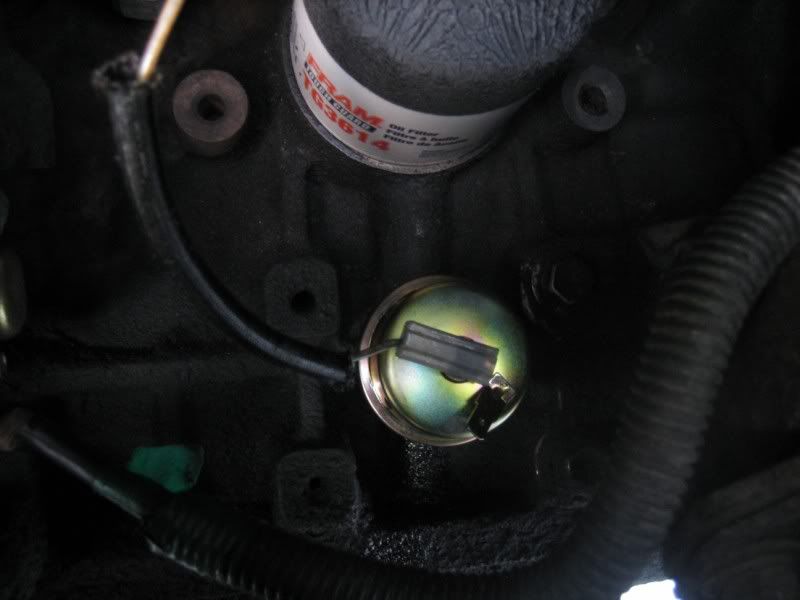
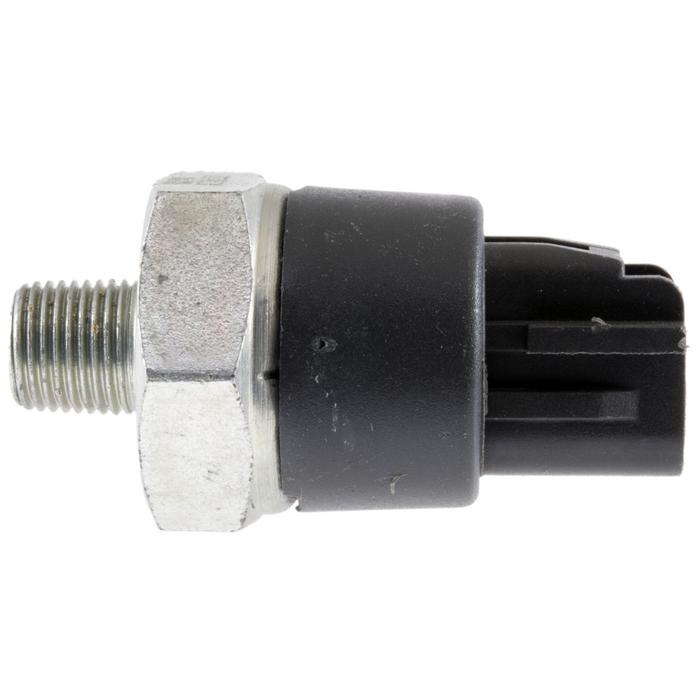
I picked up the new replacement oil pressure sender since the FIRST one I had bought was broken to begin with, and it would have leaked had I installed it. This one was ever to slightly different. It felt a little heavier and a little stronger maybe, but one thing really stood out:
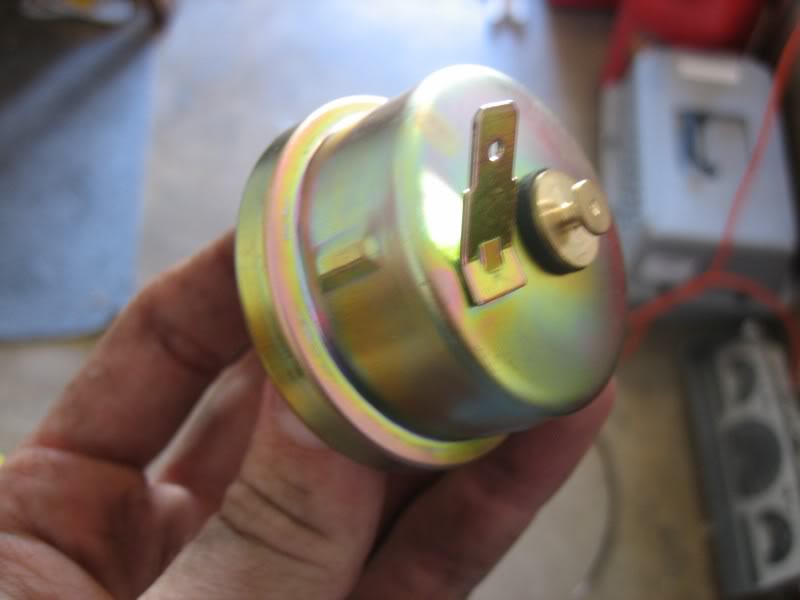
that's right; it has what appears to be a second connection on it!
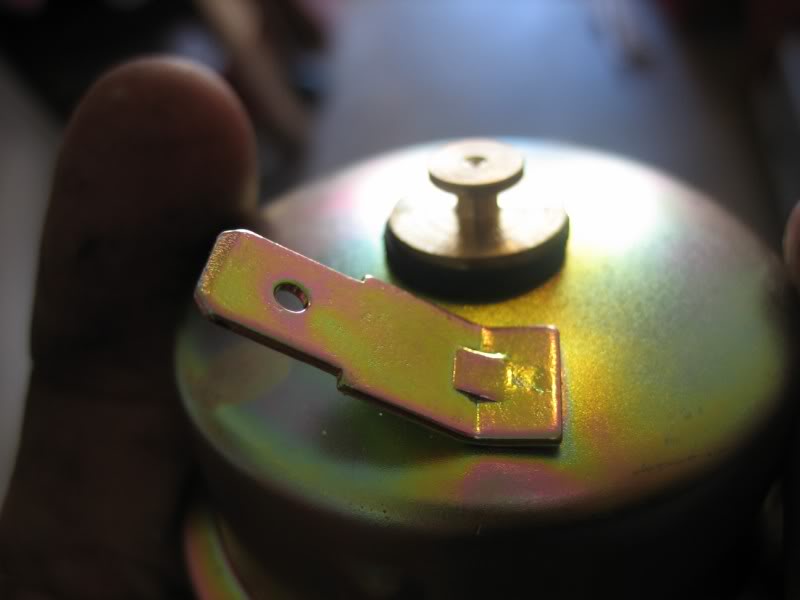
my first though was "Wow, that hookup is just like the one on the old sencor!". But then I realised that if I hooked the wire to it, it would pretty much just be directly grounding the wire out! NOT GOOD!
IF YOUR SENCOR LOOKS LIKE THE SENCOR PICTURED ABOVE, DO NO HOOK YOUR WIRE ONTO THE FLAT PUSH-IN CONNECTOR OFF TO THE SIDE; HOOK IT TO THE CENTER POST!!!
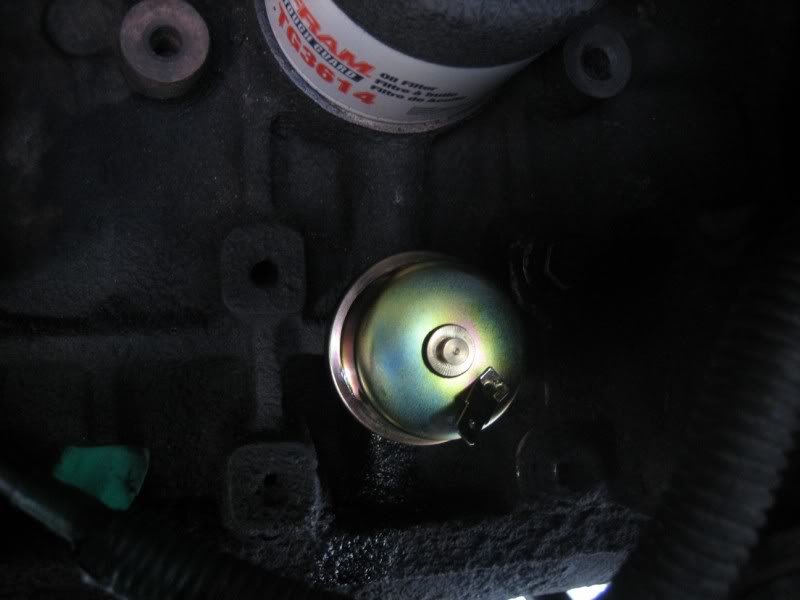
So a quick swap, and a plug-in later, and the new sender was it

Now the dash is still COMPLETELY torn apart right now. I awaiting a FedEx delivery; the original SR5 cluster I had purchased off eBay not too long ago, before I aquired this one, bcause it has a 4cly tach already, so I wont have to try and recalibrate this one I've got new bulbs to throw in it, so I don't have to worry about that.
And while the dash was all torn down, I took the time to remove all the aftermarket gauges I had on the pillar and the 5" tach in the center of the dash. The truck looks SO much more clean on the inside now. I had a replacement A-piller cover that I put on because of the holes in the original because of the gauge pod and the wiring ran through it, but it's the blue interior. But actually, it's hardly noticable! The colors are quite close, but then again I am color blind too I still have 2 holes and an indentation from the tach in the dash-pad on top, but they blend in with the cracks Maybe I'll get a dash cover to put over it and make it look all purdy...
the main thing I wanted to do was to roll the odometer up so that it was current. so there was 295,074 on the original to match, plus the 100 even that I had put on the trip of the SR5 cluster, so the goal milage was 295,174. Well I took a drill to it and went to town... I rolled 20,000 more, and thought to myself "there's just got to be a better way..."... I was growing impatient, lol
well it turns out that if you grasp any one of the wheels on the odometer firmly, you can make them pop up or down how ever many numbers you need to! so 10 seconds later, I had the reading I needed!
and then I played around with the old one, the one I messed up the coild return spring up on, lol
one day way back when:
and then, someday in the future
lawl
anyhow, back to business
I picked up the new replacement oil pressure sender since the FIRST one I had bought was broken to begin with, and it would have leaked had I installed it. This one was ever to slightly different. It felt a little heavier and a little stronger maybe, but one thing really stood out:
that's right; it has what appears to be a second connection on it!
my first though was "Wow, that hookup is just like the one on the old sencor!". But then I realised that if I hooked the wire to it, it would pretty much just be directly grounding the wire out! NOT GOOD!
IF YOUR SENCOR LOOKS LIKE THE SENCOR PICTURED ABOVE, DO NO HOOK YOUR WIRE ONTO THE FLAT PUSH-IN CONNECTOR OFF TO THE SIDE; HOOK IT TO THE CENTER POST!!!
So a quick swap, and a plug-in later, and the new sender was it
Now the dash is still COMPLETELY torn apart right now. I awaiting a FedEx delivery; the original SR5 cluster I had purchased off eBay not too long ago, before I aquired this one, bcause it has a 4cly tach already, so I wont have to try and recalibrate this one
I've got new bulbs to throw in it, so I don't have to worry about that.And while the dash was all torn down, I took the time to remove all the aftermarket gauges I had on the pillar and the 5" tach in the center of the dash. The truck looks SO much more clean on the inside now. I had a replacement A-piller cover that I put on because of the holes in the original because of the gauge pod and the wiring ran through it, but it's the blue interior. But actually, it's hardly noticable! The colors are quite close, but then again I am color blind too
I still have 2 holes and an indentation from the tach in the dash-pad on top, but they blend in with the cracks Maybe I'll get a dash cover to put over it and make it look all purdy...
Last edited by iamsuperbleeder; Apr 10, 2009 at 12:51 PM.
Apr 10, 2009 | 07:49 PM
#24
Thread Starter
Contributing Member
Joined: Feb 2008
Posts: 12,248
Likes: 33
From: Lake City, Fl
I guess I'll find out if I NEED to ground that tab tomorrow. Stupid FedEx delivered the package with my 4cy cluster to the wrong house
 9:30 rolled around, and I checked the tracking number, and apparently it was delivered at 12:03... right down the road, lol. I got the address from the FedEx guy on the phone, and I was like "Oh well that's right down the road, I'll just walk over and get it!" he's like "Well we'll send a truck tomorrow to to pick it up from that house, and send it back to you at the right address". Well I garantee I can walk to the house it's at and get it myself before they even get out to do it.
I google-maps'ed it, and my house is circled in blue, and the house it was delivered to is circled in red


 Apr 11, 2009 | 07:21 AM
#26
Thread Starter
Contributing Member
Joined: Feb 2008
Posts: 12,248
Likes: 33
From: Lake City, Fl
lol
oh I'm so mad at FedEx right now... I just walked down to the house to see if I could get it, and NO ONE'S HOME!!!
I guess I'll be keeping an eye on the driveway...
In the mean time while my dash was torn apart, I took care of some things I've been wanting to do, like not only getting rid off all the aftermarket gauges I had on the pillar in the pod and the 5" tach on the dash, but I also removed my ghetto black lights I had on installed on the roof and lower dash, the ghetto green LED's that I had wired into my head lights and turn signals, replaced my broken entenna since I already had the replacement just sitting in the garage, and even probed the plug-in to the cluster for the 12v+ that comes on with the lights, and spliced and ran it to my newly install SR5 12v lighter plug-in and ash tray so that they only come on with the lights, because before they were just wired to come on whenever the key was turned
Apr 11, 2009 | 10:32 AM
#28
Thread Starter
Contributing Member
Joined: Feb 2008
Posts: 12,248
Likes: 33
From: Lake City, Fl
well FedEx showed up with the cluster... lmao, this is a wierd story...
FedEx Lady: "This little situation has flustered a few people"
Me:
 "What do you mean?"
FedEx Lady: "What's your name?"
Me: "Travis -last name-"
FedEx Lady: "Ok, well here's what must have happened. You just so happen to have the same last name as a man that use to live at the house this was delivered to, just across the street. The thing that threw people off was that this other man passed away 5 years ago, according to his elderly wife who still lives at the house and got the package"

Me: "Um... wow... that's really weird..." at this point, I kinda feel bad for the old lady at that house it was delivered to
Now I don't know how the guy I bought this from on eBay got that address, because my address registered through PayPal is verified, and I've bought SEVERAL items since I've lived in this house (like my shackle receiver, and my Warn recovery strap
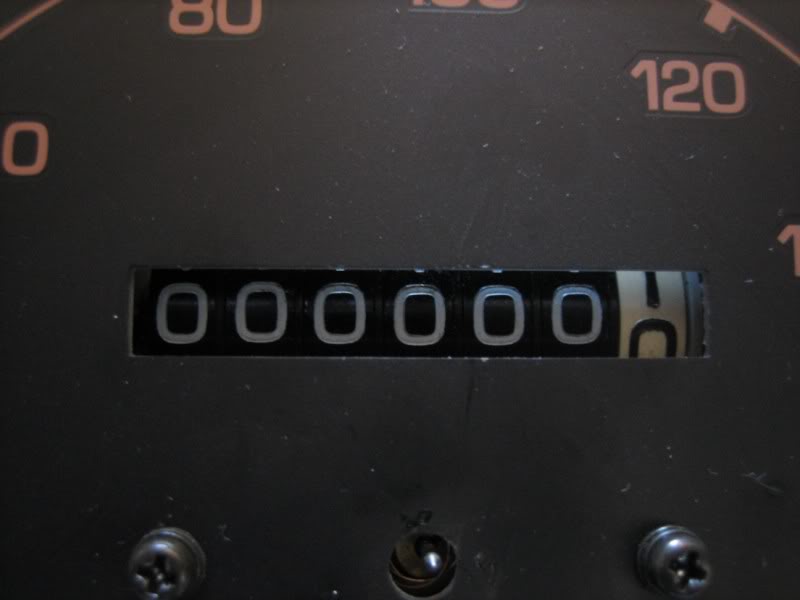
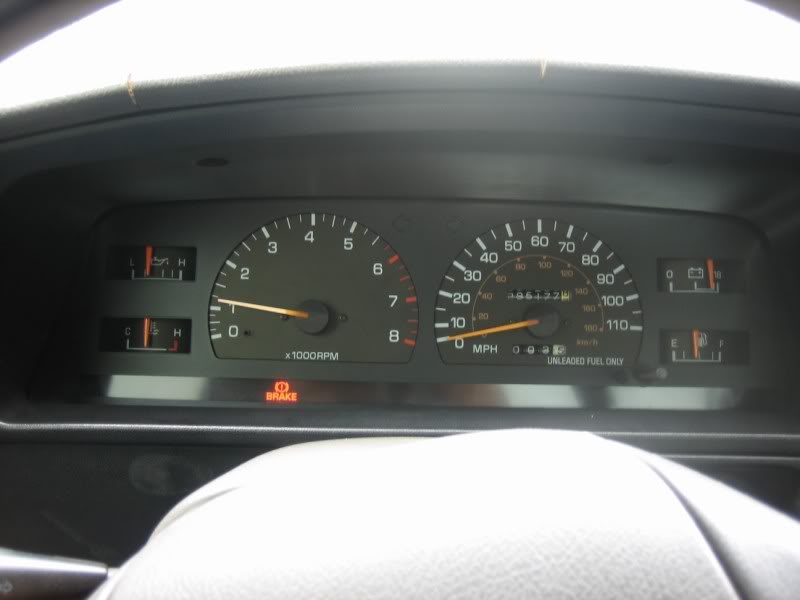
), and they've always been delivered no problem. So yeah, I'm not sure how he got that mixed up...But anyway, with that cluster, I just did some cleaning, swapped in my odometer with the mileage on it, and kept the 4cyl tach in it so that I didn't have to do any fooling with the calibration of it, put my new bulbs it in, and used the front lense I had before sence it was in MUCH better shape, so the thing is installed now, the dash is all put back together, and the gauges look BRAND NEW, and WORK GREAT!!!
Pics, and a video, are uploading now
Last edited by iamsuperbleeder; Apr 11, 2009 at 10:34 AM.
Apr 11, 2009 | 10:34 AM
#29
Registered User
Joined: Jan 2008
Posts: 1,085
Likes: 7
From: Connecticut

'Bleeder, thanks much for this great write-up, and especially for the great pics. My new SR5 cluster is waiting for me to get off my butt and throw it in my Base truck's dash, and I had been wondering how to set the odo to the correct mileage. The junkyard that sold it to me suggested that I could use a needle to turn the wheels, if I were careful not to scratch the white number paint off. Does that seem doable to you, based on how hard it was to turn the wheels? Or do you think I'll have to take it apart, as you did?
As far as the grounding tab is concerned,

On your earlier pic, it looked like there was a second (gray or black) grounding wire plugged into the base of the sensor from the side, and I was thinking that connector would go to the grounding tab on the new sender:
But on your pic of the new sender installed, there appears to be only the one wire. What happened to the other wire??
BTW, in the second pic, the thicker grounding cable at the bottom (with the exposed copper wire) looks like it might could use some help. I found the perfect stuff for things like that: Boeing's Boeshield T-9 - which dissolves corrosion and then dries, leaving a waterproof lubricating wax. It was developed for aircraft, but bikers use it on their chains, salt-water boaters use it on everything. In addition to waterproofing electrical connections, I found it works great on the spare tire winch, parking brake linkage, etc:
http://www.boeshieldcanada.com/howto.pdf
http://www.boeshield.com/index.htm
http://www.jamestowndistributors.com...uct.do?pid=552
http://www.theruststore.com/Boeshiel...osol-P3C4.aspx
Anyway, thanks again for doing this thread - great stuff.
Apr 11, 2009 | 10:57 AM
#30
Thread Starter
Contributing Member
Joined: Feb 2008
Posts: 12,248
Likes: 33
From: Lake City, Fl
Lol, yeah, a lame move by FedEx for sure. UPS has done that to me before.
'Bleeder, thanks much for this great write-up, and especially for the great pics. My new SR5 cluster is waiting for me to get off my butt and throw it in my Base truck's dash, and I had been wondering how to set the odo to the correct mileage. The junkyard that sold it to me suggested that I could use a needle to turn the wheels, if I were careful not to scratch the white number paint off. Does that seem doable to you, based on how hard it was to turn the wheels? Or do you think I'll have to take it apart, as you did?
As far as the grounding tab is concerned, on your earlier pic, it looked like there was a second (gray or black) grounding wire plugged into the base of the sensor from the side, and I was thinking that connector would go to the grounding tab on the new sender:
But on your pic of the new sender installed, there appears to be only the one wire. What happened to the other wire??
BTW, in the second pic, the thicker grounding cable at the bottom (with the exposed copper wire) looks like it might could use some help. I found the perfect stuff for things like that: Boeing's Boeshield T-9 - which dissolves corrosion and then dries, leaving a waterproof lubricating wax. It was developed for aircraft, but bikers use it on their chains, salt-water boaters use it on everything. In addition to waterproofing electrical connections, I found it works great on the spare tire winch, parking brake linkage, etc:
http://www.boeshieldcanada.com/howto.pdf
http://www.boeshield.com/index.htm
http://www.jamestowndistributors.com...uct.do?pid=552
http://www.theruststore.com/Boeshiel...osol-P3C4.aspx
Anyway, thanks again for doing this thread - great stuff.
I highly doubt that you'll be able to turn those wheels in the odometer over with the tip of a needle... they grab pretty hard to stay in place, I had a rough time with just the odometer out and grabbing an indivudual wheel with my index finger and thumb and trying to turn it. They snap to each number, but with a little turning brute-force, they'll snap right over to the next number in either direction.
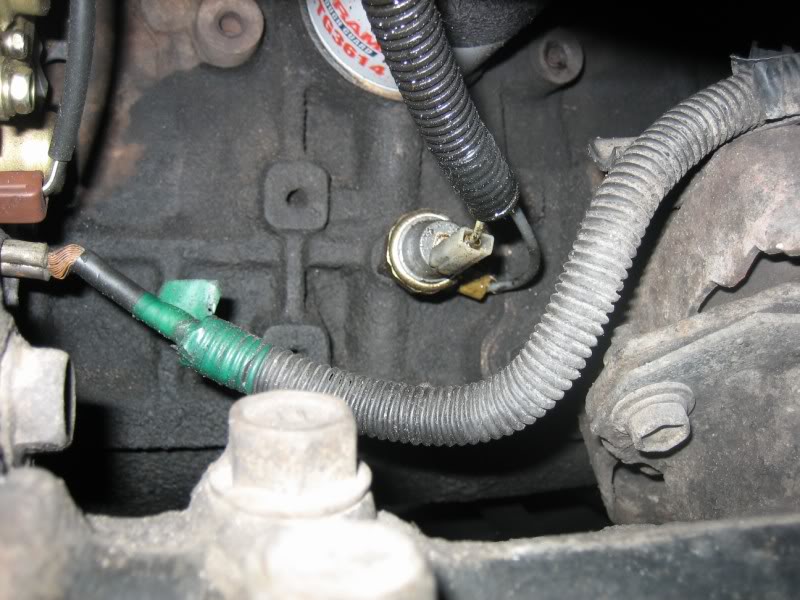
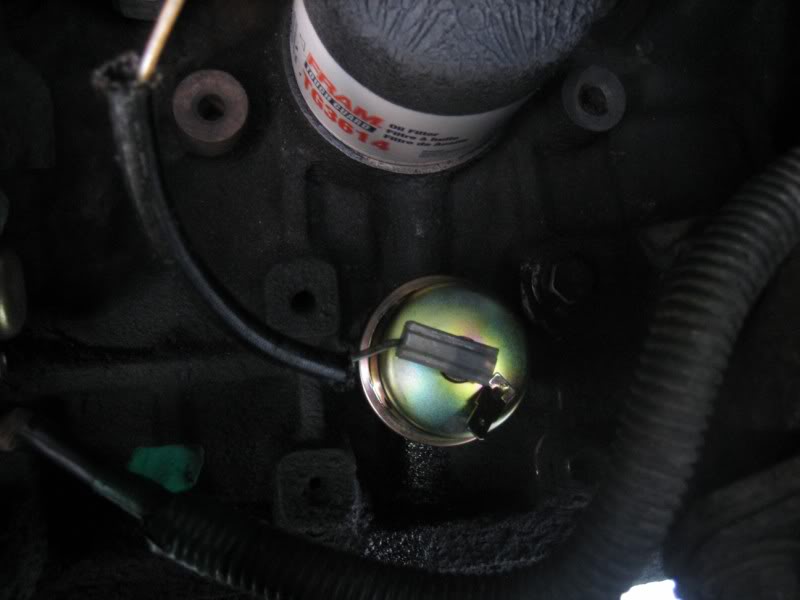
But what appears to be a second wire is acutally the hookup of a manual oil pressure gauge that I did away with when I installed the SR5 cluster, since it has an actual pressure gauge instead of a light. See thiss thread. So that's why it's not installed with the new sender.
And that cable you see at the bottom, that's actually the main power cable going to the starter. I haven't had any issues with it, and untill I do I'm just going to leave it be
But here's the final pics
so nice and clean inside now
and the replacement pillar cover I snagged, the blue color, is really harldy noticable. I can deal with it untill I can find a gray one
but now I've got to do something about this dash... here's where the gimungous tach use to be:
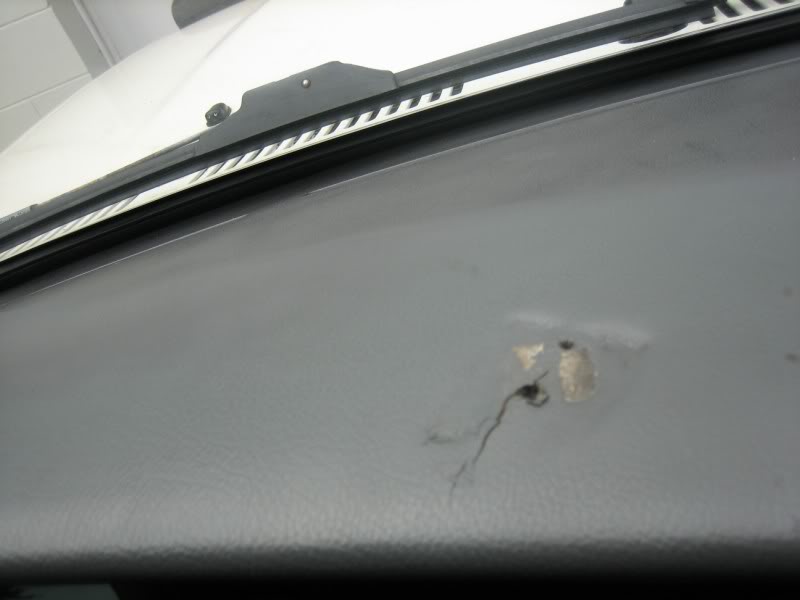
but the resh of the dash is in pitiful shape too...
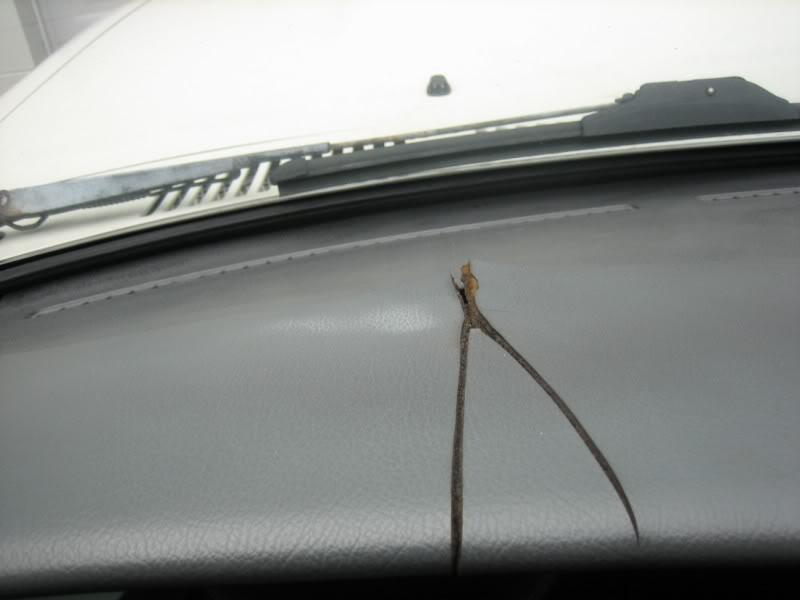
maybe I'll pick up a dash cover or something, cause it's kinda hard to find a dash pad that's still in good shape...
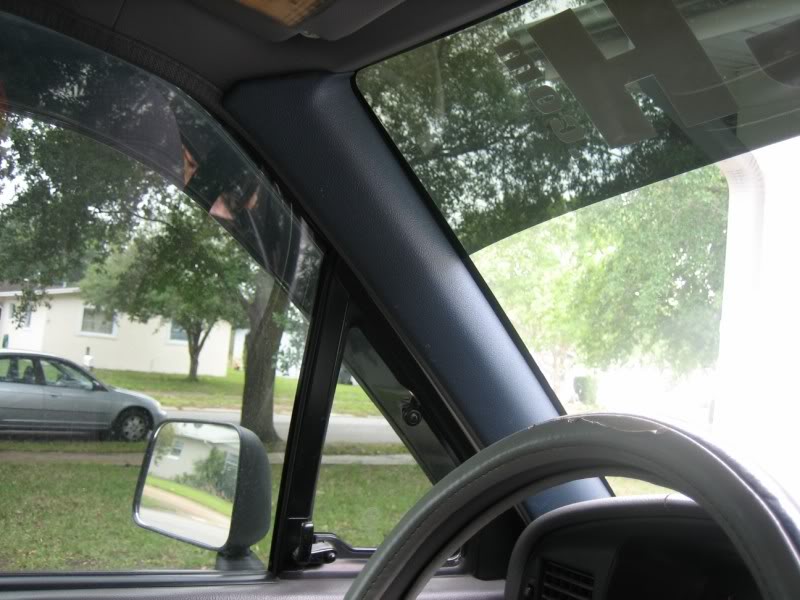
but about the only thing that's not stock equpiment anymore is my window mounted cell-phone holder wich I use Garmin on
I have yet to find a 3rd gen PU or 2nd gen Runner where this was a factory option though 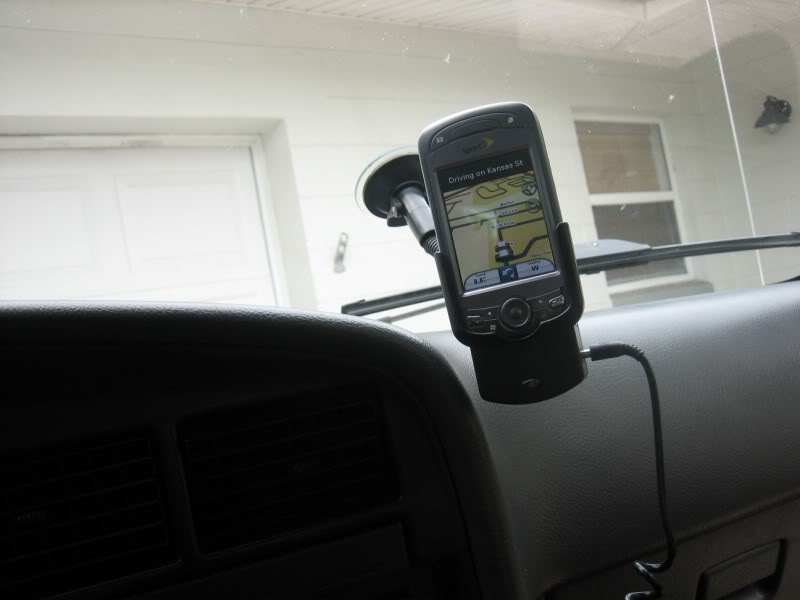
oh yeah, and the video
[YOUTUBE]http://www.youtube.com/watch?v=loVZABdobeI[/YOUTUBE]
yes I know my idle is a little high... it helps with a smooth idle, cause of the slack in the timing chain do to a broken guide, which is about to get taken care of, but that's a hole other thread

Last edited by iamsuperbleeder; Apr 11, 2009 at 12:09 PM.
Apr 11, 2009 | 07:02 PM
#32
Thread Starter
Contributing Member
Joined: Feb 2008
Posts: 12,248
Likes: 33
From: Lake City, Fl
just for kicks, and if anyone still curious about the swap, here's a night shot, with all the lights working now

and also of my other SR5 swapped goodies so far, the lighted 12v plug in and ash tray
it's a dark pic and it's hard to see, but the light is in fact a little brighter when seen in person

next swap will be pulse wipers, or just maybe the entire tilt column out of a junk-yard find
and also of my other SR5 swapped goodies so far, the lighted 12v plug in and ash tray
it's a dark pic and it's hard to see, but the light is in fact a little brighter when seen in person
next swap will be pulse wipers, or just maybe the entire tilt column out of a junk-yard find
Apr 11, 2009 | 07:23 PM
#34
Thread Starter
Contributing Member
Joined: Feb 2008
Posts: 12,248
Likes: 33
From: Lake City, Fl
came with the window tint job; it contrasts the banner and really makes it stand out quite well
ew, I just noticed that I really need to put a coat of black paint on my wiper arms
ew, I just noticed that I really need to put a coat of black paint on my wiper arms
Last edited by iamsuperbleeder; Apr 11, 2009 at 07:24 PM.
Apr 14, 2009 | 02:54 PM
#35
Registered User
Joined: May 2007
Posts: 91
Likes: 0
From: Lancaster, PA
Just got done doing the swap. Thanks for the heads up about the spacer thingy for the speedo cable. Everything went smooth.
My cluster was for a 6 cyl, i adjusted the screw according. You just have to bump the screw like ~2 degrees, not much.
My cluster was for a 6 cyl, i adjusted the screw according. You just have to bump the screw like ~2 degrees, not much.
Apr 14, 2009 | 03:30 PM
#36
Thread Starter
Contributing Member
Joined: Feb 2008
Posts: 12,248
Likes: 33
From: Lake City, Fl
I think's it cool Toyota gave us (or rather theirselves
) the flexability to be able to use the same tach no matter the engine size; it cool cause you guys with a V8 swap and adjust it to make it work too
May 27, 2009 | 05:15 AM
#37

Registered User
Joined: May 2009
Posts: 18
Likes: 0
From: Ohio
Questions
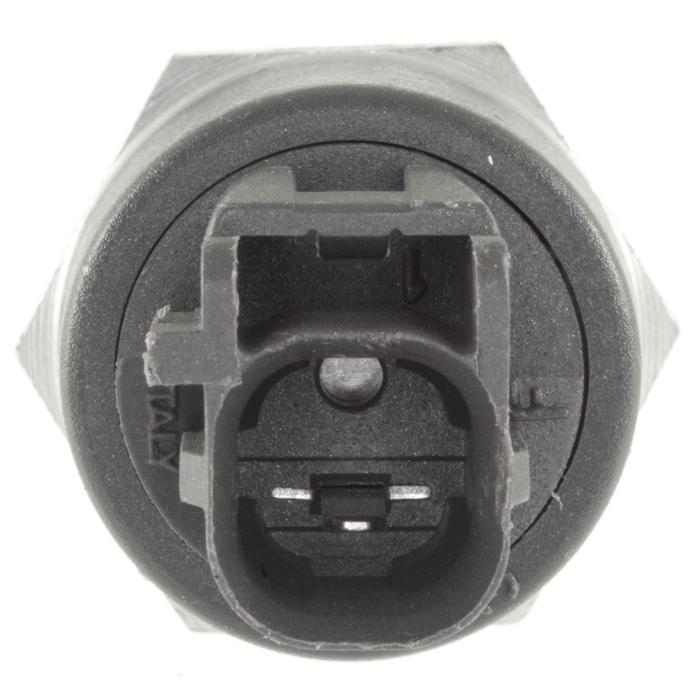
I have a 1994 toyota with an SR5 dash and the oil pressure connection is completely gone. The sending unit looks like the pictures I have attached. Should I use one like it or one like you have pictured? Do you have any idea on the wire color? Like I said my wiring is completely gone.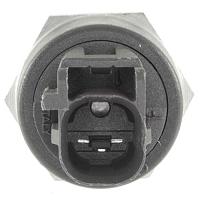

 May 27, 2009 | 12:52 PM
#38

Registered User
Joined: May 2009
Posts: 29
Likes: 2
From: Longwood, FL
More questions for an old thread if anyone has time, answers are appreciated.
RE: Adjusting the tachometer from 6cyl to 4cyl. I found these instructions for adjusting the tachometer to match an engine size. I was wondering if anyone knew the approx. resistances for either the 4 cyl or the 6 cyl engine. (I'm not sure if the SR5 cluster I got is for a 4 or 6 cyl)
Also, @ HAI-TEK7, do you remember which direction you turned the screw?
May 27, 2009 | 01:00 PM
#39
Thread Starter
Contributing Member
Joined: Feb 2008
Posts: 12,248
Likes: 33
From: Lake City, Fl
I have a 1994 toyota with an SR5 dash and the oil pressure connection is completely gone. The sending unit looks like the pictures I have attached. Should I use one like it or one like you have pictured? Do you have any idea on the wire color? Like I said my wiring is completely gone.Attachment 74249
Attachment 74250
Attachment 74250
 sorry
sorryMore questions for an old thread if anyone has time, answers are appreciated.
RE: Adjusting the tachometer from 6cyl to 4cyl. I found these instructions for adjusting the tachometer to match an engine size. I was wondering if anyone knew the approx. resistances for either the 4 cyl or the 6 cyl engine. (I'm not sure if the SR5 cluster I got is for a 4 or 6 cyl)
Also, @ HAI-TEK7, do you remember which direction you turned the screw?
Dangit... at one time I had both a 4cyl and v6 stock tach; I should have measured the resistance of each... I'm not sure which way denotes more or less resistance on the little pointameter er whatever you call that thingy
But yeah with a multimeter, you would be able to watch the resistance reduce of climb as you turned the calibration set-screw.Dangit, now I wish I hadn't have sold those other 2 clusters so fast...


