
replacing carpet with anti-fatigue mat
 Jun 29, 2011 | 10:07 AM
#1
Thread Starter
Registered User
Joined: Apr 2007
Posts: 1,458
Likes: 5
From: ATL!
replacing carpet with anti-fatigue mat
hi all!
my truck has been off the road in shops for about 5 months. in that time i've been collecting interior parts so i can put them all in together and have a completed interior.
but - i came up with a wild idea to replace the carpet with a vinyl mat. they sell the stuff at places like Grainger, as the type of mat you'd find at the auto parts counter or places where people stand all day. it's 1/2" thick and 5' wide. i found it on sale at the Pendergrass Flea Mkt in N. GA and bought $100 worth, enough to do the whole floor of the truck and the seat backs/cargo area too.
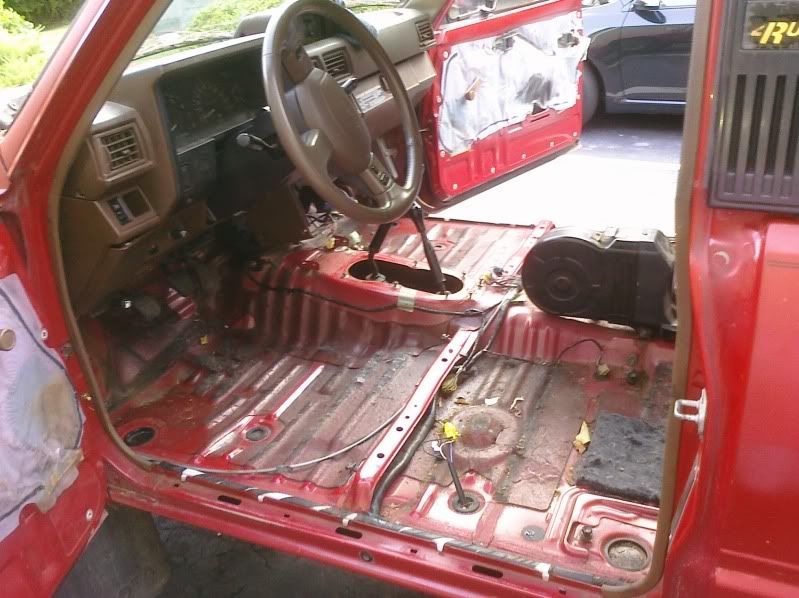
so first step was to remove everything left inside. i had already traded my entire grey interior for some cool SR5 seats in tan. (in hindsight i'm not sure that was a good idea, but...) i pulled the seats, seatbelts, trim panels, and anything else bolted down until it was nothing but wiring harness left.
i gave everything a wipe down with some spray wax, just to clean up and give a little protection.
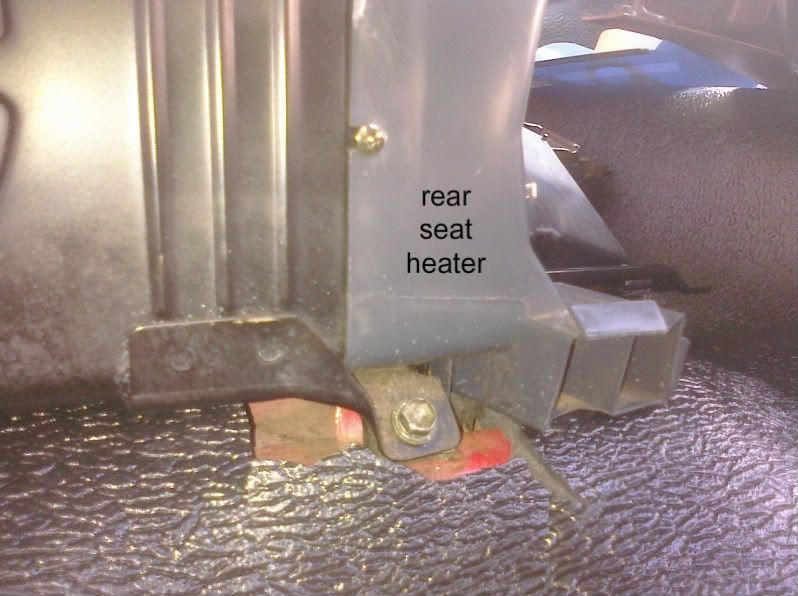
i couldn't remove the rear seat heater because it's piped in from underneath and i didn't want to open up the coolant circuit. i wish there was a shut off right there to remove it easily.
i rolled out the mat and cut it to length. i determined the length by laying a piece of masking tape from tailgate to dashboard, following every crease in the sheetmetal.
then i marked a center line on it so i could cut a hole to fit over the heater. it was like trying to stick your head in a shirt where the collar is still buttoned.
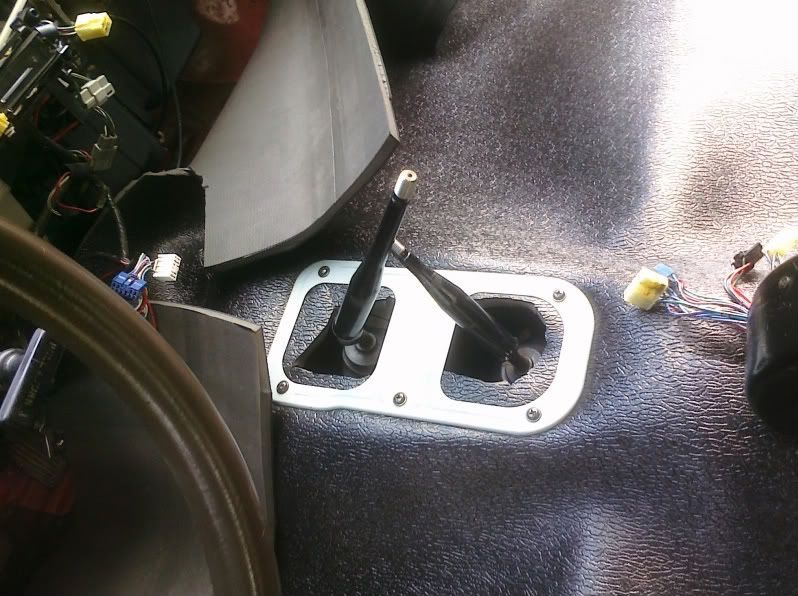
i cut a big X where the gear shifters could poke through. then i reinstalled the metal plate to hold the mat in place while i started working on trimming to fit along the bottom of the dashboard. with the plate on, i cut the holes for the shifters.
there are two struts which come down along each side of the radio housing, which it seemed i couldn't remove without disassembling the entire dashboard.
i was trying to keep from cutting the mat along the top of the hump, so it'd look nice and clean. i decided to take the plunge and remove the whole dashboard. most of the parts to be removed, i had a replacement for in better condition anyway, so i just started pulling out every screw i saw.
it seems like you can't just partially disassemble, you have to remove everything in order and eventually it all must go. on the driver's side, there's the lower panel/speaker grille. mine had broken tabs from some impatient prev. owner.
there's apparently two different types of plastic on our dash, some that's brittle and some that's soft. but they each are prone to easy damage after being weakened by decades of UV. i couldn't remove the rear defroster switch trim without breaking the tabs, but since i'm a soft top user and the rear def. never worked anyway, i'm replacing the switch with the larger coin holder trim piece.
to remove this trim piece completely, you must remove the gas door pull (easy) and the hood release pull (not as easy). the cable does come loose on it if you're careful.
on the right side, there's screws and bolts everywhere, holding the dashpad, the glovebox, etc. the right speaker grille has two screws, two plastic tabs, and a third slot on top for a metal tab. i think they engineered this grille for maximum chance of breaking it.
there's bolts holding the lower brace of the glove box. be careful not to tear the vinyl "back" of the glove box (if yours still even exists). once gone, you can see some of the screws holding the dashpad. but taking out the screws isn't enough. there's a secret bolt at the far right of the dash pad. YOU CAN ONLY ACCESS IT IF YOU REMOVE THE RIGHT SIDE VENT. good luck. mine was already chipped from a previous removal, but i couldn't get mine out without it breaking, it was just too brittle. but it's ok, i have another one in good shape. once you remove that vent, you can get to the last bolt.
but wait, before removing the dashpad, take off the cluster cover, and go ahead and remove the cluster too.
now you're left with the dashboard subframe, which is bolted in but has a tricky stud at the top center where you must remove a nut. there's also one screw on the left side of the radio housing.
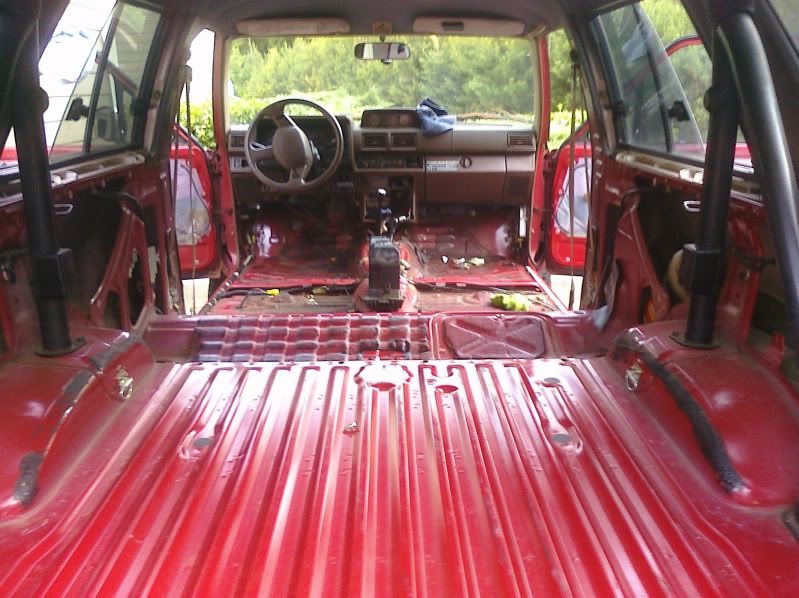
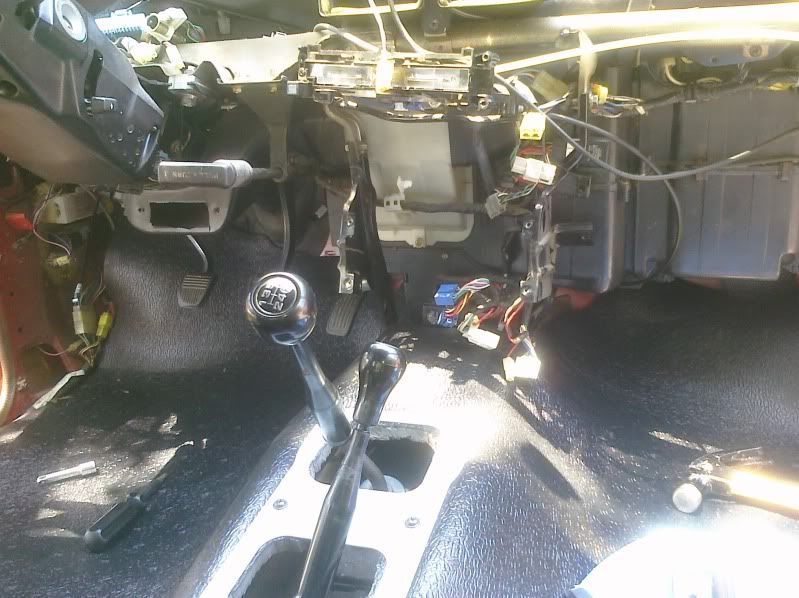
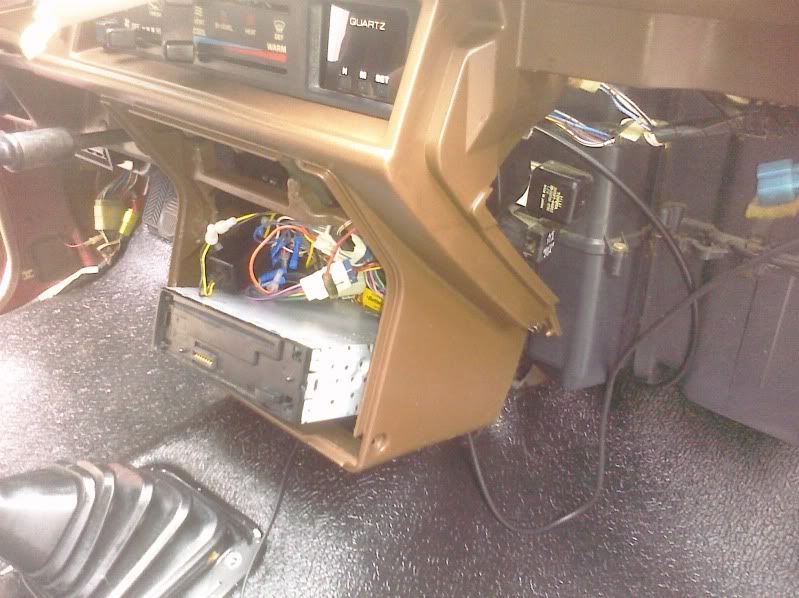
once it's all out, you'll have this:
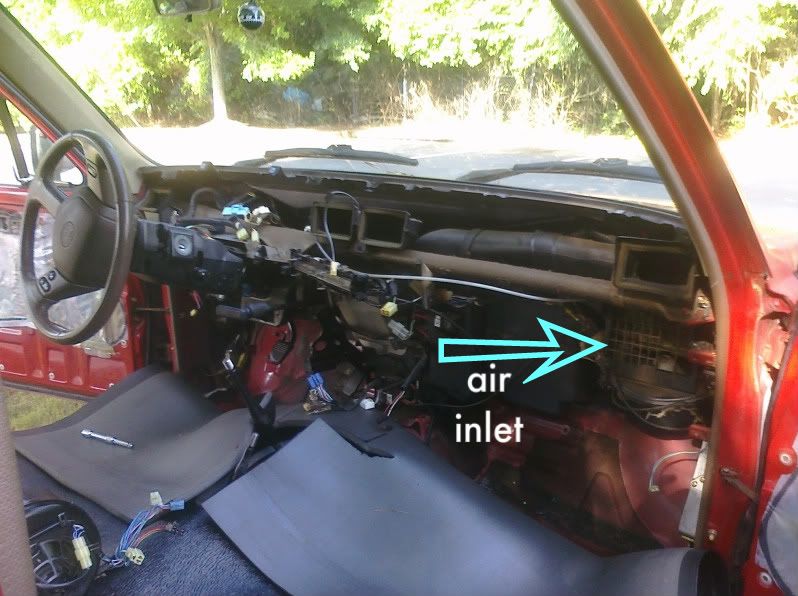
on the right, you can see the recirc air intake. i saw my fan was filled with pine needles so i pulled it out and cleaned it up some.
with the dash completely out, i started pushing the mat away from the hump and toward the front. i did some trimming along the a/c housing, which came out nice. but on the driver's side, the pedals were making it tough. i trimmed around the steering column and eventually had a heck of a time trying to replace the left foot dead plate for the driver. i had to find some longer bolts since the carpet is trimmed around the deadplate, but i wanted it to go over the mat.
while all of the plastic pieces were out, i sprayed them down well with armor all to try to infuse a little UV protection.
with the front trimming done, i reassembled the dash with my new(er) dash parts i'd collected, and put everything back together up to the dash pad. i scored an uncracked dash pad with another inclinometer attached, but when i removed it, i could see the sun had turned this pad a murky brown/green. the spot where the inclinometer was, was still the correct brown! so i am going to try to dye the pad brown again before reinstalling. i'll let you know how that goes when i get to it.
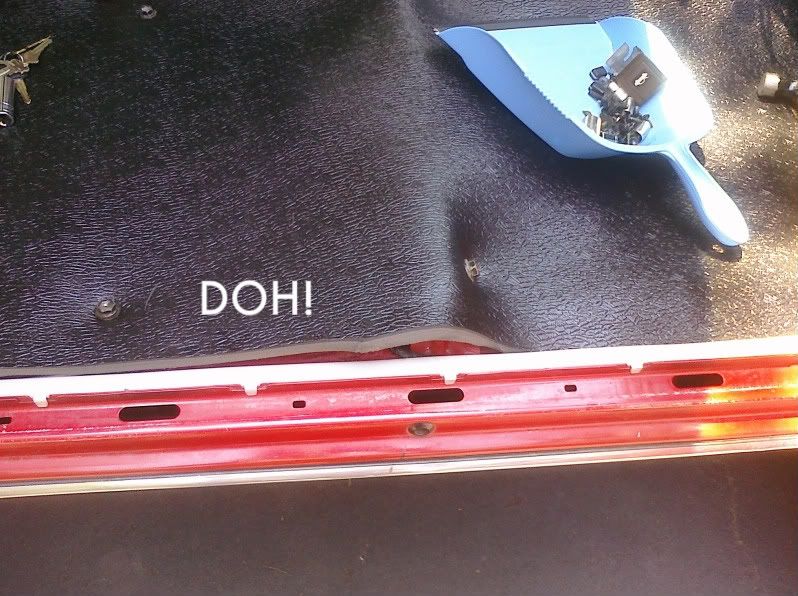
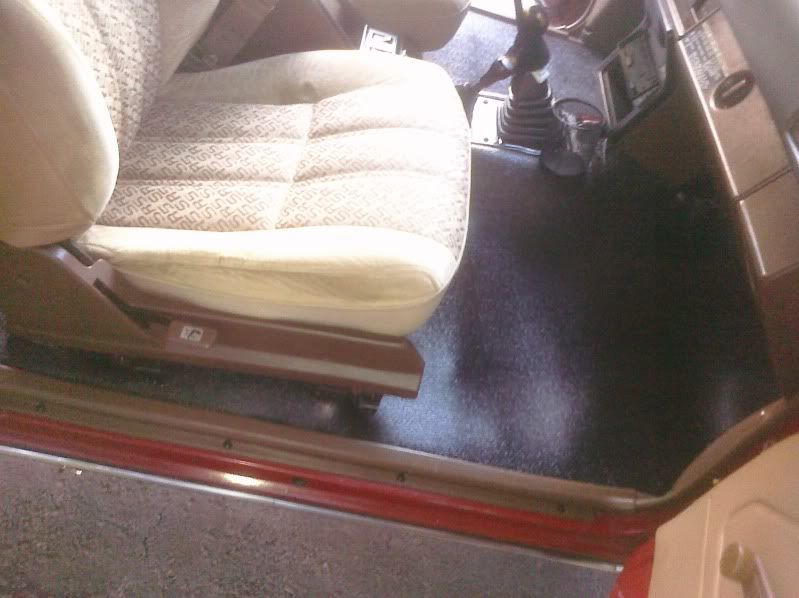
i started trimming along the doors and working toward the hump of the rear seat. i screwed up and trimmed too much on the passenger side. the rail for the front seat mounts makes a bump in the mat, and i needed to leave some extra to accomodate for that. realizing this, i did the driver's side ok, but needed to fix the pass. side. so i had to unbolt the shifter plate to attempt to stretch it about an inch.
one of the hard parts of working with this mat is it's really thick. it was very difficult getting those 6 screws in the first time, so i decided to abandon the idea of powdercoating that plate later, and just painting it gloss black. i sprayed it up, and replaced it, being sure to include the rubber shift boots which were soaking in armor all. i had to find a slightly longer screw for the one that goes through my custom cup holder. this will be the final product, i don't plan to reinstall the shifter boot and rectangle surround trim that usually covers this.

this coming weekend i'll try to get the rest of it done, including going up the rear seat bottom and into the bed. but i'm now debating how much stereo stuff i want to install. if i want an amp in the back, i'll have to run the cables under the mat now.
more to come...
my truck has been off the road in shops for about 5 months. in that time i've been collecting interior parts so i can put them all in together and have a completed interior.
but - i came up with a wild idea to replace the carpet with a vinyl mat. they sell the stuff at places like Grainger, as the type of mat you'd find at the auto parts counter or places where people stand all day. it's 1/2" thick and 5' wide. i found it on sale at the Pendergrass Flea Mkt in N. GA and bought $100 worth, enough to do the whole floor of the truck and the seat backs/cargo area too.
so first step was to remove everything left inside. i had already traded my entire grey interior for some cool SR5 seats in tan. (in hindsight i'm not sure that was a good idea, but...) i pulled the seats, seatbelts, trim panels, and anything else bolted down until it was nothing but wiring harness left.
i gave everything a wipe down with some spray wax, just to clean up and give a little protection.
i couldn't remove the rear seat heater because it's piped in from underneath and i didn't want to open up the coolant circuit. i wish there was a shut off right there to remove it easily.
i rolled out the mat and cut it to length. i determined the length by laying a piece of masking tape from tailgate to dashboard, following every crease in the sheetmetal.
then i marked a center line on it so i could cut a hole to fit over the heater. it was like trying to stick your head in a shirt where the collar is still buttoned.
i cut a big X where the gear shifters could poke through. then i reinstalled the metal plate to hold the mat in place while i started working on trimming to fit along the bottom of the dashboard. with the plate on, i cut the holes for the shifters.
there are two struts which come down along each side of the radio housing, which it seemed i couldn't remove without disassembling the entire dashboard.
i was trying to keep from cutting the mat along the top of the hump, so it'd look nice and clean. i decided to take the plunge and remove the whole dashboard. most of the parts to be removed, i had a replacement for in better condition anyway, so i just started pulling out every screw i saw.
it seems like you can't just partially disassemble, you have to remove everything in order and eventually it all must go. on the driver's side, there's the lower panel/speaker grille. mine had broken tabs from some impatient prev. owner.
there's apparently two different types of plastic on our dash, some that's brittle and some that's soft. but they each are prone to easy damage after being weakened by decades of UV. i couldn't remove the rear defroster switch trim without breaking the tabs, but since i'm a soft top user and the rear def. never worked anyway, i'm replacing the switch with the larger coin holder trim piece.
to remove this trim piece completely, you must remove the gas door pull (easy) and the hood release pull (not as easy). the cable does come loose on it if you're careful.
on the right side, there's screws and bolts everywhere, holding the dashpad, the glovebox, etc. the right speaker grille has two screws, two plastic tabs, and a third slot on top for a metal tab. i think they engineered this grille for maximum chance of breaking it.
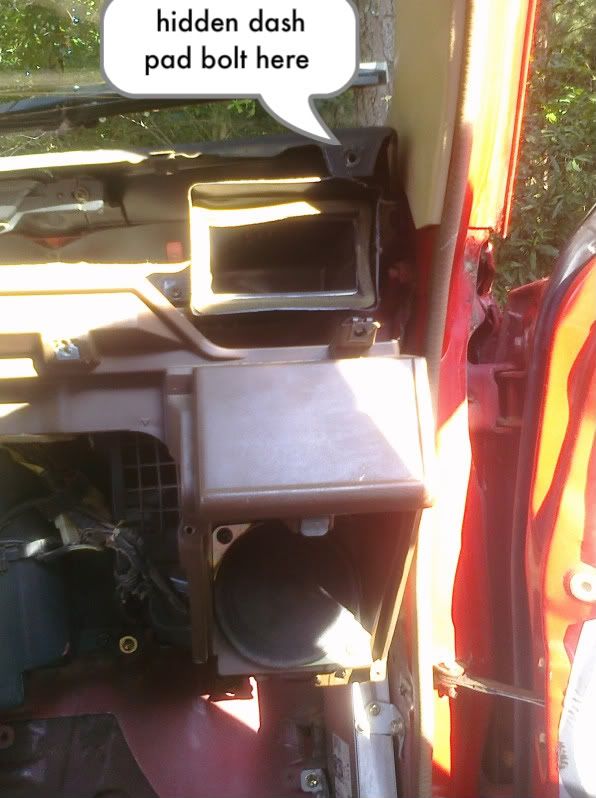
there's bolts holding the lower brace of the glove box. be careful not to tear the vinyl "back" of the glove box (if yours still even exists). once gone, you can see some of the screws holding the dashpad. but taking out the screws isn't enough. there's a secret bolt at the far right of the dash pad. YOU CAN ONLY ACCESS IT IF YOU REMOVE THE RIGHT SIDE VENT. good luck. mine was already chipped from a previous removal, but i couldn't get mine out without it breaking, it was just too brittle. but it's ok, i have another one in good shape. once you remove that vent, you can get to the last bolt.
but wait, before removing the dashpad, take off the cluster cover, and go ahead and remove the cluster too.
now you're left with the dashboard subframe, which is bolted in but has a tricky stud at the top center where you must remove a nut. there's also one screw on the left side of the radio housing.
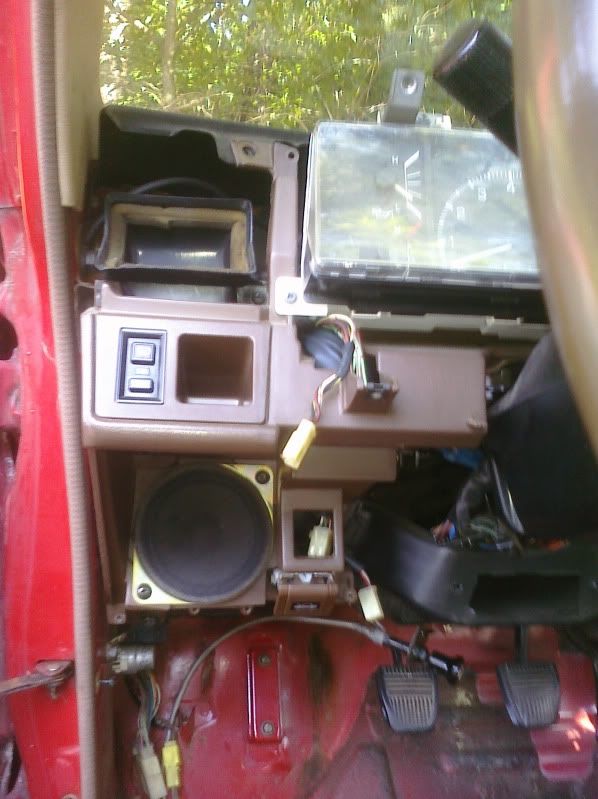
once it's all out, you'll have this:
on the right, you can see the recirc air intake. i saw my fan was filled with pine needles so i pulled it out and cleaned it up some.
with the dash completely out, i started pushing the mat away from the hump and toward the front. i did some trimming along the a/c housing, which came out nice. but on the driver's side, the pedals were making it tough. i trimmed around the steering column and eventually had a heck of a time trying to replace the left foot dead plate for the driver. i had to find some longer bolts since the carpet is trimmed around the deadplate, but i wanted it to go over the mat.
while all of the plastic pieces were out, i sprayed them down well with armor all to try to infuse a little UV protection.
with the front trimming done, i reassembled the dash with my new(er) dash parts i'd collected, and put everything back together up to the dash pad. i scored an uncracked dash pad with another inclinometer attached, but when i removed it, i could see the sun had turned this pad a murky brown/green. the spot where the inclinometer was, was still the correct brown! so i am going to try to dye the pad brown again before reinstalling. i'll let you know how that goes when i get to it.
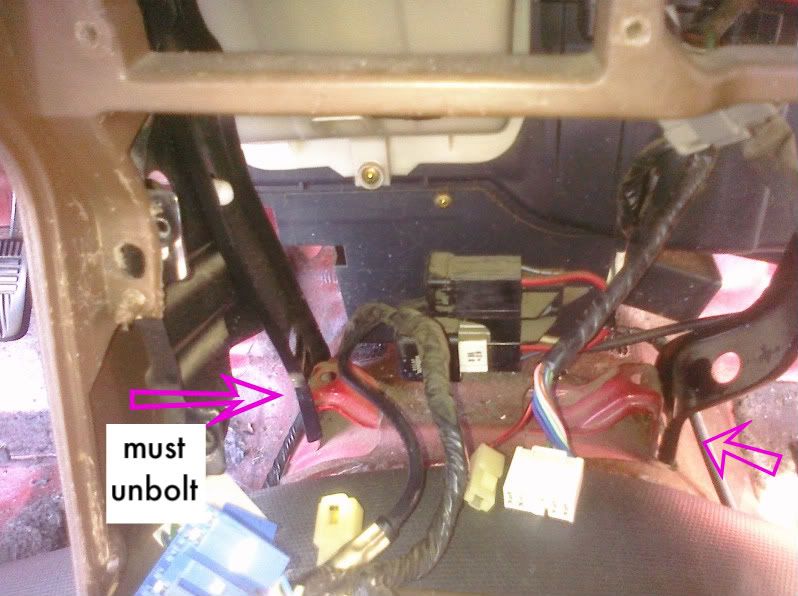
i started trimming along the doors and working toward the hump of the rear seat. i screwed up and trimmed too much on the passenger side. the rail for the front seat mounts makes a bump in the mat, and i needed to leave some extra to accomodate for that. realizing this, i did the driver's side ok, but needed to fix the pass. side. so i had to unbolt the shifter plate to attempt to stretch it about an inch.
one of the hard parts of working with this mat is it's really thick. it was very difficult getting those 6 screws in the first time, so i decided to abandon the idea of powdercoating that plate later, and just painting it gloss black. i sprayed it up, and replaced it, being sure to include the rubber shift boots which were soaking in armor all. i had to find a slightly longer screw for the one that goes through my custom cup holder. this will be the final product, i don't plan to reinstall the shifter boot and rectangle surround trim that usually covers this.
this coming weekend i'll try to get the rest of it done, including going up the rear seat bottom and into the bed. but i'm now debating how much stereo stuff i want to install. if i want an amp in the back, i'll have to run the cables under the mat now.
more to come...
Last edited by tj884Rdlx; Jun 29, 2011 at 10:16 AM.
Jul 8, 2011 | 06:19 AM
#2
Thread Starter
Registered User
Joined: Apr 2007
Posts: 1,458
Likes: 5
From: ATL!
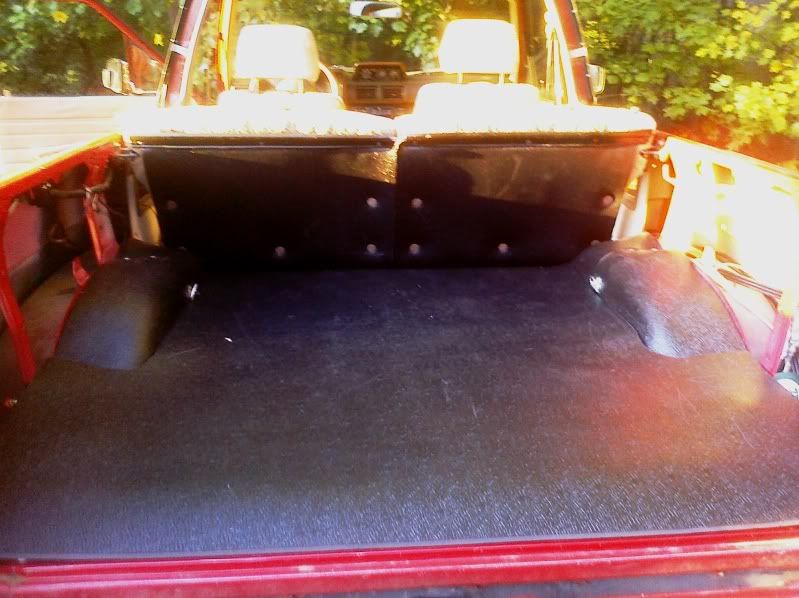
completed installing this rubber mat last weekend. there's enough bolts throughout the truck to hold it all in place. in the very wrinkly areas at the sides of the rear bench, the seatback mount brackets helped pinch it in place.
i tried cutting out notches to allow the seat bottom latches to catch. but the thickness of the padding has caused misalignment. now i kinda regret cutting holes in my new mat. i can probably get the latches to catch if i add some washers to space the latch a little wider.
it even worked out well along the rear fender wells. the mat is just wide enough to cover the wells completely, and the forward set of tie downs help maintain the tight crease up the sides, while the roll bar bolt sets keep the tops fairly flat.
the bottom layer is done, but now i'm going to add a 2nd layer to cover the seat backs and the cargo area again. so it will be double-thick along the corrugated bed surface. I'll cut it around the wheel wells this time, but i'll most likely have to use longer bolts through the 2nd set of tie downs. the rear bolt set for the roll bar should be able to thread in if i really lean on the bar while bolting it in.
at the moment i'm waiting for some wires to come in from monoprice.com . if you need cables for anything electronic, this is a place worth checking. their prices are amazingly low.
 Jul 8, 2011 | 04:46 PM
#5
Registered User
Joined: Jan 2007
Posts: 6,106
Likes: 27
My vote for coolest cup holder idea yet.
Wasn't that fun figuring that out on your own? I thought so too!
Oh well, it's not a secret any more!

..on the right side, there's screws and bolts everywhere, holding the dashpad, the glovebox, etc. the right speaker grille has two screws, two plastic tabs, and a third slot on top for a metal tab. i think they engineered this grille for maximum chance of breaking it.
there's bolts holding the lower brace of the glove box. be careful not to tear the vinyl "back" of the glove box (if yours still even exists). once gone, you can see some of the screws holding the dashpad. but taking out the screws isn't enough. there's a secret bolt at the far right of the dash pad. YOU CAN ONLY ACCESS IT IF YOU REMOVE THE RIGHT SIDE VENT.
there's bolts holding the lower brace of the glove box. be careful not to tear the vinyl "back" of the glove box (if yours still even exists). once gone, you can see some of the screws holding the dashpad. but taking out the screws isn't enough. there's a secret bolt at the far right of the dash pad. YOU CAN ONLY ACCESS IT IF YOU REMOVE THE RIGHT SIDE VENT.
Oh well, it's not a secret any more!
Last edited by MudHippy; Jul 8, 2011 at 06:20 PM.

 Jul 18, 2011 | 09:58 AM
#7
Thread Starter
Registered User
Joined: Apr 2007
Posts: 1,458
Likes: 5
From: ATL!
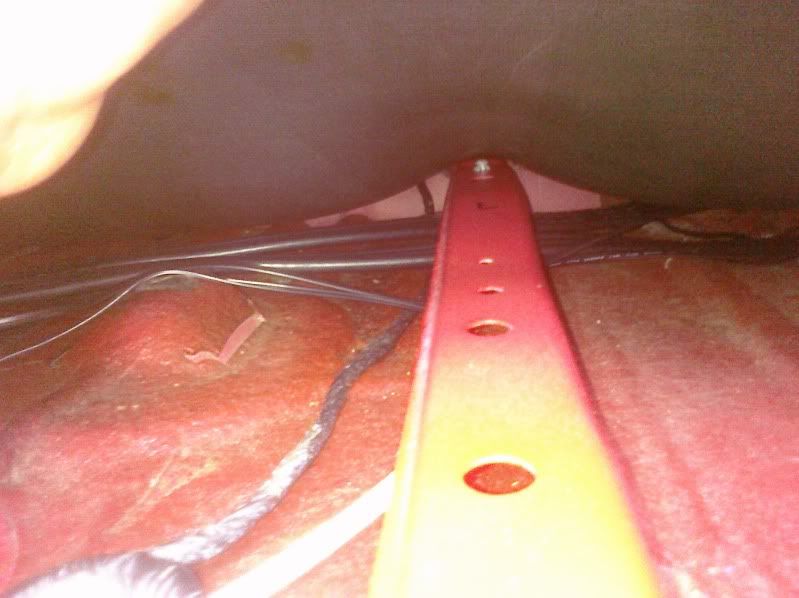
still working on this, but i've hit some snags while installing my stereo equipment now. i'm running the cables under the mat, here you can see there's a few holes in the front seat rail that i can run them through:
i'm at an impasse right now, because i cannot mount the stereo. the RCA cables plug directly into the rear of the stereo at its right rear corner. unfortunately, they're bumping into the HVAC airbox now, here you can see the view from the passenger's left foot, the RCAs (red, green, and blue ringed) add an inch to the overall length:
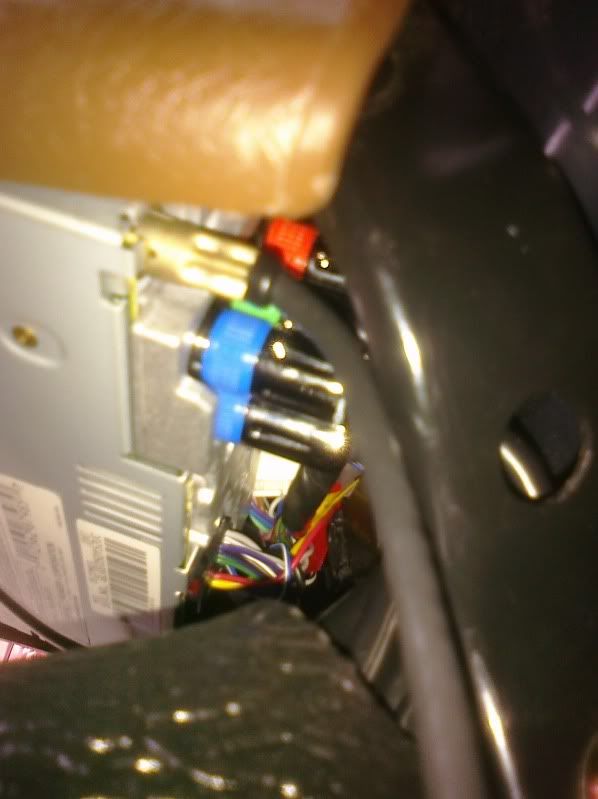
this is effectively making the stereo too long to mount in factory holes. i'm going to have to modify the stereo brackets to make it work. hopefully it won't look too stupid. see how far it sticks out?
i have to finish this before i can go through and route the rest of the cables neatly and reinstall the passenger seat.
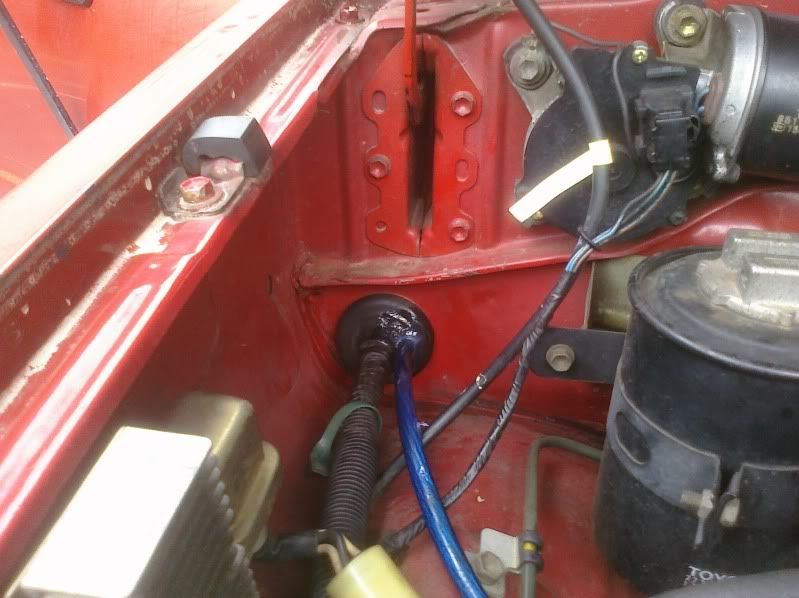
here's where i ran the main power cable from the battery through the firewall. i snuck through with the EFI harness penetration.

siliconed up the gasket on the engine side:
i'm at an impasse right now, because i cannot mount the stereo. the RCA cables plug directly into the rear of the stereo at its right rear corner. unfortunately, they're bumping into the HVAC airbox now, here you can see the view from the passenger's left foot, the RCAs (red, green, and blue ringed) add an inch to the overall length:
this is effectively making the stereo too long to mount in factory holes. i'm going to have to modify the stereo brackets to make it work. hopefully it won't look too stupid. see how far it sticks out?
i have to finish this before i can go through and route the rest of the cables neatly and reinstall the passenger seat.
here's where i ran the main power cable from the battery through the firewall. i snuck through with the EFI harness penetration.
siliconed up the gasket on the engine side:
Last edited by tj884Rdlx; Jul 18, 2011 at 10:16 AM.
Trending Topics
Jul 18, 2011 | 10:46 AM
#8
Thread Starter
Registered User
Joined: Apr 2007
Posts: 1,458
Likes: 5
From: ATL!
i am making SOME progress.
i ran the speaker wire to the front left, so i was able to replace the kick panel and the left door sill. the kick panels required a little trimming, the left foot rest required longer bolts. the sill fit up nicely.
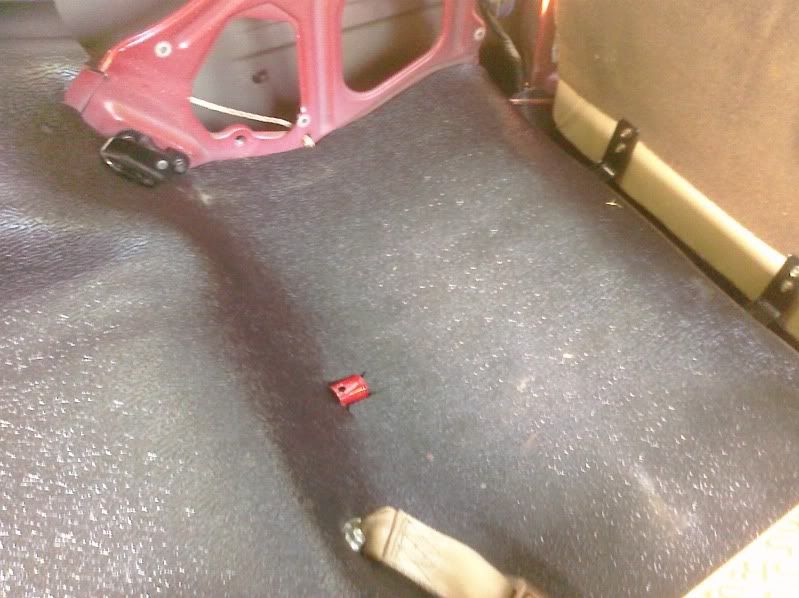
fits nice and tight along the rear seat hinges.
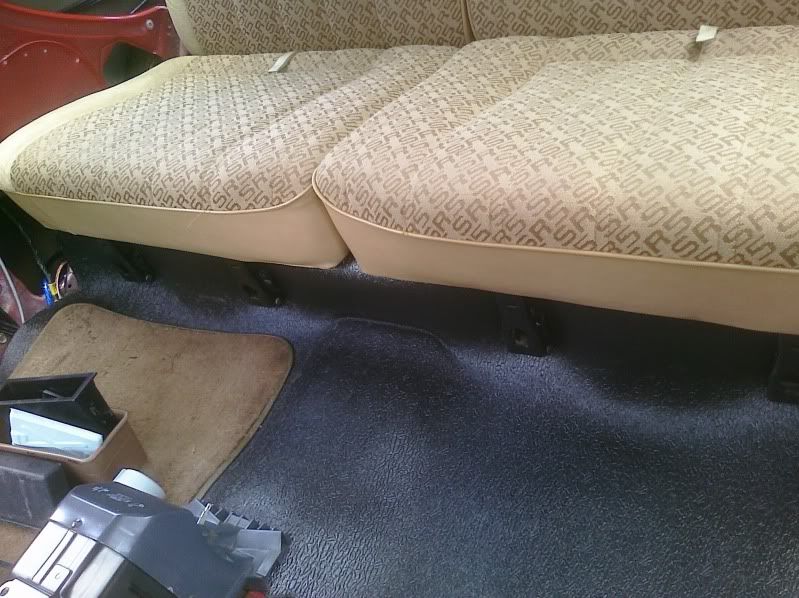
a view from the rear of layer one, which covers the floor and wheel wells.
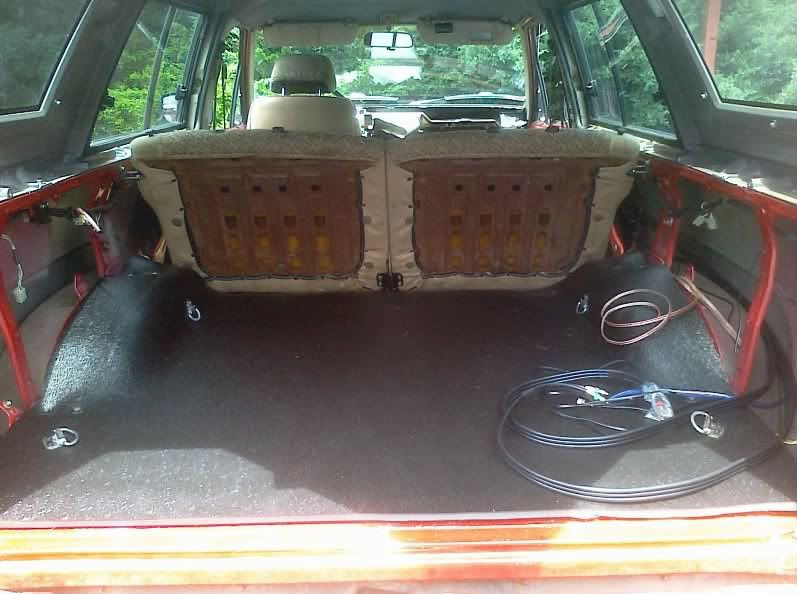
my 2nd layer will cover the seat backs and the bed floor in one piece, the same shape as the original factory carpet. you can see that before i finish that, i've got some wires to straighten out for the amp which will go in the right qtr. panel.
i ran the speaker wire to the front left, so i was able to replace the kick panel and the left door sill. the kick panels required a little trimming, the left foot rest required longer bolts. the sill fit up nicely.
fits nice and tight along the rear seat hinges.
a view from the rear of layer one, which covers the floor and wheel wells.
my 2nd layer will cover the seat backs and the bed floor in one piece, the same shape as the original factory carpet. you can see that before i finish that, i've got some wires to straighten out for the amp which will go in the right qtr. panel.
Last edited by tj884Rdlx; Jul 18, 2011 at 10:51 AM.
Aug 17, 2011 | 06:26 AM
#9
Thread Starter
Registered User
Joined: Apr 2007
Posts: 1,458
Likes: 5
From: ATL!
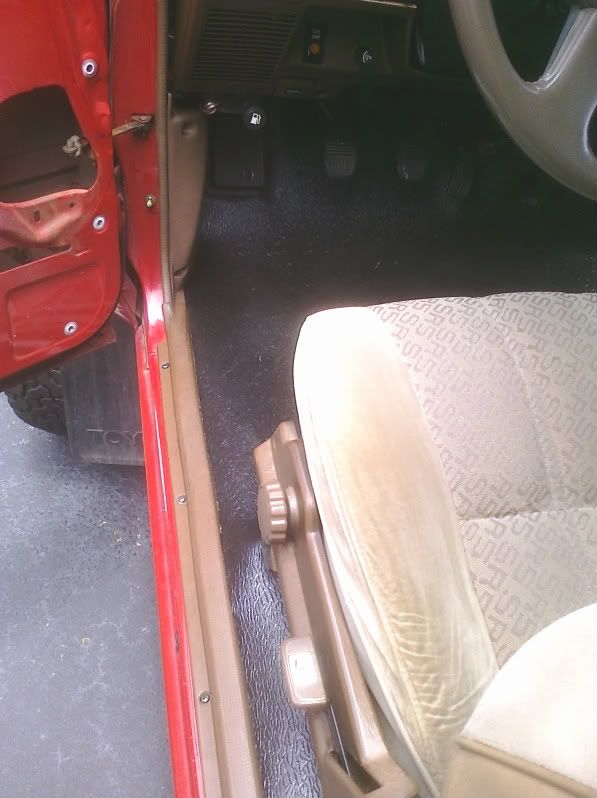
had some cool mornings the past few days, so took the opportunity to do a little more reassembly on the front, trimming to fit the new padding.
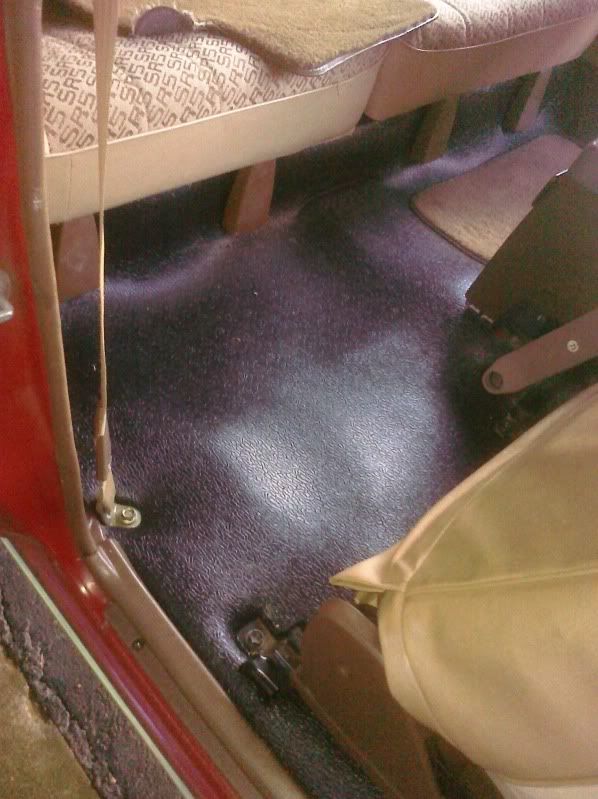
here's the driver's floor, where i trimmed the kick panel a half inch, but the door sills i was able to screw in by only leaning on them firmly.
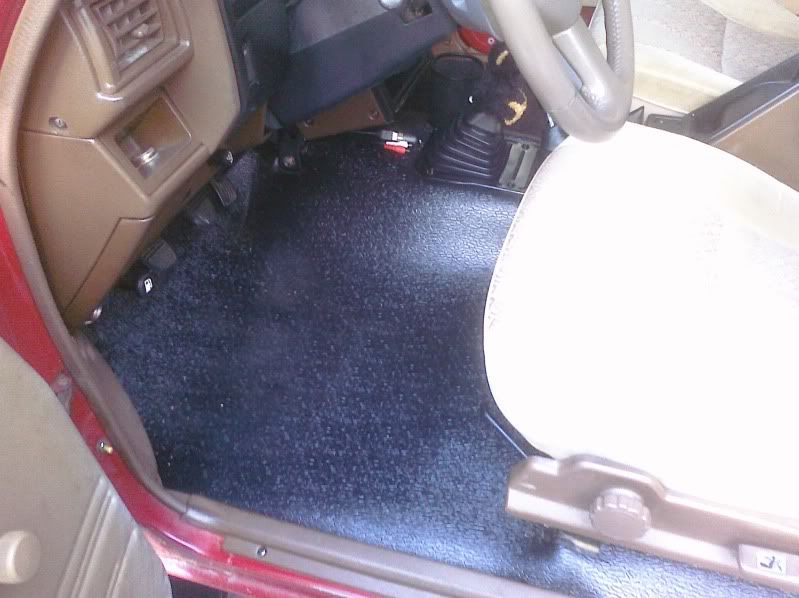
here's the passenger side sill, i was able to stretch the floor a little and recover the gap from my overtrimming earlier. you may notice i haven't put the trim on that surrounds the right seat legs. i'll have to trim that to fit the curve of the padding as adding pressure here might pull out the padding from the sill.
you might be able to see that my radio is sticking out of the dash at an angle. that's the result of those RCA cables i mentioned earlier. it doesn't look too bad, and i actually prefer the additional angle up to view. i might try to make it a little less obvious with a permanent marker to color in the radio's sides.
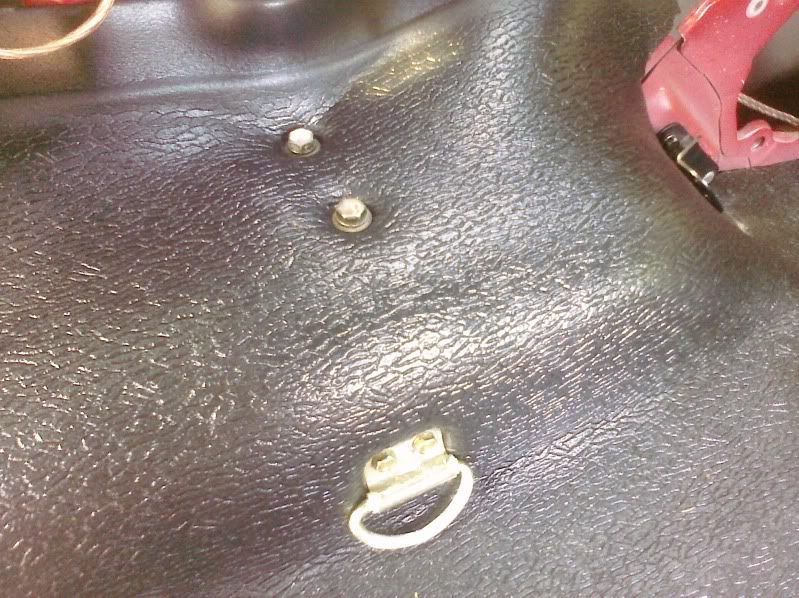
here's the rear seat floor from the driver's side. the little plastic panels which cover the lower seat belt anchor bolt were trimmed 1/2" to fit as well. amazingly, this one is concealing a dozen stereo cables running from the floor into the quarter panel right behind it.
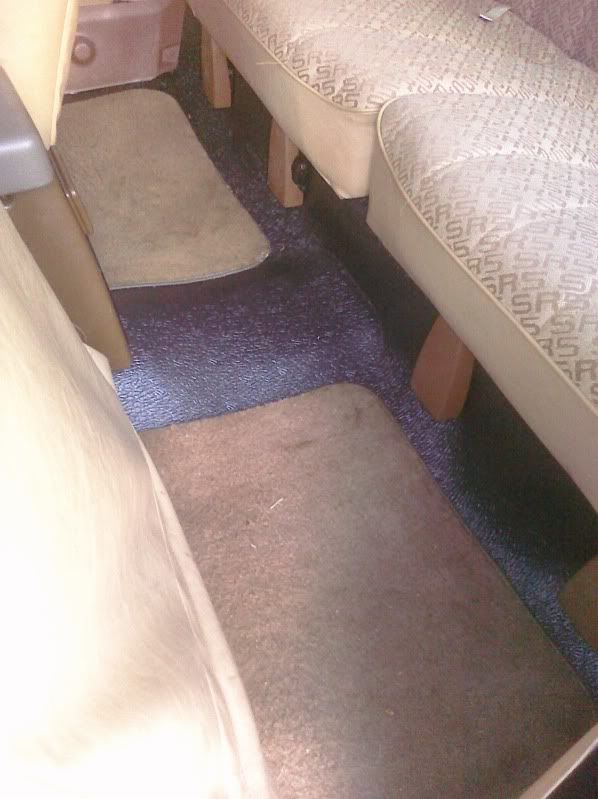
clear approach climbing in from the right side:
this weekend i'm going to take a stab at putting the final piece in the rear, covering the seatbacks and then replacing the rollbar, then deciding what to do with the cargo side panels.
here's the driver's floor, where i trimmed the kick panel a half inch, but the door sills i was able to screw in by only leaning on them firmly.
here's the passenger side sill, i was able to stretch the floor a little and recover the gap from my overtrimming earlier. you may notice i haven't put the trim on that surrounds the right seat legs. i'll have to trim that to fit the curve of the padding as adding pressure here might pull out the padding from the sill.
you might be able to see that my radio is sticking out of the dash at an angle. that's the result of those RCA cables i mentioned earlier. it doesn't look too bad, and i actually prefer the additional angle up to view. i might try to make it a little less obvious with a permanent marker to color in the radio's sides.
here's the rear seat floor from the driver's side. the little plastic panels which cover the lower seat belt anchor bolt were trimmed 1/2" to fit as well. amazingly, this one is concealing a dozen stereo cables running from the floor into the quarter panel right behind it.
clear approach climbing in from the right side:
this weekend i'm going to take a stab at putting the final piece in the rear, covering the seatbacks and then replacing the rollbar, then deciding what to do with the cargo side panels.
Last edited by tj884Rdlx; Aug 17, 2011 at 07:21 AM.
Aug 17, 2011 | 07:51 AM
#10
Registered User
Joined: Jul 2011
Posts: 7
Likes: 0
From: McComb, OH
This is Looking Great! I don't know if you have the room but a "Right Angle RCA Adapter" might gain you enough room to put the stereo in. just a thought google the above quoted text and there are lots of returns
Nov 26, 2011 | 08:51 PM
#11

Wow, that looks great. I am going to do something similar. I have a 1997 Ford F-350 that has a vinyl mat for the flooring. That was my idea for my 1987 4Runner. But seeing this, I am sold.
Do you think that the floor drain plugs could be routed up through the mat?
I think it would be cool to be able to hose out the interior...carefully..and just drain the water out of the bottom of the floor pan.
Good work!!
Do you think that the floor drain plugs could be routed up through the mat?
I think it would be cool to be able to hose out the interior...carefully..and just drain the water out of the bottom of the floor pan.
Good work!!
Nov 27, 2011 | 05:41 AM
#12
Thread Starter
Registered User
Joined: Apr 2007
Posts: 1,458
Likes: 5
From: ATL!
finally finished!
here's the last set of pics to complete this project.
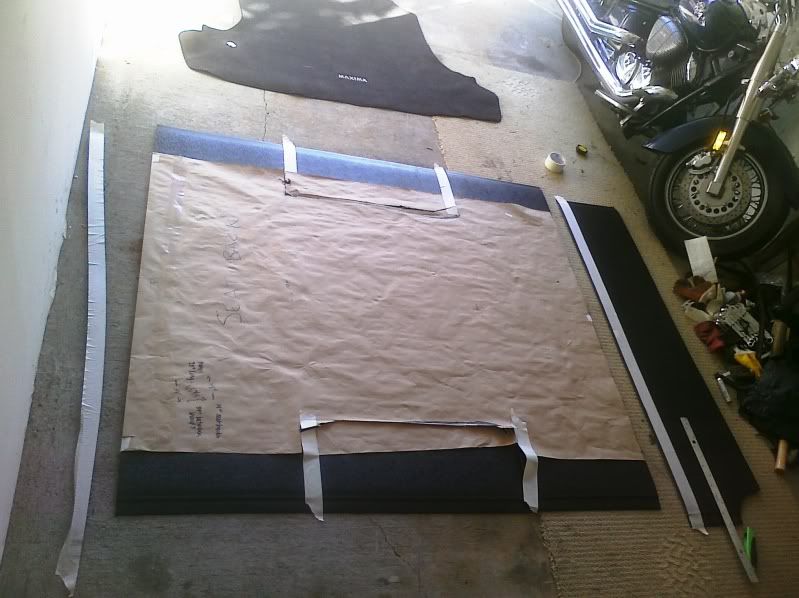
i used heavy brown paper to create a template of the cargo area, including where the plastic "pushpins" go in the seat backs. this helped eliminate the guesswork of cutting around the wheel wells too.
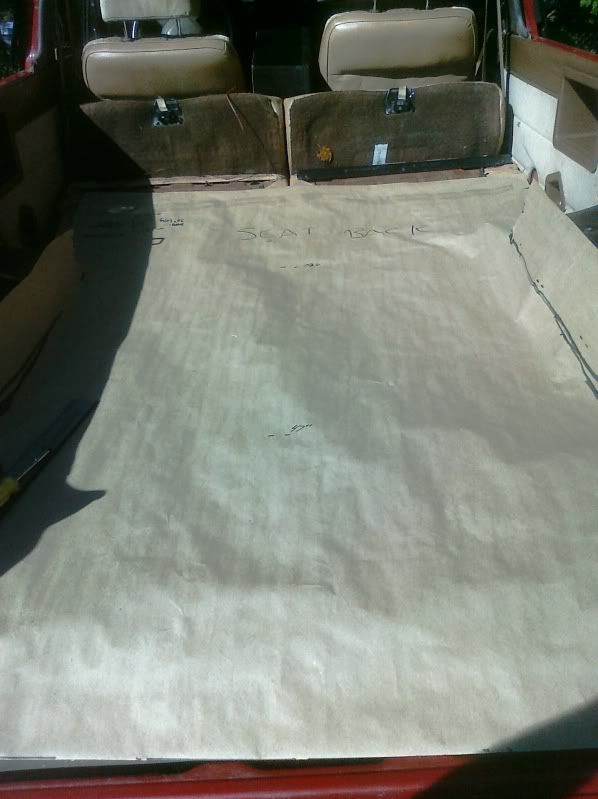
i masking taped the template to the mat, then cut the front and rear edges square. then i cut sides and around the wheel wells.
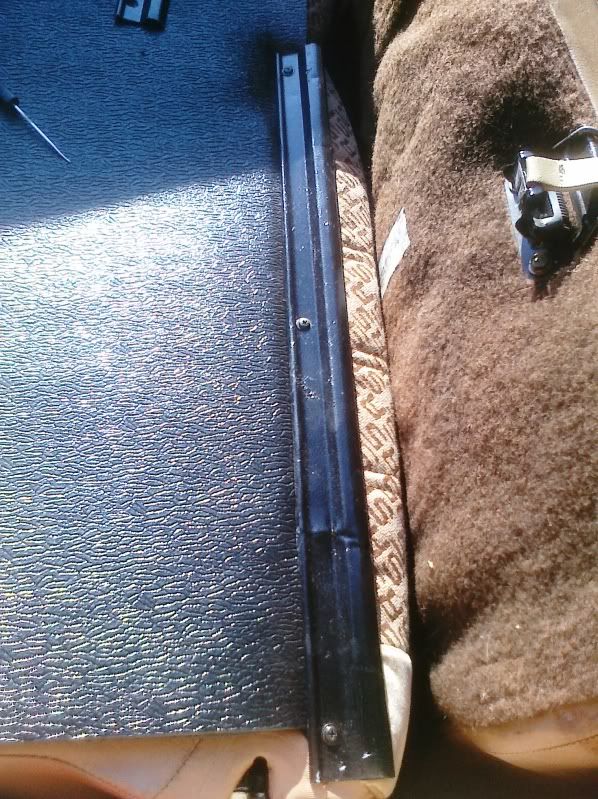
i had previously sprayed the metal trim pieces black, so they'd be ready to attach the leading edge of the mat to the seat backs. i had to lean on the piece to compress the foam, start the screws, then every few minutes i'd tighten them up some more, as the foam got used to being compressed. i didn't want to strip any of the holes in the metal seat back frame.
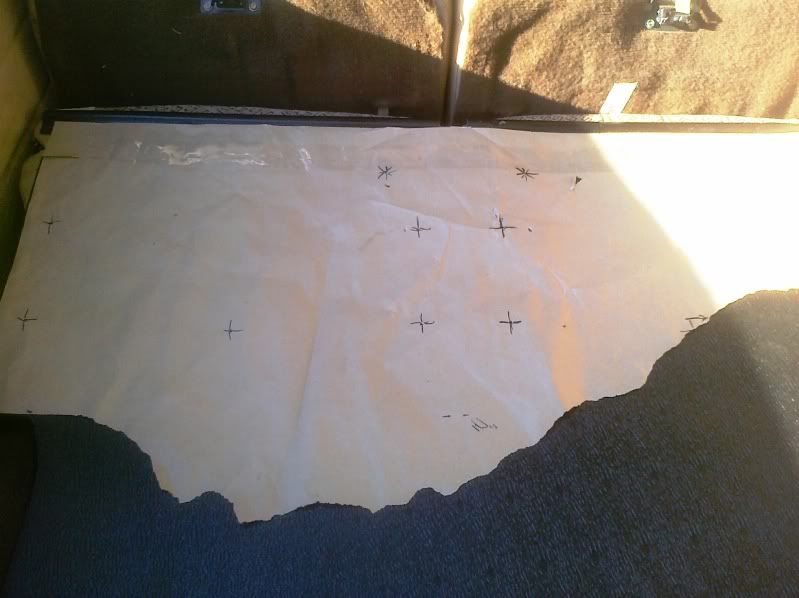
here's my template for pressing in the plastic pins.
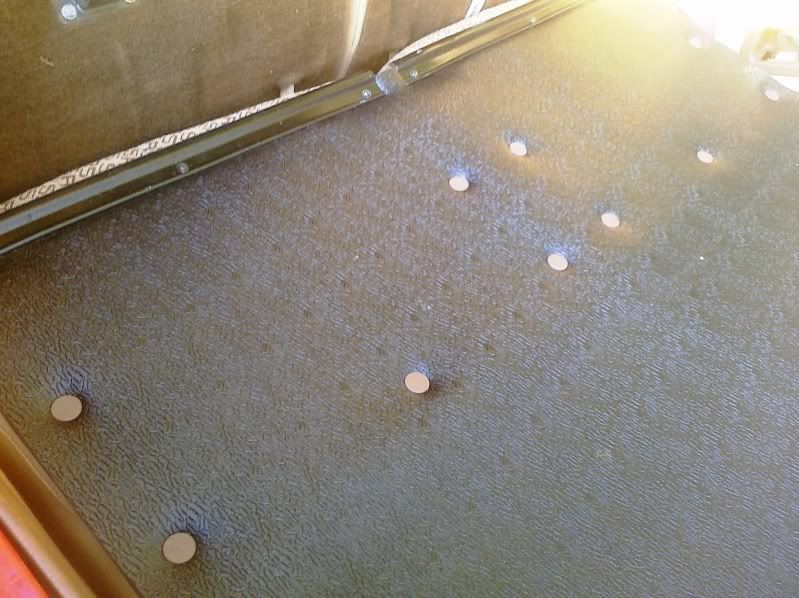
and all the pins in place. i left off the black plastic discs which work with the strap on the seat bottoms. i thought about painting them black too, but for now they're ok as is.
here it is after some fine tuning of the cut around the wells. once i had all the pushpins in, i lifted the joined seat backs forward and locked them in. it's tight, but it latches. then i used a long blade to make the slice down the middle that separates the two seat backs, without cutting the seat fabric. i also used a rubber mallet to tap down the edges of the black trim pieces, so rear seat passengers wouldn't scrape their arms up.
and here it is done! i had to use longer bolts for the rear legs of the rollbar. i actually used extra bolts that secure the hard top. i bought longer metric bolts to attach the rear set of tie down rings. these rings and the rear legs go through two layers of mat.
the side panels were tricky to get wedged back into place, but they're in there, just like stock. i didn't trim them. i'll have to refinish them some other day.

my last step will be to replace the door sill trim at the tailgate. i think i'm going to use some longer screws that will work with the existing plastic inserts, since this edge is also double thick.
i used heavy brown paper to create a template of the cargo area, including where the plastic "pushpins" go in the seat backs. this helped eliminate the guesswork of cutting around the wheel wells too.
i masking taped the template to the mat, then cut the front and rear edges square. then i cut sides and around the wheel wells.
i had previously sprayed the metal trim pieces black, so they'd be ready to attach the leading edge of the mat to the seat backs. i had to lean on the piece to compress the foam, start the screws, then every few minutes i'd tighten them up some more, as the foam got used to being compressed. i didn't want to strip any of the holes in the metal seat back frame.
here's my template for pressing in the plastic pins.
and all the pins in place. i left off the black plastic discs which work with the strap on the seat bottoms. i thought about painting them black too, but for now they're ok as is.
here it is after some fine tuning of the cut around the wells. once i had all the pushpins in, i lifted the joined seat backs forward and locked them in. it's tight, but it latches. then i used a long blade to make the slice down the middle that separates the two seat backs, without cutting the seat fabric. i also used a rubber mallet to tap down the edges of the black trim pieces, so rear seat passengers wouldn't scrape their arms up.
and here it is done! i had to use longer bolts for the rear legs of the rollbar. i actually used extra bolts that secure the hard top. i bought longer metric bolts to attach the rear set of tie down rings. these rings and the rear legs go through two layers of mat.
the side panels were tricky to get wedged back into place, but they're in there, just like stock. i didn't trim them. i'll have to refinish them some other day.
my last step will be to replace the door sill trim at the tailgate. i think i'm going to use some longer screws that will work with the existing plastic inserts, since this edge is also double thick.
Last edited by tj884Rdlx; Nov 27, 2011 at 05:51 AM.
Nov 27, 2011 | 06:08 AM
#13
Registered User
Joined: Jan 2011
Posts: 288
Likes: 0
From: newnan georgia
Nov 27, 2011 | 06:10 AM
#14
Thread Starter
Registered User
Joined: Apr 2007
Posts: 1,458
Likes: 5
From: ATL!
Wow, that looks great. I am going to do something similar. I have a 1997 Ford F-350 that has a vinyl mat for the flooring. That was my idea for my 1987 4Runner. But seeing this, I am sold.
Do you think that the floor drain plugs could be routed up through the mat?
I think it would be cool to be able to hose out the interior...carefully..and just drain the water out of the bottom of the floor pan.
Good work!!
Do you think that the floor drain plugs could be routed up through the mat?
I think it would be cool to be able to hose out the interior...carefully..and just drain the water out of the bottom of the floor pan.
Good work!!
i originally wanted to make it so i could take a hose to it, or leave the top off, and not worry about rain.
but the catch is, unless i took steps to either glue the mat to the floor, or seal every edge and penetration, water will be able to get between the mat and floor and pool there.
for example, the drain plugs: they'd have to be deep enough to go through the 1/2" mat and the floorplan. the stock ones aren't. but even if you had a deeper plug, once you pull it, water could seep between the floor and mat.
so, you'd need a plug that sealed a ring around the outlet, so water could drain out w/o getting under the mat. you'd also need to seal the door sills and every other edge and penetration.
it became clear to me that if i wanted the floor waterproof and "hose-able", i'd need to apply a roll-on or spray-on product. so this mat acts like carpet, only more durable. for $100 in material, i'm ok with it. but it does clean up easily with a dust pan brush instead of vacuuming.
Dec 22, 2011 | 03:49 PM
#16

Registered User
Joined: Feb 2011
Posts: 124
Likes: 0
From: New Hampshire
I know this is a month or so too late, but they do make 90* rca connectors that turn in less then an inch and a half.
When you need to take out any of the screws that are holding down the mat, try trimming some of the backing foam from aroung that area. It will make it easer to put back down.
BTW looks awseome!
When you need to take out any of the screws that are holding down the mat, try trimming some of the backing foam from aroung that area. It will make it easer to put back down.
BTW looks awseome!
Jan 31, 2013 | 09:27 PM
#17

Registered User
Joined: Jan 2013
Posts: 14
Likes: 0
From: Indiana
Looks great! Good idea with the mat. Where did you purchase your material. I have an 88 pickup 4x4 and the carpet is trashed, I was thinking about just putting down new carpet but I like the new idea of tougher material.
Jan 31, 2013 | 10:14 PM
#18

And nice job OP!
they sell the stuff at places like Grainger
...
found it on sale at the Pendergrass Flea Mkt in N. GA and bought $100 worth
...
found it on sale at the Pendergrass Flea Mkt in N. GA and bought $100 worth
anti-fatigue mats at grainer industrial supply
Last edited by Co_94_PU; Jan 31, 2013 at 10:21 PM.
 Feb 1, 2013 | 02:09 PM
#20
Registered User


Joined: Mar 2012
Posts: 7,139
Likes: 687
Low-Maintenance & Surely Better Sound-Proofing
Looks good! I'm sure it also does better sound-proofing than original plain carpet and padding. man, surely more detailed work that I did on mine!
If anyone does this, in the future, I suggest also adding Thermo-Shield padding from Pep Boys or equivalent on floor above exhaust and also footwells/firewall.
If anyone does this, in the future, I suggest also adding Thermo-Shield padding from Pep Boys or equivalent on floor above exhaust and also footwells/firewall.

Thread
Thread Starter
Forum
Replies
Last Post
jasonty
Pre 84 Trucks (Build-Up Section)
41
Dec 23, 2018 01:00 PM
TURBOrunnerNM
86-95 Trucks & 4Runners
4
Jul 22, 2015 11:01 AM
rushw
General Electrical & Lighting Related Topics
4
Jul 18, 2015 01:46 PM


