
The Repair Saga of 'Bradley'
 Jan 30, 2014 | 01:22 PM
#1
Thread Starter
Registered User
Joined: Jan 2014
Posts: 126
Likes: 0
From: McMinnville, TN
The Repair Saga of 'Bradley'
Note: I mistakenly posted this in the wrong sub-forum earlier, could a mod attend to deleting that thread?
I'm making this a general repair thread for my truck to help me not only document any repairs done, but also get assistance when I run in to problems. For the most part I have sworn off mechanics, I'll explain why shortly.
I traded a 1996 'yota Camry for this truck in August of 2013, the guy I got the truck from wasn't the original owner (he traded a Tahoe or something for it). I'm not sure how many owners it has had, cannot afford a CarFax report yet. I am, however, going to be it's final owner.anyway. Guy I got it from told me it had a little rust and brakes needed adjustment. Discovered going down the mountain that it needed more than a little brake work. Wound up replacing front calipers and discs. Rotors are soon to be replaced as well. Also discovered 'a little rust' meant that the entire frame is held together with good intentions. Will be replacing the frame soon since I've already put about $800 into the truck between brakes, calipers, spark plugs, oil, coolant, water pump, timing chain kit, universal joint (rear), fuel filter and labor to have it all installed for me.
I have just bought a fuel pump (several mechanics are convinced this is the real problem, and after I saw what was in the filter, I can believe it) and throttle position sensor (sensor failed testing as advised by Chilton's manual). I should be getting the pump and sensor by the middle of next week (ordered through Rock Auto). Chilton's is pretty straightforward and - after my wife helped out the mechanic's girlfriend - I'm getting some free help putting the pump in (I don't have all the proper tools to do it on my own, yet).
I do want to ask something: I used a .58mm feeler gauge to test the tps in the first position and a similarly off-sized one in the second position. is that hundreth of a millimeter that crucial? If so I'll definitely have to find another set of feeler gauges as the set I used had neither size called for in the Chilton's manual (the first position is .57mm, the second .80mm).
Oh yeah, the truck's name is Bradley, hence the title. Also hope this is the right forum for this.
If anyone would like, I could post my list of 'work already done', 'work to be done', and 'mods planned on being done' (though I think I'll save the latter for a 'build-up' thread if appropriate).
Feb 3, 2014 | 10:08 PM
#3

Registered User
Joined: Sep 2013
Posts: 1,631
Likes: 110
Did I read this correctly.. change the frame? How much are those running theae days? It seems like an awful lot of work. Hope it works out for you. You could test almost alll the parts and not buy them if they are in apec. This is going to be a very expensive build if you throw parts at it.
Feb 3, 2014 | 11:56 PM
#4
Just seen in your signature it is an 89 4x4. I bought a beater and didn't know of the frame issues and had to replace mine. $200 for a frame and 24 hours later I had it on the road and that is where the madness started. It gave me a big boost in confidence in if I could swap a frame there wasn't much I couldn't do. I have since swapped or helped others swap frames and cabs.
I enjoy following in depth builds. You should start a build for yourself just to follow along and see where you have been and where you are going. How many have built a truck from the ground up? If you are having it done it will cost a fortune. If you are doing it yourself, with some time and patience you can cut the cost way down.
I enjoy following in depth builds. You should start a build for yourself just to follow along and see where you have been and where you are going. How many have built a truck from the ground up? If you are having it done it will cost a fortune. If you are doing it yourself, with some time and patience you can cut the cost way down.
Feb 4, 2014 | 05:54 AM
#5
Registered User
Joined: Sep 2013
Posts: 1,631
Likes: 110
only $250 for a frame? The prices of parts on these cars are all over the place! lol
Well now that Terrys87 says it's not that much work, I guess I'll take his word for it. I bet it would take me 4 full days of work
Well now that Terrys87 says it's not that much work, I guess I'll take his word for it. I bet it would take me 4 full days of work
Feb 4, 2014 | 05:28 PM
#6
Thread Starter
Registered User
Joined: Jan 2014
Posts: 126
Likes: 0
From: McMinnville, TN
Did I read this correctly.. change the frame? How much are those running theae days? It seems like an awful lot of work. Hope it works out for you. You could test almost alll the parts and not buy them if they are in apec. This is going to be a very expensive build if you throw parts at it.
Just seen in your signature it is an 89 4x4. I bought a beater and didn't know of the frame issues and had to replace mine. $200 for a frame and 24 hours later I had it on the road and that is where the madness started. It gave me a big boost in confidence in if I could swap a frame there wasn't much I couldn't do. I have since swapped or helped others swap frames and cabs.
Originally Posted by Terrys87
I enjoy following in depth builds. You should start a build for yourself just to follow along and see where you have been and where you are going. How many have built a truck from the ground up? If you are having it done it will cost a fortune. If you are doing it yourself, with some time and patience you can cut the cost way down.
Next post will feature some of the work I done today (well, just the new tps). I tested the old tps and am hoping the feeler gauges I used was 'good enough' for changing it out. I will be posting pictures in my album of all the pics I took while working (though I stopped shooting pictures once we started working on draining the tank of gas).
Feb 4, 2014 | 05:42 PM
#7
Thread Starter
Registered User
Joined: Jan 2014
Posts: 126
Likes: 0
From: McMinnville, TN
Attached is a pic of the new TPS. It was fairly easy to replace once I removed the coolant manifold. I think I messed something up though because now my truck is registering as hot after only driving a few miles, then going back down to normal and is pretty much all over the place. The thermostat dropped out and hit the ground in the process of replacing it. Cheap fix if I busted it and nothing else is wrong. Could I have put it back upside down? I'm sure I didn't, though. I can do some checking on it tomorrow, though (and plan on it). I have some long distance driving to do (about 154 miles round trip) next Tuesday for a doctor's appointment and need my vehicle working in tip-top shape (for the most part, frame is cracked again and needs to be welded back together again).
I might take some pics of the old fuel pump, though nothing interest on it except a rest encrusted filter bag thing.
I might take some pics of the old fuel pump, though nothing interest on it except a rest encrusted filter bag thing.
Trending Topics
Feb 5, 2014 | 12:04 AM
#10
Thanks Gevo..I should of said 24 hours working time. It took me 12 on Saturday and 12 on Sunday to have it running and that was with the axles on the frame. With the engine and tranny out, there isn't much more to do to get the body off. 6 bolts hold the cab on, disconnect the brake and clutch line by the passenger front tire, disconnect the steering at firewall or gear box, and the electrical plug under the passenger seat and good to go. Fierohink, Foolio, and Dakotawho have done the same thing and seem to say the same thing as it is actually easy to do.
I guess it depends on where you live at for a frame. A friend of mine sold a 79 long bed frame for $100, I have a 87 standard cab frame that I would let go for $150. When I did my frame swap, I bought a whole truck with no motor, no bed and a damaged cab for $250.
When I get my 85 truck running, I am going to do an in depth picture and how to on tearing a truck down which will show how to go about doing a frame swap. I am going to paint the frame and body, just waiting for the weather to warm up.
Feb 5, 2014 | 12:34 AM
#11
janagyjr... I get my fuel pumps off of ebay for around $30. Like you said the pump is most likely trashed since you live in the Midwest like I do. I would suggest checking the return line and looking at the tank as well. I clean mine out with white vinegar by soaking a few days and then coating with Red Kote. You can replace the tank as well as they are available.
Like was mentioned, raising the truck as high as it will go on the front end and letting the thermostat cycle a few times will get the air out of the system and help with idling. Also as far as the temp gauge issue you are having, cleaning the sensor between cylinders #3 and #4 can help on that. It gets a crust build up on it and can throw the gauge off. Cleaning all of the sensors isn't a bad idea as well.
Here are a few links
https://www.yotatech.com/forums/f199.../#post51633022
Feb 5, 2014 | 06:15 AM
#12
Thread Starter
Registered User
Joined: Jan 2014
Posts: 126
Likes: 0
From: McMinnville, TN
With the engine and tranny out, there isn't much more to do to get the body off. 6 bolts hold the cab on, disconnect the brake and clutch line by the passenger front tire, disconnect the steering at firewall or gear box, and the electrical plug under the passenger seat and good to go. Fierohink, Foolio, and Dakotawho have done the same thing and seem to say the same thing as it is actually easy to do.
I guess it depends on where you live at for a frame. A friend of mine sold a 79 long bed frame for $100, I have a 87 standard cab frame that I would let go for $150. When I did my frame swap, I bought a whole truck with no motor, no bed and a damaged cab for $250.
When I get my 85 truck running, I am going to do an in depth picture and how to on tearing a truck down which will show how to go about doing a frame swap. I am going to paint the frame and body, just waiting for the weather to warm up.
I would suggest checking the return line and looking at the tank as well. I clean mine out with white vinegar by soaking a few days and then coating with Red Kote. You can replace the tank as well as they are available.
I'll look and see what this Red Kote stuff is.
I'll still probably buy a new tank so having this one soaking with vinegar doesn't keep me still. I think I just need to replace the lines anyway. I saw a lot of rust on the metal lines going to/from brakes and gas tank.
Like was mentioned, raising the truck as high as it will go on the front end and letting the thermostat cycle a few times will get the air out of the system and help with idling.
Also as far as the temp gauge issue you are having, cleaning the sensor between cylinders #3 and #4 can help on that. It gets a crust build up on it and can throw the gauge off. Cleaning all of the sensors isn't a bad idea as well.
Here are a few links
https://www.yotatech.com/forums/f199.../#post51633022
https://www.yotatech.com/forums/f199.../#post51633022
Feb 6, 2014 | 06:10 AM
#13
Thread Starter
Registered User
Joined: Jan 2014
Posts: 126
Likes: 0
From: McMinnville, TN
Okay, I did some googling because I'm still having coolant temp issues. Seems I might have to do several cycles of bleeding out the coolant system, but all I have right now to do it is water (I've not been using 50/50 coolant/water mix, turned to slush several days after the timing chain was replaced). I have a customer who owes me some money and I'm expecting to hear from him anytime this week (if not, I'll be knocking on his door come Monday). Would it be okay to put water in until I can get straight coolant?
Also, as I was trying to bleed the system yesterday instead of letting it idle I would rev the engine up slowly and then let it go back to idle. With the truck running at temp and idling, coolant filled the neck of the radiator (I could see it from the cab) and as I would rev it, it would sink back down. Is that normal?
I thought the system was bled because the temp gauge started to remain steady at higher rpm's but when I actually got to driving it got hot (but only during acceleration, as soon as I take my foot off the gas it went to normal immediately). I'm going to double check the thermostat is not upside down and go from there. Most likely I will test it in boiling water if it doesn't start working as expected.
Feb 6, 2014 | 06:32 AM
#14
Tennessee has about the same climate as Missouri. I have family over around Nashville. The humidity and issues that trucks have there pretty much apply here as well.
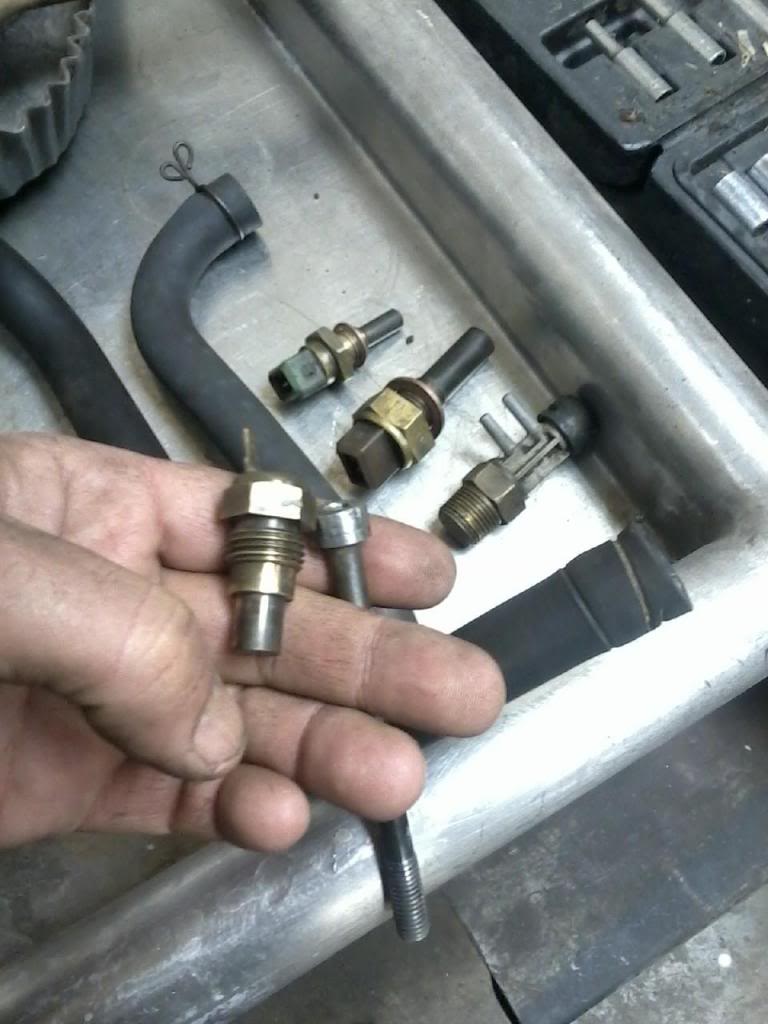
The brown sensor in the background is your Cold Start Injector Timing Switch. I have gotten it to work just by cleaning it as well.
Is your fan clutch operating properly? It is a consumable part, is it engaging or disengaging like it should. In my experience, when it goes bad, it stays engaged all of the time and has a loud noise.
Flushing your radiator makes a big difference. The Preston kit wont clean it well enough. Usually need to pull the radiator to have a local radiator shop to power flush it. A lot of nasty gunk will come out of it.
Check your thermostat and make sure it is operating and installed correctly.
A steep incline will work for burping the system. Remove radiator cap to allow air to escape. It can shoot alot of water out. The first one or two usually isnt to hot but after that, be careful as it could burn you.
I clean my sensors with a brass wire toothbrush. Not much at a parts store. The one in my hand is the one that controls the temp gauge. With the scaling it gets on it, I have had it to mess with my guage. Cleaning it has fixed a couple of trucks. Not a bad idea to do the rest.

Last edited by Terrys87; Feb 6, 2014 at 06:36 AM.
Feb 6, 2014 | 07:03 AM
#15
Thread Starter
Registered User
Joined: Jan 2014
Posts: 126
Likes: 0
From: McMinnville, TN
The brown sensor in the background is your Cold Start Injector Timing Switch. I have gotten it to work just by cleaning it as well.
[quote]Is your fan clutch operating properly? It is a consumable part, is it engaging or disengaging like it should. In my experience, when it goes bad, it stays engaged all of the time and has a loud noise.[/quoted]
I don't know? I'll have to look and see. When I tried burping the system yesterday I was doing it by myself and didn't think of chocking my wheels on the slight incline I was on so was in the cab during the whole process.
Flushing your radiator makes a big difference. The Preston kit wont clean it well enough. Usually need to pull the radiator to have a local radiator shop to power flush it. A lot of nasty gunk will come out of it.
Check your thermostat and make sure it is operating and installed correctly.
A steep incline will work for burping the system. Remove radiator cap to allow air to escape. It can shoot alot of water out. The first one or two usually isnt to hot but after that, be careful as it could burn you.
I clean my sensors with a brass wire toothbrush. Not much at a parts store. The one in my hand is the one that controls the temp gauge. With the scaling it gets on it, I have had it to mess with my guage. Cleaning it has fixed a couple of trucks. Not a bad idea to do the rest.

I'm really getting frustrated with my Chilton's manual.
Feb 6, 2014 | 07:12 AM
#16
All of the sensors are easy to get to. The thermostat sensor (in my hand) is a 17mm deep well if I remember correctly.
The brown sensor is up front under the theromstat on the intake. (brown connector, CSI Timing Switch)
The Water Thermo Senor has the green connector, it is beside the brown one.
The vacuum sensor, not sure what it does but it does get scaling on it and cant hurt to clean it.
You might soak the radiator in some CLR for a few hours and shake it around a few times.
How cold is it in your area? It is 10 degrees here. That is cold enough to crack a block. Make sure you have some antifreeze in your mixture. Atleast a 50/50 mix.
I feel your frustration with Chiltons Manual. A Haynes Manual works great. I have the Factory Service Manual, Haynes, and Chilton. I use my Haynes more then my FSM. I never use Chilton. Several will say to use a FSM. Even it says it is for advanced users and except for two things Haynes works great. The FSM is nice to have but is not needed.
Last edited by Terrys87; Feb 6, 2014 at 07:19 AM.
Feb 6, 2014 | 07:58 AM
#17
Thread Starter
Registered User
Joined: Jan 2014
Posts: 126
Likes: 0
From: McMinnville, TN
The Water Thermo Senor has the green connector, it is beside the brown one.
The vacuum sensor, not sure what it does but it does get scaling on it and cant hurt to clean it.
You might soak the radiator in some CLR for a few hours and shake it around a few times.
How cold is it in your area? It is 10 degrees here. That is cold enough to crack a block. Make sure you have some antifreeze in your mixture. Atleast a 50/50 mix.
I feel your frustration with Chiltons Manual. A Haynes Manual works great. I have the Factory Service Manual, Haynes, and Chilton. I use my Haynes more then my FSM. I never use Chilton. Several will say to use a FSM. Even it says it is for advanced users and except for two things Haynes works great. The FSM is nice to have but is not needed.
Feb 8, 2014 | 09:05 AM
#18
Thread Starter
Registered User
Joined: Jan 2014
Posts: 126
Likes: 0
From: McMinnville, TN
Finally got around to testing the old ignition coil (which seems to be a from-the-factory Denso coil).
Primary side resistance is 200mΩ (or 0.2Ω, same difference)
Secondary side resistance is 12.8kΩ
Chilton's list the acceptable range's as:
Primary 0.4Ω -0.5Ω
Secondary 8.5kΩ- 11.5kΩ
Yeah, bad coil.
I've also attached a picture of the old fuel pump. All the rust particles are very fine. Hopefully I can keep the current tank for a little longer. I'm going to a local pick-and-pull that has several to choose from. $15+ tax if I pull it myself (should be easy enough).
If the new-to-me tank is in good enough condition, I plan on Red Kote'ing the old tank and either keeping it as a spare or figuring out a way to do dual gas tanks on the truck. Would it be feasible on such a small truck to do that? Or is that just a pipe dream. I could use the extended range a second full-sized tank would give me as I'd like to be able to service customers throughout the mid-state and beyond (I'm a licensed electrician fwiw).
Last edited by janagyjr; Feb 8, 2014 at 09:08 AM. Reason: idea
Feb 8, 2014 | 10:57 PM
#20
I would like another tank and using a stock tank as an extra looked to me like there wasn't much room, but I didn't even try to see if one would actually fit. Something I just was wondering about as well.
The headlight problem is a freebie fix. I have it listed below on my 88 runner build thread on the first page on how to fix it. Usually just the contact in the headlight assembly just needs cleaned. I use fine grit sand paper (2000) or the wifes finger nail file kit.
The headlight problem is a freebie fix. I have it listed below on my 88 runner build thread on the first page on how to fix it. Usually just the contact in the headlight assembly just needs cleaned. I use fine grit sand paper (2000) or the wifes finger nail file kit.


