
the question-22re or 22rte?
 Check what Engine Builder gets for a head.
 Jun 28, 2014 | 11:34 AM
#22
Thread Starter
Registered User
Joined: Apr 2014
Posts: 82
Likes: 0
From: Palmer, Alaska
Engine Builders is better priced than the other guys. Just need to see about shipping and which head i want. The fun side says get the one that isn't guaranteed emissions safe, the reasonable side says get the stock head.
That quote for 22re performance isn't in AK so shipping is awful i'm sure.
That quote for 22re performance isn't in AK so shipping is awful i'm sure.
Last edited by deesmckee_ak; Jun 28, 2014 at 11:40 AM.
Oct 3, 2014 | 08:38 AM
#23
Thread Starter
Registered User
Joined: Apr 2014
Posts: 82
Likes: 0
From: Palmer, Alaska
At last the parts are ordered!!! Went with the street RV head from engnbldr along with the 261C camshaft and of course the gasket set. Should be able to start putting her together in two weeks.
Now for questions. Mostly about cleanup.
Removal of old old, stuck on gaskets without hurting the gasket surfaces?
What to use as far as cleaners and tools?
Best way to clean out cylinders with pistons in still?
That last one brings up something i'm going back and forth on. I was told I should replace the bearings and piston rings while I have the head off. Supposedly you can take the oil pan off and push the pistons out through the top of the block. Anyone have testament to this? If this does work out then i figure i'll grab a cylinder hone and get them clean that way. If it's not that easy or if I really shouldn't worry about it, that takes me back to how to efficiently clean the cylinders, pistons in.
So close to finally making progress on this gal.
Oct 3, 2014 | 09:47 AM
#24

Removing Pistons with the block still in the truck is possible but to rebuild it no. Pull the rest of the engine and do it right.
Cleaning the old gaskets off can be done with a razor blade, just be careful. Bend the blade so it makes a curve while you scrape off the gasket.
I've always cleaned the cylinders with ATF (automatic transmission fluid) just wipe them down with it. Don't hone the cylinder unless you pull the pistons.
Oct 3, 2014 | 08:21 PM
#25
Thread Starter
Registered User
Joined: Apr 2014
Posts: 82
Likes: 0
From: Palmer, Alaska
Not rebuilding. Not yet anyways. Just putting the new head on and cleaning things up. If she doesn't run after this then i'll probably work into rebuilding.
Bent razor blade, ATF. Thanks.
Bent razor blade, ATF. Thanks.
Oct 26, 2014 | 09:51 AM
#26
Thread Starter
Registered User
Joined: Apr 2014
Posts: 82
Likes: 0
From: Palmer, Alaska
Here's progress:
Got the new head on, very shiny.
Exhaust system is on and shinier than it was before at least.
Where I'm at is getting the air intake and fuel system on. I do want to do some cleaning up first though. Any preferences on products? I'm thinking seafoam and then running lucas in the oil and fuel when it's all together again. Also buying a new fuel filter just because it's convenient at the moment.
Feels like we're getting close!!!!! Can't wait to here it fire up. *fingers crossed*
Oct 28, 2014 | 08:48 AM
#27
Thread Starter
Registered User
Joined: Apr 2014
Posts: 82
Likes: 0
From: Palmer, Alaska
So this was fun hurdle. Here's how this problem happened.
When i pulled the head, I didn't notice the long allen bolt holding the lower intake on, so, i pulled the head with the entire lower intake attached. Smarrt. Of course i found the bolt later when i was cleaning things up. When i went to put the lower intake back on i was pulling my hair out trying to figure out how the coolant pipe that attaches on the bottom side of the intake configured around the motor. I had the head on at this point so i ended up having to take off the mount for the fuel filter to get the pipe in it's proper path. It was a real thrill. Of course putting it back together isn't half as easy as taking it apart.
What else? I take this long to take a good look at my injectors and realize the seals going to the combustion chambers are in terrible shape. Now i have to either find new seals or buy new injectors altogether. Having new ones sure sounds nice but this project continues to dig deeper into my wallet. The trials of bringing an old truck back to life.
Oct 28, 2014 | 01:07 PM
#28
Thread Starter
Registered User
Joined: Apr 2014
Posts: 82
Likes: 0
From: Palmer, Alaska
I'm beginning to feel guilty about how I'm going about this. I just read a couple pages of a thread titled, "beginers 22re timing chain failure." That is a great thread. So much more thorough as far as cleaning and replacing EVERYTHING.He was also much better about posting step by step by step progress. I have what feels like a dozen gaskets that came with the upper gasket kit that I can't even find a home for!!!! It makes me a little nervous. Maybe I'm not patient enough. If I have to go through this again, I'll step back, ask more questions, post more progress and replace more parts. I suppose this is part of the learning process. Woe.
Done wallowing. NOW, does anyone know what this harness is for? Pointing to the top portion. I don't remember unplugging it and there is nothing to plug it into. part of the jumble that goes underneath the lower intake. Also the small black one can't find a partner. hmmm, maybe should have taken more pictures!!!! Duh
Done wallowing. NOW, does anyone know what this harness is for? Pointing to the top portion. I don't remember unplugging it and there is nothing to plug it into. part of the jumble that goes underneath the lower intake. Also the small black one can't find a partner. hmmm, maybe should have taken more pictures!!!! Duh
Nov 19, 2014 | 01:39 PM
#29
Thread Starter
Registered User
Joined: Apr 2014
Posts: 82
Likes: 0
From: Palmer, Alaska
It's all together again!!! Not to my surprise, she still won't start. So i've concluded I will be getting the cylinders bored out most likely. I ran a compression test cold seeing as there is no way to get the engine to operating temperature.
Results-#1- 55psi #2- 32 psi #3- 90psi #4- 115 psi.
Sad story for 1 and 2 but at least i got an answer. I am assuming i can still rely on numbers that vary that much even though I did the test cold. I did do it wet also and turned up minor gains. Maybe 5 psi. The head and all components are brand new though, so it can't be a valve....right?
Found a machine shop 50 miles away that will do the job for $330. Not as bad as I thought it would be.
So here we go with practice taking it apart again. Only this time the block is coming with it. I shall be far more diligent in labeling every single nut and bolt and harness. Also be needing an array of new hoses. Found some electrical tape on the lower radiator hose. There are others that are pretty badly cracked and dry.
Be back in...a while. Tips and help are always appreciated!!
Nov 28, 2014 | 08:01 AM
#30
Thread Starter
Registered User
Joined: Apr 2014
Posts: 82
Likes: 0
From: Palmer, Alaska
Got the motor pulled with mostly no problems. The 17mm bell housing bolt on the drivers side was a pain without a ratcheting box wrench.
Little piece of the PLASTIC timing chain guide was broken off. Cylinder #1 and piston was not pretty.
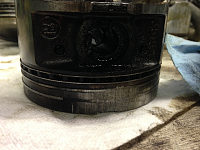
Block and crank are at the machine shop. I have to wait 3 weeks before I get home to pick it up though. I'll be anxious. Rebuild kit coming from engnbldr and some misc. hardware kits and hoses coming from 22re performance and rock auto.
Anyone have any break in tips and tricks? "Burping" the coolant system, getting a good seat for the rings, etc.

Thread
Thread Starter
Forum
Replies
Last Post


