
New rebuilt 22-re (85-95) **BLOWN**
 Jun 22, 2010 | 12:36 PM
#1
Thread Starter
Registered User
Joined: Jun 2010
Posts: 79
Likes: 0
From: Santa Cruz, CA
New rebuilt 22-re (85-95) **BLOWN** / REBUILD
I got a freshly rebuilt 22-re motor.
The original purchaser only ran it for a couple hours and a couple miles (3-4 hrs. 5 miles).
BLOWING OIL like you wouldn't believe. I actually had to drill a hole into the muffler to empty it all. Anyways... Wondering what direction to start heading into... (and for consideration: I busted the cam sprocket... so will also have to be replaced...)
But I'm curious as to what direction to move. Are we talking valve guides, or possibly forgotten rings? possibly bored cylinders and stock pistons? bottom or top end? anyone have something similar?
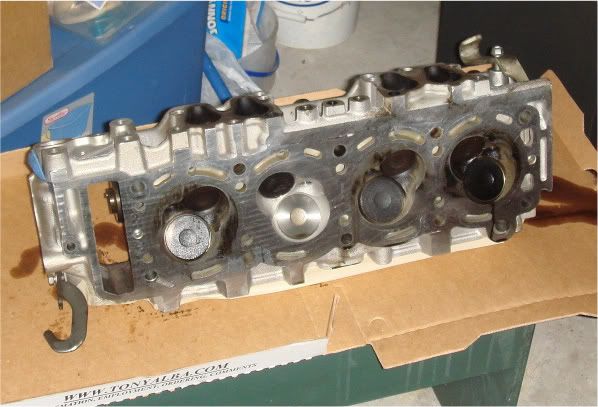
here is the damage:
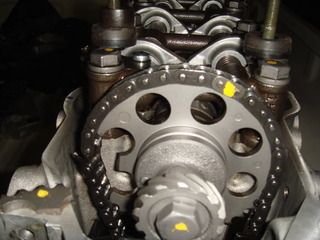
OUCH!!!!! always remove crankshaft bolt while engine is in!
Here is the exhaust side:

Each valve looks pretty similar.
And intake (from exhaust recirculation?)
Yeah... thats not good.
Thanks for any input!
The original purchaser only ran it for a couple hours and a couple miles (3-4 hrs. 5 miles).
BLOWING OIL like you wouldn't believe. I actually had to drill a hole into the muffler to empty it all. Anyways... Wondering what direction to start heading into... (and for consideration: I busted the cam sprocket...
so will also have to be replaced...)But I'm curious as to what direction to move. Are we talking valve guides, or possibly forgotten rings? possibly bored cylinders and stock pistons? bottom or top end? anyone have something similar?
here is the damage:
OUCH!!!!! always remove crankshaft bolt while engine is in!
Here is the exhaust side:
Each valve looks pretty similar.
And intake (from exhaust recirculation?)
Yeah... thats not good.
Thanks for any input!
Last edited by gbwsaw28; Jul 14, 2010 at 09:33 PM.
Jun 22, 2010 | 12:43 PM
#2
Registered User
Joined: Nov 2008
Posts: 2,306
Likes: 8
From: Cheyenne, Wyoming
Honestly who knows...it could be a million different issues and they could be related or not. If I had to take a shot in the dark I would say the rings were not installed right or the pistons don't match the bore.
Jun 22, 2010 | 02:15 PM
#4
Thread Starter
Registered User
Joined: Jun 2010
Posts: 79
Likes: 0
From: Santa Cruz, CA
The engine is now on a stand. While the engine was in the truck, the psi was a consistent 120 psi. It was cold at the time. I think a warm 22re should be showing around 160? is 120 acceptable for a cold engine or should it still be higher?
But considering that the oil consumption looks to be pretty consistent, I would lean to something being wrong inside the cylinders.
But considering that the oil consumption looks to be pretty consistent, I would lean to something being wrong inside the cylinders.
Last edited by gbwsaw28; Jun 22, 2010 at 02:17 PM.
Jun 22, 2010 | 11:53 PM
#5
Thread Starter
Registered User
Joined: Jun 2010
Posts: 79
Likes: 0
From: Santa Cruz, CA
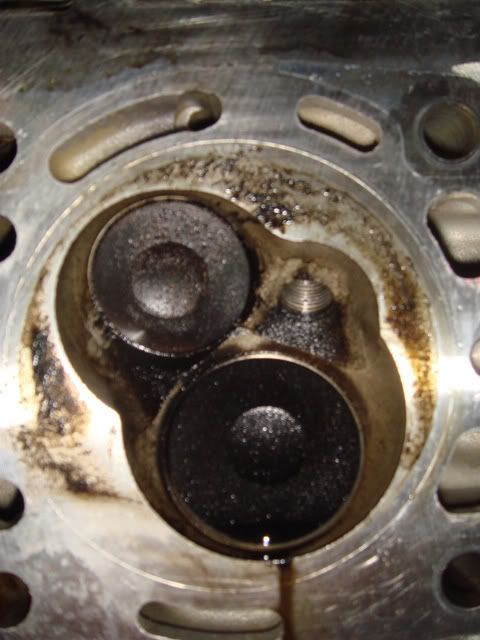
head now removed
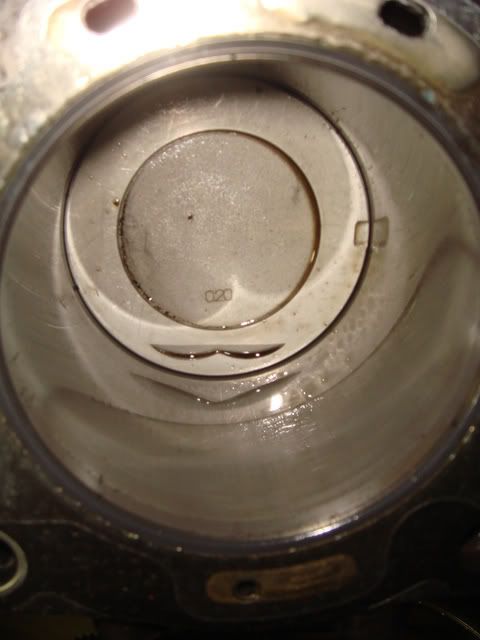
So here is what it looks like inside.
Considering the amount of burning oil, I was really surprised to find it that clean. But then again it only ran for a few.A little carbon here and there. The block and cylinders look good. I'm not being exact by anymeans, but the cylinders seem to be the correct fit with no play whatsoever. the pistons have 020 printed on them, meaning bored .020 over?
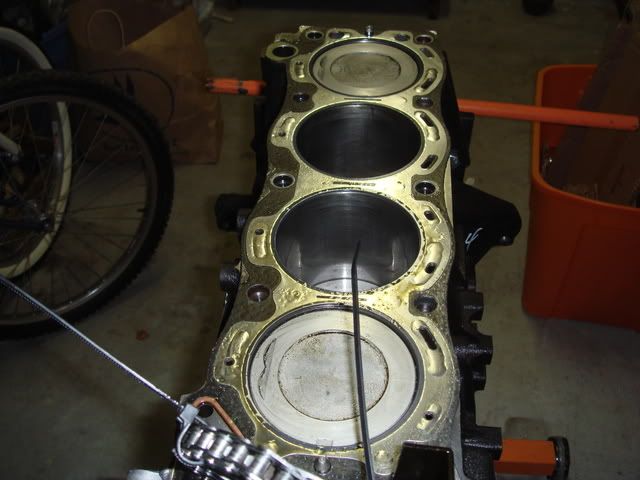
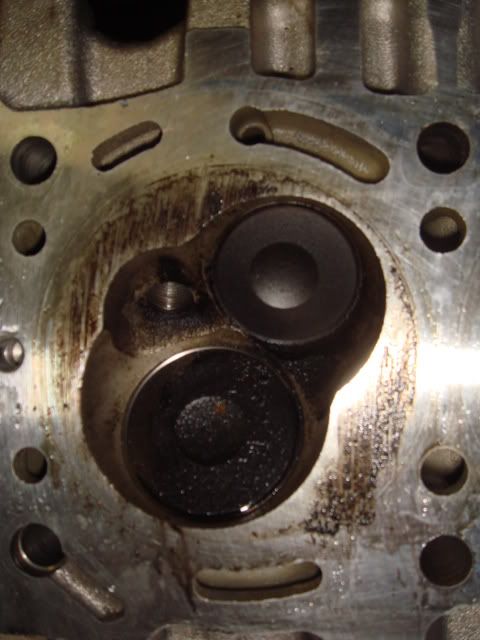
It seems Cyl. 4 is the worst, with 1st behind.
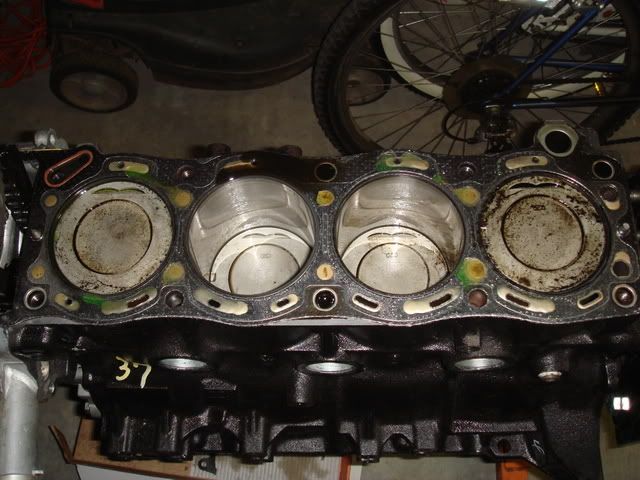
Here your really can see how clean it is, So it was a new rebuild!. but you can also see that cyl 4 and 1 are getting a little dirty!
Check out the oil. Cyl 2 seems to be the cleanest.
With the oil pattern being inconsistent, and the pistons/cylinders looking so good its hard to say.
Considering the amount of burning oil, I was really surprised to find it that clean. But then again it only ran for a few.A little carbon here and there. The block and cylinders look good. I'm not being exact by anymeans, but the cylinders seem to be the correct fit with no play whatsoever. the pistons have 020 printed on them, meaning bored .020 over?
It seems Cyl. 4 is the worst, with 1st behind.
Here your really can see how clean it is, So it was a new rebuild!. but you can also see that cyl 4 and 1 are getting a little dirty!
Check out the oil. Cyl 2 seems to be the cleanest.
With the oil pattern being inconsistent, and the pistons/cylinders looking so good its hard to say.
Last edited by gbwsaw28; Jun 23, 2010 at 06:33 AM.
Jun 23, 2010 | 02:30 AM
#6

Registered User
Joined: May 2009
Posts: 586
Likes: 2
From: Arizona
Sorry for your troubles, but congrats on making an interesting thread.
Who rebuilt it?
I removed my cam gear bolt with an impact wrench after trying and failing to hold a wood block and screwdriver while pulling on a breaker bar. Impact is definitely the way to go for this if you have one. Tightening the bolt was surprisingly easy. I didn't have to hold anything to get it torqued to spec.
Don't just replace the cam timing gear. Put in a whole new decent quality timing set so you know what you have.
I don't know what the problem is, but in your position (torn down that far, essentially half way through a rebuild) I'd take the bottom apart and have a shop check everything out. Measure pistons, bores, etc.
Pistons stamped "020" seem strange. Usually these things are metric. My pistons from engnbldr that are .020" over were stamped "0.50," which is .5 mm.
It's hard to tell from your pic, but your #1 intake valve looks funky -- chewed up?
Last edited by flyingbrass; Jun 23, 2010 at 02:55 AM.
Jun 23, 2010 | 02:43 AM
#7
Registered User
Joined: May 2009
Posts: 586
Likes: 2
From: Arizona
My FSM says compression is supposed to be 171 psi, with a lower limit of 142. No more than 14 psi difference among cylinders.
Trending Topics
 Jun 23, 2010 | 07:17 AM
#10
Registered User
Joined: Jun 2006
Posts: 262
Likes: 0
From: Ocean Springs, MS
I would bet the rings are on wrong. Or wrong size... The last one I built I ordered a package deal off ebay and the rings came in the wrong size. If I hadn't checked it I would have had problems because there was a .25 ring gap. I called and they sent the right ones over night.
Jun 23, 2010 | 07:48 AM
#11

Registered User
Joined: Jun 2010
Posts: 123
Likes: 0
From: Washington
Yeah it looks like a possible ring problem...The builder probably didnt stagger the rings like he/she was supposed to. This could also account for the low compression as well. If the oil can get in, then the compressed air can get out. Did the oil smell like it had a lot of gas in it?
Jun 23, 2010 | 11:34 AM
#12
Contributing Member
Joined: Feb 2008
Posts: 12,248
Likes: 33
From: Lake City, Fl
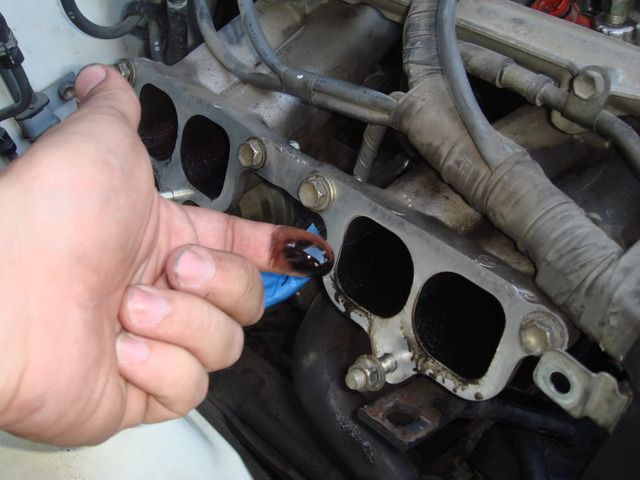
that's a lot of oil in the intake runners...
is a line hooked up wrong in the PCV system and sucking in tons of oil?
I would hate for it to be as simple as that after tearing the motor completely apart...
is a line hooked up wrong in the PCV system and sucking in tons of oil?
I would hate for it to be as simple as that after tearing the motor completely apart...
Jun 23, 2010 | 05:49 PM
#14
Thread Starter
Registered User
Joined: Jun 2010
Posts: 79
Likes: 0
From: Santa Cruz, CA
To iamsuperbleeder: I started there, because the intake manifold and air chamber was COATED in oil on the inside, but i can only conclude that was due to exhaust recirculation and not incorrect hookup. Let me explain how I got this motor: My dad bought an 89 toyota pickup for cheap from a laid off individual who just recently had a rebuilt installed, from a company out of texas, where he knew a guy who knew a guy (the usual). I think being laid off and trying to fund the removal and shipment of a motor was too much. He had another car in his driveway.I took the blown motor as payment for installing a NEW motor in the truck.
okay...cool story... SO: The truck with the NEW motor runs great, no smoke, passed smog clean. I hooked everything up the same, so it's not the lines. In the end there can be only one, and its the rebuilt motor...
To americanmcss: Thinking about it, the engine oil was of a very slightly off consistency. As for smell I couldn't say. I don't have a great nose.
As for head gasket:if i remember flyingbrass right, I think the consensus was TOYOTA?
Would valve guides affect the pressure in the same sense? or no because they would be sealed? or hell, it could be completely messed with both jacked valve guides and rings that didn't seat, because some poor guy was letting his truck idle and praying the smoke cloud would stop.
But I think the easiest of all possibilities to start on would be to pop out that #4 piston from the bottom, past the crank, and check rings
I thought the TOYOTA pistons looked like the bottom of soda cans? is this a different year I'm thinking of?
Jun 23, 2010 | 07:12 PM
#15
Registered User
Joined: Mar 2010
Posts: 594
Likes: 0
From: Fresno, California
I am still thinking possible valve guide seals not on or on wrong, its wierd that only the front and rear vavles look bad and not the middle 2. if there were the wrong rings on there it seems like all the valves should be about the same. but who knows. keep us informed. very interesting!!
Jun 23, 2010 | 07:43 PM
#17
Registered User
Joined: May 2009
Posts: 586
Likes: 2
From: Arizona
Re: head gaskets, OEM Toyota is probably the best way to go. I decided to use the Rock gasket that came in Engnbldr's kit. No matter what gasket you use, recheck/retorque the head bolts after the first run. Many of mine turned, and that was even after initially working them in. Ted says recheck again at 500 miles.
Remember iamsuperbleeder had a coolant leak before he resnugged his.
Marlin checks head bolt torque each time before adjusting valves.
Last edited by flyingbrass; Jun 23, 2010 at 07:45 PM.
Jun 23, 2010 | 10:15 PM
#18
Thread Starter
Registered User
Joined: Jun 2010
Posts: 79
Likes: 0
From: Santa Cruz, CA
When trying to follow up on what c0uger69 has been suggesting (to check valve seals), I did happen to notice something interesting. I hope you guys, who have been here, can tell me whats wrong here:
Okay, looking at the head from a distance, like the picture a few posts above, you notice the 4th combustion chamber is really dirty, versus the 2nd which was almost spotless.... I'm looking the the valves on the intake:
Combustion Chamber 2: CLEAN
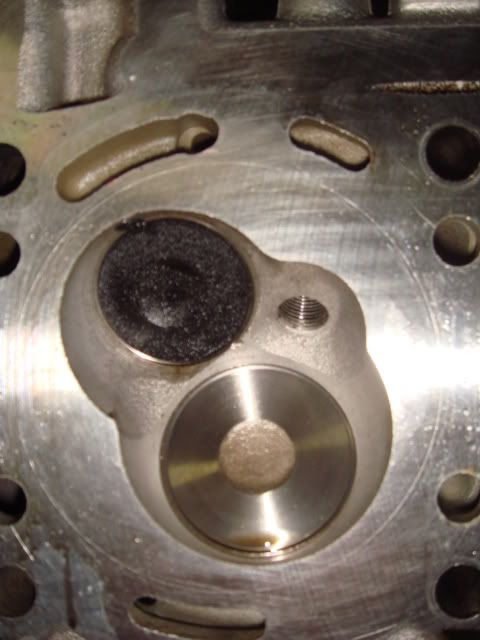
Intake valve #2 cyl.
notice the placement of the valve seal.
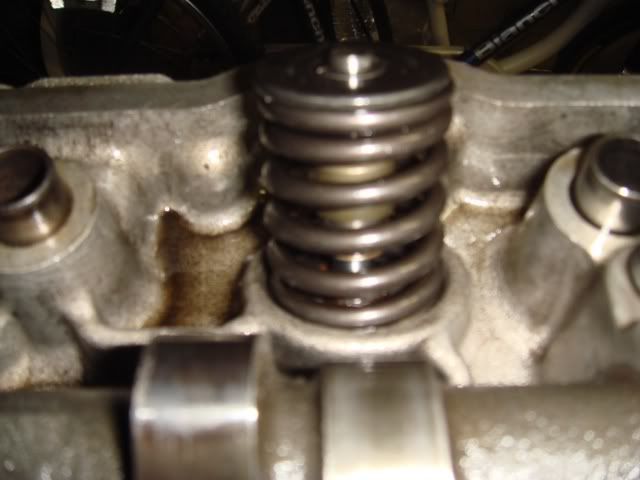
NOW...
COMBUSTION CHAMBER 4: DIRTY
And it's valve:

it's kind of hard to tell, but the clean cylinder's valve seal is much higher up on the stem... anyone have a comparable picture of what they should look like?
or what this could mean?
Okay, looking at the head from a distance, like the picture a few posts above, you notice the 4th combustion chamber is really dirty, versus the 2nd which was almost spotless.... I'm looking the the valves on the intake:
Combustion Chamber 2: CLEAN
Intake valve #2 cyl.
notice the placement of the valve seal.
NOW...
COMBUSTION CHAMBER 4: DIRTY
And it's valve:
it's kind of hard to tell, but the clean cylinder's valve seal is much higher up on the stem... anyone have a comparable picture of what they should look like?
or what this could mean?
Last edited by gbwsaw28; Jun 24, 2010 at 12:10 AM.
Jun 23, 2010 | 10:53 PM
#20
Registered User
Joined: May 2009
Posts: 586
Likes: 2
From: Arizona
So, #2's stem seal isn't seated, yet for whatever reason that cylinder is relatively cleaner?
Aren't the valve guide bushings themselves more important overall than the stem seals?
Here is a picture of the seals.

Aren't the valve guide bushings themselves more important overall than the stem seals?
Here is a picture of the seals.


