
My ISR MOD - whad u think???
 May 4, 2009 | 06:35 PM
#1
Thread Starter
Registered User
Joined: Sep 2008
Posts: 74
Likes: 0
From: SJ-California
My ISR MOD - whad u think??? any more improvement??
Hi Fellow Yota'rs,
Scoop:
original body paint:
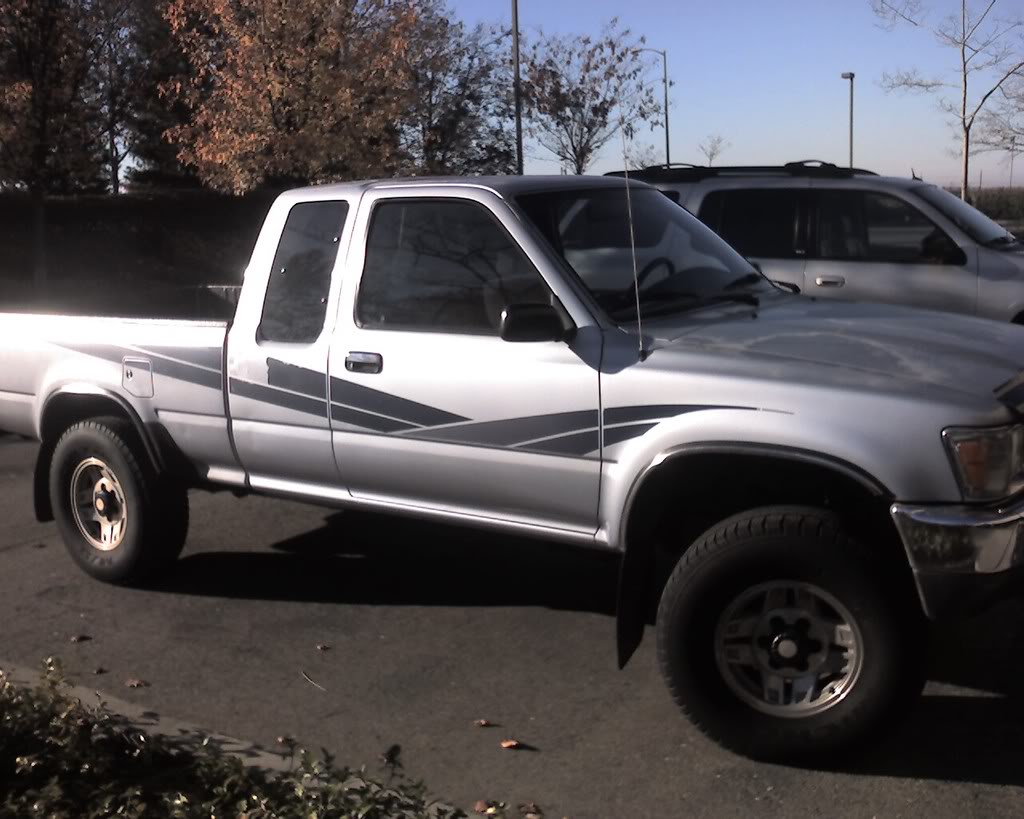
here the latest paint job...midnite blue

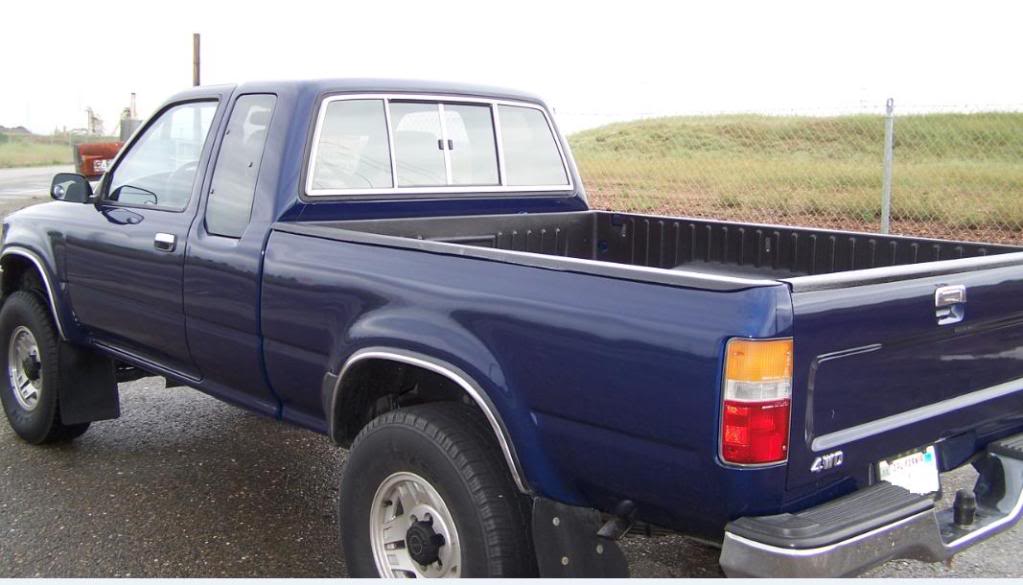
rear view...
==============
====MY ISR MOD====
==============
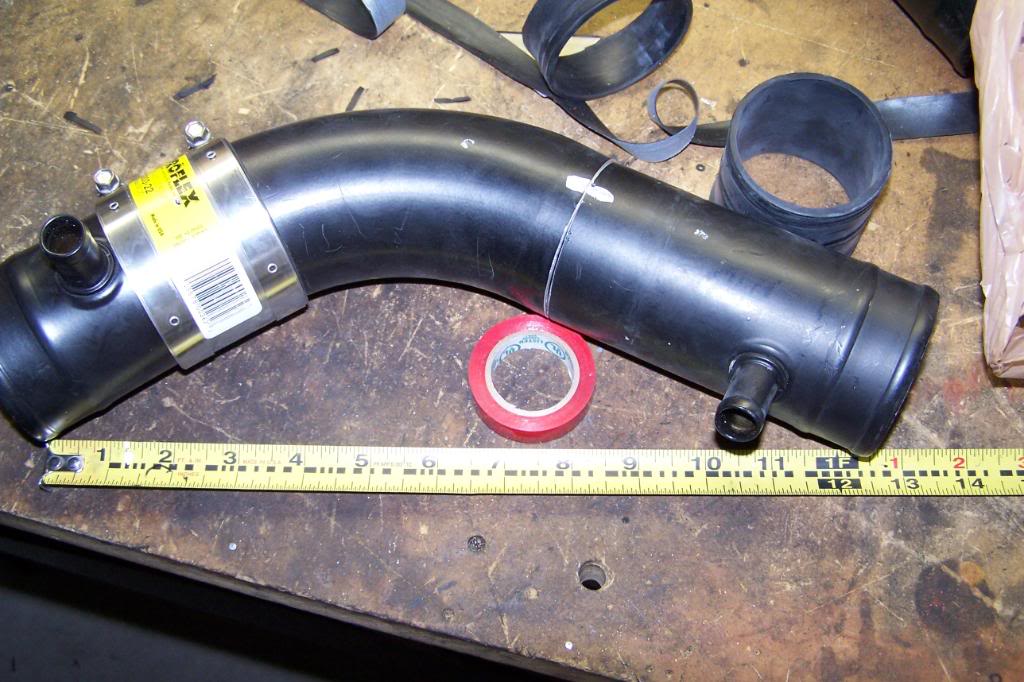
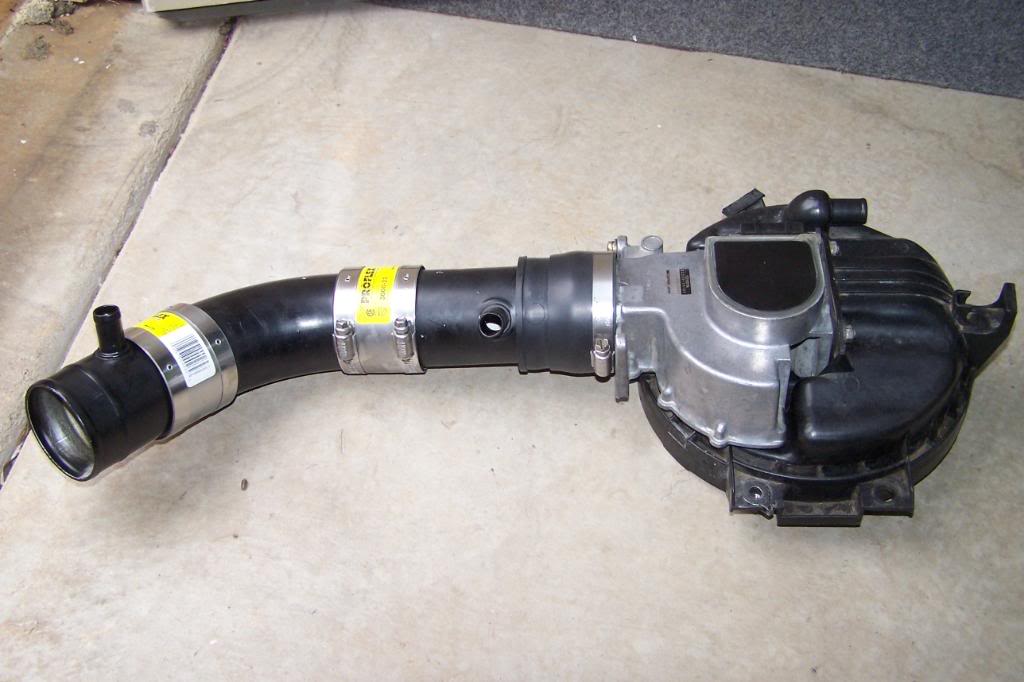
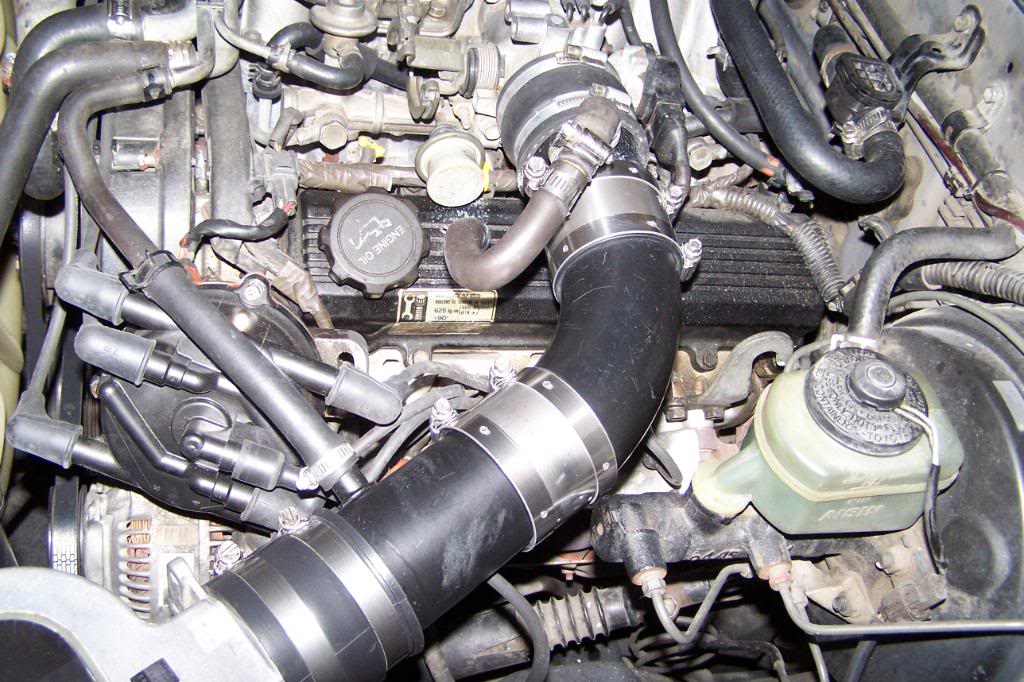
Here's the parts list:
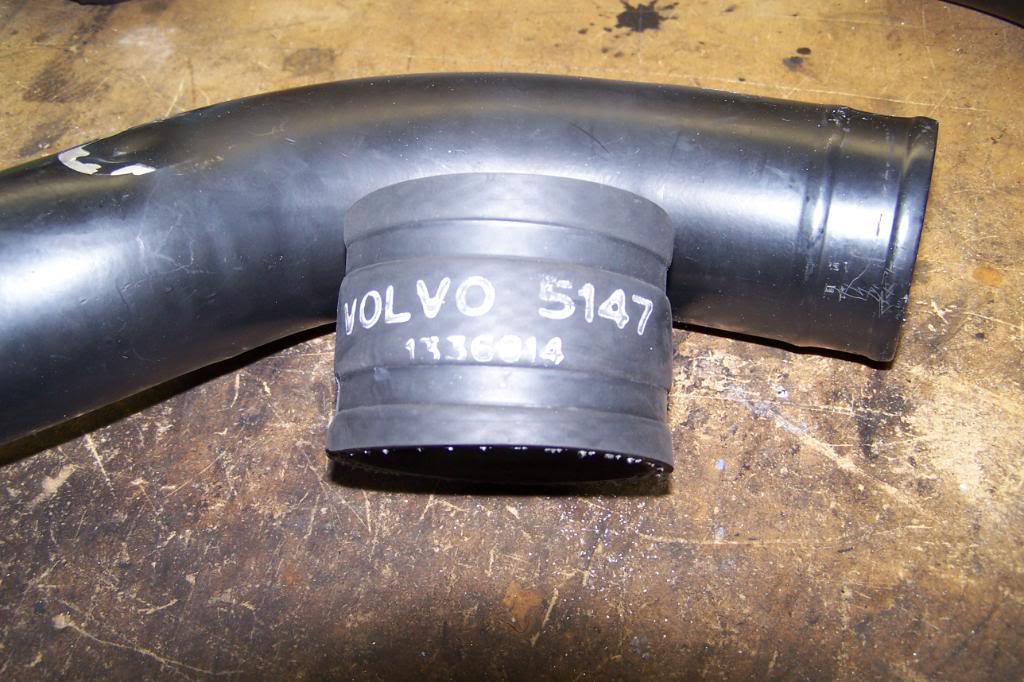
1) Intake pipe / rubber hose - came off from a 1986 Volvo 740 model - Pick N Pull junk yard.
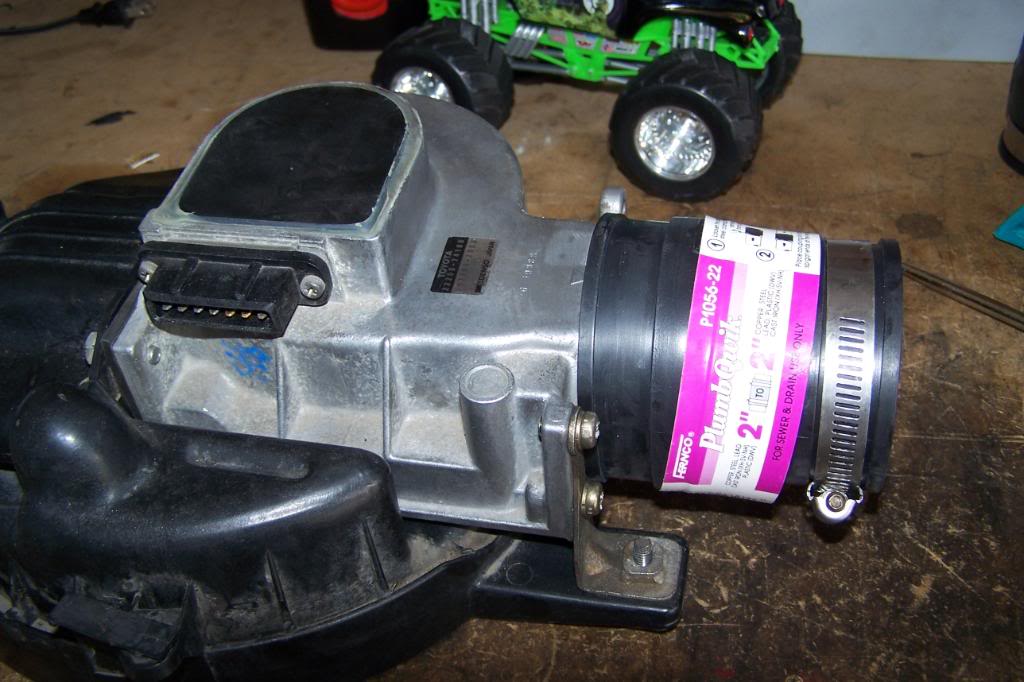
2) Two 2"-2" steel / rubber couplers - Home Depot pn 3000-22.
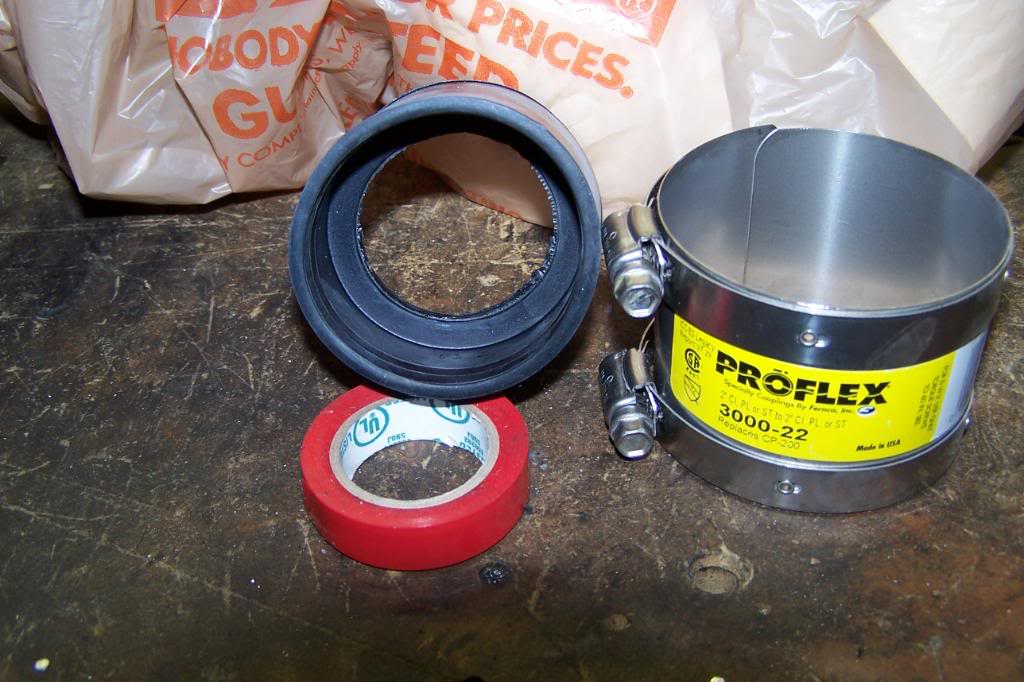
3) One 2"-2" rubber coupler - Home Depot (don't remember the pn but it's in the plummming section). - installed at the MAF/AFM end
4) 1/2 90 degree hose - Pick N Pull jy.
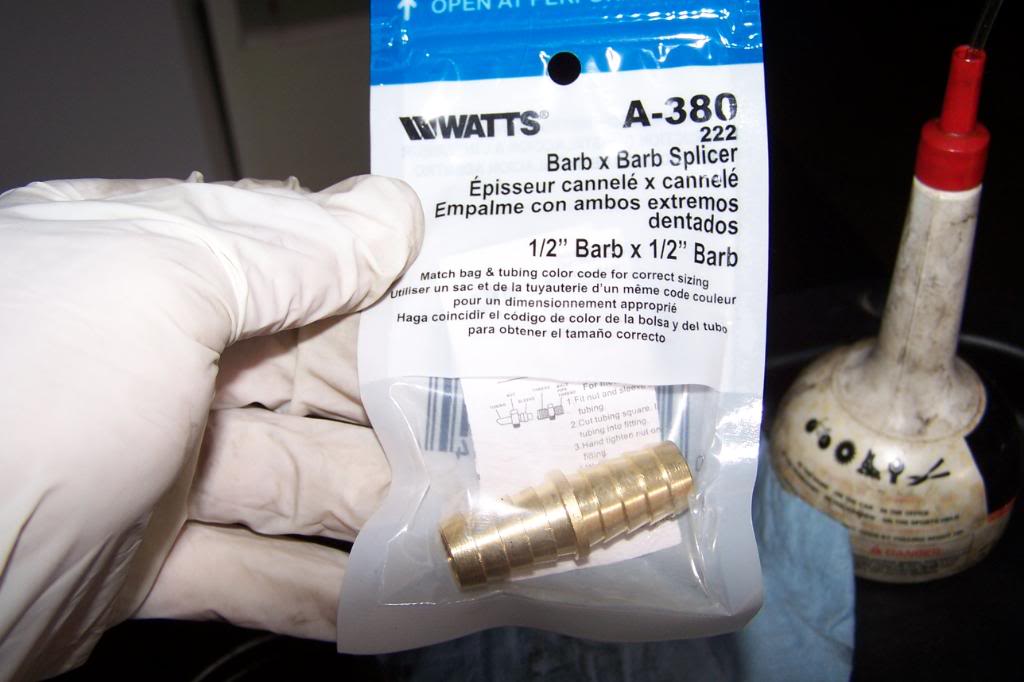
5) One 1/2" barb x 1/2" barb - HD pn A-380.
***********************
Fab and installation ********
***********************
Hint: Make sure to remove the negative battery cable and turn on the headlight to reset the ecu before doing the install.
Steps:
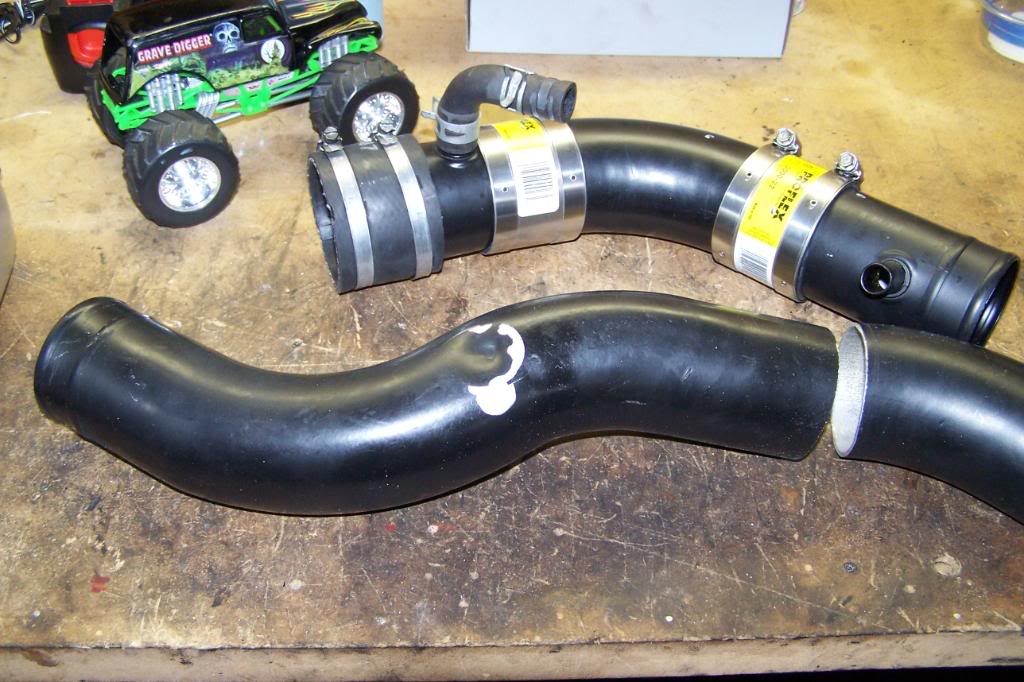
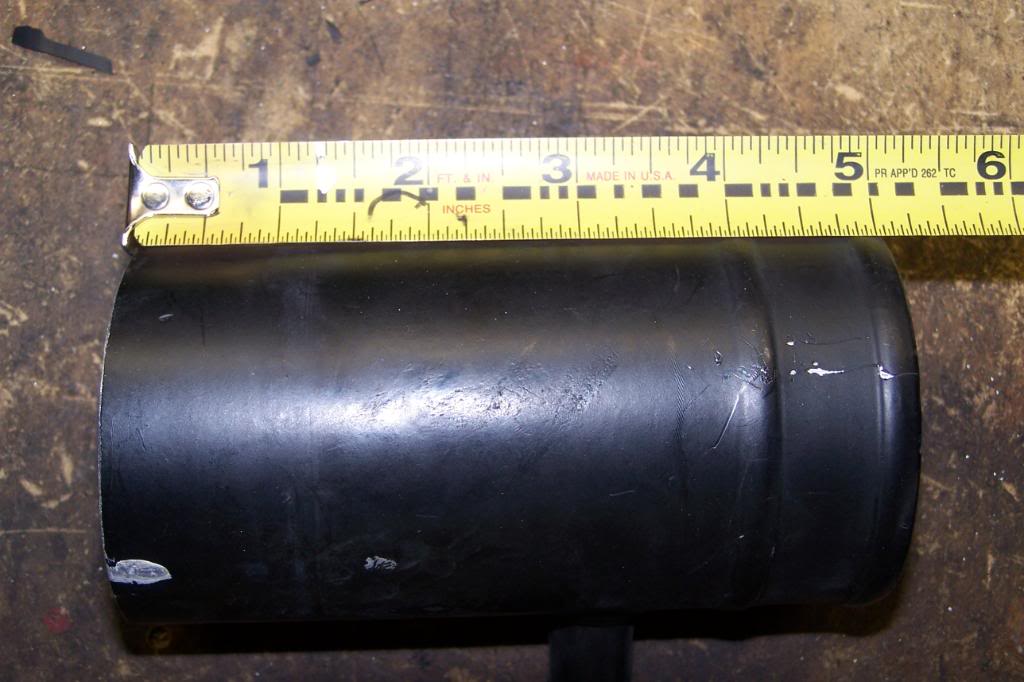
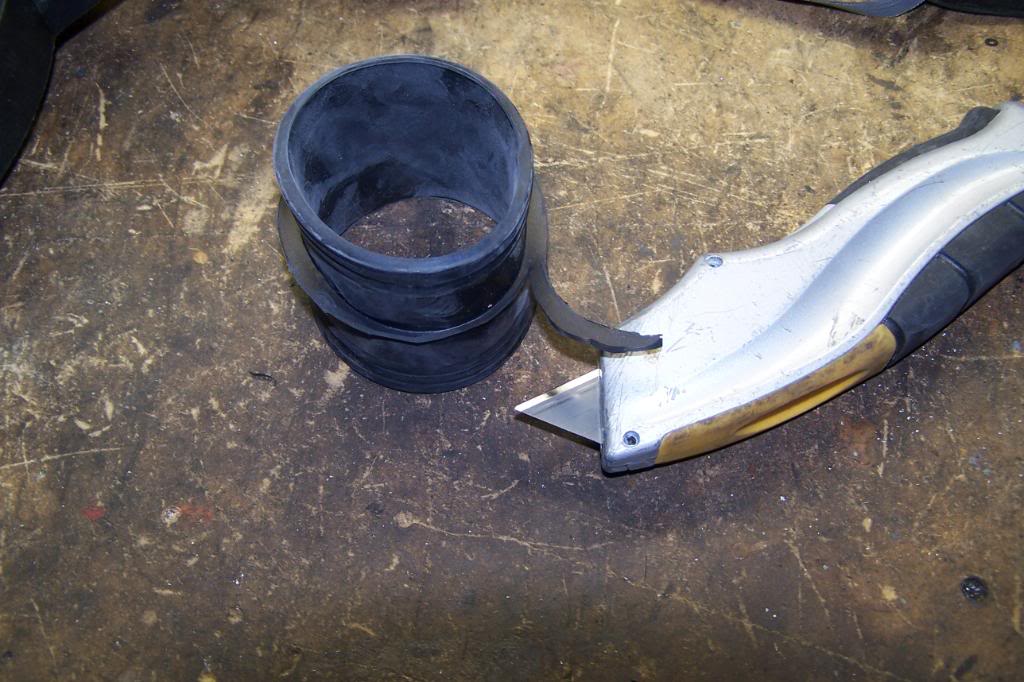
1. Cut the Volvo intake pipe to the correct sizes - three parts. Measurement shown in the pics below.
TIP: Although you can use just one pipe I used two because of the preinstalled bib/nipple. It saved me time/money from installing a new bib. Plus the bib/nipple on the pipe is factory sealed and no worry about leaks.
Total lenght: 12 1/2 or so.
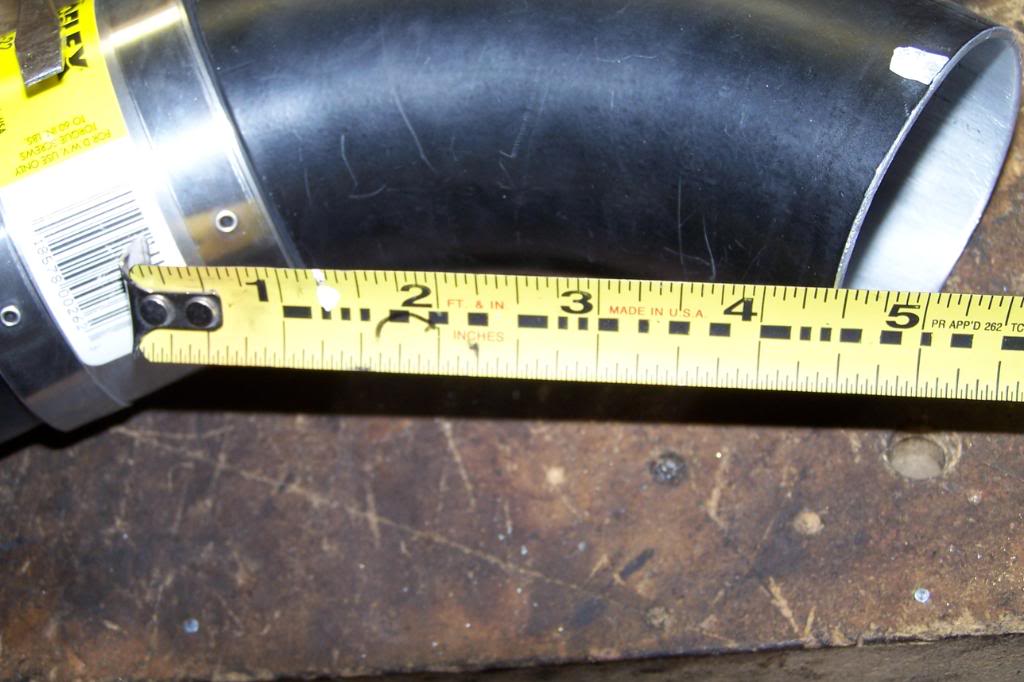
Pipe that connects to the MAF/VAFM end:
Pipe that connects to the intake end - shown with the (angled) mid part of the ISR pipe assembly.
--intake pipe around 3 1/2" cut -
angled pipe cut aroud 4 1/2" or so.
2. Once you are done cutting the pipe(s). Pre-assemble them to make sure you have the correct length and the correct position/locations of the bibs. Place a white marker where the pipes meet - another farther out so they will not get covered when the couplings are installed (see pics above).
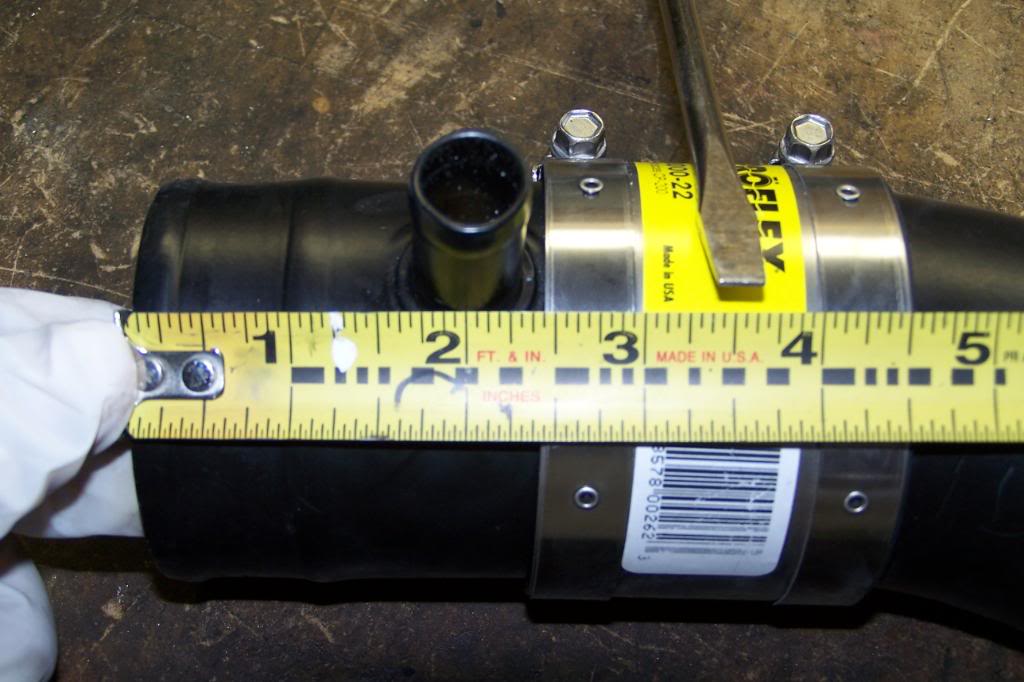
3. Prepare the 2-2 steel couplers. You will notice a liner/divider in the mid section of the rubber couple. Remove the liner by turning the coupler inside out.
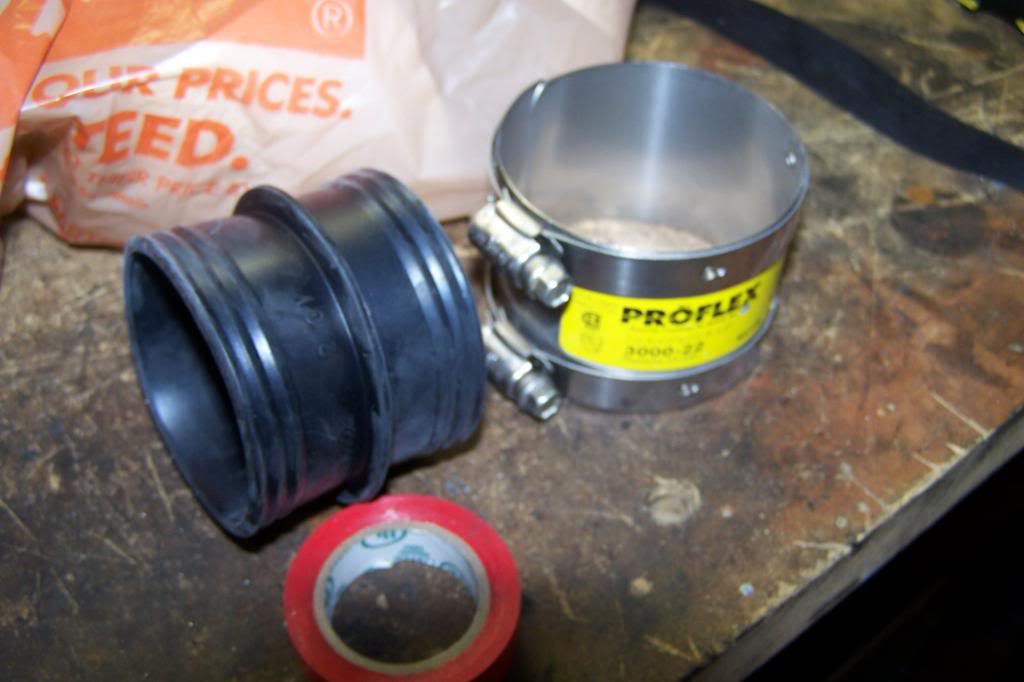
Use a sharp knife to cut the divider.
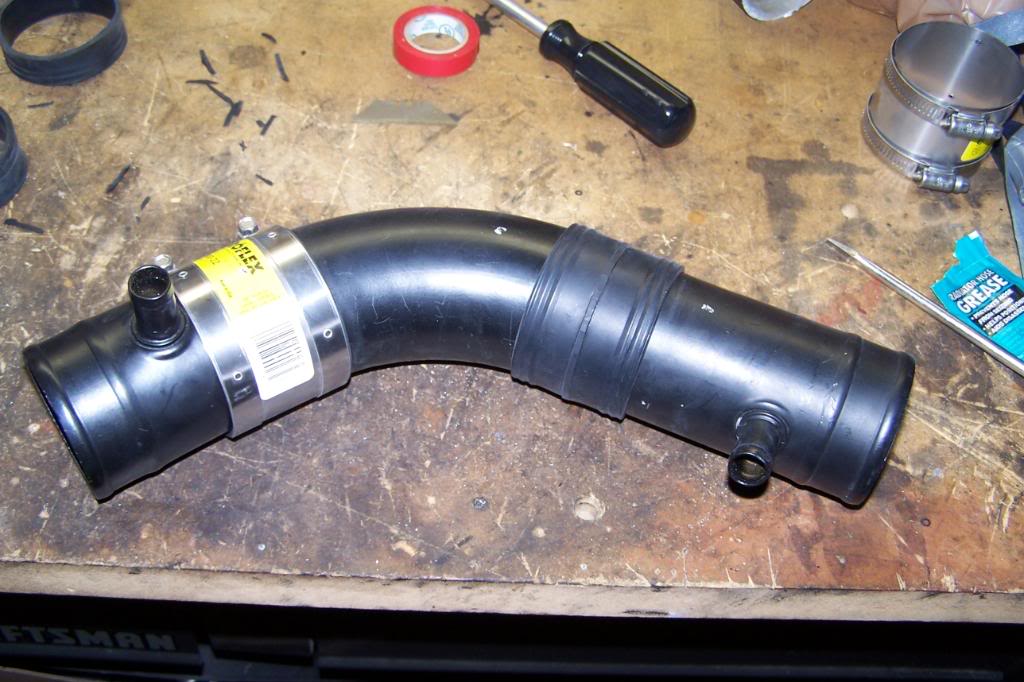
4. Assemble the ISR pipes. Insert the rubber couplers (make sure they are turned inside out), then tighten the steel couplers properly.
Tip: coat the rubber couplers with a radiator grease to make the insertion easier.
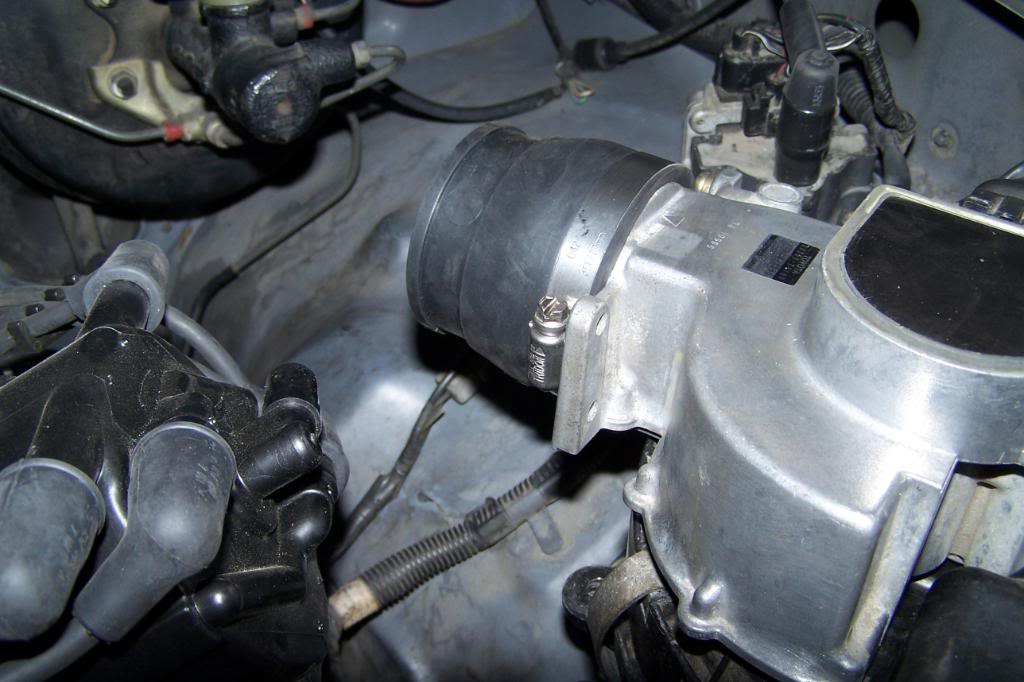
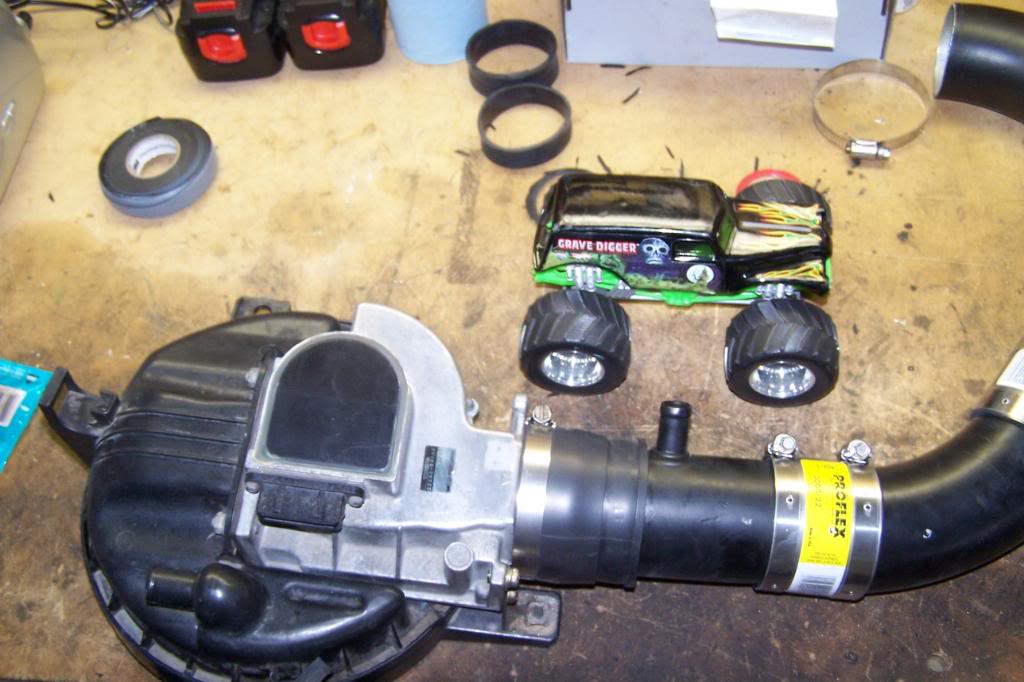
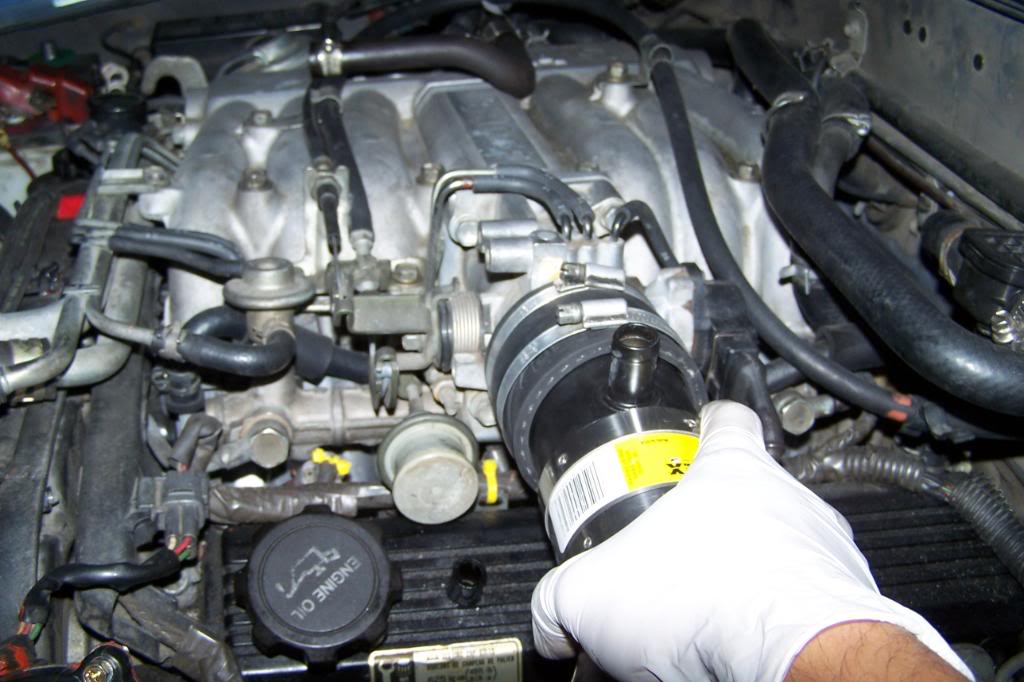
5. Connect the pre-assembled ISR pipe to the MAF/VAFM.
Tip: it's easier to do this on a table rather than in the engine bay (MAF/VAFM still in the filter box), then again have it ur way.
Here's what it looks like after completing assembly:
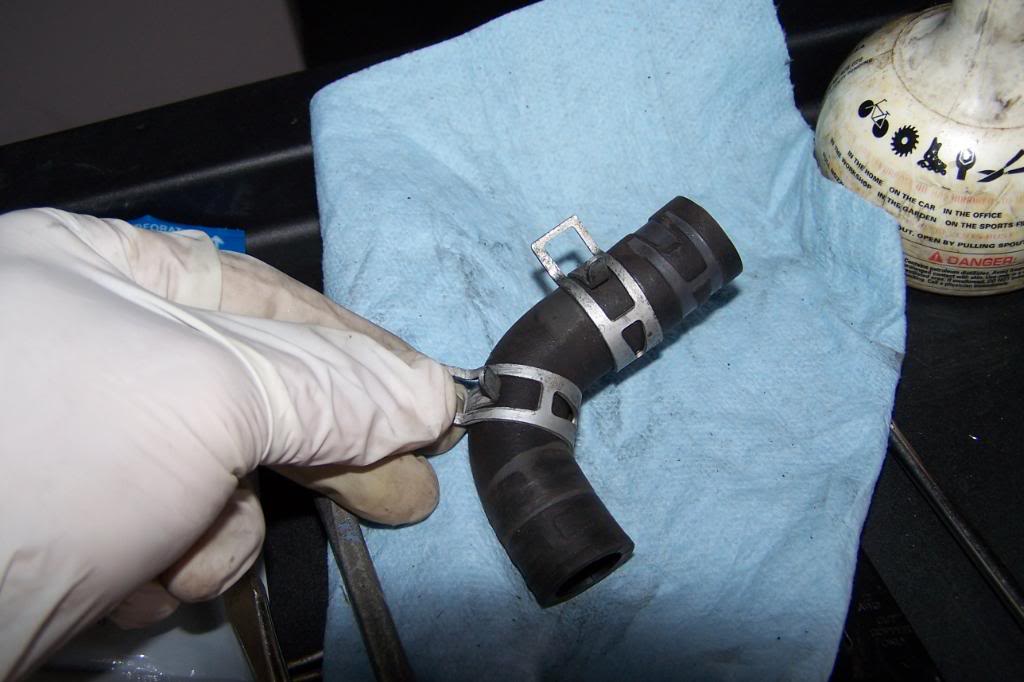
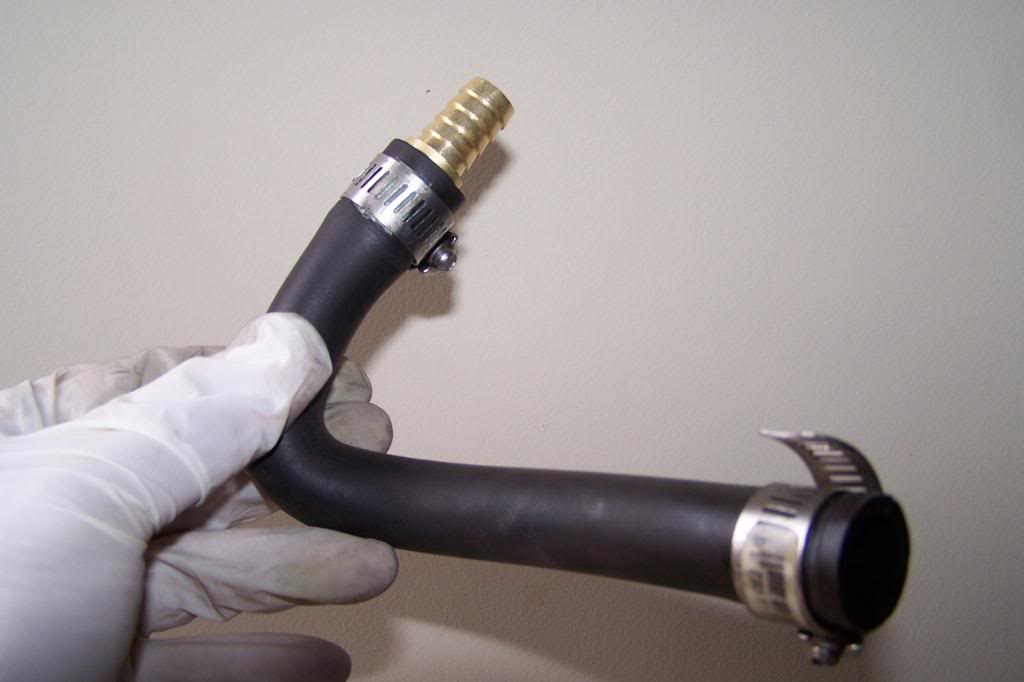
6. Next, connect the barb to the engine air hose (forgot what it's called). Pic below shows what I mean:
7. Connect the Volvo coupler to the intake, then the ISR assembly (MAF/VAFM already connected). Do not tighten the coupler yet so that you can udjst the assembly properly.
Tip: if you don't have the Volvo coupler - use the HD 2-2 rubber coupler - same as the one installed in the MAF/VAFM. Reason I used it is for easy removal of the ISR. The HD couplers are tight.
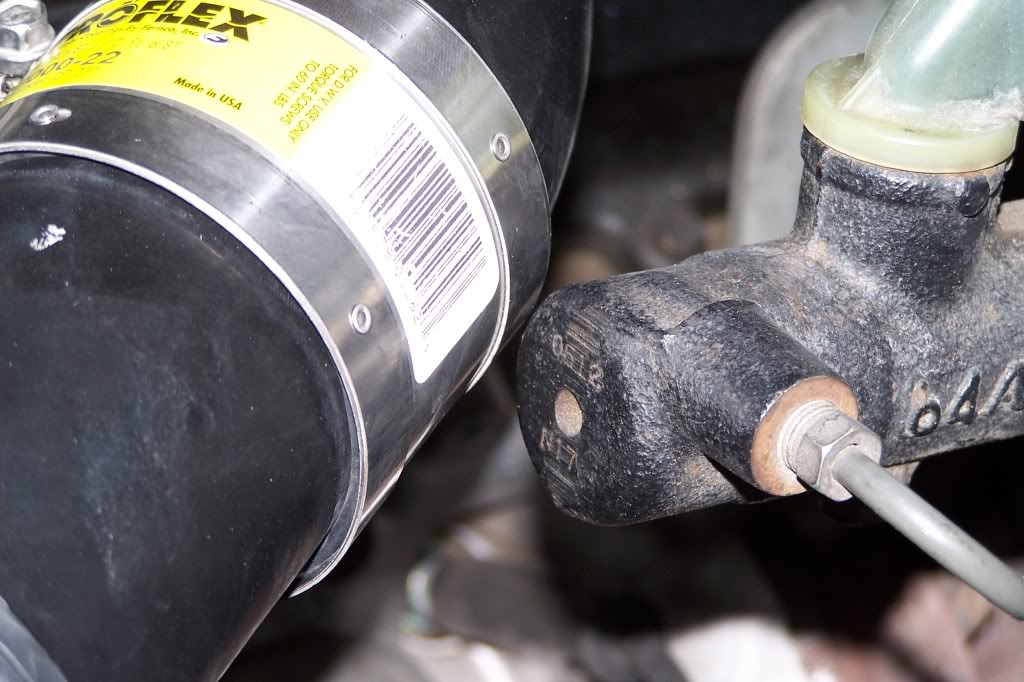
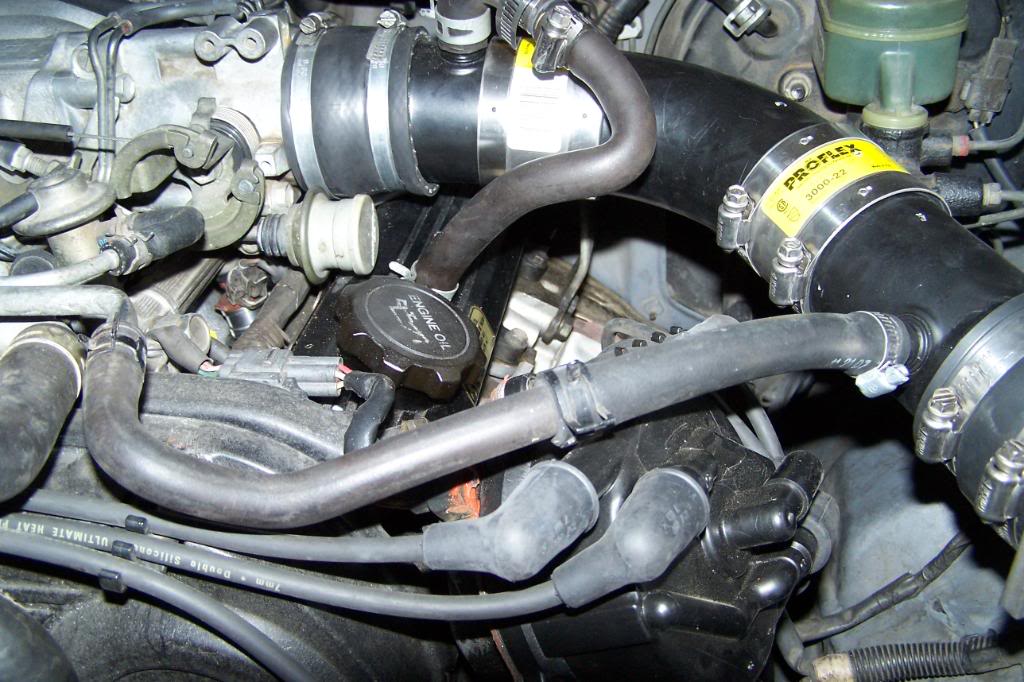
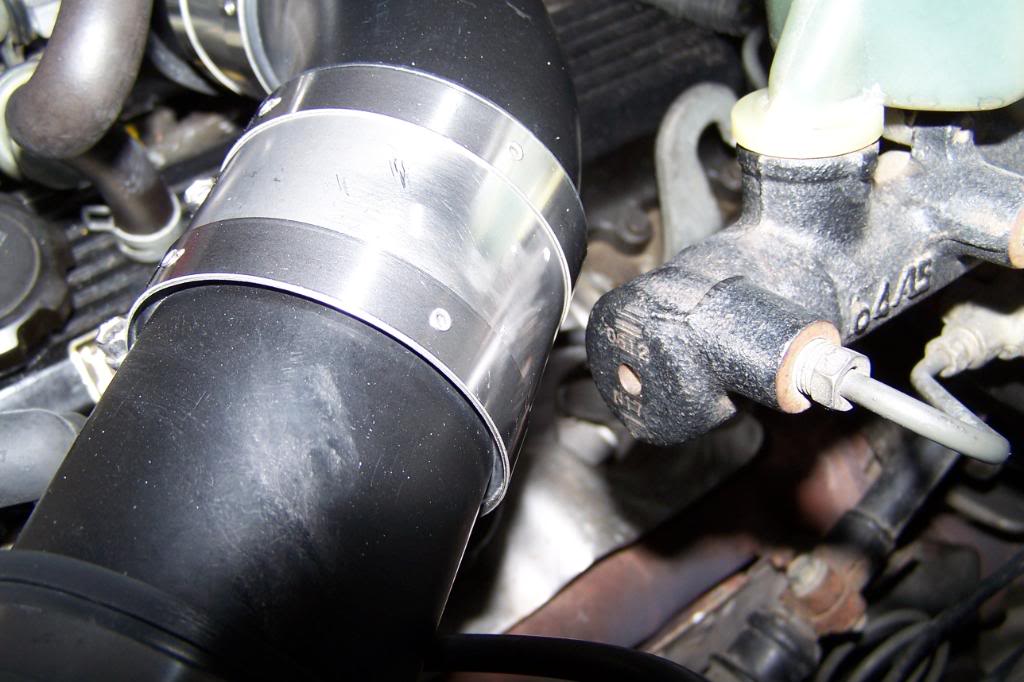
Make sure that there's a gap between the ISR pipe and the brake master cylinder to prevent any rubbing. Don't want to be sorry later...
8. Once you are satisfied with the location, tighten the couplers.

9. Install the 90 degree hose to the intake ISR bib. Connect the engine hose thru the barb. Connect the SILENCER hose to the other bib (MAF/VAFM end).
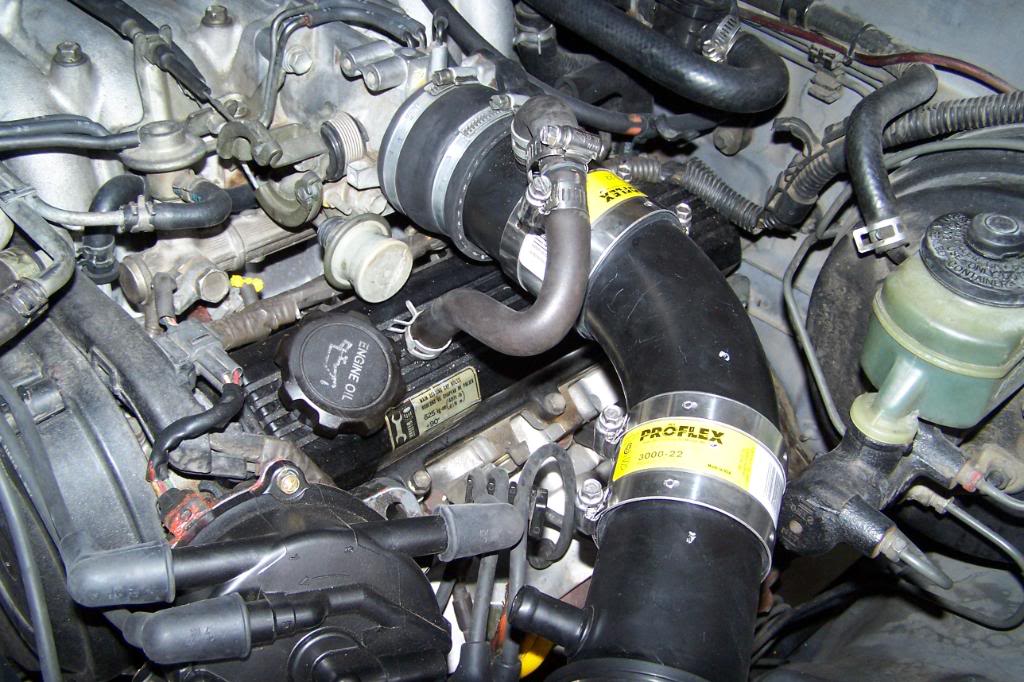
bib at the MAF/VAFM end:
Tip: use a larger hose to connect the silencer hose to the bib.
10. Install the reservior and clean up to finish the project. Reconnect the battery cable and test drive.
Next project:
Find a way to clean up the intake hoses (spaghette). I'm planning on rerouting them somewhere...let you know later...any idea????

Scoop:
original body paint:
here the latest paint job...midnite blue
rear view...
==============
====MY ISR MOD====
==============
Here's the parts list:
1) Intake pipe / rubber hose - came off from a 1986 Volvo 740 model - Pick N Pull junk yard.
2) Two 2"-2" steel / rubber couplers - Home Depot pn 3000-22.
3) One 2"-2" rubber coupler - Home Depot (don't remember the pn but it's in the plummming section). - installed at the MAF/AFM end
4) 1/2 90 degree hose - Pick N Pull jy.
5) One 1/2" barb x 1/2" barb - HD pn A-380.
***********************
Fab and installation ********
***********************
Hint: Make sure to remove the negative battery cable and turn on the headlight to reset the ecu before doing the install.
Steps:
1. Cut the Volvo intake pipe to the correct sizes - three parts. Measurement shown in the pics below.
TIP: Although you can use just one pipe I used two because of the preinstalled bib/nipple. It saved me time/money from installing a new bib. Plus the bib/nipple on the pipe is factory sealed and no worry about leaks.
Total lenght: 12 1/2 or so.
Pipe that connects to the MAF/VAFM end:
Pipe that connects to the intake end - shown with the (angled) mid part of the ISR pipe assembly.
--intake pipe around 3 1/2" cut -
angled pipe cut aroud 4 1/2" or so.
2. Once you are done cutting the pipe(s). Pre-assemble them to make sure you have the correct length and the correct position/locations of the bibs. Place a white marker where the pipes meet - another farther out so they will not get covered when the couplings are installed (see pics above).
3. Prepare the 2-2 steel couplers. You will notice a liner/divider in the mid section of the rubber couple. Remove the liner by turning the coupler inside out.
Use a sharp knife to cut the divider.
4. Assemble the ISR pipes. Insert the rubber couplers (make sure they are turned inside out), then tighten the steel couplers properly.
Tip: coat the rubber couplers with a radiator grease to make the insertion easier.
5. Connect the pre-assembled ISR pipe to the MAF/VAFM.
Tip: it's easier to do this on a table rather than in the engine bay (MAF/VAFM still in the filter box), then again have it ur way.
Here's what it looks like after completing assembly:
6. Next, connect the barb to the engine air hose (forgot what it's called). Pic below shows what I mean:
7. Connect the Volvo coupler to the intake, then the ISR assembly (MAF/VAFM already connected). Do not tighten the coupler yet so that you can udjst the assembly properly.
Tip: if you don't have the Volvo coupler - use the HD 2-2 rubber coupler - same as the one installed in the MAF/VAFM. Reason I used it is for easy removal of the ISR. The HD couplers are tight.
Make sure that there's a gap between the ISR pipe and the brake master cylinder to prevent any rubbing. Don't want to be sorry later...
8. Once you are satisfied with the location, tighten the couplers.
9. Install the 90 degree hose to the intake ISR bib. Connect the engine hose thru the barb. Connect the SILENCER hose to the other bib (MAF/VAFM end).
bib at the MAF/VAFM end:
Tip: use a larger hose to connect the silencer hose to the bib.
10. Install the reservior and clean up to finish the project. Reconnect the battery cable and test drive.
Next project:
Find a way to clean up the intake hoses (spaghette). I'm planning on rerouting them somewhere...let you know later...any idea????
Last edited by edwinb4x4; May 16, 2009 at 10:36 PM. Reason: photo update/correction: not Rad pipe but intake pipe/K&N KIT detail/removed early history
 May 4, 2009 | 09:49 PM
#6
Thread Starter
Registered User
Joined: Sep 2008
Posts: 74
Likes: 0
From: SJ-California
couplers - around $5 ea (bought 3 from HD)
Barb - aound $2 (bought 1)
rubber hoses / intake (Volvo) coupler- free
could have used rubber hoses/couplers from the junkyard but did not have time to search for a good one.
That's pretty much about it.
Trending Topics
May 5, 2009 | 08:00 AM
#9
Thread Starter
Registered User
Joined: Sep 2008
Posts: 74
Likes: 0
From: SJ-California
My bad though - it wasn't a rad pipe but an INTAKE pipe off a 86-89 Volvo turbo sedan (I'll get back to you on this for the exact car model - heading back to the junk yard to get some stuff this Sat).
Car model is: 1986 Volvo 740
- Pipe to intake / Intake pipe
Last edited by edwinb4x4; May 7, 2009 at 03:44 PM. Reason: reply to mmcpeck
 May 6, 2009 | 11:55 PM
#12
Thread Starter
Registered User
Joined: Sep 2008
Posts: 74
Likes: 0
From: SJ-California
I'm back...
To all thanks for the feedback ... appreciate it a lot!!
Aviator:
Here's the scoop.
So far so good . Got a CEL yesterday but got rid of it after reseting the ECU.
Pros: in just a few days of driving
First of all, my main goal for doing this MOD was to get more pep from my Yota. This mod for sure accomplished that and much more(also way cheaper than the K&N Intake system). Truck accelerates much faster now. A plus especially during merging into fast lanes (man.. hate it when you have the pedal to the metal and not go anywhere). Going uphill used to be a struggle, this time no sweat. I don't need to floor it w/ the OD turned off anymore (unless very steep).
In addition to the pep, there's more room now to work on (at least on this side of the engine bay – the other side, it's still a pita – next project - find a way to clean it up). The ease of install/un-install is also a plus. Very easy and fast removing the entire ISR assembly. Then there's the looks and roar but those are just icing on the cakes.
Cons:
I guess the drawback is mileage. As someone already mentioned in one of the post (sorry dude forgot ur name tag - apologies) more air = more fuel. I think this is true but don't have the numbers yet to confirm it. Hopefully by the next 2-3 weeks I'll have it. So far I'm doing 15-18 mpg city/freeway.
But in my case I'll take the pep than the mileage rate.
In short it's well worth it.
Now for the latest update:
Went back to HomeD to buy another 2-2 rubber coupler to replace the one I've already installed (MAF end). Turned out that the GAP between the ISR pipe and the brake master cylinder was not enough . The pipe started hitting the brake mc during ignition due to a slight up/down (rev) engine motion. I made a mistake of cutting the coupler too short
 . Replacing it with a new (uncut) coupler and moving/adjusting the pipe higher gave me the space needed. No more knocking – all quite now in the western front (knock on wood).
Latest pictures:
New coupler:
now wider gap in between ISR Pipe/MBC:
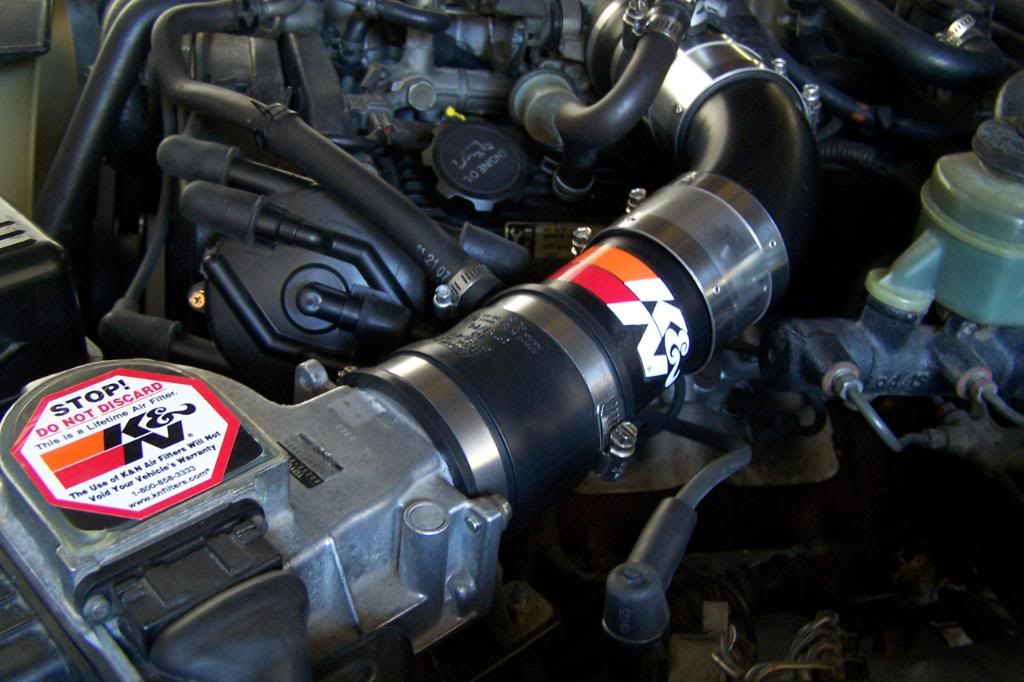
And to complete the MOD, I dropped in a new K&N filter (should give me additional pep – I hope). Check out the K&N stickers.
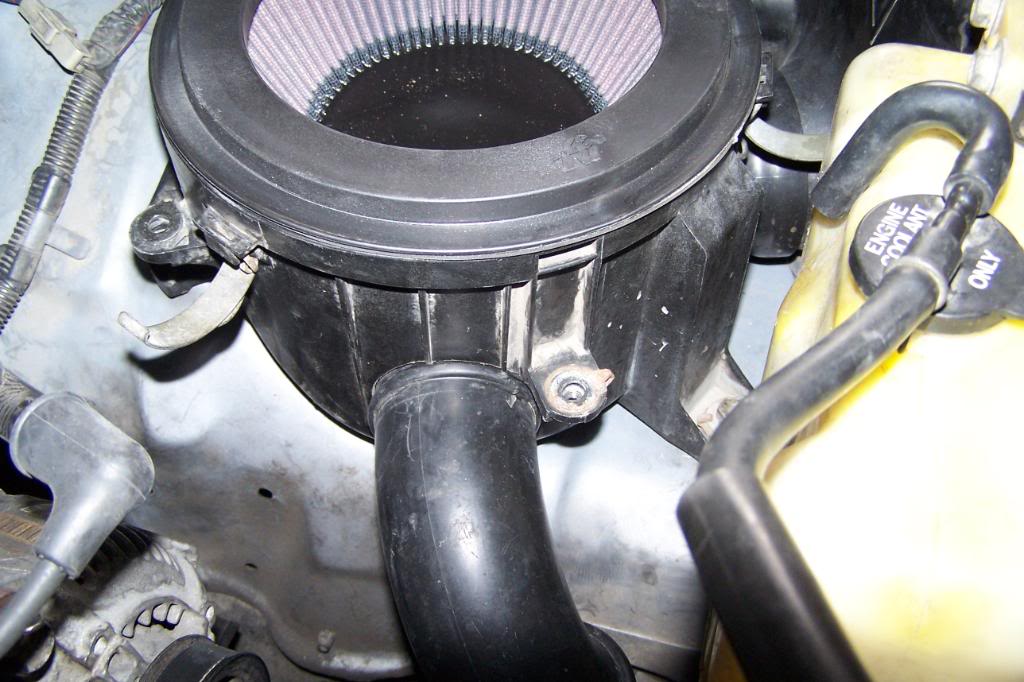
While I was there, I also added another opening in the stock filter box and finished with the 90 degree pvc pipe (I'm not really sure if there's a plus to this but it's not hurting anything).

Well that's all for now and thanks again for the feedback!!
To all thanks for the feedback ... appreciate it a lot!!
Aviator:
Here's the scoop.
So far so good
. Got a CEL yesterday but got rid of it after reseting the ECU.Pros: in just a few days of driving
First of all, my main goal for doing this MOD was to get more pep from my Yota. This mod for sure accomplished that and much more
(also way cheaper than the K&N Intake system). Truck accelerates much faster now. A plus especially during merging into fast lanes (man.. hate it when you have the pedal to the metal and not go anywhere). Going uphill used to be a struggle, this time no sweat. I don't need to floor it w/ the OD turned off anymore (unless very steep). In addition to the pep, there's more room now to work on (at least on this side of the engine bay – the other side, it's still a pita – next project - find a way to clean it up). The ease of install/un-install is also a plus. Very easy and fast removing the entire ISR assembly. Then there's the looks and roar but those are just icing on the cakes.
Cons:
I guess the drawback is mileage. As someone already mentioned in one of the post (sorry dude forgot ur name tag - apologies) more air = more fuel. I think this is true but don't have the numbers yet to confirm it. Hopefully by the next 2-3 weeks I'll have it. So far I'm doing 15-18 mpg city/freeway.
But in my case I'll take the pep than the mileage rate.
In short it's well worth it.
Now for the latest update:
Went back to HomeD to buy another 2-2 rubber coupler to replace the one I've already installed (MAF end). Turned out that the GAP between the ISR pipe and the brake master cylinder was not enough
. The pipe started hitting the brake mc during ignition due to a slight up/down (rev) engine motion. I made a mistake of cutting the coupler too short. Replacing it with a new (uncut) coupler and moving/adjusting the pipe higher gave me the space needed. No more knocking – all quite now in the western front (knock on wood).Latest pictures:
New coupler:
now wider gap in between ISR Pipe/MBC:
And to complete the MOD, I dropped in a new K&N filter (should give me additional pep – I hope). Check out the K&N stickers.
While I was there, I also added another opening in the stock filter box and finished with the 90 degree pvc pipe (I'm not really sure if there's a plus to this but it's not hurting anything).
Well that's all for now and thanks again for the
feedback!!
Last edited by edwinb4x4; May 8, 2009 at 09:23 PM. Reason: cpu = ecu
May 7, 2009 | 12:39 PM
#13
Contributing Member
Joined: Mar 2003
Posts: 11,334
Likes: 0
From: COTKU,Ontario,Canada
Looks good but you should've looked at the deck plate mod instead of cutting the hole in the side of the box....
as long as you can keep your boot out of it your mileage should improve slightly... because you're truck is breathing easier it will take less throttle to cruise at a desired speed all other things being equal. But it can be hard lol when I put my K&N cone on I used to love to hit it hard just to hear the woosh of the incoming air...
as long as you can keep your boot out of it your mileage should improve slightly... because you're truck is breathing easier it will take less throttle to cruise at a desired speed all other things being equal. But it can be hard lol when I put my K&N cone on I used to love to hit it hard just to hear the woosh of the incoming air...
May 7, 2009 | 02:37 PM
#15
Thread Starter
Registered User
Joined: Sep 2008
Posts: 74
Likes: 0
From: SJ-California
Ur welcome Phildelfino - 'hope it helps!
Aviator,
Do you have something in mind that I can take a look at? I searched the site but could not find a deck plate mod. Maybe I was not looking hard enuff. Anyway please let me know if you have one in mind or for that matter fellow Yoters let me know what you have.
oh, and by the way...the whoosh is becoming addictive...foot is getting heavier...
Thanks again for the input...
Last edited by edwinb4x4; May 7, 2009 at 02:43 PM. Reason: scheck
May 8, 2009 | 02:07 PM
#16
Contributing Member
Joined: Mar 2003
Posts: 11,334
Likes: 0
From: COTKU,Ontario,Canada
No problem here's the thread https://www.yotatech.com/forums/f130...ate-mod-75169/. It and many other performance/appearance mods can be found in the Tech write-ups sub-forum.
Others have done the mod in our trucks as well you may just need to use a smaller dia. plate...
here's a link to another option... https://www.yotatech.com/forums/f130...-engine-75127/ the deckplate's advantage over this one is if you want to go off-road and run into a water fording situation you can snap the plate in and your airbox returns to a stock condition from a water/air entry point of view...
May 8, 2009 | 03:57 PM
#18
Thread Starter
Registered User
Joined: Sep 2008
Posts: 74
Likes: 0
From: SJ-California
Thanks Aviator -- very interesting decplate mod -- something to think about.
Cutting out the bottom part of the box -- yeaks!!...I dunno...but then again if it works why not...
Hey Toylocost...look me up when u r in the area...I ussually go to the jy when I have the urge to splurge...
---outa here...
Cutting out the bottom part of the box -- yeaks!!...I dunno...but then again if it works why not...
Hey Toylocost...look me up when u r in the area...I ussually go to the jy when I have the urge to splurge...
---outa here...
Last edited by edwinb4x4; May 12, 2009 at 07:03 PM. Reason: reword
May 17, 2009 | 06:35 AM
#20

Registered User
Joined: Feb 2009
Posts: 590
Likes: 0
I recently took my intake off and put the stock one back on. I got sick of checking my oil and having the intake directly in the way. I'll have to come up with a new design that has more of a curve to it or something. I did notice a very small loss of power after putting the stock intake on. It's also a tad quieter now.


