
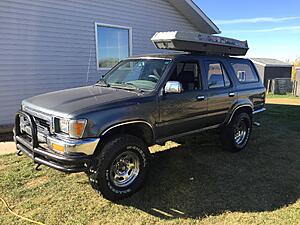
My 1991 4Runner Progress Thread
 Dec 26, 2019 | 08:22 PM
#1
Thread Starter
Registered User
Joined: Dec 2019
Posts: 22
Likes: 7
My 1991 4Runner Progress Thread
Hey all,
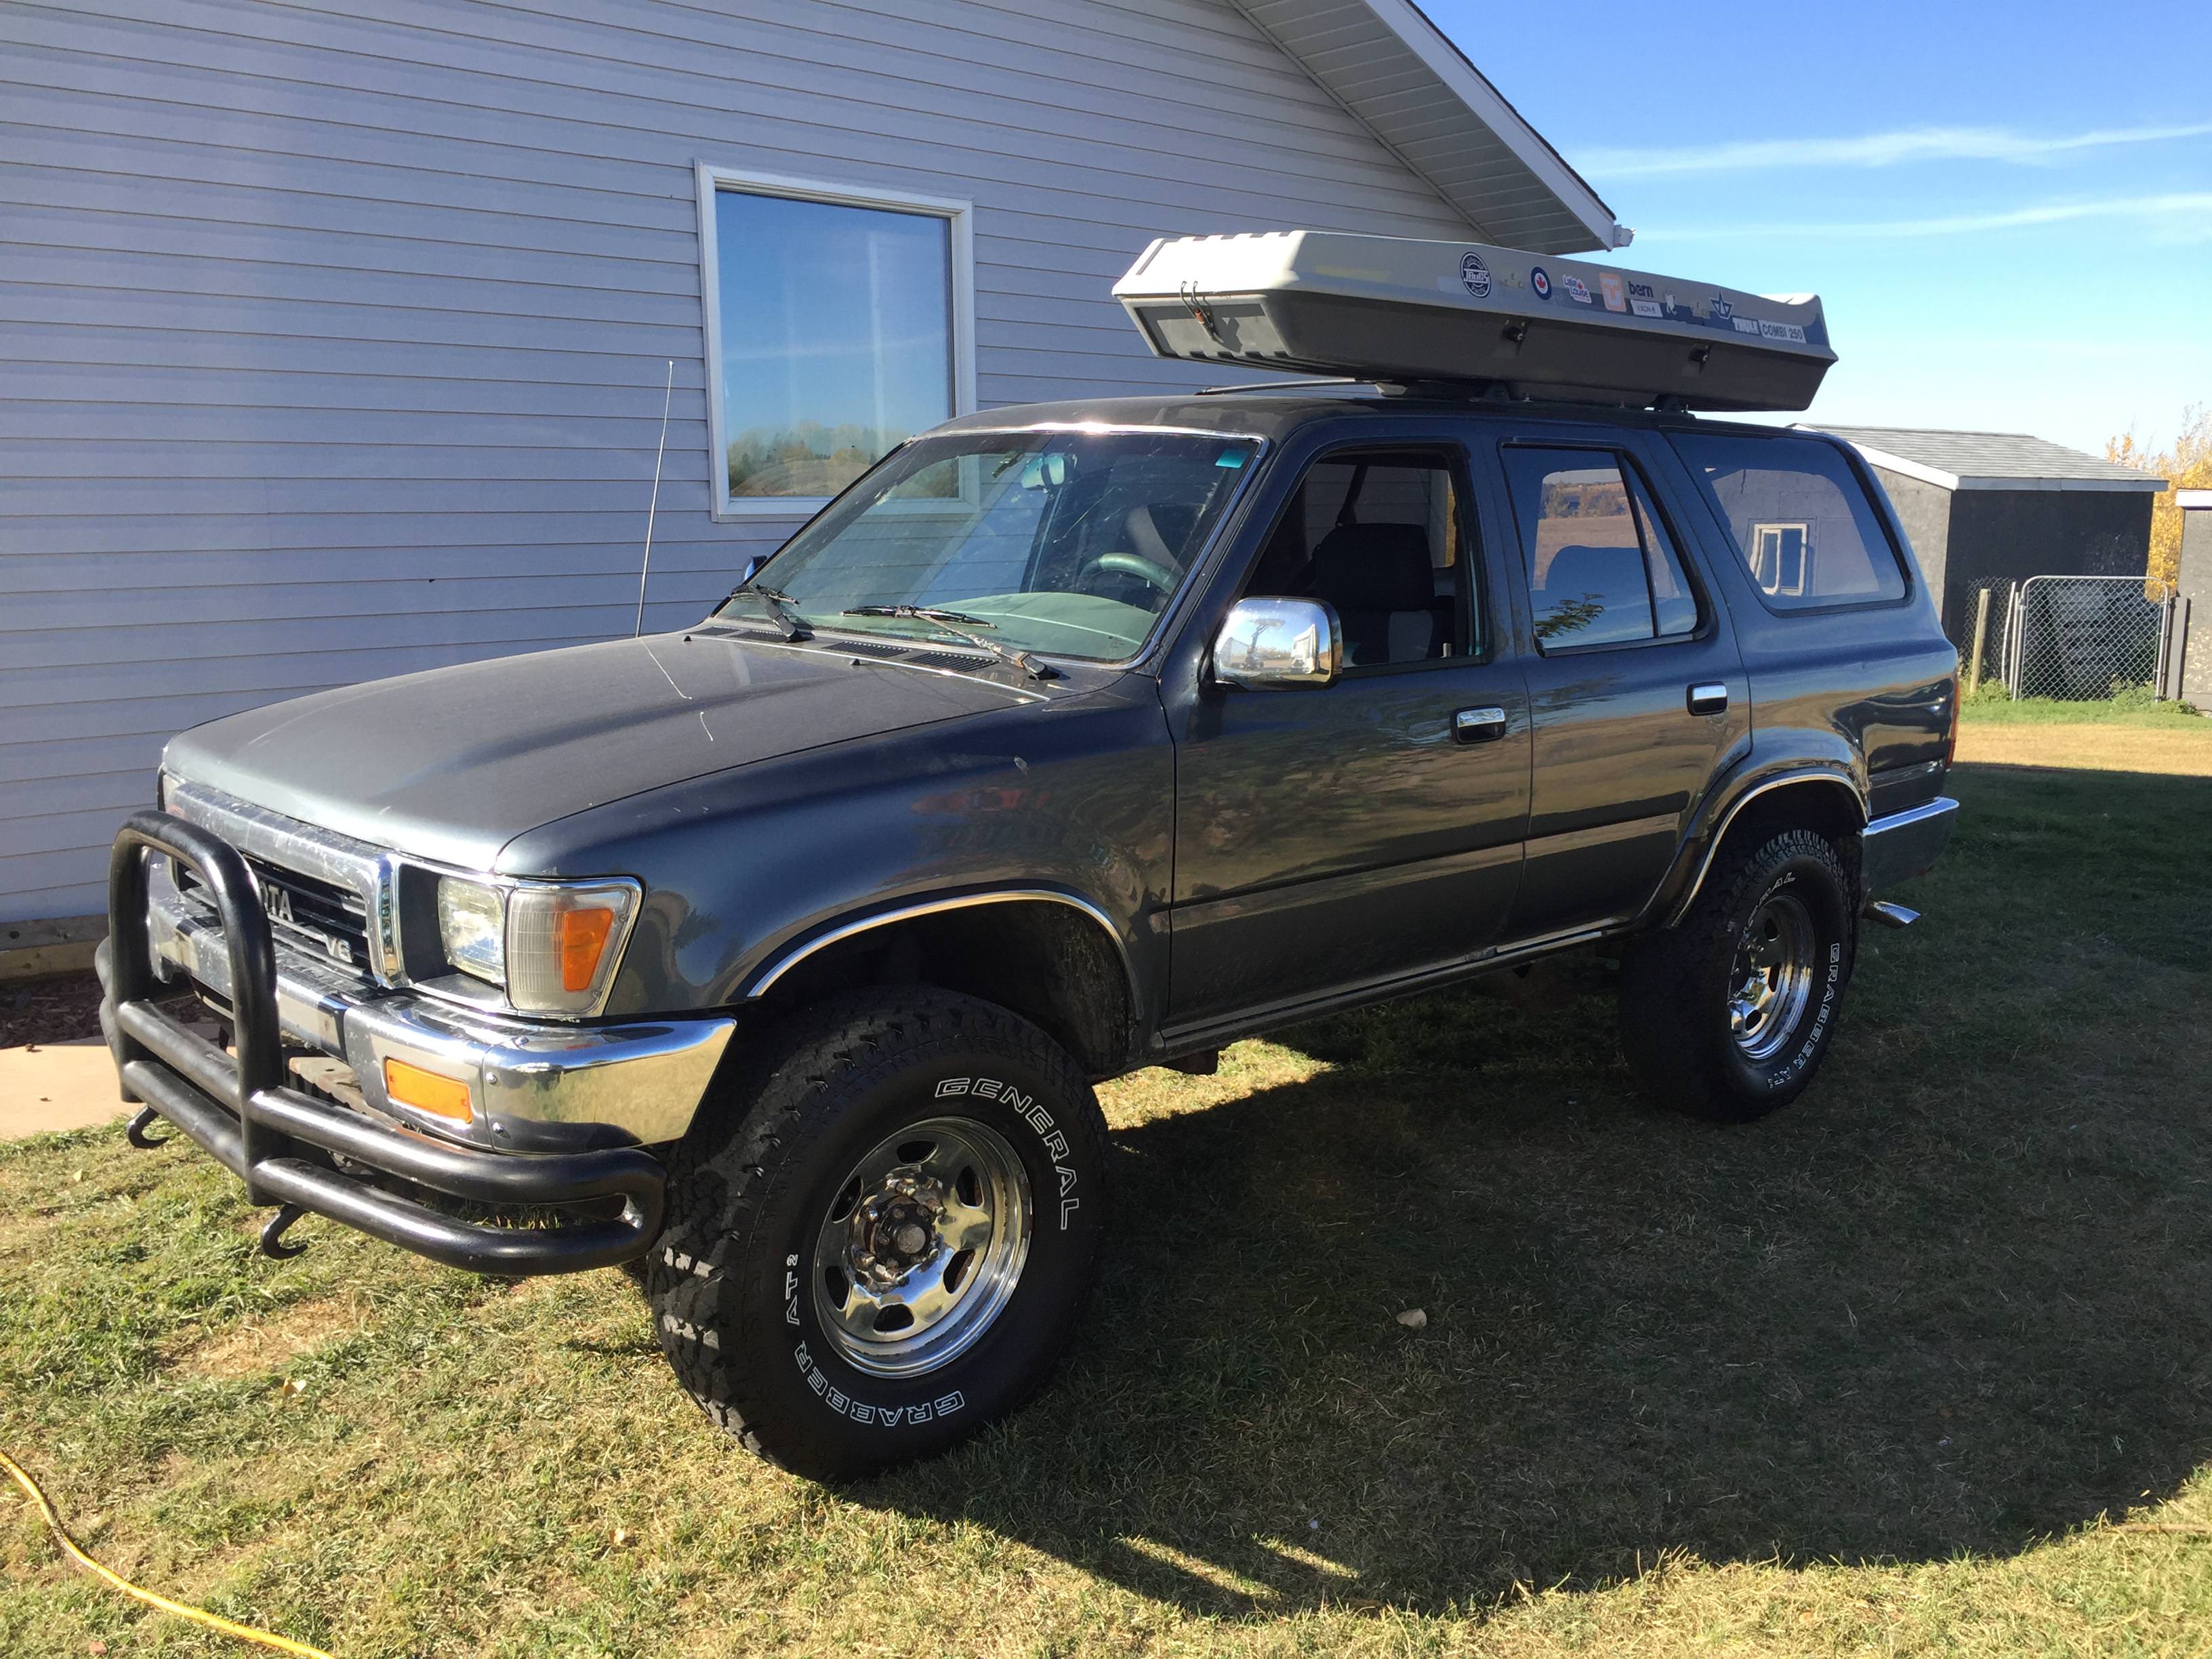
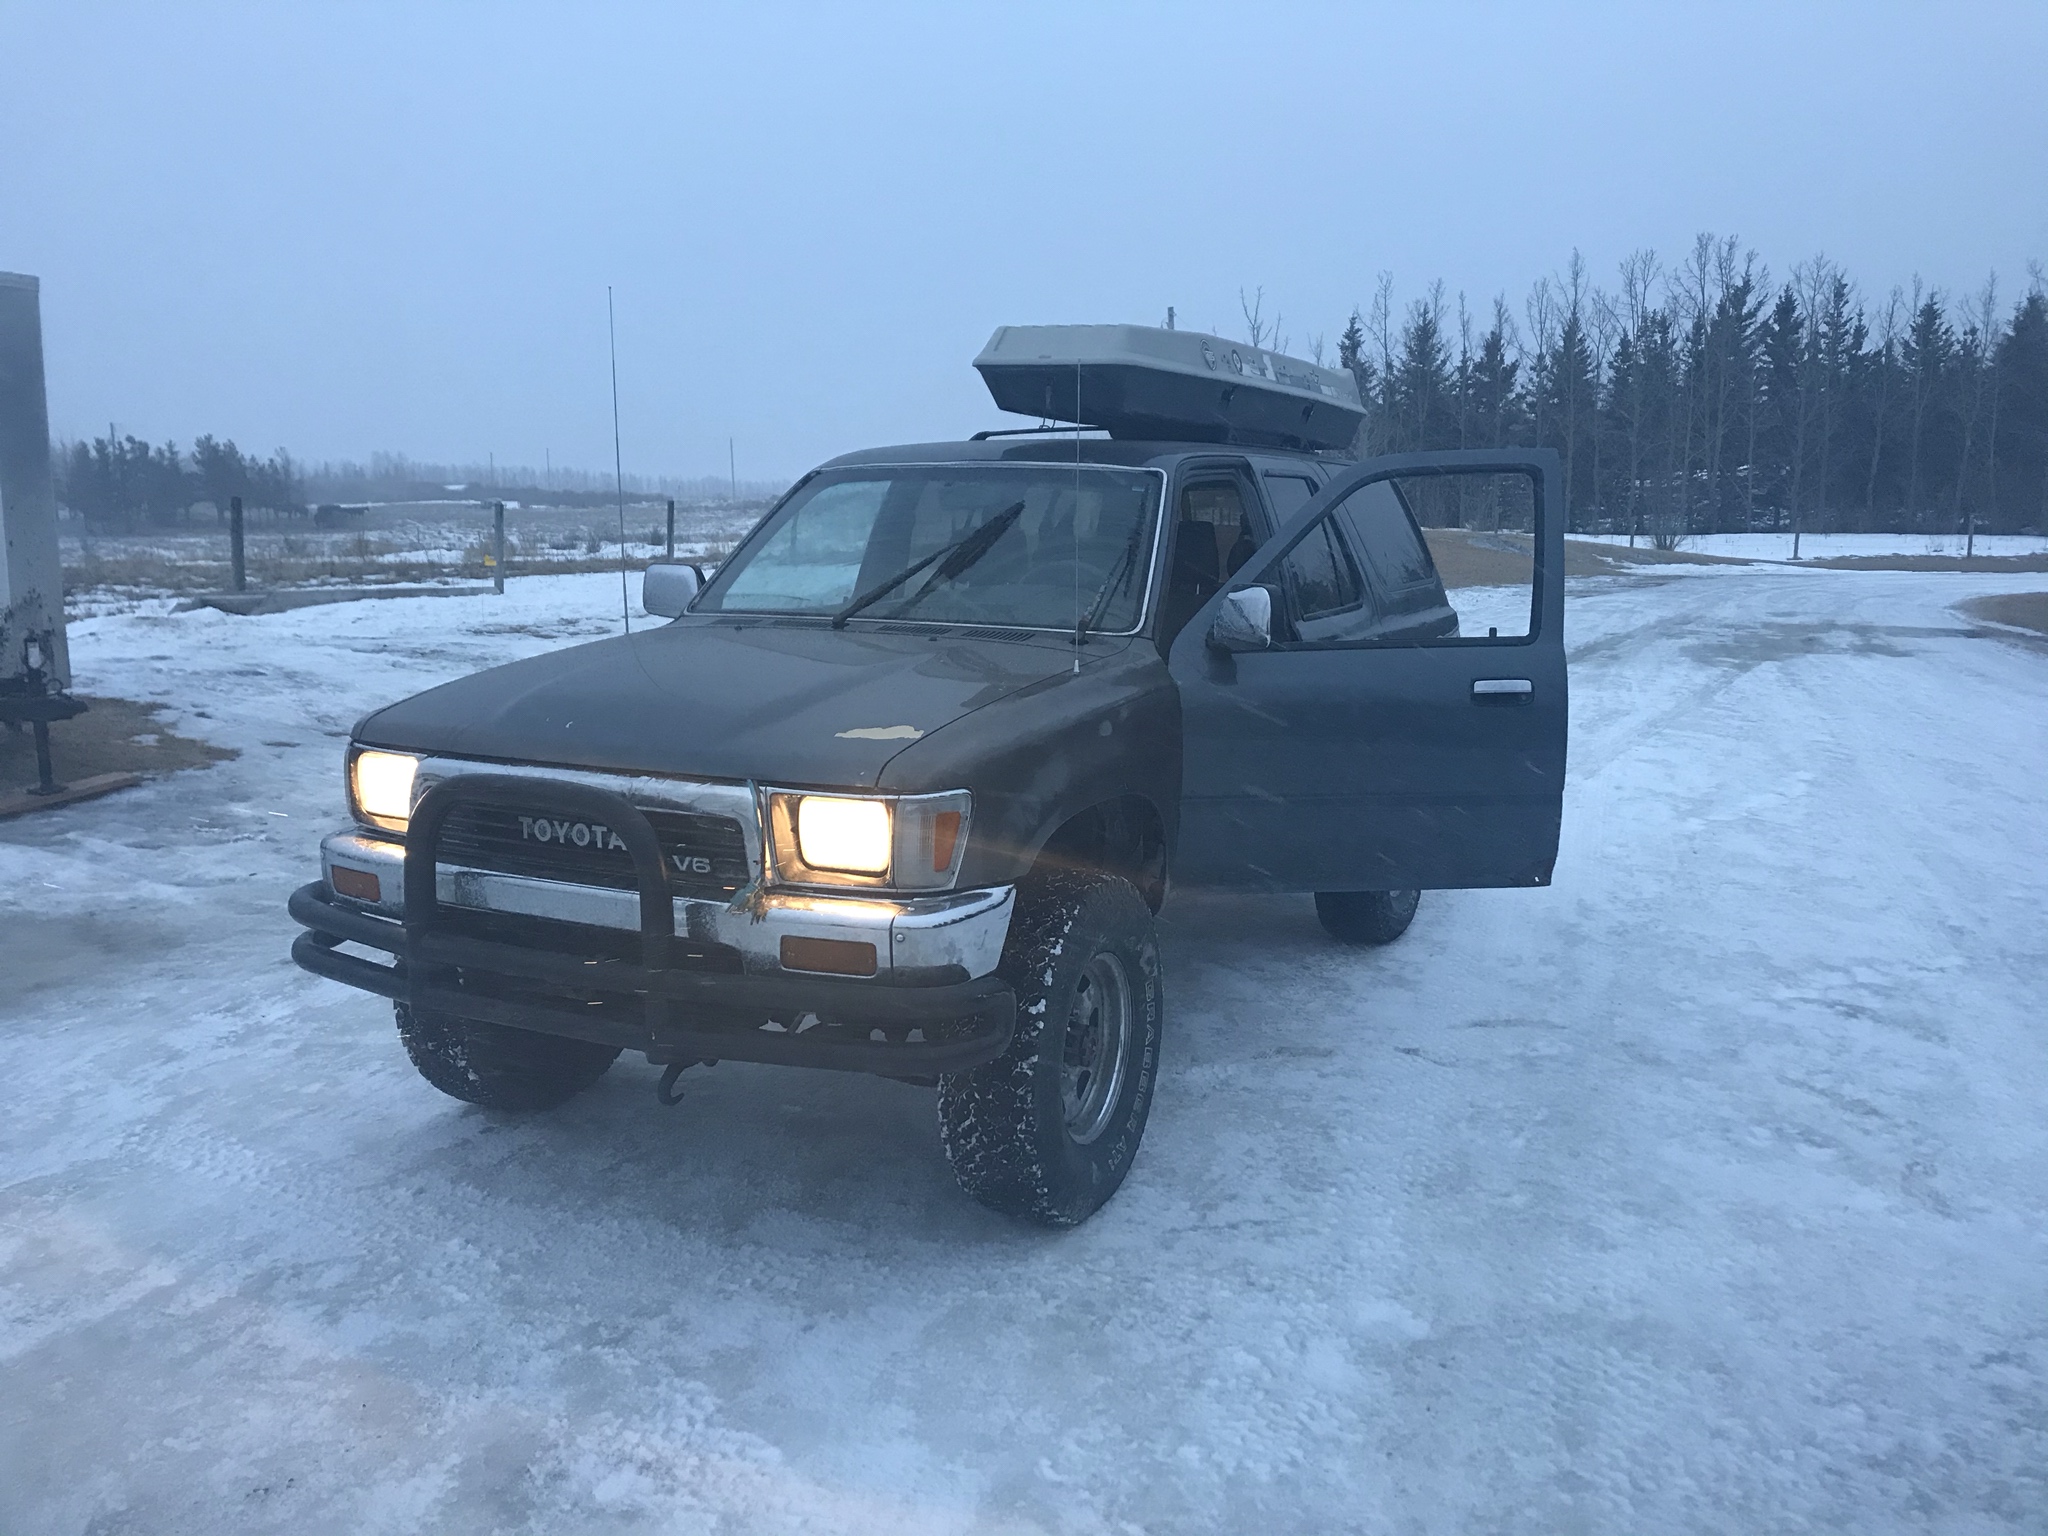
Excited to begin posting here at Yotatech, to learn as much as I can from all the bright people hanging around here. I've used this forum in the past but decided since I'm entering waist deep with this thing over the holidays I felt like it was time to join up and become a part of the community because chances are I'll need the help, and hopefully the mistakes I make can help others in the future as these trucks/suvs become more and more scarce on the roads. So, here's the low-down on my current 4runner. 3VZE, auto tranny, stock ride height, rebuilt engine (head gaskets and some top end components) 65,000kms ago. 418,000kms on the clock.
Lots of longer term plans, but, for starters, here is what I'm tackling in the next week or so.
Manual Transmission Swap
Ignition/rear hatch/ front handle key swap
Cross-over elimination, brand new exhaust including cat, o2 etc.
HID conversion for headlights
Power steering system swap
Dual battery, Solar Panel and Isolator addition
Head unit replacement+ Antennae replacement
CB Radio Replacement + Antennae replacement
Oil pan replacement
Oil change/filter, air filter, fuel filter etc.
EGR, PAIR Delete
Spark Plugs
Blower Switch/Relay (Currently only two speeds)
Valve cover gaskets
Can I do all of this in a week? I don't really think so but it's what I have parts for anyways!
Long term plans, hopes, dreams;
Front windshield replacement
SAS with father in laws ARB air locker 4:29 gears, + super swampers and rims (When he welds his new 1-ton axles on)
5VZE swap
Fiberglass fenders + rear hatch + rear quarters, Body Rust Fixes and re-paint
Rocksliders, rear tube bumper
Aftermarket seats
Interior/exterior roll cage
Marlin Crawler
and whatever else my head can dream up.
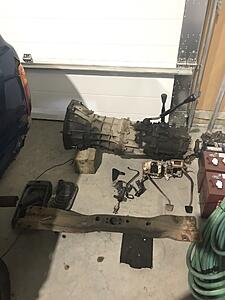
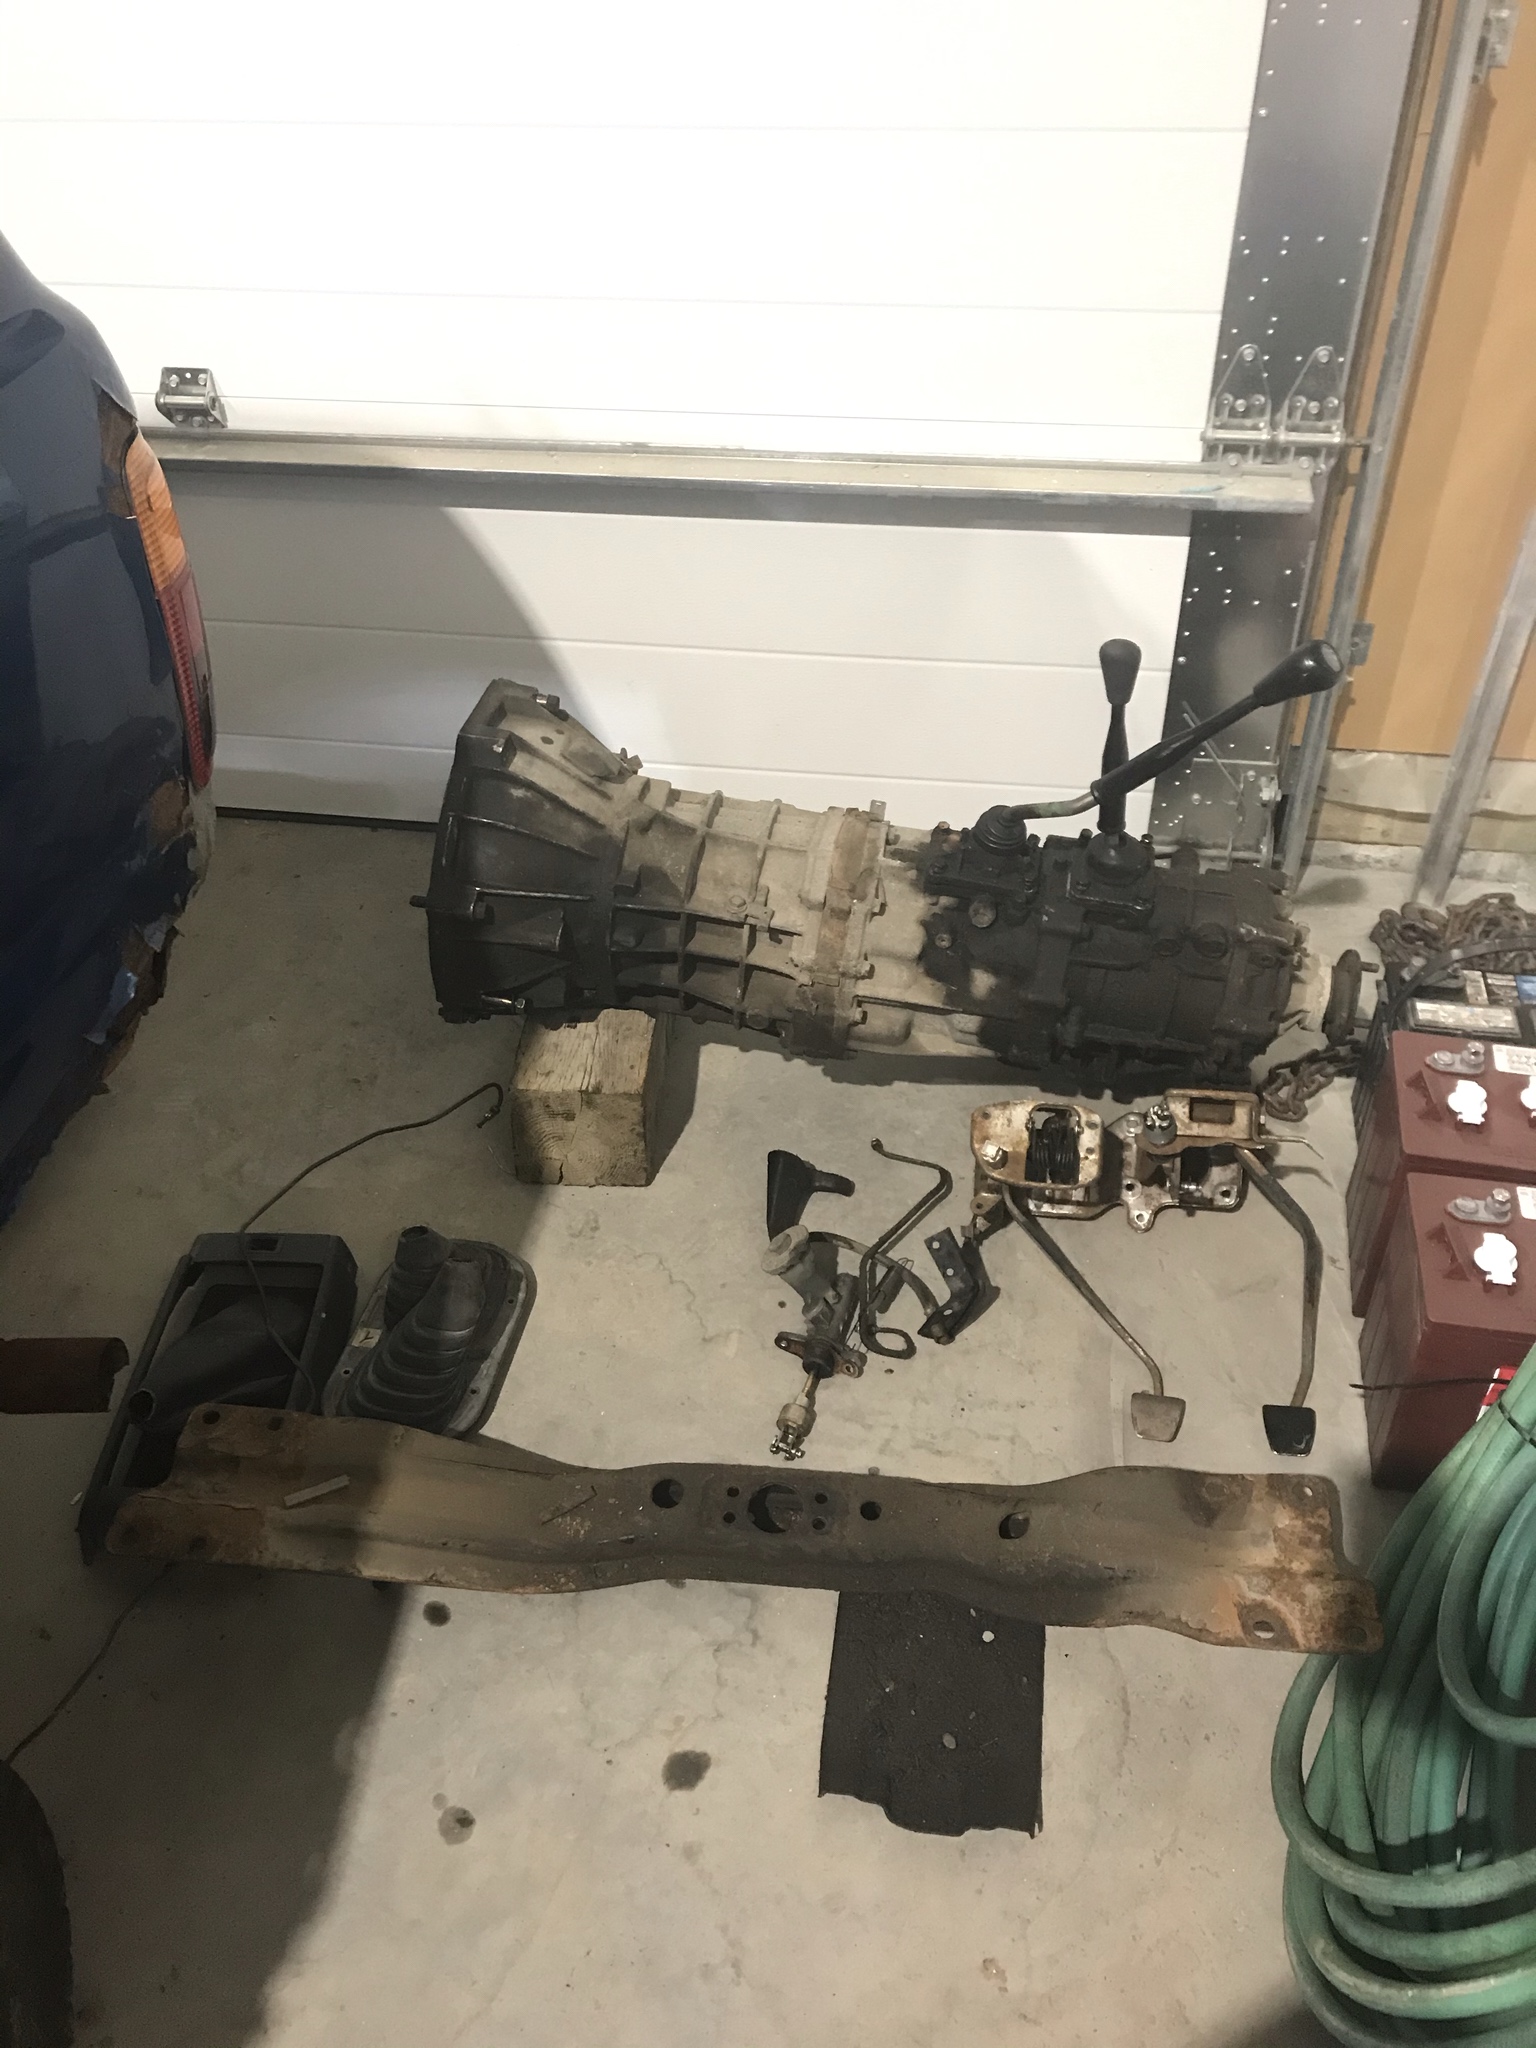
So where am I starting? The manual transmission off my parts truck!

In all I've spent 8 hours pulling all the parts I want off of this old 93' 4runner. This was my second 4runner and the headgasket went a couple years ago. The rust made me decide this particular 4runner wasnt worth all the effort of a restore and long term investment. So, time to part it out!

Tomorrow, I plan on cleaning up the parts I pulled off, organizing them into bins for the ones I won't be using, and hopefully starting in on my 4runner's manual swap! Will post more tomorrow.
Excited to begin posting here at Yotatech, to learn as much as I can from all the bright people hanging around here. I've used this forum in the past but decided since I'm entering waist deep with this thing over the holidays I felt like it was time to join up and become a part of the community because chances are I'll need the help, and hopefully the mistakes I make can help others in the future as these trucks/suvs become more and more scarce on the roads. So, here's the low-down on my current 4runner. 3VZE, auto tranny, stock ride height, rebuilt engine (head gaskets and some top end components) 65,000kms ago. 418,000kms on the clock.
Lots of longer term plans, but, for starters, here is what I'm tackling in the next week or so.
Manual Transmission Swap
Ignition/rear hatch/ front handle key swap
Cross-over elimination, brand new exhaust including cat, o2 etc.
HID conversion for headlights
Power steering system swap
Dual battery, Solar Panel and Isolator addition
Head unit replacement+ Antennae replacement
CB Radio Replacement + Antennae replacement
Oil pan replacement
Oil change/filter, air filter, fuel filter etc.
EGR, PAIR Delete
Spark Plugs
Blower Switch/Relay (Currently only two speeds)
Valve cover gaskets
Can I do all of this in a week? I don't really think so but it's what I have parts for anyways!
Long term plans, hopes, dreams;
Front windshield replacement
SAS with father in laws ARB air locker 4:29 gears, + super swampers and rims (When he welds his new 1-ton axles on)
5VZE swap
Fiberglass fenders + rear hatch + rear quarters, Body Rust Fixes and re-paint
Rocksliders, rear tube bumper
Aftermarket seats
Interior/exterior roll cage
Marlin Crawler
and whatever else my head can dream up.
So where am I starting? The manual transmission off my parts truck!

In all I've spent 8 hours pulling all the parts I want off of this old 93' 4runner. This was my second 4runner and the headgasket went a couple years ago. The rust made me decide this particular 4runner wasnt worth all the effort of a restore and long term investment. So, time to part it out!


Tomorrow, I plan on cleaning up the parts I pulled off, organizing them into bins for the ones I won't be using, and hopefully starting in on my 4runner's manual swap! Will post more tomorrow.
 Dec 28, 2019 | 07:51 PM
#3
Thread Starter
Registered User
Joined: Dec 2019
Posts: 22
Likes: 7
Today was a good day, but I'm realizing the large scope of work I have ahead of me in terms of the list of tasks I've set before me.

Both my valve cover gaskets leak, and I've wanted to change them for as long as I've had the truck. So, in removing various components to get to my exhaust manifolds (more on why later), I decided I'd do the valve cover gaskets at the same time. In addition, I'm also just changing the spark plugs because I haven't done it since owning the truck and they were fairly cheap. As far as the transmission swap goes, I've got the dash all apart, and while doing so I'm working on a few other components as well. For example, the key barrel is worn out (remains in ACC even when the key is removed) and so I decided to take the entire steering column assembly with switches out of the other 93' and use the ignition from that truck with that key. Eventually I will switch out both door handles and rear hatch switch as well, but for now I'll keep both keys on my key ring. With the steering column gone, its very easy to work on other components under the dash, like my hvac system. There were several pieces missing under the dash, which explains why the air doesn't work on the driver side.

I removed the driver's seat because it was much easier to work on things in and under the dash with it gone. While I'm in there swapping out the pedal assembly for the one with a clutch pedal, I'll also be wiring a new head unit in (because I want Bluetooth now), wiring in my new Cobra CB radio, and as well I'll be running all the wires and hoses for my new gauges that I will be installing.

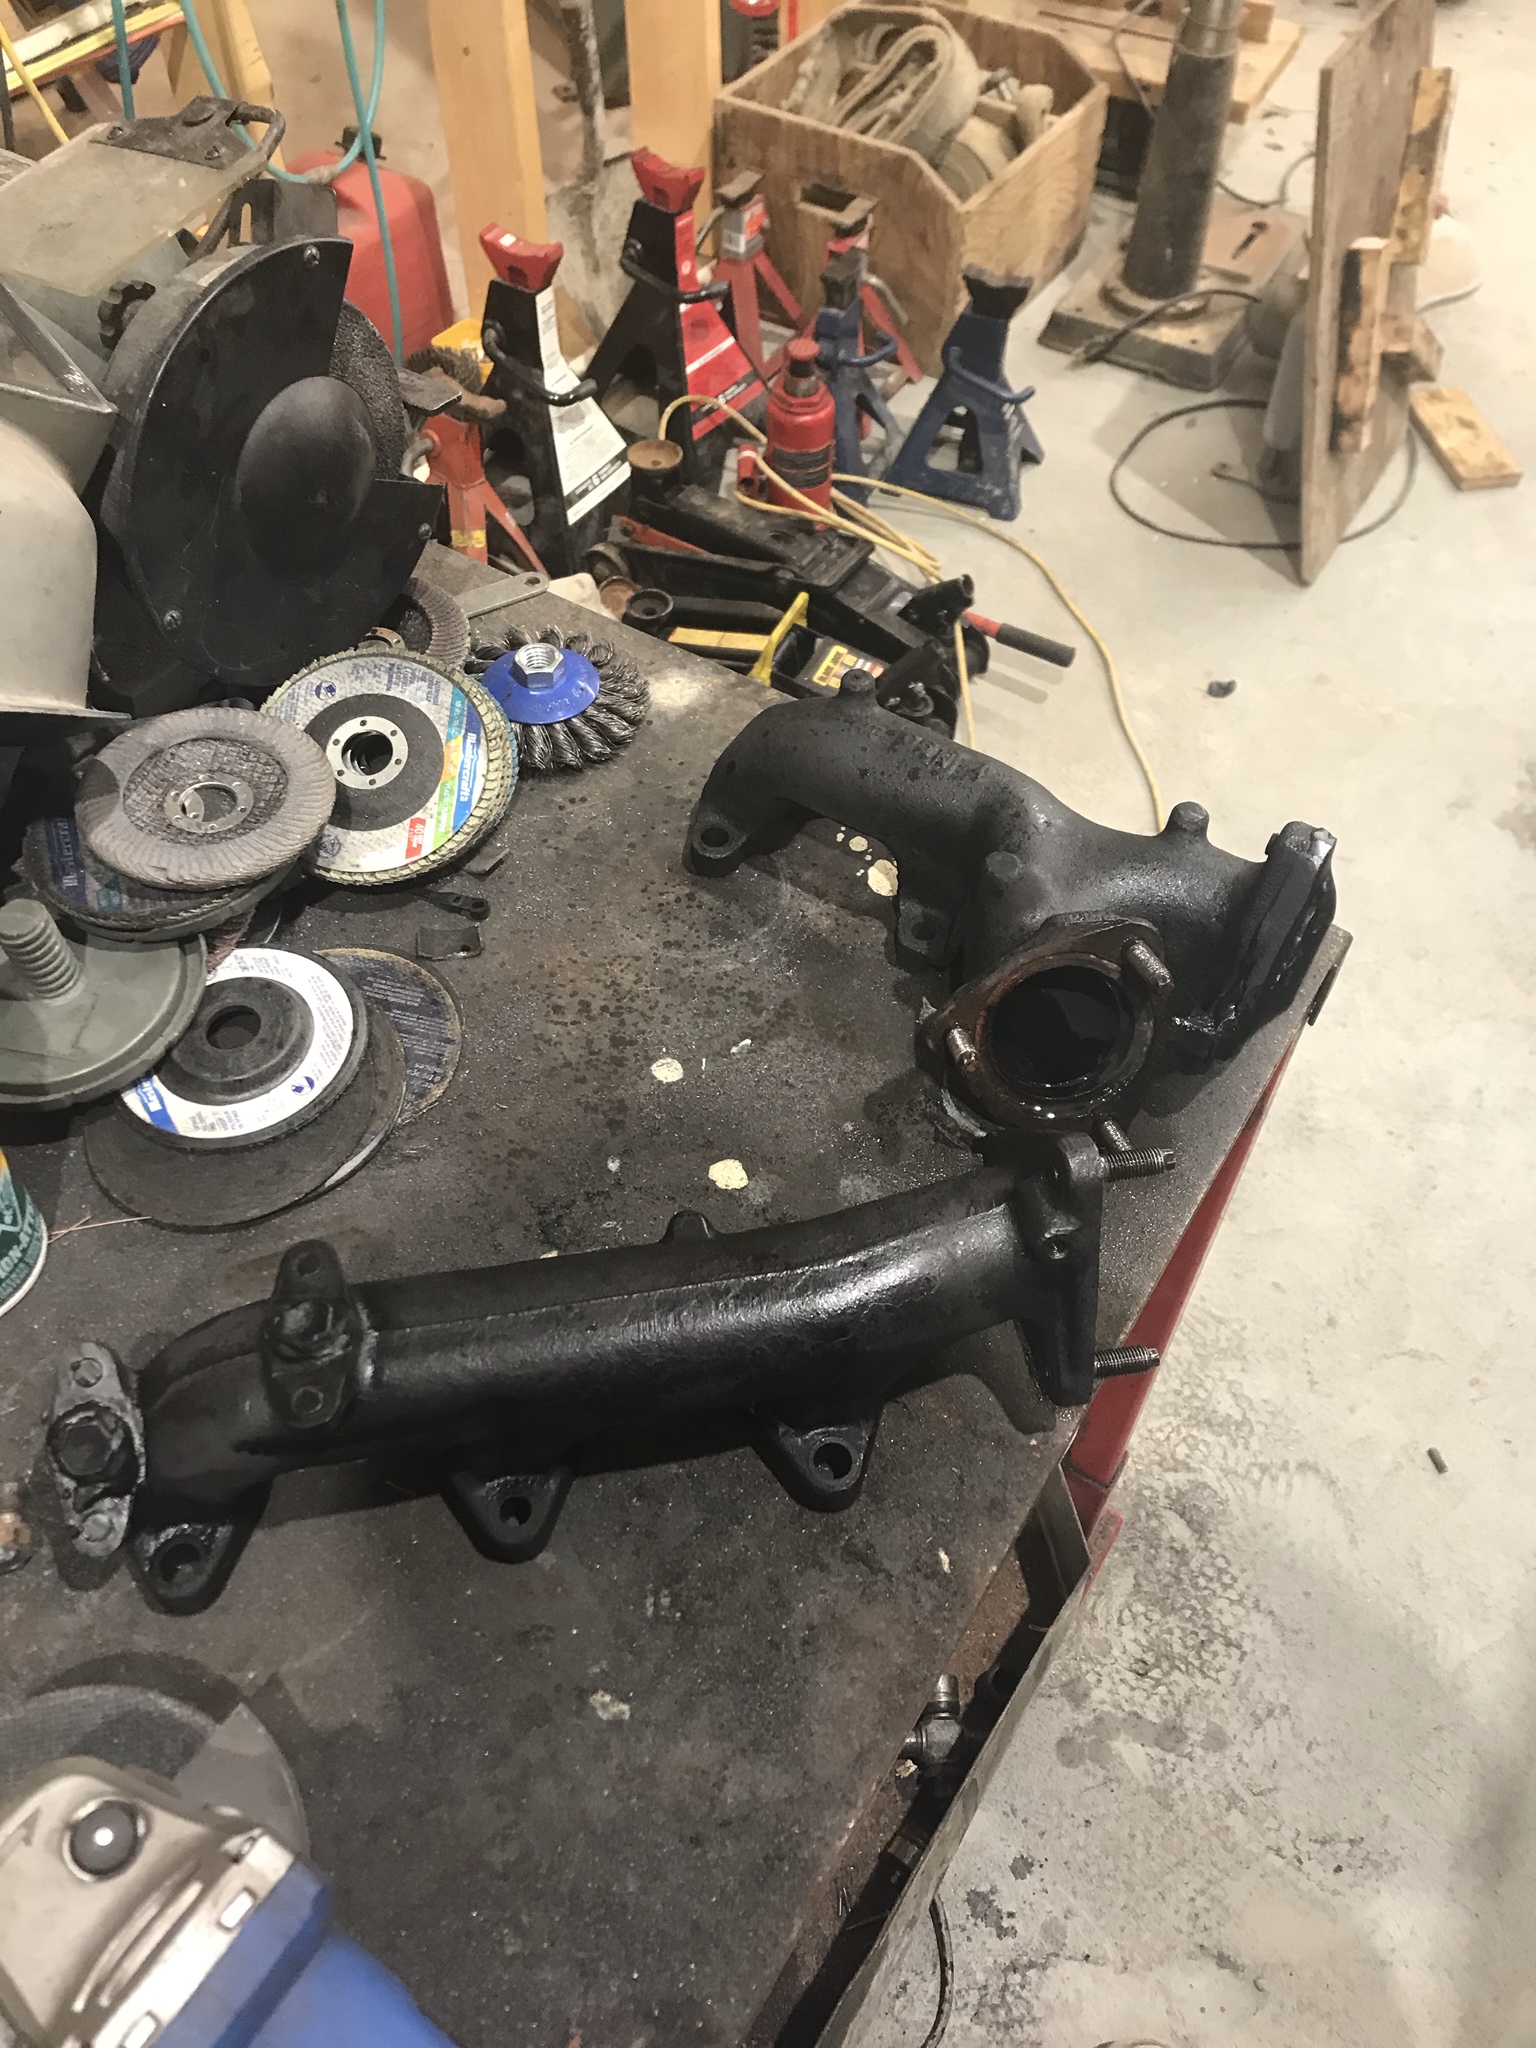
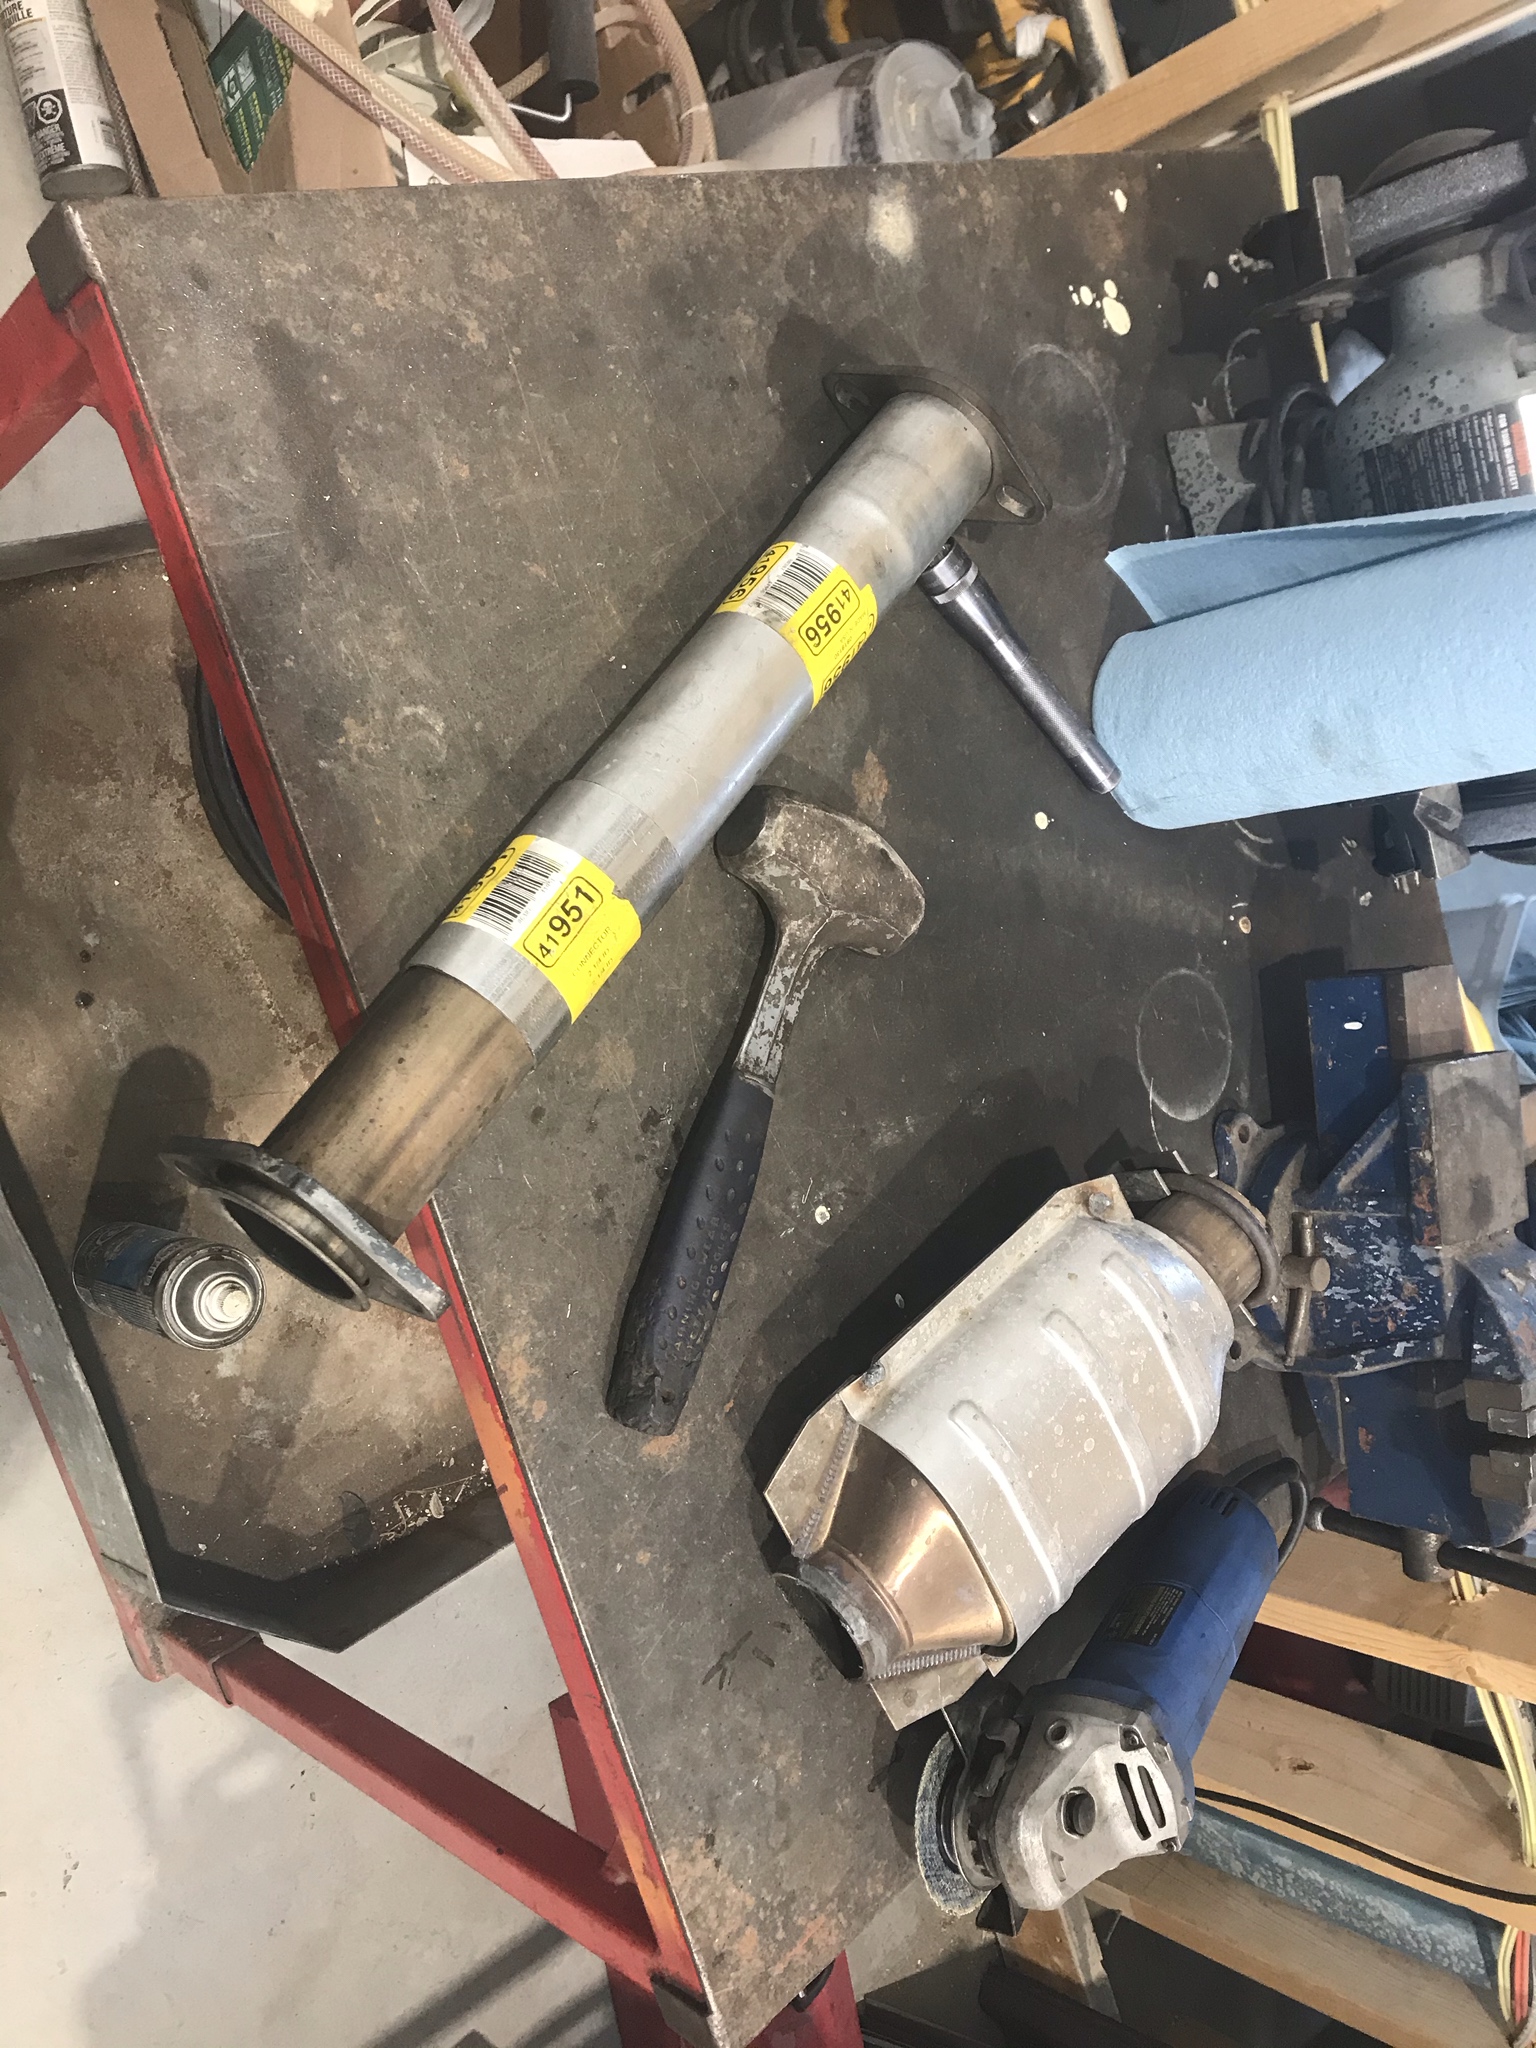
As of now I have almost all the bolts undone on the crossover pipe and manifold on the driver's side exhaust manifold. I'm removing all this for a few different reasons. Primarily I have a few exhaust leaks I need to deal with (throughout the whole system) and I didn't want to have the crossover pipe collecting heat at that junction. When I get the manual transmission installed I will begin to weld up a new crossover piper further down in front of the catalytic converter. I have a new exhaust from the collector down, which will deal with all the leaks I have on my system.
Tomorrow I hope to install the new pedal assembly, drop the automatic transmission and remove all the old exhaust. Once this happens I'll work on wrestling the manual transmission back in (with a new clutch assembly and manual flywheel) and get to fixing up the exhaust. At the same time I hope to do some vacuum line clean up along with a PAIR and EGR delete.
If I can accomplish this into Monday, I'll say I'm doing pretty well. But unfortunately that's not even half of the battle I have left ahead of me. I'll keep the posts coming as I work through these things.

Both my valve cover gaskets leak, and I've wanted to change them for as long as I've had the truck. So, in removing various components to get to my exhaust manifolds (more on why later), I decided I'd do the valve cover gaskets at the same time. In addition, I'm also just changing the spark plugs because I haven't done it since owning the truck and they were fairly cheap. As far as the transmission swap goes, I've got the dash all apart, and while doing so I'm working on a few other components as well. For example, the key barrel is worn out (remains in ACC even when the key is removed) and so I decided to take the entire steering column assembly with switches out of the other 93' and use the ignition from that truck with that key. Eventually I will switch out both door handles and rear hatch switch as well, but for now I'll keep both keys on my key ring. With the steering column gone, its very easy to work on other components under the dash, like my hvac system. There were several pieces missing under the dash, which explains why the air doesn't work on the driver side.

I removed the driver's seat because it was much easier to work on things in and under the dash with it gone. While I'm in there swapping out the pedal assembly for the one with a clutch pedal, I'll also be wiring a new head unit in (because I want Bluetooth now), wiring in my new Cobra CB radio, and as well I'll be running all the wires and hoses for my new gauges that I will be installing.

As of now I have almost all the bolts undone on the crossover pipe and manifold on the driver's side exhaust manifold. I'm removing all this for a few different reasons. Primarily I have a few exhaust leaks I need to deal with (throughout the whole system) and I didn't want to have the crossover pipe collecting heat at that junction. When I get the manual transmission installed I will begin to weld up a new crossover piper further down in front of the catalytic converter. I have a new exhaust from the collector down, which will deal with all the leaks I have on my system.
Tomorrow I hope to install the new pedal assembly, drop the automatic transmission and remove all the old exhaust. Once this happens I'll work on wrestling the manual transmission back in (with a new clutch assembly and manual flywheel) and get to fixing up the exhaust. At the same time I hope to do some vacuum line clean up along with a PAIR and EGR delete.
If I can accomplish this into Monday, I'll say I'm doing pretty well. But unfortunately that's not even half of the battle I have left ahead of me. I'll keep the posts coming as I work through these things.
Jan 7, 2020 | 07:16 PM
#4
Thread Starter
Registered User
Joined: Dec 2019
Posts: 22
Likes: 7
Things moving along here. Now that I'm back at work I'm continuing to progress with these things a bit slower than before, but all in all I've completed a lot of work on my 4runner over the last week.
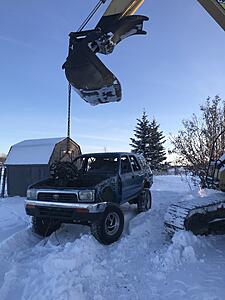
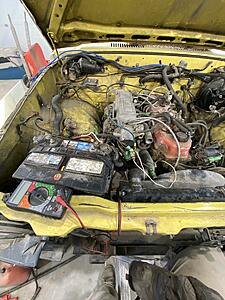
Pulling the automatic transmission was eventful without a proper transmission jack. My brother and law wrestled with it for a while but I had completely missed that I needed to unbolt the torque converter from the flywheel. My brother in law was giving it hell while I was looking at my Haynes manual for help and the torque converter stayed on the engine while the automatic transmission came off. This of course meant ATF everywhere. It was a bit of a nightmare. Feeling pretty foolish, we pulled it to the side and started cleaning up the mess. Soon after, I removed the bolts on the back of the flywheel and removed the converter.

With the transmission out, I decided it would be a good time to tackle the leaking oil pan. This job as well was not very fun. I decided not to drop the differential but in the future if my fix fails, or if I ever do another 3vze oil pan, I will drop the diff to save myself the struggle. I thought I'd be saving myself the effort but really I just made it hard on myself. So far, there's no leaks so hopefully it lasts.

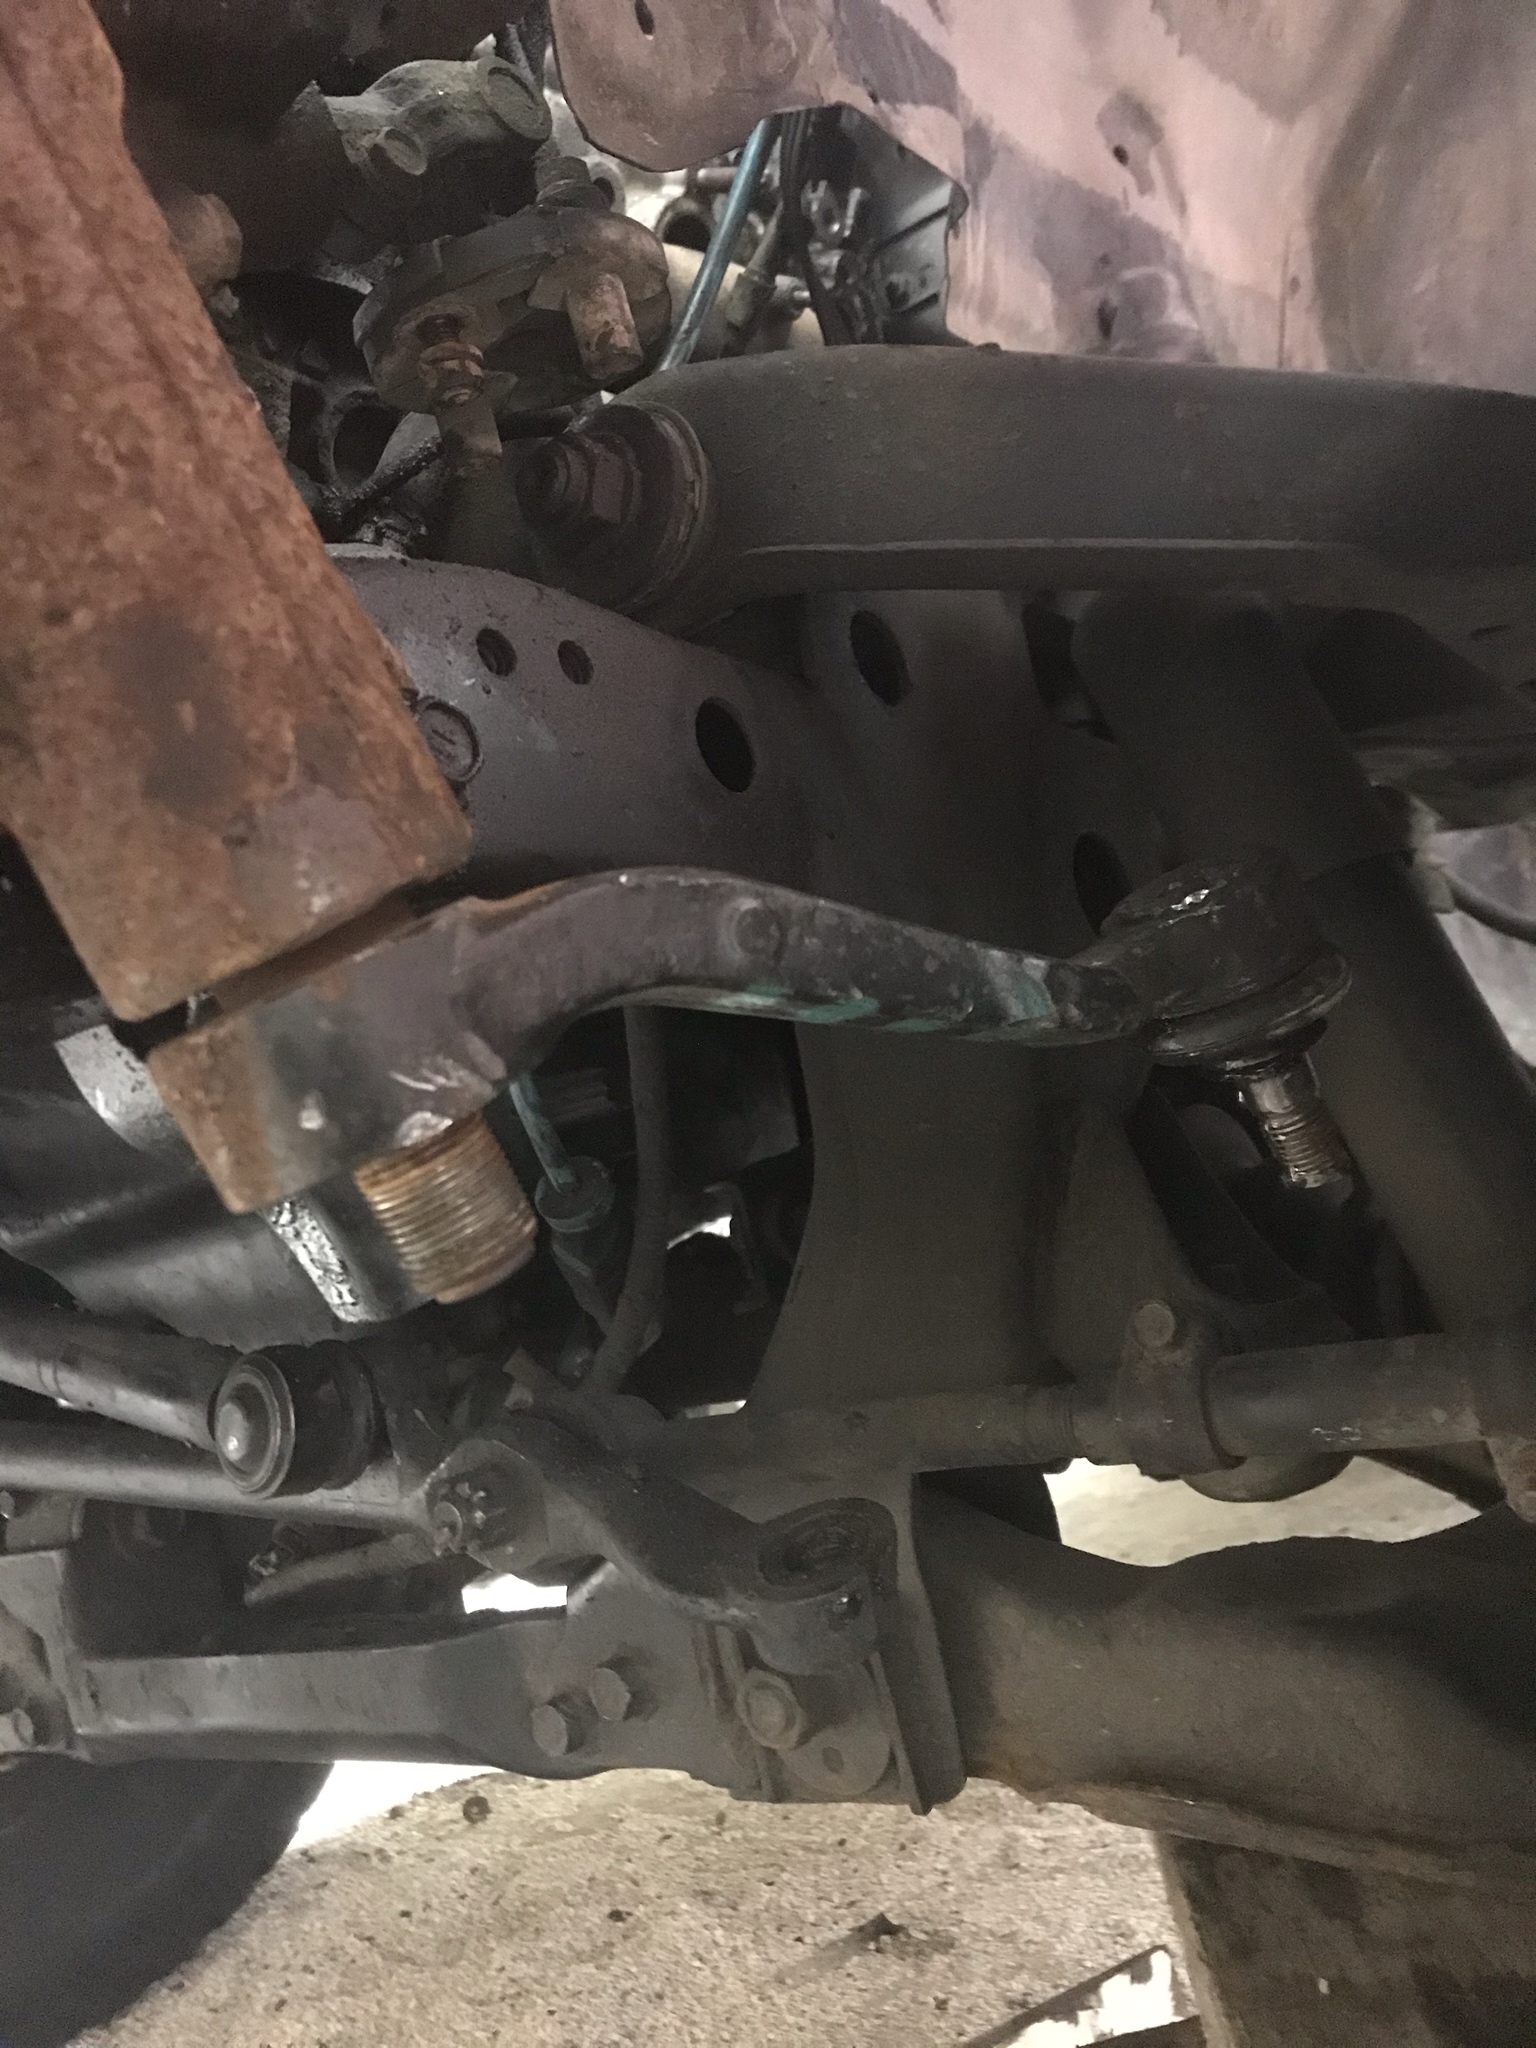
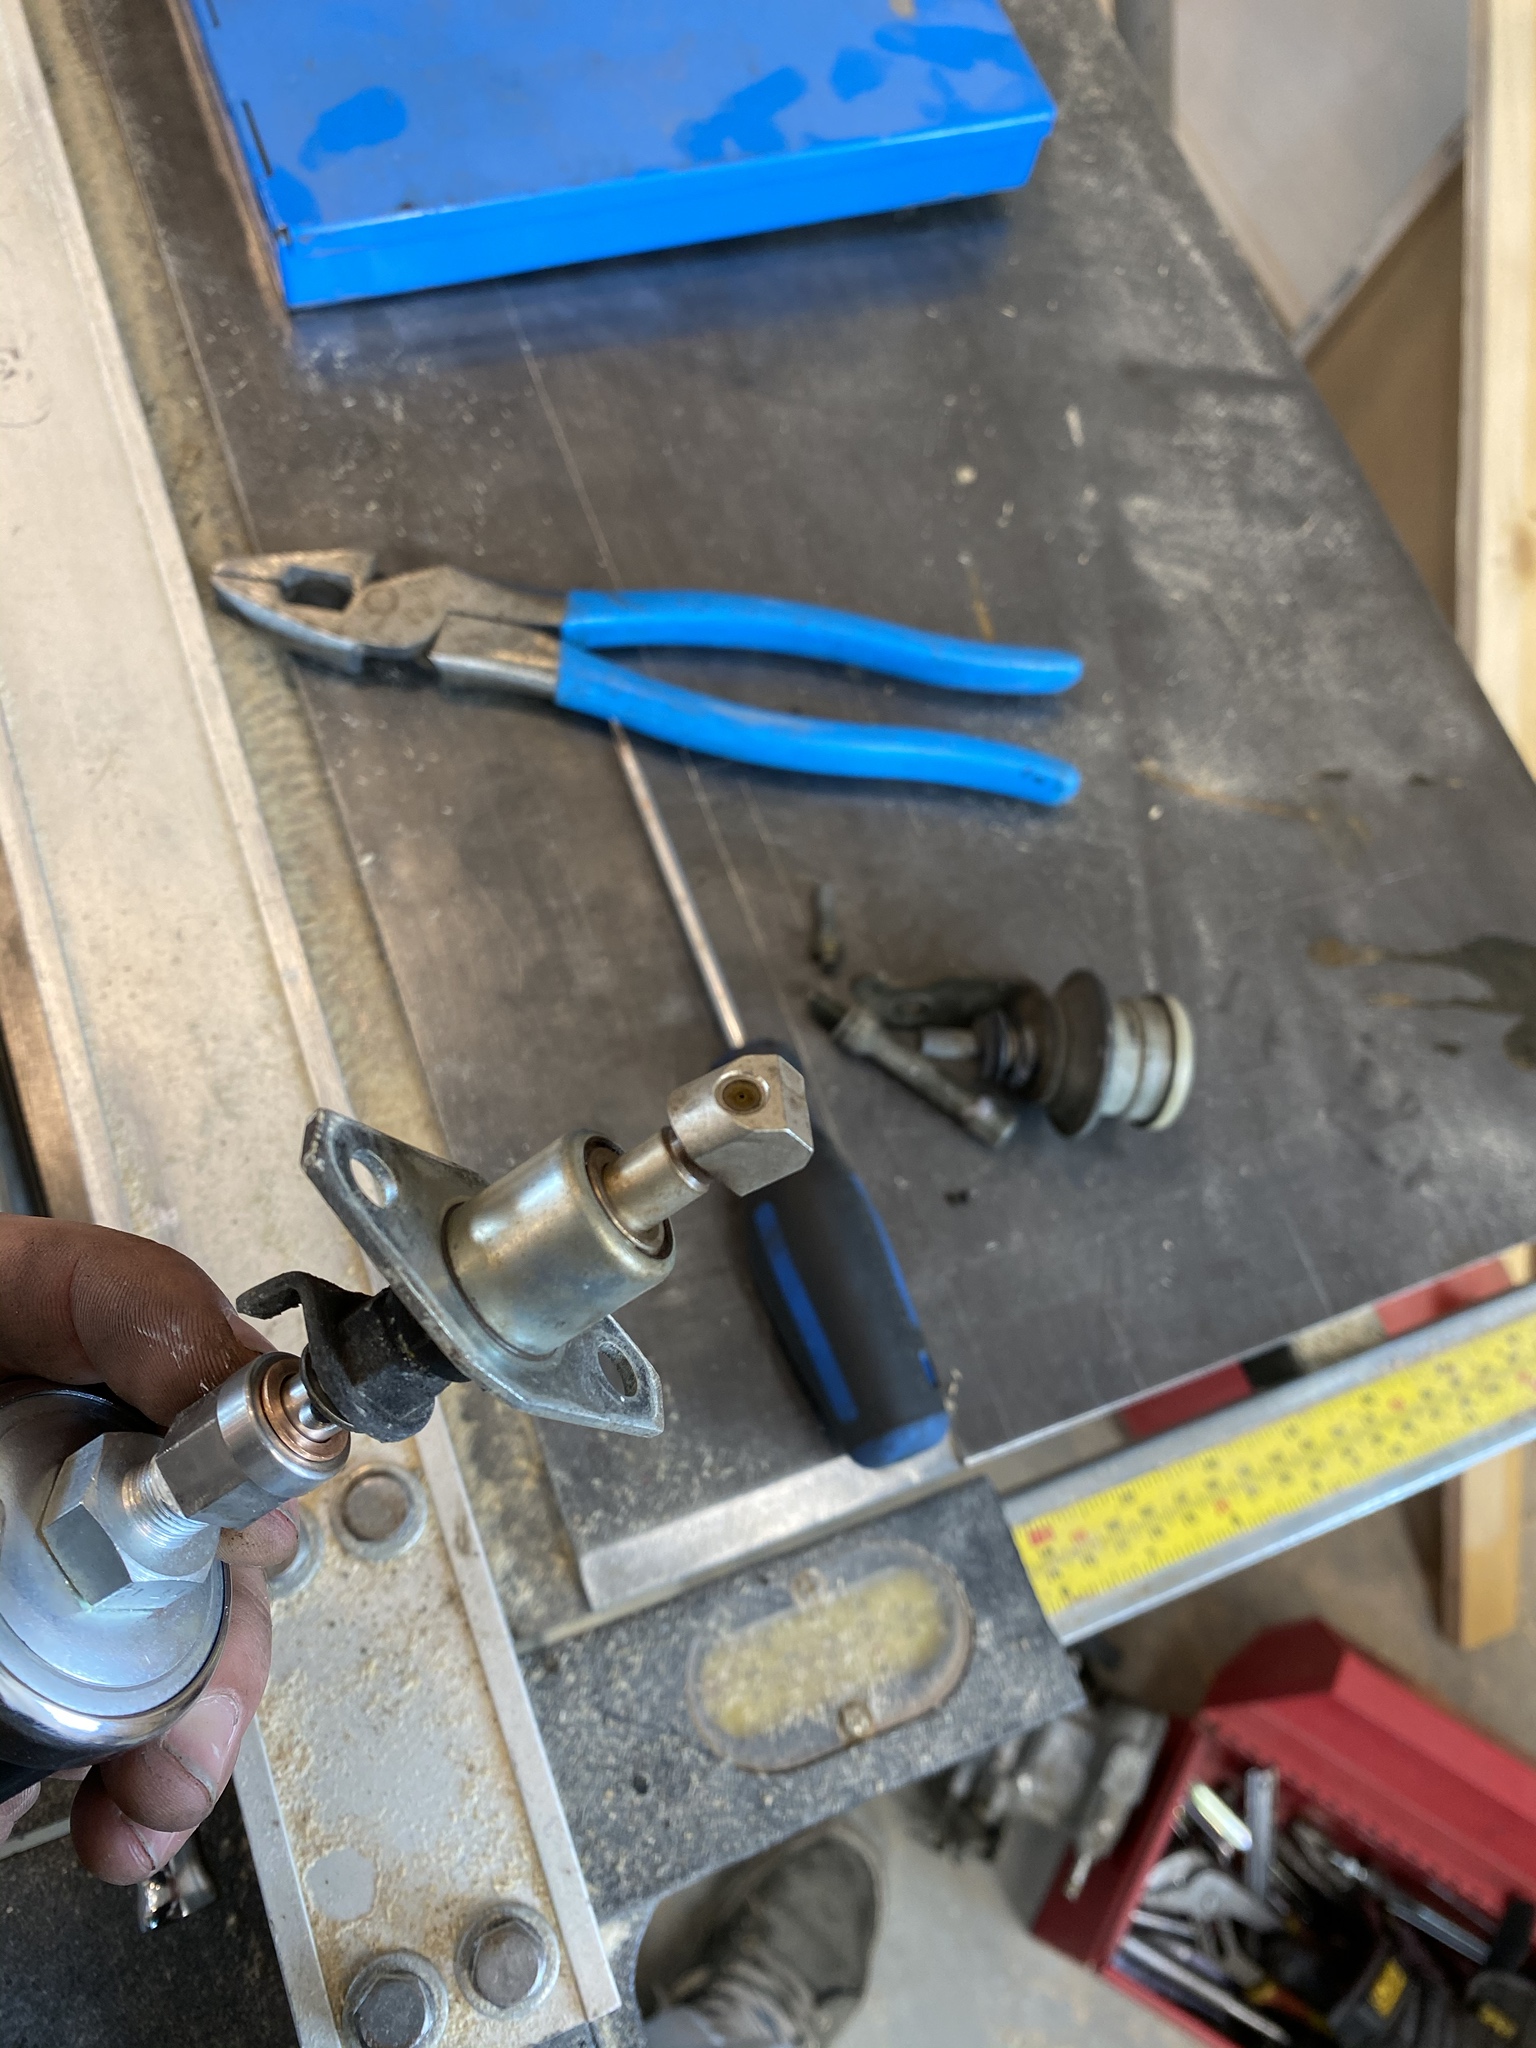
On the top half of the engine, I re-did the valve cover gaskets, the plenum gasket, and the throttle body gasket (at the same time I did the PCV, because I had a new one ready to go). To my surprise, when I removed the intake, power steering fluid poured out the various intake areas. I never put two and two together, but the valve on the power steering pump had long failed and been pumping fluid into my intake. This would constantly cause my truck to burn with a distinctly odd smell and puff upon start up. My engine isn't burning coolant and so I realized this was the root of that issue. Luckily, I had also planned to re-do my entire power steering system. (Both high pressure lines, low pressure return, steering gear box, and power steering pump). I got the replacement gear box from my old truck. I needed to replaced the pitman arm on the replacement gear box with the currently installed one and all I can say is that is not a fun job, even with the right kind of tools.
Once I had completed the power steering refresh, I got ready to install the manual transmission. I swapped the flywheel and put the new clutch disc and pressure plate on. Without a transmission jack this was looking a bit daunting. I know I should buy one but I decided I could be creative, careful and with an extra set of hands, safe. The oil in the bell housing is from the leaking oil pan from my other truck. (what joy to have had two leaky trucks!). I also changed my throw out bearing as it came with the kit.
With some extra bolts from the other 4runner I cut some dowels to line the transmission up, and I was able to get it in without too much effort.

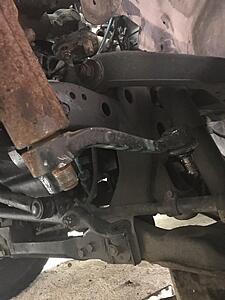
I have the front end apart and the passenger fender off to replace the fender and remove the A/C components. I also did an HID headlight conversion while I was in there. I removed all the AC lines to the firewall, and the fan/radiator/compressor to clean up the engine bay a bit more. My AC never worked and I find a lot of these components get in the way of regular maintenance and work. So off the parts came. While this was completed, I finished the full install of the transmission. I redid the U joints on my manual transmission driveshaft, and reinstalled both. While my dash was apart, I decided to remove the main steering column in order to replace the key barrel on my 4runner with the other one. This was a pretty easy fix. I also got the driver and passenger side door handles, and rear hatch key barrel so I can convert them all to the one key type eventually.


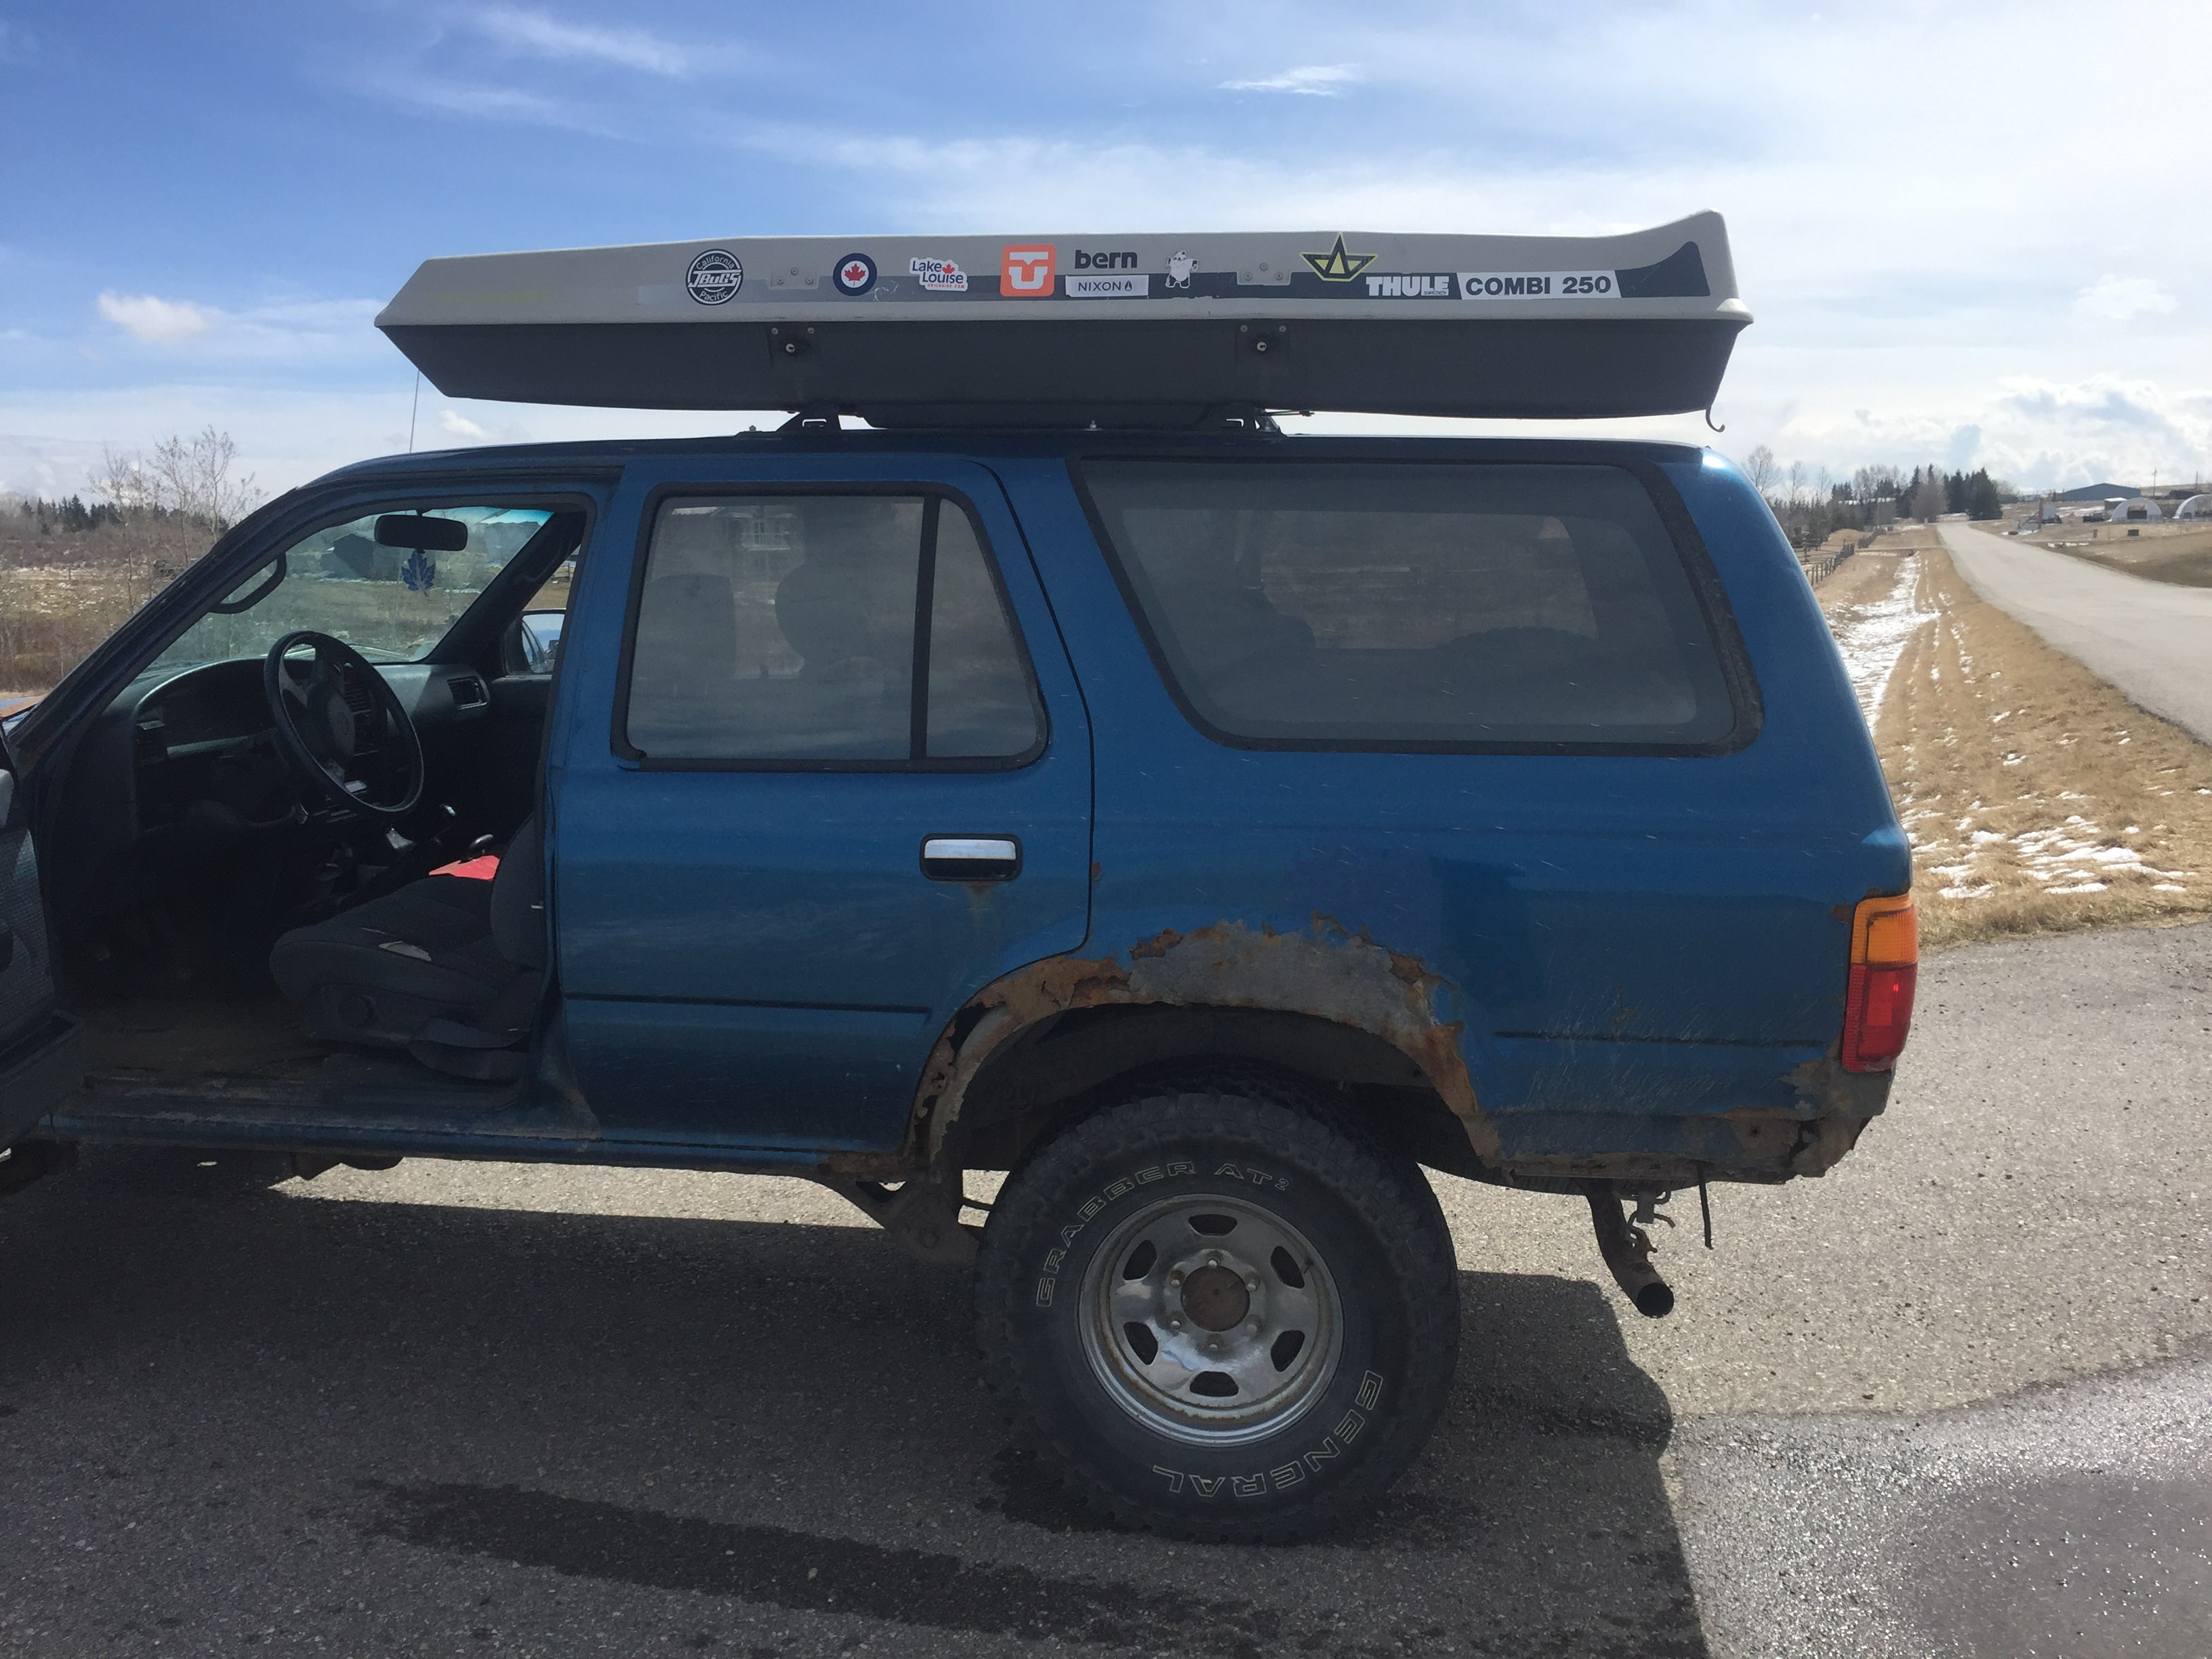
The blue shifter vinyl is a funny touch. Maybe I'll change it when I find another boot, but for now it works.
With the clutch bled, I moved on and did a transmission/transfer case oil change. I figured what better time than now to do that. Plus, I dumped a couple liters out of both when I accidentally knocked the transmission over so there's that. The only thing left to do now is wire in the brake pin-outs and figure out how to hook up the speedometer cable and my manual swap should be finished. From there I began installing my replacement exhaust system, including a new catalytic converter. Not that I need one really but it was cheap and for now it keeps things kind of stock. Once I get the exhaust piping I've ordered in, I'll be able to put together a new crossover piece that joins in further down the stream and is less restrictive around the stock driver side manifold. Coupling this with an EGR + PAIR delete, modified intake, and vacuum line deletes. More updates as I progress in a bit.

Pulling the automatic transmission was eventful without a proper transmission jack. My brother and law wrestled with it for a while but I had completely missed that I needed to unbolt the torque converter from the flywheel. My brother in law was giving it hell while I was looking at my Haynes manual for help and the torque converter stayed on the engine while the automatic transmission came off. This of course meant ATF everywhere. It was a bit of a nightmare. Feeling pretty foolish, we pulled it to the side and started cleaning up the mess. Soon after, I removed the bolts on the back of the flywheel and removed the converter.

With the transmission out, I decided it would be a good time to tackle the leaking oil pan. This job as well was not very fun. I decided not to drop the differential but in the future if my fix fails, or if I ever do another 3vze oil pan, I will drop the diff to save myself the struggle. I thought I'd be saving myself the effort but really I just made it hard on myself. So far, there's no leaks so hopefully it lasts.
On the top half of the engine, I re-did the valve cover gaskets, the plenum gasket, and the throttle body gasket (at the same time I did the PCV, because I had a new one ready to go). To my surprise, when I removed the intake, power steering fluid poured out the various intake areas. I never put two and two together, but the valve on the power steering pump had long failed and been pumping fluid into my intake. This would constantly cause my truck to burn with a distinctly odd smell and puff upon start up. My engine isn't burning coolant and so I realized this was the root of that issue. Luckily, I had also planned to re-do my entire power steering system. (Both high pressure lines, low pressure return, steering gear box, and power steering pump). I got the replacement gear box from my old truck. I needed to replaced the pitman arm on the replacement gear box with the currently installed one and all I can say is that is not a fun job, even with the right kind of tools.
Once I had completed the power steering refresh, I got ready to install the manual transmission. I swapped the flywheel and put the new clutch disc and pressure plate on. Without a transmission jack this was looking a bit daunting. I know I should buy one but I decided I could be creative, careful and with an extra set of hands, safe. The oil in the bell housing is from the leaking oil pan from my other truck. (what joy to have had two leaky trucks!). I also changed my throw out bearing as it came with the kit.

With some extra bolts from the other 4runner I cut some dowels to line the transmission up, and I was able to get it in without too much effort.

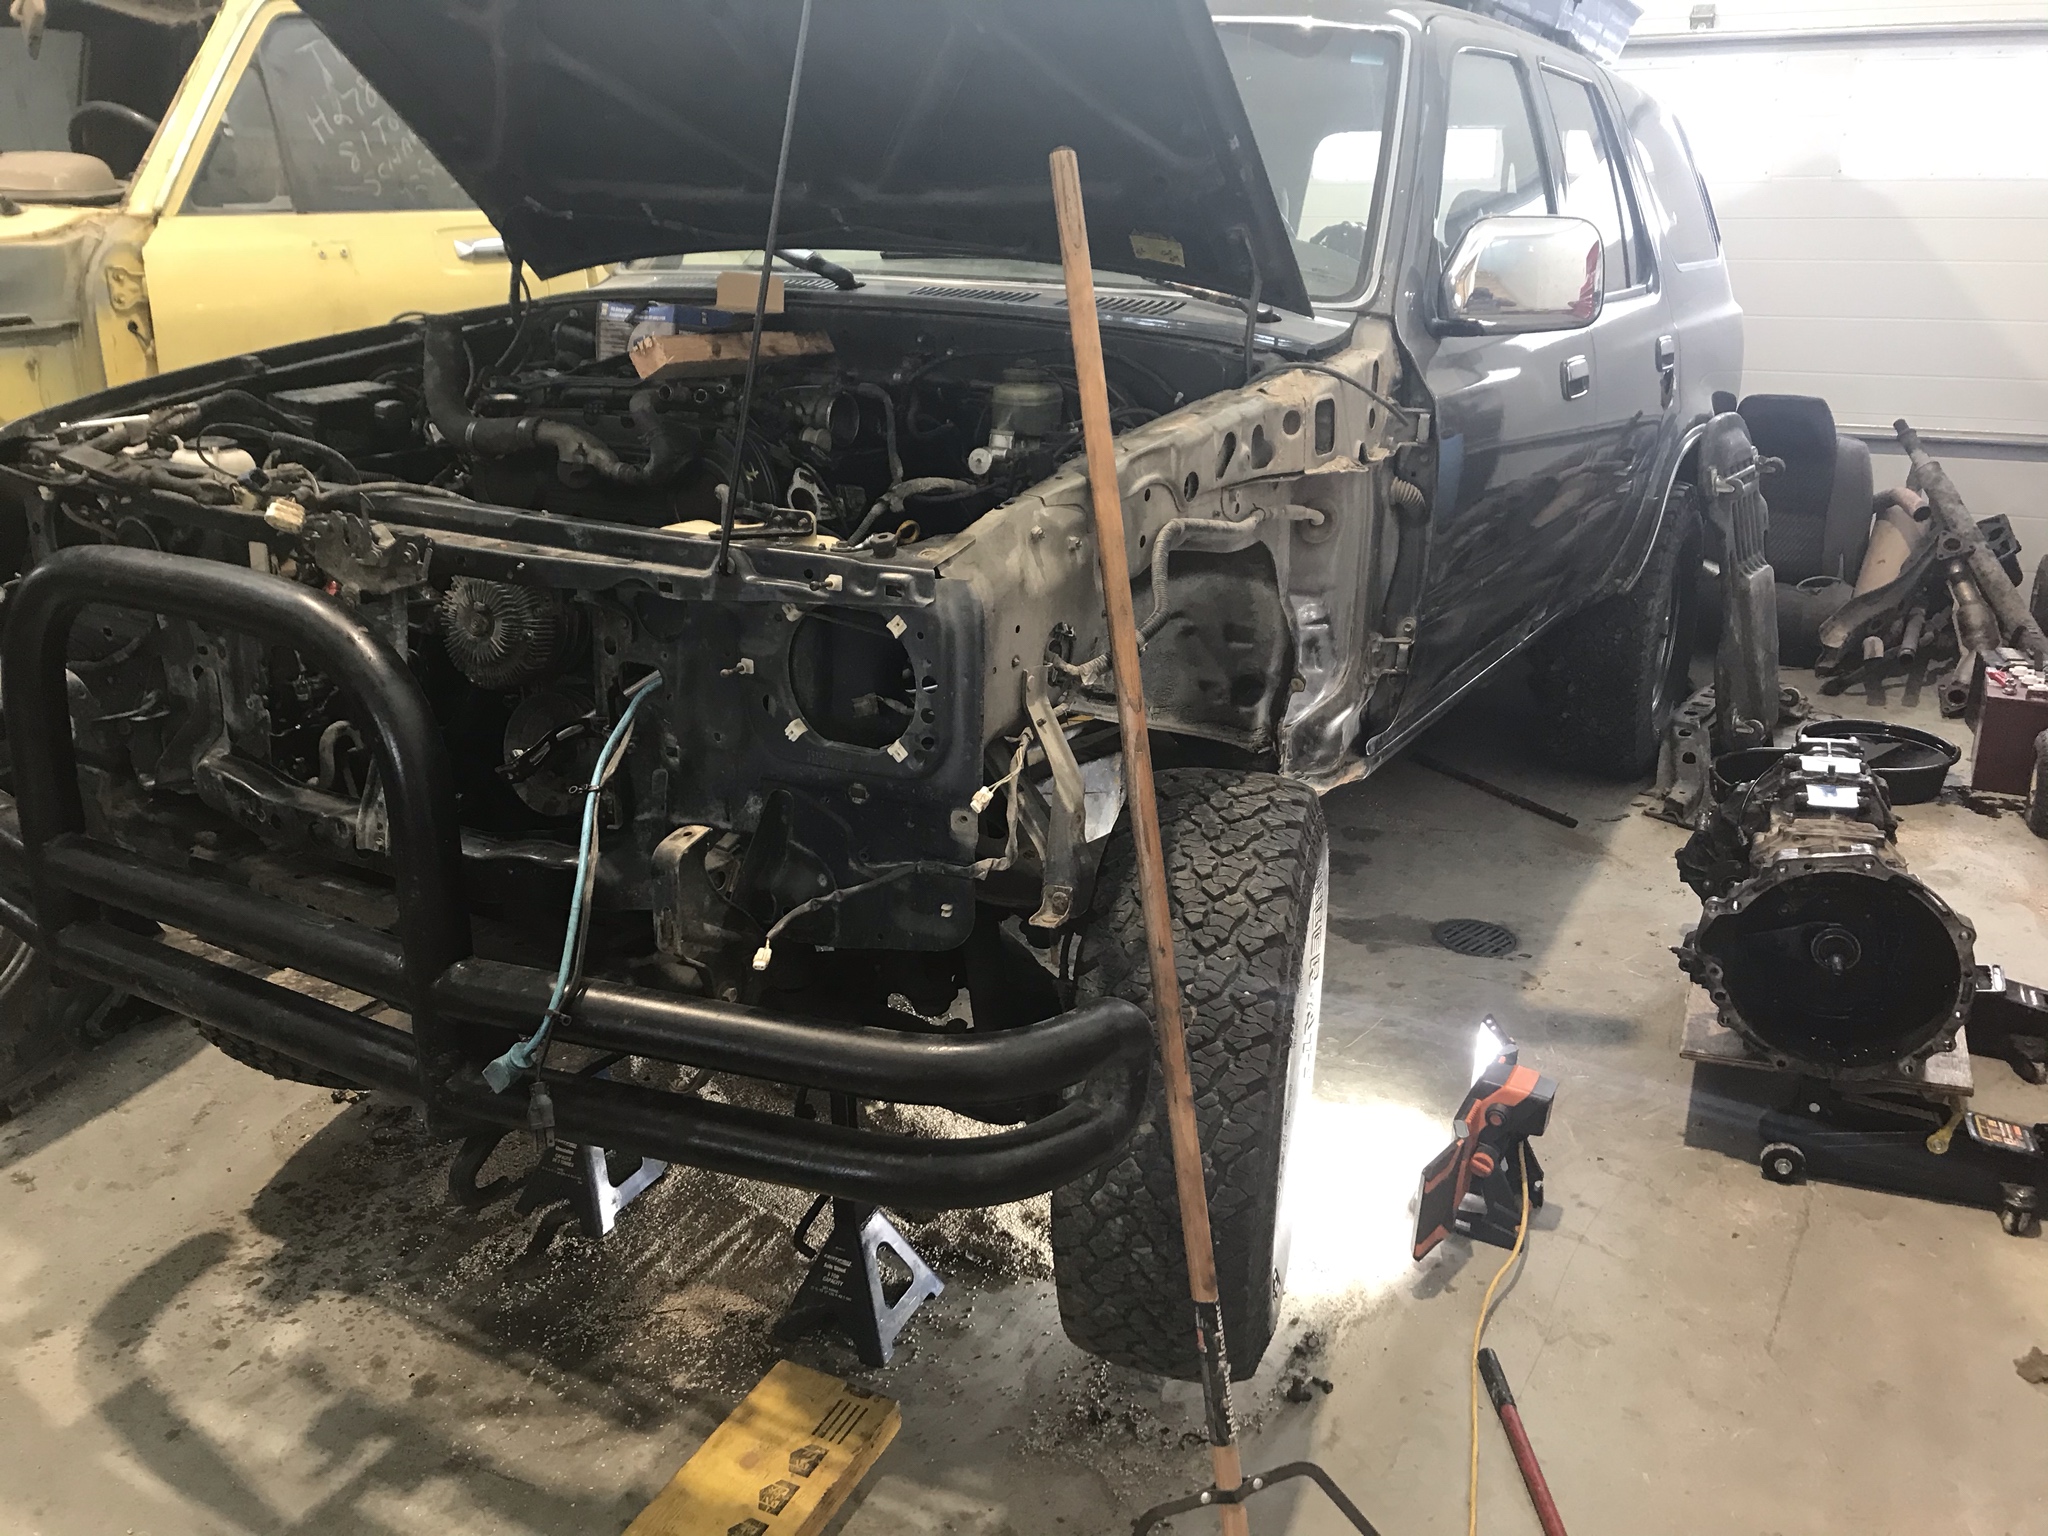
I have the front end apart and the passenger fender off to replace the fender and remove the A/C components. I also did an HID headlight conversion while I was in there. I removed all the AC lines to the firewall, and the fan/radiator/compressor to clean up the engine bay a bit more. My AC never worked and I find a lot of these components get in the way of regular maintenance and work. So off the parts came. While this was completed, I finished the full install of the transmission. I redid the U joints on my manual transmission driveshaft, and reinstalled both. While my dash was apart, I decided to remove the main steering column in order to replace the key barrel on my 4runner with the other one. This was a pretty easy fix. I also got the driver and passenger side door handles, and rear hatch key barrel so I can convert them all to the one key type eventually.


The blue shifter vinyl is a funny touch. Maybe I'll change it when I find another boot, but for now it works.

With the clutch bled, I moved on and did a transmission/transfer case oil change. I figured what better time than now to do that. Plus, I dumped a couple liters out of both when I accidentally knocked the transmission over so there's that. The only thing left to do now is wire in the brake pin-outs and figure out how to hook up the speedometer cable and my manual swap should be finished. From there I began installing my replacement exhaust system, including a new catalytic converter. Not that I need one really but it was cheap and for now it keeps things kind of stock. Once I get the exhaust piping I've ordered in, I'll be able to put together a new crossover piece that joins in further down the stream and is less restrictive around the stock driver side manifold. Coupling this with an EGR + PAIR delete, modified intake, and vacuum line deletes. More updates as I progress in a bit.
 Feb 3, 2020 | 05:21 PM
#5
Thread Starter
Registered User
Joined: Dec 2019
Posts: 22
Likes: 7
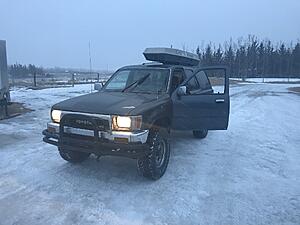
It's been several weeks, but I'm back with some updates and a happily running/driving 4runner.
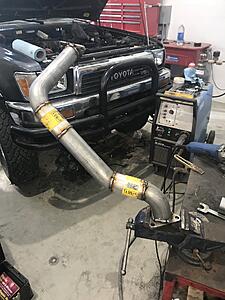
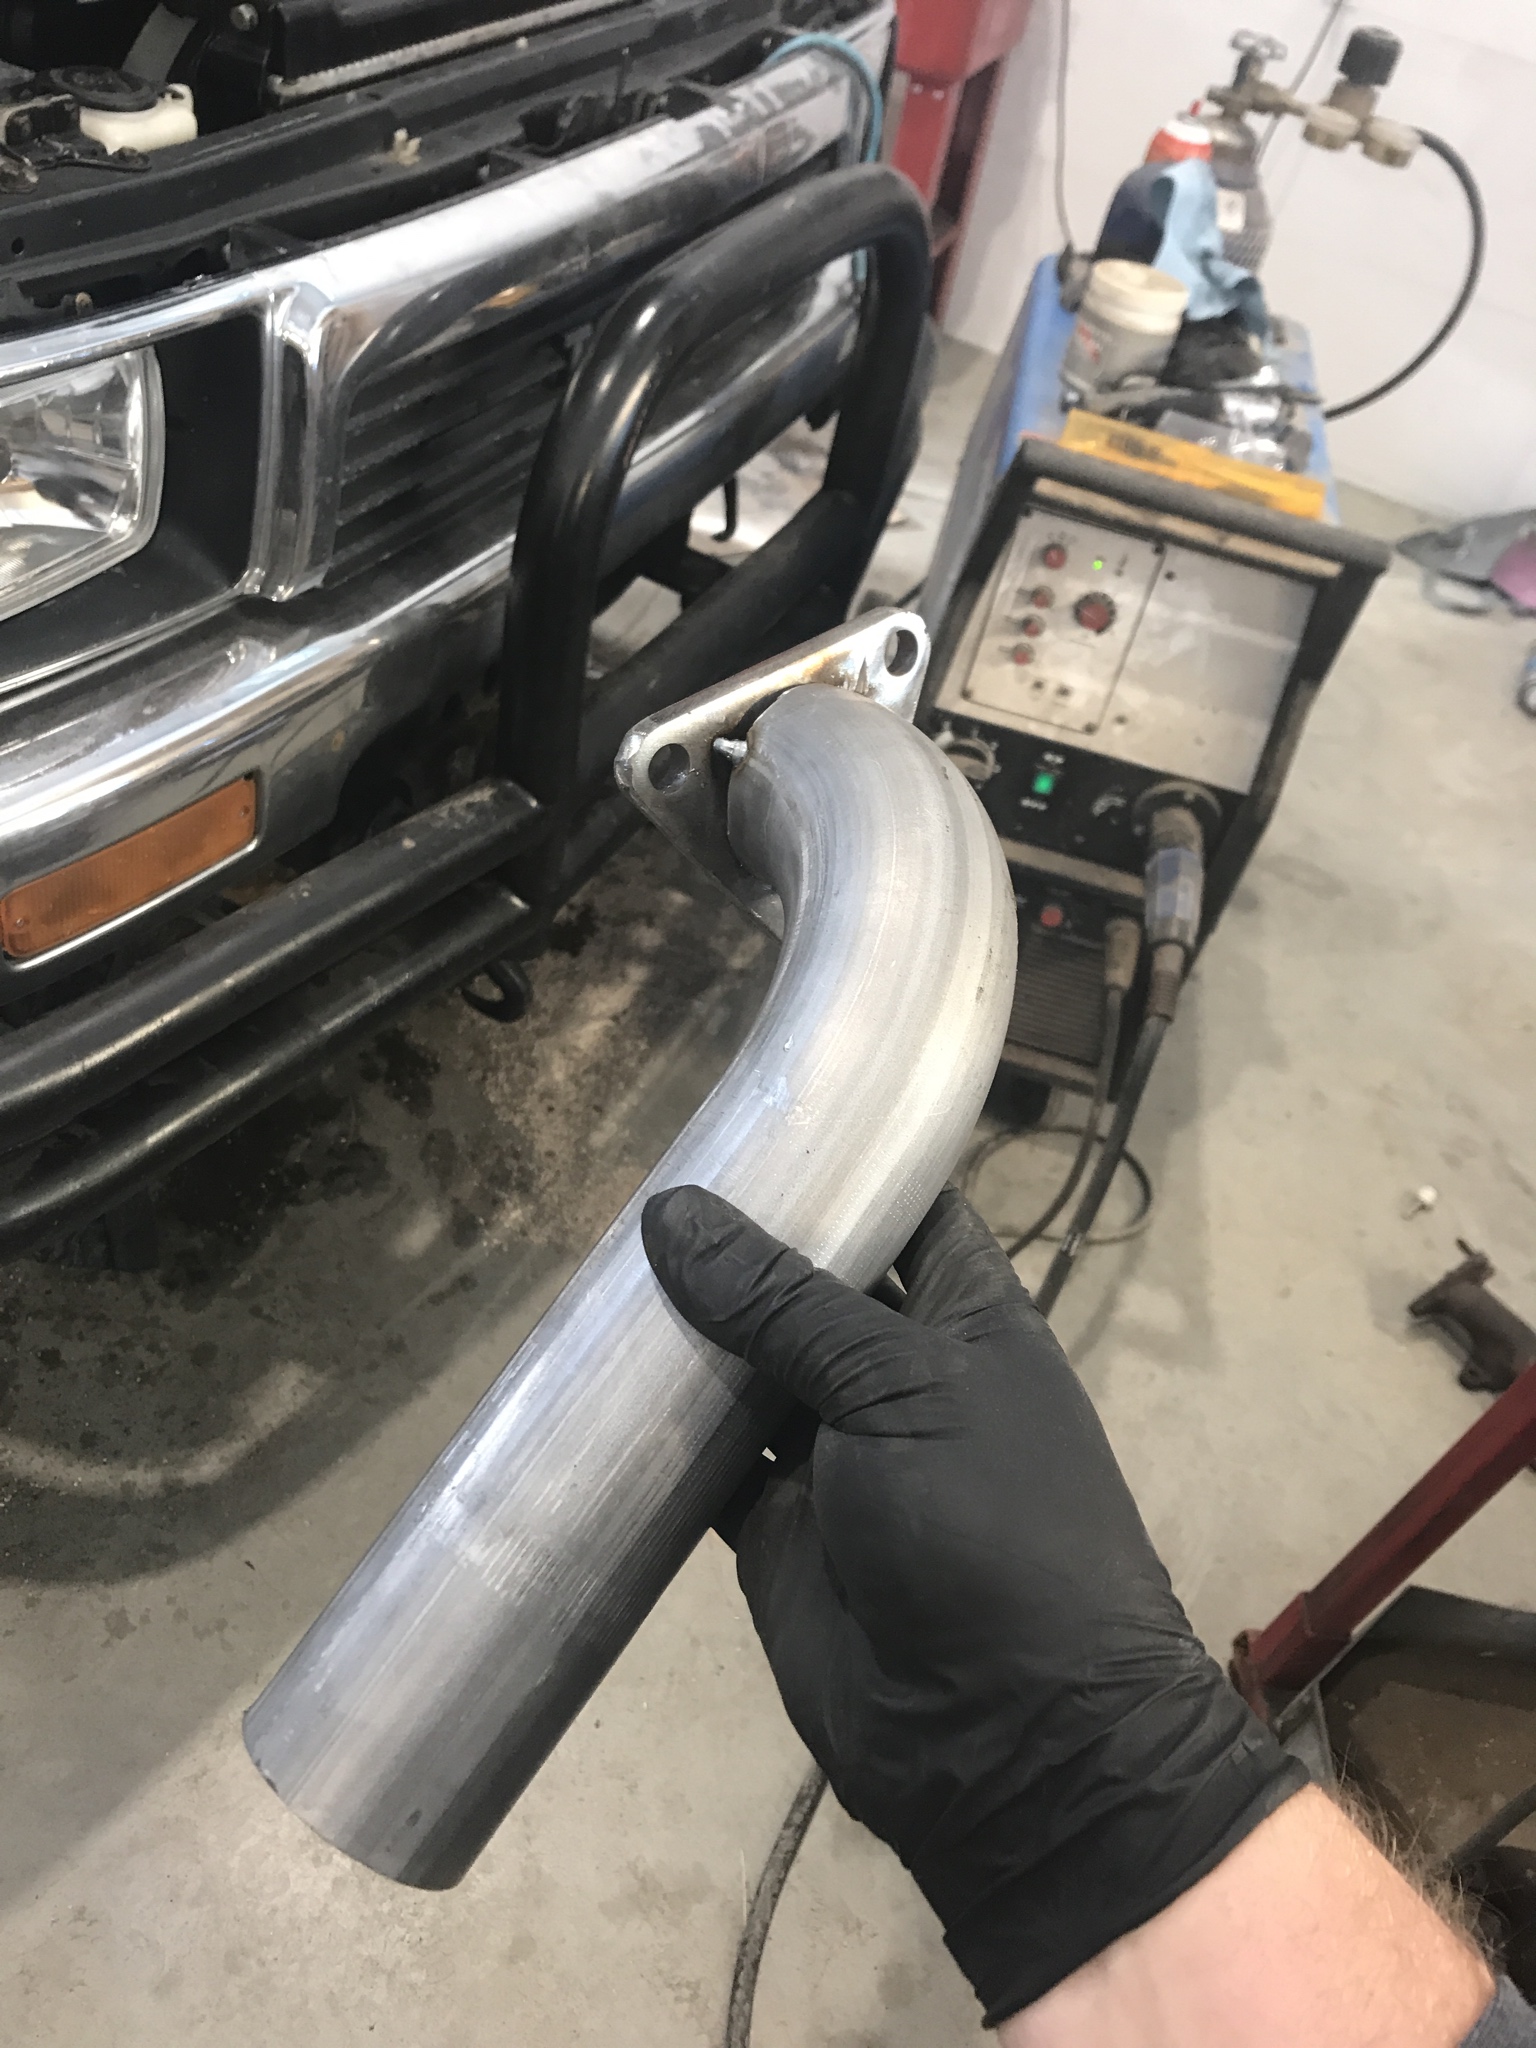
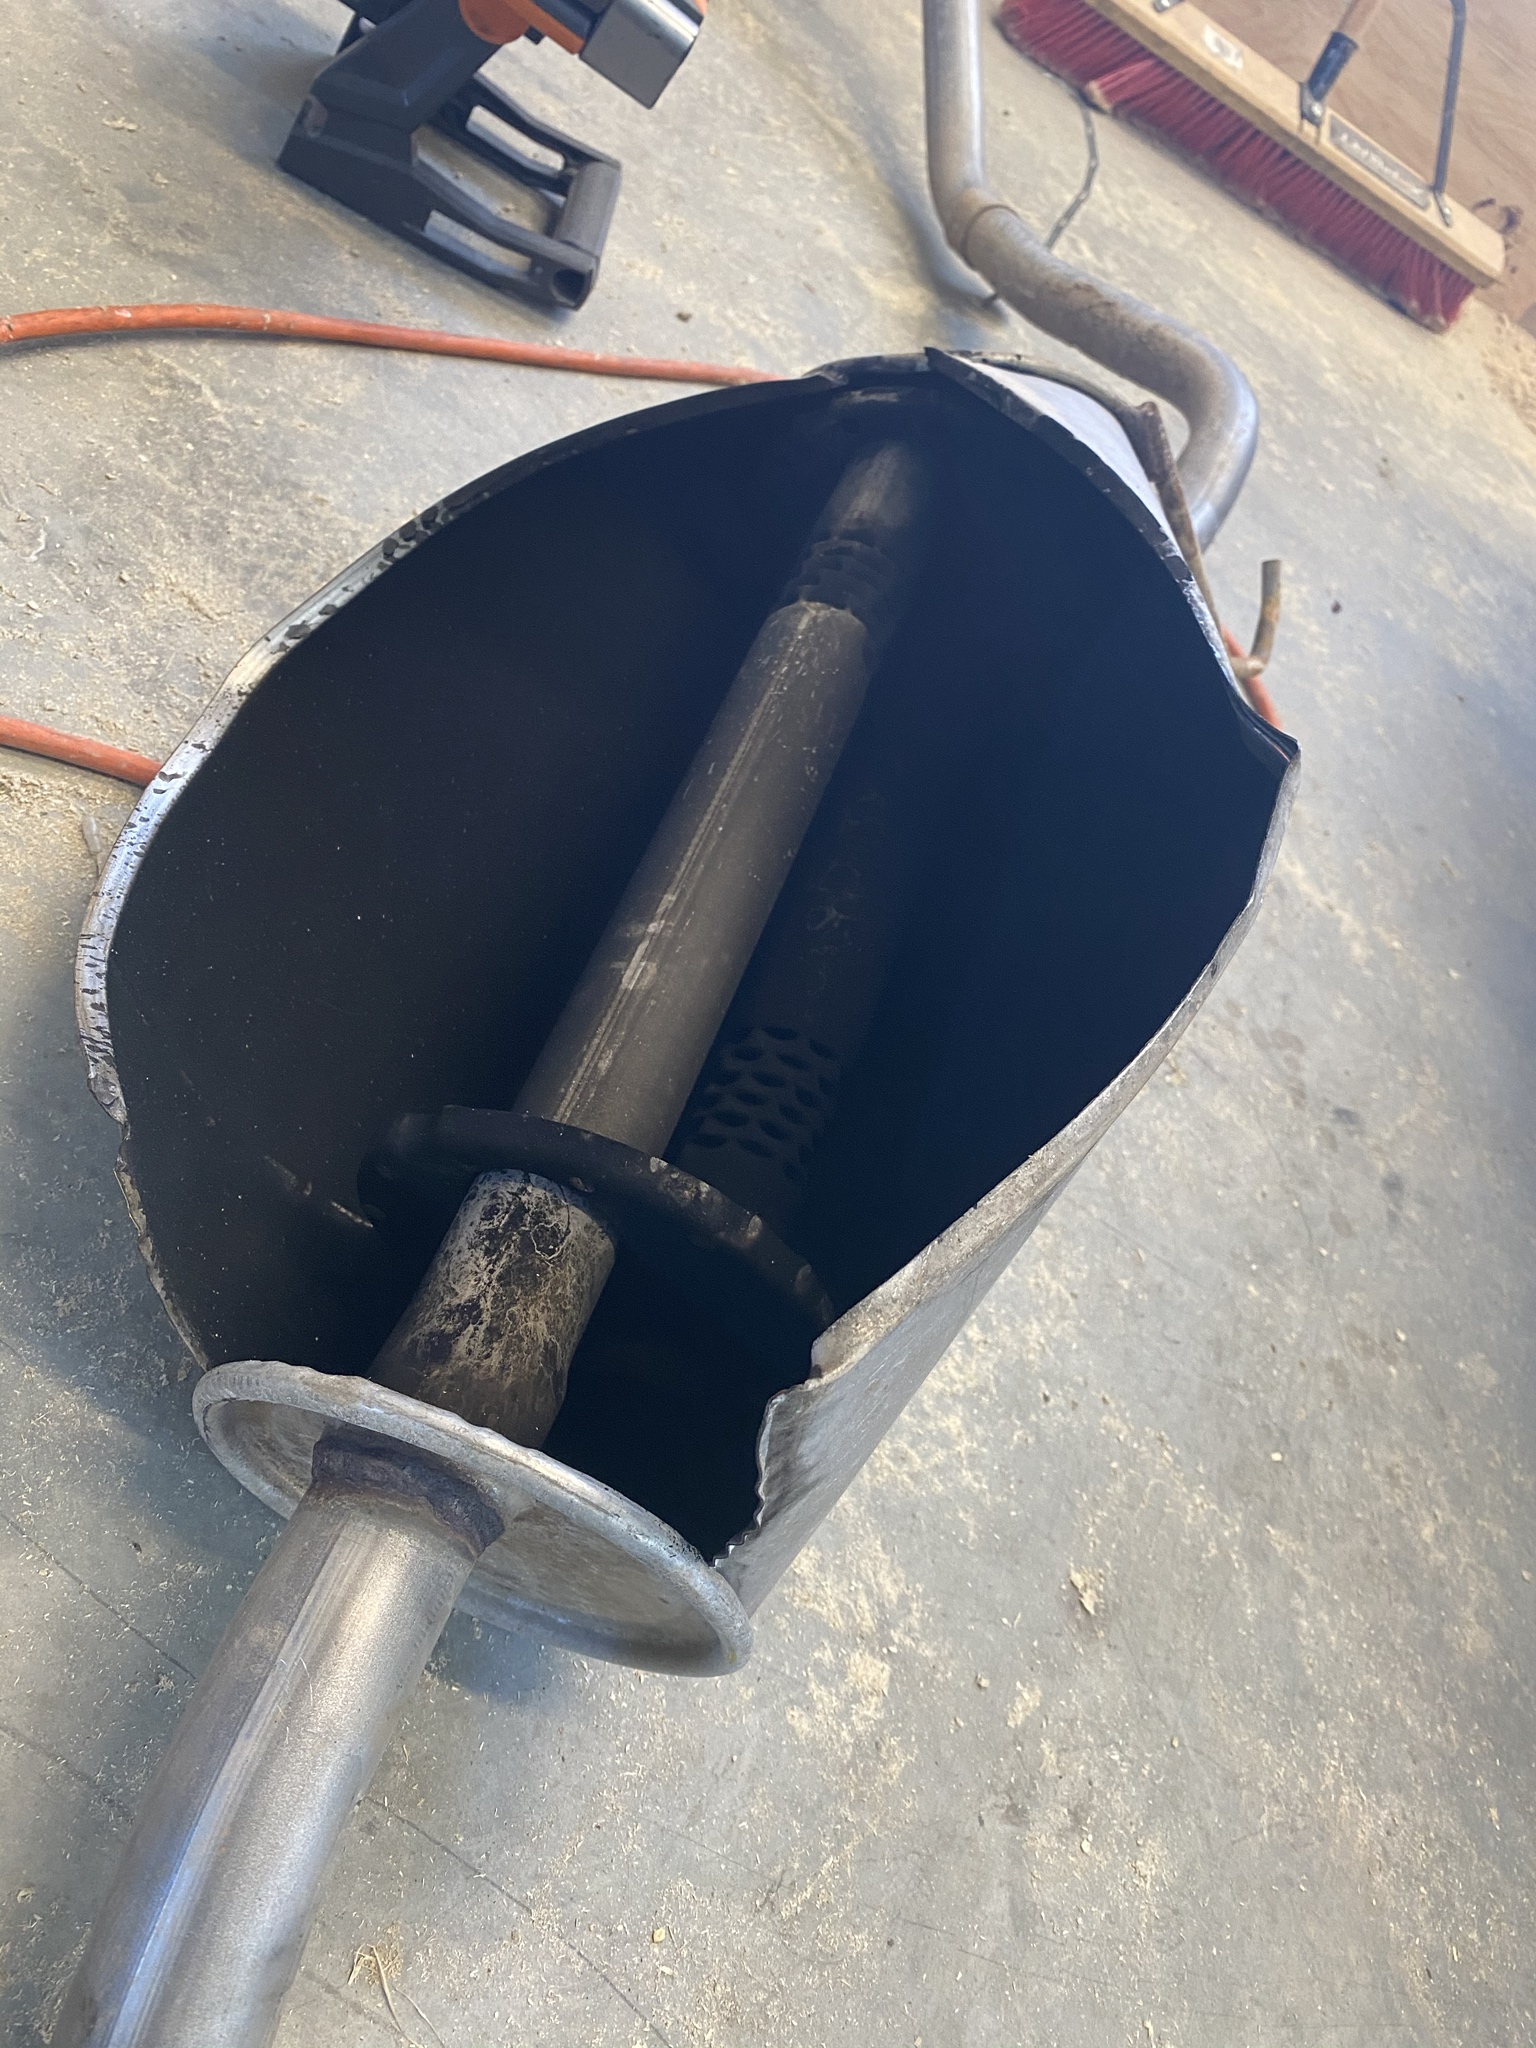
Once the transmission was in, I started working at getting the exhaust built. Like I mentioned in an earlier post, I wanted to do a crossover delete on the 3VZE. On my 2nd 4runner, the head gasket blew up at cylinder #6 and I found myself pretty sad about that. In an effort to help the 3VZE breathe better, I modified the exhaust manifolds and built a new crossover pipe that connected with the stock exhaust system just before the catalytic converter:
I'm no artist with a welder, but I can create a nice enough bead to keep exhaust gas flowing.

With the EGR and PAIR system removed, it freed up a lot of space on the passenger side of the engine bay. Using 2 1/4" pipe, I welded the crossover carefully to fit between the clutch slave cylinder and frame. In the end, I had enough room to keep the components close to it safe, and had ample space for the exhaust to flow freely. Because of the EGR + PAIR delete, I also modified the intake tube. Apart from the stock airbox and PCV tube going to the driver side valve cover, there are no longer and additional hoses or connectors that interfere with the incoming air. It's hard to determine what kind of health this gave the engine, but coupled with the 5 -speed R150F, the 3.slow actually has a fair bit of jam to it now. While in there, I tackled the plenum gasket, the MAF gasket, the spark plugs, the spark timing, the PCV's, air filter, vaccum line delete, and a lot of other stuff I'm not even thinking of at the moment.

My father in law has been very generous with the use of his tools and space (Mostly because he knows we're going to start working on his old yellow toy in the back ground very soon, and he gets a kick out of me trying to figure out my old truck) and I did my best to use my time wisely. With a brand new exhaust end to end, o2 sensor, I was happy to see my truck was almost totally silent for the first time since I've owned it. I say almost because I have a small leak where the catalytic converter is bolted to the new Y Pipe. Going to try to trouble shoot this sometime soon. Nothing bad, but you sure do hear the valves ticking away when its right under your seat. While I had the welder out, I fixed one of the stripped floor pan nuts that held the driver's seat in place. I was happy to get this fixed because ever since I found out about it, part of me feared what an accident would do.

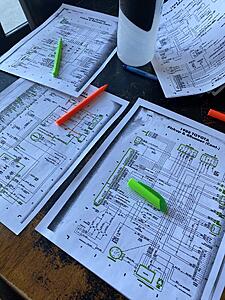
Once I completed my welding, I moved along to the wiring. I was struggling for a few days to sort through the FSM EWD posted here, (which has been incredibly useful in a lot of different situations) but year to year, there were changes in auto transmissions and their respective plugs. For my truck (1991), the plugs and pins were quite a bit different than the ones listed on the online manual stickied here. So, instead of tirelessly blowing fuses and using incorrect haynes schematics, I bought a 2-day subscription to the Toyota Information System, and downloaded both the FSM and EWD for my year. Instantly this saved me a lot of headache and I was able to finally start my truck for the first time in 5 weeks!

With the truck running, I started putting together the interior and finishing up some final loose ends. One thing I struggled to get engaged was the 4x4. After several hours of trying to get the ADD to engage, I decided to modify and remove the ADD system from the equation entirely. It was pretty simple to do, and while I was in the midst of that, my father in law kindly offered his manual hubs that were sitting on his 88' 4runner sitting in the field. They were a direct fit, and this essentially made my truck another step simpler and a touch more old school. With the 4x4 finally engaging properly and my rear back up lights working, the truck was almost ready to go. I had been waiting for a while to install my new CB radio and Head unit, and so this was the best time to finally do that.

With a quick clean up of the interior I was off for my first drive and I was totally stoked. To my surprise, I have very little to troubleshoot with all the things I have done. The transmission shifted smoothly, engaged nicely, and there were no funky vibrations compared to the automatic. Like I noted before, there is an obvious difference in power and just how much; I have no idea. I just know it definitely has a noticeable increase in engine power, and power band with the manual transmission.
On the topic of little gremlins I have to attend to, there's only a few:
1. My power steering system is still leaking. I replaced all of the lines (high pressure, low pressure), replaced the pump itself with a re-manufactured one, replaced the steering gear, and it is still leaking from somewhere and it will not bleed. There's a continual whine and I'm not sure how to go about fixing this. But it is bugging me enough to be at the top of the list.
2. Fix the exhaust leak at the catalytic converter bolt-on flange. Pretty simple fix and self explanatory issue.
3. Power Window/door lock intermittent problem. This one will take a bit of work. I'm not sure why, but intermittently the power windows and locks decide not to work. I haven't taken a ton of time to troubleshoot this, but I did replace the entire switch unit on the driver's door and the issue is still happening. I'm wondering if its a door- control relay that is starting to go. If anyone has had a related issue and knows of the solution please let me know. Otherwise, I'm going to have to get the multi-meter out and start a long Saturday this weekend.
And that's all for now. Hopefully my next post will include some more mod-type, exciting repairs. But for now, it's back on the road and it's awesome.
Once the transmission was in, I started working at getting the exhaust built. Like I mentioned in an earlier post, I wanted to do a crossover delete on the 3VZE. On my 2nd 4runner, the head gasket blew up at cylinder #6 and I found myself pretty sad about that. In an effort to help the 3VZE breathe better, I modified the exhaust manifolds and built a new crossover pipe that connected with the stock exhaust system just before the catalytic converter:

I'm no artist with a welder, but I can create a nice enough bead to keep exhaust gas flowing.
With the EGR and PAIR system removed, it freed up a lot of space on the passenger side of the engine bay. Using 2 1/4" pipe, I welded the crossover carefully to fit between the clutch slave cylinder and frame. In the end, I had enough room to keep the components close to it safe, and had ample space for the exhaust to flow freely. Because of the EGR + PAIR delete, I also modified the intake tube. Apart from the stock airbox and PCV tube going to the driver side valve cover, there are no longer and additional hoses or connectors that interfere with the incoming air. It's hard to determine what kind of health this gave the engine, but coupled with the 5 -speed R150F, the 3.slow actually has a fair bit of jam to it now. While in there, I tackled the plenum gasket, the MAF gasket, the spark plugs, the spark timing, the PCV's, air filter, vaccum line delete, and a lot of other stuff I'm not even thinking of at the moment.

My father in law has been very generous with the use of his tools and space (Mostly because he knows we're going to start working on his old yellow toy in the back ground very soon, and he gets a kick out of me trying to figure out my old truck) and I did my best to use my time wisely. With a brand new exhaust end to end, o2 sensor, I was happy to see my truck was almost totally silent for the first time since I've owned it. I say almost because I have a small leak where the catalytic converter is bolted to the new Y Pipe. Going to try to trouble shoot this sometime soon. Nothing bad, but you sure do hear the valves ticking away when its right under your seat. While I had the welder out, I fixed one of the stripped floor pan nuts that held the driver's seat in place. I was happy to get this fixed because ever since I found out about it, part of me feared what an accident would do.
Once I completed my welding, I moved along to the wiring. I was struggling for a few days to sort through the FSM EWD posted here, (which has been incredibly useful in a lot of different situations) but year to year, there were changes in auto transmissions and their respective plugs. For my truck (1991), the plugs and pins were quite a bit different than the ones listed on the online manual stickied here. So, instead of tirelessly blowing fuses and using incorrect haynes schematics, I bought a 2-day subscription to the Toyota Information System, and downloaded both the FSM and EWD for my year. Instantly this saved me a lot of headache and I was able to finally start my truck for the first time in 5 weeks!
With the truck running, I started putting together the interior and finishing up some final loose ends. One thing I struggled to get engaged was the 4x4. After several hours of trying to get the ADD to engage, I decided to modify and remove the ADD system from the equation entirely. It was pretty simple to do, and while I was in the midst of that, my father in law kindly offered his manual hubs that were sitting on his 88' 4runner sitting in the field. They were a direct fit, and this essentially made my truck another step simpler and a touch more old school. With the 4x4 finally engaging properly and my rear back up lights working, the truck was almost ready to go. I had been waiting for a while to install my new CB radio and Head unit, and so this was the best time to finally do that.

With a quick clean up of the interior I was off for my first drive and I was totally stoked. To my surprise, I have very little to troubleshoot with all the things I have done. The transmission shifted smoothly, engaged nicely, and there were no funky vibrations compared to the automatic. Like I noted before, there is an obvious difference in power and just how much; I have no idea. I just know it definitely has a noticeable increase in engine power, and power band with the manual transmission.
On the topic of little gremlins I have to attend to, there's only a few:
1. My power steering system is still leaking. I replaced all of the lines (high pressure, low pressure), replaced the pump itself with a re-manufactured one, replaced the steering gear, and it is still leaking from somewhere and it will not bleed. There's a continual whine and I'm not sure how to go about fixing this. But it is bugging me enough to be at the top of the list.
2. Fix the exhaust leak at the catalytic converter bolt-on flange. Pretty simple fix and self explanatory issue.
3. Power Window/door lock intermittent problem. This one will take a bit of work. I'm not sure why, but intermittently the power windows and locks decide not to work. I haven't taken a ton of time to troubleshoot this, but I did replace the entire switch unit on the driver's door and the issue is still happening. I'm wondering if its a door- control relay that is starting to go. If anyone has had a related issue and knows of the solution please let me know. Otherwise, I'm going to have to get the multi-meter out and start a long Saturday this weekend.
And that's all for now. Hopefully my next post will include some more mod-type, exciting repairs. But for now, it's back on the road and it's awesome.
Feb 3, 2020 | 07:19 PM
#6

Registered User


Joined: Apr 2017
Posts: 964
Likes: 197
I like that toy in the background!
nice Runner too! You guys are living in a toyota dreamworld. Also like that crane you pulled the engine out with up above. Dont have to worry abt that thing breaking.
bump the 5vze swap up on the list. Get some horses in there!
but whatever you do, its great that youre keeping it on the road.
nice Runner too! You guys are living in a toyota dreamworld. Also like that crane you pulled the engine out with up above. Dont have to worry abt that thing breaking.
bump the 5vze swap up on the list. Get some horses in there!
but whatever you do, its great that youre keeping it on the road.
Feb 4, 2020 | 07:38 AM
#7
Thread Starter
Registered User
Joined: Dec 2019
Posts: 22
Likes: 7
I like that toy in the background!
nice Runner too! You guys are living in a toyota dreamworld. Also like that crane you pulled the engine out with up above. Dont have to worry abt that thing breaking.
bump the 5vze swap up on the list. Get some horses in there!
but whatever you do, its great that youre keeping it on the road.
nice Runner too! You guys are living in a toyota dreamworld. Also like that crane you pulled the engine out with up above. Dont have to worry abt that thing breaking.
bump the 5vze swap up on the list. Get some horses in there!
but whatever you do, its great that youre keeping it on the road.
Last edited by vokeyz; Feb 4, 2020 at 03:11 PM.
Trending Topics
Feb 4, 2020 | 01:59 PM
#8
Registered User

Joined: Jul 2005
Posts: 2,345
Likes: 657
From: Chiloquin, OR
He’s swapped out the carbed 22re for a fuel injected one
Great thread, though! Thanks for all the pictures and great descriptions of the work as it went. Great good luck as the build(s) continue

Sorry, just a little detail...
Feb 4, 2020 | 03:08 PM
#9
Thread Starter
Registered User
Joined: Dec 2019
Posts: 22
Likes: 7
Not to be a nit picker, but by definition a 22RE is the fuel injected version of the engine. The carbed version is the 22R.
Great thread, though! Thanks for all the pictures and great descriptions of the work as it went. Great good luck as the build(s) continue
Sorry, just a little detail...
Great thread, though! Thanks for all the pictures and great descriptions of the work as it went. Great good luck as the build(s) continue
Sorry, just a little detail...
thanks. I try to be detailed when doing posts because it could always help someone else!

 Feb 11, 2020 | 08:42 PM
#12
Thread Starter
Registered User
Joined: Dec 2019
Posts: 22
Likes: 7
Another quick update with some small advances. It would appear I’m still hunting down an oil leak. It dreads me to think it isn’t a power steering leak (though it still needs a proper bleeding which I am still stumped on how to do), it would seem I did a bit of a poor job on the valve cover gaskets. I replaced them when doing all the other projects and it appears to me I’ve definitely got some wetness towards the firewall side of the engine. Not such a big deal, but enough to sadden me a bit! The gaskets didn’t fit nicely and I was just hoping they would work properly for a while. They were a cheap fel-pro set, which I don’t even think fel-pro themselves made. I will need to order more gaskets of a higher quality (or OEM). It didn’t take long for me to decide to ditch the catalytic converter, and weld a straight pipe in. This fixed the exhaust leak, somehow feels a bit (ever so small) more powerful (maybe it’s placebo).

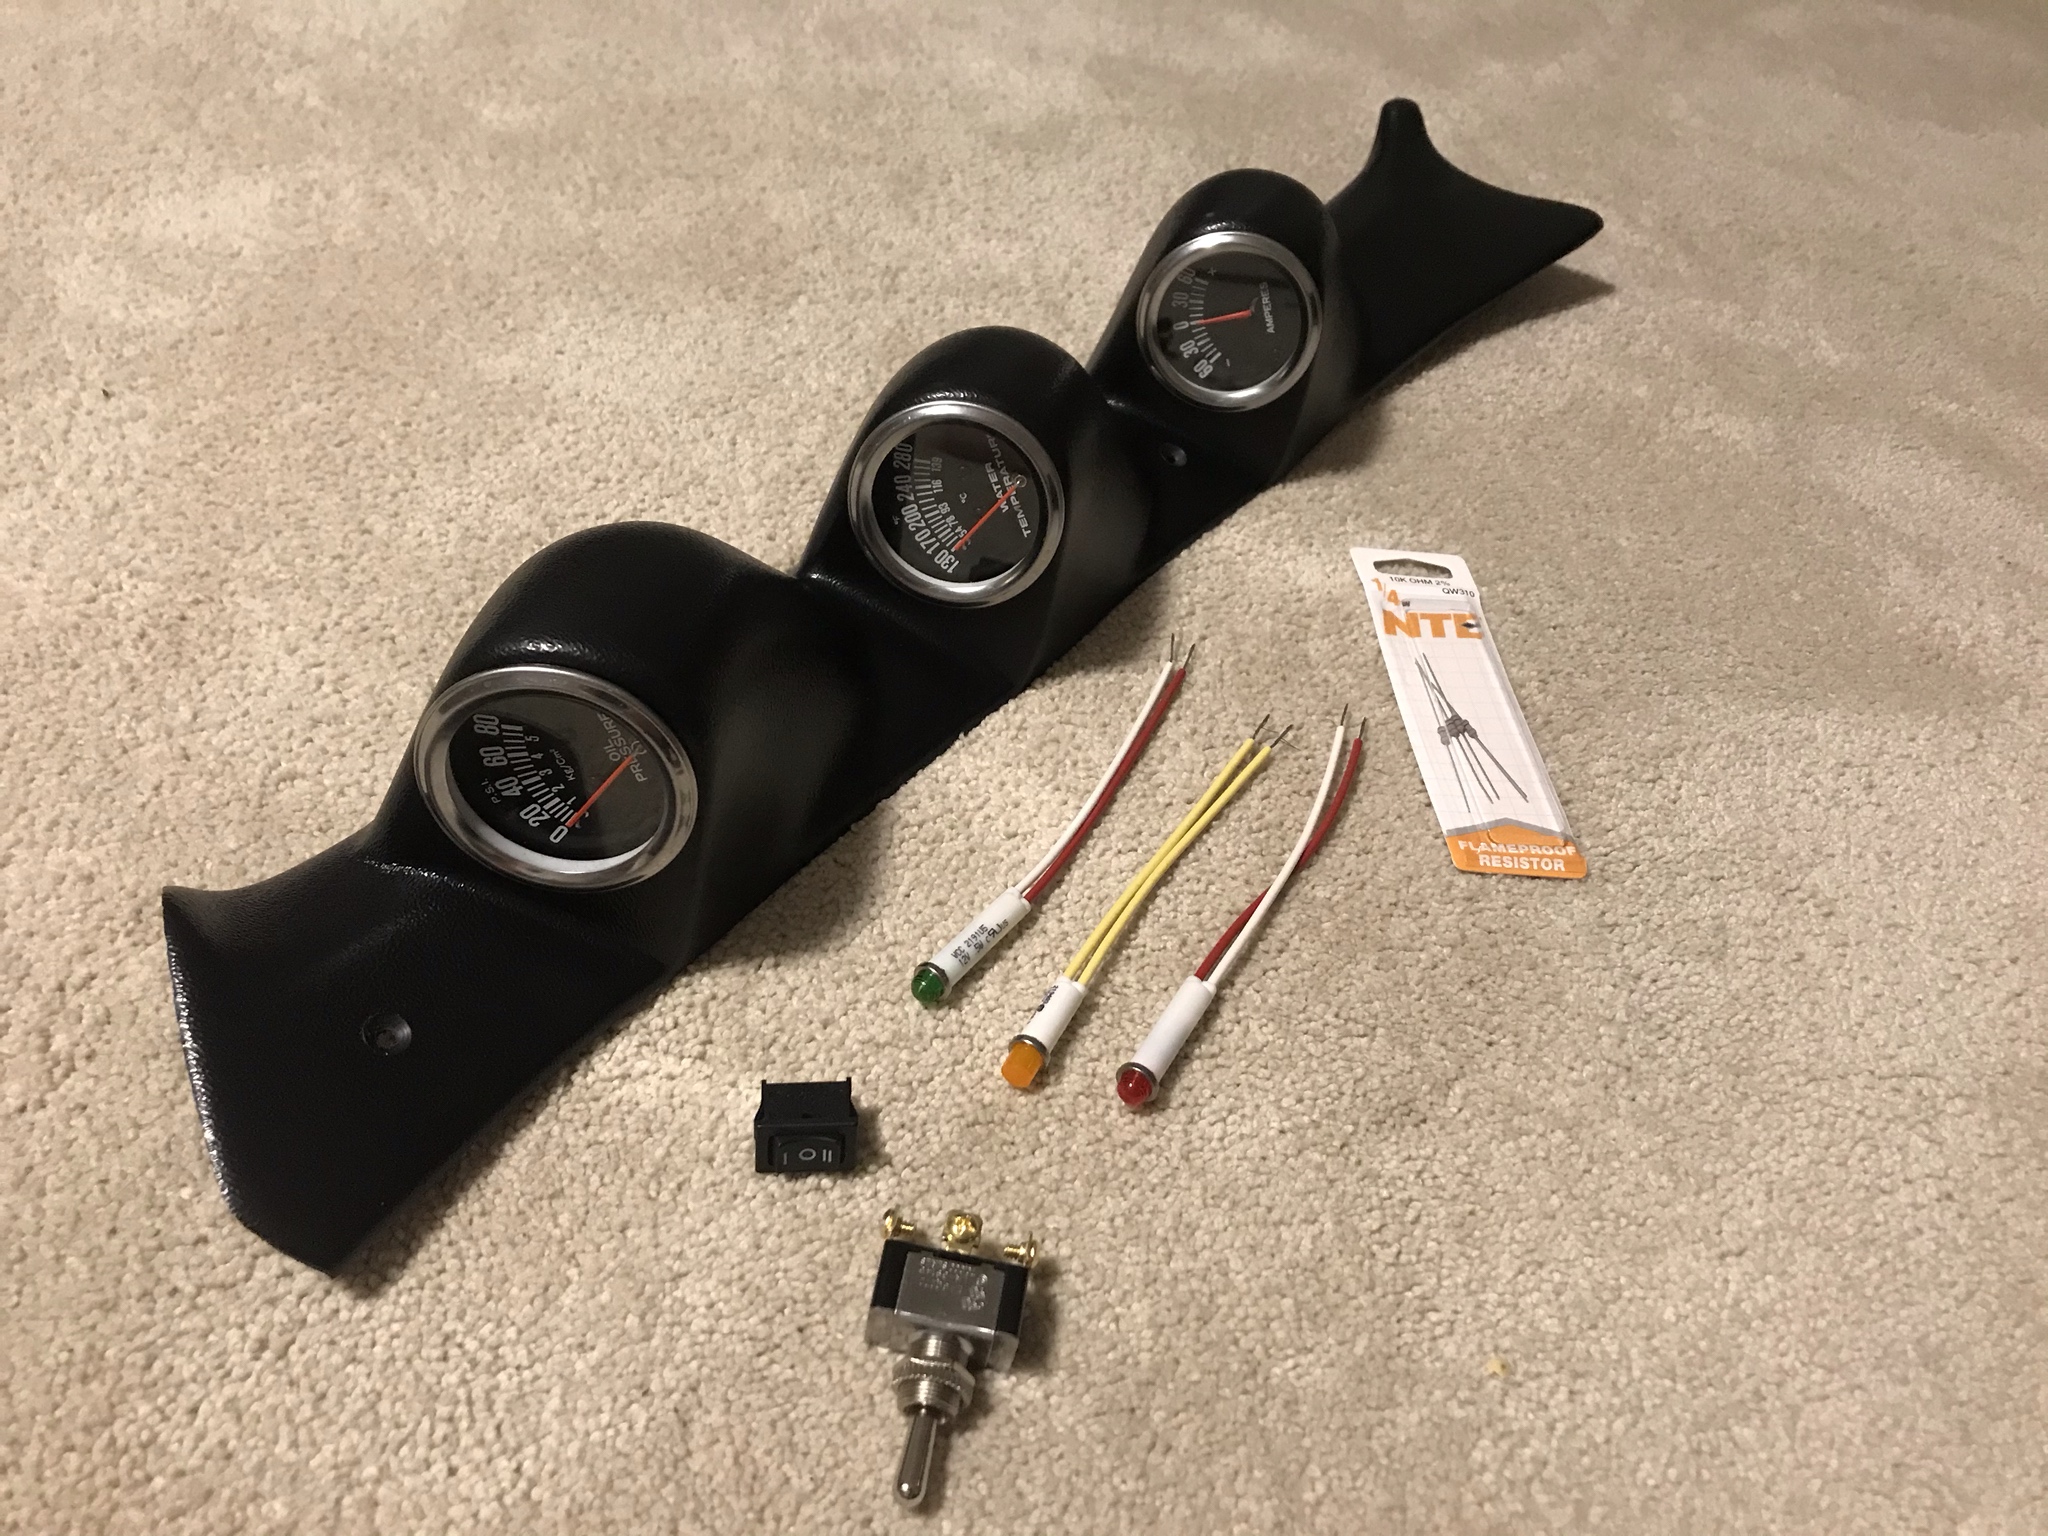
In the mean time, I had ordered a few fun things for myself to update the truck a smidge, and in the spirit of trying to get a better diagnostic system on my engine, I ordered this from LCE performance:

The gauges themselves were cheap ones I had lying around and will most likely end up getting changed for higher quality ones as funding permits. The electronic components came from the best Electronics store in Cowtown, B&E electronics. (The resistors are you stick in the old PAIR+ EGR sensors so the check engine light stops getting thrown on occasion). One gauge is currently on its way to being changed right away. for the three pod-mounts, I want Fuel pressure, Coolant temperature and Volts for battery 1 and 2. Fuel pressure is for when I decide to get a touch more fancy with some Performance minded modification. The coolant gauge is an obvious one. I want to have decent numbers to go by, and I will use a new temp sensor I bought from rock auto with a wire tab instead of the plug. MY only question is whether or not this will mess with any other system on the truck, going to have to consult the FSM EWD for that.
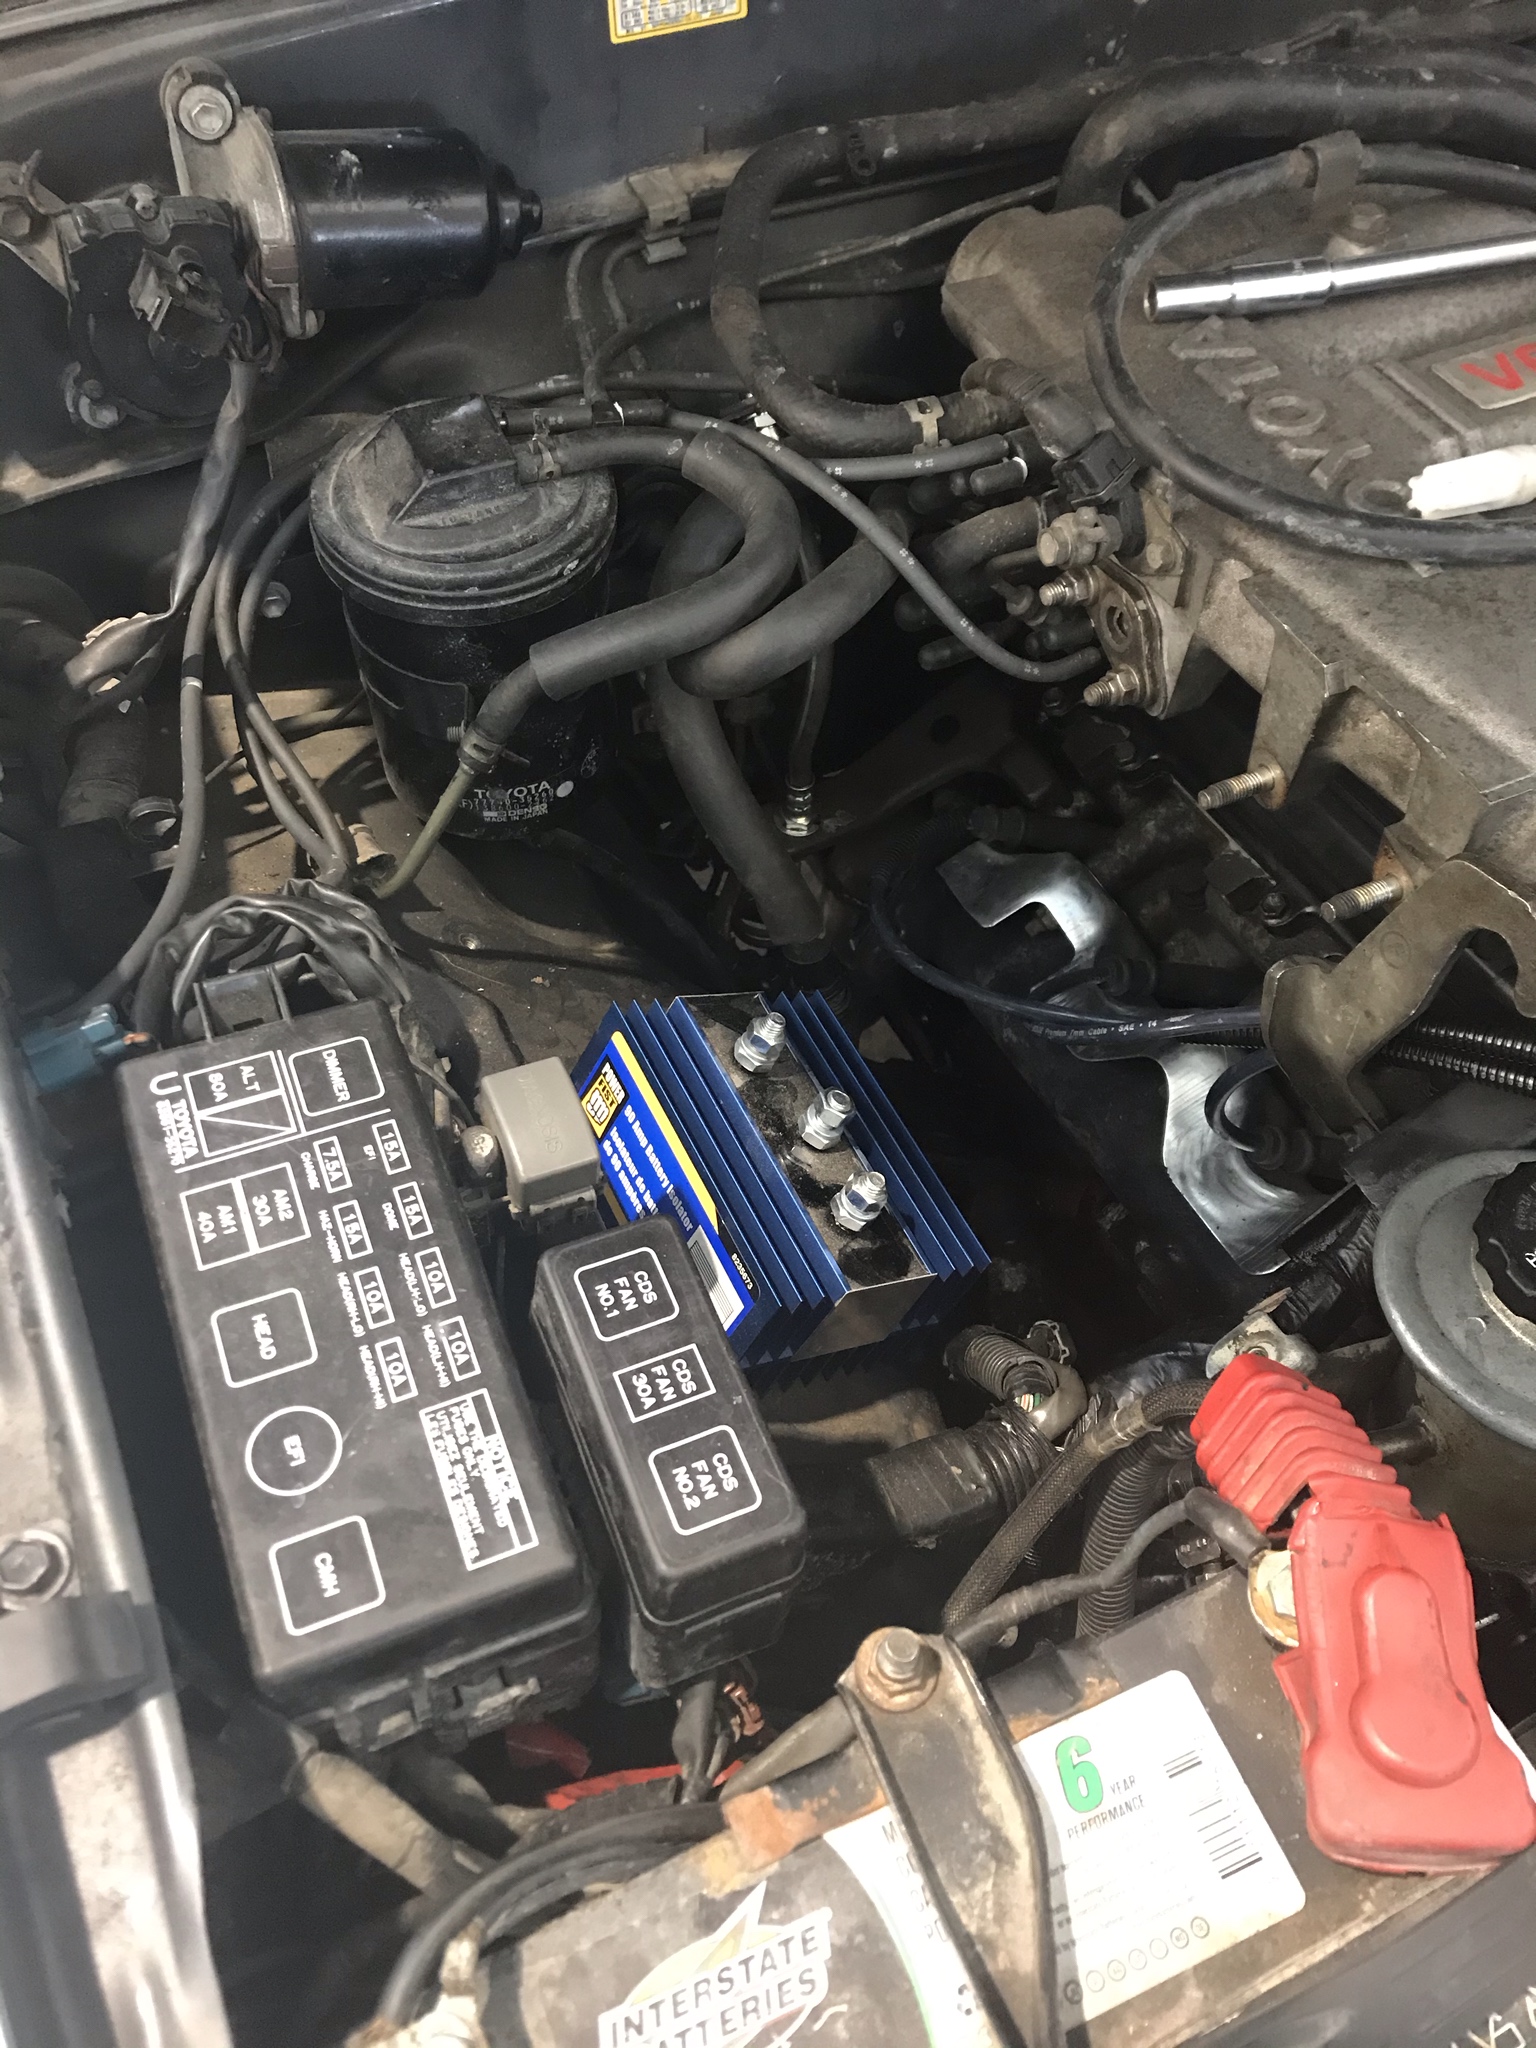
And finally, I will have a voltmeter that will read both of my batteries on an ON-OFF-ON rocker switch. The LED lights (I have three colours so I can decide which is less jarring on the eyes at night) which I will run in parallel to the voltmeter. The reasoning for this is so I can check where my batteries are at when the truck is off. When camping or off-roading, I want to have independent control of the volt meter for each battery that will let me check on them. I tend to run a power inverter on a secondary battery, which will also be connected to a fuse box for auxiliary lighting, power ports and so on. The led will stay on as a reminder light so I don’t leave the voltmeter running to drain power while the truck is off. I also mounted my battery isolator in the engine bay after removing the 4x4 ADD vsv’s. I placed the fuel pressure regulator vsv in the ADD vsv location, and this gave me lots of room for the battery isolator:
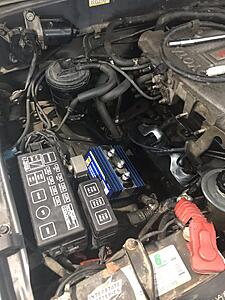
The isolator is a neat little trinket. It will allow me to charge both the driving battery and auxiliary battery while prioritizing the driving battery and switching to the auxiliary one once the driving is fully charged. In addition to this it will prevent the additional lights, power connections and other electronics I will be adding from draining my drive battery.
Because I like to go one step further, also purchased a small solar panel to mount on my Thule which will trickle charge the auxiliary battery. Oh what a time to be alive.
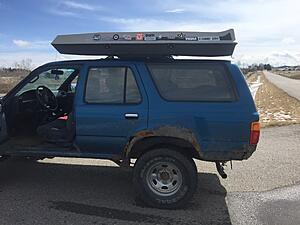
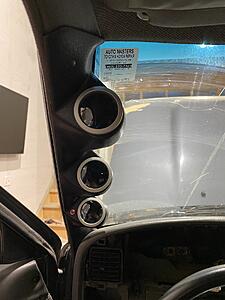
Of course with this fun stuff, I had to update the interior. With a quick test fit of the gauges and a new Grant steering wheel, I really dig how these old units spruceup:
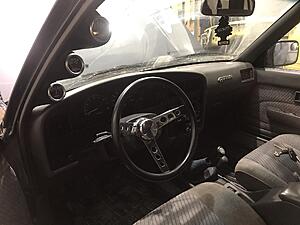
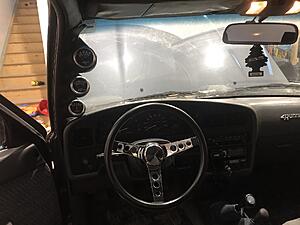
For 55$ American and 28$ for the adapter, the steering wheel feels, looks and installed great. Save for the horn, I had to get creative as the adapter is generic Toyota adapter, so I had to modify the original contact ring, so it would actually work! And finally, I purchased something I’d been on the look out for:


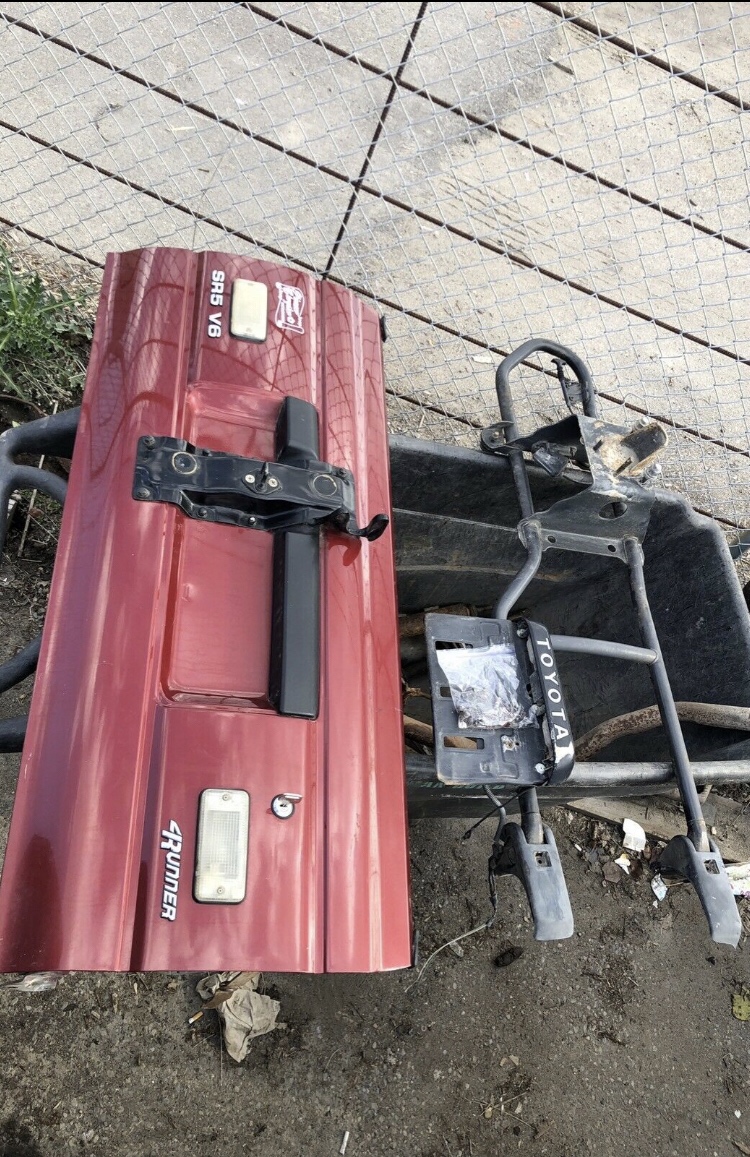
A nice rust-free tailgate with the original Toyota tire gate. I think I have seen one truck in person with one of these. I think they look awesome, and I really wanted one that didn’t interfere with our tailgate system on the 4runners. The plan is to prime it up, repaint the tire gate and leave the panel primed until I prime the rest of the truck for paint!
That’s all for now I guess!
In the mean time, I had ordered a few fun things for myself to update the truck a smidge, and in the spirit of trying to get a better diagnostic system on my engine, I ordered this from LCE performance:
The gauges themselves were cheap ones I had lying around and will most likely end up getting changed for higher quality ones as funding permits. The electronic components came from the best Electronics store in Cowtown, B&E electronics. (The resistors are you stick in the old PAIR+ EGR sensors so the check engine light stops getting thrown on occasion). One gauge is currently on its way to being changed right away. for the three pod-mounts, I want Fuel pressure, Coolant temperature and Volts for battery 1 and 2. Fuel pressure is for when I decide to get a touch more fancy with some Performance minded modification. The coolant gauge is an obvious one. I want to have decent numbers to go by, and I will use a new temp sensor I bought from rock auto with a wire tab instead of the plug. MY only question is whether or not this will mess with any other system on the truck, going to have to consult the FSM EWD for that.
And finally, I will have a voltmeter that will read both of my batteries on an ON-OFF-ON rocker switch. The LED lights (I have three colours so I can decide which is less jarring on the eyes at night) which I will run in parallel to the voltmeter. The reasoning for this is so I can check where my batteries are at when the truck is off. When camping or off-roading, I want to have independent control of the volt meter for each battery that will let me check on them. I tend to run a power inverter on a secondary battery, which will also be connected to a fuse box for auxiliary lighting, power ports and so on. The led will stay on as a reminder light so I don’t leave the voltmeter running to drain power while the truck is off. I also mounted my battery isolator in the engine bay after removing the 4x4 ADD vsv’s. I placed the fuel pressure regulator vsv in the ADD vsv location, and this gave me lots of room for the battery isolator:
The isolator is a neat little trinket. It will allow me to charge both the driving battery and auxiliary battery while prioritizing the driving battery and switching to the auxiliary one once the driving is fully charged. In addition to this it will prevent the additional lights, power connections and other electronics I will be adding from draining my drive battery.
Because I like to go one step further, also purchased a small solar panel to mount on my Thule which will trickle charge the auxiliary battery. Oh what a time to be alive.
Of course with this fun stuff, I had to update the interior. With a quick test fit of the gauges and a new Grant steering wheel, I really dig how these old units spruceup:


For 55$ American and 28$ for the adapter, the steering wheel feels, looks and installed great. Save for the horn, I had to get creative as the adapter is generic Toyota adapter, so I had to modify the original contact ring, so it would actually work! And finally, I purchased something I’d been on the look out for:

A nice rust-free tailgate with the original Toyota tire gate. I think I have seen one truck in person with one of these. I think they look awesome, and I really wanted one that didn’t interfere with our tailgate system on the 4runners. The plan is to prime it up, repaint the tire gate and leave the panel primed until I prime the rest of the truck for paint!
That’s all for now I guess!
Last edited by vokeyz; Feb 12, 2020 at 09:26 AM. Reason: Broken Pic links
Feb 12, 2020 | 09:28 PM
#13
Registered User
Joined: Jul 2005
Posts: 2,345
Likes: 657
From: Chiloquin, OR
I could be wrong, but if the isolator takes the alternator off the main battery, won't you get the CHARGE and BRAKE lites come on? Or is that only fed from one of the smaller wires coming off the alternator.
I'm just being curious. I'm nosey
Pat☺
I'm just being curious. I'm nosey
Pat☺
Feb 13, 2020 | 08:39 AM
#14
Thread Starter
Registered User
Joined: Dec 2019
Posts: 22
Likes: 7
I believe it's only off the small wire, so the main charging circuit stays in tact. I wondered the same thing, but was unsure of how it would work. I figure with the dual gauge set up, it will be easy to determine which battery is receiving charge. Ultimately if it seems like the second battery is receiving more charge time than the first one, I might swap their terminals on the Isolator so that the brake/battery light doesn't come on very often. I won't know until I put it all together.
Feb 13, 2020 | 12:00 PM
#15
Registered User
Joined: Jul 2005
Posts: 2,345
Likes: 657
From: Chiloquin, OR
Ok, thanks!
I'll be interested in seeing what happens when you actually fire 'er up. I'm sure that'll answer the question right off.
Thank you for answering. I appreciate it. Even with the dual meters, so you can see what's going on, a couple of bright red lights coming on might be distracting. That's why I was wondering
We'll see what happens.
Pat☺
Feb 25, 2020 | 07:33 PM
#17
Thread Starter
Registered User
Joined: Dec 2019
Posts: 22
Likes: 7
Another few weeks and a few more advances. We just had our first baby so my wrenching time isn't at an all time high. My wife is very supportive of my projects though and she's happy to see me progress with things so long as I keep my priorities straight.
I've run into a snag with my dual battery electrical system. I've desired to keep my dual battery set up isolated for the purpose but I should have taken more time to research our starting systems. The battery isolator I bought from Princess Auto won't work for our Yotas. With it being a 3 terminal unit, (battery 1, battery 2, and Alternator) it has no way of "detecting" the "ON" switch from the ignition to close the starting circuit in a Toyota application. I require a 4-post isolator, which are slightly more expensive but you live and learn with these things. I'll order one from amazon and hook that system up once I get the new isolator in. I found my desired spot for the second battery, and did a test fit while I had the rear panels apart.
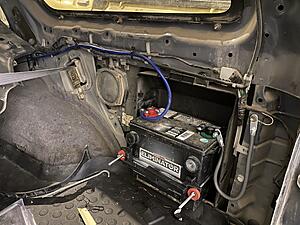
(before I'm flamed, the ground is temporary and merely for the heck of it, I will be installing a frame-ground once I finish the rest of the work back there). The panels are apart because I'm working on getting my tire carrier and new tailgate installed. I shot a coat of primer on the new tailgate and installed it, but now I'm working on figuring out the brackets for the tire gate.


The rear gate bracket seems "a little" tricky. It would seem the factor one was pretty basic, and others who have done this before me have pushed for a more robust design. Here is an old link to an archive that I will utilized for bracket inspiration:
http://www.oocities.org/baja/3499/spare.html
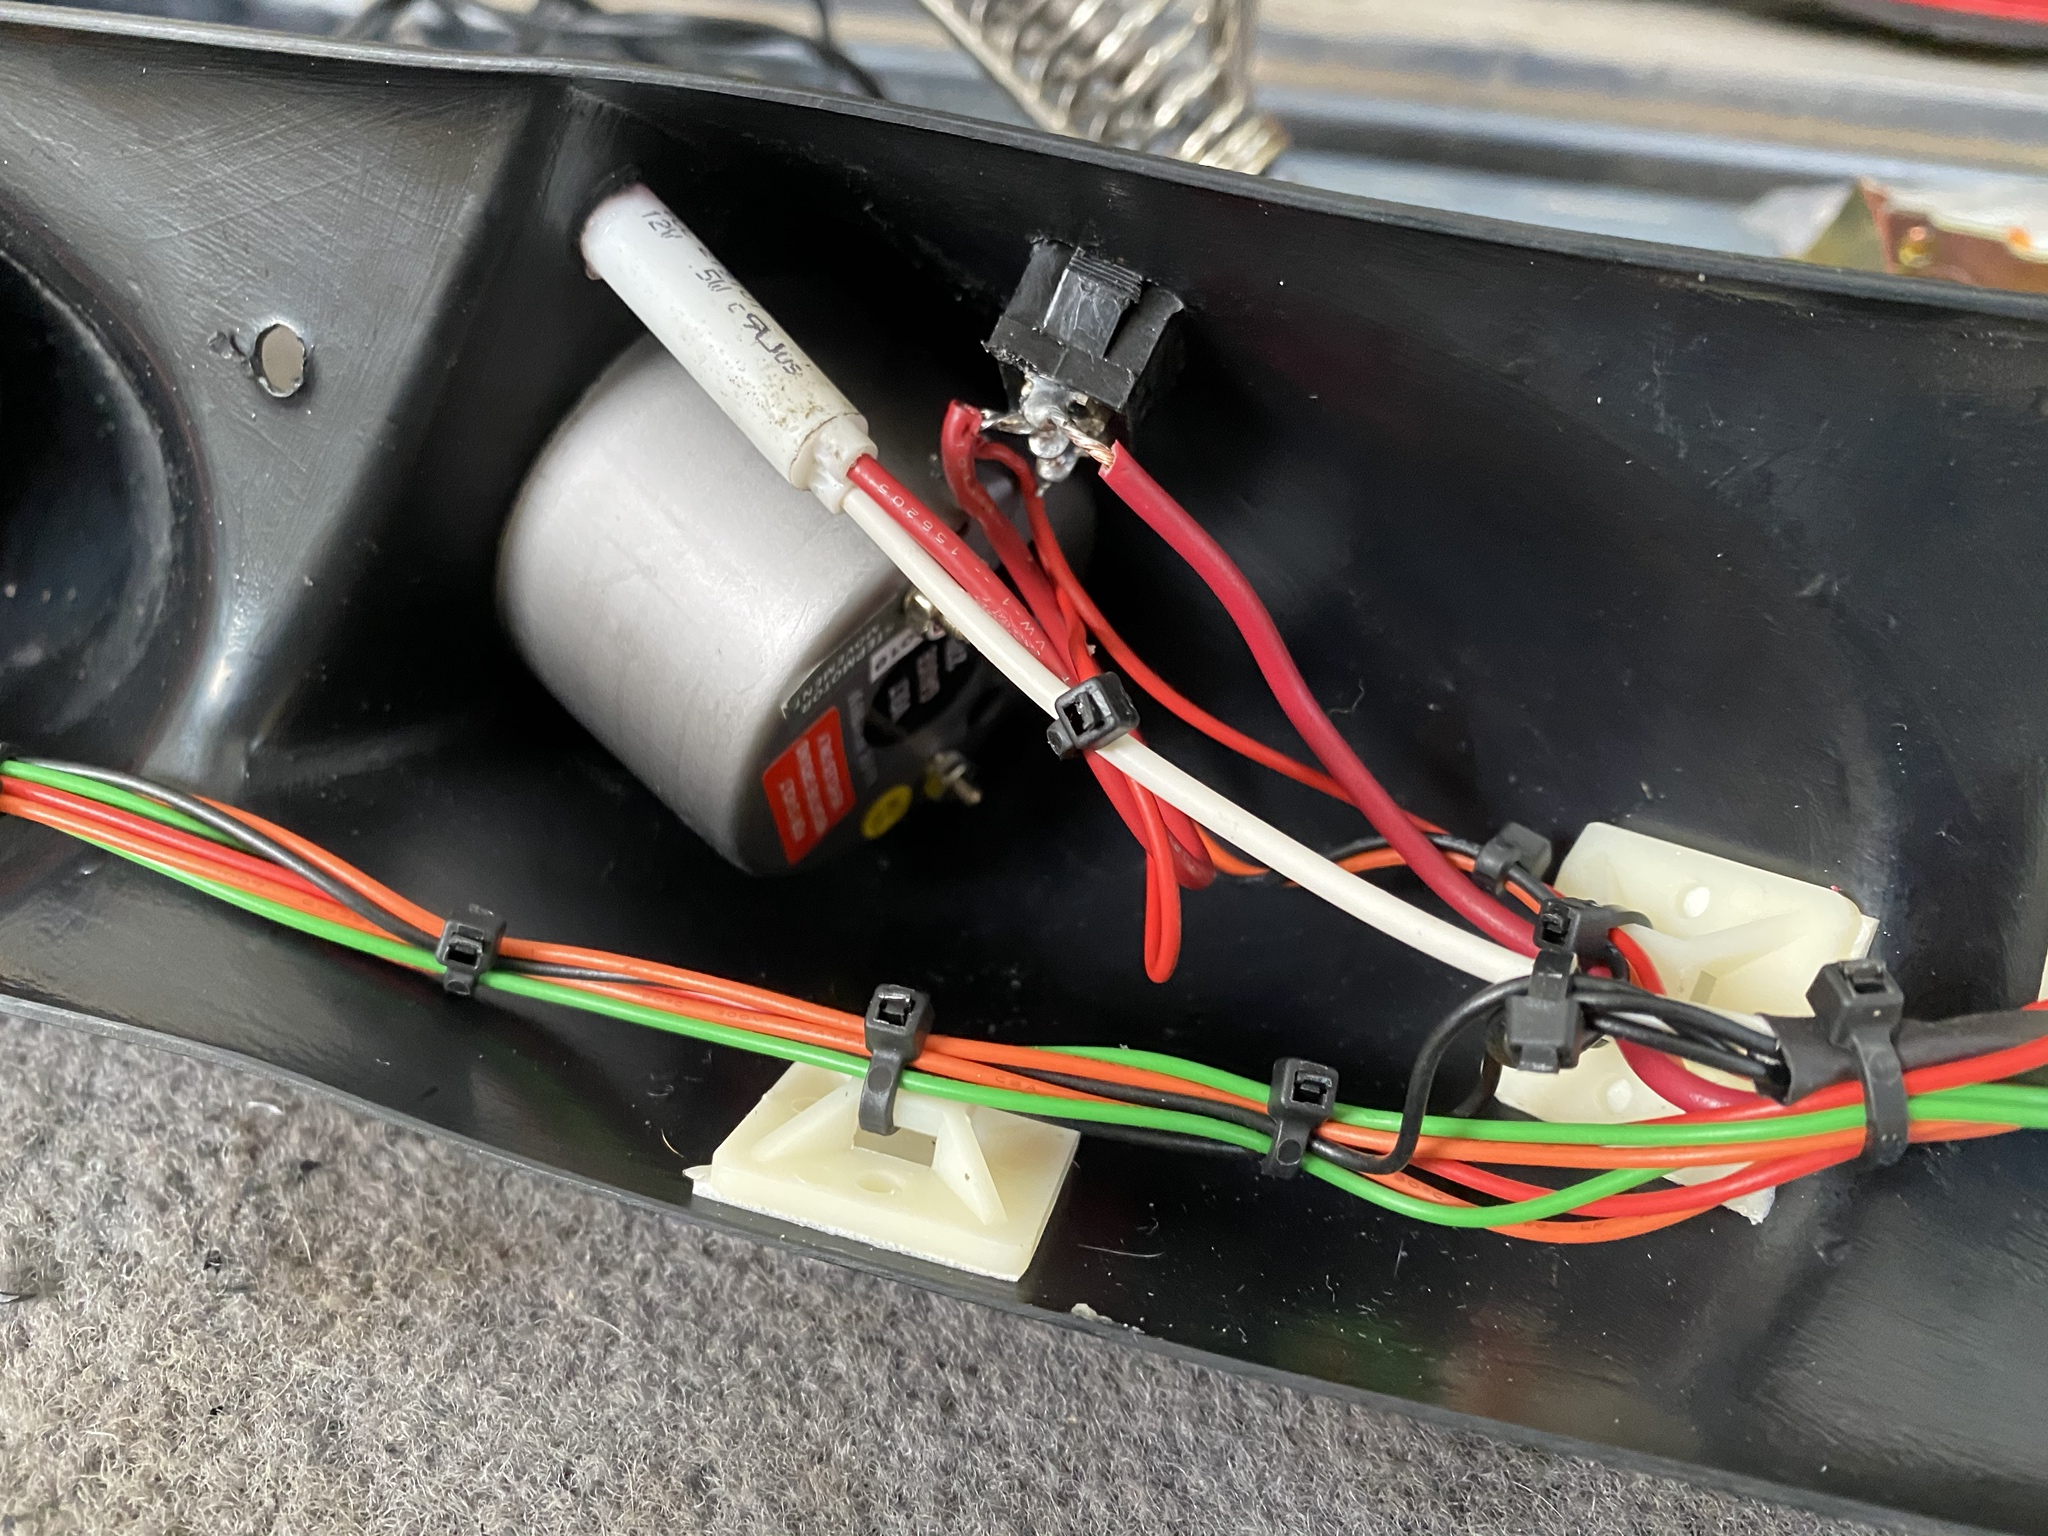
I received another shipment of parts from Rockauto and LCE performance, so I have the appropriate gauges for my pillar from LCE, and a few more parts to finalize some repairs. I went to work on wiring my gauges into place. I opted for GlowShift Gauges, even though I had read some mixed reviews. LCE uses them on their projects and I felt they would be good enough for my purposes. My fuel pressure kit from LCE came with a Glowshift gauge so I bought a temperature gauge and Voltmeter from them as well.
I took my dash apart and began fishing wires through. Once I was happy with the positioning I went to work on the pillar wiring.

I like things when they're neat and easy to manipulate, so I was pretty liberal with the zip ties.


After a bit of digging I decided to power the gauges off my CB radio ignition feed. The plan is to place an inline fuse of about 12 amps on the circuit if I start blowing fuses on start up (when all three stepper motors are spinning while lighting up and the CB radio is powering on if I leave it on).


Now I still have to hook up the wiring for the fuel pressure sensor and the coolant sensor, but I will finish those when I fix my leaking valve cover gaskets. It's the last leak on the whole truck, and I plan on nailing it this time. I replaced them not long ago and obviously did not seal them correctly. When reading the FSM I realize I did it wrong (or not according to the manual) which explains the leakage.
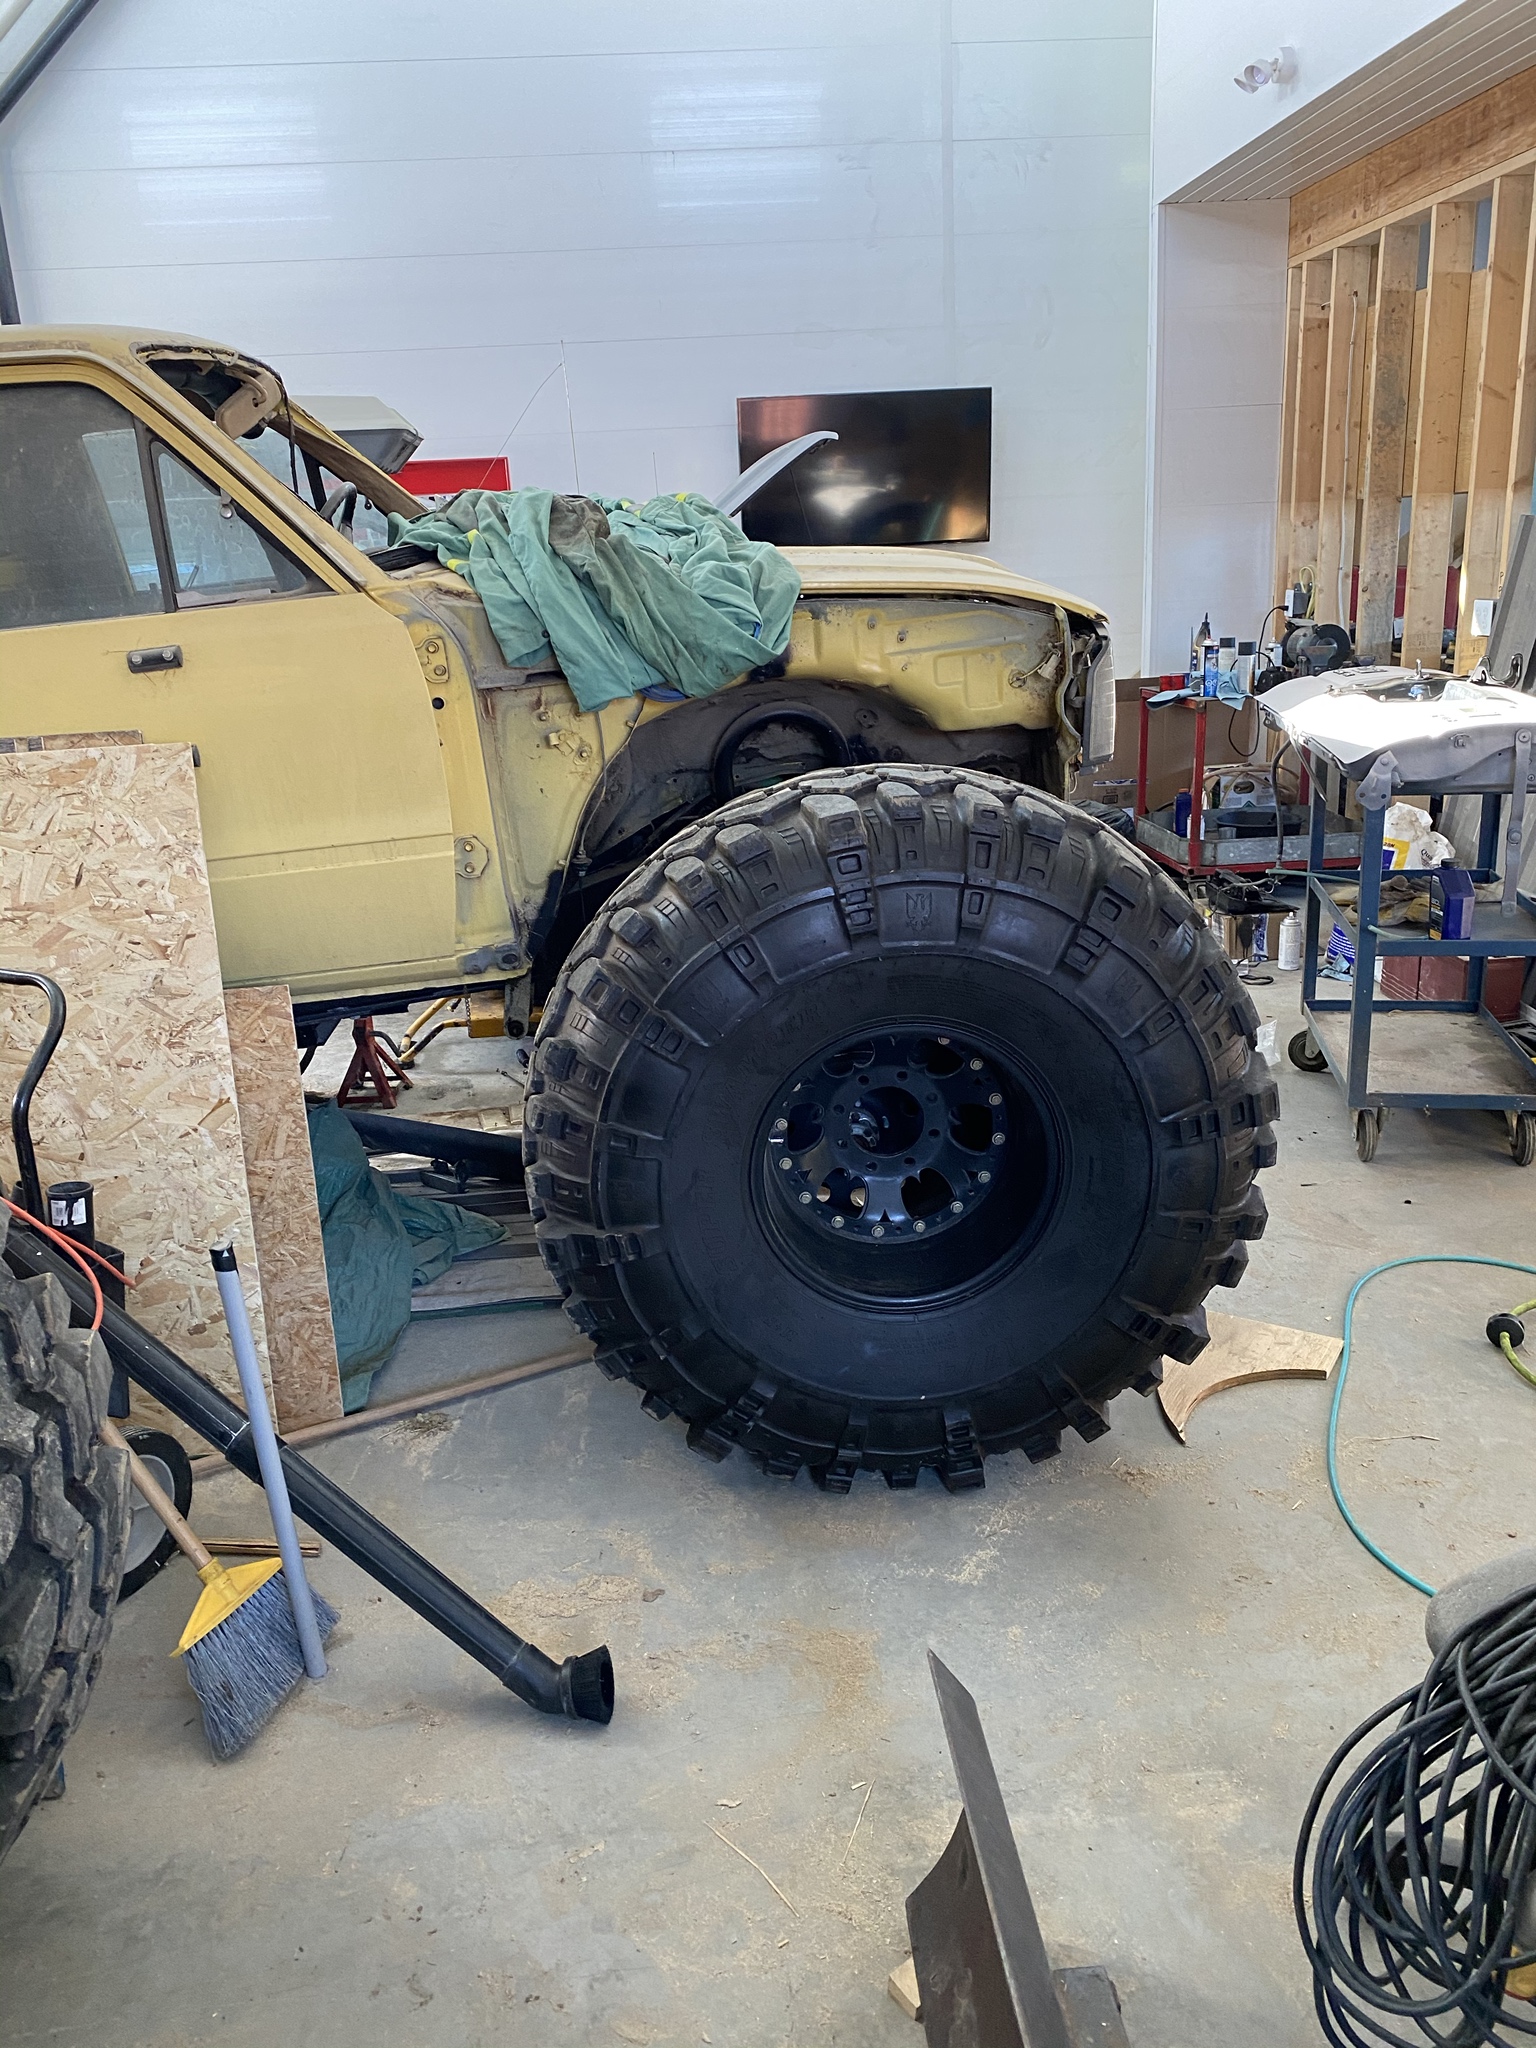
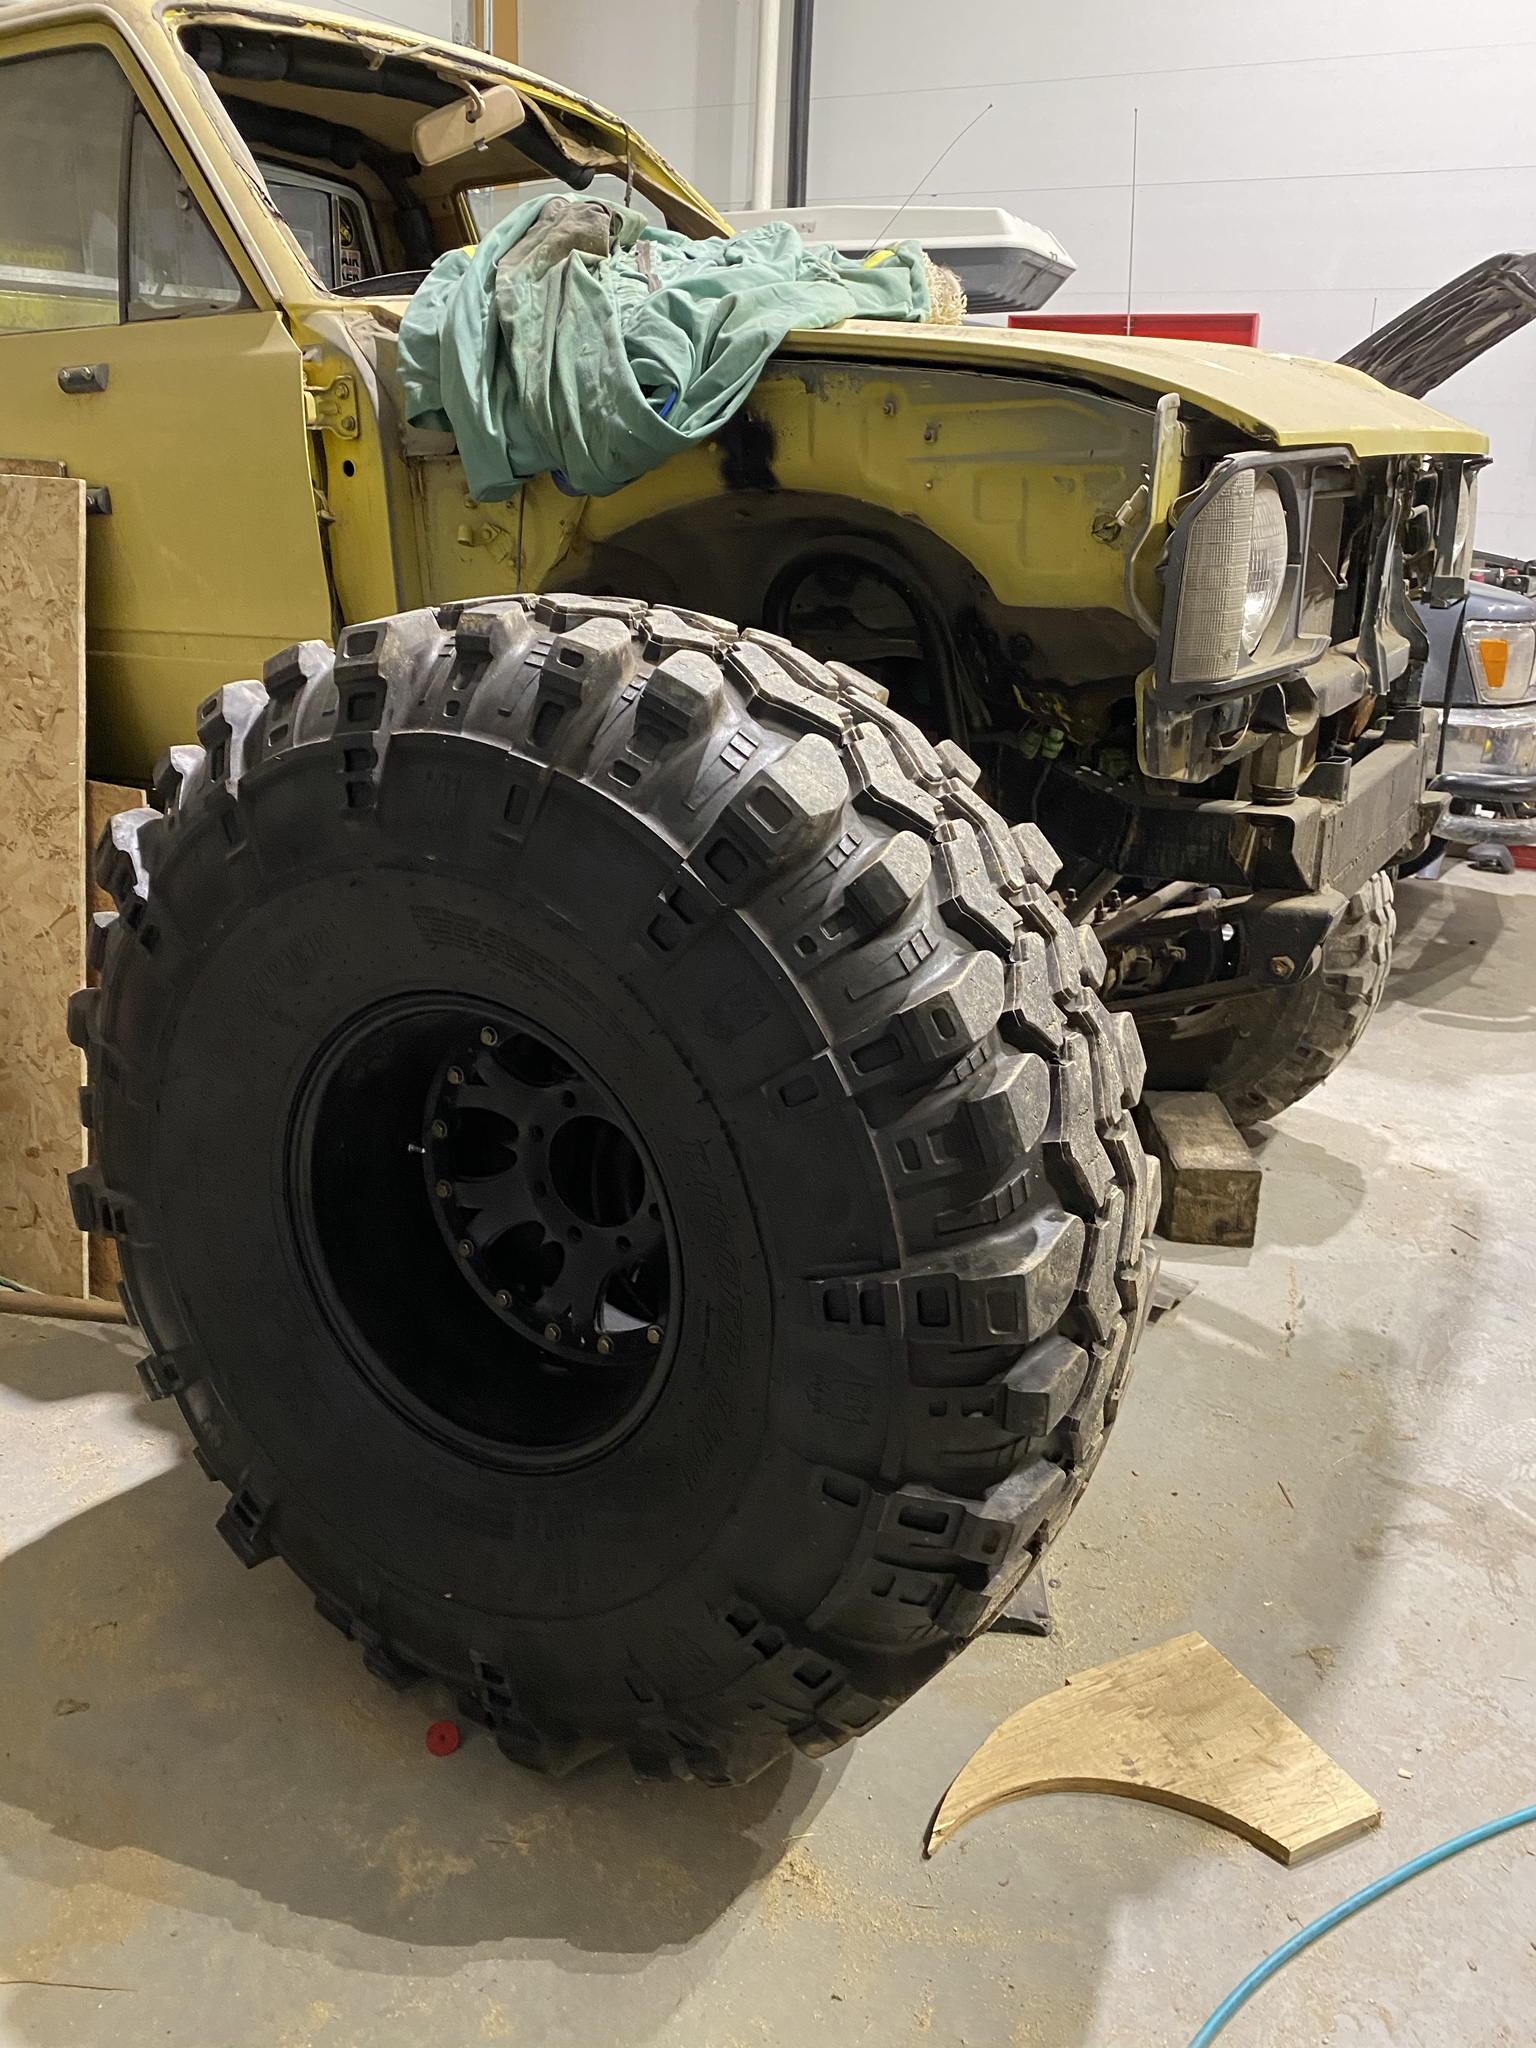
Once all these projects are wound up I'll finally start looking into the solid axle swap with my father in law's ARB locker loaded, geared, armored, high-steer set up axles with 36" super swampers.

I thought they looked huge until he brought these home:


47" 17" 17" Super Swampers on double interior beadlocks. Crapped my pants! My father in law has big plans with his 1 ton axles to say the least.
I've run into a snag with my dual battery electrical system. I've desired to keep my dual battery set up isolated for the purpose but I should have taken more time to research our starting systems. The battery isolator I bought from Princess Auto won't work for our Yotas. With it being a 3 terminal unit, (battery 1, battery 2, and Alternator) it has no way of "detecting" the "ON" switch from the ignition to close the starting circuit in a Toyota application. I require a 4-post isolator, which are slightly more expensive but you live and learn with these things. I'll order one from amazon and hook that system up once I get the new isolator in. I found my desired spot for the second battery, and did a test fit while I had the rear panels apart.

(before I'm flamed, the ground is temporary and merely for the heck of it, I will be installing a frame-ground once I finish the rest of the work back there). The panels are apart because I'm working on getting my tire carrier and new tailgate installed. I shot a coat of primer on the new tailgate and installed it, but now I'm working on figuring out the brackets for the tire gate.


The rear gate bracket seems "a little" tricky. It would seem the factor one was pretty basic, and others who have done this before me have pushed for a more robust design. Here is an old link to an archive that I will utilized for bracket inspiration:
http://www.oocities.org/baja/3499/spare.html
I received another shipment of parts from Rockauto and LCE performance, so I have the appropriate gauges for my pillar from LCE, and a few more parts to finalize some repairs. I went to work on wiring my gauges into place. I opted for GlowShift Gauges, even though I had read some mixed reviews. LCE uses them on their projects and I felt they would be good enough for my purposes. My fuel pressure kit from LCE came with a Glowshift gauge so I bought a temperature gauge and Voltmeter from them as well.

I took my dash apart and began fishing wires through. Once I was happy with the positioning I went to work on the pillar wiring.

I like things when they're neat and easy to manipulate, so I was pretty liberal with the zip ties.

After a bit of digging I decided to power the gauges off my CB radio ignition feed. The plan is to place an inline fuse of about 12 amps on the circuit if I start blowing fuses on start up (when all three stepper motors are spinning while lighting up and the CB radio is powering on if I leave it on).


Now I still have to hook up the wiring for the fuel pressure sensor and the coolant sensor, but I will finish those when I fix my leaking valve cover gaskets. It's the last leak on the whole truck, and I plan on nailing it this time. I replaced them not long ago and obviously did not seal them correctly. When reading the FSM I realize I did it wrong (or not according to the manual) which explains the leakage.
Once all these projects are wound up I'll finally start looking into the solid axle swap with my father in law's ARB locker loaded, geared, armored, high-steer set up axles with 36" super swampers.

I thought they looked huge until he brought these home:

47" 17" 17" Super Swampers on double interior beadlocks. Crapped my pants! My father in law has big plans with his 1 ton axles to say the least.
Apr 6, 2020 | 08:59 PM
#18
Thread Starter
Registered User
Joined: Dec 2019
Posts: 22
Likes: 7
All kinds of time these days to work on my 4runner and other projects. I guess self isolation could be worse.


Since my last post I've worked through a few more gremlins in the old girl, while adding a few more to fix. Two of my gauges were not working properly since I installed them. I wasn't sure what the issue was until I did enough searching to figure it out.
Temp Gauge:
Use the Sender that your gauge comes with. Simple as that. I was foolish and thought I could use the stock sender on the sensor bank at the back of the engine, and I was incorrect about that. My gauge would read 180F cold, and 280F (maxed out) at normal operating temperature. As a side note; Be careful with hoses that you remove when you're working back there. I took my entire manifold off 3 times hunting down a coolant leak that was the return (or send?) for the heater core. The hole was right under a clamp, and would leak onto the sensor bank at the back of the engine. I thought it was because of how I had installed my new sender for my gauge (I had tapped a new hole for it) and each time I would run the truck it would be wet all around and it was difficult to determine the cause.
Fuel pressure gauge:
Also simple: Don't get our ground and positives mixed up on the sensor. Double check these things first. I had my dash all apart again only to realize I had soldered it backwards. Typical.
I was having horrific fuel mileage. Like, real bad. Like 7 miles per gallon bad. At first i thought it was because I hadn't wired in the 10k resistors into the old PAIR and EGR vsv harnesses. After soldering that, and not seeing a real change, I cruised the net to see what it could be. After not getting very many answers and consulting my mechanical friends, I consulted the FSM to see a full breakdown of the fuel system. I noticed that ever since I deleted the EGR and PAIR systems, the idle was somewhere around 1100-1300 rpms. At first I thought it would be vacuum related, but I also noticed that the engine would hesitate/cut when I gave it a decent boot full (from zero load to a considerable amount). Which led to me to consider how it would run so rich and yet run "ok". The cold start injector. Pulling it off, it was swamped with carbon. I pulled my other cold start injector off my old truck and installed it. Not only does it idle better once it has warmed up, but it actually idles down to the 800-900rpm range. Easy enough fix. I haven't been able to see what kind of mileage I have now, but I'm pretty confident I have it under control now.

I decided I would do a compression test, and check/adjust my timing. Great idea, but when you're not really focused on the task at hand you forget to do things. Like shutting the fuel off when doing a compression test. The result is "explosive" to say the least.

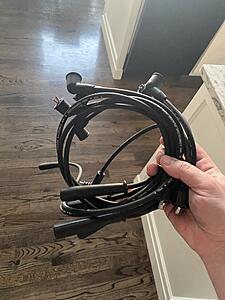
The good news is, I was able to adjust my timing nicely. I set it slightly advanced from factory to 12 degrees because of some online discussion about power, fuel economy and it sounded better to my ears too. While I did that, I thought I'd measure resistance on the ht plug wires and found they were way out of spec and varying up to 48k in one case. Unfortunately cylinder 5 had no continuity, no matter how I tried to touch the multimeter leads to the contacts. I double checked the multimeter, but since then I decided to order new plug wires, distributor cap and rotor from rock auto. They're cheap but hopefully within spec. Either way, I hope I can deliver spark to cylinder 5!

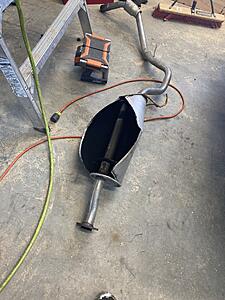
With my gauges working, engine almost all tuned up, oil leaks taken care of, and a blown exhaust, I'm sort of running out of things to fix on my 4runner. With a muffler and ignition parts in the mail I've begun work on a different project entirely:


My father in law's 81' hasn't had an engine turn over in it in 21 years. This 22re is out of an 87' and replaced his 20r. He's asked me if I'd be willing to try and rewire his truck to get fuel injection which is definitely keeping me occupied in a different way. But once his truck runs, we begin the process of placing his 1-ton axles underneath. I will be working out a deal for the original toyota axles and wheels equipped with air lockers and 36" swampers. Good deal if you ask me!


Since my last post I've worked through a few more gremlins in the old girl, while adding a few more to fix. Two of my gauges were not working properly since I installed them. I wasn't sure what the issue was until I did enough searching to figure it out.
Temp Gauge:
Use the Sender that your gauge comes with. Simple as that. I was foolish and thought I could use the stock sender on the sensor bank at the back of the engine, and I was incorrect about that. My gauge would read 180F cold, and 280F (maxed out) at normal operating temperature. As a side note; Be careful with hoses that you remove when you're working back there. I took my entire manifold off 3 times hunting down a coolant leak that was the return (or send?) for the heater core. The hole was right under a clamp, and would leak onto the sensor bank at the back of the engine. I thought it was because of how I had installed my new sender for my gauge (I had tapped a new hole for it) and each time I would run the truck it would be wet all around and it was difficult to determine the cause.
Fuel pressure gauge:
Also simple: Don't get our ground and positives mixed up on the sensor. Double check these things first. I had my dash all apart again only to realize I had soldered it backwards. Typical.
I was having horrific fuel mileage. Like, real bad. Like 7 miles per gallon bad. At first i thought it was because I hadn't wired in the 10k resistors into the old PAIR and EGR vsv harnesses. After soldering that, and not seeing a real change, I cruised the net to see what it could be. After not getting very many answers and consulting my mechanical friends, I consulted the FSM to see a full breakdown of the fuel system. I noticed that ever since I deleted the EGR and PAIR systems, the idle was somewhere around 1100-1300 rpms. At first I thought it would be vacuum related, but I also noticed that the engine would hesitate/cut when I gave it a decent boot full (from zero load to a considerable amount). Which led to me to consider how it would run so rich and yet run "ok". The cold start injector. Pulling it off, it was swamped with carbon. I pulled my other cold start injector off my old truck and installed it. Not only does it idle better once it has warmed up, but it actually idles down to the 800-900rpm range. Easy enough fix. I haven't been able to see what kind of mileage I have now, but I'm pretty confident I have it under control now.
I decided I would do a compression test, and check/adjust my timing. Great idea, but when you're not really focused on the task at hand you forget to do things. Like shutting the fuel off when doing a compression test. The result is "explosive" to say the least.

The good news is, I was able to adjust my timing nicely. I set it slightly advanced from factory to 12 degrees because of some online discussion about power, fuel economy and it sounded better to my ears too. While I did that, I thought I'd measure resistance on the ht plug wires and found they were way out of spec and varying up to 48k in one case. Unfortunately cylinder 5 had no continuity, no matter how I tried to touch the multimeter leads to the contacts. I double checked the multimeter, but since then I decided to order new plug wires, distributor cap and rotor from rock auto. They're cheap but hopefully within spec. Either way, I hope I can deliver spark to cylinder 5!


With my gauges working, engine almost all tuned up, oil leaks taken care of, and a blown exhaust, I'm sort of running out of things to fix on my 4runner. With a muffler and ignition parts in the mail I've begun work on a different project entirely:

My father in law's 81' hasn't had an engine turn over in it in 21 years. This 22re is out of an 87' and replaced his 20r. He's asked me if I'd be willing to try and rewire his truck to get fuel injection which is definitely keeping me occupied in a different way. But once his truck runs, we begin the process of placing his 1-ton axles underneath. I will be working out a deal for the original toyota axles and wheels equipped with air lockers and 36" swampers. Good deal if you ask me!


Thread
Thread Starter
Forum
Replies
Last Post
Red Leader
86-95 Trucks & 4Runners (Build-Up Section)
40
Nov 21, 2016 06:18 AM
NCalDyer
86-95 Trucks & 4Runners (Build-Up Section)
11
Apr 12, 2015 07:10 AM
jd20phill
86-95 Trucks & 4Runners (Build-Up Section)
3
Apr 10, 2012 06:11 PM
toyotasaurus
86-95 Trucks & 4Runners (Build-Up Section)
78
Dec 2, 2011 07:48 PM
jeffs84runner
The Classifieds GraveYard
9
Mar 13, 2007 07:55 AM


