
MSD-6A Install on the 3VZE:: A How-to for the at home mechanic
 Jan 18, 2008 | 09:18 PM
#1
Thread Starter
Registered User
Joined: Jan 2005
Posts: 571
Likes: 0
From: Moreno Valley, Ca
MSD-6A Install on the 3VZE:: A How-to for the at home mechanic
So I decided to document and detail the process I went through to get my MSD-6A ignition system installed. I decided to do this because as I searched on Yotatech and other Toyota forums I found that more than a handful of people had asked about this process and yet none of their threads ever got a complete or suitable answer.
I used some basic information from Yotatech, the MSD forums, and the FSM to get this done. I posted this in the "86-95 Trucks and 4Runners" section since this is the era that the 3VZE engine was utilized so it only made sense to me. So here goes.
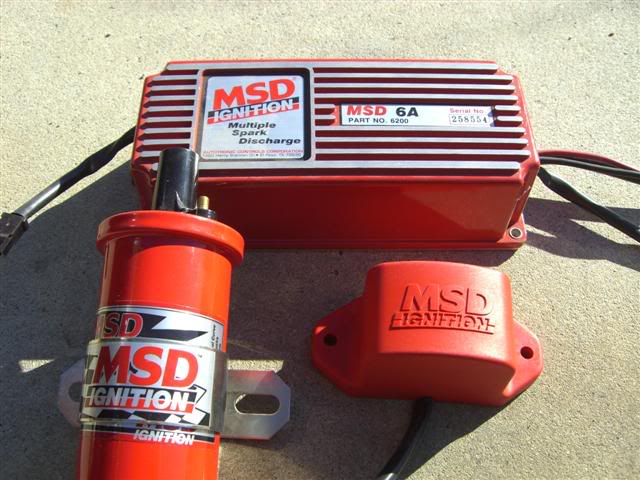
Parts installed::
MSD-6A Ignition Control box:: Part No. 6200
MSD Blaster 2 Coil:: Part No. 8202
MSD Universal Col Bracket:: Part No. 8213
MSD Tach Adapter EIS (Electronic Ignition System):: Part No. 8910EIS
Here is what the parts look like:
1.) First thing you will want to do is disconnect your battery. SAFETY FIRST!
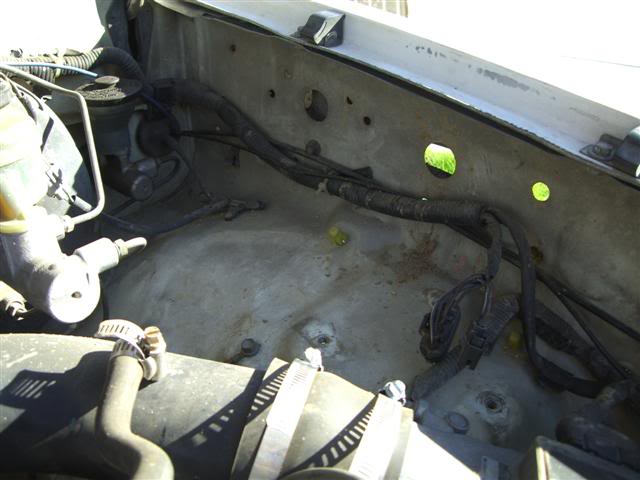
2.) You will want to find a suitable place to setup and install the devices. This is only a "Dry" fitting so you don't need to secure anything down yet. Here is where I plan on installing mine:
Here is the "dry" fitting:
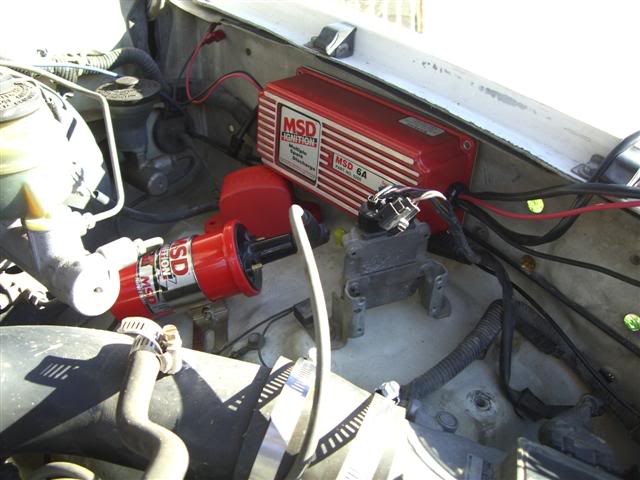
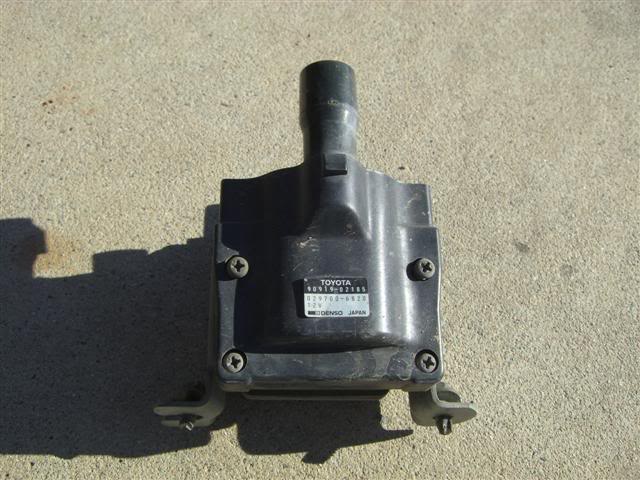
In this picture I have already disconnected and removed the factory coil and igniter. These are the 2 devices I removed:
and
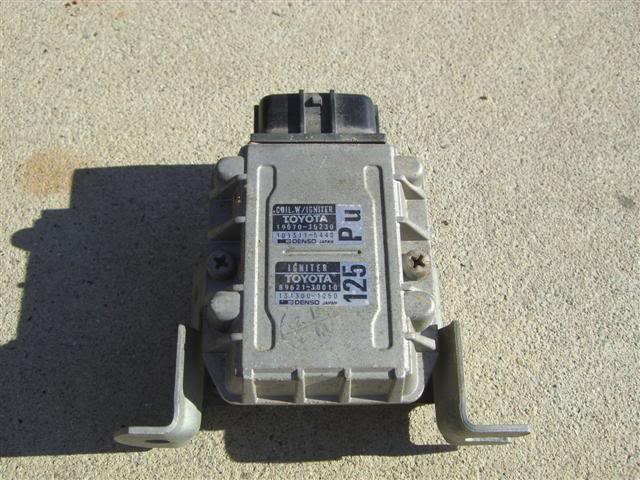
DO NOT THROW AWAY THE SECOND UNIT! YOU WILL NEED IT TO CONNECT INTO THE NEW SYSTEM.
3.) When the "dry" fitting is done you will want to make your cables the appropriate length. I had to lengthen the positive and negative cables so that they will run from the battery to the MSD-6A Ignition Control box.
Red 14ga to Positive Battery.
Black 14ga to Negative Battery.
4.) You'll take the Tach Adapter EIS (PN 8910EIS) there is going to be a connector. You will connect it to the Magnetic Pick-up on your MSD-6A. Then the black will go your coil negative. And the red goes together with red 18ga from your MSD-6A and also your OEM Coil Positive.
White wire from your 6A will not be used.
Black/Red = Coil Positive
Black/White = Coil Negative
Here is the adapter from the OEM Coil that you will be tieing into.
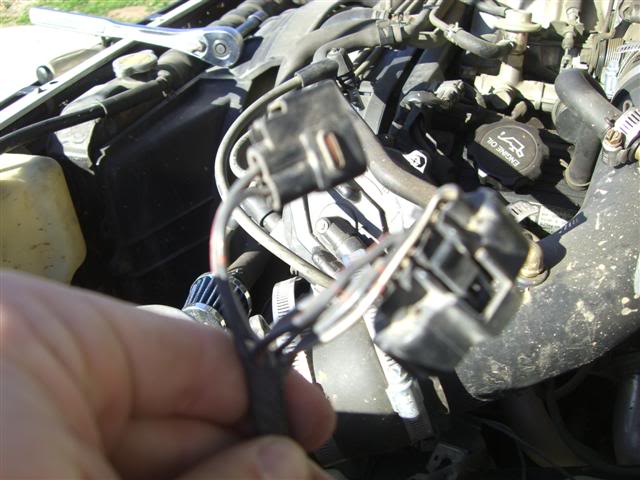
It is the one with only 2 wires going into it. The other plug will be reconnected back to the stock unit.
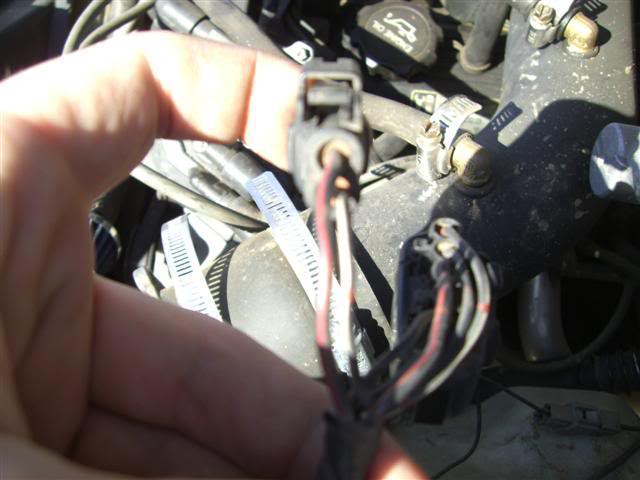
In this next picture you can see the "Black and Red" and the "Black and White" wires:
5.) At this point there are no wires connected to your stock Coil...I chose to remove mine to lessen confusion.
6.) Now you should have two wires left. Orange and Black..
Orange is your Coil Positive.
Black is your Coil Negative.
7.) You are now ready to connect everything together and apply power. If all of your connections are good and secured, your truck/4Runner should fire right up.
Points of Interest::
On the OEM Coil I recommend that you peel back the "electrical" tape and expose more of the wires. Since you will need to cut into and splice into these here you want to give yourself plenty of "slack" for the just in case problem.
Here is how much I peeled back to make this easier for myself:
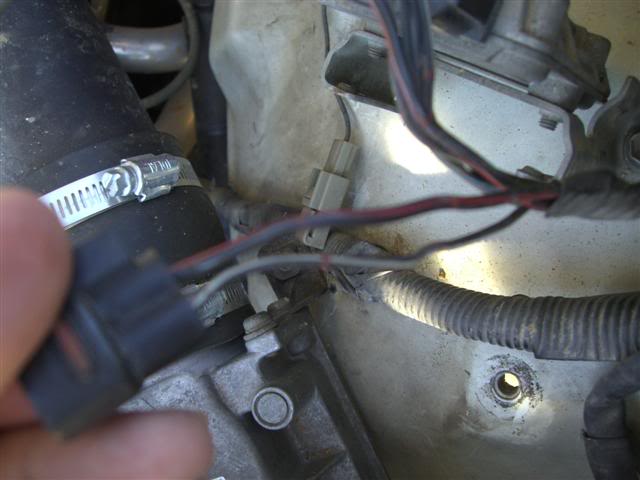
Next on Step #4 I said that you will need to connect the red wire, the red 18ga from the MSD-6A and your OEM coils power wire together. Here is how I did mine.
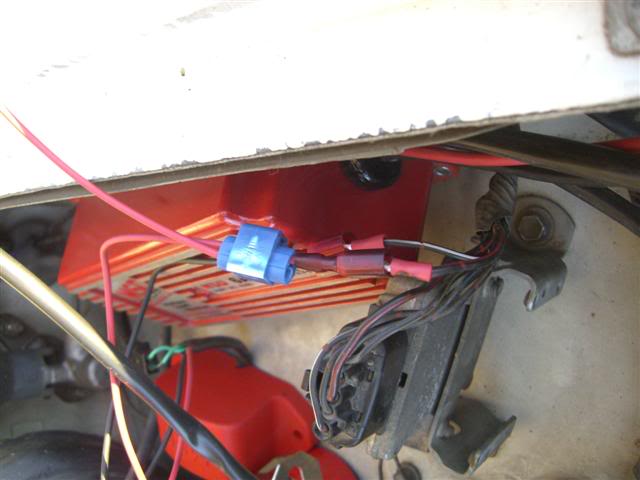
As you can see I simply joined the 2 red wires from the MSD equipment and connected it to the OEM "Black and Red" wire.
Well that pretty much sums it all up. It was quite simple and really didn't take that long at all. If you have questions or need any help just post away. If anyone would like a different picture I will do my best. Thanks!
-=Morphine=-
I used some basic information from Yotatech, the MSD forums, and the FSM to get this done. I posted this in the "86-95 Trucks and 4Runners" section since this is the era that the 3VZE engine was utilized so it only made sense to me. So here goes.
Parts installed::
MSD-6A Ignition Control box:: Part No. 6200
MSD Blaster 2 Coil:: Part No. 8202
MSD Universal Col Bracket:: Part No. 8213
MSD Tach Adapter EIS (Electronic Ignition System):: Part No. 8910EIS
Here is what the parts look like:
1.) First thing you will want to do is disconnect your battery. SAFETY FIRST!
2.) You will want to find a suitable place to setup and install the devices. This is only a "Dry" fitting so you don't need to secure anything down yet. Here is where I plan on installing mine:
Here is the "dry" fitting:
In this picture I have already disconnected and removed the factory coil and igniter. These are the 2 devices I removed:
and
DO NOT THROW AWAY THE SECOND UNIT! YOU WILL NEED IT TO CONNECT INTO THE NEW SYSTEM.
3.) When the "dry" fitting is done you will want to make your cables the appropriate length. I had to lengthen the positive and negative cables so that they will run from the battery to the MSD-6A Ignition Control box.
Red 14ga to Positive Battery.
Black 14ga to Negative Battery.
4.) You'll take the Tach Adapter EIS (PN 8910EIS) there is going to be a connector. You will connect it to the Magnetic Pick-up on your MSD-6A. Then the black will go your coil negative. And the red goes together with red 18ga from your MSD-6A and also your OEM Coil Positive.
White wire from your 6A will not be used.
Black/Red = Coil Positive
Black/White = Coil Negative
Here is the adapter from the OEM Coil that you will be tieing into.
It is the one with only 2 wires going into it. The other plug will be reconnected back to the stock unit.
In this next picture you can see the "Black and Red" and the "Black and White" wires:
5.) At this point there are no wires connected to your stock Coil...I chose to remove mine to lessen confusion.
6.) Now you should have two wires left. Orange and Black..
Orange is your Coil Positive.
Black is your Coil Negative.
7.) You are now ready to connect everything together and apply power. If all of your connections are good and secured, your truck/4Runner should fire right up.
Points of Interest::
On the OEM Coil I recommend that you peel back the "electrical" tape and expose more of the wires. Since you will need to cut into and splice into these here you want to give yourself plenty of "slack" for the just in case problem.
Here is how much I peeled back to make this easier for myself:
Next on Step #4 I said that you will need to connect the red wire, the red 18ga from the MSD-6A and your OEM coils power wire together. Here is how I did mine.
As you can see I simply joined the 2 red wires from the MSD equipment and connected it to the OEM "Black and Red" wire.
Well that pretty much sums it all up. It was quite simple and really didn't take that long at all. If you have questions or need any help just post away. If anyone would like a different picture I will do my best. Thanks!
-=Morphine=-
Last edited by Morphine; Jan 18, 2008 at 10:24 PM.
Jan 18, 2008 | 09:51 PM
#3
Registered User
Joined: Dec 2006
Posts: 99
Likes: 0
From: Matthews, NC
 and are notorious for taking dumps), that we use on our 96 Camaro.. only reason we have it is to retard the timing when we shoot it w/ the OJ(nitrous)... Then we just go
  down the track. Other than that, does nothing from what i can tell(feel). The boxes are supposed to help with different little things(of course depending on which one you get, they have different features).. stronger high RPMs, multi-spark, and some other stuff like that.. Believe it or not, it's said that after market ignition systems sometimes aren't as good as factory, and most of the time do very little to nothing performance wise...
 BTW, in no way trying to be mean with what i've said above
 Or dog any "performance" products.. This has just been my experience and the experience of the people i know.
On the other hand...
Nice write-up Morphine. Let us know if YOU notice a difference, hopefully you do. I'd love to hear someone say that they noticed a change for the better with this modification..
 I'm kinda tired of hearing everyone saying that they just "wasted" their money on a box/coil/etc.
Last edited by Anubiscougar; Jan 18, 2008 at 09:56 PM.
Jan 18, 2008 | 10:11 PM
#4
Thread Starter
Registered User
Joined: Jan 2005
Posts: 571
Likes: 0
From: Moreno Valley, Ca
AnubisCougar - No Worries man! HAHAHA. Like I said I couldn't find a write up or proper instructions on how to do this from the viewpoint of the "At home mechanic" so I took what I found from the MSD forums and went at it. I did this for the "Multi Spark" aspect of the ignition. I had already rebuilt the top end. I used Over sized Valves, Ceramic headers, the ISR mod and cone filter. When I rebuilt the top end I also cleaned he fuel injectors. I'm hoping that opening up the engines breath ability a bit, and getting a bit more fuel into her she should be able to run a bit better. Well to make use of the added airflow and gas the extra spark makes sense.
Now I have no proof other than my home made ass-dyno (patent pending ) but I figured why not.
As for first impressions she idles a lot smoother and starts immediately! She no longer waits to crank over and start. This was immediately noticeable, even by my fiancee!!! Cruising up hills she doesn't lose power as quickly and on the flats she accelerates through all of the gears. In he past 3rd gear was almost useless.
I plan to go through a tank or 2 and check mileage, performance, etc and report back also.
-=Morphine=-
Now I have no proof other than my home made ass-dyno (patent pending
) but I figured why not.As for first impressions she idles a lot smoother and starts immediately! She no longer waits to crank over and start. This was immediately noticeable, even by my fiancee!!! Cruising up hills she doesn't lose power as quickly and on the flats she accelerates through all of the gears. In he past 3rd gear was almost useless.
I plan to go through a tank or 2 and check mileage, performance, etc and report back also.
-=Morphine=-
Last edited by Morphine; Jan 18, 2008 at 10:19 PM.
Trending Topics
Jan 19, 2008 | 06:51 PM
#8
Registered User
Joined: Jul 2002
Posts: 977
Likes: 0
From: Thurston County WA State
I ran a Crane HI-6 on my 3.0 and it didn't really do anything as the factory ignition is pretty good especially on a stock (non-turbo/supercharged) setup. It did melt my distributor caps though. I was using the HI-6 with the Universal Trigger Adaptor. I believe that the Crane was better then the MSD since mine had a built in adjustable rev limiter and would function with the factory tach with no adaptors.
Jan 19, 2008 | 07:15 PM
#10
Registered User
Joined: Dec 2006
Posts: 99
Likes: 0
From: Matthews, NC
well by golly Morphine, i'm glad to hear it!! Didn't think it would make much of a difference. But i'm glad to see that you feel it did. Make that one happy customer of ignition systems to date, lolols. I wonder if you'll get any better fuel economy.. Let us know if you do, plz! Glad to see it worked for ya!
I wonder if you'll get any better fuel economy.. Let us know if you do, plz! Glad to see it worked for ya!
Jan 21, 2008 | 05:00 PM
#11
Registered User
Joined: Sep 2007
Posts: 118
Likes: 0
From: Bay Area CA
 Did you upgrade the wires aswell? if so who'd you use, an whered you get them from? i seem to only find wires for the I4. Another question... seeing as this has (or maybe its just the Jacobs) its own Rev Limiter, does that (can It?) eliminate the stock limiter? mine kills injectors at 105, i think i can go higher....
Sep 15, 2008 | 04:18 PM
Did you upgrade the wires aswell? if so who'd you use, an whered you get them from? i seem to only find wires for the I4. Another question... seeing as this has (or maybe its just the Jacobs) its own Rev Limiter, does that (can It?) eliminate the stock limiter? mine kills injectors at 105, i think i can go higher....
Sep 15, 2008 | 04:18 PM
#13
Registered User
Joined: May 2006
Posts: 532
Likes: 1
From: kc mo

 May 19, 2010 | 09:03 AM
#18
Registered User
Joined: Oct 2008
Posts: 468
Likes: 0
From: Back in New York City!
I feel the 6AL is a great thing for not-so-great engines. It won't give you massive power gains (often, it wont even really give you any at all). What it does, besides being able to support a hotter spark than many factory ignitions, is to deliver multiple sparks across a slightly longer period of time, making sure you burn every last bit of combustion mixture available. It's not a miracle power-adder, especially for the 3vze which just can't get enough air into the cylinders to allow much room for power building in the first place. That being said, I love the things. I had a 1991 GMC S-15 Jimmy, equipped with the often-swapped-for 4.3l 90-degree V6. Yes, the sweet and sloppy block that's essentially just 2 cylinders lopped off of a 350 V8. Lots of parts commonality. Anyhoozle, I put the 6AL on that engine and because of how imprecise the engine is (throttle body injection, round air cleaner, and nothing too complicated in its composition) the MSD box gave me much more complete combustion. I went from running rich to something thats closer to dead-bang on. This gave me a bit of extra power BACK that was previously lost due to the engine's fuel delivery design, whereas we have multi port injection on the 3vze. This jimmy was never offroad, and was 2wd, so I wouldnt have even thought about the 6-offroad box. Those are encased in a block of epoxy for vibration dampening and waterproofing. If I were to put an MSD box on my 3.slow, and I'm considering it, I would go with the one that had the best chance of taking me offroad and back. That would be the one designed for the job. I've never had one fail on me, but with all the time I've spent out in the woods with major trail rides and the time I've spent on race tracks, there's almost always a 6 series MSD box in somebody's spare parts collection. Sure, if you're building an expedition vehicle to drive off into the third world or somewhere else exotic you may want to stick with Toyota parts, but hell... I wouldnt take a 3vze where my truck could well have to save my life. I'd swap a 5vz in first!
P.S. thanks for bringing this thread back from the dead so I could
P.S. thanks for bringing this thread back from the dead so I could
May 25, 2010 | 03:21 PM
#19

Registered User
Joined: Feb 2008
Posts: 620
Likes: 1
From: San Antonio
No, they don't like water which is why I'm mounting it in the cab. 
I doubt it'd do much on the 22RE. My veezy runs rich though so I'll get a little bit better combustion. Getting it to have for when I swap a 4.3, essentially getting the parts that can be used for either, like ignition, fans, etc.
I doubt it'd do much on the 22RE. My veezy runs rich though so I'll get a little bit better combustion. Getting it to have for when I swap a 4.3, essentially getting the parts that can be used for either, like ignition, fans, etc.
Last edited by Mic09dcsm; May 25, 2010 at 03:23 PM.
May 25, 2010 | 10:11 PM
#20
Thread Starter
Registered User
Joined: Jan 2005
Posts: 571
Likes: 0
From: Moreno Valley, Ca
Wow I haven't been here for a while, I'm sorry everyone.
First off I did upgrade the wires but not to the MSD wire kit....to expensive for what it is. I bought some upgraded wires from a local shop here.
Second, yes the 6al HATES water. Just run bead of silicone around the seem however and you should be good. If you look at the 6al and the 6(don't recall the model number off hand) that supports off-road use and water, the only difference is the inside seal. I figure a good bead of silicon around the outer edge will help.
Third, yes she is still running and since replacing the stock ignition system all of my start-up issues have been resolved. Power and fuel is minimal but still noticeable. I would not recommend installing this if you are thinking "WOW Major gains", but in my experience my reliability has greatly improved and my gas mileage is a slight bit better...maybe 15 to 20 miles per tank.


