
Misfire, glowing header, on fresh rebuild.
 Sep 12, 2013 | 10:48 AM
#22
Here is how I fixed my headlight and horn while in there as well.
Copied...
I went to work on my Light Switch and Wiper delay. I plugged my old one in and the wiper delay worked. But not bright lights. I then tried to combine the 2 and was going to have cut wire and splice and didnt want to go that route.
MORE INFO>>> https://www.yotatech.com/forums/f116...icator-229946/
The Light Assembly I had before was from an 86 and it has another plug my 88 didnt have. I figured it was for some option mine didnt have so didnt think much about it. The white plug is what I am talking about on an 86 in this picture.
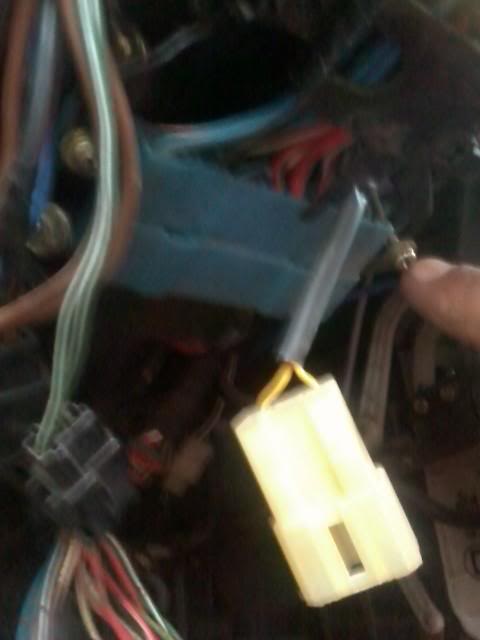
Today I got to looking at it (the white plug) and it runs to the wiper handle and I am guessing it is to the delay in the handle. So I then decided to see what I could do about my original Light assembly.
I took the Steering Wheel off. I have had mine off before and have it snug but not so tight I need a Steering Wheel Puller. If you havent had it off, dont bang on it as it will bulge the Steering shaft. Go rent a puller from the parts store. It is free.
You will need to drop the lower plastic panel and I diconnect the dimmer switch and just let it lay on the floor. Remove the Steering Wheel and the covers to the steering column.
There are 4 screws that hold the Light Switch Assembly on. They are recessed. Then disconnect the black clip that keeps all of the wire bundeled to the column and 2 screws that hold the blue connectors to the black tabs /clip.

Once I had it off, I had to take 2 screw out that hold the hazard light switch to the assembly, and set it out of the way. I then had to remove the clear plastic cover so as I could use my wife finger nail file (yeah.. she liked that idea) and went over the little copper tips on the copper layers. Just a couple of times to help make a good clean contact. Then I hit with some WD-40.
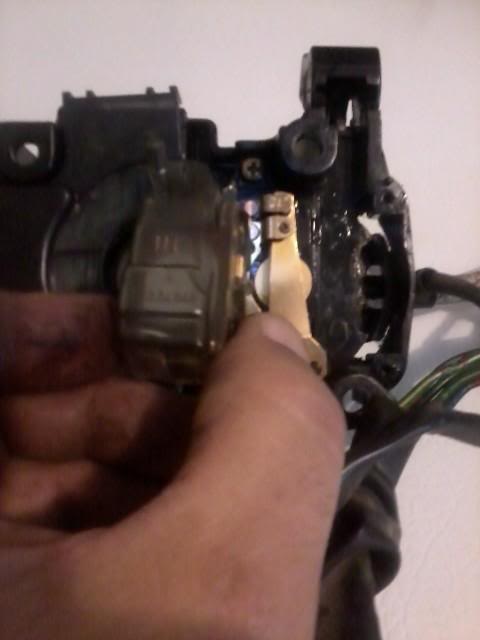
Here is a good picture of the contacts that need cleaned and more info if someone needs it.
https://www.yotatech.com/forums/f116...t-work-100088/
Put it back togther and everything works great. The 86 and 88 Light assemblys do have different part numbers on them and they interchanged and it got me thru. But it is nice having everything working as it should.
I did take my passenger kick panel off and didnt see a relay box there. Not saying it isnt, I just didnt want to pull the ECM and since I was able to test with a good wiper delay switch, I didnt need to go that far into it.
Found another link to a headlight problem I just wanted to add.
https://www.yotatech.com/forums/f116...icator-229946/
Here is how I fix my horn issue.
Got the horn to working. I used a .22 shell to make the contact to the steering wheel. I found this on Yotatech and like it better then how I used to fix my horns. I have it listed on my 88 4Runners build thread for more details about getting the horn to work on the first page. Will add this info at a later time.
Combo switch is around $40 at the boneyard here if you can find one. I just cleaned the contacts with some 1500 grit sand paper. Have it listed on the 88 runner build thread as well.

Copied...
I went to work on my Light Switch and Wiper delay. I plugged my old one in and the wiper delay worked. But not bright lights. I then tried to combine the 2 and was going to have cut wire and splice and didnt want to go that route.
MORE INFO>>> https://www.yotatech.com/forums/f116...icator-229946/
The Light Assembly I had before was from an 86 and it has another plug my 88 didnt have. I figured it was for some option mine didnt have so didnt think much about it. The white plug is what I am talking about on an 86 in this picture.
Today I got to looking at it (the white plug) and it runs to the wiper handle and I am guessing it is to the delay in the handle. So I then decided to see what I could do about my original Light assembly.
I took the Steering Wheel off. I have had mine off before and have it snug but not so tight I need a Steering Wheel Puller. If you havent had it off, dont bang on it as it will bulge the Steering shaft. Go rent a puller from the parts store. It is free.
You will need to drop the lower plastic panel and I diconnect the dimmer switch and just let it lay on the floor. Remove the Steering Wheel and the covers to the steering column.
There are 4 screws that hold the Light Switch Assembly on. They are recessed. Then disconnect the black clip that keeps all of the wire bundeled to the column and 2 screws that hold the blue connectors to the black tabs /clip.
Once I had it off, I had to take 2 screw out that hold the hazard light switch to the assembly, and set it out of the way. I then had to remove the clear plastic cover so as I could use my wife finger nail file (yeah.. she liked that idea) and went over the little copper tips on the copper layers. Just a couple of times to help make a good clean contact. Then I hit with some WD-40.
Here is a good picture of the contacts that need cleaned and more info if someone needs it.
https://www.yotatech.com/forums/f116...t-work-100088/
Put it back togther and everything works great. The 86 and 88 Light assemblys do have different part numbers on them and they interchanged and it got me thru. But it is nice having everything working as it should.
I did take my passenger kick panel off and didnt see a relay box there. Not saying it isnt, I just didnt want to pull the ECM and since I was able to test with a good wiper delay switch, I didnt need to go that far into it.
Found another link to a headlight problem I just wanted to add.
https://www.yotatech.com/forums/f116...icator-229946/
Here is how I fix my horn issue.
Got the horn to working. I used a .22 shell to make the contact to the steering wheel. I found this on Yotatech and like it better then how I used to fix my horns. I have it listed on my 88 4Runners build thread for more details about getting the horn to work on the first page. Will add this info at a later time.
Combo switch is around $40 at the boneyard here if you can find one. I just cleaned the contacts with some 1500 grit sand paper. Have it listed on the 88 runner build thread as well.
Last edited by Terrys87; Sep 12, 2013 at 11:35 AM.
Sep 12, 2013 | 11:39 AM
#24
The contacts by my thumb will in most cases have some black carbon from arching built up. I use a fine grit sandpaper (2000 grit or so) and I have used the wifes fingernail file before to get the carbon off. It doesnt take much to get the contacts back to looking shiney again. I have only gotten the high beams to work using this fix. I have never had a problem with the low beams. The little circlular post about the size of an ink pen cap or so is what get dirty and needs cleaned.
Last edited by Terrys87; Sep 12, 2013 at 11:41 AM.
Sep 12, 2013 | 12:57 PM
#25
Thread Starter
Registered User
Joined: May 2013
Posts: 137
Likes: 0
From: NW WA
Thanks. I just did the job in about 15min. It took me a while to figure out, but I cleaned it up without having to take anything apart. My 87 is a bit different than yours probably because it was made in 86.
I also looked for the buzzer box you posted about for the dome lights and It's not even there or it looks different.
I also looked for the buzzer box you posted about for the dome lights and It's not even there or it looks different.
Sep 12, 2013 | 02:14 PM
#26
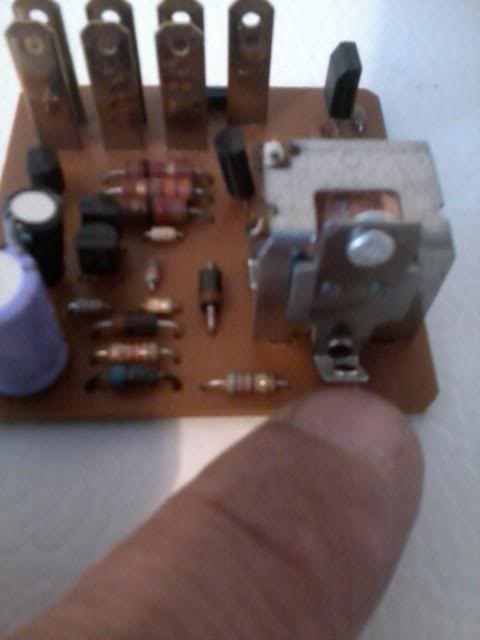
The buzzer box is just above your foot on the brake side. Some take the buzzer box out to stop the annoying noise but dont realize it contols the dome light. From my experience they are on the 85 all the way up to the early 90s (92 or so).
Here is what it should look like and how I fixed mine.
Copied...
I thought I was going to fix a problem and created another. I always got tired of hearing my door buzzer alarm and first thing I did was find it under the Steering Column.
All was fine until I noticed that I did not have a dome light when I opened the drivers door. Passenger door worked and so did the switch on the cab. First thing I thought was the door switch was bad or dirty or corroded. I checked it out and it was good.
Did some looking around and you have to have the door alarm in for the drivers door light to work.
Also found the cure for the alarm on YT. Just bent the tab out a little so as not to make contact. If you ever want to hear it again, it can be bent back in.
Here is the Buzzer Box under the Steering Column.

Just bend the tab out from the bottom a little bit.
Here it is going back together. There are 2 tabs to the cover that I just pryed a pocket knife. Life is good now.

Apparently this is a fairly common problem. What I found on different threads is that a lot of the door switches and buzzers get removed. This was as far as I had to go to troubleshoot. Also I did find that by bending the tab you can control how loud the buzzer is.
Here is what it should look like and how I fixed mine.
Copied...
I thought I was going to fix a problem and created another. I always got tired of hearing my door buzzer alarm and first thing I did was find it under the Steering Column.
All was fine until I noticed that I did not have a dome light when I opened the drivers door. Passenger door worked and so did the switch on the cab. First thing I thought was the door switch was bad or dirty or corroded. I checked it out and it was good.
Did some looking around and you have to have the door alarm in for the drivers door light to work.
Also found the cure for the alarm on YT. Just bent the tab out a little so as not to make contact. If you ever want to hear it again, it can be bent back in.
Here is the Buzzer Box under the Steering Column.
Just bend the tab out from the bottom a little bit.
Here it is going back together. There are 2 tabs to the cover that I just pryed a pocket knife. Life is good now.
Apparently this is a fairly common problem. What I found on different threads is that a lot of the door switches and buzzers get removed. This was as far as I had to go to troubleshoot. Also I did find that by bending the tab you can control how loud the buzzer is.
Sep 12, 2013 | 04:06 PM
#27
Thread Starter
Registered User
Joined: May 2013
Posts: 137
Likes: 0
From: NW WA
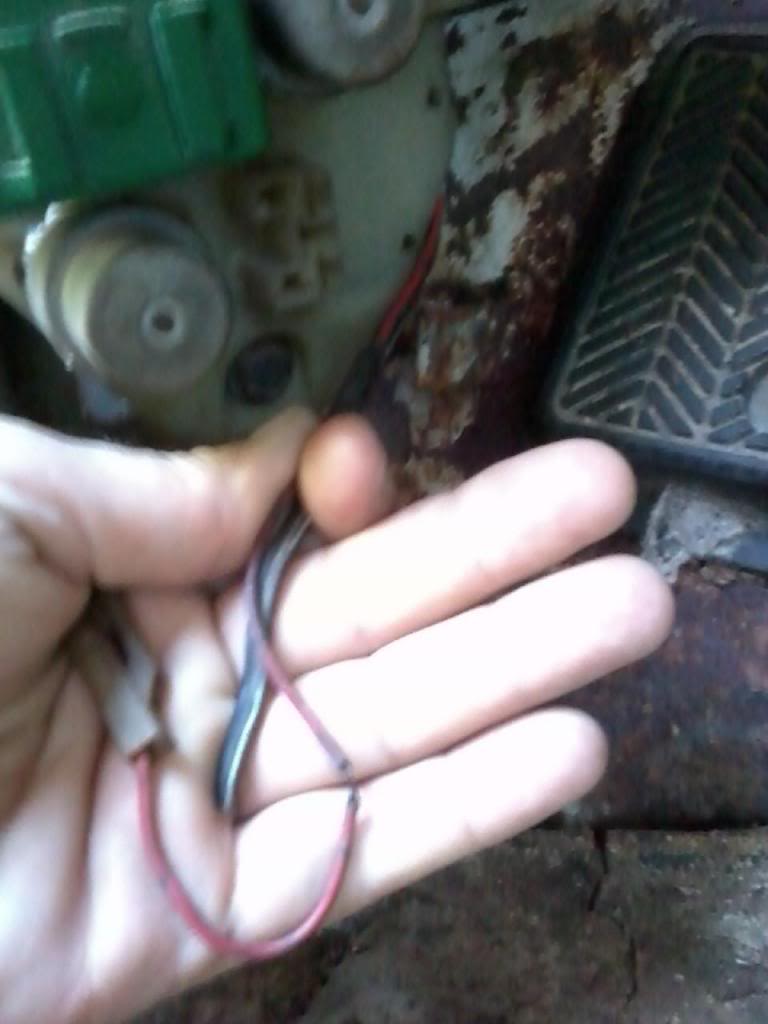
I pulled the buzzer and it looks fine. I think i'll keep the connection there. I don't mind the buzz. The driver side door switch is not connected to anything and it loose.
I found a wire with a connector and it kinda fits but there isn't enough length and plugging it in does nothing for the light.
I also show here the passenger side door switch in tact. I'm not really sure what to do here.
I found a wire with a connector and it kinda fits but there isn't enough length and plugging it in does nothing for the light.
I also show here the passenger side door switch in tact. I'm not really sure what to do here.
Sep 12, 2013 | 04:34 PM
#28
Thread Starter
Registered User
Joined: May 2013
Posts: 137
Likes: 0
From: NW WA
Sep 14, 2013 | 08:44 AM
#29
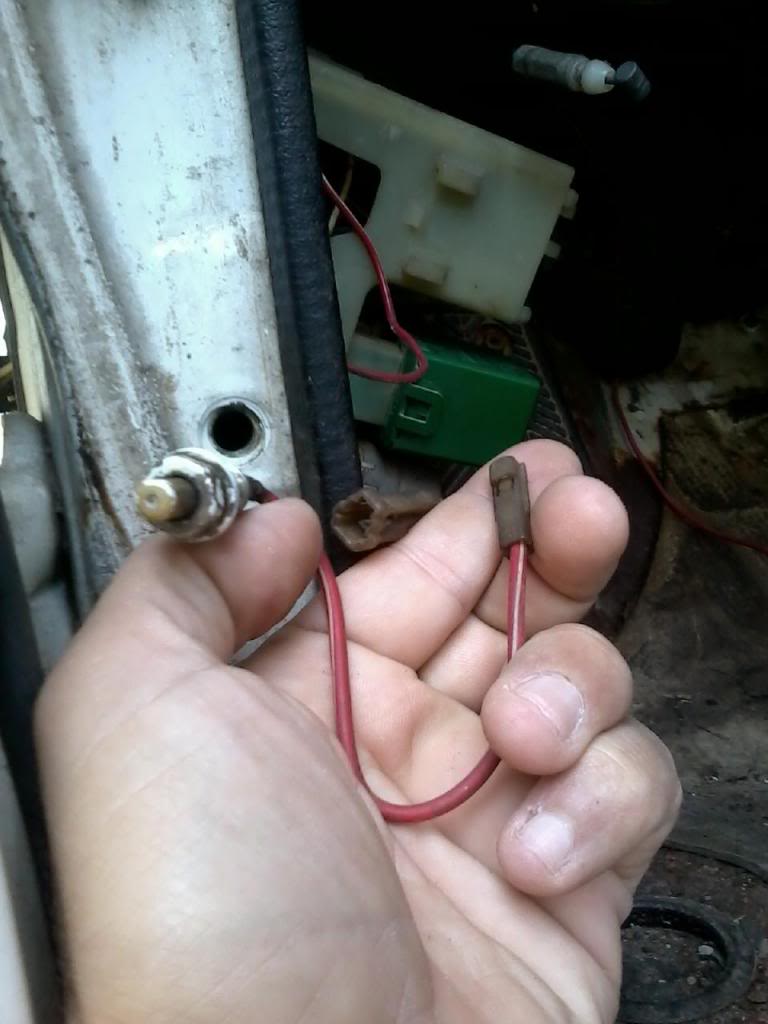
This is off of my 85. The door switch connects and passes thru the backside of the fusebox. It isnt connected to the fuse box. The black/black white wire looks to be factory wrapped. Mine is cut off so is something I get to find out where it goes to.
Pic of door wire connected to it connector.
Pic of door wire connected to it connector.
 Sep 14, 2013 | 10:00 AM
#30
Thread Starter
Registered User
Joined: May 2013
Posts: 137
Likes: 0
From: NW WA
I guess what I have is right then.
I think the part of the switch that screws into the frame may be damaged.
Do you have a picture of that as well? I was going to take the passenger side apart but it felt the rust would snap and id be even worse off.
I think the part of the switch that screws into the frame may be damaged.
Do you have a picture of that as well? I was going to take the passenger side apart but it felt the rust would snap and id be even worse off.
Sep 14, 2013 | 10:41 AM
#31
You will need to unhook it from the clip like in the post above. Then use a 12mm wrench or socket to get it out. It will want to twist inside the door jam so I keep a finger in the jam to help keep it form twisting.
Here I have the button pressed. The shiney yellow is where the metal is not making contact and where the grungy stuff is where the metal that completes the circuit. I am fairly sure that is how the circuit works, but electric is not my strongest point, so you may need to ask someone how the circuit works about that. Dont trust my electrical knowledge. Anytime I am in the boneyard, I grab a few of these as spares just to have as they do tend to get corroded. I would imagine a Toyota car would have the same.
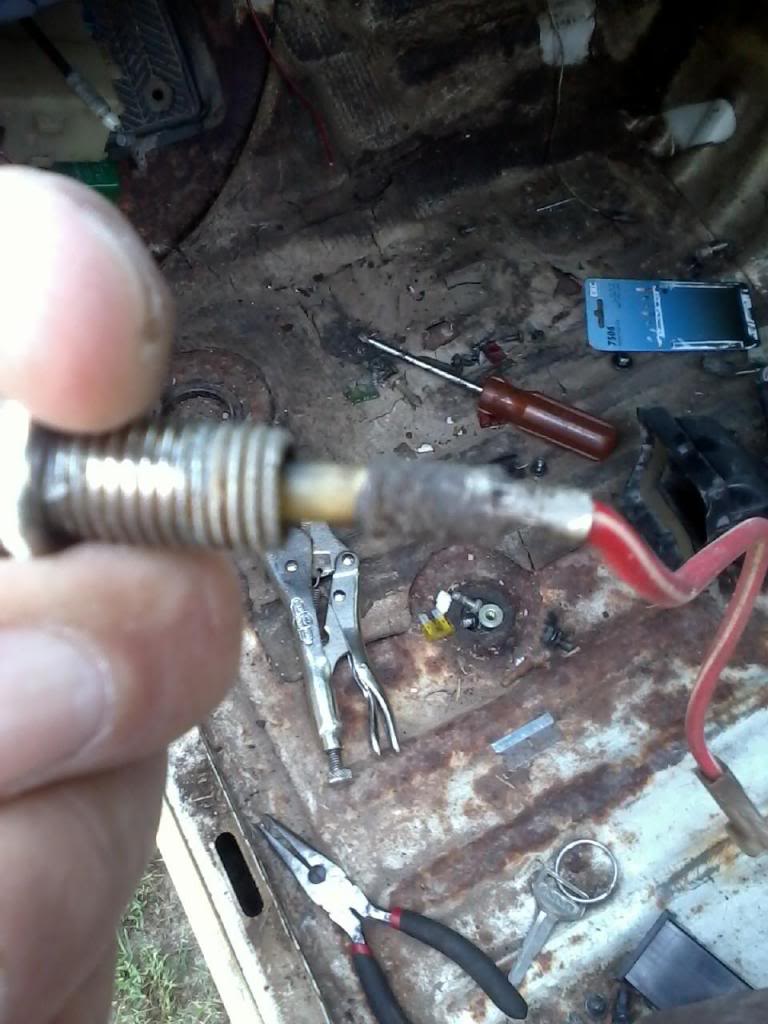

Here I have the button pressed. The shiney yellow is where the metal is not making contact and where the grungy stuff is where the metal that completes the circuit. I am fairly sure that is how the circuit works, but electric is not my strongest point, so you may need to ask someone how the circuit works about that. Dont trust my electrical knowledge. Anytime I am in the boneyard, I grab a few of these as spares just to have as they do tend to get corroded. I would imagine a Toyota car would have the same.


Thread
Thread Starter
Forum
Replies
Last Post
dzldust
General Vehicle Related Topics (Non Year Related)
7
Oct 6, 2015 05:39 AM


